Search the Community
Showing results for tags 'y500'.
-
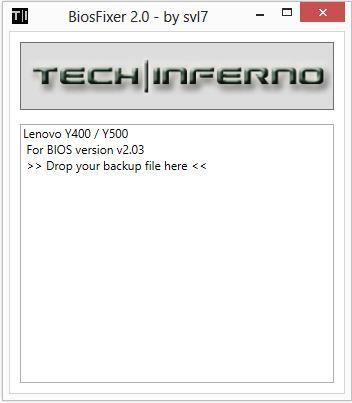
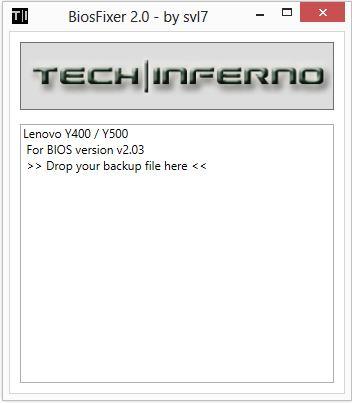
This is continuation of this thread (http://forum.techinferno.com/lenovo-ibm/2690-lenovo-y500-unlocked-bios.html) with all the necessary information in the first post in order to make it easier to find all the stuff. Lenovo Y400 / Y500 - 'unlocked' BIOS / wwan-wlan whitelist removal + modified VBIOS for higher overclocking The Lenovo Y500 comes with a pretty locked down BIOS, and in addition to this with a whitelist which prevents the user from getting 3rd-party wwan/wlan cards to work properly. The modified BIOS versions here will take care of this. Keep in mind that not necessarily all options available in the modified bios will work. Some might not do anything at all, others could possibly leave your system in a state which will prevent it from booting. Use care when changing stuff in the modified bios, don't touch things you're not familiar with. Use all the mods and software posted here on your own risk. Read the instructions carefully. NOTE: This will only flash the bios region. It won't reset the nvars set in the bios. *************** ONLY FLASH A MOD OF THE SAME VERSION AS YOUR CURRENT BIOS VERSION!!! If you're on 2.02 or 2.03 you can safely use the 2.04 update, *************** Attached you'll find modified versions of the Y400 / Y500 BIOS v1.03 and v1.05. Removed as they're outdated. Better updated to v2.02. The bios contains your Windows 8 license, therefore you can't just flash any file, else you'll have issue with your Windows activation. Furthermore the serial numbers, service tags etc. are stored there as well. You don't want to loose them. I wrote a little program that will take care of this issue and personalize the modified bios for you, so that you won't end up with an invalid Windows or no service tags. *************** Preparation to get to BIOS v2.02 (coming from any earlier version): Generally it's a good idea to keep the BIOS up to date. We're luck to have an official BIOS update to v2.02 apparently thanks to a leak on the net. (Lenovo is really bad when it comes to providing firmware updates and fixing issues). The leaked version must be genuine, else it wouldn't flash by using the regular method. If you want to update your system to v2.02 then grab the update here, extract it and flash the bios by executing the included InsydeFlash utility. Once the update is completed you can continue with the instructions below to get a modified version on your system. *************** Instructions for flashing a modified version: As a reminder - the modified BIOS needs to be the same version as you have on your system (2.02 to 2.04 is ok). Prepare an USB stick which can boot DOS. If you don't know how to do this, follow this short guide: Download the flash tool, for flashing you'll need the DOS version, but for creating the backup of your current BIOS the Win64 version will do as well, and it is faster. Get the prr tool as well. Grab the modified BIOS you want to flash, it comes as a tool which will patch the bios for you. Make sure you grab the version that corresponds with your BIOS version. Create a backup of your current BIOS using the flash tool you downloaded (first step) by runing the included backup.bat, or by using the Win or Dos version flash tool with this command: If the .bat doesn't work then open an administrator command prompt in your working directory and run the .bat per command line or type the command written above. In case you get an 'error 104' replace the parts file with the one that can be found in the 'error 104 fix' attachment at the end of the post. And if you still have issues after doing all of the steps above then please leave a reply in the thread and describe your problem. Open the downloaded tool and execute it. Drag and drop your BIOS backup file on it, it will create the mod for you. It will look like this: Put the modified BIOS, the prr.exe tool and the fpt.exe (along with the fparts.txt file) on the root of your prepared DOS bootable USB drive, restart your system and boot from that drive. Execute the prr.exe, if you don't get an error message continue by pressing enter. Then flash the bios by using this command (filename.bin obviously needs to be replaced with the name of the file you want to flash). If you can't remember the name of your file, use the command dir to display all the files on your drive. Flash with this: fpt.exe -f filename.bin -bios NOTE: The name of the BIOS file mustn't exceed eight characters (not counting the extension)! That's a DOS limit, so make sure the name of your file isn't too long. Wait until the process is done. After flashing it will verify the data, in case there's something wrong with the flashed data it will tell you. In that case don't reboot, just flash again. *************** Flashing the ultra bay 650m - only for SLI users with BIOS v2.02: The modified BIOS v2.02 also contains a vbios which will allow you to overclock your 650m past the 135MHz limit. As the ultra bay GPU has it's own vbios module you need to flash it separately. You'll need an USB drive which can boot DOS (just as the one you used for flashing the BIOS). *************** It might look a bit complicated at first, but that's the easiest way I could think of. Let me know if anything is unclear. >> Here's the 'buy me a beer' link in case you like this << Use at your own risk, you are responsible for your system and the changes you make on it. My programs come with absolutely no warranty to the extent permitted by applicable law. Grab file archive here:
- 2578 replies
-
- 243
-

-
I followed the youtube video Lenovo Y400 Y500 Full Disassembly - YouTube. However, the video was probably created with a prototype y500 because some of the layout of the laptop did not match mine. Most noticeably is that there are *three* screws holding the keyboard down not *two*, I almost ripped the keyboard trying to pull it off with one screw still in there. Also, a few of the ribbons are located in different places which I think is an improvement over the y500 in the video. Finally, the hardest part of the entire process was to remove the back cover because it is held on by plastic tabs facing in different directions so the best way is to wiggle it left and right while lifting and not lift directly up. That is just regular white thermal paste on the heatsinks. The OEM thermal paste resembled AS5 in color and thickness and I recommend that it be left alone if the temperatures are good. I have since replaced the cheap stuff I put on there with AS5 and still have not seen the temperatures I saw when it was stock (still 3-5C higher). Here is what I did to stop the twitchy touchpad (issue is well documented in the Lenovo support forum) and the random extra characters the keyboard would add while typing (less known issue).
- 191 replies
-
- 17
-

-
Hey guys, what are some accepted wireless card that has 5G which is compatible with Lenovo Y500? Thanks!
- 12 replies
-
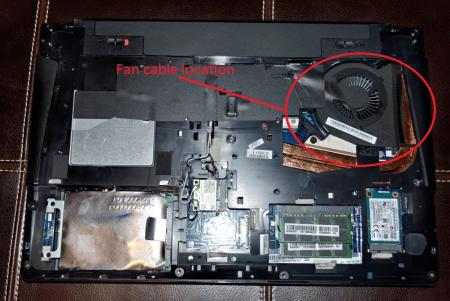
My Y400 ran into some trouble a while back and still isn't fixed but I won't tell what happened to it here as I will post it on a new thread. Simply put, I had to mod the laptop fan so that it would run at 100% speed no matter what. It made the fan run louder but made my temps considerably lower. This is a post to show you how I did the mod. 1. Open up the bottom cover of your Y400 or Y500 2. Locate the cables for the fan. 3. There should be four cables there. One red, one black, one yellow and one brown. 4. Cut the brown wire. The brown wire is for the motherboard to control the fan speed. Once you cut it your laptop fan will run as fast as the dust cleaning process lets it in lenovo's energy management tool. This is the fan's normal speed. It was made to run slower by lenovo to make less noise. I got the image above from this thread: http://forum.techinferno.com/lenovo-ibm/2773-y500-disassembled-pictures.html It shows roughly where the cables should be for the Y400 and Y500.
- 17 replies
-
- 1
-

-
- cooling mod
- fan
-
(and 3 more)
Tagged with:
-
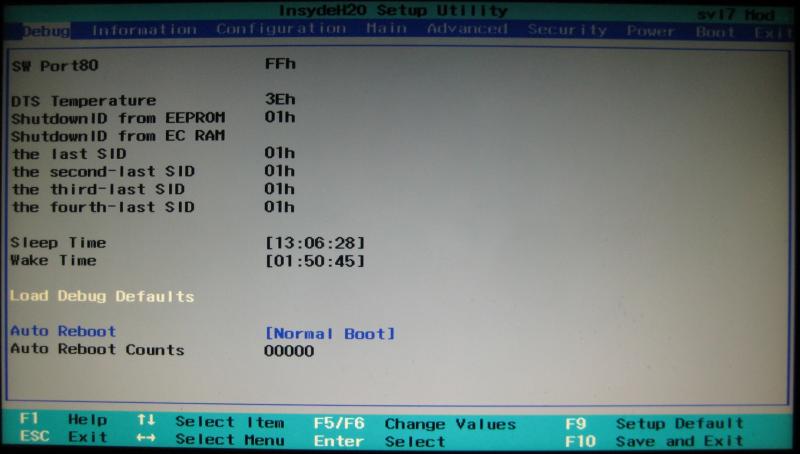
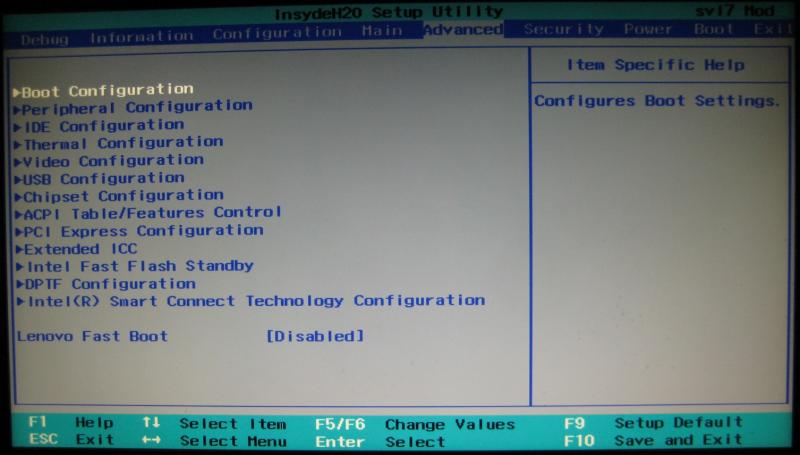
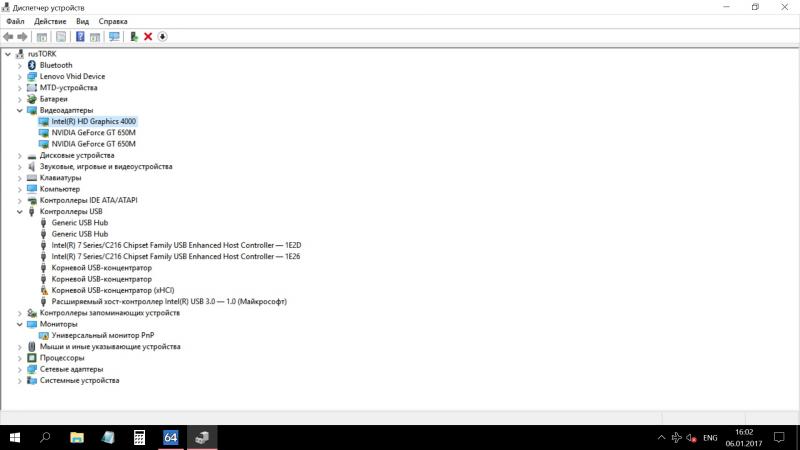
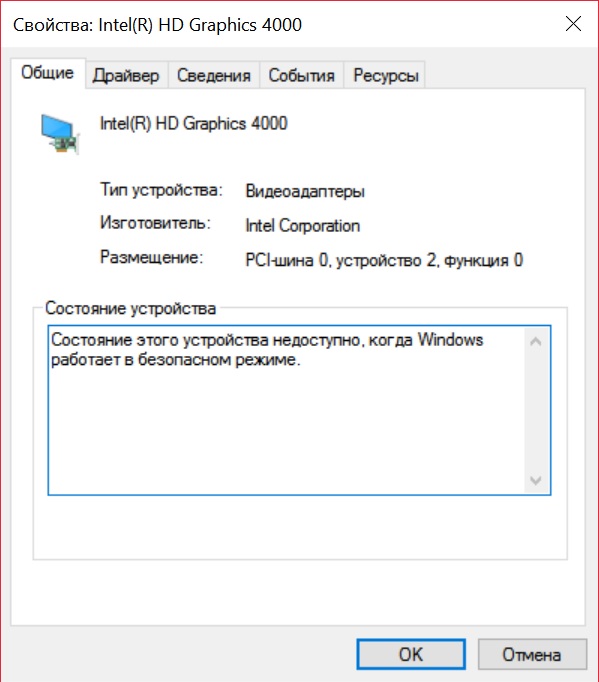
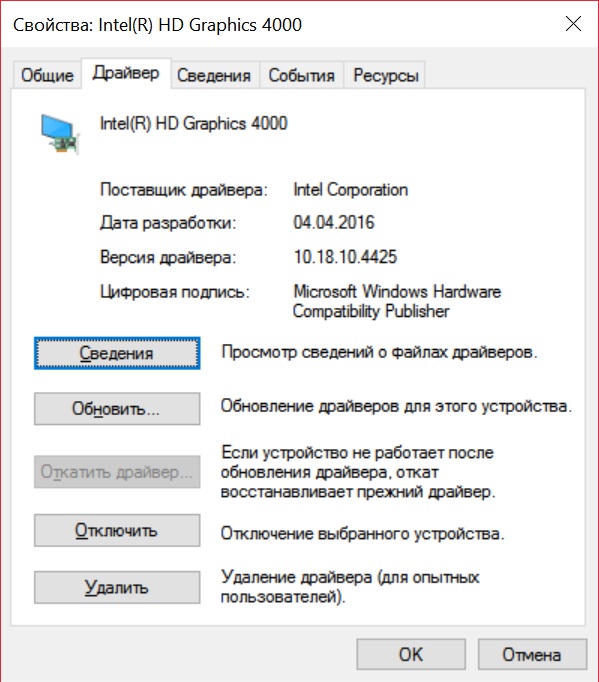
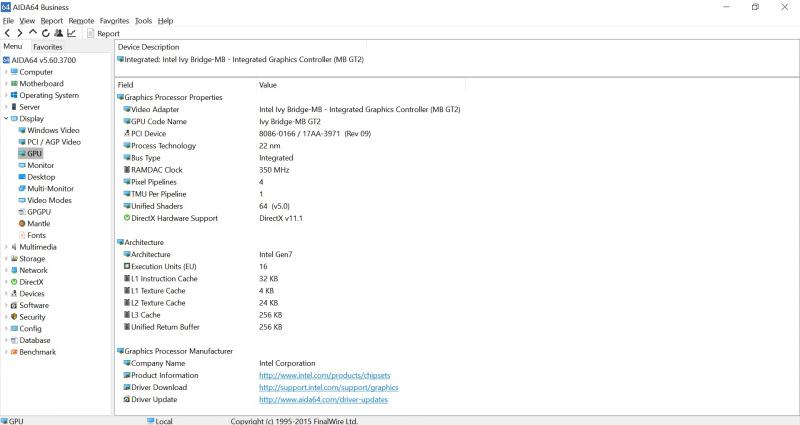
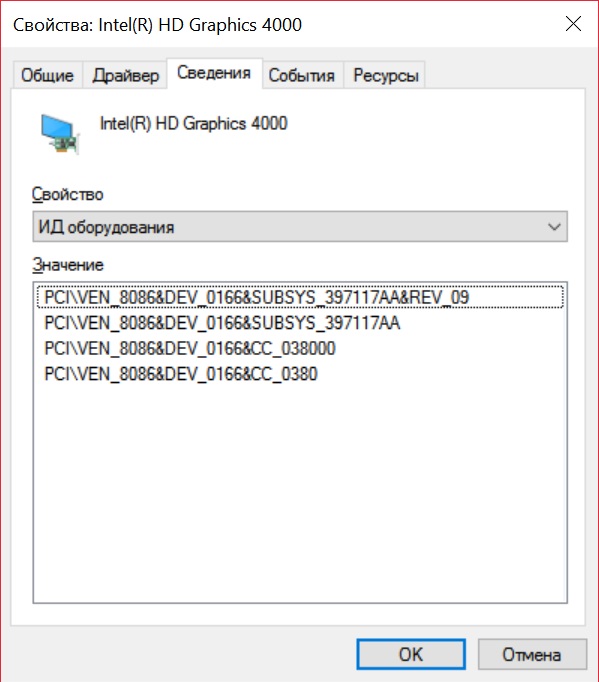
I know, i know, i know... @svl7 said it's disabled, @octiceps said it's disabled and many other forum users said it's disabled. I am always want to double check everything and i did it this time too. And i would like to post here result of my research. But first thing first - my PC: Laptop Configuration: Lenovo Y500 SLI CPU: Intel i7-3630QM (2400-3400 MHz, Ivy Bridge, QuadCore) VGA: 2x 2048Mb NVIDIA GeForce GT650M (SLI Configuration) MB: Compal LA-8692P RAM: 2x 4Gb Ramaxel RMT3160ED58E9W1600 (11-11-11-28) HDD: 1TB Seagate Momentus 5400 (ST1000LM024 HN-M101MBB) SSD: 120 Gb Samsung 850 EVO (MGX S4LN062X01) Display: 15.6" LG\Philips LP156WF1-TLC1 (1920x1080) WIN: MS Windows 10 Pro (x64) Also i must say, that i have got UNLOCKED BIOS by @svl7. And for second VGA too. Research It's beginning from @geraldthread about his Ultrabay to PCI-E Adapter for Lenovo Y510p for useing Radeon Desktop VGAs as external VGA. It's performed well with Y510p, but there was zero info about how it perform on Y500 or will it perform at all (now we know that it's no, but it's another story). Unlocked BIOS didn't help with adapter and i decided to dig more deep in re-enabling integrated GPU in Intel CPU - Intel HD Graphics 4000. And new unlocked BIOS give me a lot of new options to play. But important thing is... some of them working, some of them no. So, here is what i am founded. First i go to new unlocked BIOS and saw there a lot new tabs. I go to Advanced => Video Configuration => Special Features This option already was Enabled (Switch Graphic Function) After that i go to Internal Graphic Device and Enable Internal Graphics Device. Then save changes and exit. Laptop is shutdown and after few seconds turn on again. I saw Lenovo loading screen and then nothing when loading complete. Windows didn't start. I am restarted laptop three times and it's started recovery mode. From recovery mode i am loaded Safe Mode and at that point i am finally was at Windows. My first way goes to Device Manager to see new device. And there was new device - Intel HD Graphics 4000. In safe mode windows can't access to it's current status, but there also was no error codes. First time there was no driver installed, but now it's even have last driver! After that i go to AIDA64 Engineer Edition and look what it's show me. It's saw iGPU! So, at this point i don't what to think about it. I can see iGPU in safe mode, but i can't boot with it in normal Windows. Is AIDA64 lie to me or even Device Manager? What do your think about it? P.S. Oh yeah, most menus on Russian language, but i hope your got the idea and trust me. =) It's no fake.
-
I am interested in getting an external UHD 4k external monitor for my Lenovo y500 sli ... As i read in specs gt650m supports 4k resolution ... Has anyone tested the overall performance of the laptop when hooking it up to a UHD monitor? i am mostly interested in CAD use
-
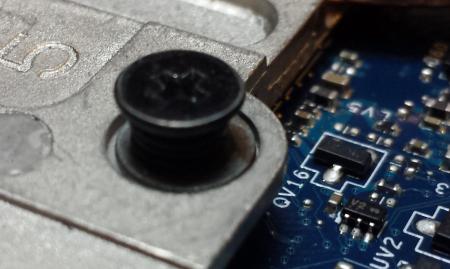
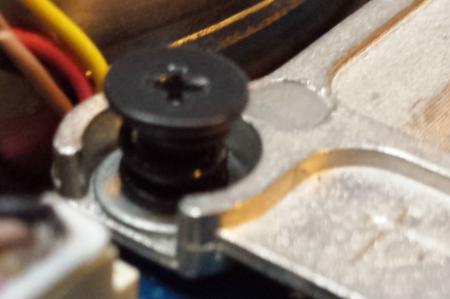
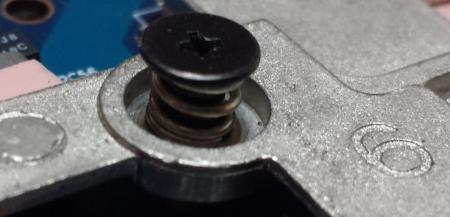
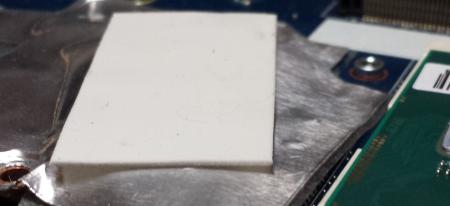
Hi! edit: merged with Conscriptvirus's post so it's easier to follow: This modification is very dangerous, can lead to broken chips. Don't say i didn't warned you... edit: he's right, it is easy Lenovo did a sloppy job with cooler, too much thermal paste, weak springs, overheating and throttling machines... First of all, disassemble the machine. Then do a repaste, with bare minimum amount of thermal paste, and remove cooler again, check thermal paste spread. Remove screws from cooler, by removing little plastik washers, keeping the screws to fall out. My gpu heatsink was not paralllel to motherboard, so the corner without screw was slightly bended upwards. Twist the gpu heatsink, so that corner is pushing gap pad a little bit harder. Be very gentle, you dont want to broke your heatsink. You can check level by putting your heatsink on flat surface with gpu screws removed, cpu screws stays in place for now. Then place a 0,5mm spacer under the spring like seen on the following pictures These are screw number 4 and 5. Screw number 6 is using a weak spring, so use double spacer, or change it to a stronger spring: Put back plastik spacer, so screw stay in place. Do the same process with cpu heatsink. You can do this to ultrabay as well, but take extra caution, since there is no backplate, and it can lead to warped/broken board. Lastly change the gap pad over cpu vrm area, because it is too tick, I used 0,5mm piece: Aaand it's done! Put back heatsink, use as little amount of thermal paste as possible, and enjoy 10-15+ lower temperatures. Spacers was lying around, i had the spring from some old heatsink, so dont have exact types and diameters, but Conscriptvirus did the mod also, his mod is better to look at, spacer perfectly fit into heatsink holes edit: I also did cpu mod, ended up adding a washer to screw 6, despite of changed spring, gained 1C-3C. I can run XTU stress test under 85C with -95mV and 3,4Ghz 4core. GPU and CPU idle is under 50, without notebook stand with fans. Thanks to Conscriptvirus for his effort and pictures. If it worth to be sticky, Mods, please make it one. Regards
- 50 replies
-
- 4
-

-
- cooling mod
- heatsink mod
-
(and 3 more)
Tagged with:
-
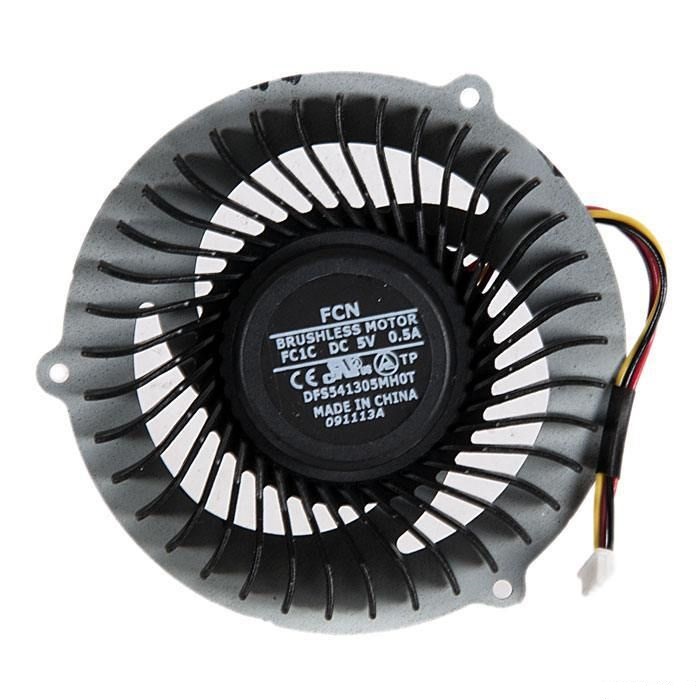
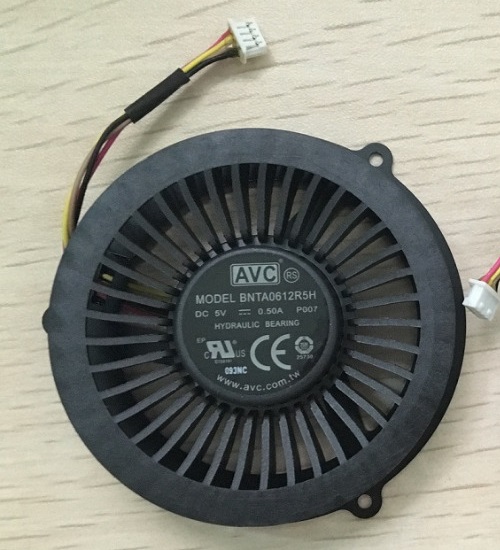
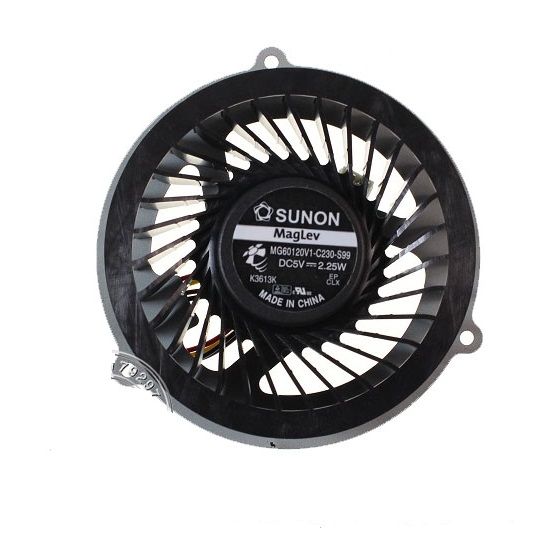
When my first CPU fan on Y500 is broke i replaced it on something compatible (non-original) and planned to replace it later on original. Since that time happened a lot things, but i still using that non-original fan. But i did some research and here is what i founded: I. ORIGINALS 1. Forcecon (marked as FCN on fan) DFS5413005MH0T-FC1C (5V - 0.5A) Spotted in: Y400, Y500. 2. Asia Vital Components (marked as AVC on fan) BNTA0612R5H-P007 (5V - 0.5A) Spotted in: Y410p, Y500, Y510p. 3. Sunon (marked as SUNON MagLev on fan) MG60120V1-C230-S99 (5V - 2.25W (0.45A)) Spotted in: Y410p, Y500. So, which to choose? Any recomendation? Maybe there also unexpected way (completely diffirent fan from another company for another laptop)?
-
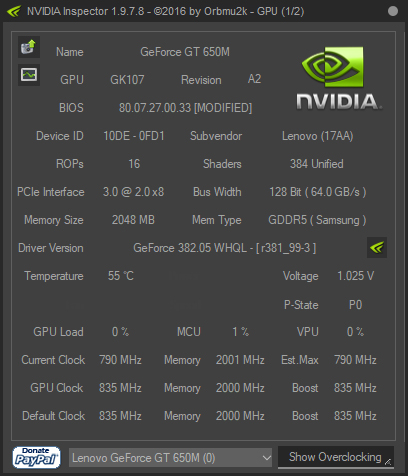
Hey sorry for my bad english and sorry if this question is kinda stupid.. So i have a y500 650m SLI and already flashed the bios. I thought about getting myself a EXP GDC v8 + 220W Dell power brick and a 1050 Ti from Zotac. i googled a bit and found some ppl saying that the y500 model 1(? - i don't know which one i have) only has mPCIE x1 - so whatever it is they say it's kinda slow. So my questions are, do i only have 1x PCIE, how can i find out and to what "powerer degree" of graphics card can i get, that doesnt suffer from power loss then?! Is a 1050Ti ok für that PCIE 1x? i attached a screen of my nvidia inspector window maybe it helps
-
During normal wildstar gameplay my CPU and both GPU's reach 90+ degrees C. This seems abnormally hot to me. Does anyone else have these hot temperatures? Will disabling hyperthreading have a significant effect in cooling down my cpu during load?
-
It seems the monitor supports 60Hz. But when you try to set it to 60Hz, the configuration cannot be saved. Any thoughts?
-
Every once and a while, my fan will start rattling, and everything works fine, but it is just extremely annoying and I don't know how to make it stop. I tried using the dust cleaning function of the lenovo battery application, and it helped a little but occasionally it will start making the noise, and it is really loud and concerning because I hope it is not indicating any other more pressing issues with the Y500.
-
Hi! Pardon my english. I've been struggling with framerate and perfomance problems with my Y500 laptop for a while now (since I bought this shittop ) Specs: i7 3630QM 8GB GT650M SLI For example, in Counter Strike: Global Offensive, I have very low framerate, and in some maps I encounter very poor perfomance including strange mouselag. When I bought the laptop, CSGO would perfom well: framerate was 200-300 easily at high settings. That was with stock drivers, with Win 8. After I updated my GPU drivers, these perfomance problems started. I rollbacked to driver version 331.82, that was the only working version I tested. When 8.1 came out, the same driver worked well. Now I have Win 10 installed, and I have these frustrating perfomance problems with many games. Like I said, CS:GO performs very poorly, framerate drops below 100 even in well optimized maps like Dust II. If a map has water in it, and I look at the water, I encounter mouselag, what makes the game impossible to play. FPS stays same (70-120 about), but mouselag is horrible. Also, I've tested Crysis 2. I have similar problems with it, but mouselag is the most disturbing thing in that, not actually the framerate. In CS:GO, all settings are low, multicore rendering is enabled (there is no difference if its enabled or disabled). So guys, I beg your help. At the moment I would like to throw my shit Lenovo out of the window , because this is the worst PC I've ever bought. A few notes: Earlier I had also problems with screen tearing, and odd mouselag. I managed to fix that, when I turned v-sync on and then off ingame. Now that does not affect anything. Changing driver versions fixed problems earlier. Does it matter, if my V-Bios versions are different? Framerate is same, no matter if I use SLI or not. Same poor shit perfomance. Energy settings: Checked. Nvidia Control Panel setting is set to perfomance, not adaptive. Also Lenovos own settings is set to perfomance mode, and Windows' too. Yes I use the correct AC adapter. Not OC:d, haven't messed with any hardware settings. Just updated V-bios when 8.1 came out. Overheating is not the problem, cold or hot, same issues. Tried to murder my cat and make a pentagram from its blood, prayed for satan. No help from there. This was also a joke. So long post, I hope you did not TL;DR If you find a solution to this problem, I love you all. -Rikama
- 10 replies
-
- y500
- perfomance problem
-
(and 1 more)
Tagged with:
-
I was wondering if theres any software that would be able to manually control the fan speeds on Y series notebooks speedfan and other software doesnt detect the fan. BIOS, no luck Is there any driversavailable to do this
-
Y500 650M Overclock Thread I can not find any of my 3dmark keys... EVGA deleted them I guess. So I am using Valley from Uni Engine. I so far have a stable clock at 969mhz Core 2500mhz Mem Score on Extreme HD 1046 Stays around 70c. Increased playability of games a whole hec of a lot. But I have noticed small artifacts so I may either see if its throttling down, or if it just happens to be to high a mem clock maybe lower the cor to 950 and keep mem up. Let me know all your experiences! I did this with Afterburner, and of course unlocked bios. Nothing special though. No CP changes, or driver tweaks. I used to be much in to benchmarking but now I look at it this way, my car may go 150 but really where can I use it at that speeds?! So playability is where I am at on this project. I will update this accordingly, I may get a cooler, put IC Diamond compound on the parts, and ThrottleStop it. These cards can run good around 70-75c without much problems. Update your findings here as well!
-
I recently bought a "Lenovo Ideapad Y500". I like it a lot, but there is one big problem: the games doesn´t run properly.On notebookcheck.com "Max Payne 3" gets around 70 fps on medium. I get 8-15 fps on medium with some settings turned off."Red Faction: Armageddon" gets 8-19 fps.On notebookcheck.com "Metro 2033" gets around 80 fps on high. I get 20-30 fps on high with some settings turned off.All three games were tested in both DirectX 9 and 11. The fps i wrote about is from DirectX 9.Specifications:3. generation quad-core Intel Core i7 processor (3630QM)8 gb RAM (DDR3)Nvidia GT 750m (SLI) (GDDR5)1 terabyte capacityFull HD screen (1920x1080)Windows 10
-
- lenovo ideapad y500
- lenovo
-
(and 2 more)
Tagged with:
-
i get plugged/unplugged audio device notification ... and sometimes randomly sound stops , i have tried unistalling and instelling the latest audio drivers from realtek but same error again , is it a driver or a hardware problem .... even if permanently uninstalling realtek drivers and using windows drivers sound gets randomly stoped...
-
Version 1.0.0
1208 downloads
Files contained in this archive: 'Error 104' Fix - v01.zip Lenovo Y500 - Y400 - BIOS [v2.02] - stock .zip Lenovo_Y500-Y400_-_Mod_[v2.04] (including update for 2.02 & 2.03 users).zip Lenovo-y500-y400-bios-[v2.02]-stock-.zip Y500 -Y400 - SLI 650m - 80.07.27.00.33 - OC.rom.zip Y500 - Y400 - SLI 750m - 80.07.9D.00.11 - OC.zip For instructions on how to use these files, see this thread: Donation Link: Here's the 'buy me a beer' link in case you like this << -
I figured this topic would do better to have its own thread so that if anyone else has this issue while upgrading they can refer to this. Now down to business: Computer information: Y500 Svl7's fixed bios, Windows 8.1 Pro (clean installation from CD), Samsung 840 Evo SSD, everything else stock. Link to Wireless NIC purchased: http://www.amazon.com/gp/product/B00DMCVKMU/ref=oh_aui_detailpage_o01_s00?ie=UTF8&psc=1 I installed the hacked bios in order to clear the block from the Intel Network 7260.HMWG WiFi Wireless-AC 7260 H/T Dual Band 2x2 AC+Bluetooth HMC NIC. Everything looked great, windows was functioning normal and all was updated without any issues. Steps followed and outcome of each: When i put the card in and restarted the laptop, it detected the card and installed the drivers. However, when clicking the wifi icon on the task-bar it said no connections could be found and no properties on the windows 8.1 network connection window could be seen. (Device manager showed correct card and all the properties) Hooked up the Ethernet cable and uninstalled the drivers for the wireless NIC. I went onto the intel website and downloaded the latest driver which installed not only the driver but the Intel Pro-Set Wireless connection utility. This didn't change anything. I restarted the computer with the newly installed drivers/utility. No changes. I uninstalled the drivers and restarted the computer, NIC was detected correctly and windows installed latest driver. No connections detected (No wireless networks detected on list) I restarted the computer with the newly restored windows drivers. No changes. I clicked repair on the Intel driver install.exe and still no issues resolved. I thought I might have messed up my hardware connections and I ended up re-installing the lenovo stock intel miniPCIe for the Y500 NIC to see if this would resolve the issues and everything worked again. I'm at a loss of how to solve this issue. I can provide screenshots of everything if needed...I would just need to re-install the card so that I can recreate the problem. I appreciate any advice or guidance in working with me on resolving this issue.
- 11 replies
-
- 1
-

-
- 7260ac
- connection problem
-
(and 2 more)
Tagged with:
-
Between changing the display and the lvds-cabel (Display-cabel) there is another point that may matter. At first I changed both, the display and the lvds-cabel but the artifacts kept occurring o my screen. I also checked that my HDMI-output was good, so the error couldn't come from my graphiccards (650m sli). In my case, the problem was a kind of a potential-error. It seems that the electrical resistence between the the display and the frame (which is connected to the body) was to high. I fixed it with some aluminium foil. It must have been some kind of potential issue but the artifacts are gone ... I'm no pro, so please don't be rude if I made mistakes Problem came back, it was another thing The contacts of the lvds-cabel were oxidated. I used some contactspray and now everything is working propably
-
So I have this interesting problem involving my laptop, Logitech USB wireless mouse and ASUS USB wifi stick. On my Lenovo Y500, I have 3 USB ports. One on the right side and two on the left. My internet will only work at a high quality if the wifi stick inserted into the right port. Otherwise the internet is slow and clunky. The mouse works fine in the left. However, if I play a game on Steam, my mouse will sometimes skip and freeze when it's plugged into a left port. So I have to switch the mouse and wifi stick so that the mouse is on the right side and the wifi is on the left. When I'm in the game they will then both work fine, including for internet gaming. But browsing websites in this state makes it slow as per usual with the wifi stick being on the left side. I know that was a lot to take in. May take more then one read to make sense. Any idea what's going on? It seems bizarre that these things happen, and is quite inconvenient. Thanks.
-
i was also having audio issues with my y500 after doing a fresh install of win8.1 no drivers were missing in device manager but that was only because standard drivers were being used for audio i only noticed after i realised the volume on full was not as loud anymore and after googling around i found Dolby Home Theater v4! v7.2.8000.14 which i believe was available on the stock y500 before this fixed my issue and also some nice options of equalization setting within the app
-
- audio
- audio driver
-
(and 3 more)
Tagged with:
-
Did a quick search and didn't notice anyone here using a solid state drive... So, I was wondering if anyone is. If so, share your experiencesǃ I'm using a Crucial M4 SSD which is 512 GB. The first thing I noticed was a great boot time. I can boot from off to my desktop in 35 seconds and all the background apps are loaded within the 40-45 second mark. Now, I'm sure there are faster...but this is the best experience I've had from anything I've ever owned personally before. I haven't tried shaking my computer to the point of disrupting the hard drive...nor do I plan to do it intentionally. However, I was running a transfer the other day and had to walk to the office with my computer running, lest I have to redo two previous hours of work and then wait again. No problems whatsoever. General speeds in running applications have been either faster compared to my last computer, although, I have no specific benchmarking comparisons there. But here are a couple things that I ran on the current Y400 with CrystalDiskMark and SiSoftware Sandra 2013 SP3. CrystalDiskMark (based on 5 tests) Read (MB/s) Sequentialː 518.1 Random 512KBː 438.6 Random 4KBː& 21.81 Random 4KB (QD 32)ː 198.8 Write (MB/s) Sequentialː 261.6 Random 512KBː 263.6 Random 4KBː 71.78 Random 4KB (QD 32)ː 212.3 SiSoftware Sandra 2013 SP3 File System Bandwidth Analysing... Aggregated Score : 430.823MB/s Result ID : Crucial M4-CT512M4SSD2 (512.1GB, SATA600, 2.5", SSD) Capacity : 512.11GB Finished Successfully : Yes File System I/O Analysing... Aggregated Score : 12330.4IOPS Result ID : Crucial M4-CT512M4SSD2 (512.1GB, SATA600, 2.5", SSD) Speed : 6000Mbps Capacity : 512110MB Finished Successfully : Yes Overall Score Aggregated Score : 7.07kPT Results Interpretation : Higher Scores mean Better Performance. Decimal Numeral System (base 10) : 1GPT = 1000MPT, 1MPT = 1000kPT, 1kPT = 1000PT, etc. Result ID : Lenovo 20192 IDEAPAD (Lenovo INVALID) (Intel Core i7-3630QM CPU @ 2.40GHz; Intel Core Mobile DRAM Controller; 2x 4GB Ramaxel RMT3160ED58E; Crucial M4-CT512M4SSD2; NVIDIA GeForce GT 650M) Finished Successfully : Yes
- 119 replies
-
- ideapad
- solid state drive
-
(and 3 more)
Tagged with:
-
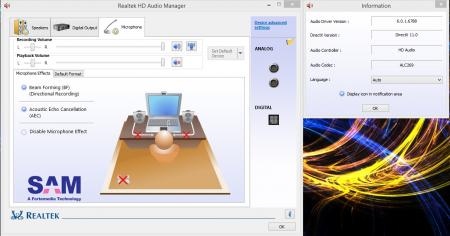
(First thread on the forum! I recently purchased the Zalman ZM MIC1 for recording videos, instead of an external condenser attachment for my ipod. I read the reviews and listened to numerous audio samples from this microphone. All of them seem pretty clear and noise-free. The only problem is that with my computer, the microphone has a HUGE background humm, along with a very large amount of static. I would like to know if this is a problem with the Y500's sound card, a problem with the microphone, or just a software setting I missed. Here are some links: The Micriophone with a good audio test: Amazon.com:*Customer Reviews: Zalman Zm-Mic1 High Sensitivity Headphone Microphone My test Microphone test.mp3 with the following settings in control panel: 100% volume, +20dB microphone boost, and DC offset cancellation. My Realtek Settings and information (Note some of the missing options): EDIT: I tested this microphone on some crappy Toshiba, and there is pretty much no static. It had a 24dB gain on it, and it sounded very good. So what I'm thinking is that the soundcard in the Y500 either doesn't have good specs, or that the "noise removal" feature on the toshiba (which was enabled) is non-existent on the lenovo. Other discovery: After installing different versions for the type of sound card I have, I still have yet to find any options for enabling a noise suppression effect. Realtek says that my card supports it, but it never appears in any option, in windows nor in Realtek. I really want to get this mic working, because I could use it for so much. I have also tested it with another microphone, and it does the exact same thing, and the static sounds identical.
- 11 replies
-
- lenovo
- microphone
-
(and 3 more)
Tagged with:
-
Upon trying to install (k)ubuntu, and possibly other Linux distributions, you may find that your installation stalls with a blank screen. I'm posting this here rather than in Linux section because it's specific to this make and/or model, but I've seen other posts with issues getting past install. The trick to getting the desktop install to boot completely to the GUI is to enable legacy boot in the BIOS (still allowing UEFI), as well as removing your 2nd GPU card during install. Once you have the system installed, reboot and install the real nvidia drivers, shut down your system, re-insert your 2nd GPU and you're all set. I'm not exactly sure why the legacy option has to be enabled even when you're using EFI, but it seems to have something to do with the way the graphics are set up during POST.


