Search the Community
Showing results for tags 'overclocking'.
-
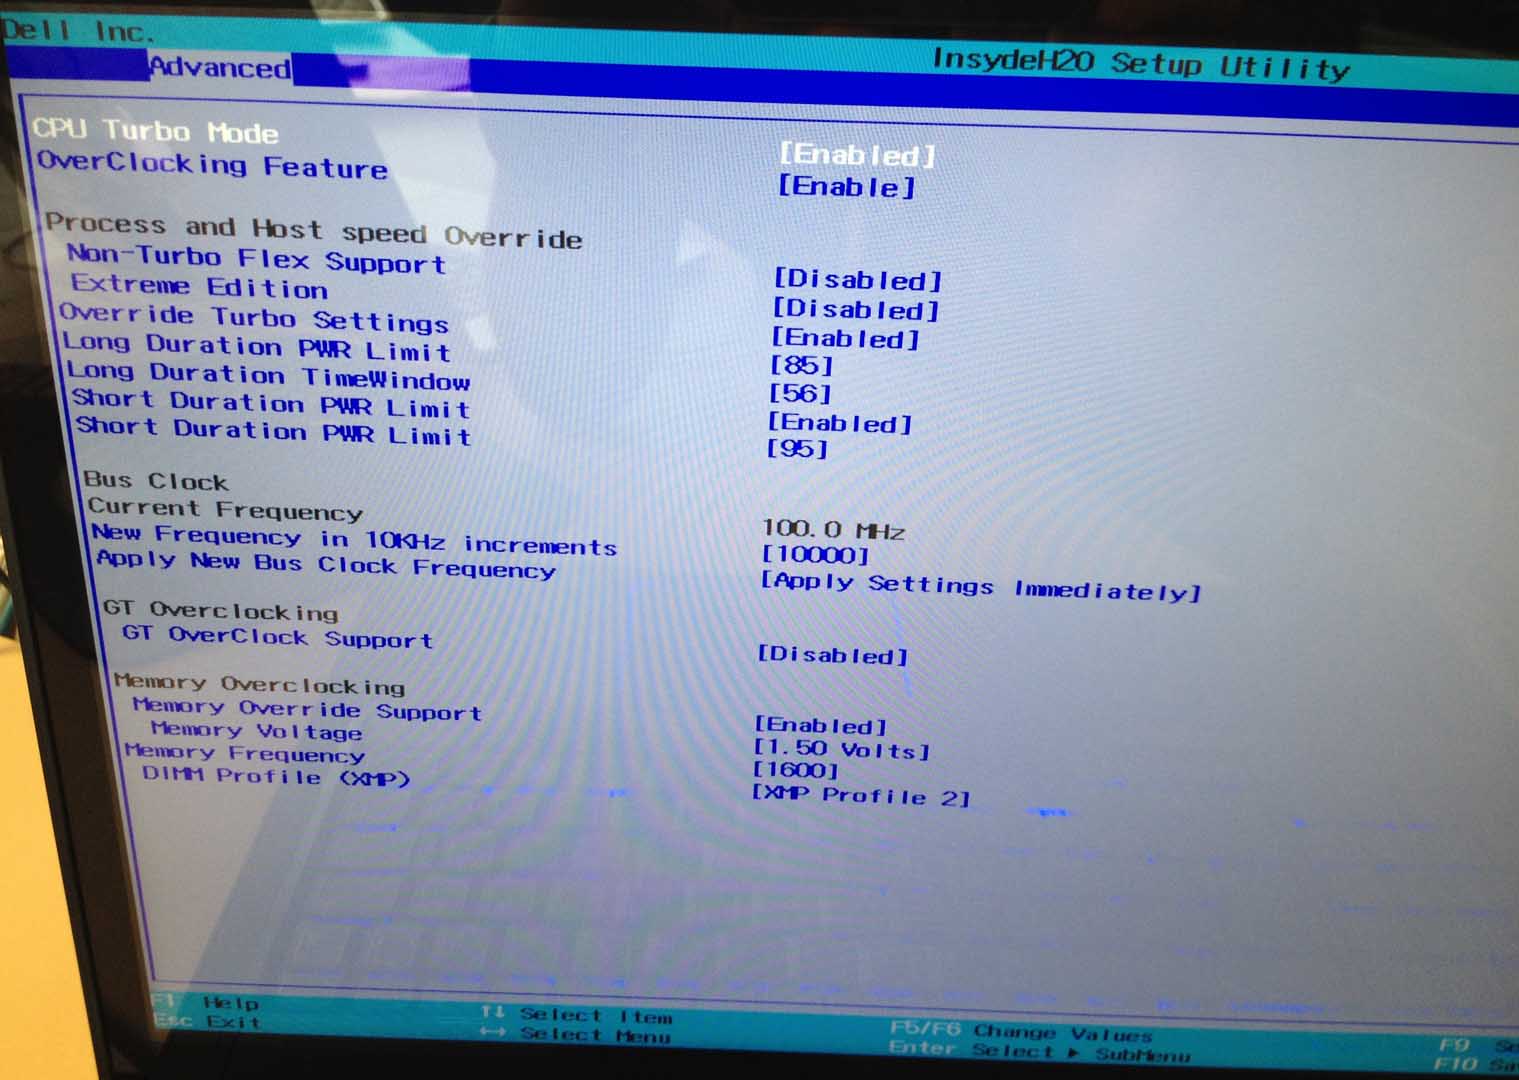
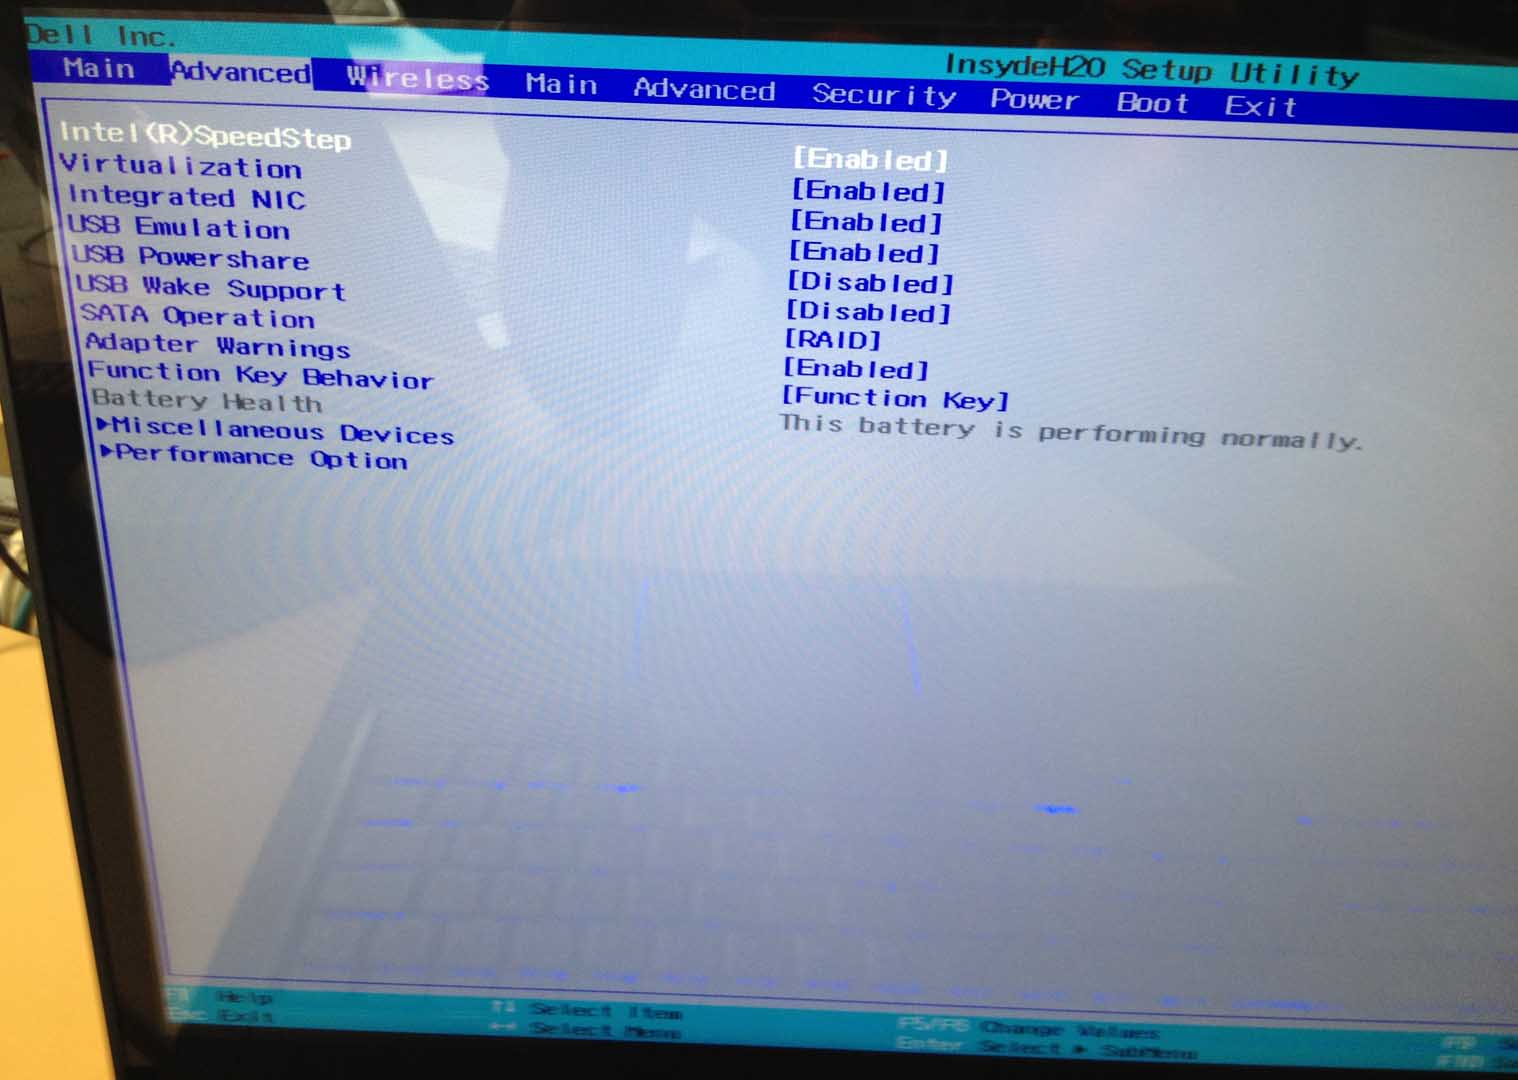
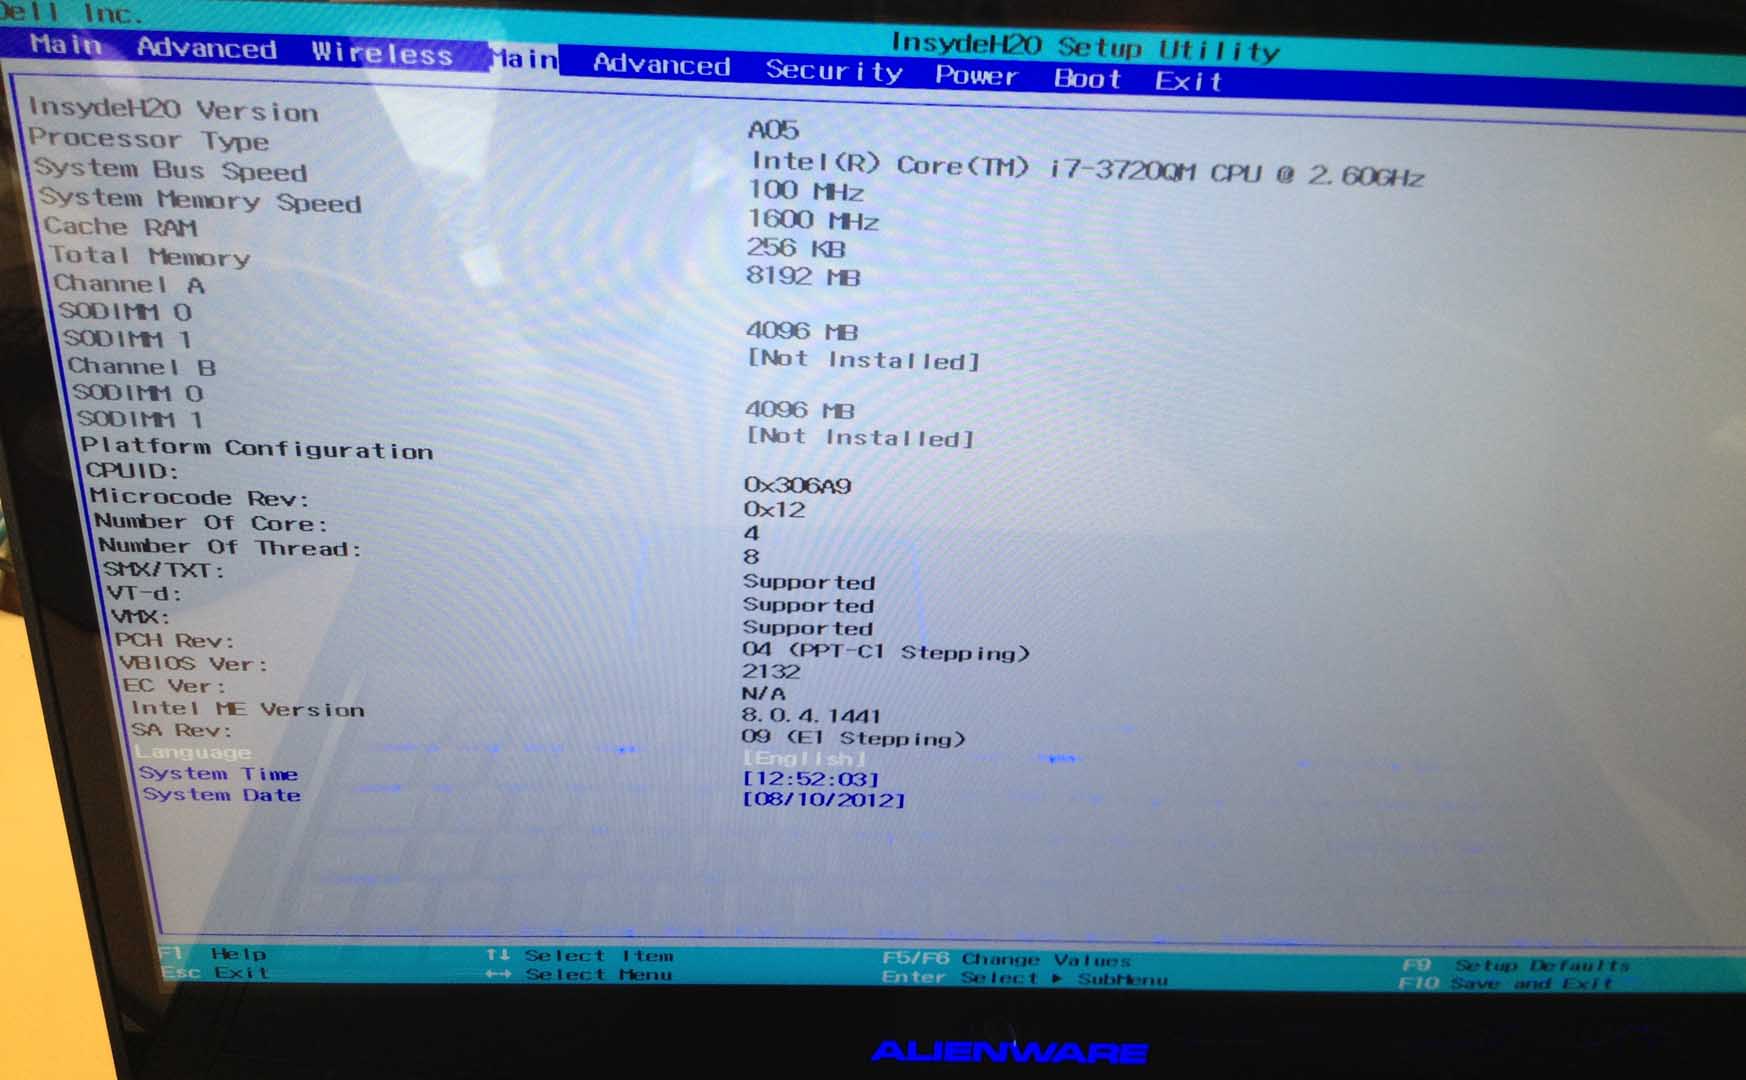
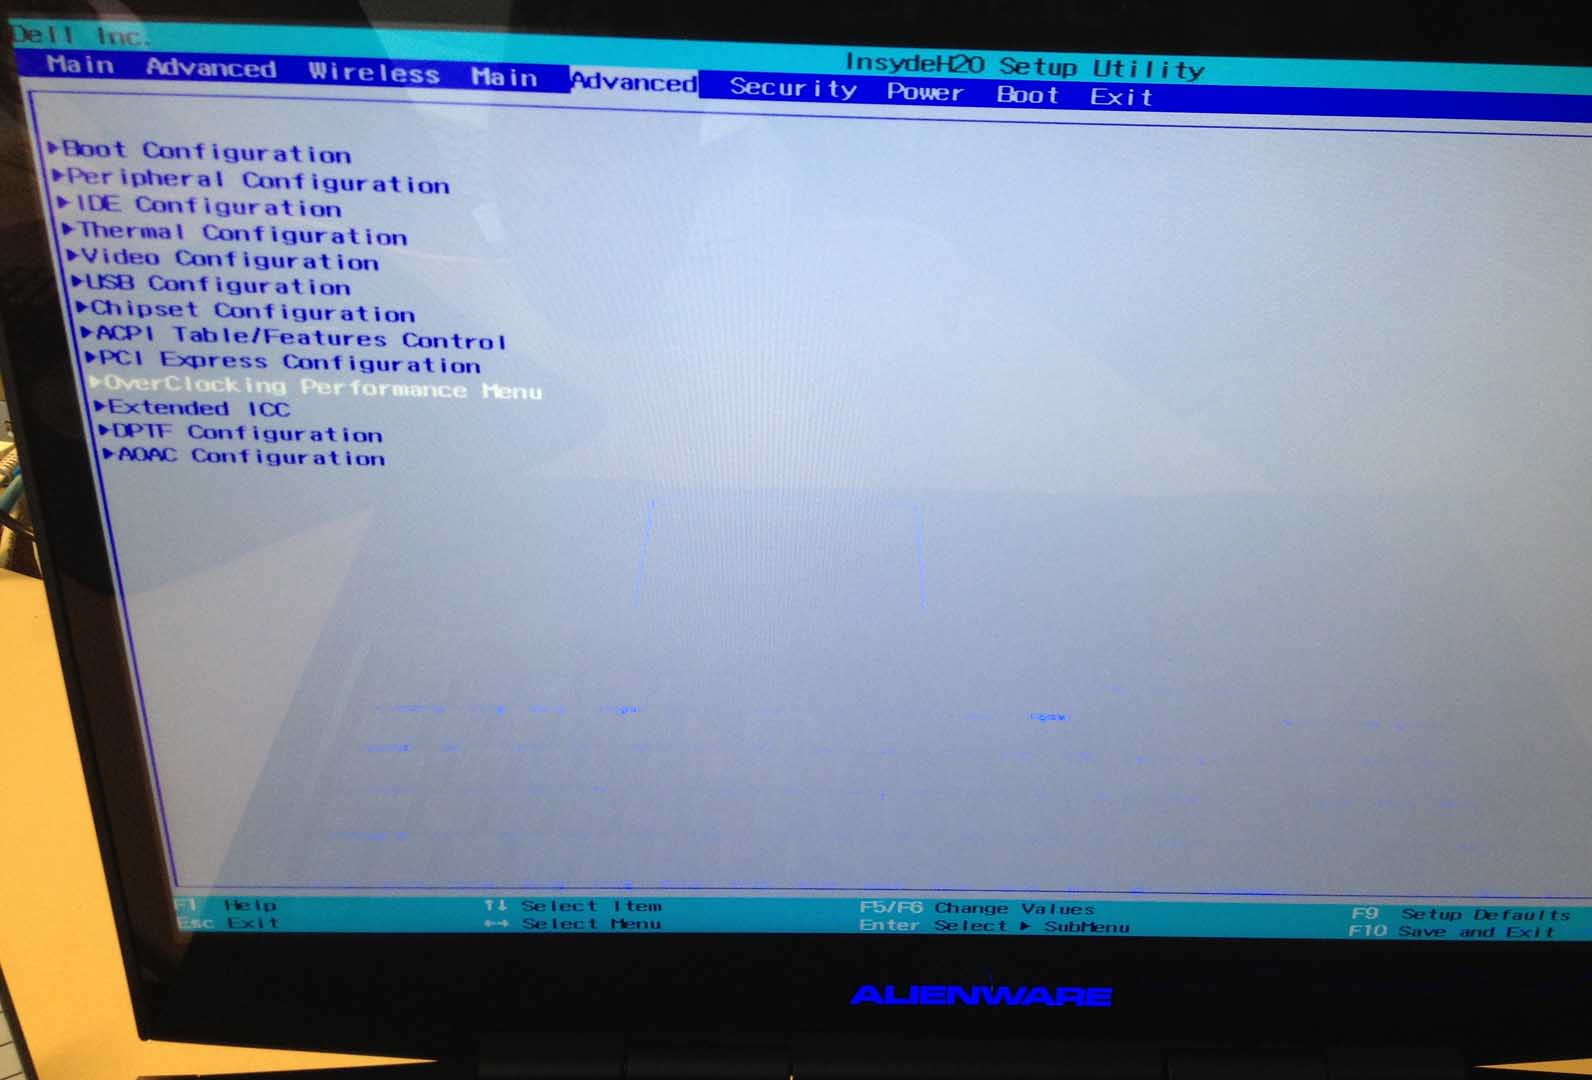
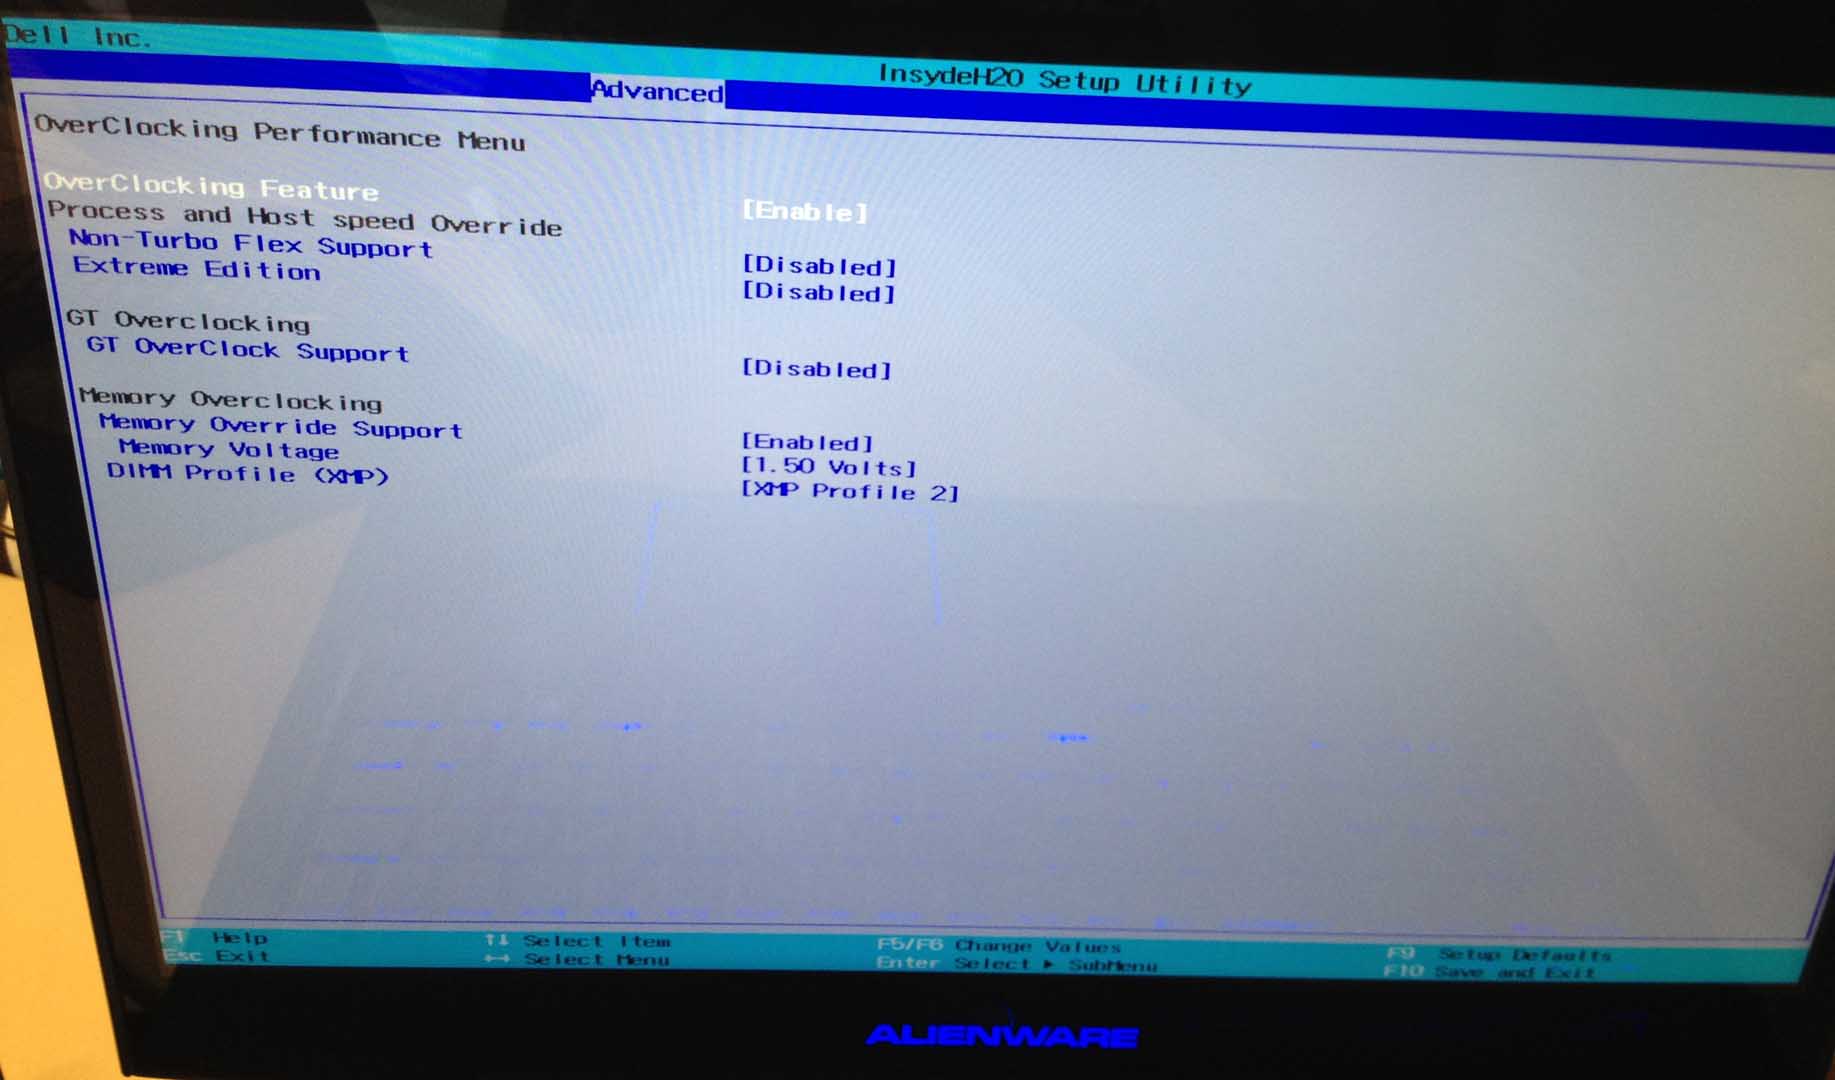
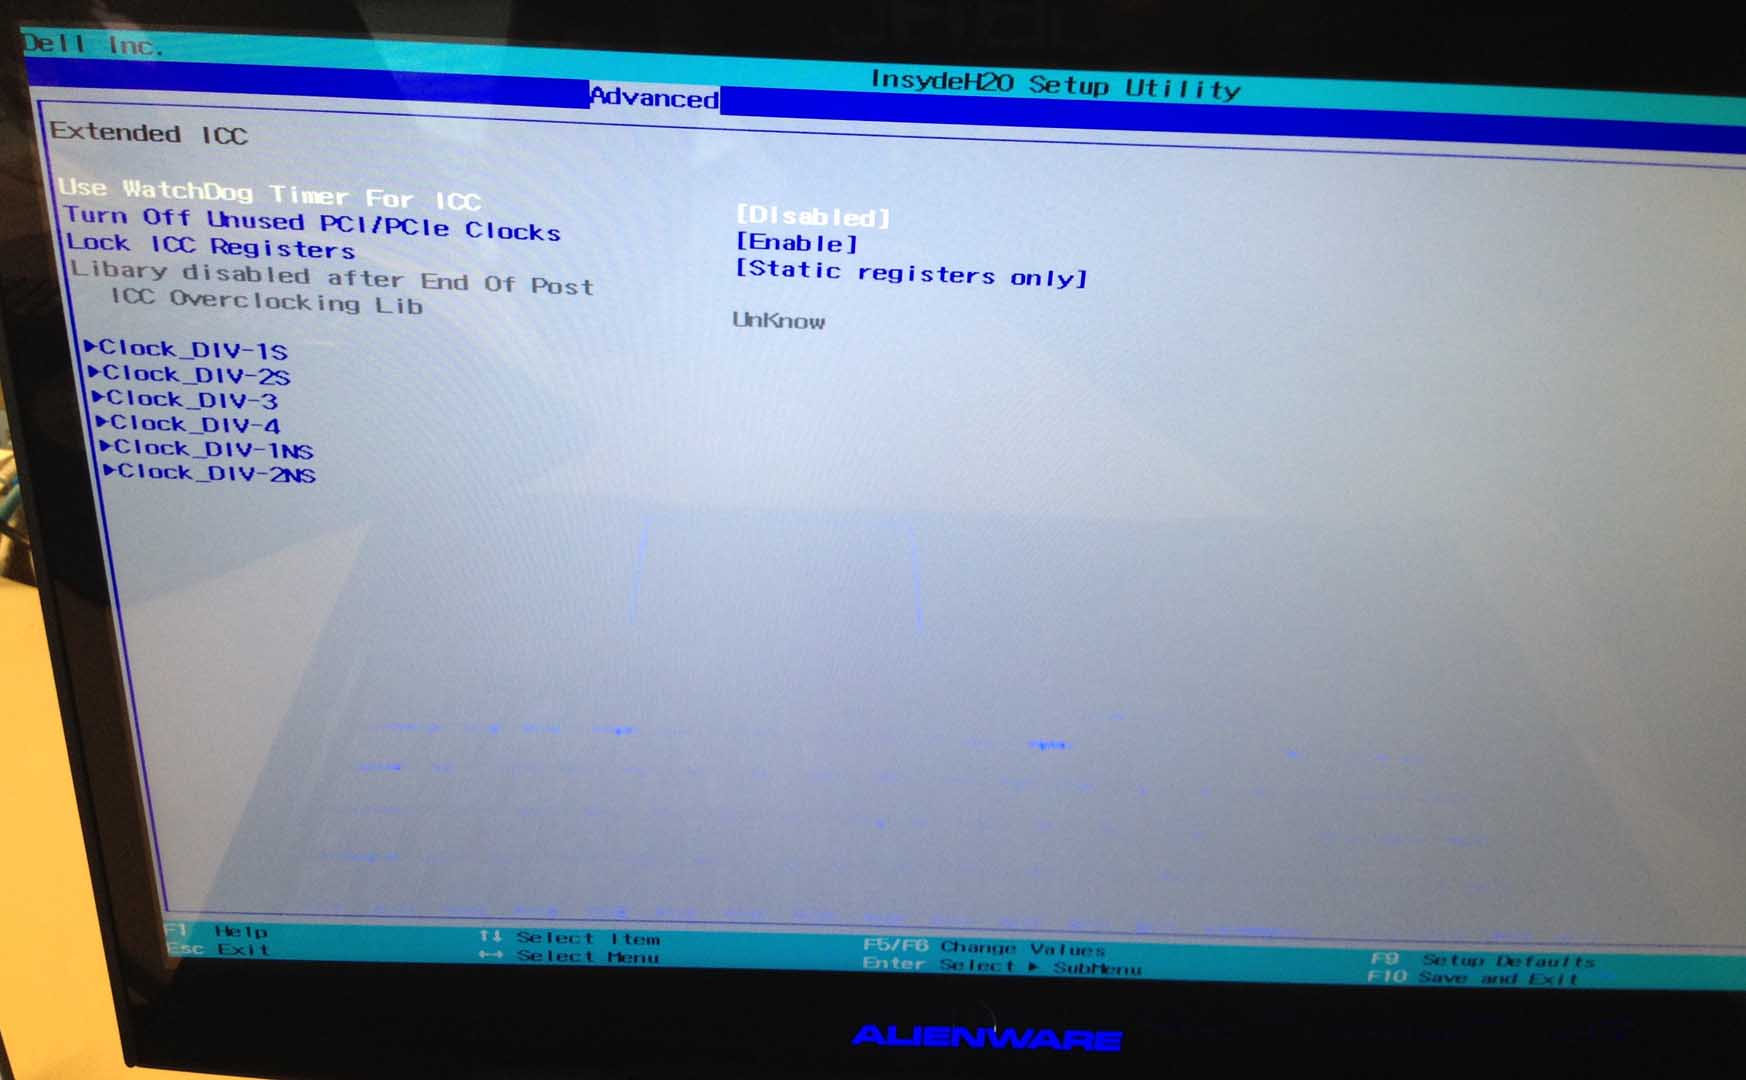
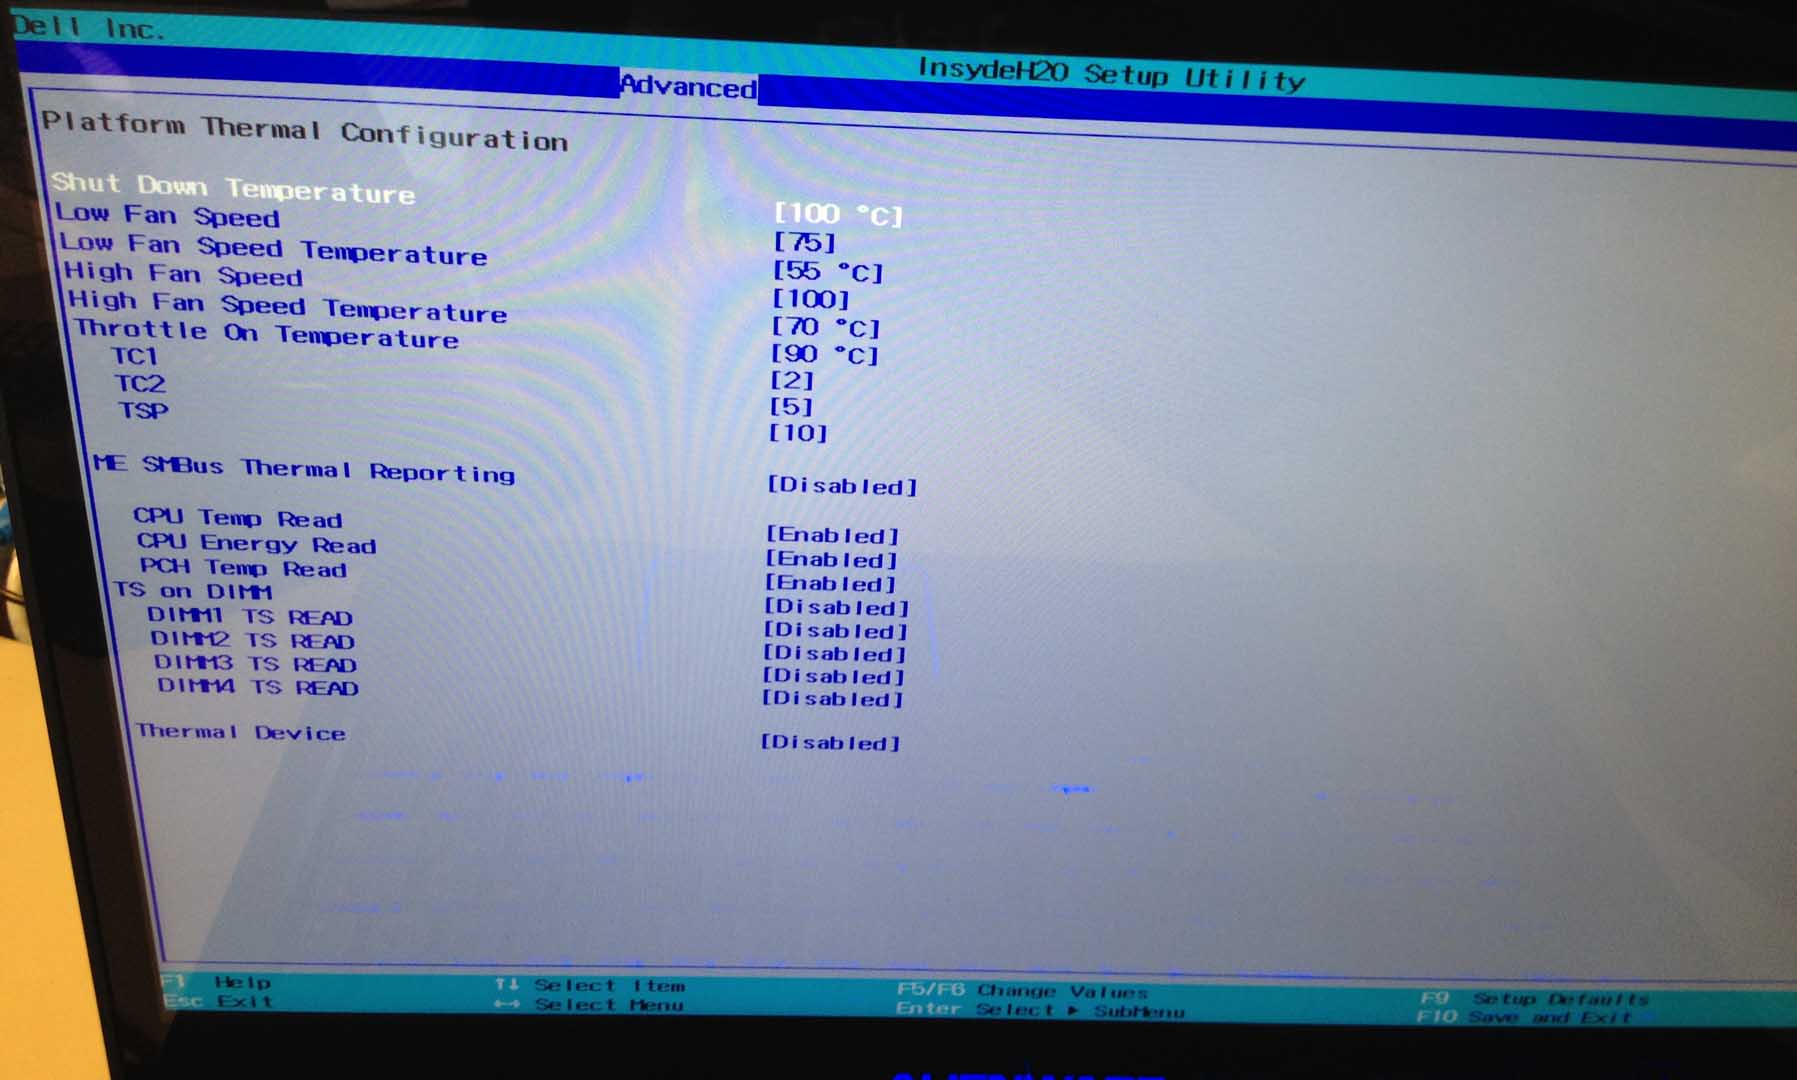
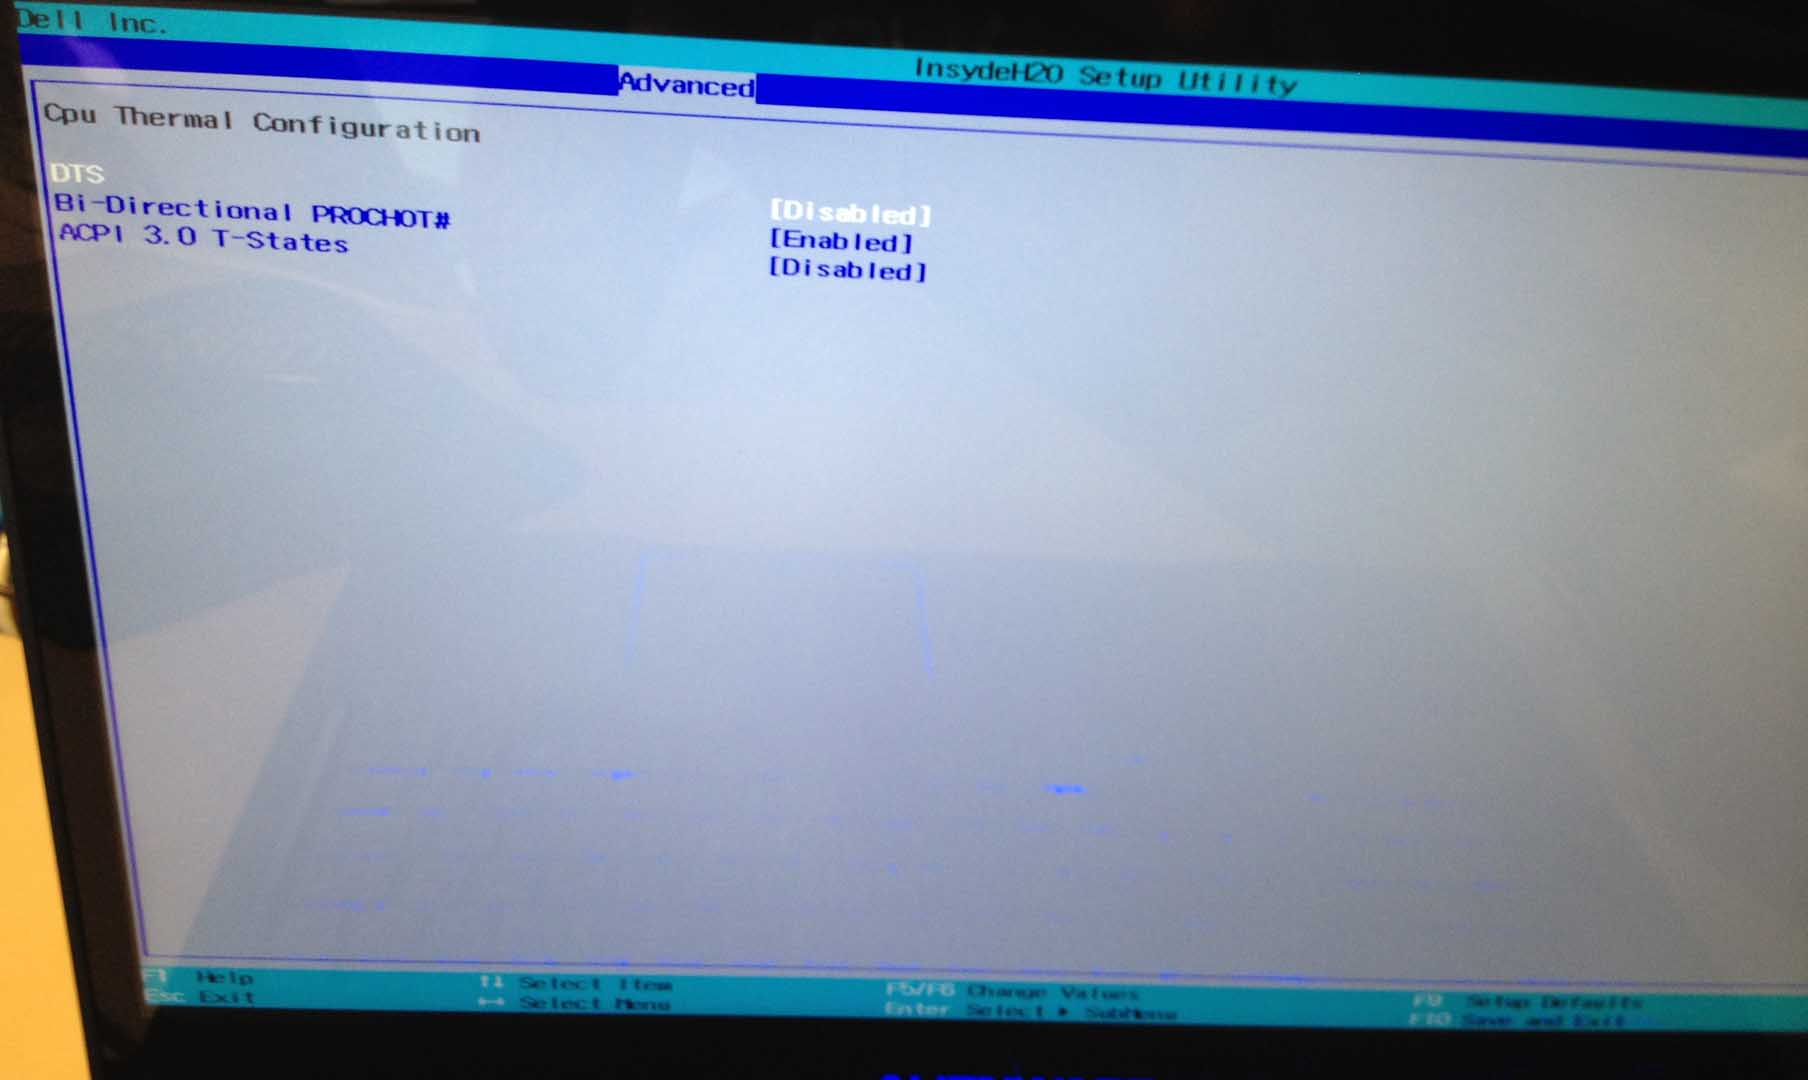
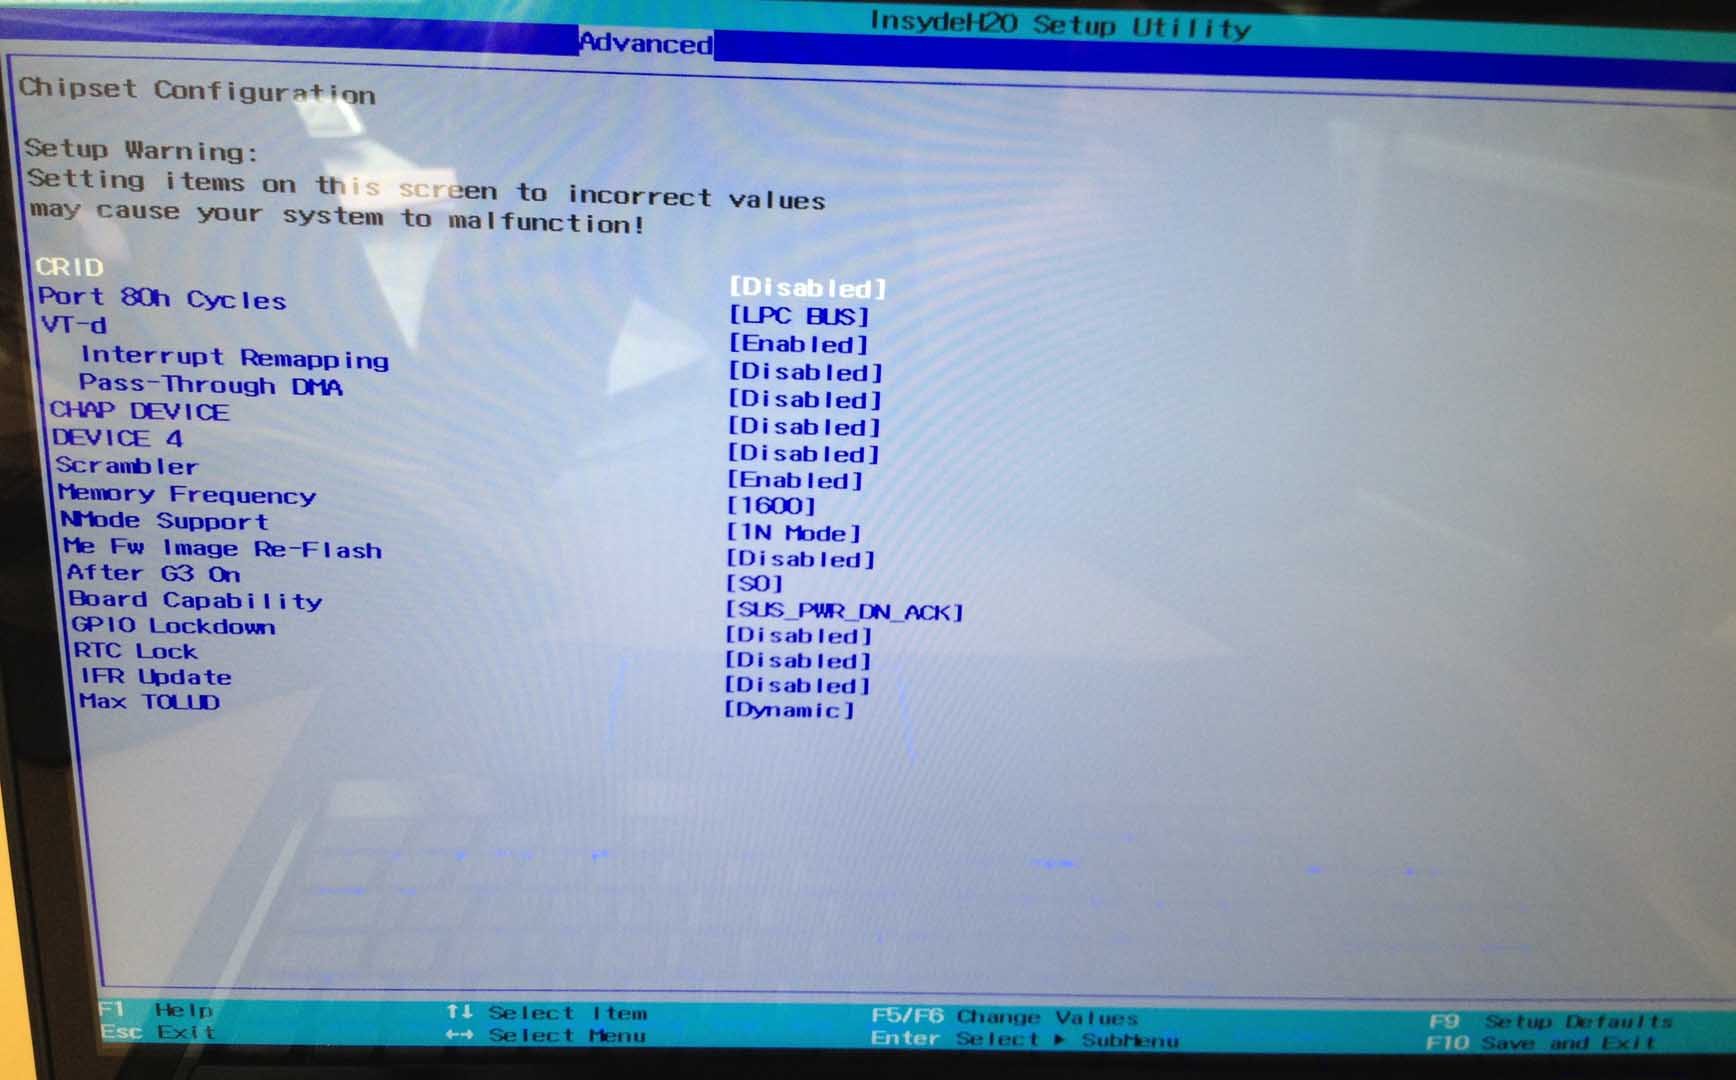
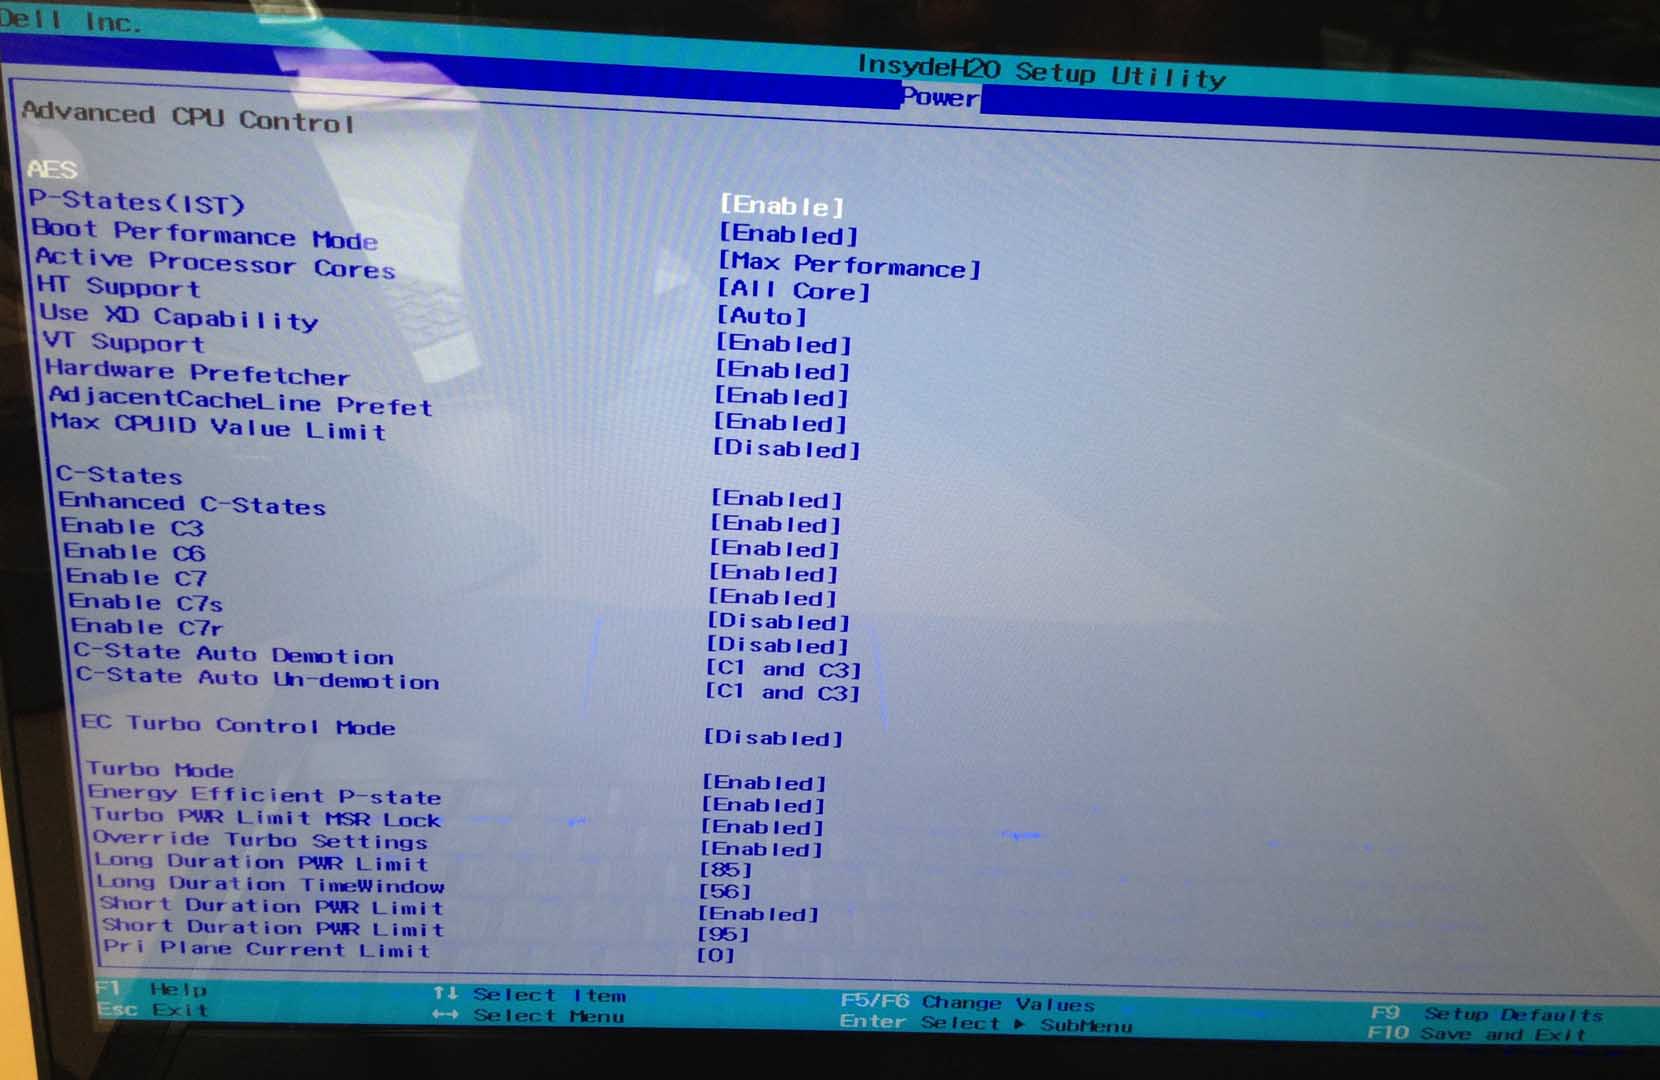
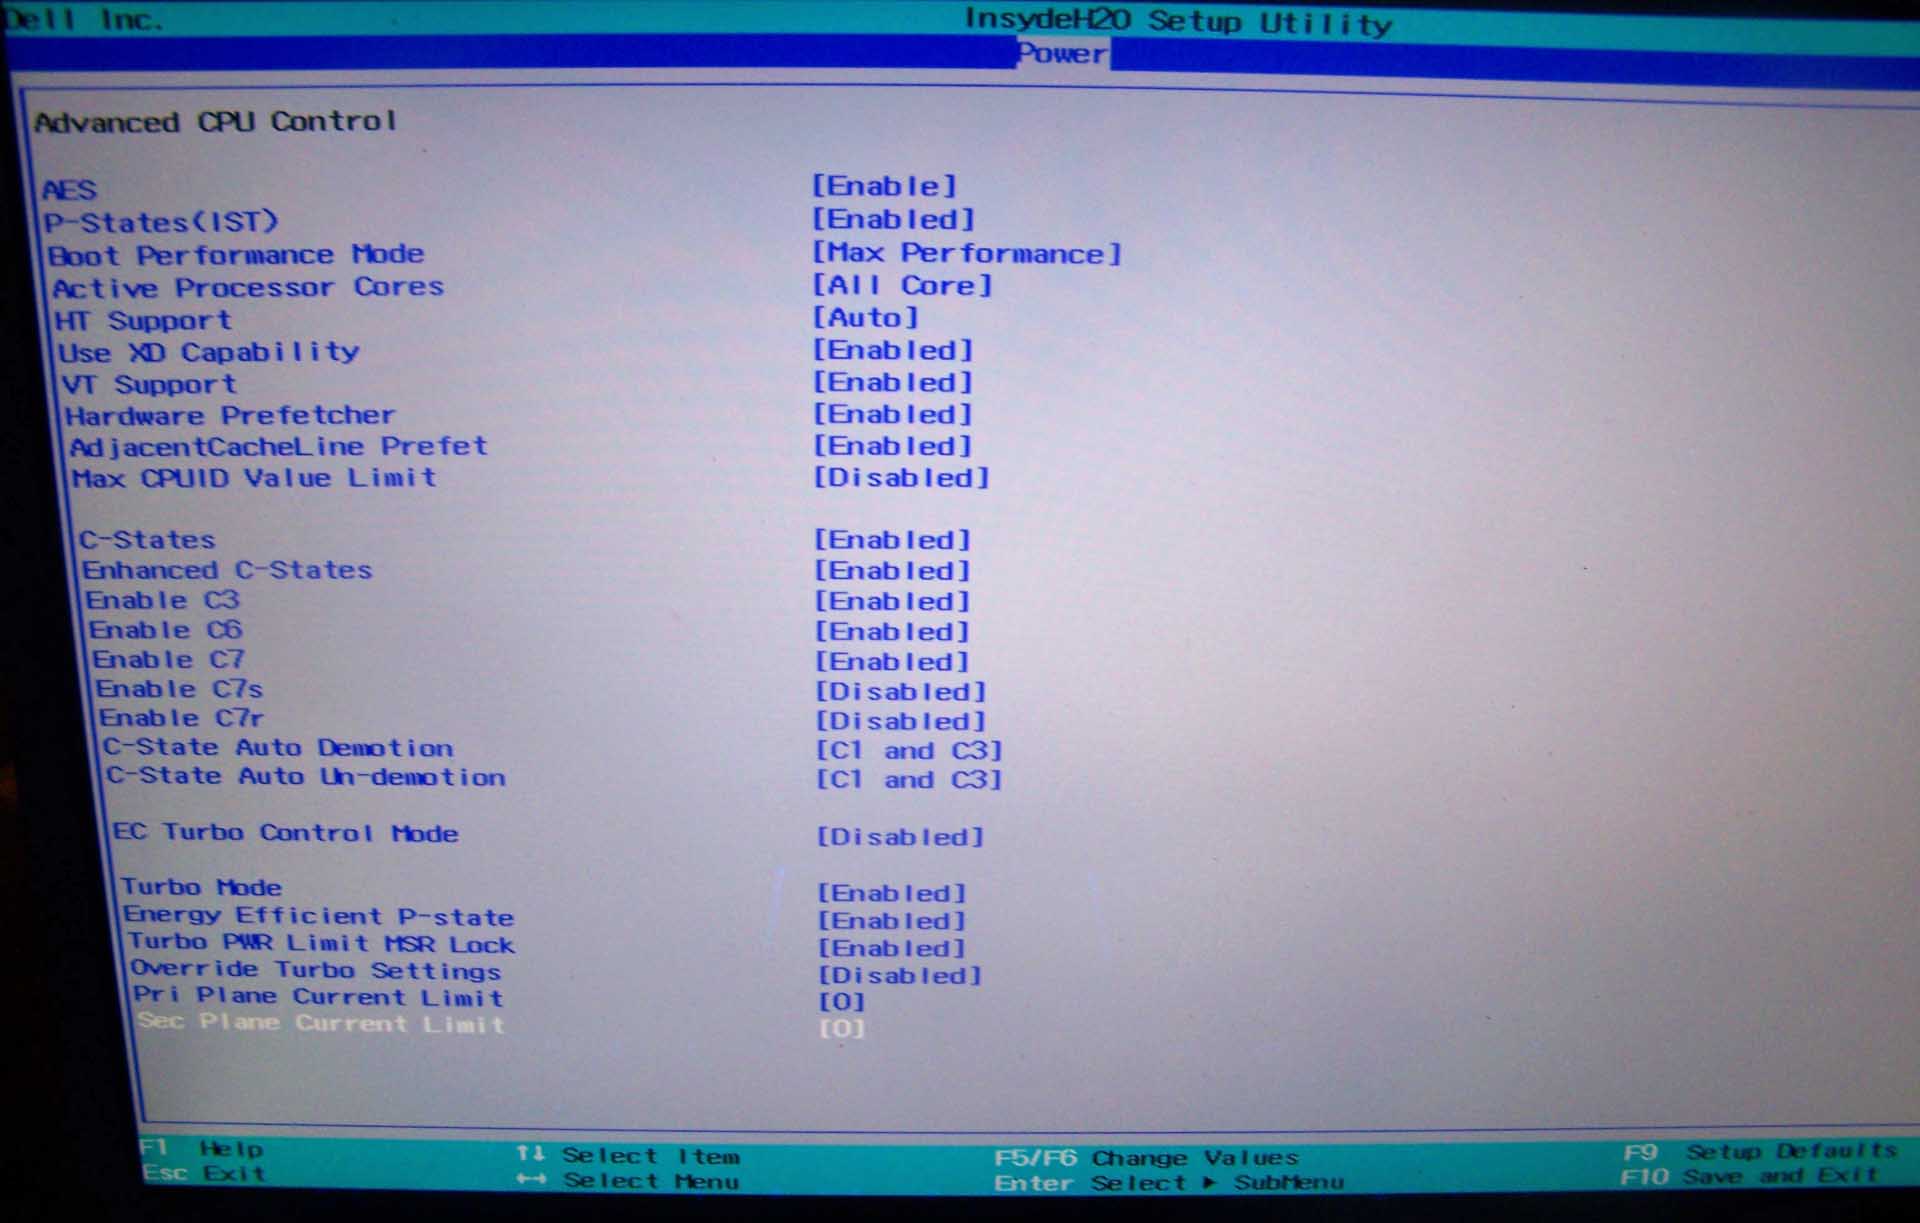
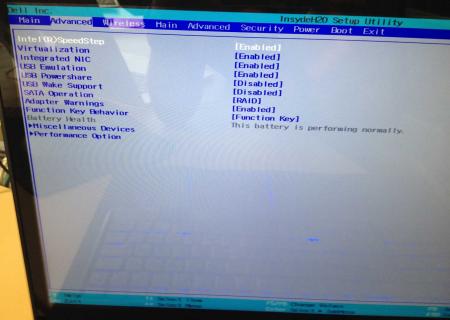
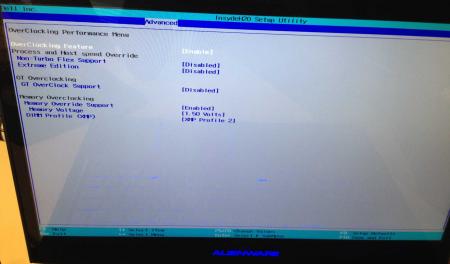
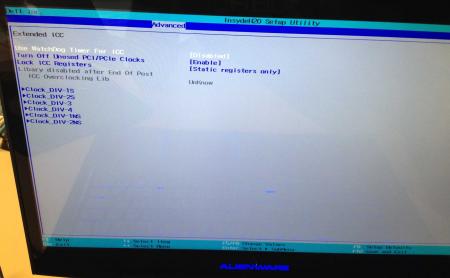
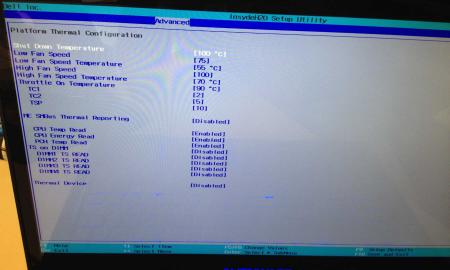
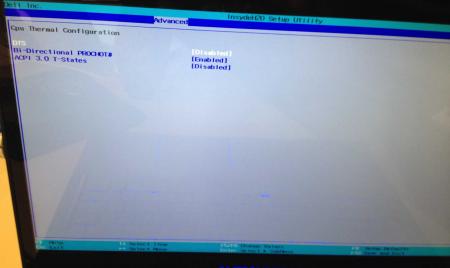
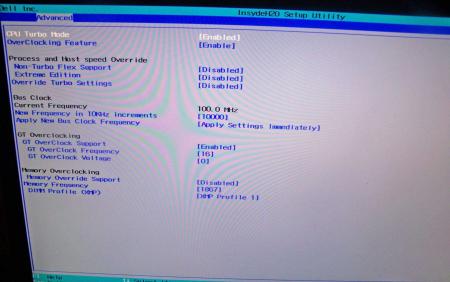
Dell has hidden a lot of options in the BIOS of the Alienware M17x R4, the modified BIOS versions here will show you all the hidden menus and allow you to further tweak your system and optimize its performance. Don't change anything you're not familiar with. There might be functions available which don't work on your system, so use this BIOS with care. It should only be used by advanced users. In case you mess up and your system refuses to boot after applying the changes you make, remove the AC adapter, battery and coin cell battery in order to clear the non-volatile ram of the BIOS. This should fix most issues. *********************** Instructions: If you're on A05 or an earlier version, you can flash the modified bios by simply using the InsydeFlash utility provided with the official bios update on the Dell support site. However, once you're on a version newer than A05, things get a bit more complicated. There are two options then: - Method 1: Revert to stock A05 or earlier by using the Insyde USB bios recovery method, and then flash the modified bios by using the official tools (InsydeFlash). - Method 2 (recommended): Flash the modified Bios from DOS by using the FPT tool: . Grab the DOS version of fpt for flashing, and my 'prr tool' to circumvent write protection.. Download a '[FPT]' labeled version of the unlocked BIOS. Put the DOS version of the flash tool on the root of the prepared USB stick (fpt.exe and fparts.txt), along with the prr.exe and the file you want to flash (plus the included flash.bat). . Restart the system and boot from your USB stick. Run prr.exe, then flash the bios by executing the flash.bat file. Wait until the tool completes the flash. If the verification is okay, reboot, else flash again.. Go to the bios, load the default settings and reboot. Done NOTE: The flashing from DOS as described above will only update the BIOS, not the rest of the firmware. Therefore I strongly advise you to first flash the stock version of the bios you want by using the official update provided by Dell, and once that's done you can go ahead and flash the modified version of your bios by following the instructions above. Download links to the unlocked M17x R4 BIOS versions: M17x R4 - BIOS A05 [unlocked] M17x R4 - BIOS A08 [unlocked] - see attachment M17x R4 - BIOS A09 [unlocked] - see attachment M17x R4 - BIOS A10 [unlocked] - see attachment [FPT] M17x R4 - BIOS A10 [unlocked] - see attachment [FPT] M17x R4 - BIOS A11 [unlocked] - see attachment Donation link, in case you want to buy me a beer Here some pictures of the menus (thanks a lot for the pics @deadbydawn!) I want to thank @widezu69 for testing !! It's hard to find users who are willing to risk their system in order to test a mod, I greatly appreciate this! Thank you!! ********* Flash and use at your own risk. I don't take any responsibility for any possible damages on your system. The software which I provide here ('prr tool') comes with absolutely no warranty to the extent permitted by applicable law. ___ M17x_R4_-_BIOS_A08_[unlocked].zip M17x_R4_-_BIOS_A09_[unlocked].zip M17x_R4_BIOS_A10_-_[unlocked].zip [FPT]-M17x_R4_BIOS_A11_-_[unlocked]V2.zip [FPT] M17x R4 - BIOS A10 [unlocked].zip M17x_R4_-_BIOS_A05_[unlocked].zip


- 998 replies
-
- 56
-

-
- alienware bios
- alienware m17x r4
- (and 8 more)
-
.If you're interested why not all modified BIOS versions can be flashed the 'usual' way with the official tools, read this:http://forum.techinferno.com/alienware/2252-information-about-bios-updates-a07-a08-higher-m14xr2-m17xr4-m18xr2.html M18x R2 - 'unlocked' BIOS versions The following BIOS of the Alienware M18x have been modified so that all hidden menus and options are visible. It will allow you to further tweak your system and optimize its peformance. Most of the options are only meant for advanced users. Don’t change anything you’re not sure about. It's possible that you see options which don’t work for your system, so be careful when changing settings. In case you mess up and your system refuses to boot applying new settings, remove the AC adapter, battery and coin cell battery in order to clear the non-volatile ram of the BIOS. This should fix most issues. *UPDATE*Instructions: There are two ways to flash the modified BIOS: Downgrade to stock A03 by using the USB recover procedure. (Thanks @Scott Matusow for summarizing the procedure). Make sure to closely follow the instructions, and wait until the system is done with the flash. Once you're on A03 flash the modified BIOS using the regular way (using the tools provided by Dell)..This method seems to work very well on the M18x R2, at least as long as you do as instructed. It can be a bit scary though since you can't see what's happening. .. Flash the BIOS from DOS with the FPT tool. This will only flash the BIOS part and leave out the EC and so on. It's a really safe option when done properly and less scary since you see the progress and information on the screen. For the USB recovery method follow the instructions in the link above. Second possibility - flashing from DOS: Prepare an USB drive so that it can boot DOS. If you don't know how to do this, check the instructions in the spoiler. . Grab the DOS version of fpt for flashing, and my 'prr tool' to circumvent write protection.. Download a '[FPT]' labeled version of the unlocked BIOS. Put the DOS version of the flash tool on the root of the prepared USB stick (fpt.exe and fparts.txt), along with the prr.exe and the file you want to flash (plus the included flash.bat). . Restart the system and boot from your USB stick. Run prr.exe, then flash the bios by executing the flash.bat file. Wait until the tool completes the flash. If the verification is okay, reboot, else flash again.. Go to the bios, load the default settings and reboot. Done. NOTE: If you want to use an unlocked BIOS newer than A03 I highly recommend to first flash the desired version of the unmodified BIOS (grab it at the Dell download site). Once you're on the version you want to unlock, follow the DOS flashing procedure described above. If you want to go A03 or earlier, the best thing to do is using the USB recovery method. Here two pics of the most interesting options: ********** Thanks @Riri-Fifi for the pics and testing! Thanks @johnksss for testing my prr tool! ********* Flash and use at your own risk. I don't take any responsibility for possible damage on your system. ___ The software which I provide here ('prr tool') comes with absolutely no warranty to the extent permitted by applicable law. Download the bios files referened in this post from here:

- 518 replies
-
- 35
-
-
- bios modification
- m18x overclocking
- (and 8 more)
-
I dont know if this is the right forum to post this, (but i need 5 posts for downloading a vbios) so my questions are these, thank you in advance for reading I have bought a laptop with a half melted 880M GPU Im assuming the person did not keep an eye on temps, so i went and replaced the card, it runs fine, (alright) but still, I remember modding my VBIOS for my 680 GTX back in the day, and it was fine, exceptionally faster, and im looking for that 60 fps LOCK, like i got on my 680 after modding the vbios, I did increase the voltage on the card to 1.212 I believe, from 1.114 , anyway I considering modding the cooling system as well for this laptop, because it definitely lacks cooling My plan is to put another laptop fan (where the HDD1 bay is in the Alienware 17) bcause I removed that hdd it was constantly at 57c which is bad even think it suffered some damage as speeds on it for specific games and tasks are pretty long, and it stays at 100% some times, which is weird, but it still works, so im using it.lol , but in the meantime, I turned the laptop upside down, plugged in the HDMI cable, and now im blasting a ROOM fan at it, which is definitely helping with temps before I would try to throttle the gpu speed at 77C, or 73C depending on the game or even saying screw it, I dont want throttling, and putting the throttle point to 83C, I use SPEEDFAN , and it helps keep the laptop relativly cool, except when the gpu is under full load, putting my hand on it is ridiculously hot, so, with the fan on it, its not going above 70, and taking a LONG time to get up there, i am playing metro last light at around 60C at 60+ fps, where as before my temps were shooting upto 80 and it would hit the throttle point, so seeing as how this is a 120 HZ laptop, I rather not push it, since the card is not capable (and if it is, the cooling sure isnt) the plan is to put the fan inside the HDD1 bay, and POSSIBLY daisey chain it to either A) the cpu fan header, or B ) the gpu fan hjeader, QUESTION: not sure which "rails" the power for these comes from, would it be able to handle another fan??? it seems like a legit idea, seeing as how the rear of the heatsink has NO heat dissipation at all. which is the part that melted offcausing the old card to die in the first place. basically the thermal pads look like they gunked the card and it was unfixable, I have a post to it on the Alienware Forum, which i could link later, is it a good idea, and will the VBIOS WORK with my 880M (DELL) from a clevo, (now in an alienware) im assuming they are compatible, as long as they are dell. also would I be able to get a Y adapter for the inside of a laptop fan, that would be AMAZING, i know they sell them for Desktops. Thanks
-
Since there are no threads about overclocking M6700 and Quadro Kepler series cards, i decided to make one. Does anybody here overclocked their "K1000M K2000M K3000M K4000M or K5000M"? I have K3000M and it seems to be way underclocked and have huge potential. With brand new alienware M17x R3 (GTX580M) i had throttle issues all the time without any OC and temps hitting 80-90c, noisy fans etc but with precision K3000M OC (+135MHz) there is no throttling and it even stays cool (65c under 100% load). Scorewise originally K3000M scored 2600 in 3dmark11 but with simple software OC +135MHz core i got 3200 points, by the way 580M GTX in M17X R3 was 3300points). So as it seems to me, precision is way better machine for gaming than that plastic cheap built kids toy Alienware (i did own M17X R3 for 1 year!) And GPU wise K5000M seems to have great potential to beat M17x R4 GPU-s in gaming performance.
-


Version 1.0.0
60 downloads
Files contained in this archive: flash.bat READ ME.txt SVS_13-15_seriesFixer.exe To learn more about how to use the files in this archive, please visit the thread below: Donation link In case you want to buy me a beer Thanks and cheers! -
Hello. I recently cleaned my laptop and changed thermal paste, so GPU has a lot of headroom for OC. At full load it's at 60c. And throttling only starts at 87c for both CPU and GPU. I searched everywhere, but it seems no one really modded this laptop's VBIOS. I found one person who does it, but he requires a donation for it. Since I don't have a lot of money I didn't even try to donate and see if it's enough. So maybe someone can help me out here? The laptop is with i7-4720HQ downclocked to 3.0 Ghz instead of 3.6 Ghz due to temperatures at full load, 16 GB of DDR3 ram and a GTX 970M 3GB. Added link for original VBIOS file. https://www.msi.com/Laptop/support/GE72-2QF-Apache-Pro-4.html#down-firmware Direct download link from MSI. Driver version for the lazy - 84.04.26.00.29.
-
I've recently purchased Sager's new P9872-S laptop with Intel i7-6700K unlocked CPU and a single nVidia 1070 XMX GPU. Let me say that overall I absolutely LOVE this new machine, but I've discovered some strange hardware/BIOS type quirks that I'd like to discuss here. Note: I don't see a version displayed in my BIOS, but HWINFO lists a BIOS date of 10/19/16. The CPU is unlocked and supports overclocking. The stock BIOS also has a section for CPU overclocking. My CPU is quite happy running a moderate 4.5GHz OC across all cores with a 70mV undervolt (offset mode.) Yes it'll do the same clock at stock voltage but I've found that many Skylake CPU's do not need such high voltage as Intel has programmed them for - and my temps run much lower with the undervolt. So I set the undervolt with Intel XTU (I've also tried doing the same with Sager's own utility) and it runs beautifully until I reboot the system. At POST, BIOS then seems to reject the undervolt, forces a power-cycle, and sets CPU PL1 and PL2 power specs to very low "safe" levels. It also changes the negative voltage offset to a positive 70mV, indicating that it's trying to "error correct" the negative value. BIOS itself specifies a valid range of -500 to +500mV for the voltage offset here, and I can change it directly within the BIOS (and then it DOES actually stick through future reboots) but the BIOS does not allow me to enter a negative value here! Instead of -500 to +500, the actual values it allows for entry are 0 to +1000! And no, +500 does not actually equal zero, tried that and it really is +500. Also of note, I can change any multipliers in XTU or Sager's utility without the BIOS objecting but *any change* to the voltage offset gets rejected at reboot - even +1mV. Even applying +1mV and then immediately applying 0mV in either utility gets rejected on the next reboot so it's as if some checksums or something are not calculated the same way by XTU as they are by BIOS, causing a rejection of *any* voltage offset modification made by a utility rather than BIOS itself. Initially I set all my CPU core multipliers to 45x and all was good. Soon I noticed that any time I put the computer to sleep or hibernate, it would limit core speed to a maximum 42x after recovering, despite still reporting 45x as the CPU maximum. I tinkered with it for a while and eventually tried different values. Now I have ONE CORE multi set to 46x and TWO, THREE, and FOUR CORE multi set to the original 45x. That shouldn’t make a lick of difference versus 45x across the board but it does! 46, 45, 45, 45 sticks properly through sleep and hibernate; Weird right? I’m fine with the current settings as an effective workaround but I feel it’s still worth noting here. The VSYNC seems "lazy." I know this may be a driver or settings issue, rather than true hardware quirk, but it really bothers me - and the same behavior exists with nVidia drivers 368.xx to 373.06. Take Dirt Rally for example; I want it to run with VSYNC ON at 1080p, 90Hz. If I turn VSYNC OFF, my average framerate is about 200Hz, and never falls below about 110Hz, but with VSYNC ON it keeps dipping momentarily below 90Hz and skips frames! In a fast-motion racing game this is very distracting! I've observed this same behavior with the internal LCD and with my AOC 144Hz gaming monitor connected via DisplayPort. With VSYNC OFF, even with framerate limiter set at or just above my refresh rate, the game looks terrible so this is not an acceptable workaround either. Yes, the reported refresh rate is on target without VSYNC but there's terrible tearing and stutter. I've never experienced this kind of VSYNC dysfunction before; any thoughts? I have the 1920x1080 120Hz LCD screen. I wanted to set a couple custom refresh rates in nVidia Control Panel for racing games that really stress the system at 120Hz but I still want more than 60Hz. If the LCD starts out set at 60Hz and I test a custom resolution of 1920x1080 at, say, 90Hz, the screen goes kaput until it reverts back to 60Hz. However, if the screen starts out set at 120Hz I can then create any custom refresh rate in between 60 and 120Hz that I want. I wouldn't bother trying to fix this one as there's a perfectly functional workaround - it's just weird to me that starting frequency matters. Any thoughts on these quirks are welcome, and I’d be happy to try/test any good suggestion or curiosity you might have. Especially getting a negative CPU voltage offset to stick permanently, as well as any thoughts on the VSYNC laziness would be greatly appreciated. Thanks everyone!
-
 Hi, So I bought an extreme edition i7-2920xm cpu a few days ago. After putting it in the notebook it ran fine, but I couldn't overclock it one bit. I have Xonar's unlocked bios for the GT780DXR, I tried changing the CPU core ratio limit but this doesn't seem to have an effect on the processors speed, I even changed the TDP and that did nothing. What can I do about this? Is there anyone out there with the MSI i7 extreme edition of this notebook which overclocks to 4.16GHz? If so can you please give me your BIOS? Please let me know if anything can be done, Thanks.
 -
When I get round to re-pasting my GPU, is it also worth fixing adhesive thermal pads to the memory chips too, would it help temps when overclocking the vRAM..?
-
I just recently received my newest Alienware purchase - the new 13" model with an nVidia GeForce GTX 960m (a Maxwell chip.) I'm aware of the recent debacle in which nVidia disabled all mobile overclocking in their drivers, I believe versions 345.09 and up. It's also been said that they've disabled it in their new vBIOSes as well. However I was able to uncover a link in which users are confirming that version 347.88 enabled overclocking even on cards that are intended to be clock-blocked in vBIOS: NVIDIA 347.88 Game Ready Driver - 17/03 (re-enables overclocking!) | NotebookReview There's even a user who reports having inf-modded that driver to allow installation with the new 960m, and claims to have unlocked overclocking capability. However, as yet I've been unsuccessful in modding that same driver to install on my system. I've copied the main ListDevices.txt file and all the .inf files in the Display.Driver folder over from version 350.12 which naturally supports the 960m but the result reports "required files are missing" and will not install. Could someone with more experience than I when it comes to inf-modding a driver give me some pointers? Any other ideas or solutions for unlocking the likely massive OC potential of the 960m? vBIOS mod perhaps? I've seen a mod for the 970m along with a modified nvflash EXE. I can provide my current vBIOS if anyone is willing to look into it!! Thank you!!
-
 Hey guys, does anyone have the spare time to mod my laptops BIOS so that I can remove the limit of the sliders in MSI Afterburner. So that I can go above a max of 135 on the core, have the voltage and power limit sliders unlocked etc. If it can be done for free, I would much appreciate it, and donate in the future when I get some money. If you can do the task, plz reply and I'll upload my BIOS backup to RGhost if that's the site you guys upload stuff to on this forum. Thanks in advance friends!
 -
Hi everybody I have laptop Asus g751JT with gtx970m 3gb on board Im very new to all this things with overclocking. But i have read many posts about overclocking my videocard . But Im very afraid to do it because i dont have much experience with overclocking. I need a very good guide. Im ready to pay for help. Best Regards to everyone
-
I have been trying for some time to clock my CPU on my M18xR2 with the 3940XM chip. Nothing I did had any effect what so ever. Since new my core multiplier had never been above x12. I recently discovered that this was down to ‘BD PROSCHOT’ and thermal throttling. As I understand it BD is a heat sensor of some description that I can only assume thinks the temp is too high. My usual core temp at x12 is around 55°C which is not even close to dangerous levels. I have started using Throttle Stop to remove BD and set the max multiplier to 20 after a XTU benchmark test I achieved 2.00 GHz with a max temp of 70°C, which in compared with other benchmarks I have seen is poor and rather warm. As I have a 3.00 GHz CPU it is defiantly on the low and warm side, which lead me to think that perhaps this BD PROCHOT thing was not wrong. I am going to do some investigation into the fans, in the meanwhile does anyone have any advice for me? Thanks Will
-
I see GTX960M is just rebranding of GTX860M with small factory OC. It is shame, that standard GT860M can run faster with OC than "new" 960M. OC is limited to +135Mhz. Is there any way to go further? Or I'm stuck with my new G551JW...
-

Version 1.0.0
101 downloads
Developed by Orbmu2k, NVIDIA Inspector is an invaluable tool for NVIDIA GPUs which has a variety of features including but not limited to the following listed below. Feature overview: Overclocking - Ability to set GPU base clock, memory clock, power and temperature target, voltage offset and fan speed. Profiles - Create per GPU overclocking and fan speed profiles. NVIDIA profile manipulation - Ability to modify NVIDIA game profiles. Version 1.9.7.3 updated setting constants until driver r343 updated custom settings override reported default value for aa gamma correction and shader cache fixed donation link show memory vendor shortname after memory type you can now add "-silent" param after the nip file for silent profile import creating startup tasks will add 30sec task delay creating seperated startup tasks for each perf level fixed default values for non p0 state oc controls fixed mdps apps drag & drop from non elevated desktop fixed rop calculation for maxwell 2 cards Screenshots: -
What are the risks of changing the vbios on a asus G751JT-CH71 (GTX 970m 3gb)? Previously I had a desktop that had a GTX 660 and I tried to change it's vbios and resulted in the card not being read by windows but since then I have changed its vbios to its original and works fine. Now I have tried overclocking my card (GTX 970m 3gb) and it worked perfectly with a slight fps boost but I feel like the card can handle more +135 on core isnt much, I have read on other sites that it exists a modded vbios that increases the amount you can add but before so I would like to know the chances of its success and if it really gives a boost that's significant and worth it.
-
I truly hope lenovo sees this and notes the CONSIDERABLE performance increases and take into consideration the lifespan of the laptops going up drastically. And as a result give us access to the fan speeds via software. Many people who have purchased the Lenovo Y510P have noted its absolute lack of fan control abilities the below is half guide/half performance report. This is to show what the Y510P is capable of if it were to have unlocked fan controls which are currently impossible to access. The below is a fairly simple hardware mod that involves removing one wire from the PWM controller on the motherboard. ((difficulty 4/10)) !NO SOLDERING!----------- Beginning The Fan Mod ----------------- The Fan will ALWAYS run at 100% it cannot be changed unless you reattach the wire. While cooler temperatures are always good this does sacrifice battery life. This is all likelyhood voids your warranty use at your own risk. The fan will be significantly louder than normal and will likely be very noticeable. You will need. 1x Phillips Head screwdriver (that fits the Y510P screws) 1x VERY SMALL flathead screwdriver A dish to keep the screws The assumption that you have some technical skills. Remove the battery and charger Carefully remove the bottom cover of the laptop Remove the sticker to the right of the fan to access the area with the controller Using the small flathead screwdriver lift up on small block at the end of the cable carefully use the small screw driver to lift one of the clips that holds the BROWN wire carefully and gently remove the brown wire from its casing (any more than a nudge is too much) securely plug the block back where it came from following the natural curves of the cable. Place the brown wire in a place where it will not create a circuit (behind the other larger connector) * for added security you can tape the end of the cable to assure no accidental connections. Without closing the bottom power on the laptop and give it 10 seconds if the fans do not turn on shut the laptop down assure all of your connections are correct and reseat the plug to assure contact. Final Result: [URL]http://i.imgur.com/pWwS6FS.jpg[/URL] After the cable is removed: [URL]http://i.imgur.com/4w8F3L6.jpg[/URL] Showing the plug to remove: [URL]http://i.imgur.com/pWwS6FS.jpg[/URL] -----------------------------------------------------------Benchmarks![URL]https://docs.google.com/spreadsheets/d/1sD4GP-DL59kPd5FaJZgMBZjsm9JzDqJ_UbBP-FI7lwQ/edit#gid=0[/URL] Y510P Temps & Preformance. No Fan Mod Fan Mod OC Fan Mod OC No Fan Mod Important Notes Below. Temps Taken in °F Idle Temperature - CPU 95 °F 91 °F 91 °F 95 °F CPU was NOT Overclocked. All tests lasted 10:00 (unless otherwise stated) Prime 95. All tests are conducted at 1366*768 Small FFT's 198°F 165°F 165°F 198°F V-Sync is off unless otherwise stated. Large FFT's 198°F 165°F 165°F 198°F * indicates that exact values could/was not recorded Blend 198°F 165°F 165°F 198°F Unigine Heaven Benchmark lasts the default time period. Unigine Heaven Benchmark. DX11 - Ultra Quality 192°F 167°F 178°F ****************************** Tessellation: Extreme 17.5 FPS 18.2 FPS 21.2 FPS *** Thermal Shutdown *** Overclocking Settings. Anti-Aliasing: 8x Score: 420* Score: 459 Score: 512* ****************************** Core Clock (MHz) +135 Memory Clock (MHz) +500 DX11 - Medium Quality 190°F 167°F 178°F Tessellation: Medium 30.1 FPS 35.5 FPS 40.2 FPS ** Tests ended for safety** Anti-Aliasing: 4x Score: 795* Score: 895 Score: 1013 Specs. Intel Core i7 - 4700 MQ - 2.4Ghz /w 3.4Ghz Turbo Battlefield 3 - Ultra Preset 193°F 168°F 180°F ** Tests ended for safety** 8 GB - 1600mhz Memory 64 Player - Operation Firestorm 31 FPS 48 FPS* 66 FPS 1tb - 5400rpm hdd 1366x768 Screen. Crysis 3 - Scene 1 Mission 1 193°F 168°F 185°F ** Tests ended for safety** Nvidia 755m - Drivers July 2014 Maximum Settings 14 FPS 24 FPS 29 FPS 130w Charger (battery removed) *Note: The massive performance difference on bf3 is worth noting and may contain a data flaw, please accept the finding with a grain of salt.
- 14 replies
-
- 2
-
-
- benchmarks
- lenovo
- (and 3 more)
-
Hello all, I've been looking around multiple forums for a few days now about overclocking the stock G73SW laptop CPU and GPU and upgrading the stock CPU/GPU but have found a lot of conflicting information or straight up dead ends. Can anyone direct me to guides specifically for the SW? I've seen JH and JW guides but nothing specific and the breadth of knowledge on OCing is intimidating enough that i don't want to even start taking my precious SW apart until I'm absolutely sure of what I'm going to be doing. Trak
-
Apologies for the wall of text, next time I take this machine apart I will take some photos! Teardown Instructions: ---- WARNING! THIS WILL MOST LIKELY INVALIDATE YOUR WARRANTY WITH DELL ---- ---- This is a guide only, no warranties or guarantees are implied, damage is at your own risk --- ---- You will need: T9 TORX screwdriver (to remove CPU only), Decent Thermal Paste, Philips Screwdriver, Thin flatblade screwdriver, Isoproponal electronics cleaner (Meths will probably work too), paper towels, plastic pry tool (or very strong fingers!) ---- If trying to "recover" the BIOS from an overclock, you will also need a non overclockable processor such as the i7-4700MQ or i7-4702MQ. It may work with the i7-4800MQ but I have not tried it. Steps: Turn system upside down, with the back / cooling fans towards you. Undo the 3 screws on the base. Carefully lift the plate that covers the front of the system (furthest from you) it is clipped in at the sides Carefully push the back plate with the fan grilles away from you about 5mm, this unclips it which means it is free to be lifted off. Remove the 2.5" HDD bay (4 rubber grommeted screws) and SATA connector from the motherboard Remove the DVD drive plate (4 screws) and SATA connector from the motherboard. Remove the battery (2 screws) and battery connector. Carefully remove 5 ribbon connectors. 2 are on the right near the 2.5" bay area, these are vertical. To remove, lift the plastic collar of the motherboard connector with a flat blade screwdriver. pull the ribbon cables up using the attached tab (not the wire) They should lift with no force, if they are still stuck, the collar needs to come up more. Remove the 3 horizontal cables under the DVD drive. You one need to undo one side of each. Undo the connector closest to the back in this area, then undo the SD card reader at the side closest to the edge, lift the white locking collar to do this and slide the ribbon cable out using the tab. repeat this for the connector underneath, this is the long one and will need gentle prizing (if you use too much force at once, you will break the locking collar). Remove the SD Card or SD card spacer / blanking plate (IMPORTANT!) Remove all the screws with a P in a circle next to them. take note of the size information. It tells you the width and length of the screw. This is very important when putting the system back together, it you put a long screw in a short hole it may damage the system or ruin the aesthetics. likewise a short scew in a long hole may not grip enough causing other problems. The next part will use the pry tools and is not for the feint hearted! Getting the AW18 apart is a pain, even when all the screws are out there are clips holding the palm rest on these are so tight, most will break when you separate the palm rest from the base of the system. It seems to be easier starting the separation at the point above the power connector and working towards the front. At that point, open the lid / screen as far as it goes, then unclip the back clips around the hinge. Then pull the palmrest away from the other side and these clips will stay intact. Finally lift it from the back and pull towards the screen, this will save the clips to the front of the palmrest. With the palmrest off you can change the second bank of DIMMS, Wireless card, CPU and graphics card. To get the CPU out, you will need to undo the lid hinge screws from the top, there are 3 in total. (2 on the left and one on the right). You will also need to remove the plastic guide for the wireless antennae leads. This has one screw on the right side. Remove the display cable from the motherboard and the logo led cable (use a small flatblade screwdriver to lever the white connector, don't pull the lead). If you have 2 video cards, you will need to remove the SLI cable. Disconnect the right side first, the cable is only wedged between the heatpipe and hinge, then carefully remove the tape from the CPU heatpipe. Then lift the lid away from the base slowly, you don't need to disconnect the antennae leads, you just need a small amount of clearance to get the CPU heatsink out. Undo the CPU heatsink screws, follow the order they show. (before you do this, make sure you have some good thermal paste, something like Arctic Silver 5 or Coolaboratory Pro). ---- FOR BIOS RESET STEP ONLY --- Install the i7-4700MQ and give it a reasonable thermal connection (you can probably re-use the existing thermal paste). Boot it up with a USB mouse and keyboard plugged in (this way you can keep the palm rest off). There is a power switch soldered onto the motherboard, just in front of the "bottom" DIMM, roughly centered between right and left. Follow the steps about the BIOS resetting below: I have to go into BIOS, reset to defaults (F9), save (F10) and then reboot again. Go into BIOS a second time (F2) and then you can disable overclocking support in the performance option (under advanced) Replace the CPU with the original that supports overclocking (i7-4930MX or i7-4900MQ for sure, not sure about i7-4800MQ). This time clean it up with the isoproponal cleaner fluid, make sure all traces of the old thermal paste have been cleaned from the copper heatsink pad and the top of the CPU / capacitors. Be careful not to break bits off the CPU die (the long grey rectangle) as this is actually the CPU and you will start to remove transistors from it! Its fairly tough, a bit like glass, but can be scratched, crushed or shattered if mis treated. Make sure you don't get cleaner and paste on the pins or in the socket. pour a small amount onto a paper cloth and use this to wipe the paste away. Don't pour directly onto the CPU, motherboard, socket or heatsink. Follow heatsink paste manufacturers instructions of how to apply the paste (I have used both Arctic Silver 5 and Coolaboratory Liquid Metal pad, the pad is much easier to apply and seems to have great results! Coollaboratory*Liquid MetalPad - the innovation of cooling for High-End sytems) Be careful not to get these metal based thermal interface pastes onto the capacitors on the CPU. Fire up the system with the palm rest off to make sure it boots (it may reset a few times or beep continuously on the first boot, this is normal. if you get the beeps, just switch it off and on again, the next time it should eventually boot (may take a minute or so to get through the BIOS screen, or even to get the AW logo). When you get the opportunity to enter BIOS setup, once again go into the BIOS and make sure overclocking options are switched off. (The BIOS auto detects the CPU and normally the OC options come back on) ---- END OF BIOS OC RESET ---- ---- GPU THERMAL PASTE CHANGE ---- If you are feeling super brave you can repeat the process on the GPU too. Personally, I found a 10 Celsius improvement in replacing the stock paste with the coolaboratory pad. The system fans stay off longer while in Windows too. ---- END OF GPU THERMAL PASTE CHANGE ---- ---- RECONSTRUCTION --- Make sure the SLI cable is reconnected.. I have done this in the past after putting it all back together to find it was not re connected, no cable, no SLI!! Hopefully it worked and booted to Windows (Check SLI is enabled, if the options are non existent then the cable is not reconnected properly (or you have 1 card!)) If no NVDIA options are enabled, the system is probably in Intel GFX mode, press FN + F5 to reboot in NVIDIA GFX mode. If everything is OK, repeat the teardown in reverse to reconstruct your machine. When the system is rebuilt but the power button, touchpad, LEDs, backlight or SD card reader don't work, this is because the ribbon cables were not connected back or locked down properly. Make sure the ribbon cables are square to their sockets (there is a guide line on the cable to indicate the final position) and the locks are clamping the cables. The next time I need to take the system apart again I will include some photos! Good luck!
-
Hi everybody! I Just installed modified bios - I have Lenovo Y580. As default there is (in modified bios) 1000MHz on base clock and 2500MHz on memory. Currently I have set 1260MHz and 3080MHz. (I used NvidiaInspector) Imo it's very big difference in compared with standard (non GHz) edition. Really it's so good card for overclocking ? Meybe Your clockies are higher ? Let me know in this topic. EDIT GPU-z Shows GPU - 1260MHz and Memory - 1540MHz
-
I got myself a GT70 (one with 675mx and 3630QM) but the stock settings were not good enough so I tried overclocking the GPU to see if i can get better performance. Using afterburner, I get around 800mhz for the core and +650 to the memory, but I think it can go a little more temps are still fine at around 75-80C under load (CPU goes way up to around 90C ) so I wondered if there's any way to overclock the core further cuz it seems to have reached its limit for the memory. PS. I have no experience with flashing vbios or modding. So please keep it simple guys
-
 All questions related to the Miscellaneous Tutorials section on the front page can be posted here.
 -
BIOS A08 popped up on Dells driver site, grab it here: Drivers and Downloads | Dell [united States] No change log included... damn it, seriously. Any noticeable changes? Let us know. If you can't download from Dell, grab the attachement. EDIT: Note that you might not be able to easily downgrade to a version which predates A08. EDIT 2: A09 is not on the Dell site, but file is nowhere to be found... weird. You might want to hold off with updating until they release A09. M14x_R2 - BIOS A08.zip
- 14 replies
-
- 1
-
-
- a08
- alienware bios
- (and 6 more)
-
 Hey guys, I've runned just to check my temps some rounds with wPrime (1.55) and was wondering why my multiplikator isn't that high as I've choosen it. My last run was follow: (with i7 920xm) 24x Multi 62 TDP/ TDC 133.005 Standard BCLK No Voltage Increase (Read out with Throttlestop 3.00) Were sitting at my U3 Cooler. Temps were maximal 90°C (on 1st and 2nd line), others at 85°C and last 2 were only 77°C. Is that normal? So here is the 1024 Score: 372,487 secs. At all tests my multiplikator is jumping down to 17 and goes maximal to 20-21!! (Never hitted the 24x) What have I done wrong? (Idle temp is at only 45°C)
 -
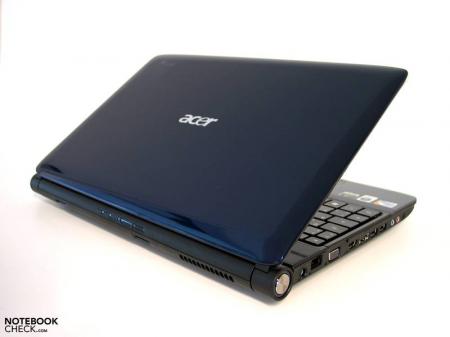
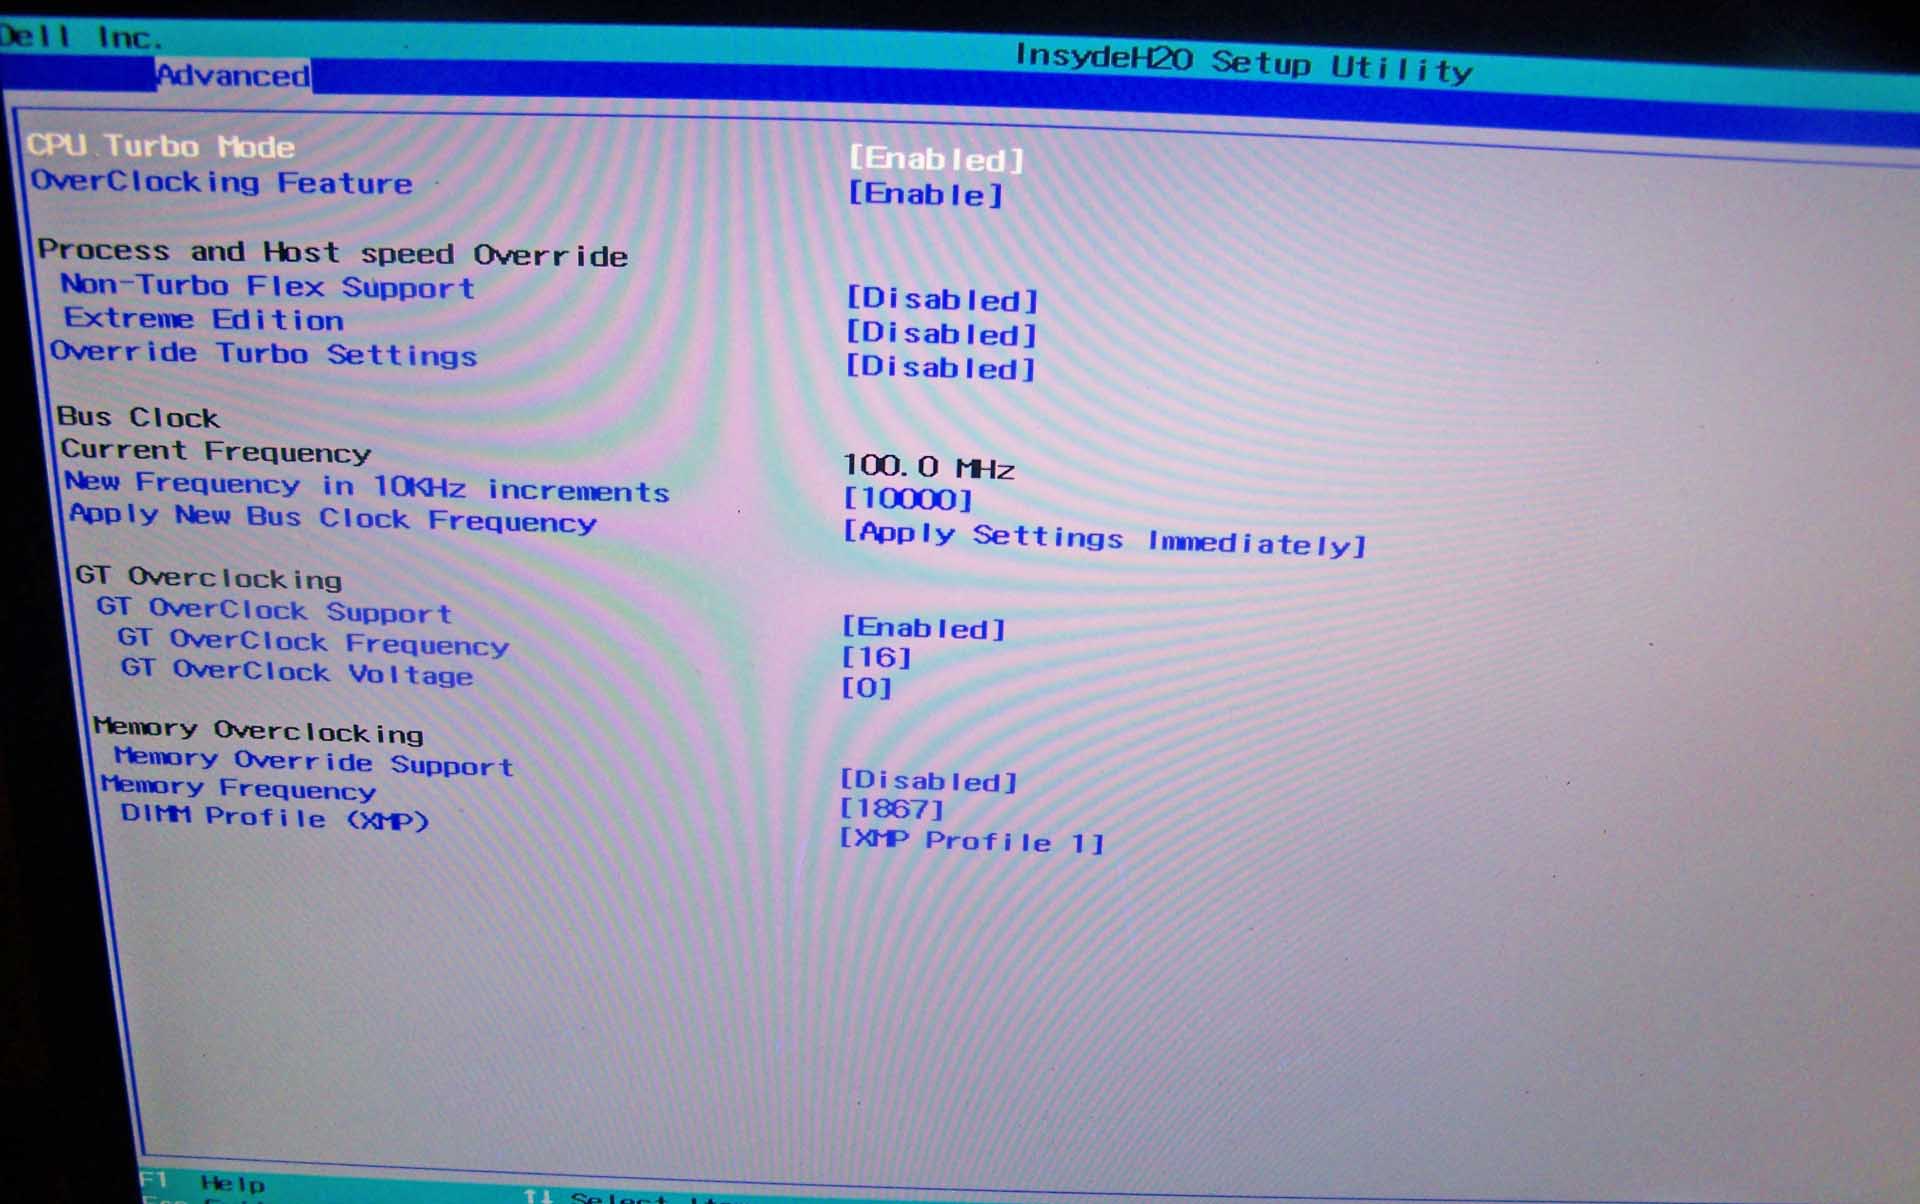
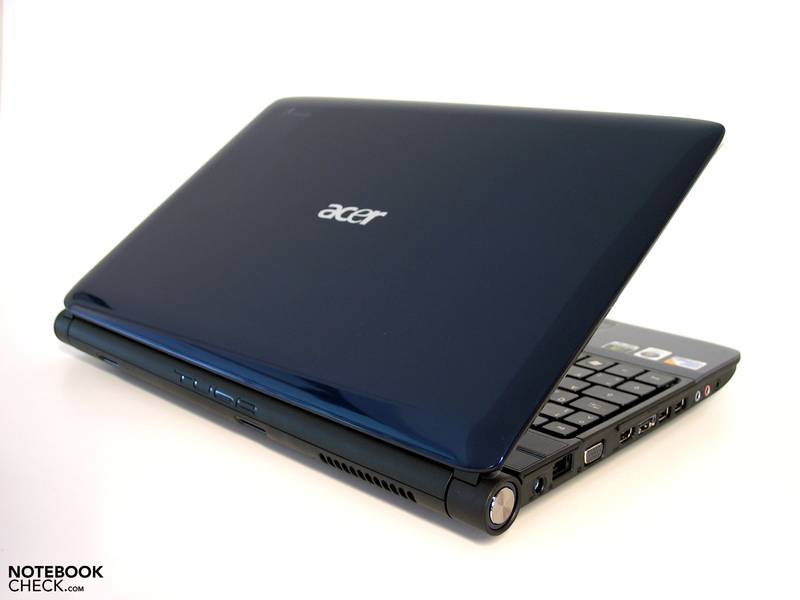
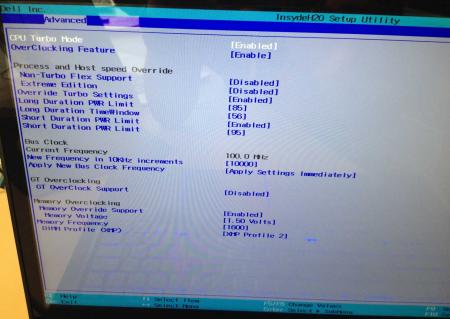
Hello ladies and gentlemen, This thread is for Acer 5739G laptop owners and other laptop owners that have Core 2 DUO/QUAD processor equipped lappys. Some Pictures from Notebookcheck.com Specs: Intel® Core™2 Duo processor T9800 (6 MB L2 cache, 2.93 GHz, 1066 MHz FSB, 35 W), supporting Intel® 64 architecture Intel® Core™2 Duo processor T9600 (6 MB L2 cache, 2.80 GHz, 1066 MHz FSB, 35 W), supporting Intel® 64 architecture Intel® Core™2 Duo processor T9550 (6 MB L2 cache, 2.66 GHz, 1066 MHz FSB, 35 W), supporting Intel® 64 architecture Intel® Core™2 Duo processor T6600 (2 MB L2 cache, 2.20 GHz, 800 MHz FSB, 35 W), supporting Intel® 64 architecture Intel® Core™2 Duo processor T6400 (2 MB L2 cache, 2.00 GHz, 800 MHz FSB, 35 W), supporting Intel® 64 architecture Intel® Core™2 Duo processor P9500 (6 MB L2 Cache, 2.53 GHz, 1066 MHz FSB, 25 W), supporting Intel® 64 architecture Intel® Core™2 Duo processor P8700 (3 MB L2 cache, 2.53 GHz, 1066 MHz FSB, 25 W), supporting Intel® 64 architecture Intel® Core™2 Duo processor P8600 (3 MB L2 cache, 2.40 GHz, 1066 MHz FSB, 25 W), supporting Intel® 64 architecture Intel® Core™2 Duo processor P7450 (3 MB L2 cache, 2.13 GHz, 1066 MHz FSB, 25 W), supporting Intel® 64 architecture GPU: GT 130M, 240M. MXM A 3.0 Module Current Build Processor: T9600 at 2.93Ghz RAM: 6GB clocked at 1066Mhz GPU: AMD 6770M Hardrive: Seagate 7200RPM 500GB Thermal Compound: Arctic Silver 5 note:Thread in development.