Search the Community
Showing results for tags 'y510p'.
-
For people that have experience in re-pasting CPU, GPU + ultrabay GPU in y510p to give some more info: What paste have you used? What are expected gains in re-pasting(temps)? Is it hard to get to the CPU/GPU/ultrabay GPU? Thank you! P.S. I am planing to follow the instructions in: .
-
Hello everyone I bought my y510p a year ago and finally decided to replace the DVD drive with a second GT750M. The first thing I did once I got the laptop was installing windows 7 as I just can't stand 8. Now that I got the second GPU I looked for drivers and only found this NVIDIA GeForce GT750M Second VGA BIOS Update for Windows 8.1 (64-bit) - IdeaPad Y410p, Y510p - Lenovo Support (US) So I suck it up and install windows 8.1. After following the installing instructions I keep getting the "no nvidia display adapters found" error message. Meanwhile Windows 8.1 just doesnt click with me so I go back to windows 7 and square one... Is there a way to manually flash the BIOS into recognizing my second GT750M? Forgive my lack of technical terms as I am quite the layman. Thank you in advance, have a nice day
-
As the thread says I re-installed the Y510P with windows 7. Becouse I hate working with WIN8. But now the mSATA is gone! Can't find it anywhere.. Thanks in advance
-
HI, i have a problem with my lenovo y510p gt755m sli. On win 8.1 some of the windows are blurry, but there's no such problem when i installed windows 7. Does any one else have such a problem and has a solution for it?
-
Hello, I soldered a NGFF connector to my laptop's motherboard a few days ago, and I installed a 128GB MyDigitalSSD SSD and it is not being detected in the BIOS, and I can't find it in the disk management either. I called Lenovo technical support the day before soldering it and they told me that installing the connector should be enough, no additional ICs or controllers are required, and I called them again yesterday, and they told me that they don't have access to such very technical information I tried a few solutions,including : 1. Switching the boot to Legacy instead of UEFI.(Stopped working since I updated the BIOS yesterday) 2. Reinstalled the chipset driver. 3. Installed ExpressCache and it didn't work either. Note: The SSD seems like it is getting power since it is heating up while I'm using the PC. Q1: Is there a way to know whether the connector is recognized by the device? Q2: I bought a NGFF to SATA connector to check whether the SSD is defective, but its arriving in a month from now, so is there any other way to do that without using any equipment? Thanks, Hush
-
I truly hope lenovo sees this and notes the CONSIDERABLE performance increases and take into consideration the lifespan of the laptops going up drastically. And as a result give us access to the fan speeds via software. Many people who have purchased the Lenovo Y510P have noted its absolute lack of fan control abilities the below is half guide/half performance report. This is to show what the Y510P is capable of if it were to have unlocked fan controls which are currently impossible to access. The below is a fairly simple hardware mod that involves removing one wire from the PWM controller on the motherboard. ((difficulty 4/10)) !NO SOLDERING!----------- Beginning The Fan Mod ----------------- The Fan will ALWAYS run at 100% it cannot be changed unless you reattach the wire. While cooler temperatures are always good this does sacrifice battery life. This is all likelyhood voids your warranty use at your own risk. The fan will be significantly louder than normal and will likely be very noticeable. You will need. 1x Phillips Head screwdriver (that fits the Y510P screws) 1x VERY SMALL flathead screwdriver A dish to keep the screws The assumption that you have some technical skills. Remove the battery and charger Carefully remove the bottom cover of the laptop Remove the sticker to the right of the fan to access the area with the controller Using the small flathead screwdriver lift up on small block at the end of the cable carefully use the small screw driver to lift one of the clips that holds the BROWN wire carefully and gently remove the brown wire from its casing (any more than a nudge is too much) securely plug the block back where it came from following the natural curves of the cable. Place the brown wire in a place where it will not create a circuit (behind the other larger connector) * for added security you can tape the end of the cable to assure no accidental connections. Without closing the bottom power on the laptop and give it 10 seconds if the fans do not turn on shut the laptop down assure all of your connections are correct and reseat the plug to assure contact. Final Result: [URL]http://i.imgur.com/pWwS6FS.jpg[/URL] After the cable is removed: [URL]http://i.imgur.com/4w8F3L6.jpg[/URL] Showing the plug to remove: [URL]http://i.imgur.com/pWwS6FS.jpg[/URL] -----------------------------------------------------------Benchmarks![URL]https://docs.google.com/spreadsheets/d/1sD4GP-DL59kPd5FaJZgMBZjsm9JzDqJ_UbBP-FI7lwQ/edit#gid=0[/URL] Y510P Temps & Preformance. No Fan Mod Fan Mod OC Fan Mod OC No Fan Mod Important Notes Below. Temps Taken in °F Idle Temperature - CPU 95 °F 91 °F 91 °F 95 °F CPU was NOT Overclocked. All tests lasted 10:00 (unless otherwise stated) Prime 95. All tests are conducted at 1366*768 Small FFT's 198°F 165°F 165°F 198°F V-Sync is off unless otherwise stated. Large FFT's 198°F 165°F 165°F 198°F * indicates that exact values could/was not recorded Blend 198°F 165°F 165°F 198°F Unigine Heaven Benchmark lasts the default time period. Unigine Heaven Benchmark. DX11 - Ultra Quality 192°F 167°F 178°F ****************************** Tessellation: Extreme 17.5 FPS 18.2 FPS 21.2 FPS *** Thermal Shutdown *** Overclocking Settings. Anti-Aliasing: 8x Score: 420* Score: 459 Score: 512* ****************************** Core Clock (MHz) +135 Memory Clock (MHz) +500 DX11 - Medium Quality 190°F 167°F 178°F Tessellation: Medium 30.1 FPS 35.5 FPS 40.2 FPS ** Tests ended for safety** Anti-Aliasing: 4x Score: 795* Score: 895 Score: 1013 Specs. Intel Core i7 - 4700 MQ - 2.4Ghz /w 3.4Ghz Turbo Battlefield 3 - Ultra Preset 193°F 168°F 180°F ** Tests ended for safety** 8 GB - 1600mhz Memory 64 Player - Operation Firestorm 31 FPS 48 FPS* 66 FPS 1tb - 5400rpm hdd 1366x768 Screen. Crysis 3 - Scene 1 Mission 1 193°F 168°F 185°F ** Tests ended for safety** Nvidia 755m - Drivers July 2014 Maximum Settings 14 FPS 24 FPS 29 FPS 130w Charger (battery removed) *Note: The massive performance difference on bf3 is worth noting and may contain a data flaw, please accept the finding with a grain of salt.
- 14 replies
-
- 2
-

-
- benchmarks
- lenovo
- (and 3 more)
-
Hello to all my first post here ! I am thinking of buying a Lenovo Y510p (non-sli) with 755m. The price is 650Euros (all expences taxes shipping is included), about 880USDollars. https://www.computeruniverse.net/en/products/90532017/lenovo-ideapad-y510p-59400122.asp I already have a Samsung 840Pro 256GB and one extra DDR3L 4GB to upgrade it. Should I look for something different or is it a good buy for the money. Sorry for my bad english, I am from Greece.
-
 Hi all, I purchased a Y510P (Dual graphics cards) a month or so ago. It came with Windows 8 and I upgraded it to Windows 8.1. I also upgraded it to the latest Nvidia drivers. Unfortunately the second graphics card does not work with the latest driver (version 335.23). When I go to device manager it shows the error message "Windows has stopped this device because it has reported problems. (Code 43)". Reinstalling the driver from the recovery partition (version 311.54) did the trick. I guess the newer driver should be able to get better performance out of the card. Is there any way around this?
 -
Hi, I changed my original wlan card in my Y510P notebook to an Intel AC7260 card. The WIFI is working well BUT the Win7 couldn't install the bluetooth driver. It couldn't recognize the bluetooth modul. Does anyone have idea to solve this problem?
-
Not sure if this is just mine or if it's the laptop but, on my Y510P when I plug in my headset the sound doesn't automatically switch over to play through the headset I have to manually go into the Audio management and change it. So the question is, is this just my machine only or is it a wide spread thing and any suggestions how to fix this? It's not a huge deal but, it is a little annoying.
-
 Hello all, I have recently bought a Lenovo Y510p. So far I have had a horrible time with my decision as it is a good laptop, but I had bought the single GT755 model. My bios version is V3.05. my computer will not boot past "Unauthorized wireless network card is plugged in. Power off and remove it." I do know that there are other forums that cover this issue but I am unable to download the files needed to correct the issue, because the website says I do not have access yet. Is there a way to do this without the files or how would I go about getting access to download them from the moderators?
 -
The lenovo y510p has no thunderbolt or express card but it does come with their own ultrabay technology by which you can add another graphics card inside a socket which hold in place of the DVD drive once you take it out. Apparently the ultrabay is a pcie 3 implementation. So I was thinking if its possible to DIY eGPU. I think besides the basic setup of eGPU one might need a specialized connector for the Ultrabay. Has anyone done it. Can anyone guide me to DIY?
-
Hello All, My Lenovo y510p is going to sleep after ~125 seconds of inactivity. I can not figure out why. Could anyone give me some ideas please? Windows 8.1 Screensaver is blank after 5 min Powerplan is high performance with the following settings (all for plugged in): turn off display after 15 min computer sleep 30 min Advanced: Hard disk turn off after 20 min sleep after 30 min hybrid sleep off never hibernate allow wake timers disable turn off display I am using lenovo energy management set to high performance, battery mode = optimized battery health Thank you!
-
Hi, recently I bought a Y510p 59400120 with two 755m in it. When I use chrome and browse to model-kartei.de the bottom grey is flickering like hell. It doesn't happen in firefox though. If I remove one graphics card the problem is gone. Do you guys have the same problem and even a fix for that? Thanks shyd
-
 Just got my new lenovo y510p and i really need an ssd in it.. It has 1 regular 2.5" hd bay, one msata bay and 1 ultra bay.. I got a 120gb samsung 830 ssd (from my old laptop) and the problem is that its too small so thats why i need that + the 1tb harddisk at the same time.. My question is, will the 1tb harddisk work slower in an ultrabay/sata dock that fits in insted of the dvd drive? (in other words, should i go and buy a msata ssd and use that so the 1tb hd can stay in its normal bay) or should i save some money and move my 1tb hd to the ultra bay and install my normal 2.5" ssd inside?? What would you do??
 -
I was wondering if the Y410p supports optimus technology ? I heard it just switches to the iGPU when on battery and the nvidia gpu when connected ?
-
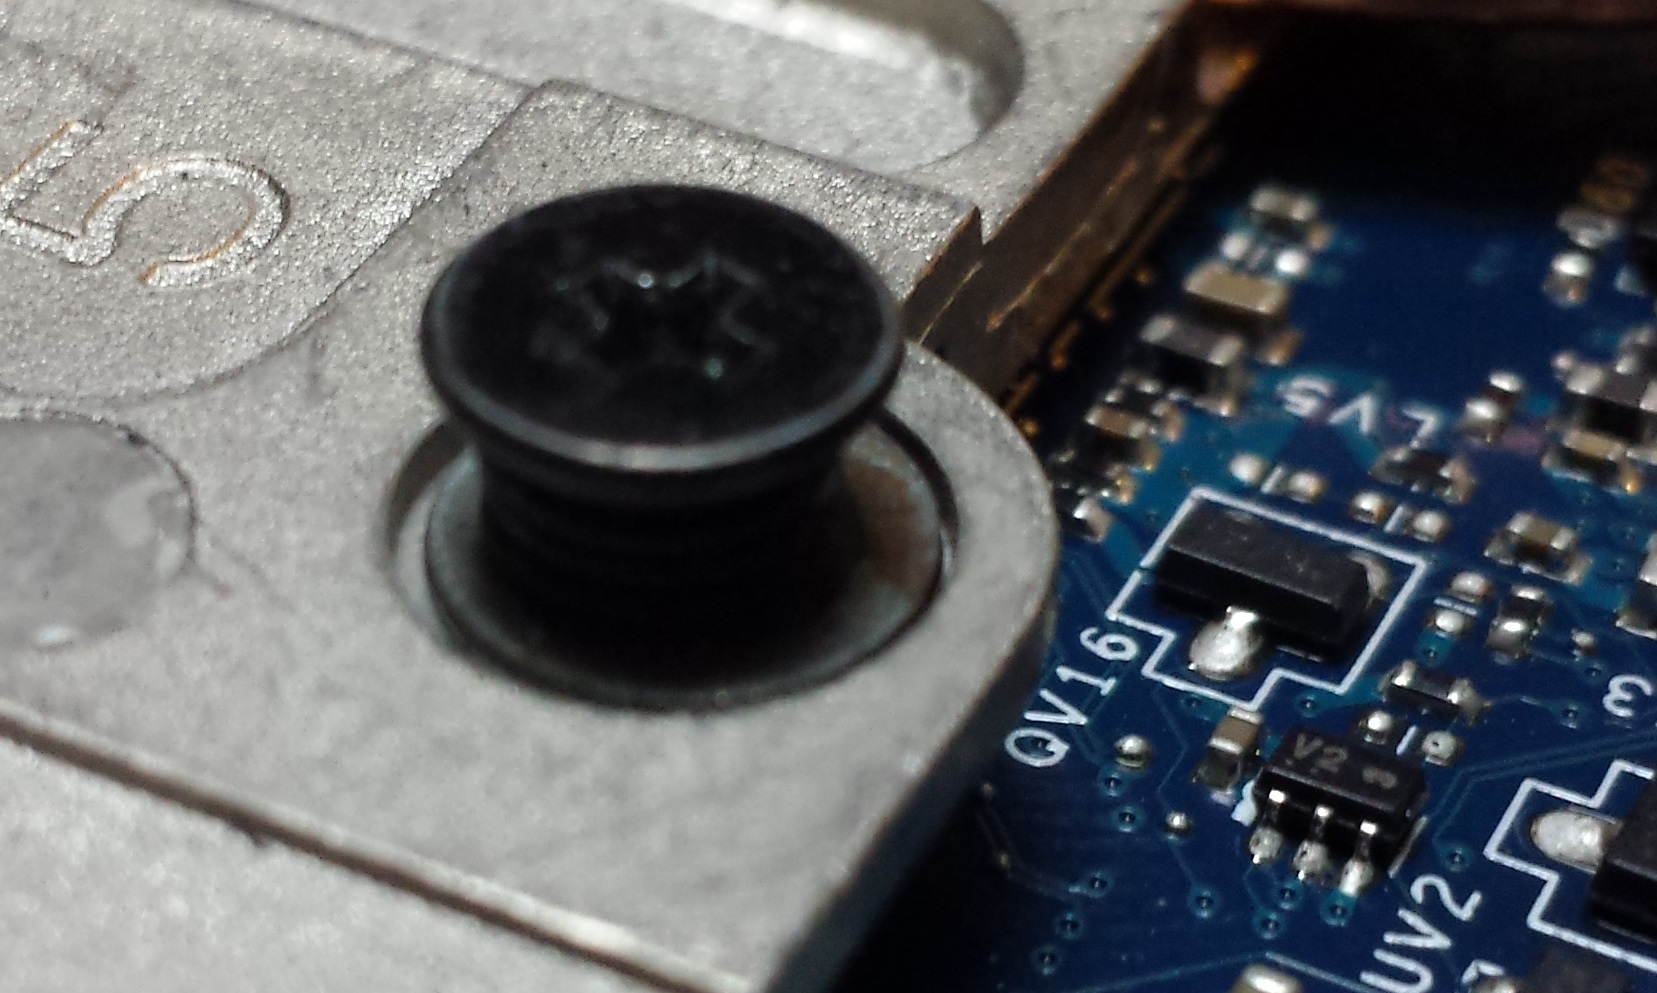
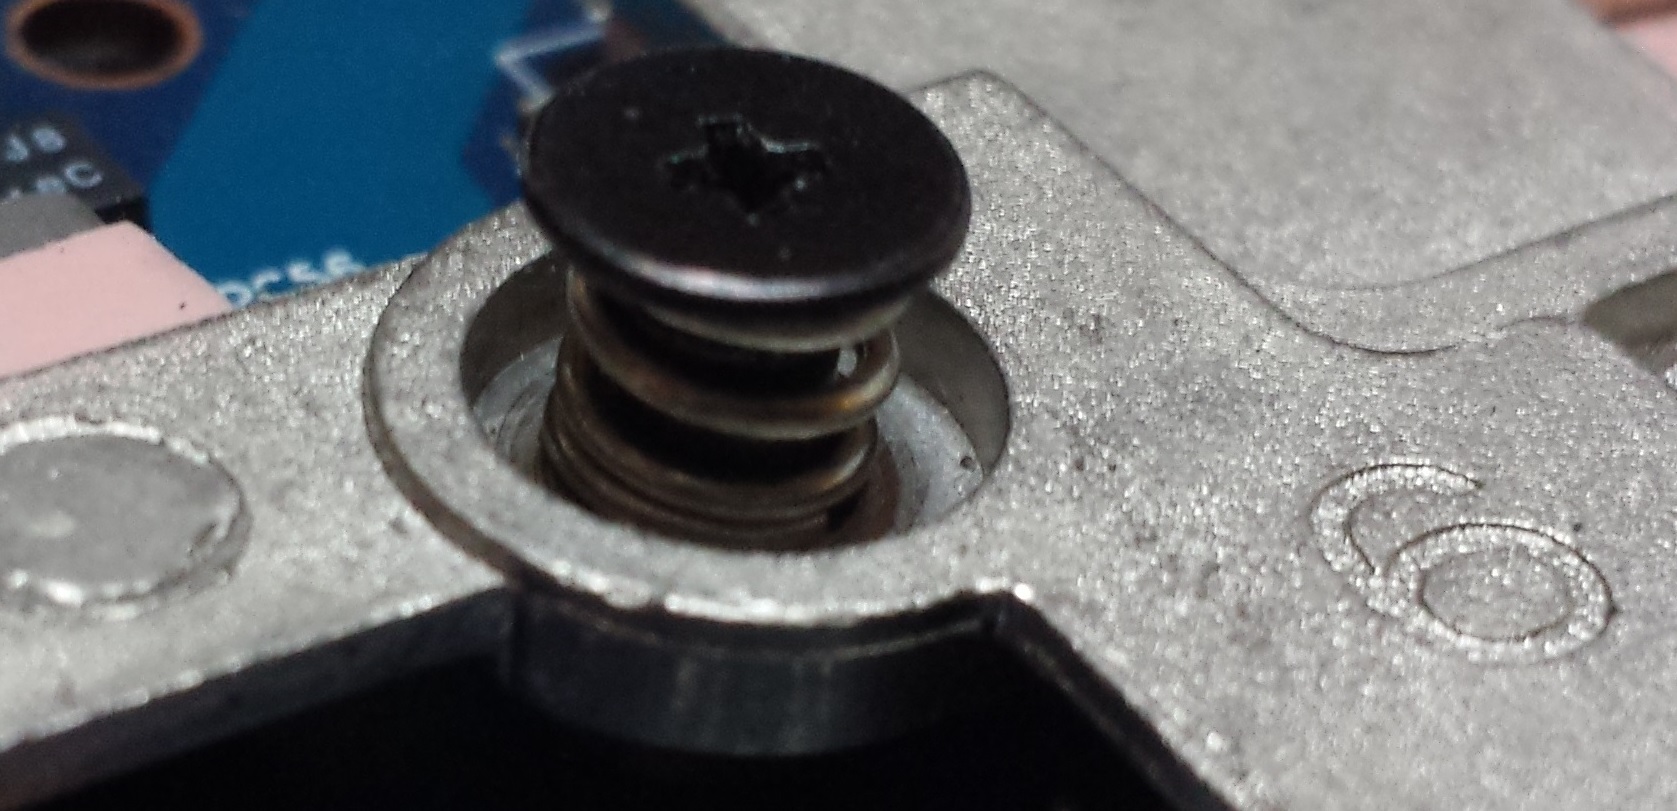
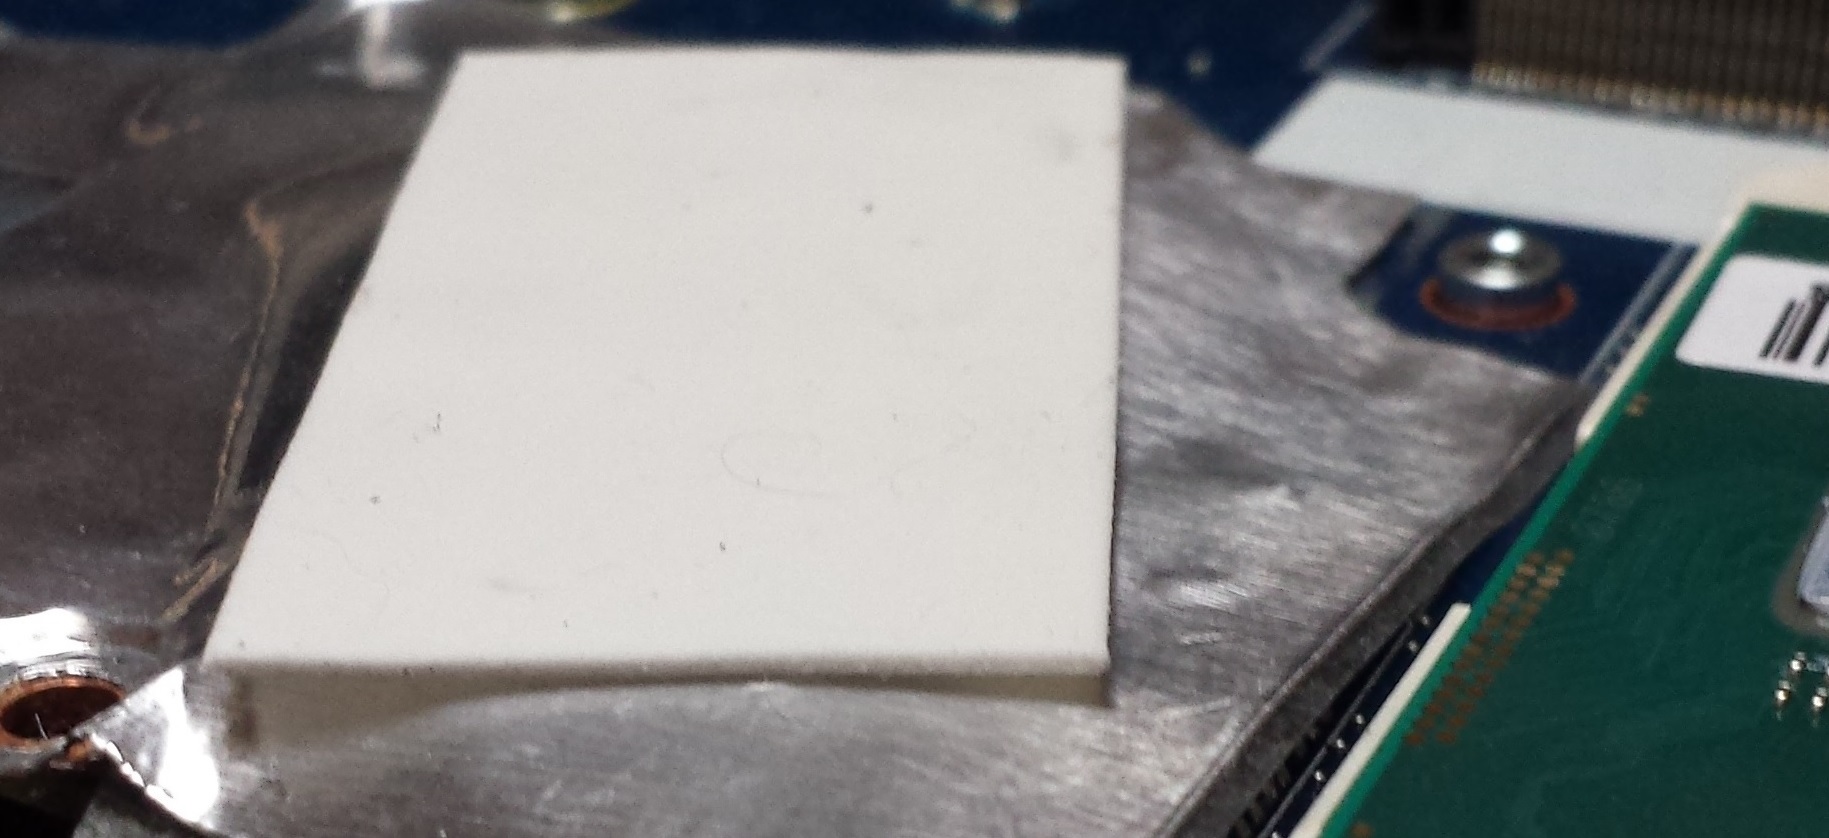
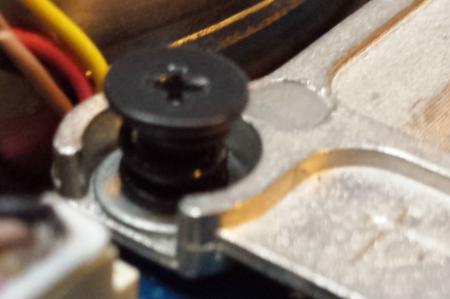
Hi! edit: merged with Conscriptvirus's post so it's easier to follow: This modification is very dangerous, can lead to broken chips. Don't say i didn't warned you... edit: he's right, it is easy Lenovo did a sloppy job with cooler, too much thermal paste, weak springs, overheating and throttling machines... First of all, disassemble the machine. Then do a repaste, with bare minimum amount of thermal paste, and remove cooler again, check thermal paste spread. Remove screws from cooler, by removing little plastik washers, keeping the screws to fall out. My gpu heatsink was not paralllel to motherboard, so the corner without screw was slightly bended upwards. Twist the gpu heatsink, so that corner is pushing gap pad a little bit harder. Be very gentle, you dont want to broke your heatsink. You can check level by putting your heatsink on flat surface with gpu screws removed, cpu screws stays in place for now. Then place a 0,5mm spacer under the spring like seen on the following pictures These are screw number 4 and 5. Screw number 6 is using a weak spring, so use double spacer, or change it to a stronger spring: Put back plastik spacer, so screw stay in place. Do the same process with cpu heatsink. You can do this to ultrabay as well, but take extra caution, since there is no backplate, and it can lead to warped/broken board. Lastly change the gap pad over cpu vrm area, because it is too tick, I used 0,5mm piece: Aaand it's done! Put back heatsink, use as little amount of thermal paste as possible, and enjoy 10-15+ lower temperatures. Spacers was lying around, i had the spring from some old heatsink, so dont have exact types and diameters, but Conscriptvirus did the mod also, his mod is better to look at, spacer perfectly fit into heatsink holes edit: I also did cpu mod, ended up adding a washer to screw 6, despite of changed spring, gained 1C-3C. I can run XTU stress test under 85C with -95mV and 3,4Ghz 4core. GPU and CPU idle is under 50, without notebook stand with fans. Thanks to Conscriptvirus for his effort and pictures. If it worth to be sticky, Mods, please make it one. Regards


- 50 replies
-
- 4
-
-
- cooling mod
- heatsink mod
- (and 3 more)
-
Hi everyone. I'm new here. My laptop is Y510p gt750m SLI. Recently I want to use the intel 4600 graphic card to save my battery. But I can only install the intel drive with the second gt750m pulling out from ultrabay. When I plug in the second GT750m, I can not find intel 4600 any more. So how can I make SLI and the intel 4600 coexist in my system?
-
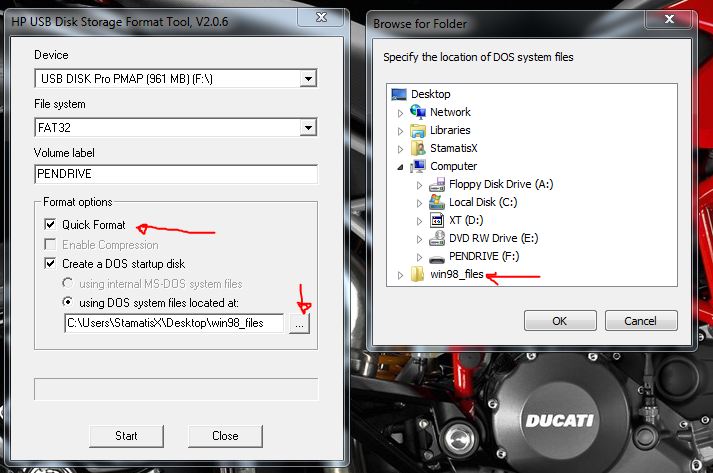
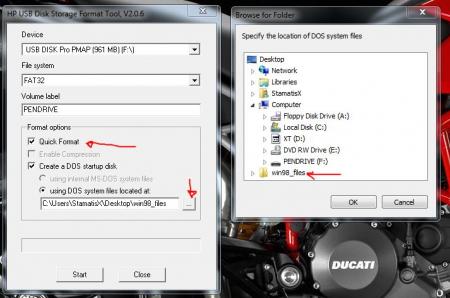
For those who don't like the restrictions Lenovo put on their system, here's a BIOS mod that will get you back at least some of the freedom you should have over your own hardware. Features: WLAN card whitelist removed, any (hardware-wise compatible) card should now work hidden BIOS menus unlocked VBIOS tweaked for more performance and better tuning possibilities Keep in mind that not necessarily all of the BIOS options available with this mod will be fully functional, so use the new available settings with care. If you're unsure about something don't change it and ask here, someone might be able to help. Available for v1.07 / v1.09 / v1.10 and v3.05. v2.04 and v2.07 added (only whitelist removal as for now) If you have a different BIOS (or more specific, a BIOS newer than 3.05) I will need a copy of it in order to make it work for your system. Instructions for flashing the modified BIOS v3.05: You need a USB stick prepared to run DOS, here is a guide you can follow in case you don't know how to do this: Guide by @StamatisX - thanks! >>> Before continuing make sure the AC adapter is connected to your laptop and your battery has at least 20% charge remaining. <<< (0) - NOTE: This step is Only necessary if your system isn't already using BIOS v3.05 Update to the official v3.05 BIOS provided by Lenovo . (1) - Create a backup of your own BIOS (now v3.05) by using Fptw64 tool. Extract the files and run the included .bat file from an admin command prompt. . (2) - Download Lenovo_Y510p-Y410p_[v3.05]_modified.zip and put the files of folder [1] to the root of your prepared USB DOS stick. Let the BiosFixer prepare your BIOS for flashing by drag and dropping your backup file on it. Put the created "v305mod.bin" file to the root of your USB DOS drive as well. . (3) - Now you need to downgrade the firmware back to v2.07 (Y510p-Y410p_v207_[stock].zip) in order to flash the mod. . (4) - Boot from your USB DOS drive, when you see the command prompt type BIOS and hit enter. Wait until the BIOS is flashed (you can safely ignore warnings about non-existing regions). . (5) - Once the BIOS flash completed with no errors, type EC and hit enter. Wait until the EC is flashed. Then reboot. . (6) - Go to the BIOS setup menu, load the default settings, apply and reboot. Done. In case you're using an ultra bay GPU follow the instructions in post #2 and flash the vbios.. NOTE: It's crucial that you flash both, BIOS and EC. Having different EC and BIOS versions can in certain situations lead to issues. IMPORTANT: If you want to go back to stock v3.05 you can do that easily by simply using the official update from Lenovo. That's it, nothing additional required in this case. Old instructions for users with v1.07 / v1.09 / v1.10 or v2.04 / v2.07 who for some reasons don't want to update to v3.05: Video walk-through of bios settings (thanks @allstone): My donation link in case you want to buy me a beer Download link for files referenced in this post:
- 2250 replies
-
- 280
-
-
Just got my Y510p 750m SLI a few days ago and was looking for BIOS with the whitelist removed. Anyone have any luck finding anything?