Search the Community
Showing results for tags 'laptop'.
-
 Guessing who will be the first company to include the nVidia Pascal 1080 and AMD Polaris GPU's inside their Laptops: 1- 2- 3- 4-
 -

I have no idea what im doing here here (HELP)
Codypom posted a topic in General Notebook Discussions
So basically, I wanted to find a way to play games without lagging everywhere and the only thing that is bad on my laptop is the graphics card, so somehow I stumbled into this eGPU page and hopefully someone can help me basically understand how all of this works or at least attempt to help me out. So I have an Dell Inspiron 17 7000 series and ill basically copy and paste the processor if that is relevant information. The processor is a Intel(R) core(TM) i5-5200U CPU @ 2.20GHz so I have no idea what most of this means because when it comes to laptops and modification I am just completely clueless. I was just hoping to get an answer from someone if I could even have a eGPU setup and what it would cost me for that and if it is even worth doing. I know this is where people who know everything about this stuff, but I am just really interested to see if I could actually just upgrade graphics cards without buying a brand new computer, and hopefully somebody can help a clueless man. Thank you for reading and replying if you choose to. -
Hey Everyone, I'm looking for some testers to see if we can get LEGACY SUPPORT for the m17xR4. Furthermore, I've also done MANY updates on this bios, too... I updated RAID (EFI & LEGACY) to v12.9.0.2006 (This may need to be downgraded as the chipset you have may NOT support this raid version, but this is the latest version that will work IF youre running RAID. It also supports TRIM in RAID0. If you are not running raid, I can update to v13 if you want, but we need to test one at a time!) Updated GOP Drivers & GOP Policy Updated vbios from 2098 to 2171 Updated Microcode for all cpu's Added M.2 Support Added NvMe support Updated Atheros Lan Firmware & PXE Boot Firmware Updated To Possibly Give Legacy Support, BUT....... I NEED TESTERS!!! Please contact me if you want to try. Understand, HOWEVER, that am NOT responsible for ANYTHING that happens to your system if it goes wrong. (Just a SMALL disclaimer, heh) Thanks, Swick
-
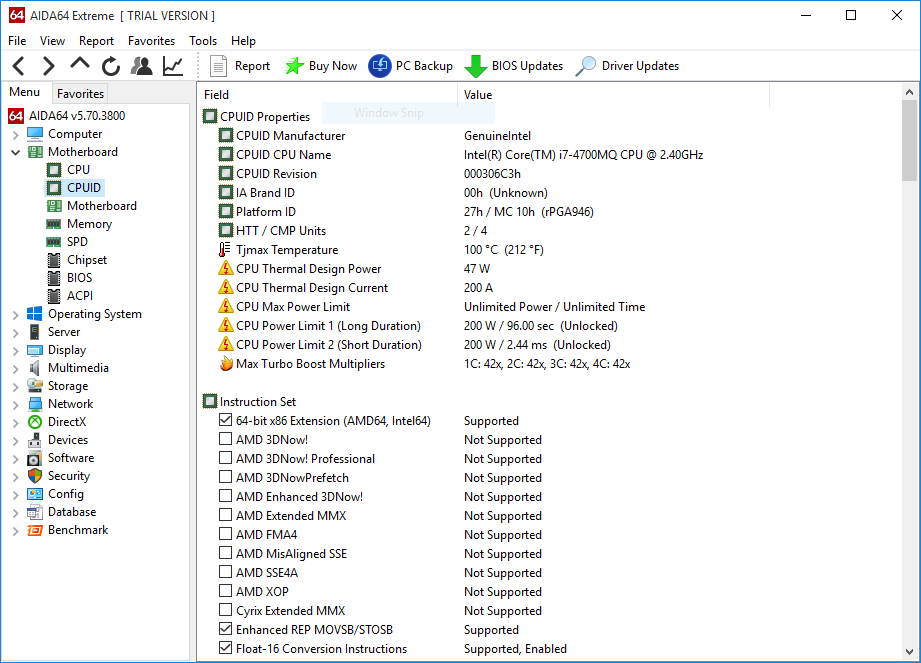
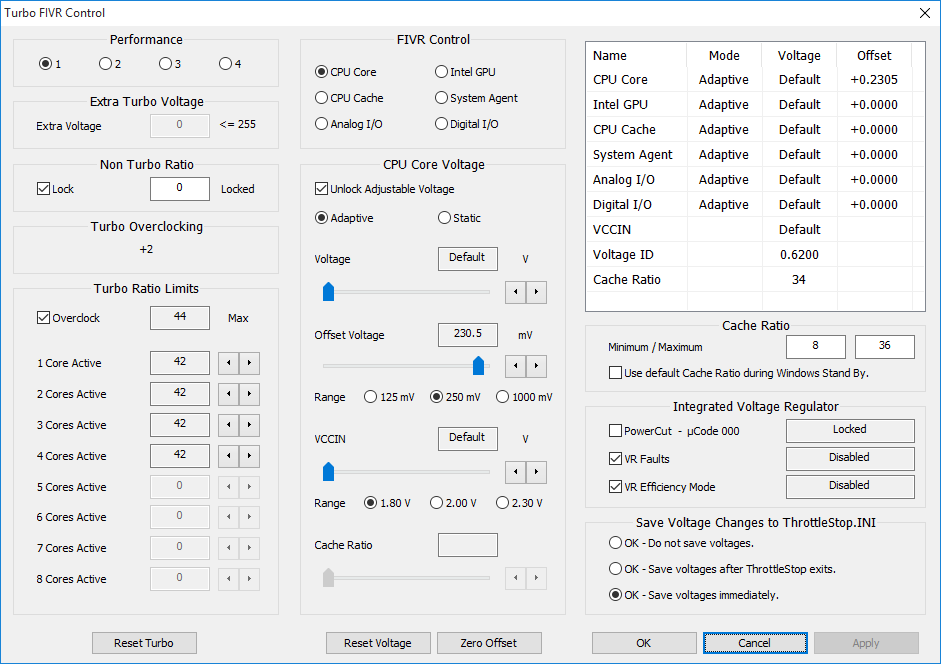
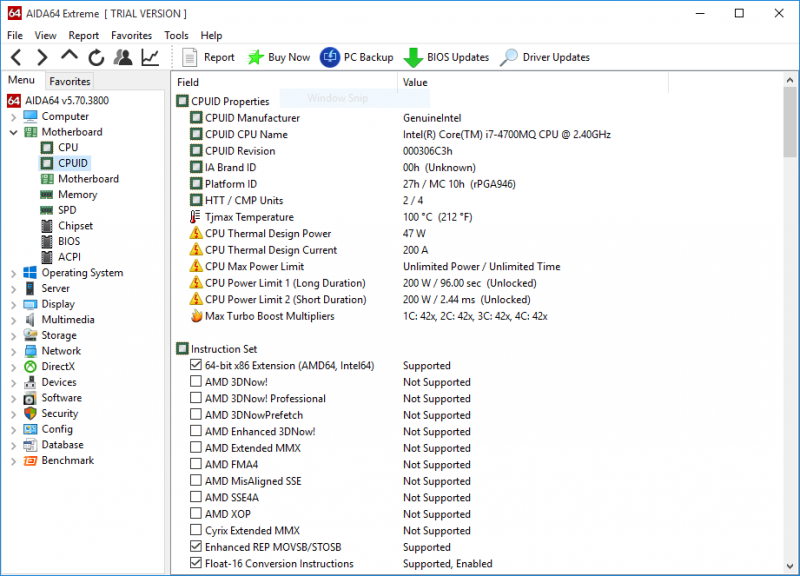
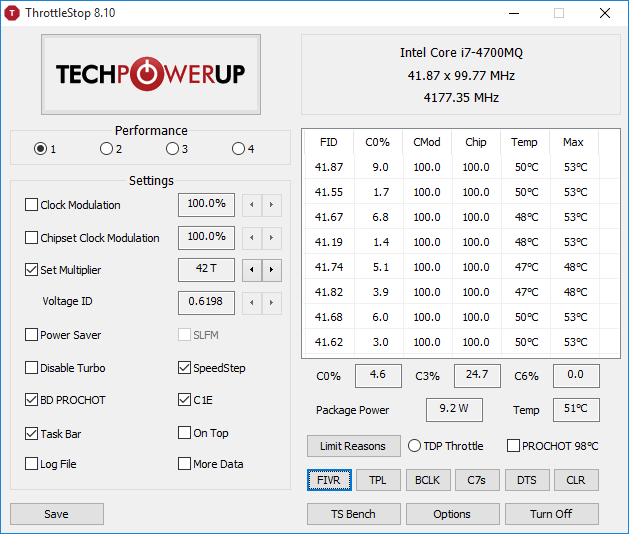
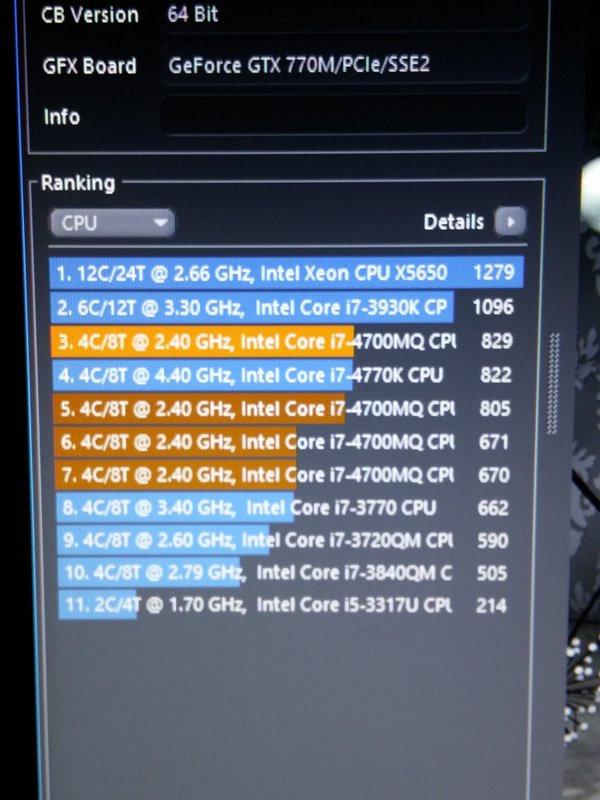
 Hi all, After I saw this result: http://hwbot.org/submission/2830783_0.0_cpu_frequency_core_i7_4700mq_4550_mhz , I got interested to replicate it with a similar method and decided to share my steps to score higher than a desktop 4.4ghz 4770k (according to cinebench ;)) Intel Stock microcode has a Turbo multiplier bin glitch that allows unlimited multiplier increase, I used prema's bios and removed a cpu microcode update to let the cpu run the stock glitched microcode. I will share the bios file, use it at your own responsibility and if you know what you are doing. 1) Download or dump your BIOS, if your bios is ami (my case) then use AFUWINx64 2) Get AMI Aptio UEFI MMTool v5.0.0.7 and UEFITool, HxD (or your fav hex editor) 3) Open your BIOS image with UEFITool, then File>Search, in our case Haswell has the following ID: , enter C3 06 03 in Hex pattern dialog click OK 4) You can see the last four Hex pattern result, double click the first result and a structure item in the main dialog will be highlighted, right click>Extract as-is to a folder (be sure to be neat and organized or you will mess things up) 5) Do the same with the third result and save it as a diff name other than the first one 6) Now in the folder you have saved the 2 files from step 4&5, open the first one with HxD(any hex editor) and look for be sure to choose Datatype:Hex-values then hit search 7) Press F3 to find again till you reach this pattern(highlighted): 8) (1) Indicates the microcode version, 17 in this case, we want 00 (cpu stock), (2) the platform ID (the search context we reached at) (3) the microcode length = 5000 (in my case) in reverse (important to know when the microcode ends in order to remove). 9) Adjust the cursor on the beginning of the highlight text/microcode (01) right click>Select Block>Length>5000 or whatever in your case 10) Delete the highlighted blocks (after step 9) then save the file 11) Do the same with the second result from step 3 to 10 then save 12) go back to UEFITool, double click the first result like you did in step 4, right click the highlighted structure in the main dialogue > Replace as-is then choose the FIRST file you edited in HxD 13) Double click the third result and follow step 12 with the SECOND file you edited in HxD 14) You will see "Rebuild" in action row, File>Save image as> P15SM04.PM2 in my case (can be any name as long as your flashing tool recognize it) 15) Open AMI Aptio MMTool > Load Image > your modified rom > CPU Patch Tab and verify there is no 06C3 in CPU ID 16) Be brave and flash your BIOS Windows Mod to remove auto update microcode on boot: Click on Start Type CMD in the Search box Right-click on CMD and choose Run as Administrator In the Command Prompt window and change to the directory where the file is located. To do this, use the CD command. You can follow the example below. to change to the Windows\System32 directory you would enter the following command and Press Enter cd \windows\system32 Now use the DEL command to delete the offending file. Type DEL mcupdate_GenuineIntel (and backup) Done! Overclocking: 1) Check CPU MCID:Download AIDA64 , open AIDA64>Motherboard>CPUID and look at IA Brand ID, it should be 00h 2) Download the latest beta Throttlestop (not stable) in my case 810b2 3) Make sure you don't have XTU installed or running (especially at startup) or it will reset any changes in Throttlestop 4) Open throttlestop, click FIVR and look at "[checkbox] Overclock [DIALOG] Max" and note it down 5) Now here is the magic! close FIVR and open it again, [DIALOG] Max value should increase by 2 (up to 80x max ~ 8ghz) everytime you open and close FIVR aslong as long as you increase one of the cores, LOL 6) Increase "Set multiplier" to maximum after your final changes in FVIR (Iv set mine to 42x all cores, so I increased set multiplier to 42 aswell - note voltage ID is messed up ignore it) 7) Increase voltage in FVIR for stability by using cinebench run 3 times instead of prime95, as it stresses FPU which increases heat and tdp instead... 8) Unlock maximum TDP and turbo wattage in TPL, in my case: 9) Done! Changes should be persistent as long as you dont save and exit from BIOS, here is my result in Cinebench with temp throttling (from 4.3 to 3.9 ghz), room temp 25-27 XD: (no.1 at 4.2ghz, no.7 stock latest microcode) UPDATE: OCed RAM from 1600 to 1866, [email protected], +200mV adaptive vcore: I'm also getting 852 with 4.5ghz with this adaptive voltage-like method: Note: You can maintain maximum turbo multiplier bin with latest microcode after setting it in throttlestop (imp: no crash when testing; make sure its stable) then flash the latest microcode for bug fixes (more stable on my side at x45 with only +230mv, depends on your CPU, i7-4800+ will require less voltage), and you will still be able to set the bin high (up to 80x) as long as you don't crash... Post your results and I'll copy it here. Tips: I highly recommend lapping heatsink and use liquid metal thermal paste or any decent tp ( I used collaboratory liquid ultra) before doing this -If your cpu throttles no matter what, try decreasing dynamic voltage in FVIR and look at maximum value the package power indicate while stressing, decrease the value by 10% in order to avoid rapid throttling (happens with bad TP) -Do not attempt the OC if you are looking after long service life wear&tear (I expect 2 years from now if I stress the cpu everyday for an hour, which i never do :P) Happy overclocking, and don't melt your laptop Thanks to Intel if they leaked this on purpose, kinda futureproofed my machine XD P150SM 1.03.05 modded bios (at your own risk): MOD EDIT: link removed, please use a clean BIOS base because of legal implications with Intel :
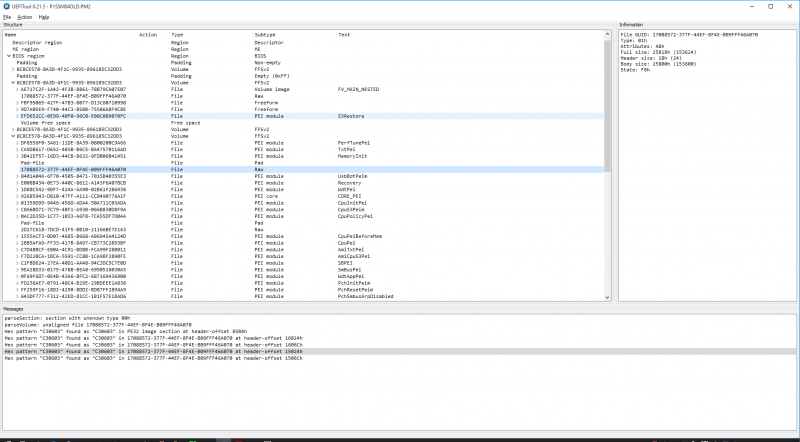


-
Hello Everyone. This is my first post, I'm not really that well educated in the world of laptops, so please go easy, I might need a bit of hand holding here. my laptop is the GT70-0nc, its the barebones MS-1762 I believe, I bought it from a custom laptop builder online. The 675m is fried I think, BSOD all over the place, disabling it and switching to my HD4000 integrated fixed the BSOD. I'm looking into upgrading the GPU of my laptop except there's some things that have me completely baffled... 1. Which GPU's are actually compatible? - I was looking at the 680m but if there are newer gpu's that work I'd love consider those too. 2. I have read a lot about flashing my BIOS, this really confused me. I get the American Megatrends Logo on boot up, so I tried checking out their BIOS but everything i've read says use the MSI VBios? I have a good bit of experience with the hardware in my laptop, I've taken it apart quite a few times like to change thermal paste / general maintinence and upgrade my WIFI card. it's the software and compatibility issues that are really getting me stuck. Any help would be massively appreciated! Thanks
-
So I have this interesting problem involving my laptop, Logitech USB wireless mouse and ASUS USB wifi stick. On my Lenovo Y500, I have 3 USB ports. One on the right side and two on the left. My internet will only work at a high quality if the wifi stick inserted into the right port. Otherwise the internet is slow and clunky. The mouse works fine in the left. However, if I play a game on Steam, my mouse will sometimes skip and freeze when it's plugged into a left port. So I have to switch the mouse and wifi stick so that the mouse is on the right side and the wifi is on the left. When I'm in the game they will then both work fine, including for internet gaming. But browsing websites in this state makes it slow as per usual with the wifi stick being on the left side. I know that was a lot to take in. May take more then one read to make sense. Any idea what's going on? It seems bizarre that these things happen, and is quite inconvenient. Thanks.
-
I have tried the following and my laptop still shuts off randomly when playing games: 1. I have already cleaned the fans and parts from dust 2. I have already put brand new Thermal Grease (I followed the recommend amount found on this picture) THINGS I NOTICED: 1. In Safe mode, my laptop does not shutdown randomly 2. My BIOS VERSION : 04.06.05 3. My Core Temps (After Long Use) 4. Hot Air blowing out of the back exhaust[on the right side] after few minutes of start up (idle) SHOULD I UPDATE THE BIOS to this: http://forum.techinferno.com/asus-gaming-notebook-forum/2538-%5Bg75vw%5D-modified-bios-vbios-higher-overclocking.html WILL THIS FIX THE PROBLEM?
-
I've heard a lot of bad things about Alienware and keep hearing Origin is the best. I don't care about the design. Even if it looks like an 80s computer, as long as I can run my Skyrim, BF4, and GTA V on the max settings even after dropping it on concrete or leaving it on and charged for days at a time. I want power and quality. What do you think?
-
...Hi all. I felt i must post this info. Today i installed windows 10 preview again here on my P370SM. 680M sli.I wanted to try out a driver that "Cyris" posted on a guru 3d forum. (349.72) here is the forum : windows 10 directx driver 349.65 windows update - Page 3 - Guru3D.com Forums . here is the driver i downloaded : 349.65-desktop-win10-64bit-international-beta . It worked ok. When i came to set the nvidia control panel to my preferred settings there was the option for "DSR" I tried it and it seemed to work.I have not used DSR before but i defiantly felt that it was working. BTW i had to add my gpu hardware id the "nv_dispiwu.inf" file. Cheers! : )
-
Hello Everyone, Can anyone tell me if there are any differences or improvements other than the increase to a 17" form factor that this computer has over the NP8651 / Clevo P650SE? On lpc-digital the price difference is only $30, so I didn't know if there were any NP8671 owners out there that could comment.
-
Hello, I have got a Clevo P150 laptop and I was wondering about how big the power supply is. The Clevo's 180W transformers are much more than twice as large as small 90W power supplies. So I asked my self: Isn't it possible to switch two 90W power supplies in parallel to get a small 180W power supply? So I did some research and found at last two 90W power supplies, that are small enough to put two of each in a laptop's DVD-mediabay. Those of you who can speak/read German, may read the detailed project description on my homepage: mitjastachowiak.de?projects/netzteil Maybe it is possible, that I can build a prototype during my bachelor-thesis. But before, I'd like to know, if I am the only one, who would like to have such a power supply or if it sold. The aim is, that if you are on the way and don't need your DVD-drive, you can just remove it and put the power supply into your laptop. So you just need to take one small cable with you to quickly connect to the grid, if a socked-outlet is near. So what is your opinion? Would you buy such a power supply? And if yes, for which price? I'm glad to read a lot of critiques
-
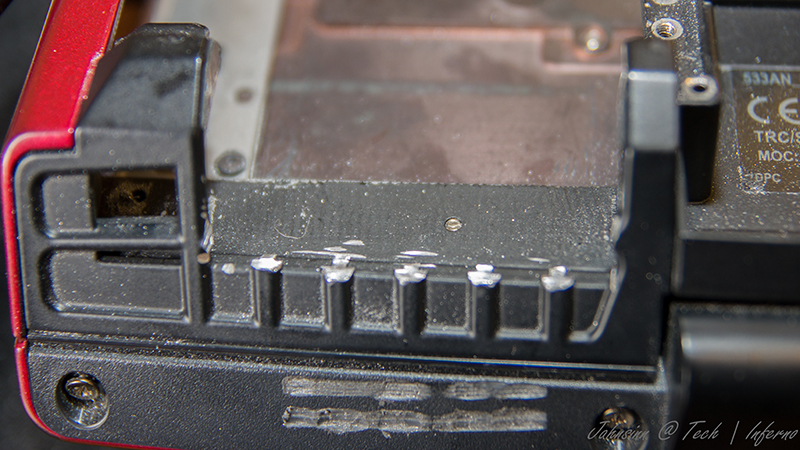
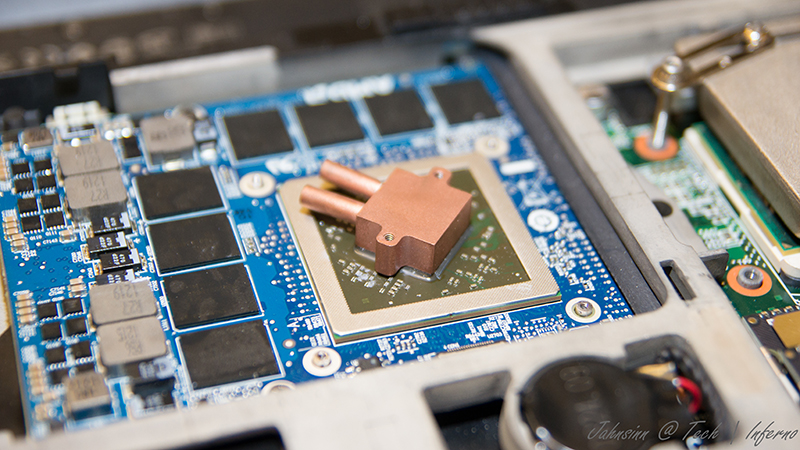
 So yeah, hello, this is my first post here. Well, the point is I've run into some issue. Today I decided to flash the vBIOS of my MSI laptop (GTX 780M). Apparently, it was successful but now for some reason, the computer isn't detecting my card. In short, I believe the pictures will describe it better. Just see below: So should I like revert back to stock or is there something else that needs to be done? Also I still have the NVIDIA drivers but they're not being recognized at all. Any help will be appreciated. Thanks.
-
I work at Best Buy in the Computer and Tablets department and the general consensus between me and my co workers is that Acer has terrible build quality and is highly unreliable. However I would love to hear people who have actually owned Acers and that had the opposite to what I previously stated as I'm just looking for a budget laptop for my Dad.
-
 I am dabbling in overclocking, and I am reaching the maximum of what my 180w Power brick can provide. My internal components are i7-3720, GTX 680M, Samsung 840EVO, 750GB Momentus HDD I have searched, and cannot seem to find any power bricks above 180w. So, I am curious in regards to the possibility of splicing a higher wattage (220w?) PSU to the plug of my current 180w, 1) if this is even feasible, and 2) If this is a terrible idea than could cause damage to my laptop. Additionally, I would be greatly appreciative if anybody knows about a source for power supplies that run in the range of 220+ watts, and would be willing to share the aforementioned source with me. _________________________________________________________________________________________________ Additionally, if anybody has done any aftermarket modifications to their GT70 to improve cooling performance, or any laptop for that matter, I would love to see, as I am hoping to do something of the sort to my laptop as well. Any and all help would be greatly appreciated. -Emma
 -
I am dabbling in overclocking, and I am reaching the maximum of what my 180w Power brick can provide. My internal components are i7-3720, GTX 680M, Samsung 840EVO, 750GB Momentus HDD I have searched, and cannot seem to find any power bricks above 180w. So, I am curious in regards to the possibility of splicing a higher wattage (220w?) PSU to the plug of my current 180w, 1) if this is even feasible, and 2) If this is a terrible idea than could cause damage to my laptop. Additionally, I would be greatly appreciative if anybody knows about a source for power supplies that run in the range of 220+ watts, and would be willing to share the aforementioned source with me. _________________________________________________________________________________________________ Additionally, if anybody has done any aftermarket modifications to their GT70 to improve cooling performance, or any laptop for that matter, I would love to see, as I am hoping to do something of the sort to my laptop as well. Any and all help would be greatly appreciated. -Emma
-
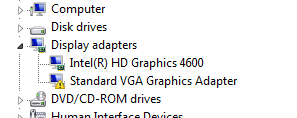
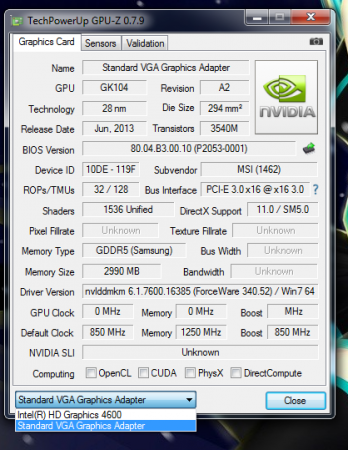
 So hello everyone, this is my first post and I've just been wondering why my laptop computer (MSI GT70 Dragon Edition 2) isn't detecting this card as being installed or is it? However, I did go to NVIDIA Control Panel and set the "Preferred graphics processor" to NVIDIA high-performance processor (or something like that). I also chose maximum performance in one of the options. I then tried to run COD4 with max settings @1080p w/ 4xAA and without V-Sync I was getting 110-140 frames. So I guess the card is functioning fine? EDIT: Nevermind. dxdiag can't detect video cards that use Nvidia Optimus technology. It's all sorted!
 -
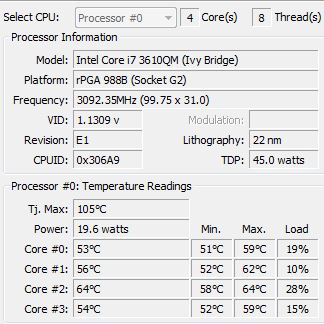
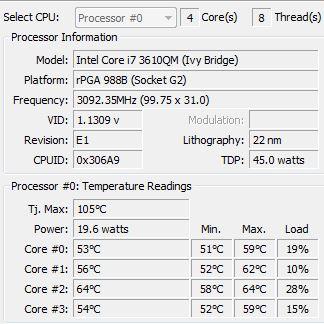
Hey everyone! I have the MSI GT60 with the i7-3610QM and GTX 680m, this being my first gaming laptop. I have been very satisfied with my purchase, though one issue has always been bothering me over the past year and that is the cooling of this laptop. The temperatures of my CPU has been well within acceptable range, but during longer periods of play (for example Alan Wake, Batman AC etc..) the temps got as high as 92 degrees (with stock clocks). After some modifications such as repasting, backplate mod and a cooler the GPU temps are back within normal range. To any fellow MSI owners, what are your stock temps, overclocked temps and if you did any cooling mods to achieve a higher overclock while maintaining a reasonable temperature range. I'm not sure if my experience mirrors that of other MSI laptop owners, but what is your cooling efficiency? Looking forward to hearing from you guys and as corny as this sounds... Keep it cool
-
I was unsure of which section to post this on, but I think this is where it might get the most visibility so here it goes. I really need help with this. http://www.dailymotion.com/video/x15dhnr_laptop-problems_tech" target="_blank">Laptop Problems by http://www.dailymotion.com/jfp555" target="_blank">jfp555 If it does not embed properly, here is the link: Laptop Problems - Video Dailymotion Is there a solution to this problem? The laptop seems to be working just fine and boots into windows and I can even make out the display, use the mouse, shutdown, but obviously it is unusable. Specs are: C2D T5850 4 gb ram 8600m GT Win 7 The fault seems to be hardware based. not software. Much thanks in advance.
-
Hi guys, i had this problem since 1 year more or less, someone know how to help me to cease the vibration of the fan when spin faster on my laptop ? i tried 3 fans and always was the same, i checked the 3 screws that holds the fan and are fine. Alienware said to me " you could try to isolate the fans with a piece of rubber. It could be a damaged screw not holding the fans in place " but don't know how is the best way to isolate the fan. When the fan spin slow i don't feel anything under my left side of the keyboard, but when goes at high speeds yeah i can feel it pretty much. Thanks again always for your help.
-
I am using msi afterburner to overclock the 675mx on my ibuypower cz-17 (i am pretty sure it uses the same hardware as msi) When i do so GPU-z Gives me weird results. The results that i am getting seem like the core clock is stuck at 653mghz when it should be 800mghz. The is room in the gpu-z graph to go up when overclocking is enabled. i tried all the power save options to max performance. I also tried to lock voltage. No good. I cant flash a vbios because i cant find one (other then the one on this site that i cannot download ) if anyone has a suggestion or a link to a download for the 4gb 675mx bios let me know.
-
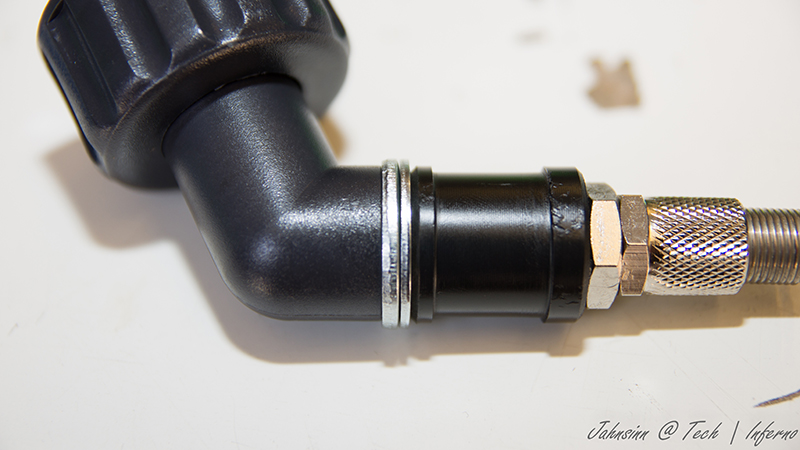
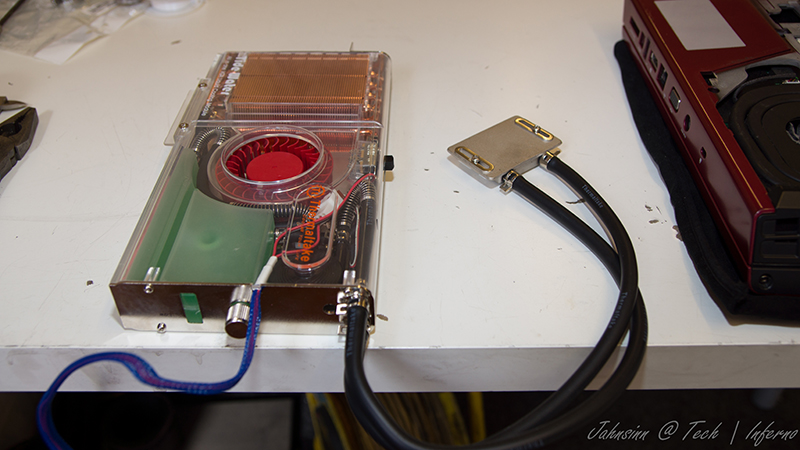
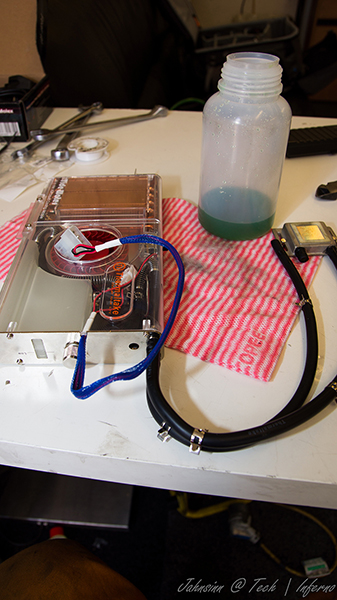
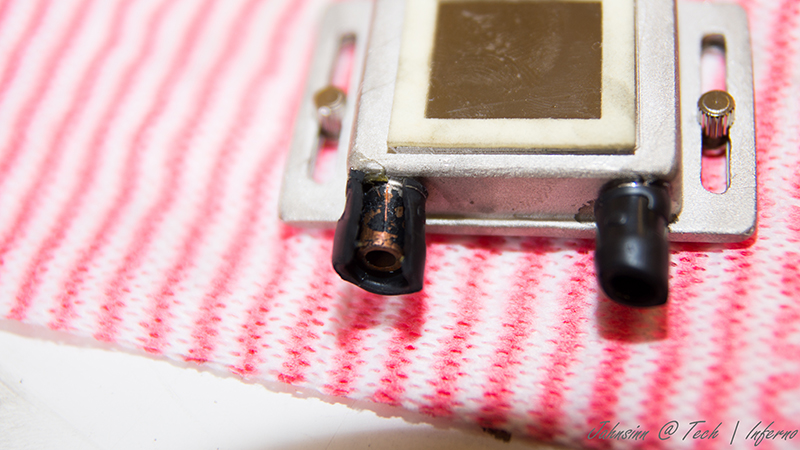
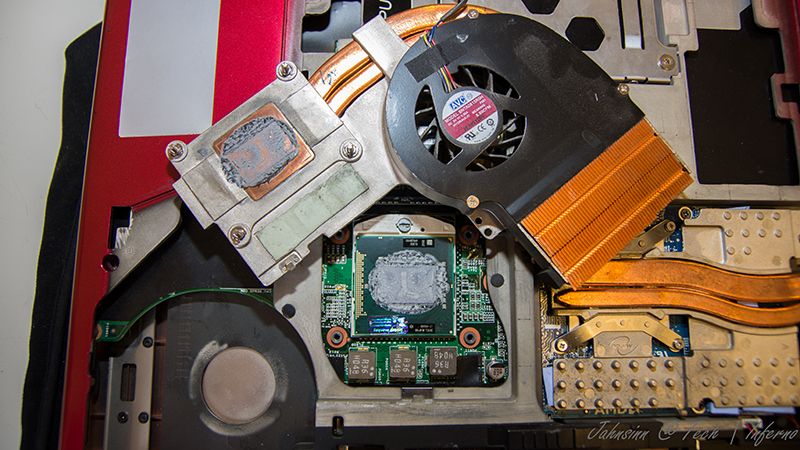
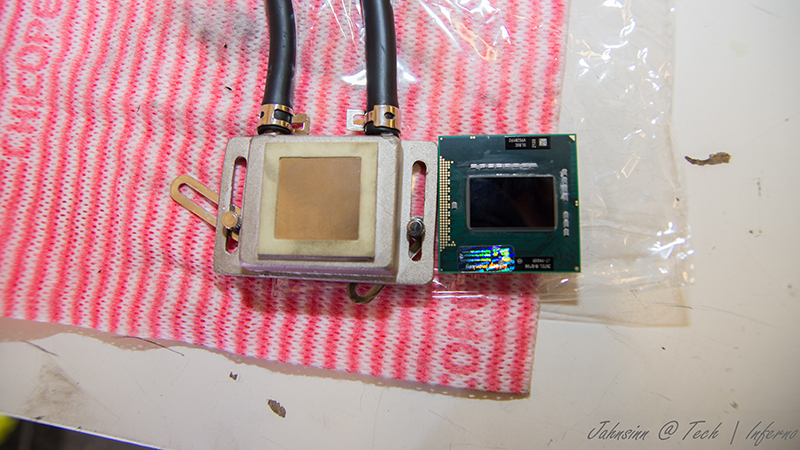
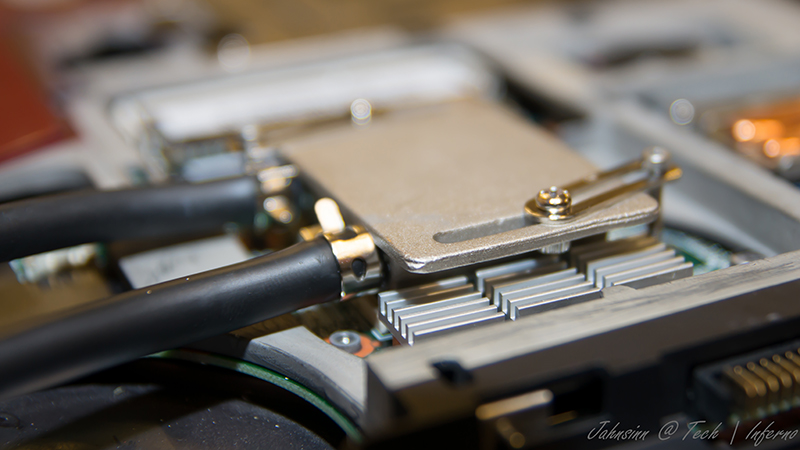
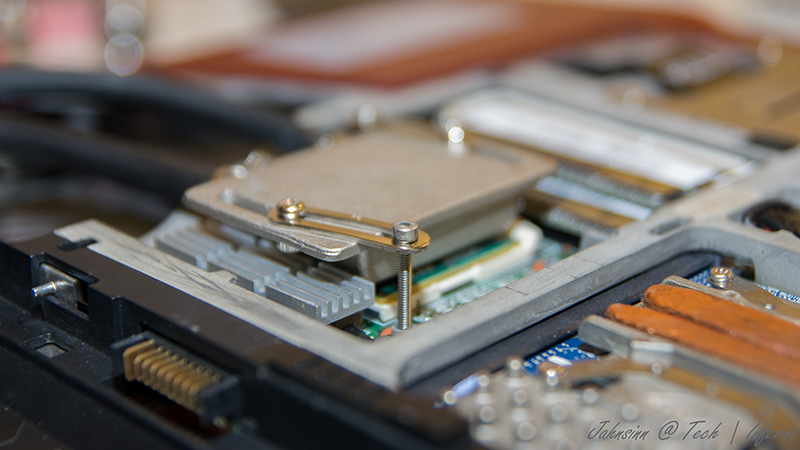
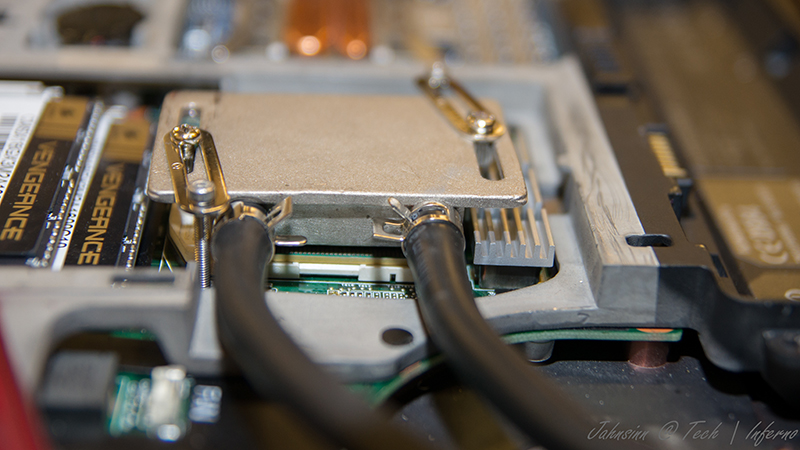
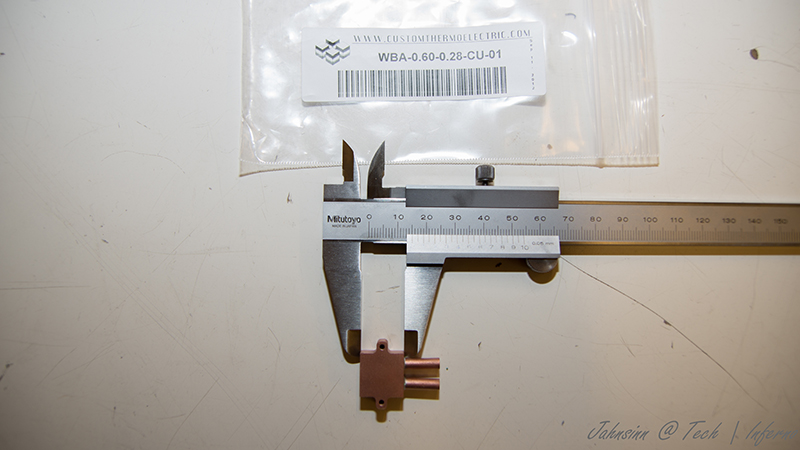
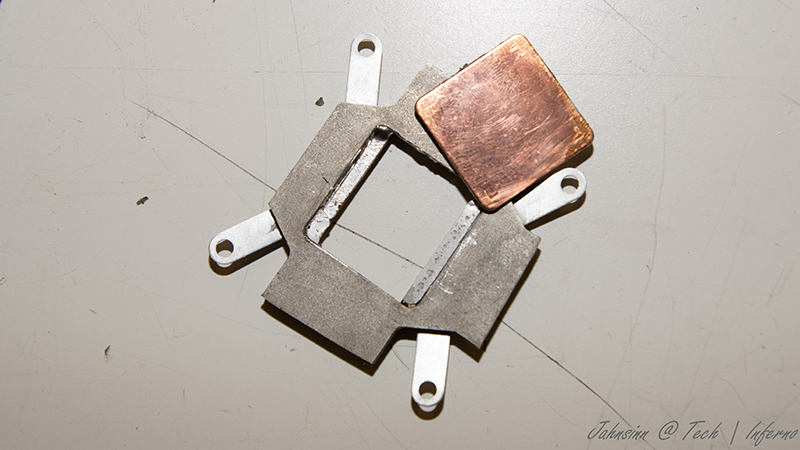
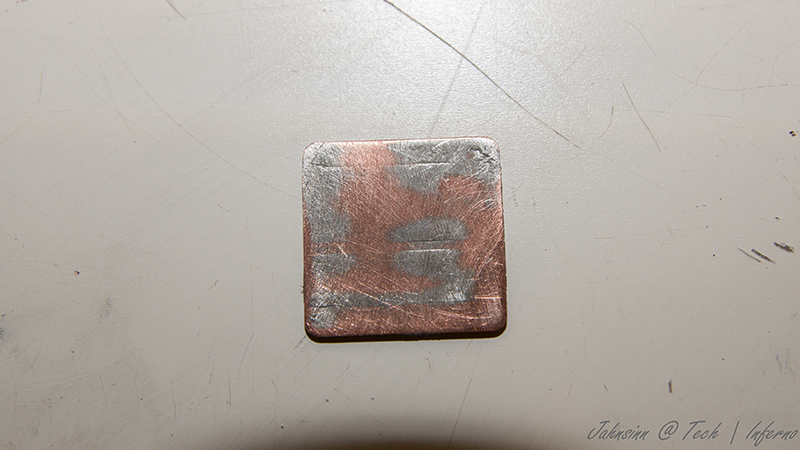
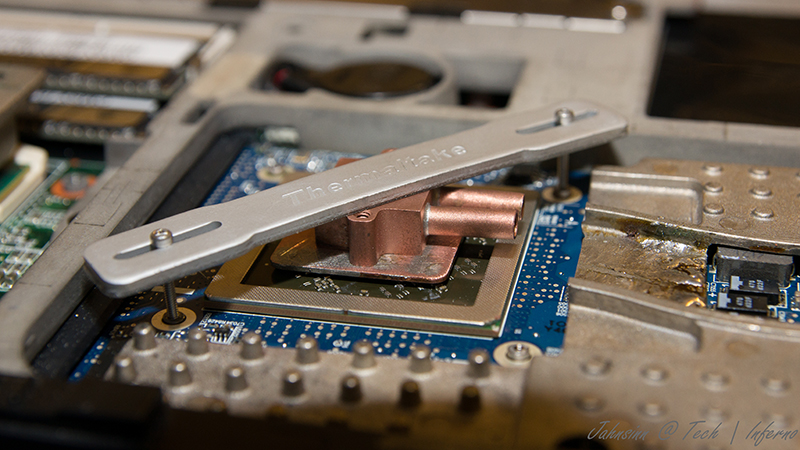
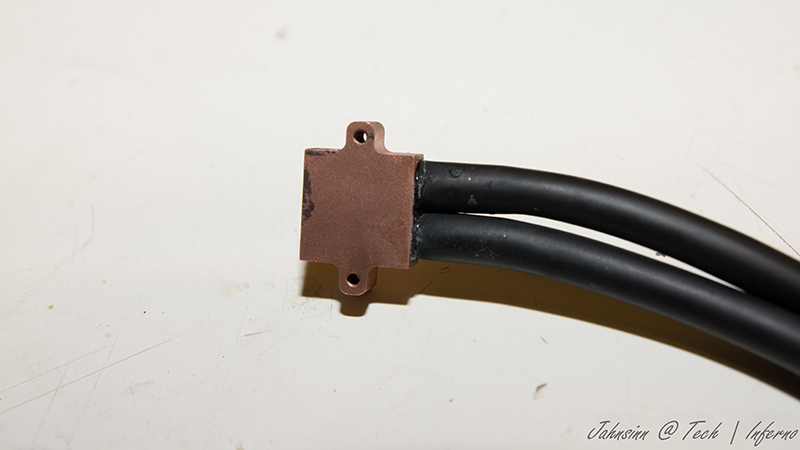
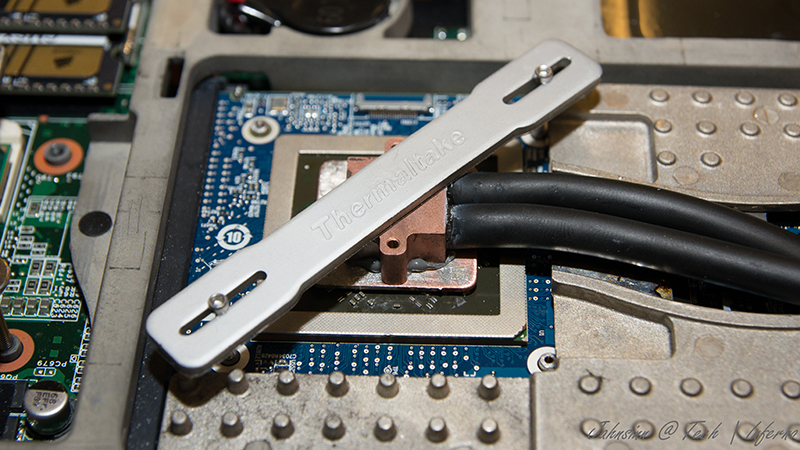
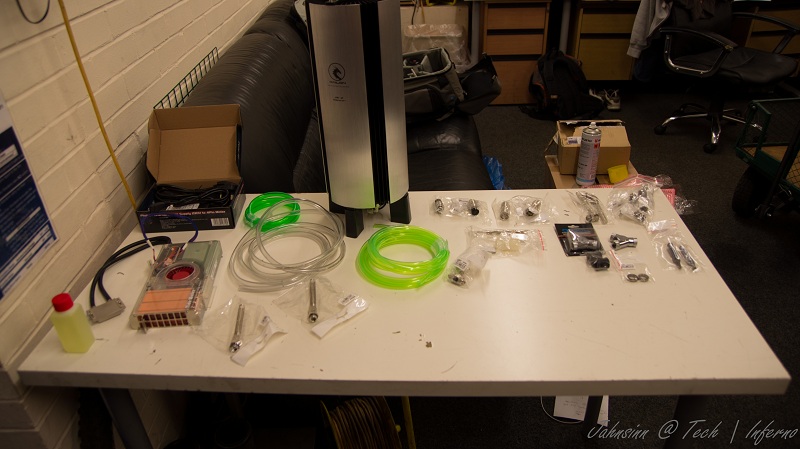
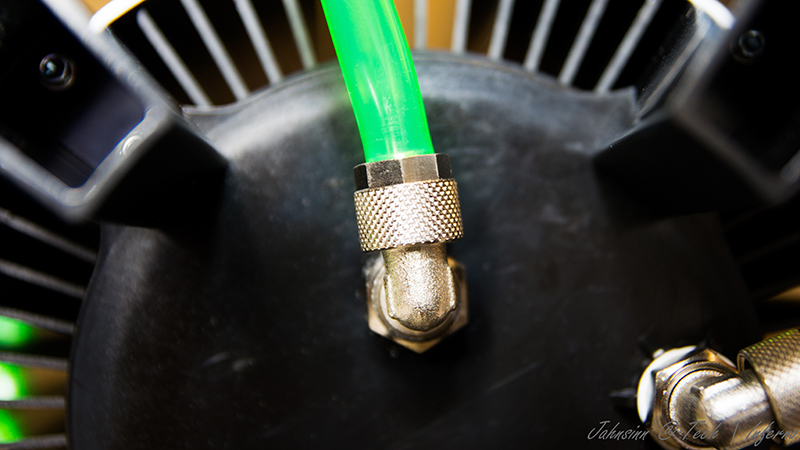
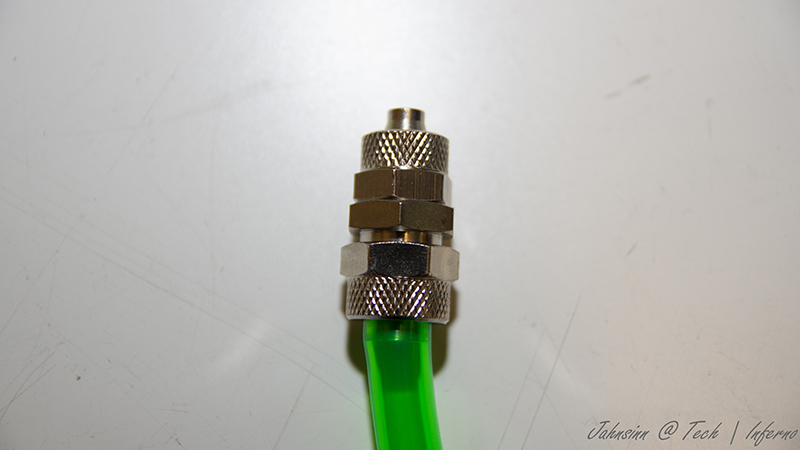
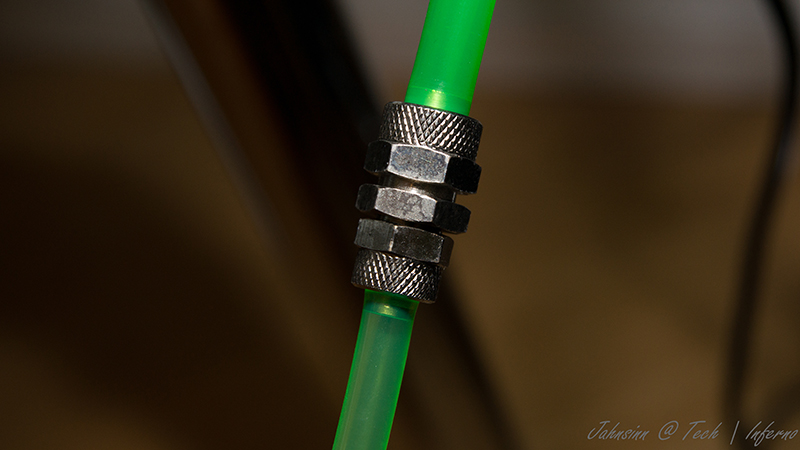
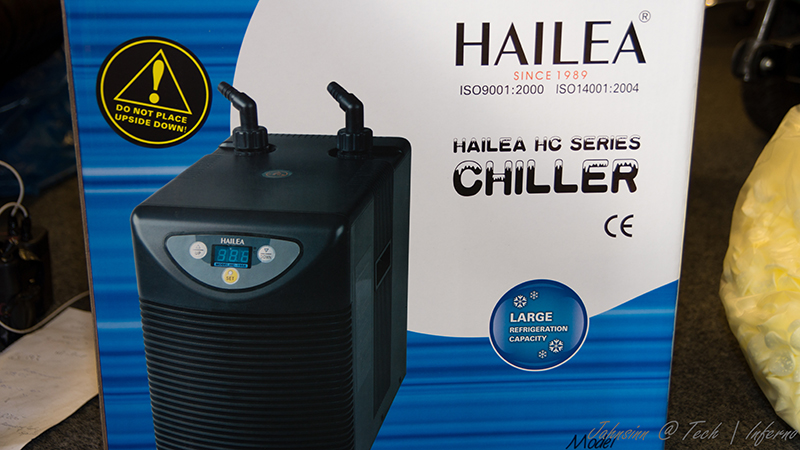
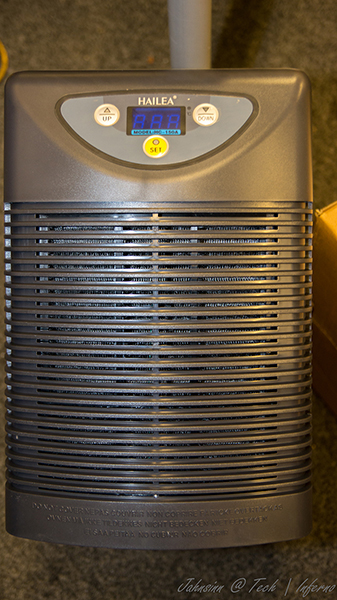
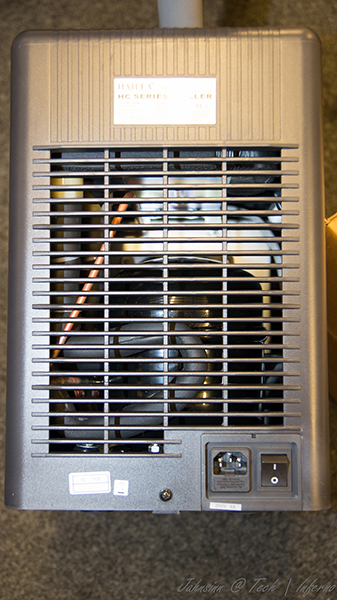
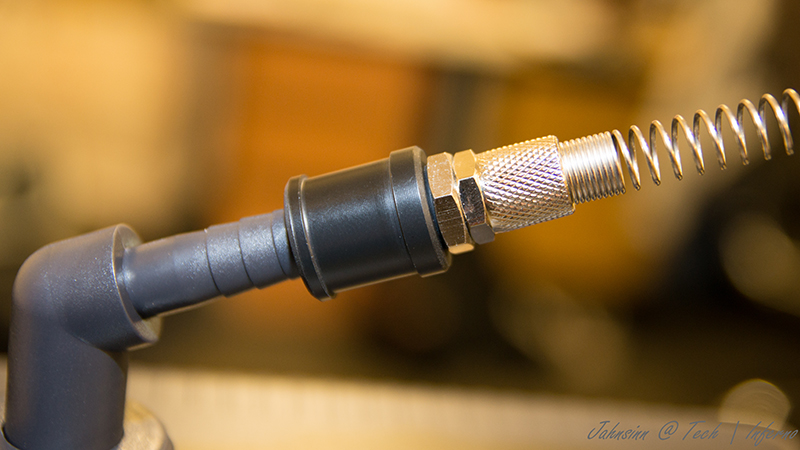
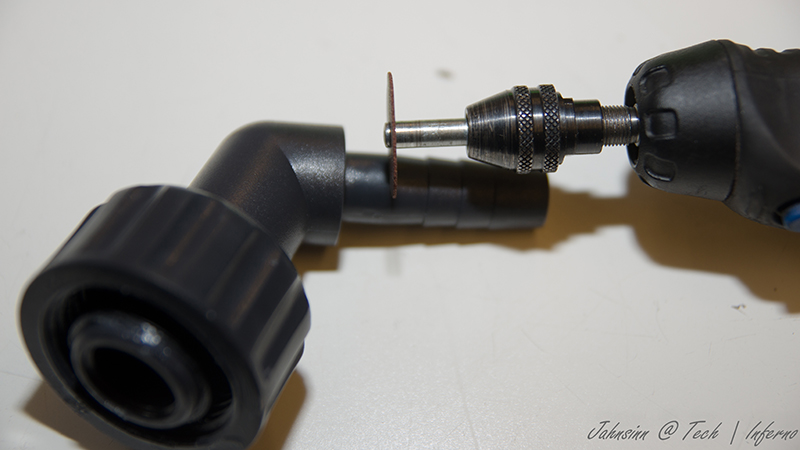
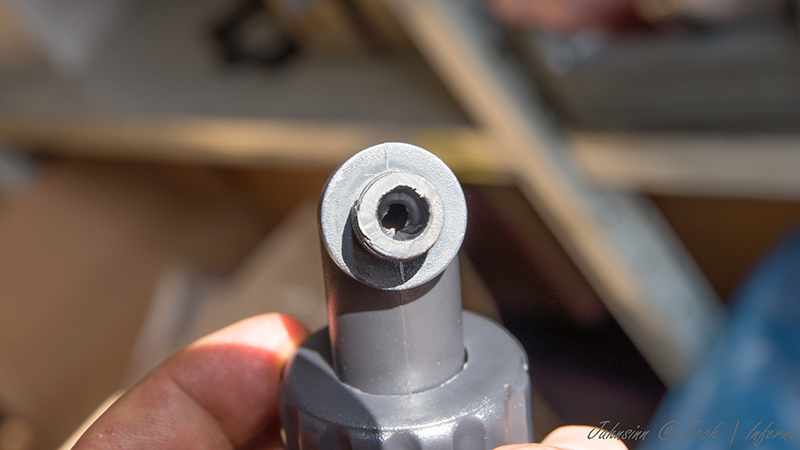
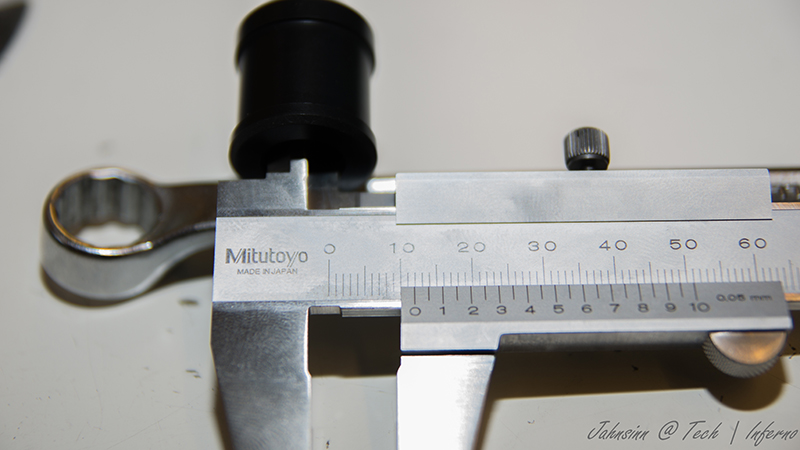
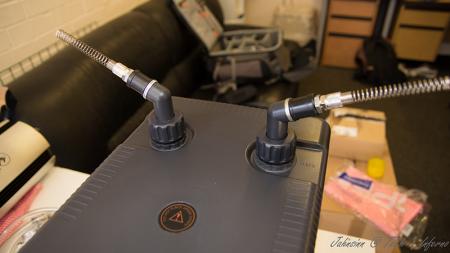
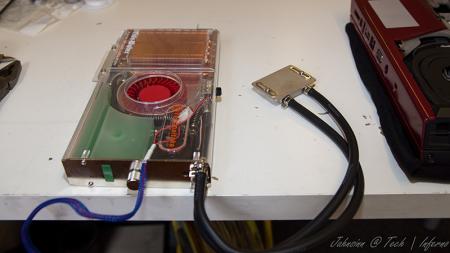
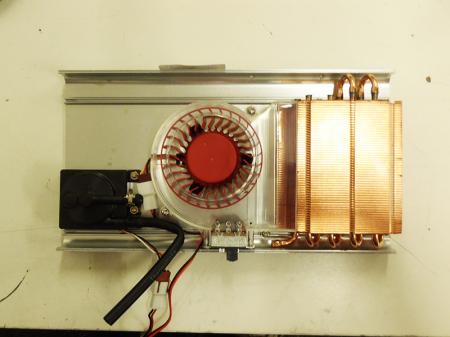
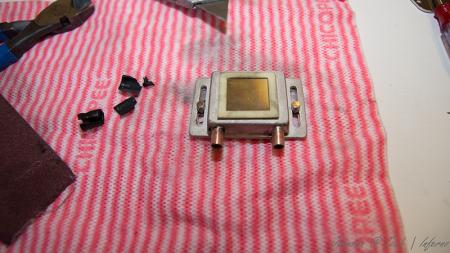
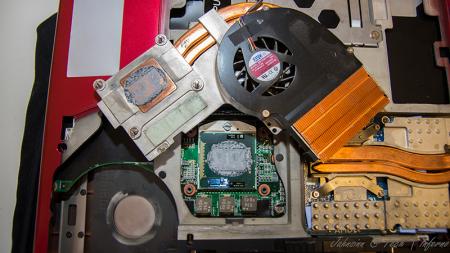
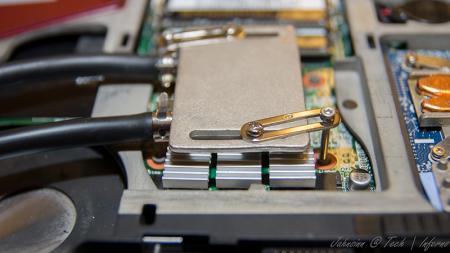
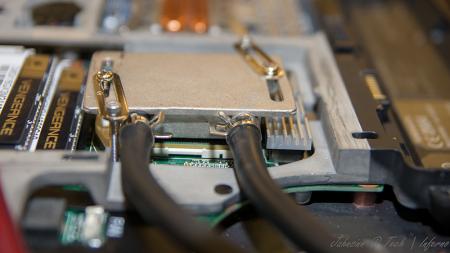
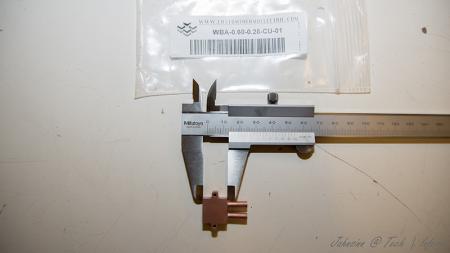
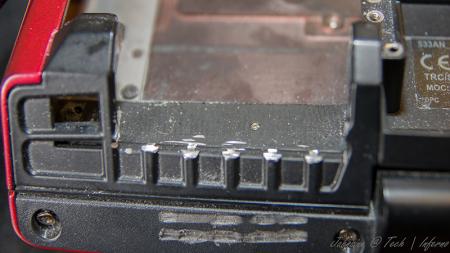
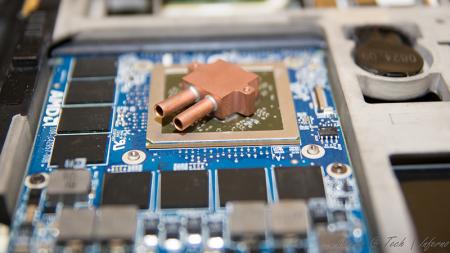
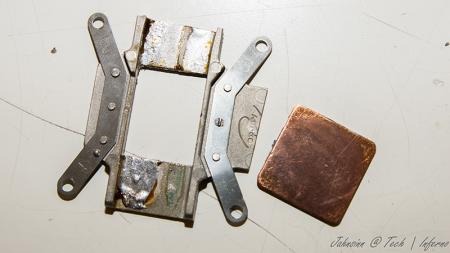
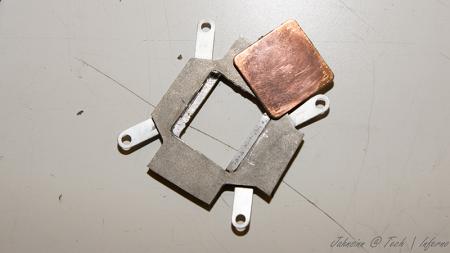
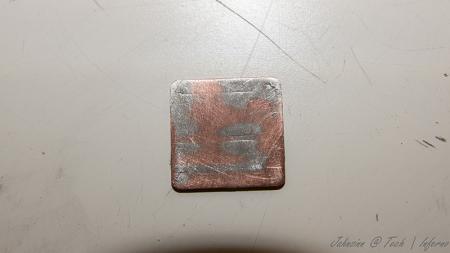
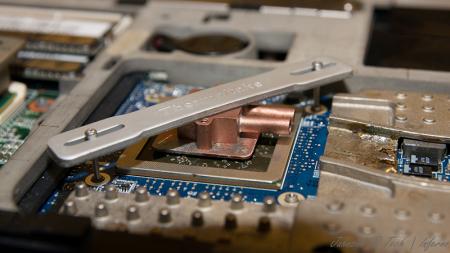
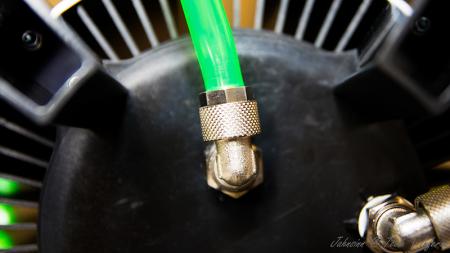
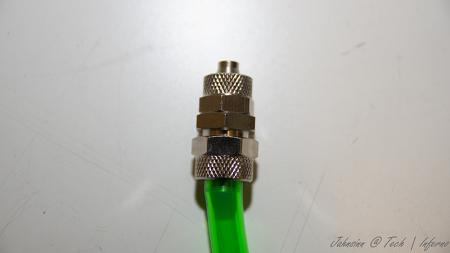
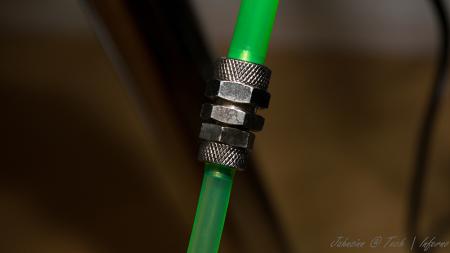
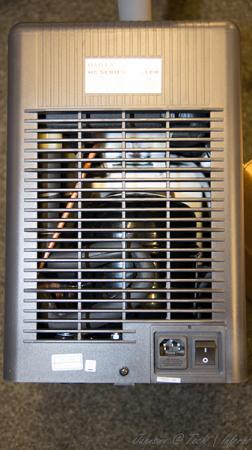
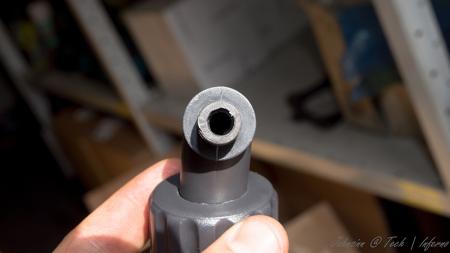
First of all, let me say I haven't finished yet. I'm still working on it and will update this thread from time to time due to much work at the moment. When I fitted my 940xm and the 7970m I got really mad of the heat and the fan noises even in idle mode. So I decided to get it all cooled with a silent, most important quiet, external water cooling system. I checked the internet and found evth I need to get it done. The most difficult thing was to find slim water blocks to cover the dies. I will list all the parts I used with article number and website if you're interested at the end of this post. First the overview. These parts are going to be used: Actually not much, so let's start. I start tubing at the inner hose socket of the reserator. This is the place where the pump is placed behind. You have to use a 10/8mm hose. By this, 10mm means the outside diameter of the hose, 8mm means the inside diameter. This is very important to know by everything you do on water cooling systems due to different fittings, barbs or reducers. Fit the hose and tighten it well with a spanner. Now you need a reducer to get on a 8/6mm hose. This is necessary to get in fitted to the chiller. At the other end you need to fit the 8/6mm hose. After this is done the 8/6mm hose leads into the chiller. A chiller pushs down your temps to a predefined value set by you, the minimum you can get theoretically is +3°C. Basically you can say it works like a refrigerator. This is very helpfully when you start gaming or other intense work on the laptop to keep the temps low. Here are some pics of it. To get the hose fitted the first custom made had to be done. Maybe I didn't know how it actually works, but I had no clue how else to do it without a modification... As you can see on the picture, the 1/4" adapter didn't fit to the chiller's nozzle. I really don't know what's the original idea by the developers. So the first adjustment had to be made. Cut the end of the nozzle as you can see on the pic. When this was done I noticed really pour casting quality inside the nozzle. This would massively reduce your flow speed. So I used a drill to get it out. Finally I got an outside diameter of 13mm at the nozzle. The adapter has 12mm inside diameter So just perfect to cut a M14 thread to both parts. Unfortunately I couldn't get closer due to the layout of the die. two washers solve this problem to get it proper tightened. To get it proper sealed I used teflon tape. Just the best way to get something sealed. Don't do it without any sealing! Use some Vaseline before you stick in the nozzles. Do the same with second side of course. At the end it'll look like that. Let's get to the CPU water block. I purchased the Thermaltake CL-W0052 Tide Water, originally made for desktop PCs to cool down the graphics card, on ebay to get all the stuff I'll need to do it. I chose that one because the water block has just a height of 8mm. Also all the hoses and clamps will be helpful. First drain the coolant. Then I opened the chassis and robbed all hoses and clamps. You'll need them in a couple of minutes. They're all bonded quite well, so just cut them at the ends. I also cut and removed the hoses of the water block itself, just to make sure everything is okay. I didn't want to get upset when I filled the system with water. So I cut them and removed the old adhesive. I then removed the original cpu heatsink and compared the die with the water block The water block as it was out from the box was just a touch too small to fit correctly onto the die. So I just removed the tape around the block. Now it was ready to get fitted. All I needed to do was loosing the existing bolts on the water block and tightened it with M2.5x20 hex nut bolts into the existing holes. At the end it looks like that. By the way, the mosfet heatsinks came with the tide water vga cooler. I also fitted the black hoses as they were, just without the glew and it still seals perfectly. To get the hoses guided out of the laptop you need to remove your fan control at the back of your laptop. When you're doing this, be careful not to touch the chassis as I did with whatever you use. I used the dremel and didn't see it for a while. What a shame! Nevermind, so let's get over to the gpu side. I bought a very tiny water block with just 15x15x7mm dimensions to not to exceed the height. So may be later I will be able to fit the backplate cover again. The water blocks would actually fit on the die, perfectly. But due to the layout of the gpu die the block just fits in diagonal postion. So useless for me. To get the water block in the right direction I unsoldered the copper plate of the original heatsink. That one has got the right dimensions to get this solved. Clean the copper plate from the old tin on top by using the Dremel or sandpaper. At the end that's the way it should work. Just to mention, also the holder came with Thermaltake tide water cooler. The bolts I bought seperatly on ebay. They are M1.6x20 but too long, so I cut them down to 15mm. Now they fit into the existing holes and push down the block properly Use now the -->small<-- black hoses robbed from Thermaltake chassis. These are the inside hoses, they're smaller. You need to use some adhesive because the clamps coming with the hoses are just a way too big and don't keep it tight to nozzle. Now just add some thermal paste between copper plate and die, and copper plate and water block. Tighten it all down. Finally it looks like that. [ATTACH=CONFIG]5105[/ATTACH] hoses leaded through the fan grill, gpu side. I mention again, just temporarily cause I'm still waiting for parts. in progress... [ATTACH=CONFIG]5107[/ATTACH] [ATTACH=CONFIG]5106[/ATTACH] cpu side [ATTACH=CONFIG]5108[/ATTACH][ATTACH=CONFIG]5109[/ATTACH] The hose laying is actually just in common sense. Nothing particular I should mention. Reserator -> 10/8mm hose -> 10/8mm to 8/6mm reducer -> 1/4" compression fitting -> 1/4" adapter for chiller -> chiller nozzle -> chiller -> nozzle, adapter, fitting -> 8/6mm hose -> Y-splitter first end hose -> 8/6mm hose -> quick coupling -> black hose (termaltake tide water) -> cpu block inlet-> cpu outlet -> black hose -> quick coupling -> 8/6mm -> Y-splitter second end hose -> 8/6mm hose -> 6mm barb -> small black hose (thermaltake tide water) -> gpu block inlet -> gpu outlet -> small black hose -> 6mm barb -> 8/6mm hose -> Y-splitter | Y-splitter -> 8/6mm hose -> 10/8 to 8/6mm reducer -> reserator update in progress...


- 25 replies
-
- 15
-

-
Fraps video test with rage im posting cause when im looking for a laptop to purchase i really enjoy these to see where the laptop stands with current gaming http://www.youtube.com/watch?v=SWZ-WAY27CQ
-
One fine day I turned my m18x off and took it to a friend's house. When I got there and tried to boot it I noticed that it hanged on the alien face screen (with the red progress bar below, which loaded quite quickly), it gets stuck there for about 2 or 3 minutes before actually booting into something or even entering the BIOS. Started completely out of nowhere, any ideas? Thanks. EDIT: Additional info: 2820QM, 16gb Kingston Hyper-X, 6970 SLI, OCZ Vertex III 240gb plus 750gb sata
-
So yeah I am having a performance issue with my laptop. Every time I play games the fps is going "wild" it drops from 100 fps to 48 and does it the whole gaming time and I have done everything to fix it but none of them have worked for me and then one of your members suggested me to use a program called throttle stop 3.0 but I don't have no idea how to use it so help would appreciated and tips what's causing this trouble