Leaderboard


Popular Content
Showing content with the highest reputation on 10/02/12 in all areas
-
Instructions for flashing the VBIOS of a NVIDIA video card: You'll need: A VBIOS file you want to flash The latest version of NVflash, a DOS utility to flash the VBIOS of Nvidia cards. A USB drive, formatted to boot DOS, in order to use NVflash How to create a bootable USB flash drive: The flashing procedure: Put the NVflash files to the root of your prepared (DOS bootable) USB drive. Do the same with the Vbios you want to flash. NOTE: DOS has a limit of 8 characters per file name (not counting the extension). So make sure to rename your files appropriately before putting them on the USB drive. Make sure the USB drive is plugged into a port which is active at boot, reboot the system and go to the boot manager. Choose to boot from your prepared USB drive. As soon as you see the command line you're ready to go, write dir and hit enter to display all the files on the USB drive. Display all Nvidia adapters in the system: nvflash -a or alternatively the longer version of the command: nvflash --list This command will return you a list with all Nvidia adapters present in your system. Here's an example output of this command run on my M15x with a 680m in it: NVIDIA Firmware Update Utility (Version 5.117) NVIDIA display adapters present in system: <0> N13E-GTX (10DE,11A0,1028,02A2) H:--:NRM B:02,PCI,D:00,F:00 The number in the <> brackets is the index of the corresponding device. SLI users will have more than one entry and flash each card separately. Backup your current VBIOS: Never forget to keep a backup of your original VBIOS before you flash anything non-stock. Use this command to save a copy of the firmware to your USB drive: nvflash -b filename.rom or with nvflash --save filename.rom Flash the VBIOS to your card(s): For a single card it's really straight forward, you don't need to worry about the adapter indices. Just use this command: nvflash -6 vbiosname.rom -6 will allow you to override mismatches of the PCI subsystem ID. In case of a mismatch you'll need to confirm the flash with 'y'. NOTE: Users with a non-US keyboard might need to press 'z' or similar, because the 'y' isn't at the same location for all keyboard layouts. SLI users will need to flash each card separately. The concept stays the same, but you will need to use the corresponding adapter index to flash a card. How to figure out the adapter nr. is described above. Flashing goes like this: nvflash -i[index] -6 vbios.rom [index] represents a number, namely the index you found with the 'nvflash -a' command. So a command example to flash a card which has index 0 is: 'nvflash -i0 -6 vbios.rom' When the flashing starts, just wait until it says that it's done. Then reboot with Ctrl+Alt+Del and remove your USB drive. Pro tip: Let me know if I missed anything important or if you have questions.4 points
-
Update: Moral Hazard used MESET.EXE on his clevo to force a dump and flash, but did not gain BCLK control. Update 2: SUCCESS by kasar on a Dell xps 15 (L502X) here! Unfortunately he needed to disable the ME region lock by desoldering and flashing the BIOS chip though. Update 3: SUCCESS by me on Clevo P150EM here! Mod relied on Clevo-only program to unlock ME region. Update 4: SUCCESS by Rhadamanthis on MSI gt780 dxr Update 5: SUCCESS by Akimox on HP 2570p here! At the hardware level, all 6 and likely 7 series laptops support overclocking. The problem is OEMs disable this ability except on laptops like the m18x. Clock configuration is NOT controlled by the BIOS. It is controlled by the Intel ME FW (management engine firmware), a BIOS extension. Only a few bits must be changed from a overclocking disabled ME FW to make it an overclocking enabled ME FW. Gigabyte accidentally leaked an intel utility that can read the ME FW, edit it, and write the new version back to the flash ROM, along with all the necessary documentation to make the correct changes. This flash ROM contains not only the ME FW, but the BIOS, flash descriptor, and 2 other regions called the GbE and PDR. There is one problem, which is that all laptop manufacturers (except ASUS) disable read/write access to the flash ROM. The read/write locks are contained in the flash descriptor. The security settings in the flash descriptor can be ignored by setting a special flag on BIOS startup known as the flash descriptor override, which enables read/write access to all regions. This override is used when you run a BIOS update. At this time there are methods to enable the flash descriptor override for HP and Clevo systems only. After setting the override and rebooting you can dump your whole flash image, edit the ME FW, rebuild the image, and flash. It is possible to flash either the ME FW region only, or the whole image. Obviously flashing the whole image is risky since you will also be flashing your BIOS, so I suggest just flashing the ME region. 6 series are more tolerable of corrupting the ME FW than 7 series. 7 series cannot run without a functional ME FW. 6 series can run without one as long as the BIOS detects that the ME FW is corrupt, and thus refuses to run its settings, however, the laptop can sill be bricked anyway if the BIOS thinks the ME FW is functional while it really is not, and attempts to run the inoperable clocking settings. Some of you may be aware of fwupdlcl.exe which can update the ME FW without enabling the flash descriptor override. This does not work for our purposes since it does not perform a full flash. It does not overwrite the hardware config portion of the ME FW, which is where clock configuration is done. However, if someone could figure out what this program does to write its partial image, it may be possible to use that knowledge to flash a full image. So here's the Intel Utilities and docs: 6 series chipset Link removed since the leaked FITC builds invalid images. Use the ME8 FPT and documentation for now. 7 series chipset: http://www.mediafire.com/?iwscmnadf5icnxq (thanks to kasar) MESET.exe to unlock Clevos: http://www.mediafire.com/?465pknsgc2z83s8 ME_Port by svet to unlock MSIs: https://www.dropbox.com/s/spmvxmz9pal1j6l/ME_Port.com BE CAREFUL WHEN USING FPTW64! It will happily overwrite your BIOS without any warning if you enter the wrong command. Even if you do things properly, still be prepared to have a dead ME FW and whatever the consequences of that may be. Although it is unlikely, trying to enable overclocking through my suggestions can kill your motherboard. There are a few combinations of mistakes that can be made which will most certainly do so. You have been warned, so don't blame me if you do. Also if you do, do NOT go RMA your laptop and make your manufacturer pay for what you caused. You took the risk, so you pay for the necessary repairs even if under warranty. If things go wrong I will do everything I can to help you recover, but please accept responsibility for trying this. Ok now that all that is out of the way so people can't justifiably yell at me. Back to how to try this. 1. Enable your flash descriptor override. Clevo users can use MESET.exe. MSI users can use ME_Port. HP users can use the keyboard sequence "WIN+left_arrow+right_arrow" during POST (got this info from Tech Inferno Fan). ASUS users don't have to do anything since they don't have the lock engaged. The rest of you guys are at this time out of luck. 2. So you'll first need to dump your ME FW image. This is done by running fptw64 in windows or fpt in DOS. It needs to be run in a cmd window with admin rights. The command to do so is "fptw64 -d imagename", where imagename is whatever name you want for your flash image dump. Prema found out that at least on Clevos, attempting to dump only the ME FW leaves out the clock control segment, so you need to dump the whole flash image. Note that you're also getting the flash descriptor when you dump everything, so you can edit it to not require the flash descriptor override to do any flash image reads and writes. 3. Now you need to change some bits to enable overclocking. By some, I mean you probably have to change quite a lot. The good news is that the settings on 6 and 7 series systems seem to be identical. When I edited my image, I followed the intel docs in the ME8 download. I've linked my original overclocked MW FW for comparison. You only need to make changes in the "ICC" section and subsections in FTIC. You can edit the ME FW as part of an entire flash image, or by itself. I edited it by itself, but have since then done several BIOS mods and flashing the whole image worked out fine. My modded P150/170EM ME FW: meoc.bin This image is just for reference to make sure you didn't miss anything. Don't just flash this ME FW. It might work, but there has been issues with flashing someone else's ME FW on HP and Dell systems and others may be affected. Dump and edit your own, or ask me to and I will if I have the time. Some manufacturers have additional changes. When it doubt read the manual or ask me if something should be changed or not. The Utility for editing the images is FTIC. This program has a GUI so it does not have to be run from cmd. Open your image and open the overclocking enabled image. Settings that are different from FTIC's generic 6 and 7 series file will be highlighted in yellow. What you need to edit is the ICC profiles under ICC Data. You can have up to 8 profiles. I think active profile changes depending on if you are say plugged in, on battery, on standby, temps are too high, etc. I don't really know how you identify which profile(s) much be changed, so I think you should just change all of them to make sure that if the flash works and you don't get overclocking, that you know you didn't miss something and that overclocking is impossible, so you don't waste time thinking about it and trying things. The number 1 thing to check that I found to make sure things don't go bad is your "clock source select" under "FCIM/BTM specific ICC registers". If it is 0x00011A33, then your laptop uses the PLL built into the PCH and you can keep going through trying this mod. It will be 0x00011A34 for enabling overclocking. If it is something else besides these 2, STOP NOW. This means that your PCH's PLL is not being used, and that instead an external PLL is feeding the PCH clocks to distribute. If you set your laptop to use the PCH's PLL, I think the PCH will get both clocks and you'll get a laptop with unintelligible clock signals. That would be bad. After making the changes you need to rebuild the ME FW image. You will then have a full image, and if you reopen this new image in FITC, FITC will create a new folder with the MW FW all by itself. You can use the full image or the MW FW image to flash. 4. Now the fun exciting part where we do the flash. I recommend doing it in DOS. The command to flash the ME FW only is "fpt -me -f filename", where filename is the name of your flash image. Don't forget the .bin extension. If you are flashing the entire ROM then you do need to leave out the "-me". If flashing the ME FW only and used the "build compact image" option in FITC, you should get a warning that the flash image is smaller than the total ME Region area that the flash descriptor says you can use, so the area after the file length will not be changed. This is OK and flash anyway. The image FTIC creates is not padded at the end, which causes the warning to occur. If you built a full image it is padded, so you don't get this warning. 5. You can now use Intel XTU to overclock. If you already installed it, you may have to reinstall it. BCLK can be changed in windows and takes effect immediately. Remember guys, this is risky stuff, especially if you have a 7 series laptop. If you're careful though everything should turn out fine.1 point
-
So you've got hold of a 4GB version of a GTX 680m, figured out how to flash the vbios and it runs well. However, there are some things missing such as GPU boost and the ability to actually install drivers easily. Perhaps you are reluctant to run a vbios that ups to voltage to 1.037v. This thread aims to have everyone owning a 4GB GTX 680m get the most out of their GPU including enabling a GPU boost hack. This is not an overkill thread, but more about getting things working well with a good performance, quality and stability improvement over stock. There will be no crazy high voltages so everything should be safe short and long term however I take no responsibility for burnt or bricked cards. Please proceed at your own risk, there will be vbios flashing. First of all, the GTX 680m is similar to the desktop GTX 670 but severely downclocked. By OC'ing, one can get the core speed up to speed and beyond but clocking the memory @3Ghz (6GHz effective) in an attempt to reach its 192GBit/s bandwidth is very risky and likely dangerous. However, if the memory is clocked to 2250 (4.5Ghz effective) then the bandwidth is identical to that of the GTX 660 Ti @144GBit/s. Both desktop GPUs have the same base and boost clock at 915Mhz and 980Mhz respectively. This brings me to the vbios. Kindly created by master hex maestro svl7. The vbios (attached below) clocks in @915/1125(2250)Mhz exactly the same as that which I mentioned above. Those specific clocks are also what makes the GPU boost work well (I'll get to that later). The vbios is engineered from the MSI ES(FD) vbios and has a voltage of 1.025v and settles @1.0v during constant load. Not amazingly(potentially dangerously) high but there is still plenty of headroom for overclocking. Flash this, and verify with GPUz. Of course the memory clock can be anything but I chose 1125 as they are nice and neat as well as offering a mild but significant boost in performance. Next, drivers. The recent nvidia drivers are great but digging deep into the source code, we find that there are image quality hacks that trade image quality for performance. Plus some drivers just plain won't install if the GTX 680m is an aftermarket upgrade on unsupported mobos. These drivers are winners though: http://files.laptopvideo2go.com/Dox/geforce306.02.2-modded.exe Modded by the infamous Dox, all hacks are removed, quality is optimsed and support for all nvidia devices is included and should install without a hitch on any system. Drivers are uber stable but not great benchers as image quality is improved at some cost to performance. but I'd happily trade performance for decent quality and stability and use another driver to bench. And finally, enabling GPU boost. This method is not actually GPU boost but it functions in exactly the same way, call it "fake" GPU boost. What we need to do is to download Nvidia Inspector: NVIDIA Inspector 1.9.6.6 download from Guru3D.com Put that in a safe place and run it, allow overclocking and set the base offset to +65 to achieve 980Mhz, the same as the desktop cards. Now some of you may think that this is plain overclocking however, this is not the case. After applying the clocks (keep Inspector open), run a mild to moderately intensive GPU task such as playing HD video or opening the settings dialogue of Furmark (but not starting any test yet) and you will see that the clocks will still show 914.5Mhz. Start a game or Furmark and that will jump to 980Mhz similar to GPU Boost. Now click on "Create clocks shortcut" and a new shortcut should appear on the desktop. Drag that to your "Startup" folder in the Start menu and Fake GPU Boost should be enabled on every restart without any user input needed. I tested other base clock speeds ranging from 900Mhz up to 1000Mhz and and every boost clock speed from +1 to +100 and 915 -> 980 was the only combination that worked. Most other base clock speeds would always change to 928Mhz and without the 915Mhz baseclock, all other fake boost clock offsets would go to 966Mhz unless I went way beyond 1Ghz which I don't recommend anyway. Either it was coincidence that those clock speeds are identical to the desktop ones or that they are the only clocks that work on the GK104 which is why nvidia set them to the desktop ones in the first place. Please report back if you have any issues. I've only tested this myself but it should apply to all 4GB GTX 680m users. EDIT by svl7: Vbios is outdated, grab the latest one here: http://forum.techinferno.com/general-notebook-discussions/1847-nvidia-kepler-vbios-mods-overclocking-editions-modified-clocks-voltage-tweaks.html1 point
-
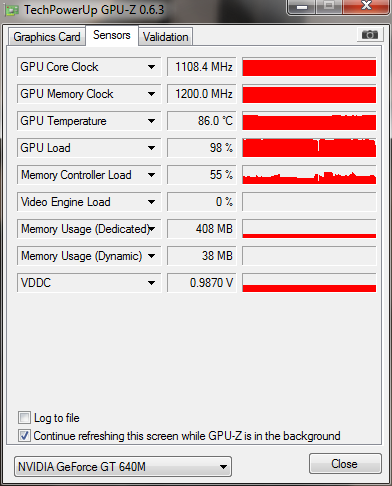
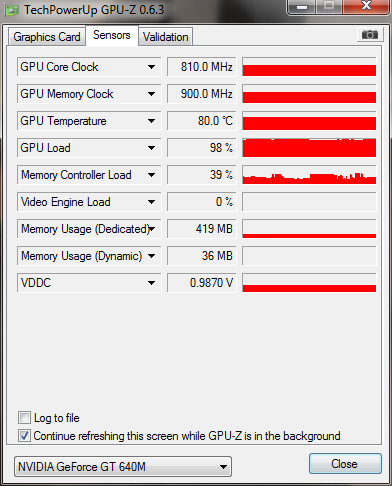
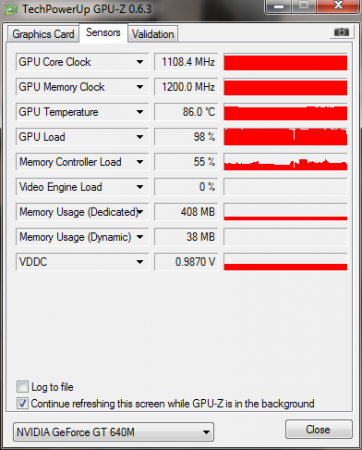
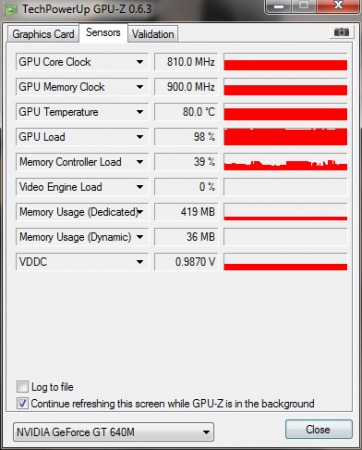
Acer Aspire V3 series BIOS mods - better Nvidia GT 640m performance The Nvidia GT640m ("Kepler") which can be found in the Acer Aspire V3 series has an incredible overclocking potential. Unfortunately this is very limited due to VBIOS restrictions. This modified BIOS version will help you to unlock the full power of your GPU. The increased default clocks (3d) gives you additional performance without having to use any additional tools. If you want to go even further - the 135MHZ software overclocking limit is removed, so you can push your GPU to the limits. Mods based on Acer Aspire V3-5xx series BIOS 1.07: This BIOS is compatible with the V3-531, V3-571, V3-571G and all other models which I may have forgotten and use the same BIOS - Overclocking edition: 810 MHz core (3d) and boost - undervolting edition: depending on interest, tba Here some pics, at 810MHz and further overclocked per software... yeah, this works very well Instructions are included, refer to the READ ME file. Please provide feedback and leave a comment. If you like my work feel free to buy me a beer *************************************************************** F.A.Q.: Why do I need to flash the BIOS in order to get higher clocks? Isn't the VBIOS responsible for the GPU settings? Answer: How can I revert to the original BIOS? Answer: What exactly got changed compared to the original BIOS? Answer: *************************************************************** Remember, you are responsible for the changes you make on your system, flash at your own risk.b
 1 point
 -
not in bios.. see the Screen1 point
-
There's the Insyde USB recovery method, though there shouldn't be any issues. The mod should make all hidden menus and options available. If it works I can combine it with the vbios mod.1 point
-
I'm glad you like it Sam Congrats on your first post!1 point
-
It's up now. Not 100% complete yet, but pretty much. -> Nvidia vbios flashing guide1 point
-
Great, thank you very much for the feedback! So with that vbios you can now change the voltage per afterburner? What system are you using? An M17x R4? I guess the front posts need some cleaning up, and as well some more explanation. The 'newOC' versions are quite a bit modified, I did a lot of tests with my Clevo 680m... it did throttle at stock in my system, didn't even reach full 3d clocks. The newOC edition solves this, and I ported the same mod to the Dell card... I expect it to work the best from all Dell versions, however, the results seem to vary... Glad to hear that it seems to work pretty fine for you! The newOC edition is simply modified a bit more, in order to prevent throttling. I removed the software OCing limits, but the voltage is stock as well as the clocks. The results don't seem to be completely consistent as not all users report the same behavior, not sure about the cause of this. I can't test it myself since I don't have a Dell card / recent AW system. That's why I need feedback. The Clevo card works with the MSI vbios, but you might run into some weird issues, not all Clevo systems seem to run well with the MSI vbios. 180W should be fine I guess, not sure. Depends on how far you push it.1 point
-
I've got the Logitech G930 and it's pretty awesome. Clear 7.1 surround sound in every game, wireless, pretty good base, even when listening to music, 10h battery life. All in all the best headset I've ever had.1 point
-
So, let me share my personal experience with various vbios and their performance so far. I tried all the various mod so skillfully made by svl7. All of them allow higher clocks and noticeable improvements in game and benchmarks. However, all of them but one (the New OCedition svl7 posted on 09/08 that you can find linked below) have locked core voltage - not possible to further OC through Afterburner - and throttle down about 100mhz and more. The one I linked is in my personal experience the only one, that starting from a locked 758mhx core clock, allows to OC as far as you like and although throttles a bit in mhz didn't drop a single fps in game. Link: http://forum.techinferno.com/attachments/general-notebook-discussions/4926d1347183728-dell-680m-oceditionnew.zip1 point
-
Do you want surround? I would avoid Steelseries due to the fact that you have to pay for shipping even with the warranty (at least in the US). The Siberia headset were quite comfortable however. Razer is hit and miss, but well... more miss than hit. Way more. I used Logitech G35 but can't say I was blown away by anything except maybe the looks. They're OK. The wireless version of this headset seems to have few quirks and bugs (at least according to newegg reviews). I also used surround Roccat headset. Comfort-wise they were about the same as Logitech G35, but I couldn't really tell the difference between surround and stereo on any headset (maybe the setup was wrong or something). If you don't plan to listen to music (much) I think most of them should do fine. However, pretty much ALL headsets are very much overpriced for what you are getting. Many decent ones are in range of pretty good quality hifi headphones, but produce sound of significantly worse quality. I know you said your budget is $100, but I managed to snag Beyerdynamic dt 770 pro stereo headphones for about $150 on eBay (refurbished but came looking brand new). They are in whole other league compared to gaming headsets (there is just no comparison in sound, comfort and construction), and I use them with a clip-on microphone (works just as fine as the headset mic). I was actually quite suspicious at first about this clip-on mic but works really great imo. The recorded sound quality is even I'd say slightly better than on the Steelseries Siberia headset. And I have a $8 Zalman clip-on mic. That means the one on their headset is really cheap stuff.1 point
-
Everything in stock , with fraps 26~30(I capped it with 30fps for recording) Without fraps 40-50fps , average fps 40+ Setting at 0:02 of the video.1 point
-
Okay I'm finishing this project up; I have to admit failure at getting the R1 and 6970 working together. Having the R2 mobo working means I don't really want to tear my computer apart for weeks on end again. I wrote two articles on my website, one for the 6970 and another with some more details on the conversion to the R2 motherboard. That post also includes files for download to dump / program the two flash memory chips on the R2 motherboard. Thanks to everyone for the help.1 point
-
Seems that's a rather popular request... I'll see what I can do.1 point
-
Your problem n°1, it's probably not a problem, because the eGPU is operating at 1.2 speed just when it needs it, like in a game. It goes automatically back to 1.1 when not used. You can check that with GPU-Z and launch a game or something and you will see that it switches to 1.2 link. As for your other problems, I don't know enough about it to answer you.1 point
-
So, trying to catch up on all the stuff here... Got a first test version ready, based on a dump of v2.05. I think I removed all the IDs, and I'm not sure if they even get flashed with the standard settings... but I still recommend anyone who's going to try it to have a backup of your original bios around. Also after flashing go to the setup and load & save the default settings. Hope you guys will be able to flash it somehow. Let me know. Feedback is crucial. In addition to this... quick question about the stock bios, do you have the ability to disable secure boot?1 point
-
@mw86: Thanks. Unfortunately I was not successful at getting the 6970m running on the R1. It would have helped if the card was working when I was doing the majority of my testing and experimentation. It sucks that the card was dead so I was effectively wasting my time.... I am really hoping eBay's buyer protection will cover this, but I'm not holding my breath. After I hacked the card and got it working, all I did was test it in the R1 MB with a system BIOS that I modified the MXM info on. It wasn't enough to get the card to POST, there is still something else in the BIOS that is holding it up. Since I successfully got an R2 motherboard in my machine, I don't really have the motivation to tear it apart again and keep messing with the R1 board. Actually what I want to do is get 7970ms for it, maybe get the 300W power supply working in it too. The 6970 works with the vBIOS that it shipped with, which is not the Clevo vBIOS, however it locks up anytime the screen goes off. If I install the Clevo vBIOS it shuts down properly but I get bad screen tearing. Something else that I can't figure out at the moment is ever since I replaced my original R1 board the LCD brightness has been stuck on low. I've tried two different R1 boards and now the R2 board and they all do the same thing. Windows can't control it either. It's so dim I can hardly see the screen. I'm about ready to hack the inverter so I can have brightness again.1 point
-
Great news! I re-installed windows 7 ultimate, and the problem is GONE!!!!, Thanks~~ If someone else has the same problem, try other version of windows!1 point
-
I'd do it. I've owned several m17x r2s and several x7200s. For your needs, and particularly since you don't move the laptop, the x7200 with SLI'ed 485ms is going to give you around 75% more GPU power than dual 5870s. I'm actually really surprised the guy is willing to do a 1:1 trade for your m17. The drawback is obviously the loss of the RGB screen, but the x7200 screen is not that bad.1 point
-
Alright, if you (or anyone else) wants to test it, let me know, then I'll send it to you.1 point
-
Ok, here it is. Glad to hear that it is more or less OK. I'll have to give this another run in the morning when it is cooler here, it is definitely warm where I am right now. Thanks for the info and tips!
 1 point
 -
Oh right, I should finally upload the stuff for the 660m and M15x... I'll see that I can do it during the next days, prolly tomorrow.1 point
-
About the warranty I don't know how close you are to him or her, you can ask him or her to give you a warranty I don't know 90 days perhaps depending on his or her reaction you will know if something's wrong with the laptop, it has its risks switching laptops mostly on the warranty issue... well good luck with that I hope you make the right choice. Cheers.1 point
-
No trade, the R2 has been proven to run the latest Video cards... i see no gain only a loss IMO.1 point
-
Save your dukets imo. Warranty would be there if you ordered new. Sixx core and triple channel doesnt make up for all the great things you are giving him. I feel widezu69 stil make a strong point. Sata 3, last gen etc. What if you just buckle down for a Ivy base 3960X, triple channel, sata 3 and 22nm vs 45nm 980x i think? I just think for raw power your looking for you would be better on a new build in the future rather than an outdated build now. I know you plan for a new syst besides this in 2014 so what if you just tried to sell it closer to the date you were going to order a new one? you can add a screen but seems like your losing money in this deal and losing money buyimg more parts for it. You sold your 6990ms if you sell the R2 maybe you can get enough funds to buy one of those Eurocom,MSI, Clevo mobile workstations soon. I mean some have 3960x or Xeon support, triple chan mem, dual or even the crazy quad gpu beast StamatisX wrote an article on, all capable of quad hard drive and multiple levels of raid if your interested so not raid 0/1 but the performance and mirroring setup raid 5/10. Thats what I may go to quite a few years from now... Though bios is often locked there would already be a mass amount of untapped power still accessable. But if I am to think of it more Im guessing you need to stick to Clevo or Alienware vs MSI,Eurocom for more of an unlocked bios possibility. if your willing to lose a bit of value to gain 2cores and triple channel +1 more hard drive then I would say go for it if it suites the work you need it for. As above X7200 has greater performance but your system has the better build quality and perks. Testing of the system aside no warranty is still a bad idea, if he does keep true to word and you guys swap back after problem thats good but what if a month or two later after sometime has passed it breaks.... Your out a superior computer and cant move forward without adding money to it and that would effect 2014 plan a little. Your decision is soley up to your needs but tread carefully with anything used. Cheers buddy1 point
-
sorry that I am just now responding good buddy nearly 2 1/2 months later bro. CAPS http://sites.amd.com/us/game/downloads/Pages/crossfirex-app-profiles.aspx Catalyst Application Profiles its like Whitelist on Nvidia cards... its a preset profile for a few ways the game runs on an AMD card to better optimize performance... though they tend not to truly add much. its a seperate install sometimes from driver and easy enough to install over last... - - - Updated - - - its hard to say in theory it should be no problem at all. Since they dont sell 32gb 1600mhz kits with the Alienware laptop from factory you will have to pioneer and try it or keep surching if anyone has done this yet. I know you could try 4 sticks of these komputer bay 2x8gb 1600mhz laptop memory http://www.amazon.com/Komputerbay-PC3-12800-1600MHz-10-10-10-27-Heatspreaders/dp/B007PZWYKM/ref=sr_1_1?ie=UTF8&qid=1347259237&sr=8-1&keywords=ddr3+sodimm+8gb+1600mhz patriot 8gb 1600mhz laptop memory http://www.amazon.com/Patriot-Memory-Signature-1600MHz-PSD38G16002S/dp/B007M538DW/ref=sr_1_2?ie=UTF8&qid=1347259237&sr=8-2&keywords=ddr3+sodimm+8gb+1600mhz corsair 2x8gb 1600mhz laptop memory http://www.amazon.com/Corsair-Vengeance-Laptop-1600MHz-CMSX16GX3M2A1600C10/dp/B0076W9Q5A/ref=sr_1_16?ie=UTF8&qid=1347259237&sr=8-16&keywords=ddr3+sodimm+8gb+1600mhz1 point
-
@svl7 has did it again.. Thanks to his contribution to the forum.. We are enjoying all this features.. Thanks @svl7 .. Was an honour to test your mod. (: Sent from my GT-I9100 using Tapatalk 21 point