Leaderboard


Popular Content
Showing content with the highest reputation on 05/03/11 in all areas
-
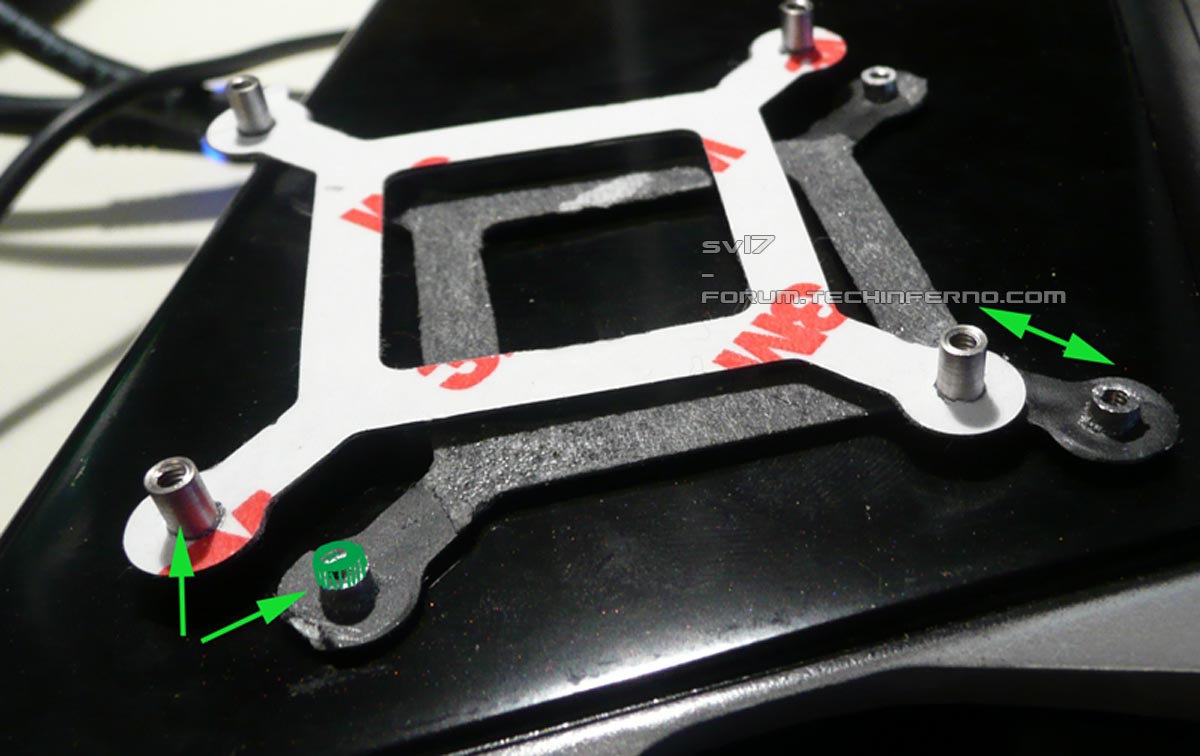
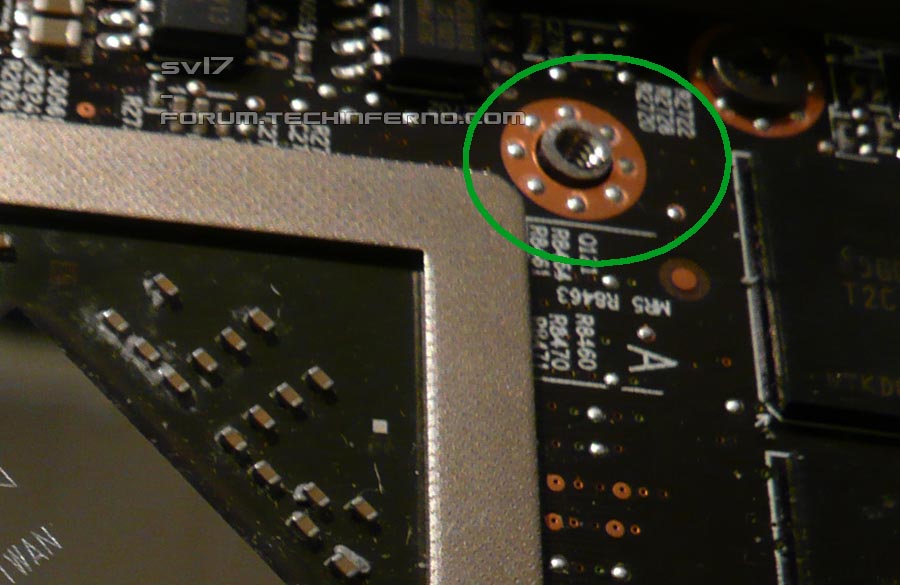
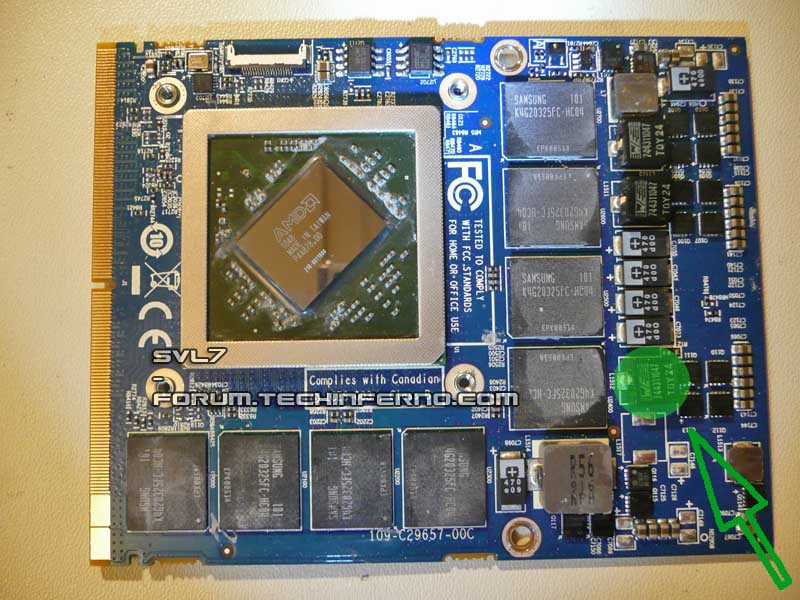
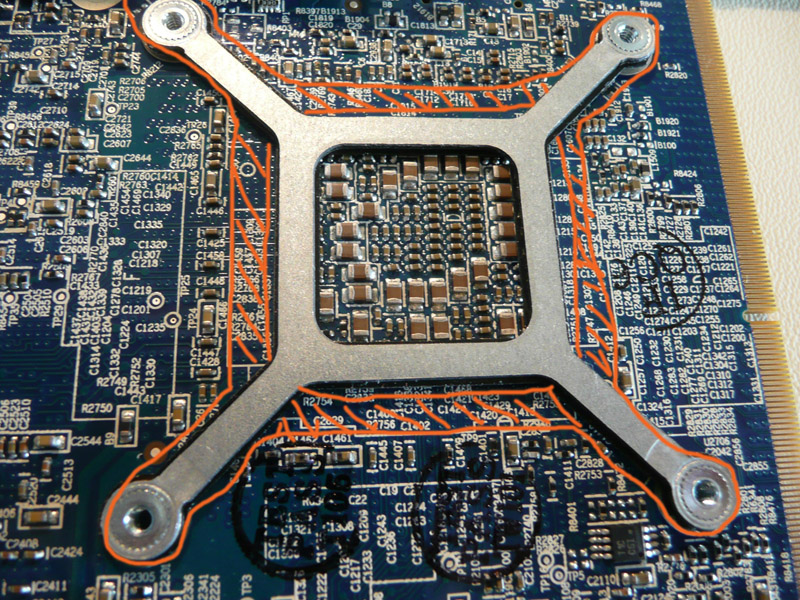
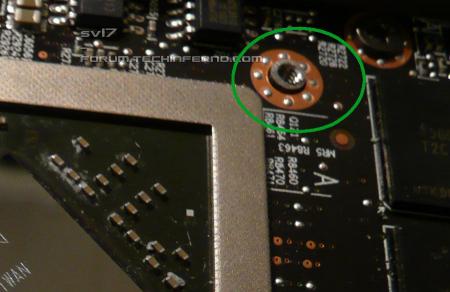
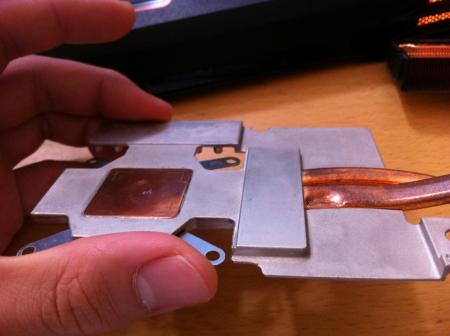
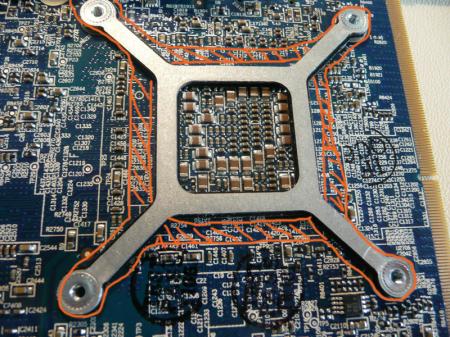
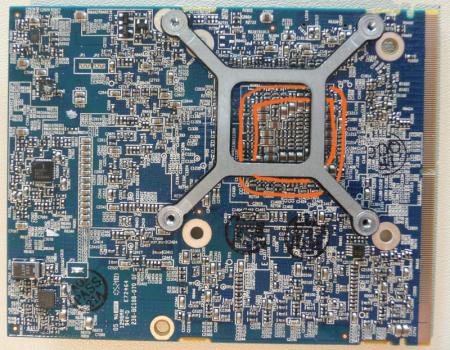
In case you have some additional info that should be included, or if I missed something important, let me know and I will include it. IMPORTANT: The 6970m is not officially supported by Dell. Upgrading to this card may void your warranty. The 6970m is a powerful card, it will draw more power and produce more heat. This card can significantly improve the performance of your system, however, the long-term effects of running this card in a M15x are currently unknown. But it works great so far Cards that are known to work: The card Dell uses in the M17x R3: This has only been tested for a short while so far, but it seems to work perfectly fine. Credits go to Rogue-OP and iloveb00bs. The first guys who tried to put a 6970m in a M15x. -DP/HDMI works, confirmed by Strigae, thanks!!. -Fan control works It seems you need to install the M17x R3 drivers first before you can get the official AMD drivers. I guess installing for example the modded 11.4 will work as well. Dell Part nr. is: V9XKH. Good luck when ordering one from Dell, depending on where you live and what kind of rep you get on the phone they might not want to sell you the card as it isn't officially available for your system. Call again in this case, or if you know someone with a M17x R3 let him order the card for you. 6970m from MXM-upgrade.com: Works great, but no fan control. The fans are constantly at a high speed, but not completely at full full speed. For now you'll need to manually control the fans with HWinfo32. -DP/HDMI works. Sound through HDMI works when you install the Dell 6970m vbios and the M17x R3 HDMI audio driver. -m15x-amd-6970m-everything-you-need-know.html#post3717"]Here are the instructions for this. Card can now be ordered for the M15x from mxm-upgrade. Clevo (and resellers) 6970m: The card from Clevo and resellers (Eurocom etc.) works as well, but make sure you get a version of the card which has holes for the back plate! Some of these cards have the screw holes for mounting the heatsink soldered on which makes it impossible to use the Dell backplate, and since Clevo uses slightly smaller screws than Dell you can’t simply put your heatsink on such a card. Contact your dealer in advance to make sure you get a card which doesn’t have the screw holes soldered to the PCB, otherwise you’ll have to remove it (which is difficult) or use some smaller screws on the heatsink. For all these cards the heatsink of the M15x fits perfectly. No modification needed. Cards from other vendors / manufacturers may work as well. If you got a different 6970m running in your M15x let me know and I'll upgrade the list. Things to do before exchanging the card: Download the drivers. This modded 11.5 should work, click on "MobilityMod Windows 7/Vista" in the linked thread. Also get GPU-Z for monitoring your video card and verifying it, Trixx, for under- and overclocking and in case you haven't got a Dell card also HWinfo32 (I recommend getting it anyway since it is a great system monitoring tool) Make sure you have thermal paste, maybe some new thermal pads as well as something to clean the heatsink (e.g. isoproply alcohol) and some cloths around. I also highly recommend using a grounded ESD-mat and a wristband. Know what you're doing. You need to partially disassemble your machine to get to the GPU. Prepare yourself thoroughly, check out the M15x service manual, as well as the if you don't know how to get to the GPU. It can be helpful to write down all the steps in advance when you're doing this for the first time. If something is still unclear about the disassembly procedure after looking at the video and checking out the service manual let me know, I can provide you some pictures if necessary. The upgrading procedure: Uninstall your GPU drivers. Make a power drain (Turn off your M15x, remove the power cord and the battery. Then press and hold down the power button (Alienhead) for about 10-20 sec. Remove your GPU - Here's a little guide with pics in case you need some help. Clean your heatsink, if necessary replace the thermal pads with new ones. Make sure the 6970m has a retention bracket on the back of the GPU. If not take the one from your old GPU and put it there. Also make sure you read the section about the "retention bracket problem". Properly insert your GPU, make sure that it sits properly. Apply the thermal paste, and attach the heatsink. Then (after reassembling your system), boot, install the drivers and reboot. Make sure the fans are running. Open GPU-Z and verify your card and the clocks. It should look more or less like this. Default 3D clocks are 680/900MHz (core/memory) and 150/100MHz when idling. Make sure PowerPlay is enabled in the Catalyst Control Center. Also make sure Stealth Mode is deactivated. Check your temperatures. Idle temps should be 40-50°C, depending on your ambient temp of course. While gaming or doing something similar GPU-intense the system will run significantly hotter, 70-80°C, maybe a bit higher. Note: By lifting the back of your system a bit (for example with a book) you can improve the airflow in the system. This can really help lowering the temps. The back plate problem: The retention bracket of the 6970m has a different size than the regular M15x cards (260m, 5850m etc.) When your card doesn't come with this x-plate you need to take the one you have on your old GPU, but this one won't fit properly. Nevertheless it works, even if it covers some resistors on the back of the card. Make sure you're not shorting anything. Usually the back plate has an insulating black plastic pad on it, this will work. However, if your x-plate doesn't have this pad on it, you must cover it with some thin, insulating tape. Here you can see the problem: In this picture I marked where the back plate should be: And in this one I highlighted the area which gets covered by the too small bracket of my 260m: The space beneath the card becomes pretty tight, but it works. My advice is contacting your dealer before buying the card and asking whether he can provide the correct x-plate. (In case he tells you that you should use the one from your old card tell him it has a different size.) The backplate problem part 2: In case you got your hands on a card with a proper backplate - cool! There's only one problem... the holes with the threads for fixing the screws are standing out just a bit too much. Compare it to the original backplate which came with your M15x, the difference is about 3 millimeters. Due to this, the heatsink applies almost no pressure on the die when you mount it on the card, resulting in high temps. A simple mod will solve this, just grind down the "screw holes" of the backplate a couple of millimeters, easy to do and very effective. This will highly increase the pressure which is applied on the die and bring down the temps. Just take it easy with fixing the screws, if you grind down the metal a bit to much and then fix the screws until you can't turn them anymore you might crack the die if you're unlucky. I recommend comparing the plate with your original M15x plate and just grind your 69xxm plate down until it has the same height. Here some pics which illustrate the problem. I cut of quite some material, you might want to leave a bit more to make sure you don't accidentally kill your card with the pressure. Heatpipe problem: It's possible that one of the coils on the cards is standing out just a little bit too much and thus touching the heatsink. This can lead to a small gap between the die and the heatsink which will lead to increased temps as well. To prevent this you can do a slightly crazy mod, as done by @widezu69... take a hammer and carefully flatten your heatpipe a tiny little bit at the problematic spot. If you work with enough care, it really works without killing the heatipe. Again, care is the keyword here. Here's a pic of the modded heatpipe as well as the problematic coil (marked with green): Power consumption: The power draw of the card is probably about 75-100W. I run this card together with an i7 920xm in my M15x and it works fine. Nevertheless you need to be careful, as the PSU of the M15x is only rated 150W. When doing some 3dM11 runs with both GPU and CPU overclocked I measured about 160-170W current draw from my system during the combined test. You really need to be careful when running this card, especially when you have an extreme processor (920/940xm). Pushing both GPU and CPU can (and will) bring the PSU to its limits (and above). Some numbers about the power draw when playing games, everything on stocks: Black Ops Zombies (everything on max): ~ 130-140W Portal 2 (everything on max): ~110-125W Medal of Honor (everything on max) ~140-150W Crysis 2 (set to "Hardcore) ~ 140-150W The device I use for measuring the power draw has an accuracy of about ± 10W. I'll update some more numbers later. Fan control: In case you have a card which makes your fans running at a high speed all the time you will need to use HWinfo32 to manually adjust the fan speed. To get to the fan control open HWinfo32 (sensor only) and press on the little fan next to the "Logging start" button. This will open the fan control window. Ignore the GPU2 fan, you only need to adjust the CPU fan and GPU1 fan value. The programm needs to override the fan setting of your system in short intervals all the time, the standard value is 100ms. (See the "respin period" box). But the fan needs some time to slow down again, even when the EC already reset the value of HWinfo32, that's called the respin time. If you set it to about 11000ms your fans should run all time at the value you set. If they start to slow down and then spin up again you need to decrease the respin period. For adjusting the fans set the slider to the desired value and click "Set Manual" You will need to do this for both fans. Update: It's now possible to create a fan control look-up table and let HWinfo32 automatically control the fan speed by temperature. 1. Click on the fan symbol 2. Click on "Custom Auto" 3. Choose the temperature sensor diode which you want to use as reference. 4. Set the desired speeds/temperatures according to your needs. Do this for both GPU and CPU, ignore GPU2 fan. I recommend using the hottest GPU diode (usually MemIO). A big thanks to Mumak, the developer of this fantastic tool. Here you can find the official Alienware fan control thread in case you find a bug or need to know more. ATTENTION: Adjusting the fan speed can be dangerous!! Always keep an eye on your temps and never forget to adjust the values before doing something CPU or GPU intense (in case you control them manually)! I'm still looking for a different solution. In case I'm successful I'll post the update here. Possible problems and solutions: Unable to install drivers. Solution: Try a different driver. Also contact your vendor, maybe he knows a specific one that works. Idle clocks are 250/900 instead of 100/150. Solution: Check your display settings and make sure only your internal notebook monitor is selected. 250/900 are the idle clocks when you're connected to an external monitor (or when your display settings are got messed up, probably driver related) Solved by iloveb00bs. The GPU temps are crazy high! Solution: Repaste. You probably did a bad job with the thermal paste. Also make sure your system is dust-free and that the heatsink sits properly and is making contact (also check the pads where the memory modules touch the heatsink). While idling the GPU clocks change from 2d to 3d clocks and back all couple of seconds. Solution: This behaviour can be caused by the M17x r3 6970m driver (A00). Get the latest AMD driver and you should be fine. If you have this problem with a different driver try another driver version. Feel free to ask questions! M15x GPU exchangement guide .pdf


 4 points
 -
Cheers, The first and major complaint about the M14x for most users is the noise it produces. I have found a very easy and common sense way to eliminate a majority of the noise. I can fully verify that this config is powerful enough for surfing, watching movies (even blu-ray) and general computing. It is NOT a gaming config and I doubt this machine will ever be quiet enough for gaming in a library. Step 1. Step 2. Step 3. Step 4. Step 5. Step 6. Step 7. Step 8. Step 9. Step 10. Step 11. Apply your settings and your good to go. One thing I have noticed is that the m14x and Windows 7 x64 do not seem to always take power corrections so what you may have to do is choose your power setting, do a quick reboot and then it will be in the correct power mode. Good Luck, StevenX4 points
-
I didn't like the KitGuru review- it doesn't give any actual con. I'd also like to argument this with couple of points: - They mention the screen is excellent and has great color gamut. There are no numbers provided, however. Again, excellent is a very subjective thing. I'd say IPS is excellent. RGB LED is excellent. Most of the TN are decent, mediocre or crap. If we start rating things with great as a worst description, what's the point of doing it at all? That said Thinkpad X200 screen I had (matte TN) was better for me than M11x, because I could actually see stuff on it when I was outside - despite the fact that it certainly had all the numbers worse than M11x display. - "The battery life is very strong." Errr.... welcome to 2011? < 5 hours just browsing the internet is pretty mediocre for an ultraportable laptop, especially the one based on Sandy Bridge platform. 2:50 watching the movie? I easily got 5-5.5 hours on M11x-R1. The results are really bad actually and are in line with bigger, more power hungry, laptops. (See: M17x-R3.) Also keep in mind here, the screen is extremely reflective - it takes some effort to find a decent angle to watch a movie. - "keyboard is a good size". Unless they did some kind of remarkable redesign (from the pics it looks exactly the same as R1) - keyboard is actually extremely cramped. The best thing about it, it shows no flex (I don't see what 'little' flex they see there.) but I often find it annoying to try to type on it since the keys are so close together. I mean it sort of works, but its far from comfortable. I ended up pressing the wrong key very often. Lastly, I wouldn't want to drop it. It may be well constructed on the inside, but I wouldn't be so sure about the cover.4 points
-
YouTube - ALIENWARE M14X GAME VIDEO Fraps Recording Hope it's ok.. will be away for about 3 hours or so. StevenX3 points
-
i found others in youtube: Crysis 2 60-70 FPS: 45-55 FPS: 26-35 FPS:3 points
-
3 points
-
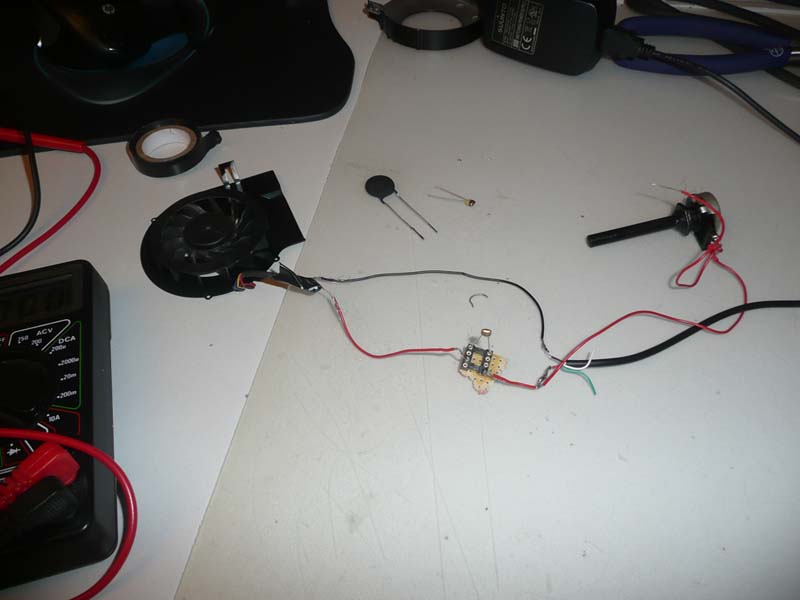
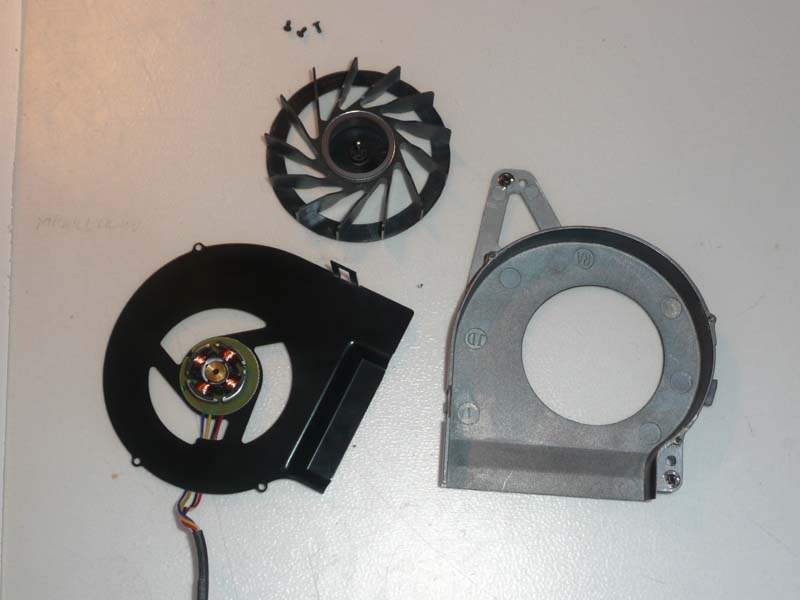
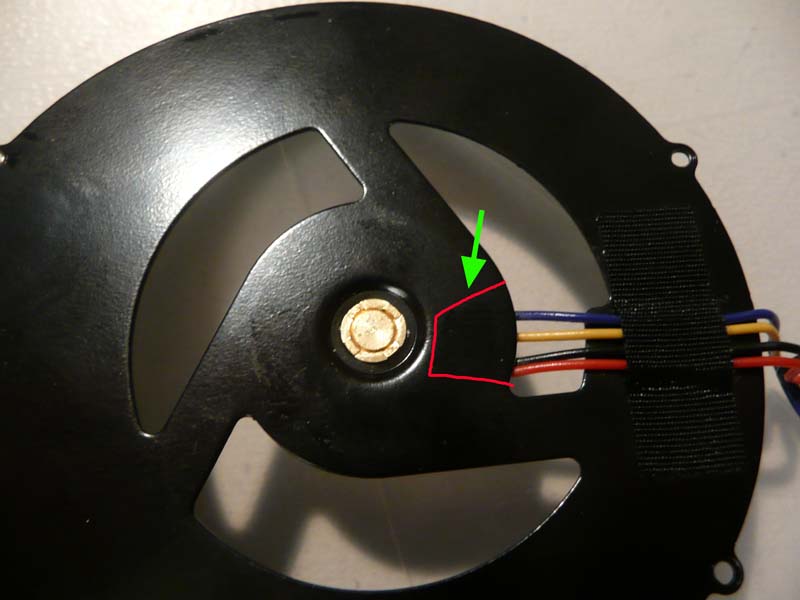
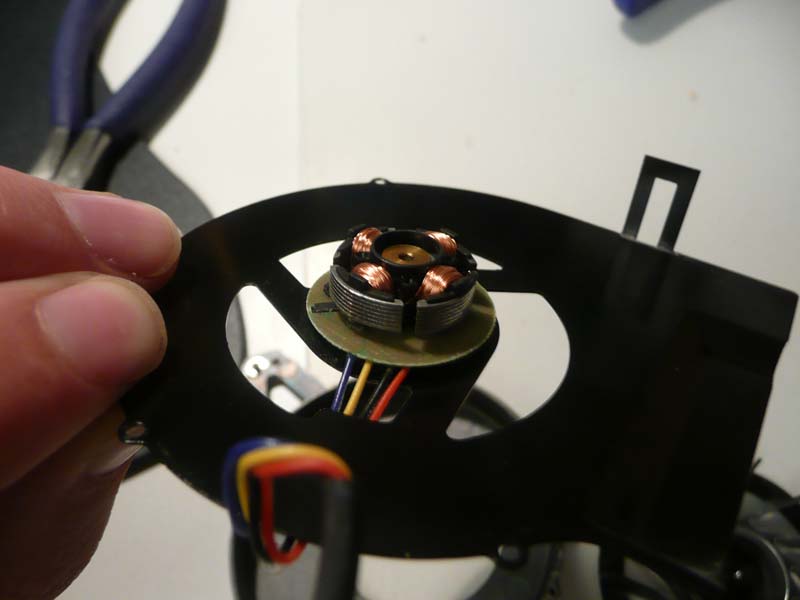
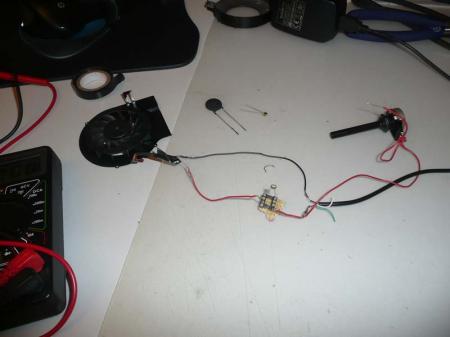
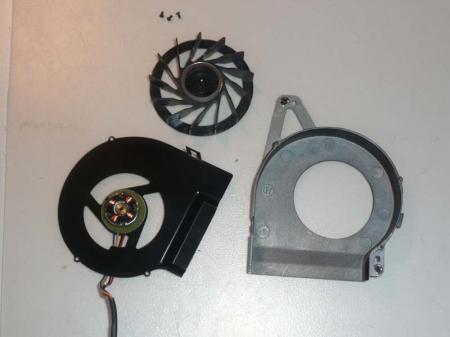
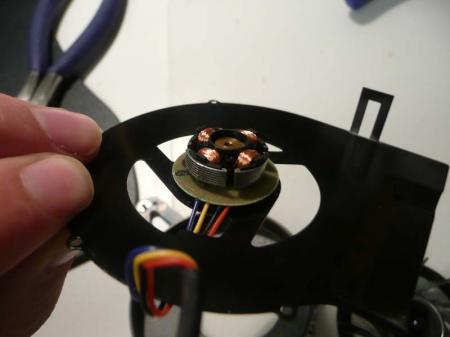
Thanks a lot guys!! I really appreciate it. I finally found some time to tinker a bit with the fans.... though I have no real result yet, it was more testing some ideas. HWinfo32 is great and works perfectly for me, but automatic fan control is still a bit better since you don't have to remember to adjust the fans everytime you want to play a game or similar. I have not a lot experience with disassembling the BIOS, so I'm looking for an easy hardware mod. My goal is to keep it as simple as possible. The less parts involved, the more fail safe it gets... and anyway, there's not much space left in there There are four cables coming from the fan control board, red is +5V, black is ground (0V) and the others are PWM and tacho as far as I know. Strangely the fan connector has 5 cables, but only four are connected to the fan, one cable is disappearing under the shrink tube.. no idea whether it's a blind one or not, I didn't check (probably it is, let me know if you're better informed about this) The 5V are always available, they won't change... the fan gets controlled by the PWM, so I don't need to worry about getting the power from somewhere else on the board. Anyway, the most simple idea I had was using a NTC thermistor... this would be a neat solution as long as the resistance gets small enough when it heats up. I've done some testing and it seems to work more or less, but the resistance at load temperatures is still a tad too high, it seems that with the thermistors I have laying around the fan won't speed up completely. Also a problem will be to attach the resistor inside the system in way that it really heats up. The NTCs I have atm aren't quite flat, which isn't ideal. They need to heat up quick enough, I guess taping/sticking them to the heatpipe would be the only way. The second (also very simple) idea, is to use a small PCB thermostat which for example closes at 70°C and opens again at 50°C. With a small resistor and a second thermostat it would be possible to make a two point fan control... but imo the NTC thermistor would be the better solution as it results in a stepless speed control. I don't like cutting such tiny wires (the one leading to the fan) and then soldering them together again (with some parts in between) ... I'd rather desolder the wires from the board so that no cutting is involved, but I can't access the fan board. It's covered by the metal case of the fan. If it's possible I'm gonna carefully cut a piece of the metal case to be able to desolder the wires, but I don't have any tools for this... well, I'll see. Maybe I'm ending up cutting the wires, hahaha. (See the second pic to see where the cut is needed, also the pic on the very right shows that you can access the wires with the solder iron) First pic (from the left) shows some improvised testing If you have some input or (better) ideas, please let me know!! I'll check some datasheets to see whether I can find a better NTC thermistor. Edit: I just had a little idea... I could combine a thermostat and a thermistor (parallel), this way I could make sure it will run on full speed when the temp gets high enough and still have the fan running at lower temps... hmm. I just don't have such thermostats laying around atm, and they cost about $15 here, damn... lol thermistor is a way cheaper solution

 2 points
 -
Good advice. Even if people are familiar with Power Management, I imagine they often forget to tweak out the "Advanced Settings". I played a lot with these settings on my M11x and Thinkpads. I'd go further and say if you want to squeeze out more battery life, check out Intel Graphics: It will make graphic little more washed out (bleak) in Windows but from what I remember it gave me decent boost in terms of battery life (~15-20% or so). Also, unless you need to be online on battery, DISABLE the WiFi! (Press Start+X then turn it off there.) That alone usually provides a significant boost (>=30%).2 points
-
2 points
-
have a iphone 4 but couldn't resist and saves having a brick on my lap lol! to browse forums IPAD2 WI-FI 32GB BLACK-AUS Ships: 18/05/2011 Delivers: 24/05/2011 wife ordered a macbook pro aswell could not convince her to get an alienware2 points
-
If you are a member of any other website, read their rules and if they allow it, put a link to Tech|Inferno in your signature. This exposes others to the site and will help us grow into a larger community that emphasizes one key point--freedom to post without the fear of suffocating oversight! No language filters are employed at T|I and we are all a knowledgeable and mature community. Thanks!1 point
-
Download OpenAl from here: http://connect.creativelabs.com/developer/Wiki/OpenAL%20Installer%20for%20Windows.aspx The installer supports both 32-bit and 64-bit versions of Windows. Download Flash Player and Shockwave Player from here: Adobe Download Microsoft Visual C++ 2010 (X86) http://www.microsoft.com/downloads/details.aspx?displaylang=en&FamilyID=a7b7a05e-6de6-4d3a-a423-37bf0912db84 Download Microsoft Visual C++ 2010 (X64) Download details: Microsoft Visual C++ 2010 Redistributable Package (x64) Download Microsoft .NET Framework Version 2.0 Redistributable Package (x86) Download details: Microsoft .NET Framework Version 2.0 Redistributable Package (x86) Download Microsoft .NET Framework Version 2.0 Redistributable Package (x64) Download details: Microsoft .NET Framework Version 2.0 Redistributable Package (x64) Download DirectX End-User Runtime Download details: DirectX End-User Runtime Web Installer It is important to only download from the distributors websites for your own safety (the above links were posted on a Wendy's Forum but because you need to be approved for membership linking to the thread is out of the question so I re-posted it here thanks to "Gerdina") Nvidia Phys-X NVIDIA DRIVERS 9.10.0513 Physx on Ati w/ Nvidia Card How To: Run PhysX in Windows 7 with ATi Cards - Overclock.net - Overclocking.net the above url was deemed a virus by MSE! you've been warned! Check the following post! Ageia Physx AGEIA PhysX Driver 2.4.0 download from Guru3D.com Info on Phys-X PhysX - Wikipedia, the free encyclopedia1 point
-
Here are some videos of some people who received their M14x prior to ours. Just to fill in the gap of waiting. Unboxing: English Accent: French: Red Version (Quiet): Red Version : How to OC: Lights: Configure: Rainbow theme: Performance: 3DMark06(stock) : 3DMark06(OC): Games: Black OPS: YouTube - Alienware M14x - CoD Black Ops SinglePlayer Gameplay Black OPS2: Crysis 2: YouTube - Alienware M14x - Crysis 2 Gameplay Bad Company2: YouTube - Alienware M14x - Bad Company 2 SinglePlayer Gameplay Metro 2033: YouTube - Alienware M14x - Metro2033 Gameplay Starcraft 2: YouTube - Alienware m14x Starcraft 2 Performance. (too short) Brink: YouTube - Alienware m14x Brink Gameplay Video Operation Flashpoint: Gameplay video made by Steven: http://www.youtube.com/watch?v=bVEOJ3GGIgI RAGINGAZN628'S HACKINTOSH TUTORIAL VIDEOS Ragingazn628 Hackintosh Install Part 1 Ragingazn628 Hackintosh Install Part 2 Ragingazn628 Hackintosh Install Part 3 Ragingazn628 Hackintosh Install Part 4 Subscribe to Ragingazn628's Youtube Channel (Tom's tech tips) for more gameplay videos and unboxings. Thanks to all who posted these vids. Just add some to the list if you find anything new.1 point
-
Official drivers and utilities for the AW M14x Official drivers from Dell Alienware Command Center Alienware Command Center houses all of the custom software for your M14x. By placing programs like AlienFusion and AlienFX, AlienTouch, AlienSense in a single, user-friendly interface, you gain more control over your system. Official documentation from Dell Official Manuals Official Wallpapers of Alienware Restore the Alienware 'Look and Feel' after a clean install of Windows EDIT: more 'look n feel' customization in this thread EDIT: Utilities Crystal Disk Info: A HDD/SSD utility software which supports S.M.A.R.T. and a part of USB-HDD. http://crystalmark.info/software/CrystalDiskInfo/index-e.html MSI Afterburner is a handy overclocking utility for ATI/NVIDIA graphics cards. Main features include GPU/Shader/Memory clock adjustment, advanced fan speed and GPU voltage control. EDIT: Core Temp: is a compact, no fuss, small footprint program to monitor CPU temperature. Download: Installer Download standalone: 32 Bit 64 Bit Core Temp Gadget: This is a sidebar gadget for Windows Vista and 7 for use in conjunction with Core Temp Addgadget: Sidebar for Windows like All CPU Meter (temps work with Core Temp), Network Meter, GPU Meter, Battery Meter, Drives Meter HWMonitor: is a hardware monitoring program that reads PC systems main health sensors : voltages, temperatures, fans speed Notebook Hardware Control: you can easily control the hardware components of your Notebook, control the hardware and system power management, ustomize the notebook (open source ACPI Control System), prolong the battery lifetime, cool down the system and reduce power consumption, monitor the hardware to avoid system failure, make your notebook quiet I hope it is helpful...cheers!1 point
-
Alienware M18x Laptop Details Base Model: $1999 - 2630qm + Nvidia 460mGTX. StevenX1 point
-
I got my new AW in red on purpose so it attracts even more attention to it's awesome design + lights I'll be taking it with me to the hospital when I start clinical rotations, can't wait to see what the other doctors + nurses think.1 point
-
Yeah it takes a serious amount of time for those things... In such cases what comes to mind are those commercials that for 30 sec require months of work.... :S1 point
-
It's just gameplay recorded with fraps free version. I probably should buy FRAPS as I should donate some more to unclewebb. It does show that even with FRAPS recording at high def 720p I can still play games at great speeds and smooth frames. I put the average fps without fraps before the gameplay starts. Only about 1 to 2 minutes of gameplay per game. Stinks that it takes 2 hours of work for 6 minutes of video along with another 2 hours to upload. WHERE IS MY EASY BUTTON?????????1 point
-
All, I completed a quick gameplay video that has bfbc2, black ops, homefront and two worlds 2. All are MP except 2 worlds 2. The intro is a huge advert to this site... Am I allowed to do this? It's in process of uploading to youtube now. If not I can edit and reupload if needed. Now that i think about it I should probably edit.. ugh.. It says something like TECHNO INFERNO PRESENTS... and it should probably just say VISIT TECHNO INFERNO.... Sorry...1 point
-
You can try taking the key off and those plastic hinges you see... rub a pencil's tip over the surfaces you can get too that hinge... it may act as a dry lubricant and get rid of said squeaking... just a thought. keys are annoying though to take off and put back on so be careful...1 point
-
AHHH of course, i did not consider turning it off, but i might just turn it off in broad daylight.. hahaha thanks for this steve.1 point
-
Steven on my M17 R2 I did the exact same thing when I was benchmarking... plus if you use CCleaner Download CCleaner 3.06.1433 - FileHippo.com you can quickly disable or enable any start up app. Not having Command center, FX starting saved a lot of memory, faster starts and everything stays normal... you just launch these when you need them and set the changes and they will stay and you didn't even need those apps starting with windows. Cheers! BTW OSD is actually important if you use any touch panel buttons regularly... otherwise you may do the same with that even if its just to bench and next start up you just re-enable it.1 point
-
I echo that... check these to out... but I don't agree with this first one saying that hybrid ssd will replace full ssd. Not gonna happen mainstream... here are the links. Hybrid SSDs - articles on StorageSearch.com SSD vs HDD vs Hybrid SSD for gaming - Overclock.net - Overclocking.net check out ALLTHATISMAN's post it makes alot of sense.1 point
-
I'll start by saying that you guys have a good point, but this is a $1500 laptop so no complex configurations should be doing to keep silent ya know.... I fully understand that in a small case like this with powerfull components (CPU/GPU) we need a powerful fan that can do a good job, and maybe that's the only reason that the fan makes so noisy.. I'm not a DELL engineer but at least i would have put out the battery and used that space to another fan or a better cooler system...1 point
-
that's a damn fast and expensive system1 point
-
Or something like that Did We Really Capture Saddam Hussein, Or One Of His 'Doubles'?1 point
-
Alienware landing page updated with M18x just now! http://www.alienware.com/Landings/laptops.aspx1 point
-
Well I'm in the exact boat you are in so good to see I won't be theonly one buying M18 from Dell with the 2920XM... Like you said I'm sure I'll here about how easy it should be to set their 4ghz Overclock... but I'm hoping someone will tell me they know it's just setting a multiplier in the bios or something...1 point
-
Might be a dumb question but what are PITA pastes?1 point
-
oh i will once it's delivered i will call customer care and give them a piece of my mind!1 point
-
I am. But that's mostly because I have a load of refund money to do so from my M17x-R2. If I was buying it with "new money" I would have to think about value = price/performance.I imagine the responses from others will be something like it's easy to do if you know what you are doing.1 point
-
Thanks Brian. I know it's basics but it's a start for the folks that need some peace and quiet with the m14. Also... I tried to get more folks to come over to this site ... apparently the jigg is up cause I was banned as of about 9pm. I need to make some decent benchmark and gameplay vids but it takes serious time and my kid has been a bit difficult this week.1 point
-
i think so ... another one: this is newand Left 4 Dead 21 point
-
I joined NBR for just that purpose I'll never post much there but enough to show T I off. Also I joined Origin PC forum so I'll do the same there. Might find others just to spread T I around.1 point
-
no don't try it unless you wanna be a very early beta tester... what they say is that they plan to make firefox 6 for Linux as fast will FF 6 be for Windows1 point
-
or you can go out and get yourself a set of balls 2 pieces Mobile Devices Cooling Ball For Laptop Computers1 point
-
LOL... I thought "Liking" someone's post did that.1 point
-
I think someone on our forum actually replaced his keys by pulling them off. I can't recall the post but I'm sure if you do a quick search in the M17x section you'll find it. Edit: Found it - http://forum.techinferno.com/alienware-m17x/238-custom-m17-r3-inap-edition-5.html#post2919 That was easy enough, guess our search function actually works unlike some sites *cough NBR*1 point
-
There are 4 hardware ports in the m17x r2, and all of them have the same host controller. Only 3 ports are wired up, however.1 point
-
You're sure? I thought only the optical drive was SATA I, not the port itself... if I remember correctly it's a SATA II port, at least that's the case in the M15x if I remember correctly, and they have similar chipsets, right? I've once seen some CDM benching of someone who had a SSD in the optical drive, and if I'm not mistaken it worked with SATA II speeds... I could be wrong though...1 point
-
There has been requests by some for a centralized area to download popular benchmarks and utilities. We've listened and compiled a list of programs we think will come in useful for measuring your gaming systems performance. We welcome suggestions by our community members for other programs/games/utilities and will take popular requests into account and add them. Gaming Benchmarks Download Links S.T.A.L.K.E.R.: Call of Pripyrat Download Unigine 'Heaven' DX 11 Benchmark Download version 2.5 Resident Evil 5 Benchmark Utility Download Lost Planet 2 Benchmark Download Devil May Cry 4 Benchmark Download Tom Clancy's: HAWX 2 Benchmark Download Benchmark Applications Download Links 3DMark 11 Download 3DMark Vantage Download v1.0.1 PCMark Vantage Download v1.0.2 build 1901 Fraps Download GPU-Z Download Benchmark Utilities Download Links ThrottleStop 3.00.1 Download HWInfo32 Download v3.70 HD Tune Download Sapphire Trixx Download v4.21 WPrime Download v1.551 point
-
I totally agree with you Brian... and as the CPU is still pretty new there's not much competition on ebay, atm I can find only three 2920xm for sale, for $1120... they seem to be OEM, no word about ES (though I only looked really quickly). This will hopefully change during the following months. If I had to guess I'd say Intel will release a 2940xm somewhen in Q4... no change when compared with the 2920xm, but higher binned and multi raised (+1). That would be the most easy way for Intel, they did the same with the first gen already.1 point
-
This generation is weird with regards to 2920xm. Dell is selling it for $900 while eBay guys are pricing it at the same price for ES chips..wtf? I guess once other OEMs start rolling out 2920xm equipped systems, the eBay guys will be forced to drop their prices but I don't see the demand there like it was for 920/940xm. There just aren't as many systems out there that really utilize it and because Sandy Bridge performs so well across the board, not many people see the justification for an extreme chip. Furthermore, because savvy consumers are aware of the lockbit placed in the bios by OEMs (thus killing any throttlestop support), they're avoiding spending money on an expensive CPU.1 point
-
It just occurred to me: If I were the mayor of the city where OBL was killed, I'd try to preserve his compound and turn it into a tourist destination. Can you imagine how much cash that would rake in? I'd even have re-enactments of the navy seals taking out OBL. Damn man I see $$$$$$$.1 point
-
Yeah, first off don't use the credit card method. IMO it's too easy to "fk"(lol) up so I've always used the "Rice drop" method on the GPU and the line method on the CPU. If you have a larger surface like a desktop part manual spreading can work well but with a laptop especially if the part is still in the computer you have very little room to work with to ensure an even and thin spread. With the CPU apply a thin line about 50% of the length of the CPU, push the heatsink down as level as possible and give a very very slight twist to reduce the likelihood of air pockets in the paste. Also keep in mind that the old saying of "less is more" is very true, you want the absolute thinnest layer possible while still filling all of the gap between the heatsink and die which isn't much. Hope this helps, just post if you have any more questions/issues.1 point
-
Yes... Charles P Jeffries can kiss my ass. I spent hours upon hours benchmarking the m15x and the m14x. Said my posts were spam and to stop posting so much. Apparently when your Avatar is Bobba Fett the professionalism goes right down the Rancor's mouth. StevenX1 point
-
A very good reason instead of M18x to buy a motorcycle...1 point
-
I'm gonna see if I can at least arrange a discount for T|I members through a Dell contact I know. Not sure if we'll get anything but it's worth a shot.1 point
-
1 point
-
Hey Brian can you post some nice 1200p screenshots from your R3? LOL1 point