Search the Community
Showing results for tags 'clevo'.
-
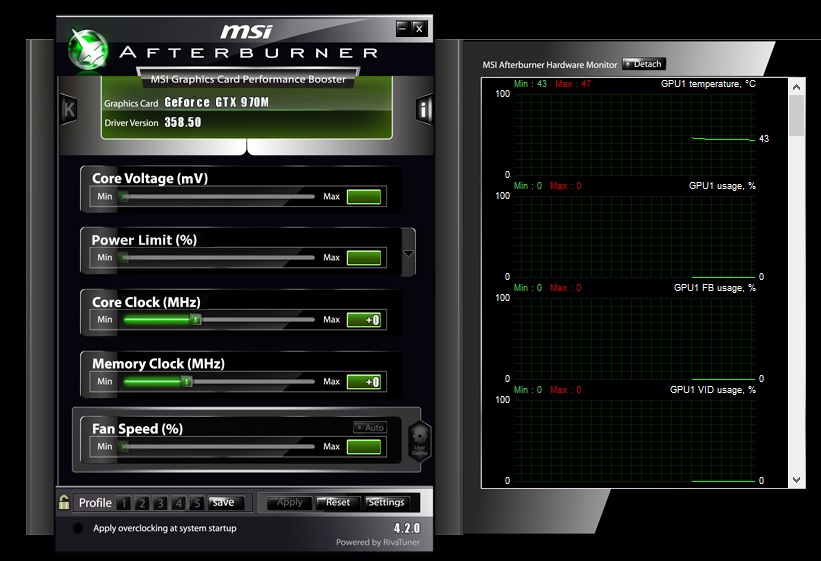
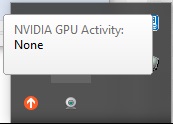
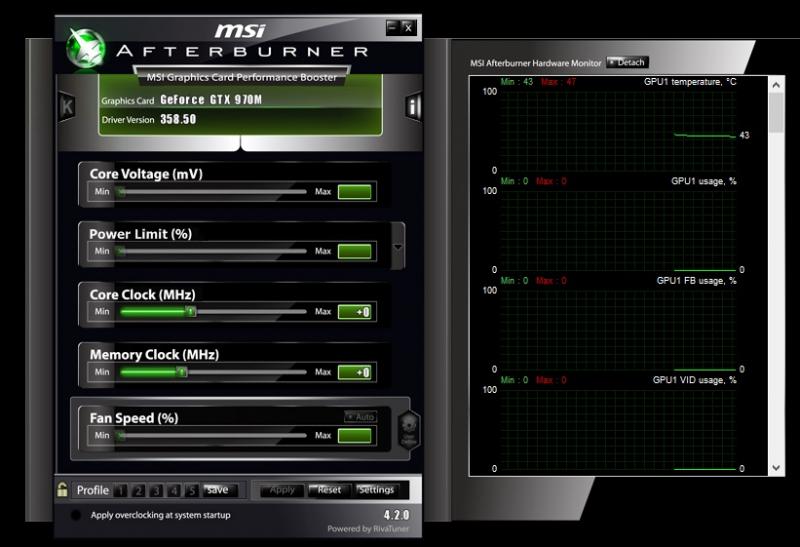
Hi all, I've my GTX 970M working for a good while, but I decided to re-apply the thermal paste today because my card seemed to get a bit hot and my gaming would suffer from fps drops. I figured re-applying the thermal paste would work, but it didn't. I then uninstalled the drivers and tried reinstalling different drivers to see if they'd perform better, but for some reason my FPS is constantly below 60 FPS no matter what game it is. I've tried checking my settings in nVidia control panel, I tried flashing the vBios, I've changed countless settings to try and make it work but nothing is working. I also noticed that when I use Speed Fan, the GPU section doesn't consistently show my GPU temps. It stays at 0 Celsius for the most part, but then randomly reads 47 Celsius. Any ideas of what could be wrong or how to possibly fix this? **EDIT** So I've noticed that the card just isn't working at all, which explains the low FPS. Although i'm not entirely sure why it's doing that. MSI Afterburner shows that it doesn't have any activity as well as the built-in nVidia GPU activity application I've got going on my task bar. In-game the icon isn't even colored, it's just black and white. I updated my bios with Prema's latest for my P150EM and I flashed my vBios, but still nothing. I've also tried installing 5 different drivers and they all yield the same results. Help would be much appreciated!!!!!

-
Hi all, It didn't dawn on me until recently after I purchased a new external harddrive with USB 3.0 that the transfer/write speeds seem to be really slow for USB 3.0. It got me thinking so I checked the Eurocom website for my laptop model for the drivers and they don't have drivers for USB 3.0 eXtensible Host for windows 10. I went onto Intel to try and find it but I couldn't find the drivers for windows 10 either, only windows 7 and 8. Any idea what might be the issue here and how to get my speeds up to par?
-
 Guessing who will be the first company to include the nVidia Pascal 1080 and AMD Polaris GPU's inside their Laptops: 1- 2- 3- 4-
 -
Hey guys, thought I would share a couple of very simple mods I did that others may benefit from. My P750ZM came with a wimpy little 240W AC adapter, that's really not adequate for a heavily overclocked 4790K and GTX 980M. I had a spare AC-100 (dual adapter) converter box and a spare Alienware 330W AC adapter. I purchased one of these dongles to convert the Dell 7.5mm connector to a different size AC plug. It does not matter what connector is on the male end, all we need is the Dell 7.5mm female connection, so any similar dongle will work. The wire gauge is smaller than I would like it to be, but the cable is short. So far I have noticed no power handling restrictions. The cable and end plugs on the dongle do not get hot, so it seems good in spite of the small wire gauge. If you can find a dongle made with larger gauge wire that would be a better option than the one I linked, but it does seem to work fine. So, what I did from here is I sacrificed the crappy little 240W adapter and stole the cable off of it. I used the original cable and strain relief boot from the 240W adapter to replace the silly short pigtail on the AC-100. I soldered it in place of the short pigtail and it looks factory. When soldering together the custom dongle, be sure to wire it correctly. Solder white to white. The ID signal wire and ground wire should be soldered together and that will tell your Alienware AC adapter to output the full 330W capacity. I used the short pigtail from the AC-100 converter and spliced it with the Dell adapter dongle, so now I can plug the 330W Alienware AC adapter into that dongle and connect it to a 4-prong Clevo laptop AC jack... easy-peasy. I can put my spare 330W Alienware adapter to good use on my Clevo laptops and now I have a nice long cord on my AC-100 converter box.
-
I've been trying unsuccessfully to flash the vbios on my Metabox P650RE-G. I've tried flashing with nvflash and keep encountering the message: "Identifying EEPROM... EEPROM ID (C8,4011) : GD GD25Q10 2.7-3.6V 1024Kx1S, page ERROR: ROM image too large for EEPROM" Even though the file I am attempting to flash is only 189KB. I've even tried flashing the stock vbios which is 188KB and that gives the same error. The the only change in the ROM's is that I altered some settings in Maxwell Bios Tweaker. I'm not sure if I'm meant to clear the EEPROM or doing something else. Any and all help is apprecieated CMD LOG------------------------------------------------------------------------------------------------------------- c:\GPU Overclock>nvflash --protectoff NVIDIA Firmware Update Utility (Version 5.236) Modified Version by Joe Dirt Adapter: GeForce GTX 970M (10DE,1618,1558,6543) H:--:NRM S:00,B:01,PCI,D:00,F:00 The display may go *BLANK* on and off for up to 10 seconds during access to the EEPROM depending on your display adapter and output device. Identifying EEPROM... EEPROM ID (C8,4011) : GD GD25Q10 2.7-3.6V 1024Kx1S, page Setting EEPROM software protect setting... Remove EEPROM write protect complete. c:\GPU Overclock>nvflash -6 1.rom NVIDIA Firmware Update Utility (Version 5.236) Modified Version by Joe Dirt Checking for matches between display adapter(s) and image(s)... Adapter: GeForce GTX 970M (10DE,1618,1558,6543) H:--:NRM S:00,B:01,PCI,D:00,F:00 WARNING: Firmware image PCI Subsystem ID (10DE.0000) does not match adapter PCI Subsystem ID (1558.6543). Please press 'y' to confirm override of PCI Subsystem ID's: Overriding PCI subsystem ID mismatch Current - Version:84.04.8C.00.14 ID:10DE:1618:10DE:0000 GM204 Board (Normal Board) Replace with - Version:84.04.8C.00.2E ID:10DE:1618:10DE:0000 GM204 Board (Normal Board) Update display adapter firmware? Press 'y' to confirm (any other key to abort): The display may go *BLANK* on and off for up to 10 seconds or more during the update process depending on your display adapter and output device. Identifying EEPROM... EEPROM ID (C8,4011) : GD GD25Q10 2.7-3.6V 1024Kx1S, page ERROR: ROM image too large for EEPROM
-
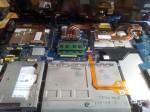
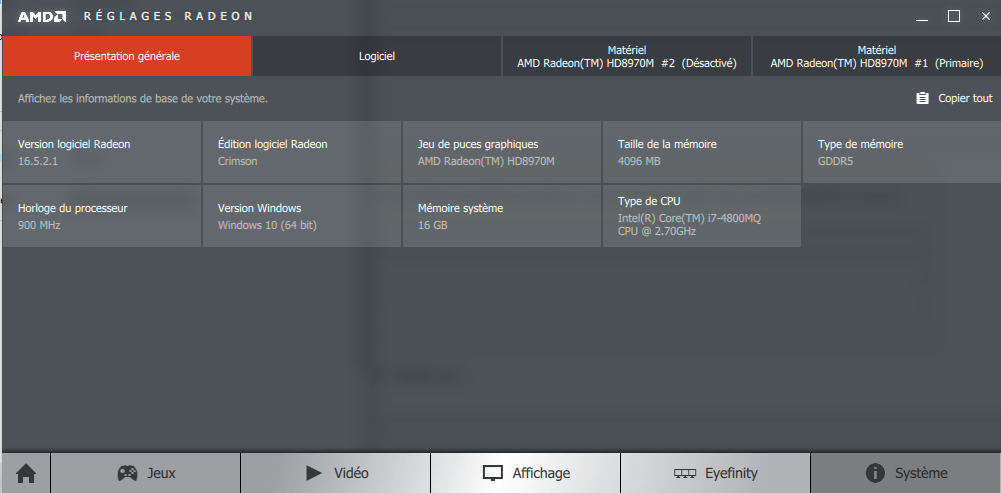
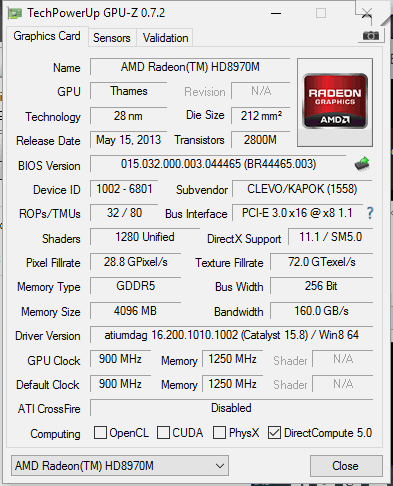
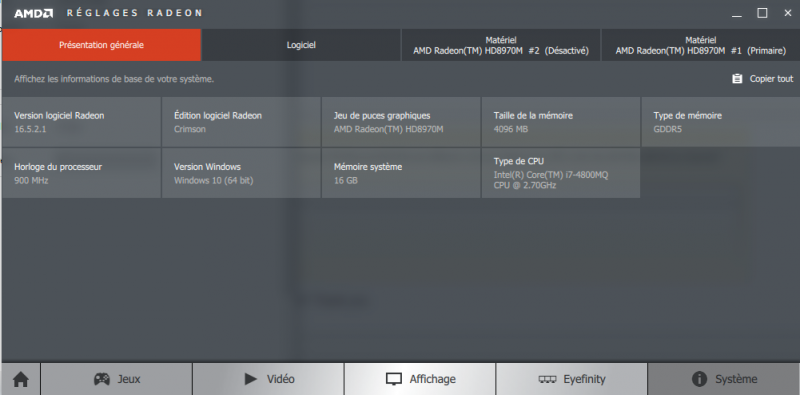
Hello, I come to you because it is very rare to find topic concerning crossfire notebook. I have bought 2 years ago a p370sm with 2 8970m 4GB paired in crossfire. 1 year ago , one of the two graphic card stopped to work. I've tried to swap the graphic card from their slot and I concluded that one of the two gpu was dead. I stayed for a long time with only one GPU on the primary slot, and 2 weeks ago , i ordered a copy of my card on Aliexpress: http://www.aliexpress.com/item/HD8970M-HD-8970M-R9-290X-4GB-GDDR5-MXM-for-CLEVO-P570WM-P370EM-P37xSM-P37xSMA-P150EM-P150SM/1978000913.html The card was recognized by my laptop and It showed two cards 8970m in the Device Manager. On CCC , the two cards were recognized but the second was "(desactivated"). I tried to reinstall catalyst but the problem is still here , i can't enable crossfire on the Radeon menu. i've made a gpu-z test and i've seen that the version of the two GPU were not the same. Moreover the bus version is different between the two cards. The responsible can possibly be the wire between the gpus ,it stayed in a drawer for 1 year. I've heard that @Prema is very qualified in Clevo gpus. Thank you for your future response. Have a good day, (All apologies for my english , I'm french)

-
Hi guys. i've bought a w350et from a friend of mine but it has a uk keyboard and it is realy strange to me and i cant find a pt-pt keyboard to sell. Also i cant find on the internet the latest drivers and utilities, and for bios updates i cant find anything from clevo. In my current bios i cant find anything about hyper threading and the thing to activate and deactivate igpu. Can u guys please help me find out this things? os win 10
-
 Just wondering if anyone else has experienced issues with excessive backlight bleed on their Clevo laptop? The panel is a 75Hz LP173WF4-SPF1.
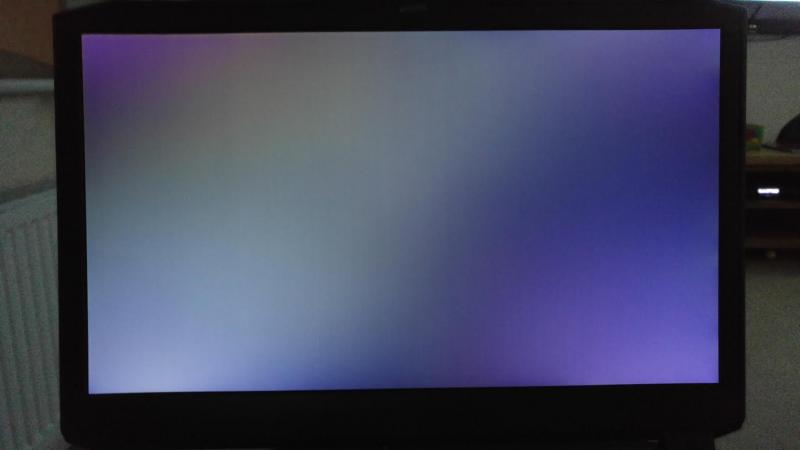
-
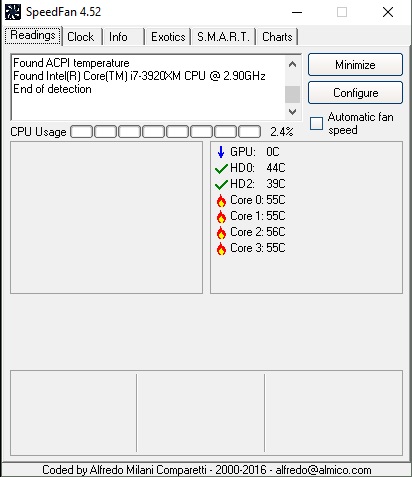
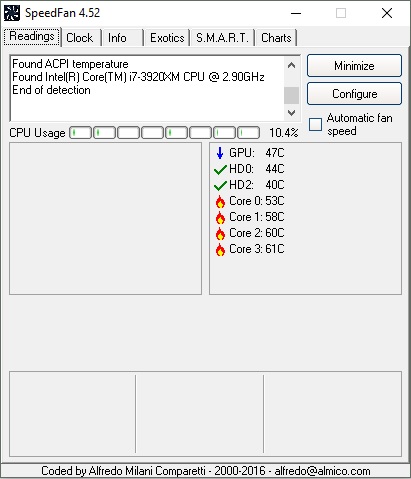
Does anyone have any good suggestions on how to make my gpu run cooler on a Clevo p170em? I'm currently running high 80's and low 90's on high graphical games like the division. I do use fn +9 to turn fans full blast which brings the temps down to mid 80's. I would like the overall temps to come down without the full fans on mode. thanks
-
[Preface: I searched for about 30 minutes on Tech|Inferno before posting this, no one likes repeatied posts: ] I have a Clevo P370SM3 (now a P370SM) running dual 980m's that were part of an upgrade kit from Eurocom. I am considering using PremaMod's VBIOS mods on this page to take advantage of Prema's GPU improvements for the 980m. On that link on Page 4 are (3) different variants of the 980m GPU. How do I tell which one is the correct one for my 980m GPU's? Nvidia Inspector? If I had to speculate I would assume the GTX980M_8GB_MXM_OC_PM? MAXWELL GTX980M_8GB_MXM_OC_PM GTX980M-G_8GB_MXM_ZM_OC_PM GTX980M-G_8GB_MXM_DM_OC_PM Constructive thoughts or suggestions appreciated. Kind Regards, Koinonos P.S. I went from 12,000 on 3DMark 2011 on 780m SLI to 16,400 on 980m SLI. A nice step up and I think 18,000 is reachable with minor adjustments.
-
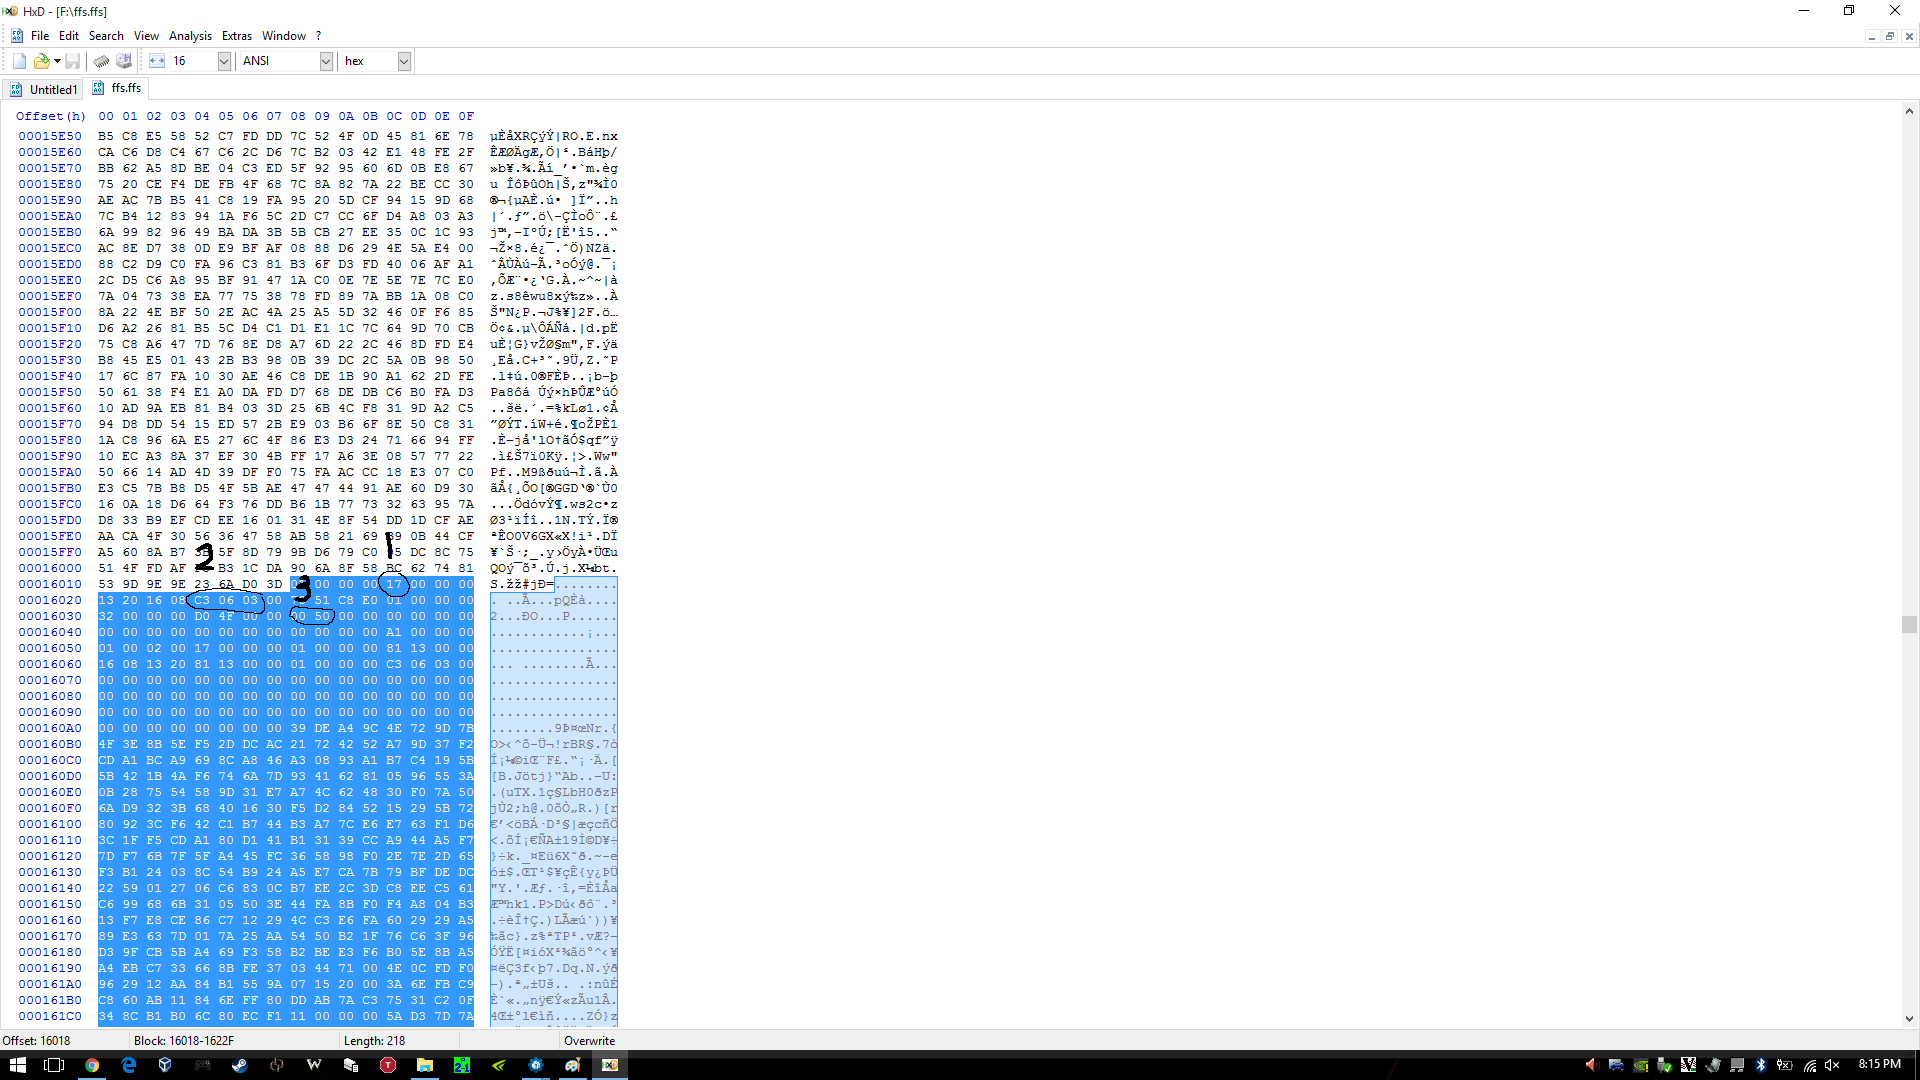
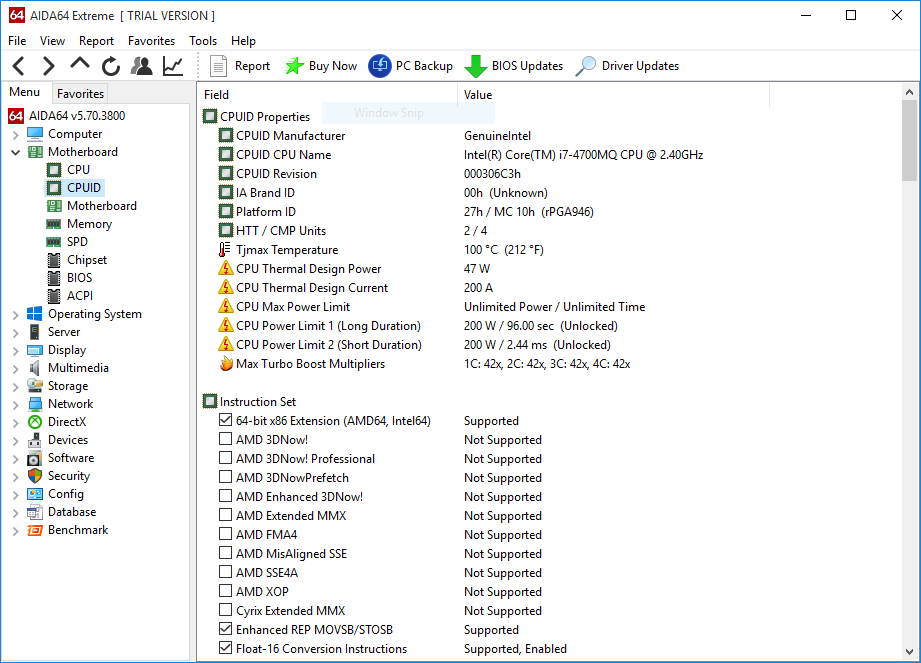
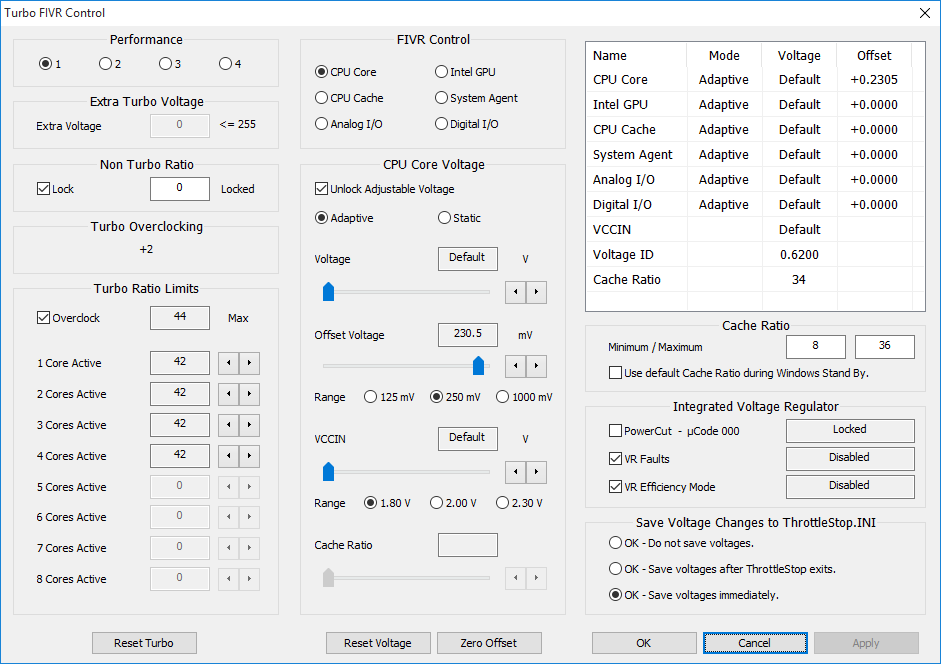
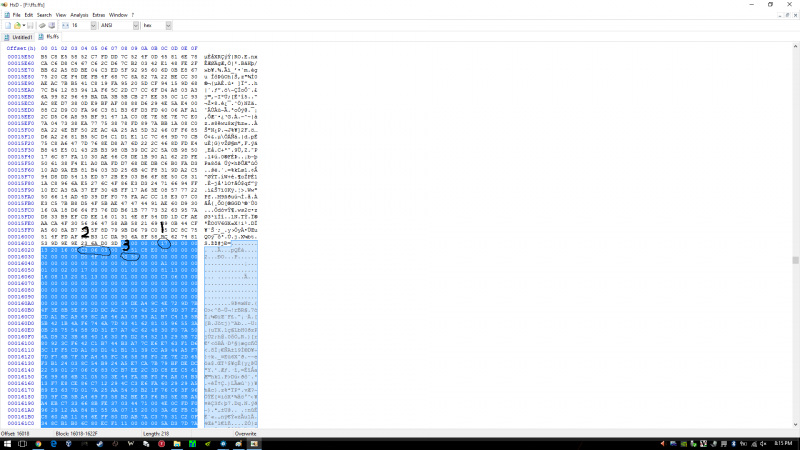
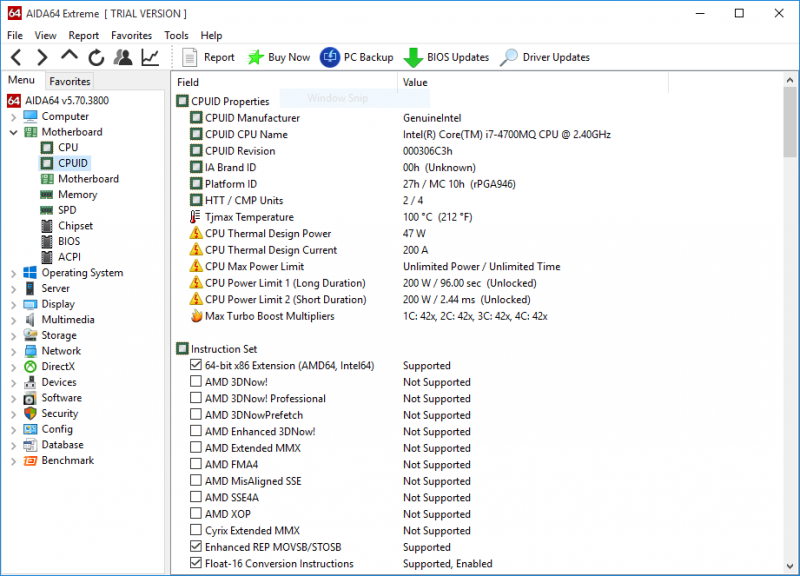
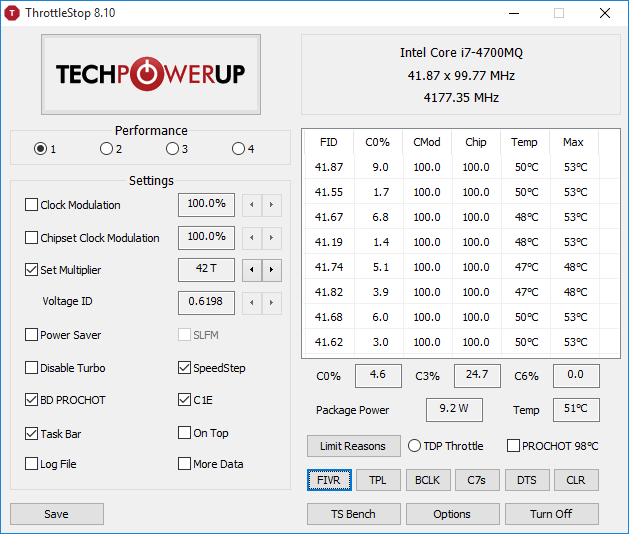
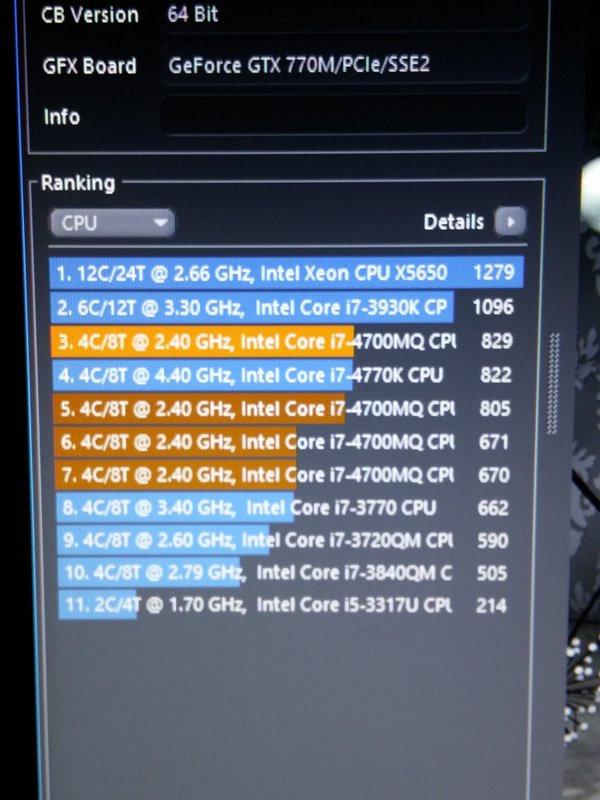
 Hi all, After I saw this result: http://hwbot.org/submission/2830783_0.0_cpu_frequency_core_i7_4700mq_4550_mhz , I got interested to replicate it with a similar method and decided to share my steps to score higher than a desktop 4.4ghz 4770k (according to cinebench ;)) Intel Stock microcode has a Turbo multiplier bin glitch that allows unlimited multiplier increase, I used prema's bios and removed a cpu microcode update to let the cpu run the stock glitched microcode. I will share the bios file, use it at your own responsibility and if you know what you are doing. 1) Download or dump your BIOS, if your bios is ami (my case) then use AFUWINx64 2) Get AMI Aptio UEFI MMTool v5.0.0.7 and UEFITool, HxD (or your fav hex editor) 3) Open your BIOS image with UEFITool, then File>Search, in our case Haswell has the following ID: , enter C3 06 03 in Hex pattern dialog click OK 4) You can see the last four Hex pattern result, double click the first result and a structure item in the main dialog will be highlighted, right click>Extract as-is to a folder (be sure to be neat and organized or you will mess things up) 5) Do the same with the third result and save it as a diff name other than the first one 6) Now in the folder you have saved the 2 files from step 4&5, open the first one with HxD(any hex editor) and look for be sure to choose Datatype:Hex-values then hit search 7) Press F3 to find again till you reach this pattern(highlighted): 8) (1) Indicates the microcode version, 17 in this case, we want 00 (cpu stock), (2) the platform ID (the search context we reached at) (3) the microcode length = 5000 (in my case) in reverse (important to know when the microcode ends in order to remove). 9) Adjust the cursor on the beginning of the highlight text/microcode (01) right click>Select Block>Length>5000 or whatever in your case 10) Delete the highlighted blocks (after step 9) then save the file 11) Do the same with the second result from step 3 to 10 then save 12) go back to UEFITool, double click the first result like you did in step 4, right click the highlighted structure in the main dialogue > Replace as-is then choose the FIRST file you edited in HxD 13) Double click the third result and follow step 12 with the SECOND file you edited in HxD 14) You will see "Rebuild" in action row, File>Save image as> P15SM04.PM2 in my case (can be any name as long as your flashing tool recognize it) 15) Open AMI Aptio MMTool > Load Image > your modified rom > CPU Patch Tab and verify there is no 06C3 in CPU ID 16) Be brave and flash your BIOS Windows Mod to remove auto update microcode on boot: Click on Start Type CMD in the Search box Right-click on CMD and choose Run as Administrator In the Command Prompt window and change to the directory where the file is located. To do this, use the CD command. You can follow the example below. to change to the Windows\System32 directory you would enter the following command and Press Enter cd \windows\system32 Now use the DEL command to delete the offending file. Type DEL mcupdate_GenuineIntel (and backup) Done! Overclocking: 1) Check CPU MCID:Download AIDA64 , open AIDA64>Motherboard>CPUID and look at IA Brand ID, it should be 00h 2) Download the latest beta Throttlestop (not stable) in my case 810b2 3) Make sure you don't have XTU installed or running (especially at startup) or it will reset any changes in Throttlestop 4) Open throttlestop, click FIVR and look at "[checkbox] Overclock [DIALOG] Max" and note it down 5) Now here is the magic! close FIVR and open it again, [DIALOG] Max value should increase by 2 (up to 80x max ~ 8ghz) everytime you open and close FIVR aslong as long as you increase one of the cores, LOL 6) Increase "Set multiplier" to maximum after your final changes in FVIR (Iv set mine to 42x all cores, so I increased set multiplier to 42 aswell - note voltage ID is messed up ignore it) 7) Increase voltage in FVIR for stability by using cinebench run 3 times instead of prime95, as it stresses FPU which increases heat and tdp instead... 8) Unlock maximum TDP and turbo wattage in TPL, in my case: 9) Done! Changes should be persistent as long as you dont save and exit from BIOS, here is my result in Cinebench with temp throttling (from 4.3 to 3.9 ghz), room temp 25-27 XD: (no.1 at 4.2ghz, no.7 stock latest microcode) UPDATE: OCed RAM from 1600 to 1866, [email protected], +200mV adaptive vcore: I'm also getting 852 with 4.5ghz with this adaptive voltage-like method: Note: You can maintain maximum turbo multiplier bin with latest microcode after setting it in throttlestop (imp: no crash when testing; make sure its stable) then flash the latest microcode for bug fixes (more stable on my side at x45 with only +230mv, depends on your CPU, i7-4800+ will require less voltage), and you will still be able to set the bin high (up to 80x) as long as you don't crash... Post your results and I'll copy it here. Tips: I highly recommend lapping heatsink and use liquid metal thermal paste or any decent tp ( I used collaboratory liquid ultra) before doing this -If your cpu throttles no matter what, try decreasing dynamic voltage in FVIR and look at maximum value the package power indicate while stressing, decrease the value by 10% in order to avoid rapid throttling (happens with bad TP) -Do not attempt the OC if you are looking after long service life wear&tear (I expect 2 years from now if I stress the cpu everyday for an hour, which i never do :P) Happy overclocking, and don't melt your laptop Thanks to Intel if they leaked this on purpose, kinda futureproofed my machine XD P150SM 1.03.05 modded bios (at your own risk): MOD EDIT: link removed, please use a clean BIOS base because of legal implications with Intel :
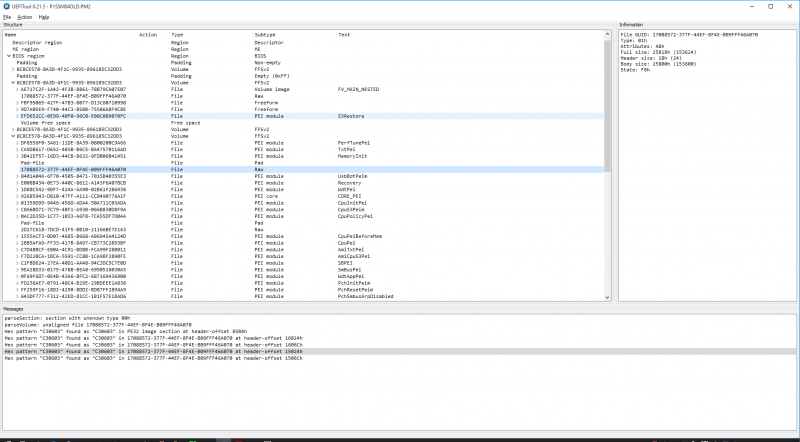


-
Dear Respected Members, I want your advice please: Upgrading my Clevo P570WM from GTX 880m SLI to GTX 980m SLI (=$2000) or the new GTX 1070/1080 if applicable? I need to verify if it will support one or 2 of them in SLI?? or Get a new Clevo P870 or Eurocom Sky 9XE Unlocked with the 980m's SLI (=$3500)? and then I have to sell my old Beast and if your advice is to go for the new system, what is the best choice?: 1- GTX 980m SLI 2- GTX 980 Desktop 3- Just wait for the GTX 980 Desktop SLI? 4- GTX 1070/1080 if applicable 5- Something else Best Regards.
-
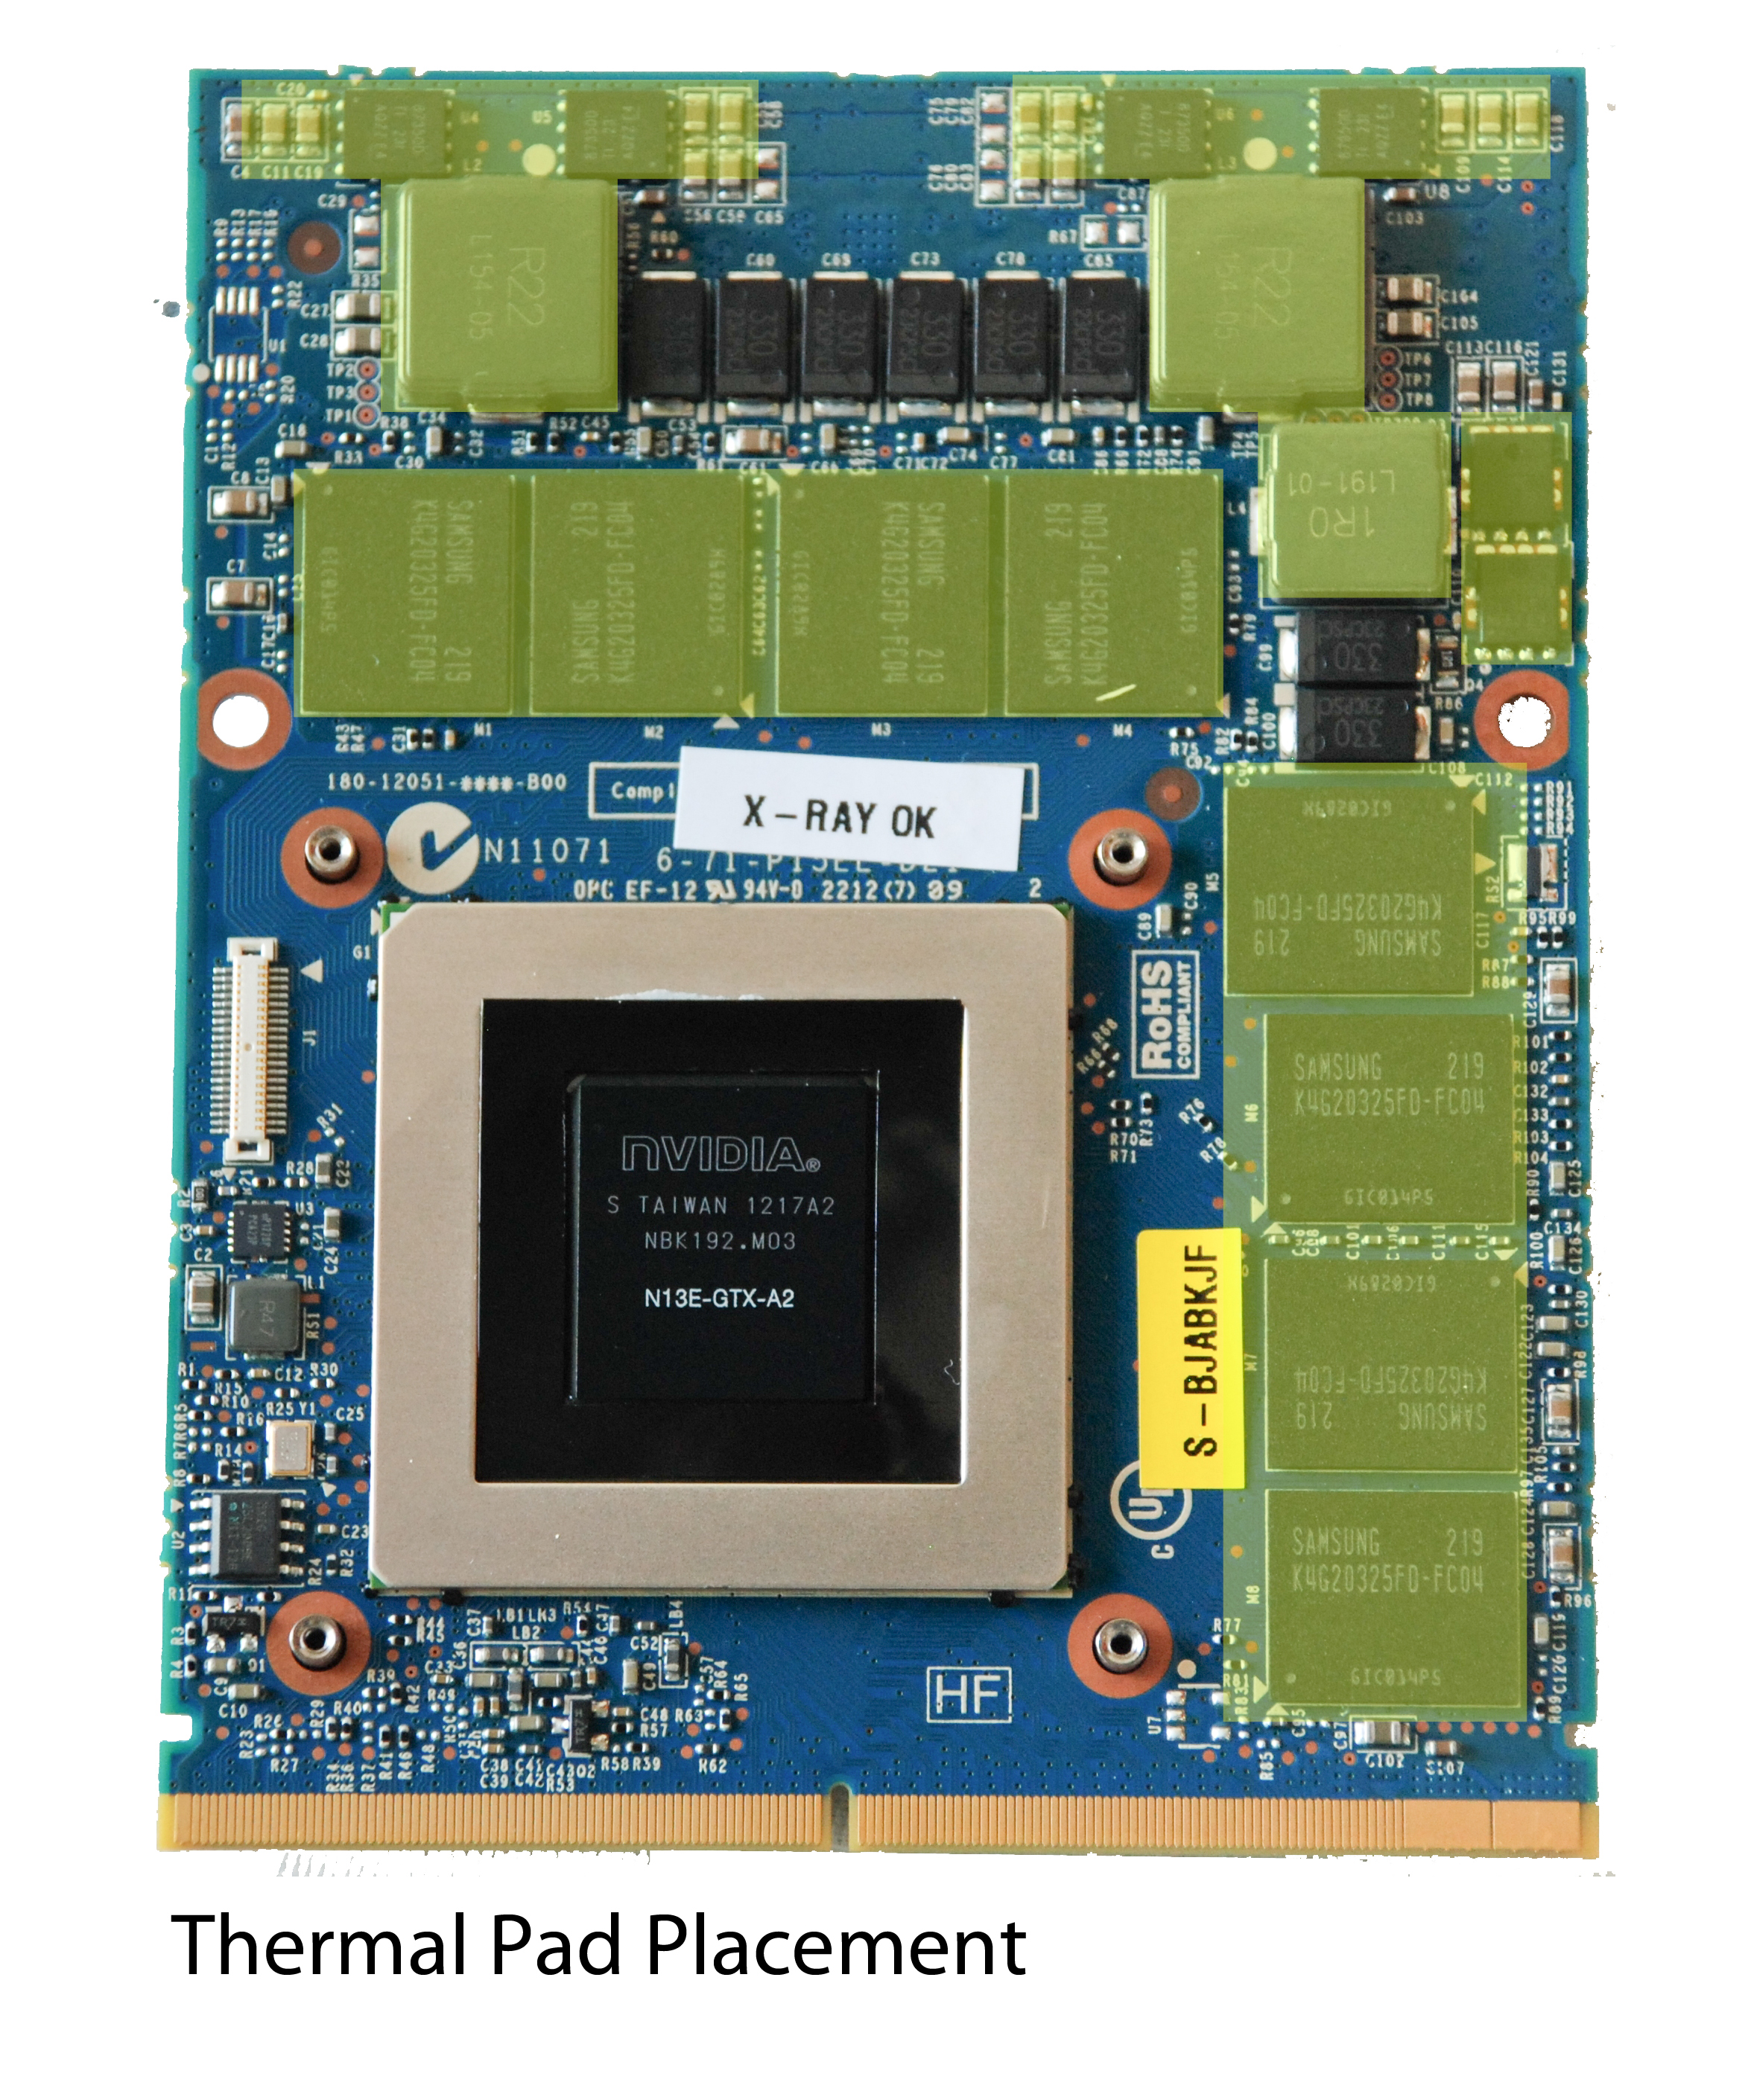
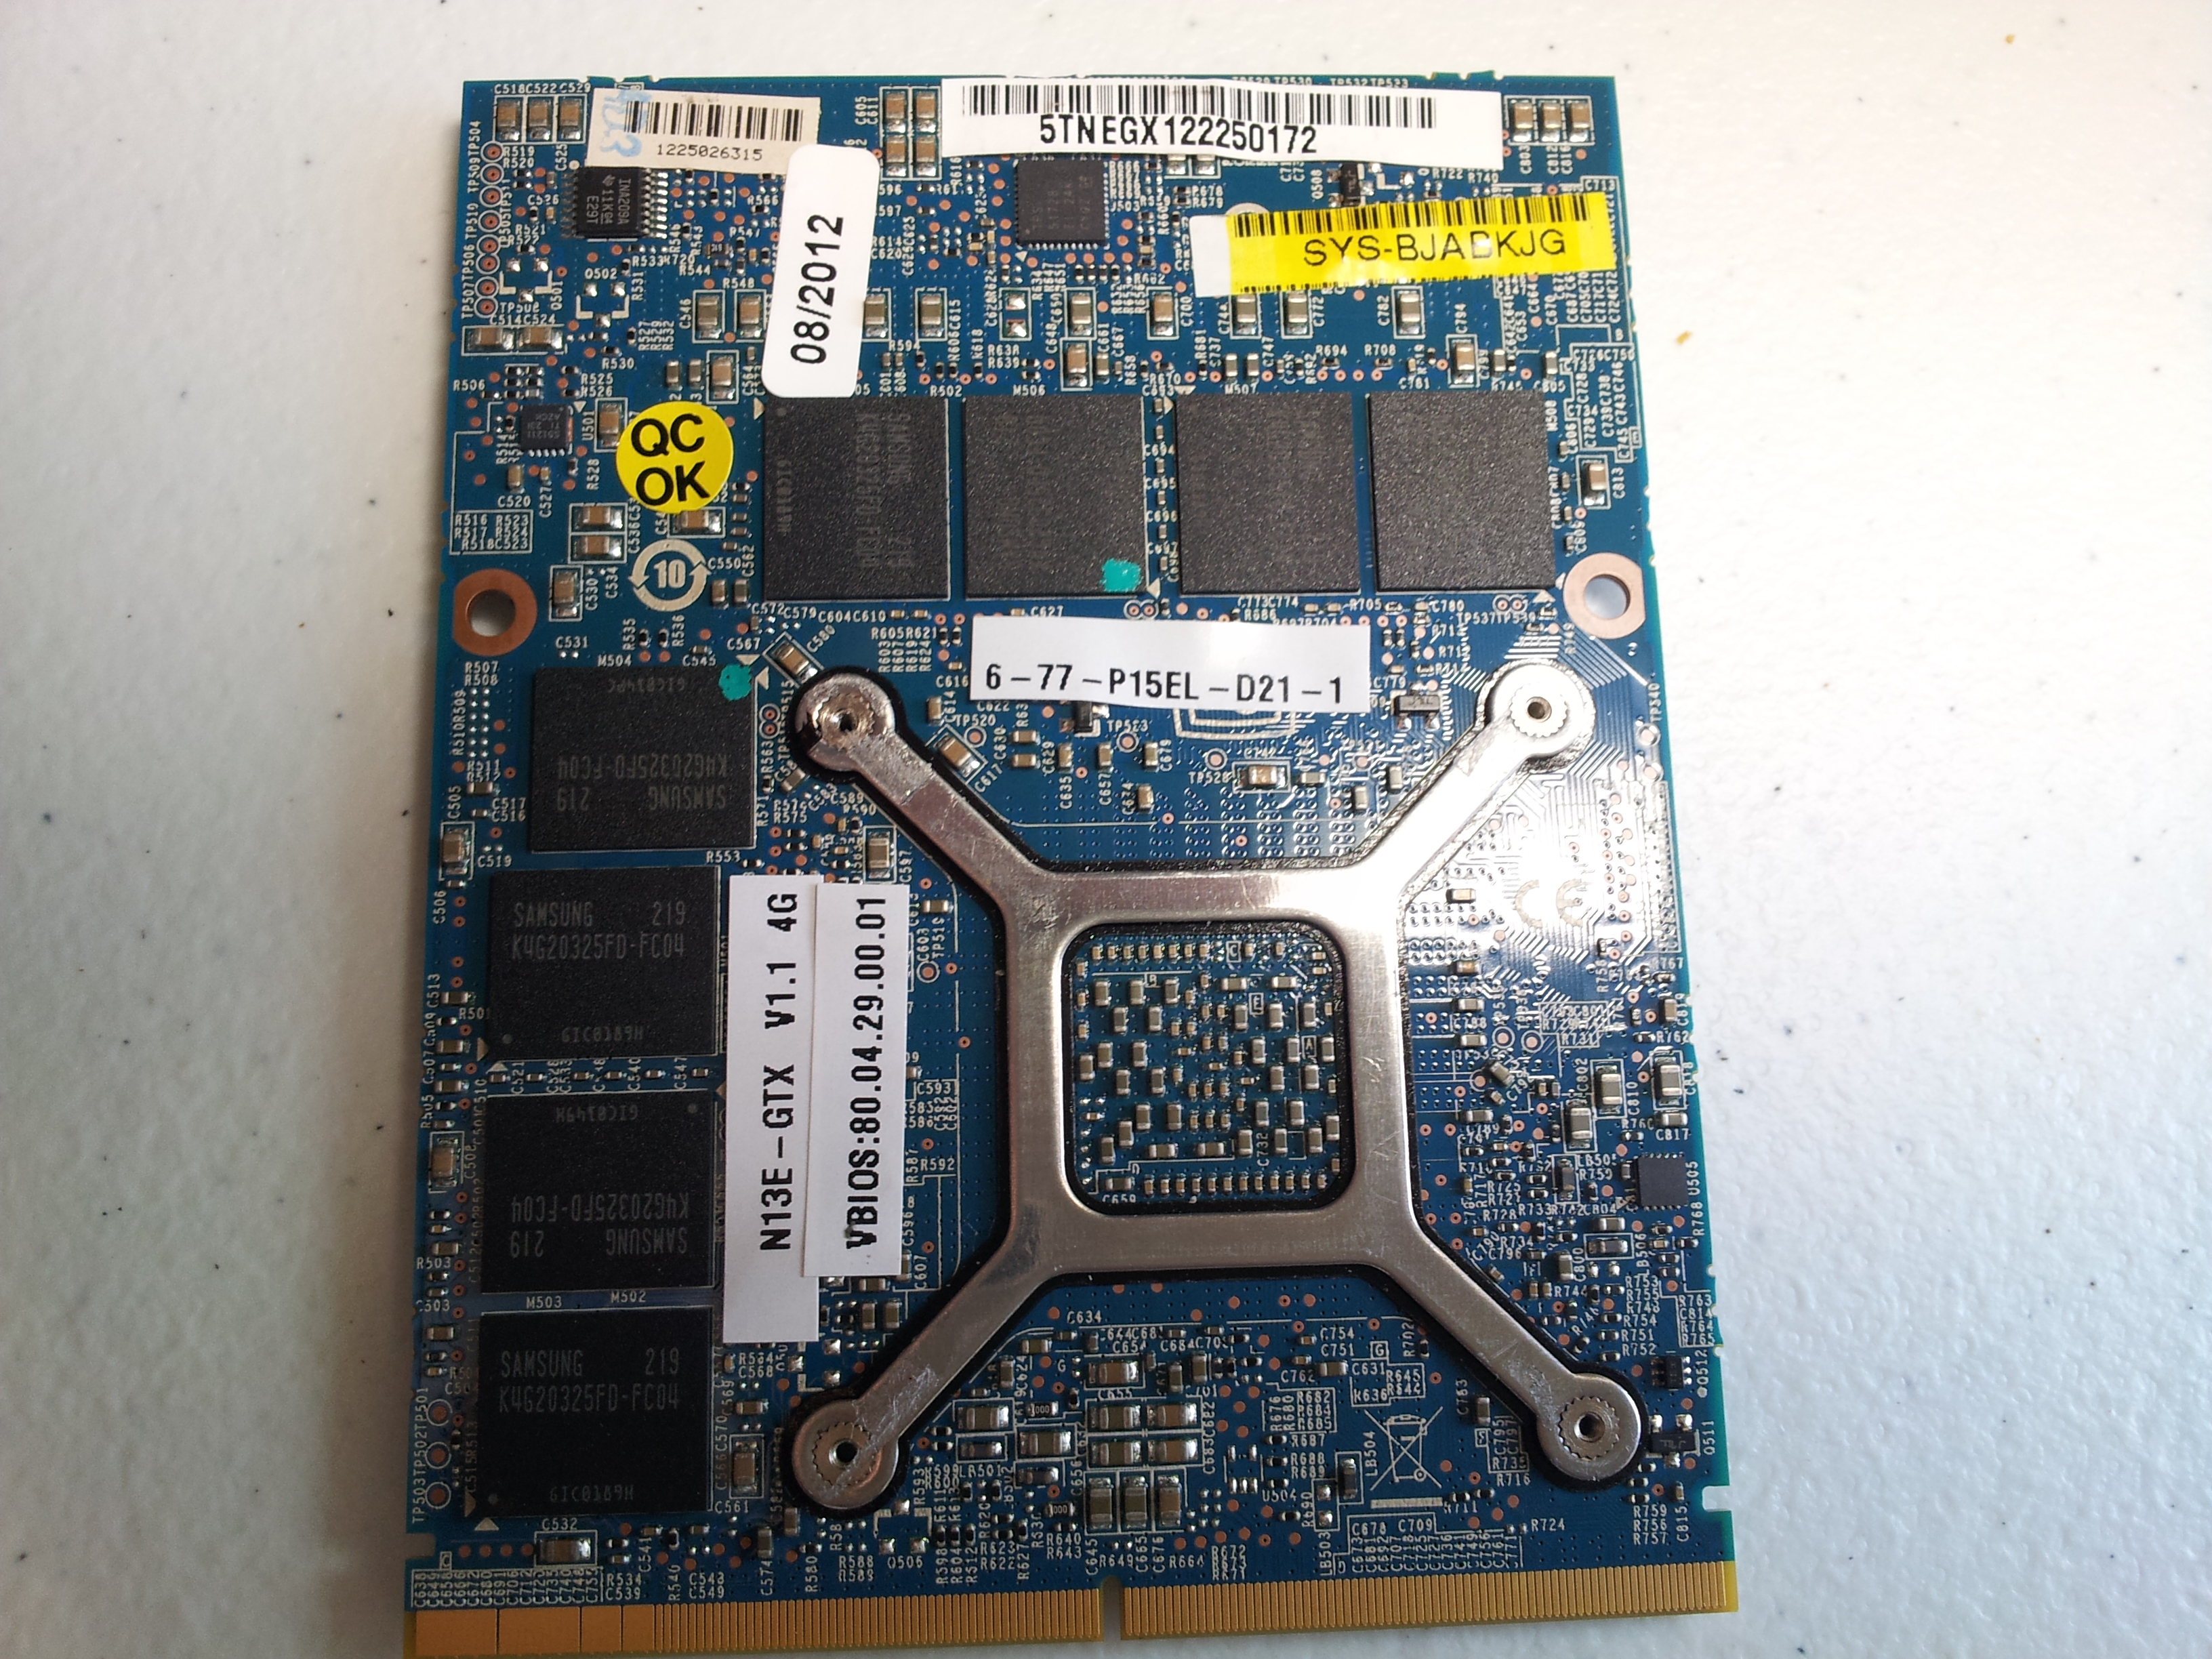
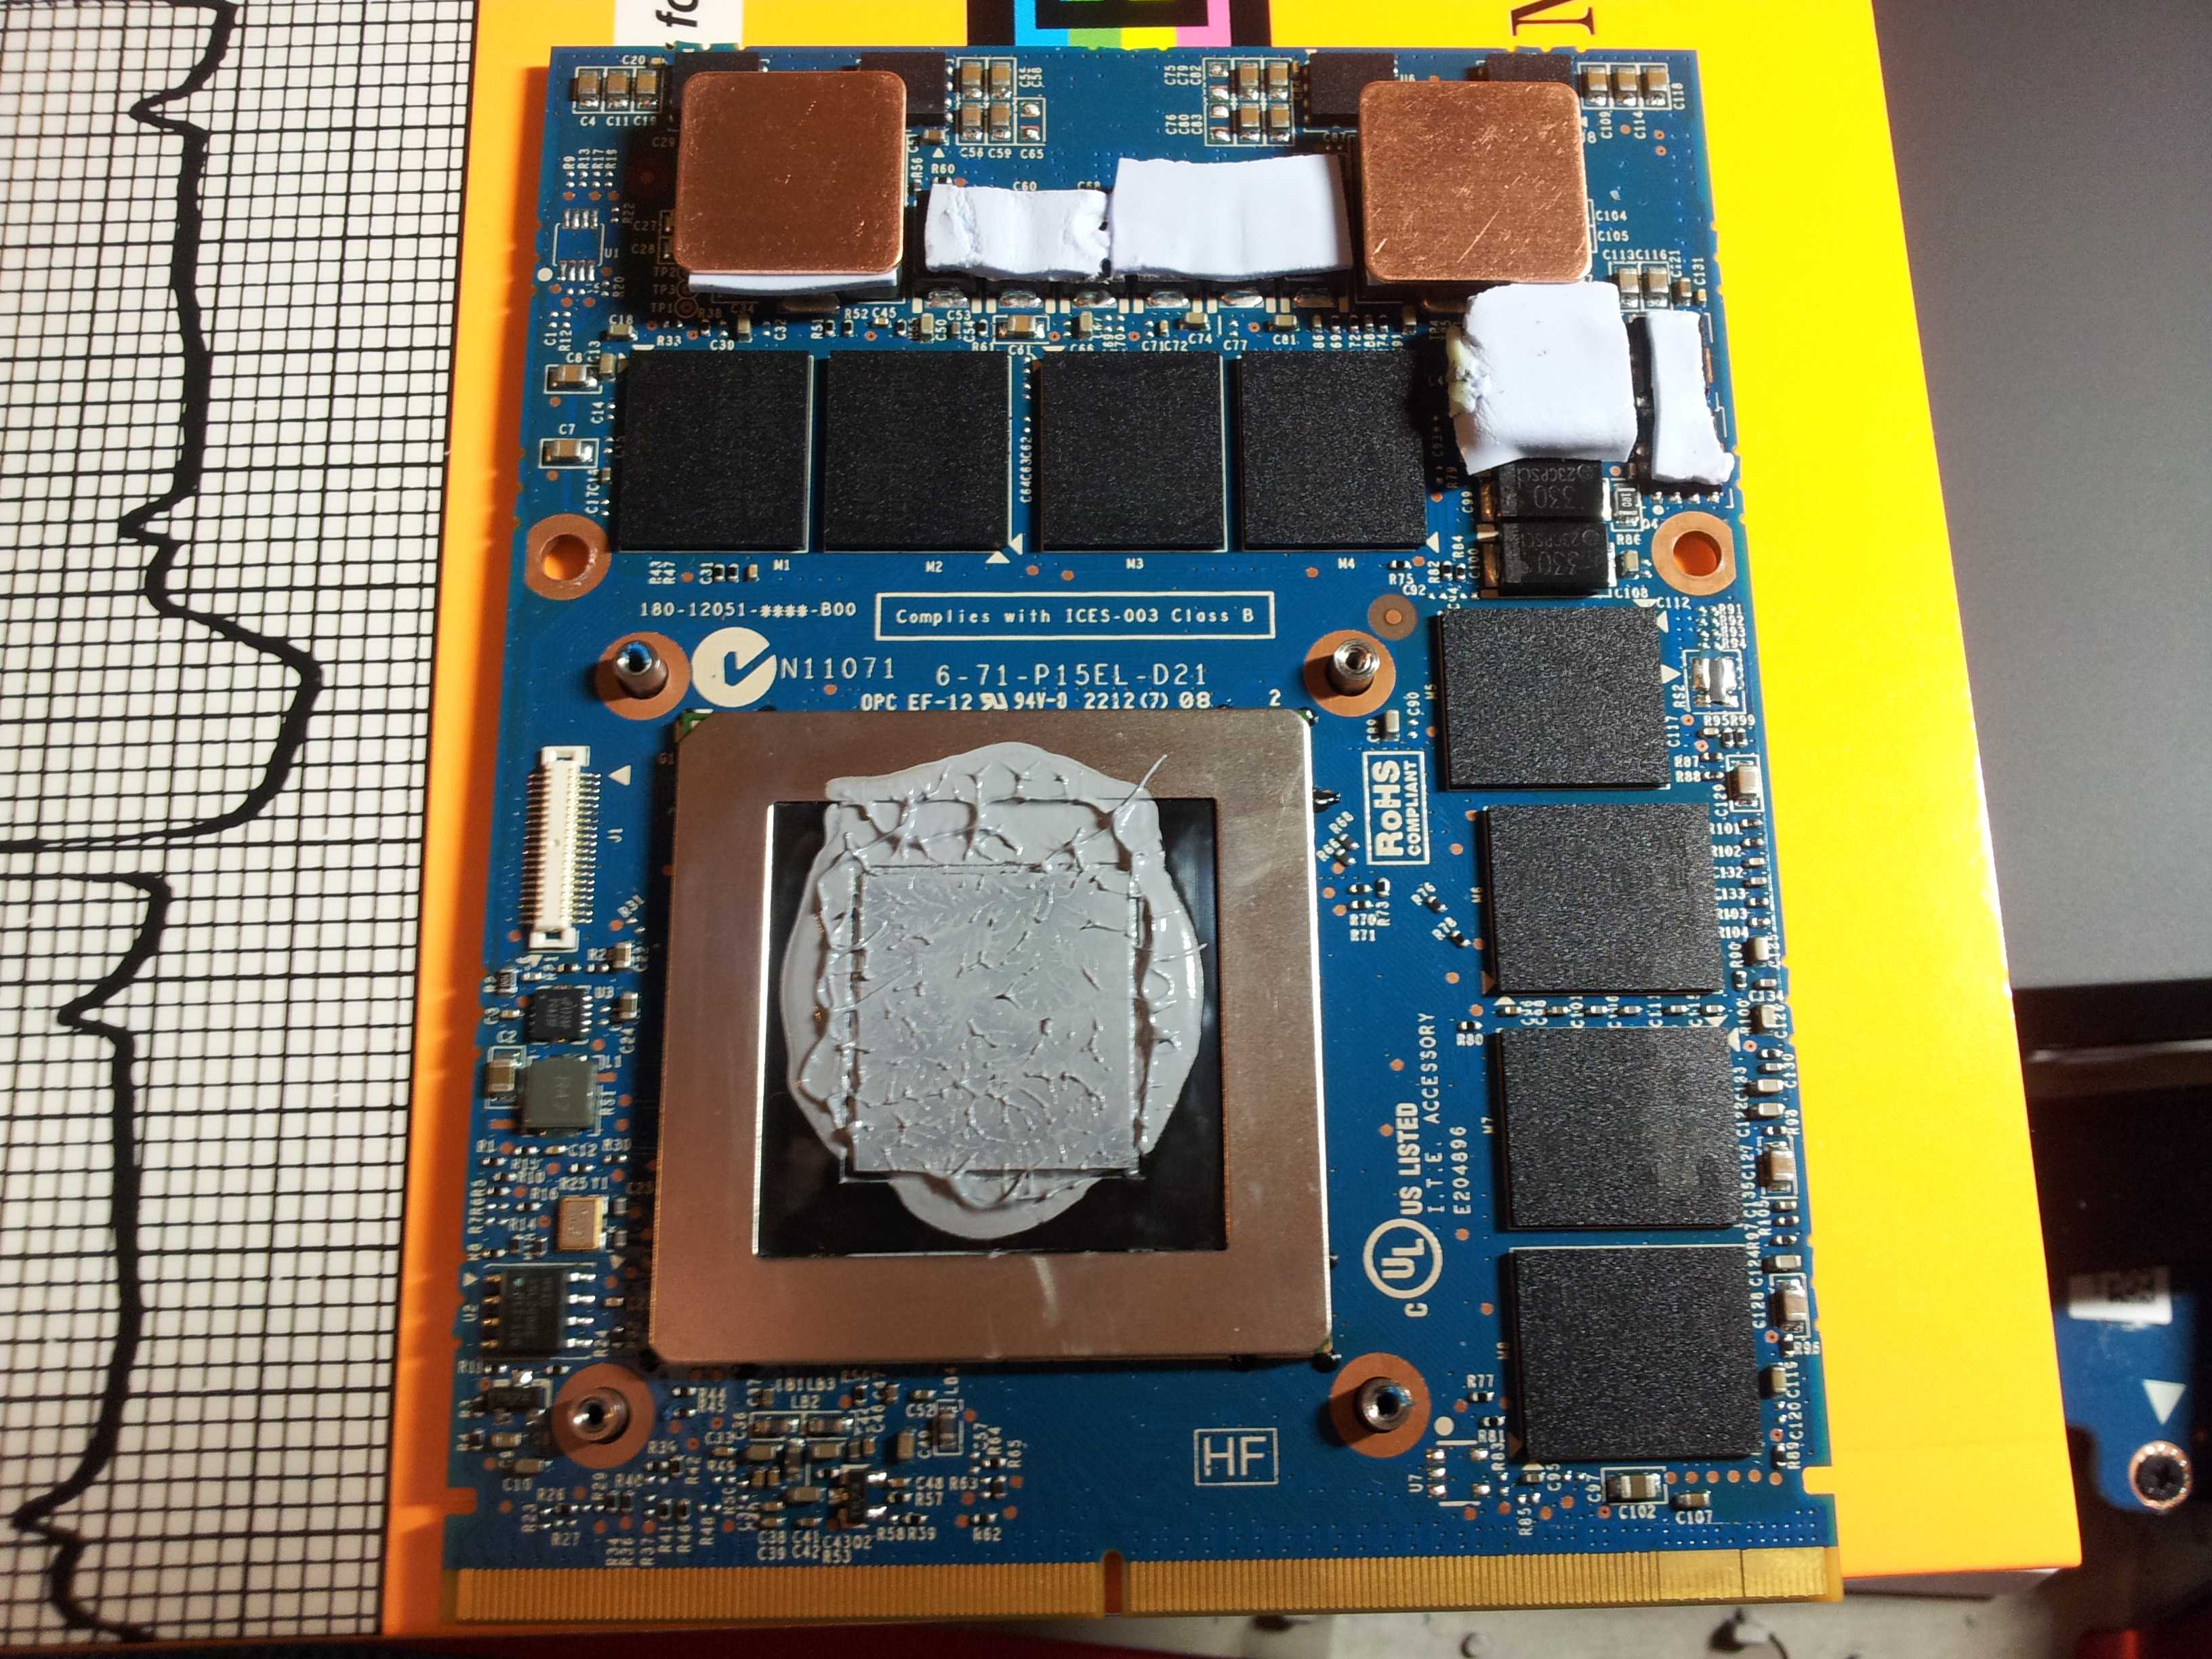
Do I need to change the thermal pads for GTX 780m every time I want to repast? if so, what is the rghit thikniss for it? and where can I but it? Clevo P570wm - GTX 780m SLI Best Regards,
-
Dear Members, I just want to create this Topic to list all laptop systems supporting (2X) Desktop GTX 980 SLI, and all information related to them, technical, pricing and reviews. In the same time, it will help me and other respected members to decide which one should we buy. 1- MSI GT80S Titan Skylake, SLI GTX980 Desktop GPU https://www.msi.com/Notebook/GT80S-6QF-TITAN-SLI-29TH-ANNIVERSARY-EDITION.html#hero-overview -------------------------------------------------------------- 2- New Asus ROG GX800 watercooled Gaming-Laptop Regards,
-
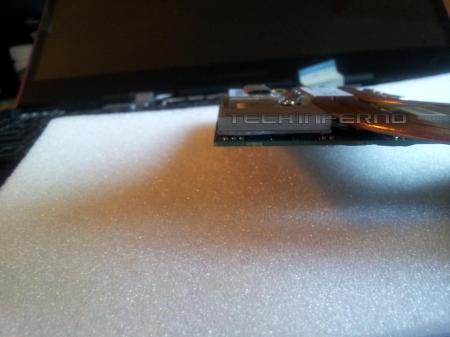
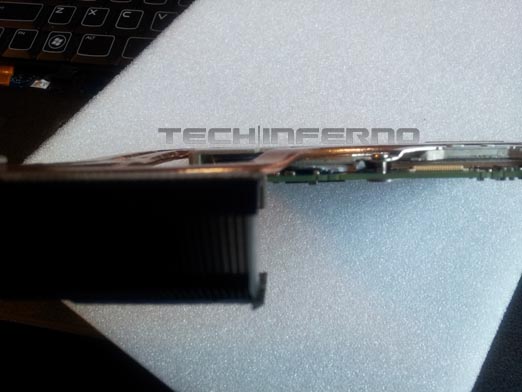
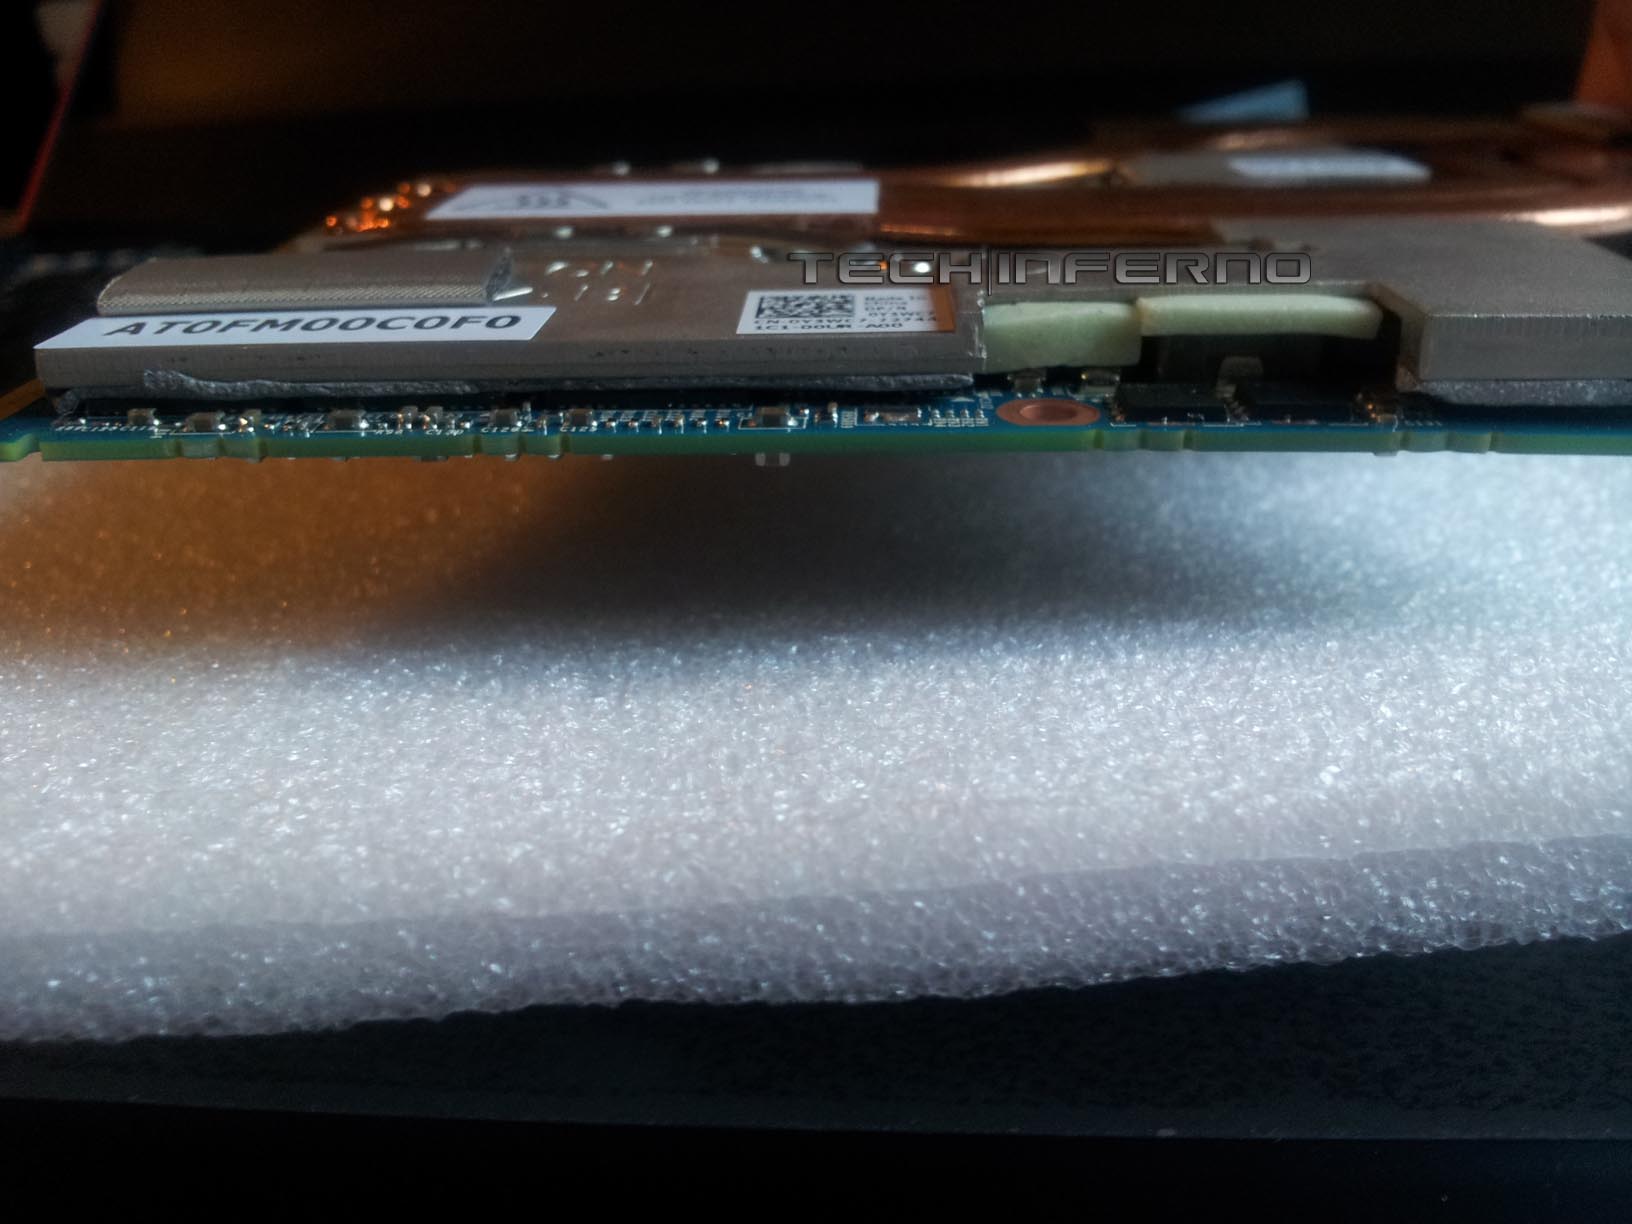
 Hi all! Figured since there aren't many avenues out there as of yet that properly show how to dissect your phoenix, I'd try to take up the mantle with my own experience in upgrading the LCD panel from FHD 1080 to the 4K panel. Before we get started, I'd like to present a list a useful tools to have beforehand if you intend to pursue this endeavor. I'll be providing pictures of my own tools as well as links to various components you need for purchase if you intend to follow-suit: MOD EDIT: ATTENTION HUGE PICTURE LOAD AHEAD!
 -
Hello. My crossfire 7970m clevo p370em boots to a black screen. Sometimes I get a blue one with lines or just random corrupted pixels. This points me to belive the gpu has died especially since the hot keys for keyboard lighting work. When it was last working, crossfire was disabled so I am thinking that the second gpu is still working but I don't know how to switch to that one. Is there a cable I can unplug inside the laptop? I am not good with hardware meddling.. Also,if I can't even see the bios is it possible that the motherboard is the problem? Please help, any info is great. Thank you
-
 Hello. This might look like a strange question to ask but I would like to know if at this point it is worth it upgrading from a P750ZM to a P750DM-G ? My current specs are the best I could get in my ZM. -i7 4790K (overclocked) @ 4.3 GHZ -16 GB Ram Hyper X Impact DDR3 -GTX 980M custom Vbios (Overclocked) -2 x Samsung 950 Pro 500 Gb V-Nand SSD -1X 1TO SSHD (seagate) 7200. I was wondering if there is any advantage the DM has over the ZM are Intel 6 gen processors worth it over my i7 4790K ? Is there any advantage of having thunderbolt on a laptop that's already up-gradable ? Is there any other advantages of getting a DM-G at this point in time. I have been hearing a lot about 6 gen intel and the new 750DM-G's but I got my ZM expecting to keep it for at least two years upgrading to a top of the line PASCAL GPU along the way when those are available and when the bios updates are available before buying a new clevo barebone and transferring my GPU and SSD's into my new clevo system when I purchase it I was expecting to do this at around X-Mas 2016-Early 2017. Is there any good reason for upgrading before end 2016 early 2017 ? I am currently torn between sending the money in this hobby or in another one (film photography)..... Thank you in advance for your help and advice !
 -
Hi all, I am new to this site but until now haven't had any trouble with this beast, or at least put up with them. I have had trouble for a while with the actual display not working, I have been using an external monitor which has worked up until now. The problem came when I bought a new one and went to go dual screen. I stupidly changed some settings and restarted. Now nothing works at all. I have taken the surrounding parts to the screen apart and have found the cable that runs to the back of the screen has frayed a little. I am having such a pain trying to find a replacement cable for it, as I am hoping this will be the cheaper option before buying a replacement screen. Any help would be much appreciated.
-
Hi all, as I already stated elsewhere in this forum, I've just bought a Batman 2.0 (P771DM-G) few days ago. What I've discovered is the computer likes to auto-resume from standby if it.. "thinks it's worth to do so".. I mean: it seems that if it requires more heat dissipation, it could wake up automously withing 20"-25". It happens only after some gaming session, that's why I think it might be some forced policy coming from the Clevo Control Center or the BIOS itself. Oh, and I troubleshooted with powercfg -lastwake and -waketimers without any more detail, and the Windows Event Viewer just says the PC got resumed by an "unknown reason". Since I think here in this forum there is the best knowledge about BIOS and low-level policies of those computers, I'd like to get a confirmation about my theory. Is it something that can be avoided with some Clevo CC setting? Or I need to let the computer dissipate some minutes before actually trying to suspend it for the next hours? I haven't the BIOS/VBIOS revision numbers here, but the computer has been assembled just 10 days ago (and I don't see any firmware update in the reseller website: http://santech.eu R39 model). The Clevo Control Center is the latest available in that website: v5.0000.0.22 Thanks for the support, guys! EDIT: wrong Model. It's a P771DM-G.
-
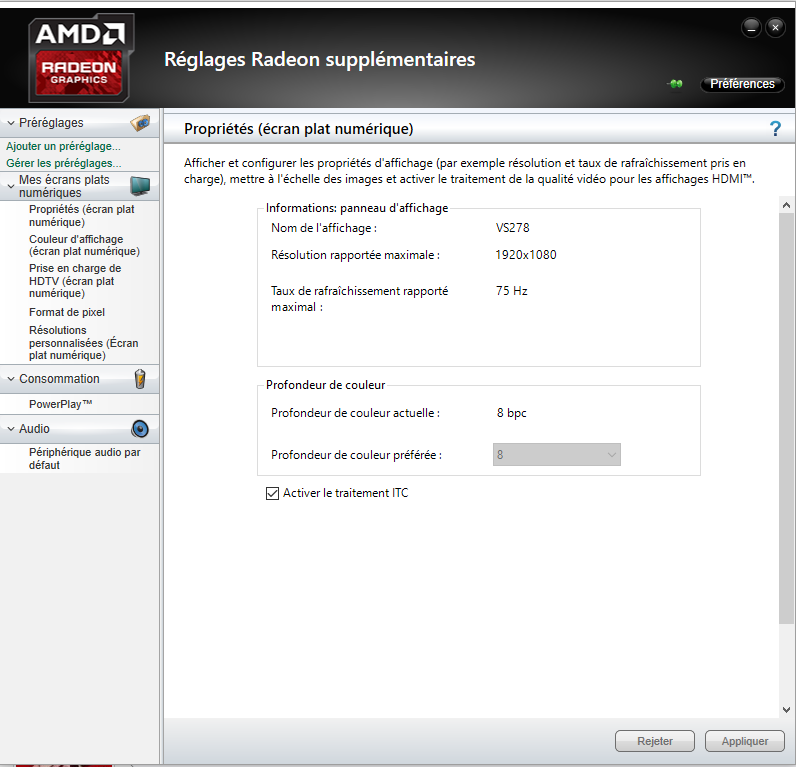
Hi all, I finally stopped being a lurker here because now own a Batman 2.0 (P771DM-G) since a week! (Santech rebranded). Great machine, I'd say. It comes with the 970M flavour. What I'm wondering, though, is: IS IT POSSIBLE to raise the G-SYNC refresh rate for games up to the maximum specification of the screen? (possibily without touching VBIOS and such) So far I couldn't bring it beyond 60 Hz in-game. Those are my attempts, so far: - I Created a custom resolution for the screen in the NVIDIA Contorl Panel: 1920x1080 @ 75 Hz - It seems to work (specific websites do recognize the panel refresh at 75-ish Hz) - Activated G-SYNC (for full screen only) in NVIDIA the CP - Disabled Shadowplay (turning it on does the same, btw), just to be sure its 60FPS recording wasn't the limiting factor - Then start a Full Screen game, for example Team Fortress 2 (with all max settings, as like as GeForce experience allows) - Turn V-Sync Off in the game (Turning it On does not change anything in that regard) RESULT: The game is G-SYNC'd at 60 Hz (SIXTY HERTZ), instead of 75. SMH Is there a known and easy way to force max-Refresh Rate under G-SYNC at the real max Refresh of the Panel (75 Hz)?? And by the way here is a mini-review of that baby, showing the "problem" I'm facing: Thanks for any help, TheMacco26 EDIT: wrong Model. It's a P771DM-G.
-
Hi all, First of all, sorry to drop by and start with my problems but I am indeed in need of your advice. I have read these forums for several years now but never took the time to sign up and join in the conversations (not that I had much to say though, apart from a big "Thank you!" for the tips and knowledge I grab here and around). I have a P170HM with a GTX 485M which is overheating quite a lot. I've managed up until now but it just seems to get worse and worse. I've followed most of the Hardware mods I could do on my P170HM (including sealing the air leaks with tape, cutting the plastic cover over the GPU to increase the airflow and applying some Tuniq2 thermal paste). The card runs around 60°C on idle (which is already an improvement from before) and immediatly goes to 90°C and over when I run a game that requires some resources (e.g. Diablo III, Eve Online), recently it goes over 100°C after no more than a few minutes which causes the laptop to shutdown. From your experience, does it sound like the card is faulty and changing for, say, a 680m would fix my problem? Or do you think the problem is due to the cooling system and going for another GPU wouldn't change a thing? Thanks in advance, Simon
-
Hi all, I just received and installed a new GTX 970M into my Clevo P150EM. It was a bit tricky at first but I finally got it to work by modding the .inf and installing the 358.50 driver from nVidia. However, I had a couple questions. The card is working but I can hear a buzzing sound when playing GTA V, The Witcher 3, etc... Also, when the game is fullscreen and I click anywhere within the game, the screen flickers and then minimizes. I've also been trying to figure out how to flash Prema's vBios for the 6gb 970M onto this card, but whenever I try to take the write protection off a menu pops up with a beep but then promptly disappears. Any help would be greatly appreciated!
-
 Do you plan to purchase a new gaming notebook in the next few months? If so, which brands are you considering and why? Additionally, with the release of Thunderbolt 3 and external enclosures like Razer Core coming to market, is this a contender for you vs a dedicated gaming notebook that is thicker and weighs more?
 -
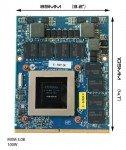
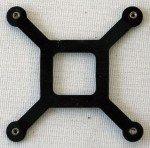
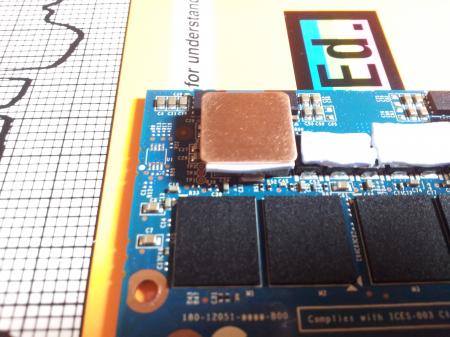
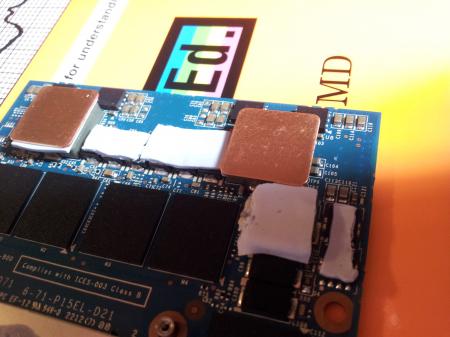
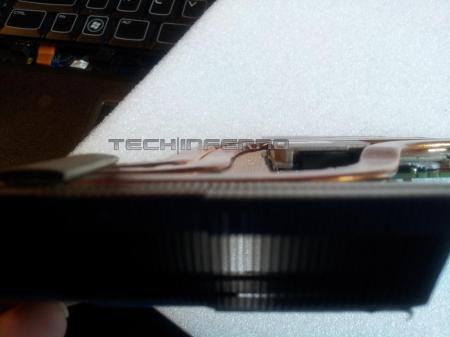
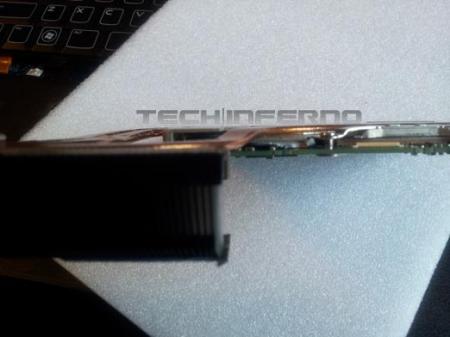
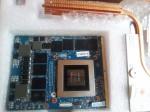
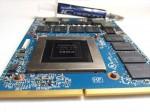
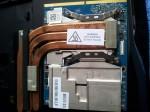
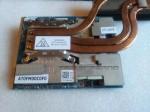
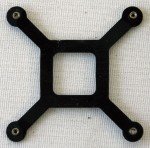
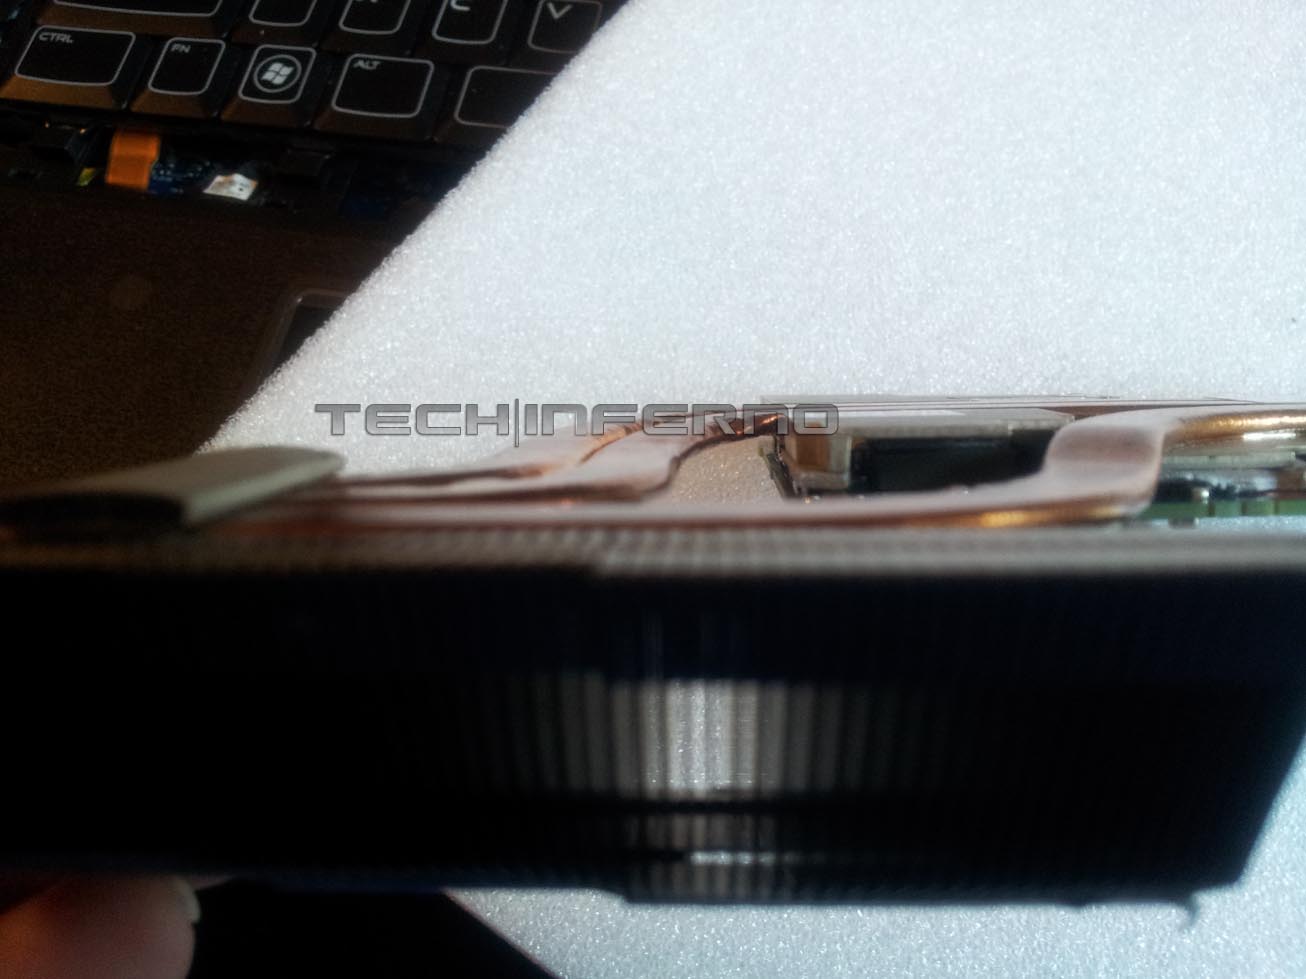
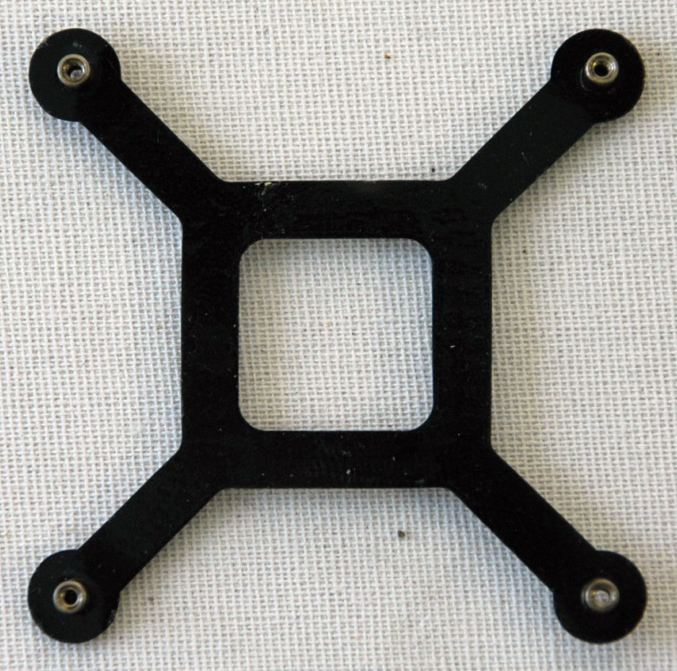
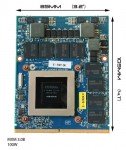
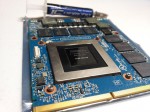
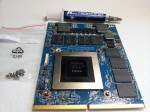
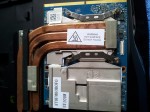
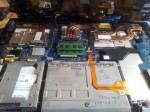
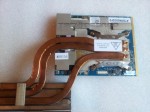
Officially, the upgrade path for the Alienware M18x-R1 ends with the nVidia GTX 580M but is that really going to stop the Tech|Inferno enthusiast from trying the latest and greatest? Absolutely not! So let’s get started. Parts & Tools Needed Quantity Part Needed (1) or (2) Clevo GTX 680M Kit from RJTech (1) X-Bracket (also included with 680M kit when purchased from RJTech) (1)Screws Screws (Also included with 680M kit from RJTech) (1)680M SLI cable SLI Cable (optional, can be found on eBay or directly from Dell) (1)IC Diamond ICD7 Diamond(recommended) or MX-4 Thermal Paste (1)Thermal pads Aftermarket Thermal Pads (1) ESD Mat + Strap (1) Precision Screwdriver Set (1) Techni-Tool Spudger Clevo GTX 680M Upgrade Kit When you purchase the Clevo GTX 680M Upgrade Kit from places like RJTech or MXM-Upgrade, they usually send a full kit that includes the X-bracket, screws, thermal paste, and Clevo heatsink. For the M18x-R1 or R2, the Clevo heatsink will be useless so you can elect to either resell it on eBay or just toss it in the garbage. A point of importance to keep in mind is that whether you opt to purchase the GTX 680M by itself or as a kit, be sure it comes with the x-bracket and Clevo screws (more information on this below). Typical price for an upgrade kit as of September 2012 is around $750-$850.00 USD. M18x Disassembly The Alienware M18x-R1 is a fairly sophisticated system that requires the user to have a familiarity with taking apart notebooks. Because some of the parts in the M18x are fragile, it is recommended you only attempt this if you feel you have sufficient experience. Refer to the Alienware M18x Service Manual to learn how to take apart the system. View Alienware’s Tear Down videos to see how its done. Installation Installation is pretty straightforward, be sure to use the ESD mat + strap when handling the M18x and GTX 680M so that no damage occurs to the sensitive electronics. Once the M18x has been opened up, remove the existing video cards. Ensure that you are using GTX 560M/580M video card heatsinks for full compatibility with the GTX 680M. You must use the screws (linked in the above table) designed for the Clevo GTX 680M X-Bracket since the Dell screws do not fit. Remove the retention washers from the 560M/580M heatsink in order to remove the original screws. Clean the previous thermal paste from the GPU using isopropyl alcohol and a cotton pad. Alternatively, coffee filter paper also works well. Place the thermal pads on the video card according to the picture below: One problem you may encounter while fitting new pads is that the heatsink does not make full contact with the inductors on the video card. To alleviate this, a thicker aftermarket thermal pad can be used or copper shims + ICD7 such as the photo below: Once the thermal pads and/or shim have been placed, do a test placement with the heatsink to ensure all the thermal pads make contact with the heatsink. An example of proper contact is illustrated in the photos below: After proper pad contact has been determined, place a thin line of thermal paste across the GPU, seat the heatsink and fasten it with the screws. Both the right and left heatsinks require different fitting of the pads so always check for proper contact before installation. Driver .inf Modification The Clevo GTX 680M may require the proper device id to be added to the nvcv.inf file found in the Display.Driver directory. Credit: jhmonroy Instructions Using Notepad, open nvcv.inf from the ‘Display.Driver’ directory (I suggest you copy a backup of file elsewhere) (Using the replace function) Replace all occurrences of DEV_11A0&SUBSYS_51051558 with DEV_11A0&SUBSYS_xxxx1028 (You can replace any GTX 680M Dev ID code you wish) Replace all occurrences of %NVIDIA_DEV.11A0.5105.1558% with %NVIDIA_DEV.11A0.xxxx.1028% <–Dell hardware ID. Replace all occurrences of NVIDIA_DEV.11A0.5105.1558 with NVIDIA_DEV.11A0.xxxx.1028 The latest beta drivers require more extensive modification that go beyond the scope of this article at this time. However, there are modified nVidia beta drivers available at LaptopVideo2Go that have the .inf files already modified for both the desktop and notebook and thus are a simple point and click installation–which is what we recommend. Update 9/13/12: You can grab the latest 306.23 modded drivers from our forum to use with the M18x-R1 and Clevo GTX 680M. Clevo GTX680M Gallery