Leaderboard


Popular Content
Showing content with the highest reputation on 11/27/12 in all areas
-
M18x-R1 + BF3 + 680M SLI = ownage Alienware M18x + nVidia 680M SLI - Battlefield 3 TDM - YouTube2 points
-
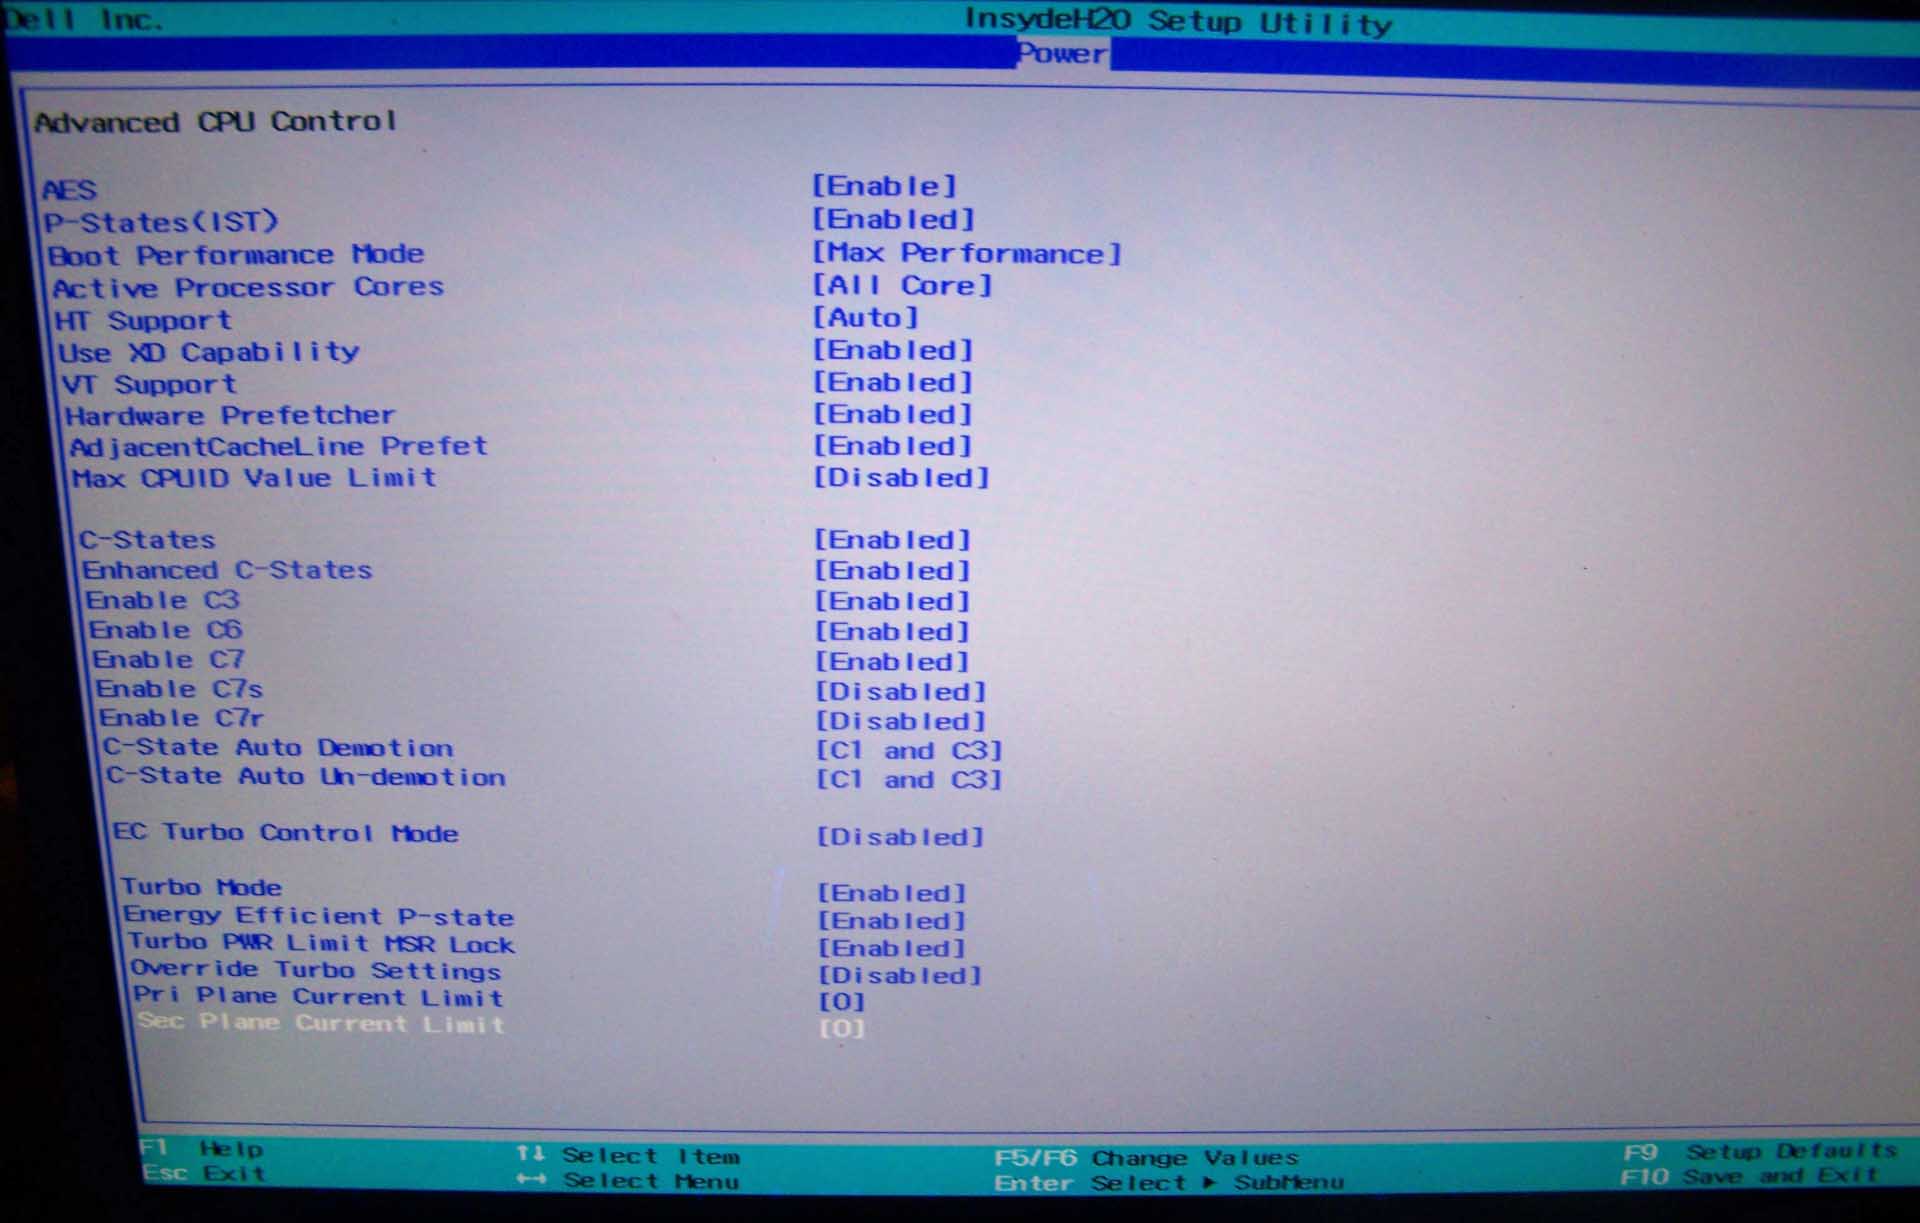
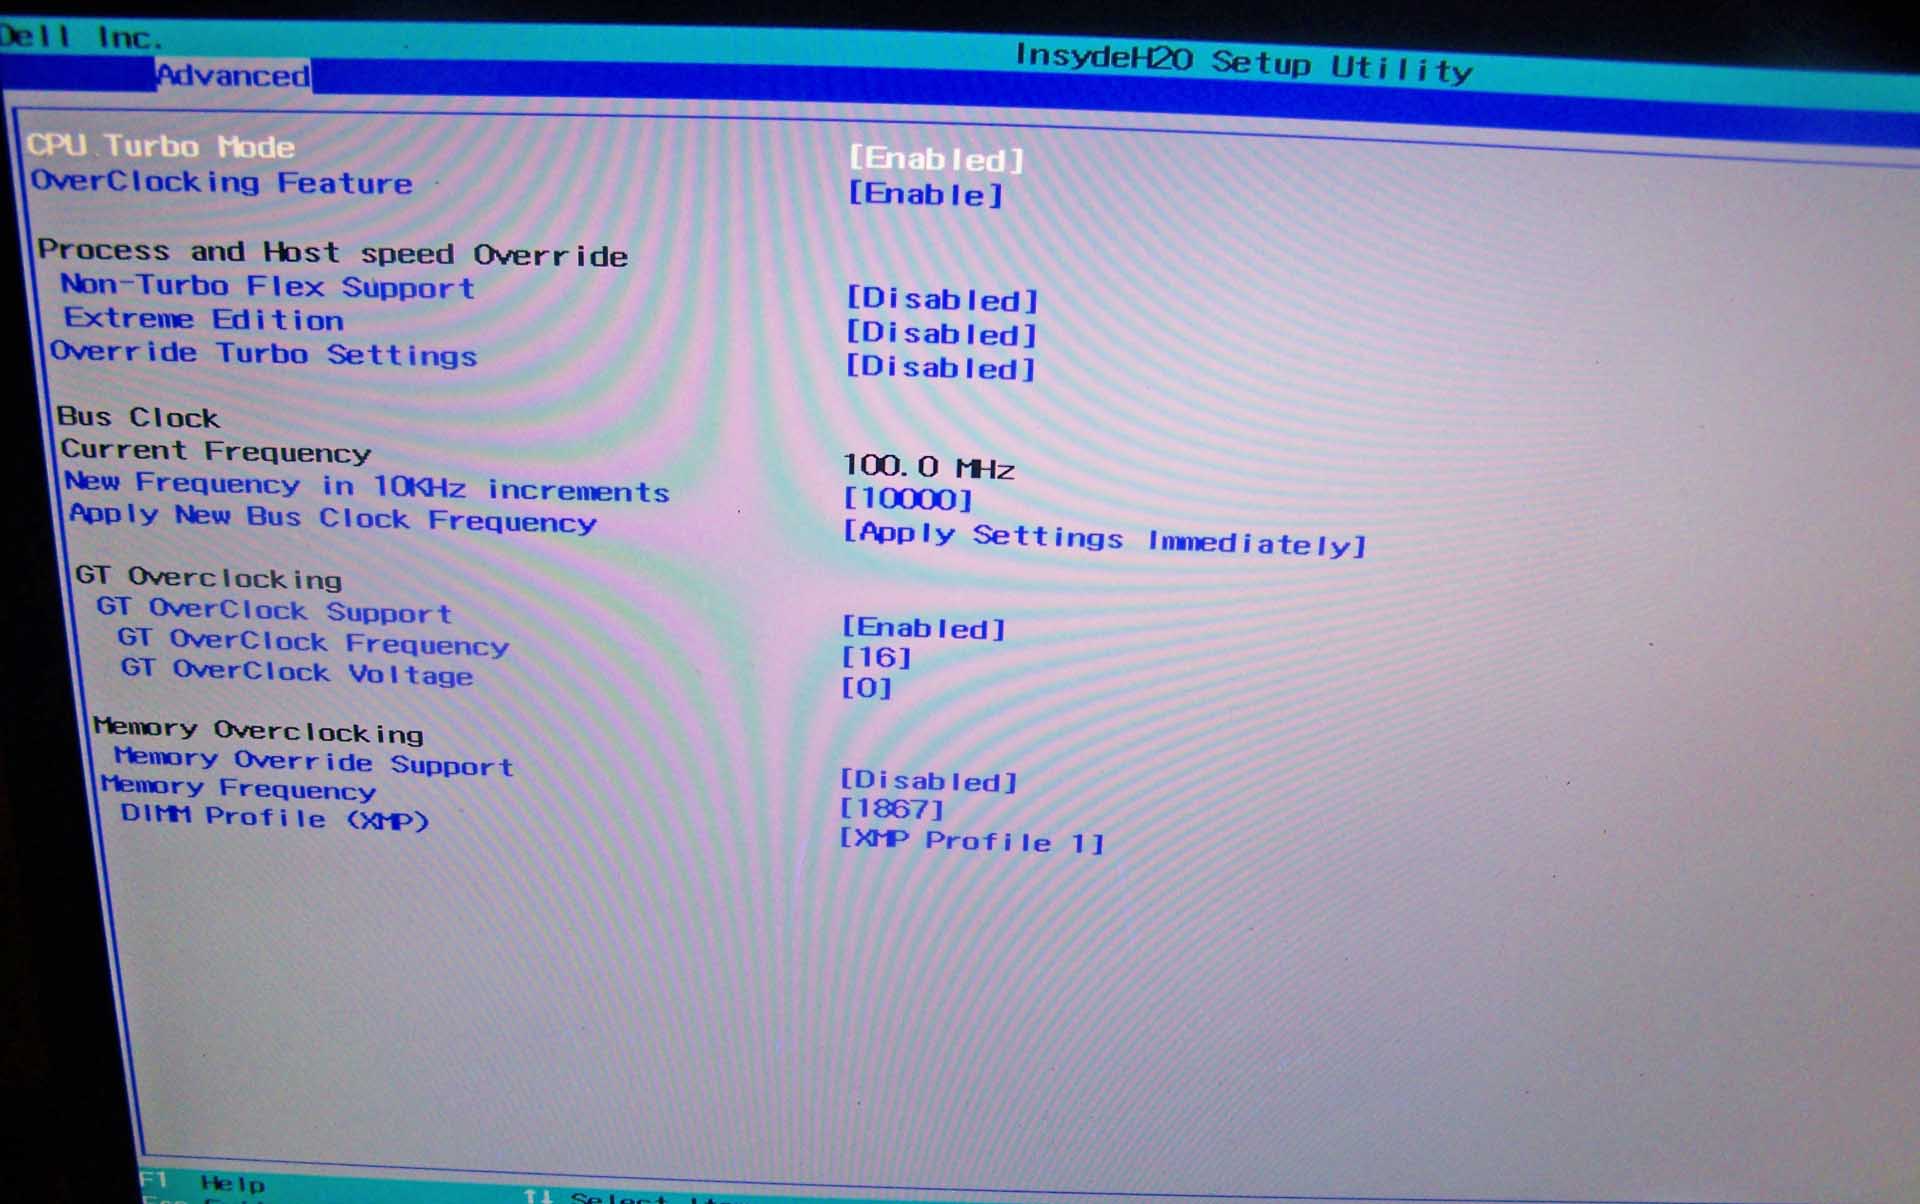
.If you're interested why not all modified BIOS versions can be flashed the 'usual' way with the official tools, read this:http://forum.techinferno.com/alienware/2252-information-about-bios-updates-a07-a08-higher-m14xr2-m17xr4-m18xr2.html M18x R2 - 'unlocked' BIOS versions The following BIOS of the Alienware M18x have been modified so that all hidden menus and options are visible. It will allow you to further tweak your system and optimize its peformance. Most of the options are only meant for advanced users. Don’t change anything you’re not sure about. It's possible that you see options which don’t work for your system, so be careful when changing settings. In case you mess up and your system refuses to boot applying new settings, remove the AC adapter, battery and coin cell battery in order to clear the non-volatile ram of the BIOS. This should fix most issues. *UPDATE*Instructions: There are two ways to flash the modified BIOS: Downgrade to stock A03 by using the USB recover procedure. (Thanks @Scott Matusow for summarizing the procedure). Make sure to closely follow the instructions, and wait until the system is done with the flash. Once you're on A03 flash the modified BIOS using the regular way (using the tools provided by Dell)..This method seems to work very well on the M18x R2, at least as long as you do as instructed. It can be a bit scary though since you can't see what's happening. .. Flash the BIOS from DOS with the FPT tool. This will only flash the BIOS part and leave out the EC and so on. It's a really safe option when done properly and less scary since you see the progress and information on the screen. For the USB recovery method follow the instructions in the link above. Second possibility - flashing from DOS: Prepare an USB drive so that it can boot DOS. If you don't know how to do this, check the instructions in the spoiler. . Grab the DOS version of fpt for flashing, and my 'prr tool' to circumvent write protection.. Download a '[FPT]' labeled version of the unlocked BIOS. Put the DOS version of the flash tool on the root of the prepared USB stick (fpt.exe and fparts.txt), along with the prr.exe and the file you want to flash (plus the included flash.bat). . Restart the system and boot from your USB stick. Run prr.exe, then flash the bios by executing the flash.bat file. Wait until the tool completes the flash. If the verification is okay, reboot, else flash again.. Go to the bios, load the default settings and reboot. Done. NOTE: If you want to use an unlocked BIOS newer than A03 I highly recommend to first flash the desired version of the unmodified BIOS (grab it at the Dell download site). Once you're on the version you want to unlock, follow the DOS flashing procedure described above. If you want to go A03 or earlier, the best thing to do is using the USB recovery method. Here two pics of the most interesting options: ********** Thanks @Riri-Fifi for the pics and testing! Thanks @johnksss for testing my prr tool! ********* Flash and use at your own risk. I don't take any responsibility for possible damage on your system. ___ The software which I provide here ('prr tool') comes with absolutely no warranty to the extent permitted by applicable law. Download the bios files referened in this post from here:

 1 point
 -
THIS PAGE IS A RUNNING SUMMARY OF THIS LONG THREAD. >> SEARCH this eGPU forum. experiences [2.0] N E W S GETTING STARTED >>> Introduction A brief introduction with the story of the solution. Pros and Cons A summary of the pros and cons of a DIY eGPU Pre purchase FAQ Answers to questions before you commit First steps Parts/software/info for a successful installation Performance: AMD versus NVIDIA benchmark results Compares AMD and NVIDIA perf on the same sys Performance: Scaling Analysis Compare performance over x1, x1E, x1.Opt, x2, x2E links Implementations: Examples and Leaderboard PC and Macbook eGPU implementations by users Implementations: older Macbook Implementations on older core2duo Macs Implementations: CUDA/OpenCL Implementations using the GPU for applications+computation Implementations: non-video Non-video implementations: soundcards atm Non English eGPU forums eGPU forums in non-English speaking locales Archived news Misc other articles INTRODUCTION >>> This thread serves as a roadmap for those who wish to attach an external Graphics Processing Unit (eGPU) to a notebook/laptop computer. Connection may be achieved through an ExpressCard, mPCIe slot, or Thunderbolt port.This thread is a place for users to share installation and performance details for others to duplicate or reference. * SimoxTav's Video game benchmarking* Graw/TWE/MafiaII12" Len.X201t+HD5770* StarcraftII13"_Dell_M1330+GTX460* Star Trek Online15"_Macbook Pro+GT240 Gaming videos running on an eGPU implementation US$70 PE4L-EC2C (expresscard) or PE4L-PM3N (mPCIe) products $91 PE4H-EC2C (expresscard) or PE4H-PM3N (mPCIe) products HP 2560P GTX560Ti @x1.2Opt DIY eGPU impl playing NFS Shift on the internal LCD HP 2510P: [mPCIe] Swap wifi card via underside covers Note: For those running Windows 7, you can install the eGPU without rebooting your system. Simply and the turn the system to standby system and attach the PE4L. Your system will return to its desktop presets once it detects the PE4L. You will immediately see a significant upgrade in the performance. For example. a Inspiron 1440 using the x1E tweak saw 3dmark06 go from 866 to 9551. RE5 benchmark went from an unplayable 4.1FPS to a very playabe 60.9FPS. The HP 2560P's x1.2Opt link saw 3dmark06 increase over 4 times to 18340 and RE5 gave an average of 148.3FPS(!!), even allowing the internal LCD to be driven by the eGPU. PROS AND CONS >>> Pros Inexpensive: US$92-shipped PE4L with HD5770+120W=$200, GTS450+120W=$160, GTX460-1GB+430W=$210, GT430+72W=$130, HD5670+72W=$140. Add $66 for a x2 capable kit using a PE4H. can be used on any system with an accessible expresscard OR mPCIe slot has inexpensive eGPU enclosure examples if you want an enclosure 10 times or more increase in video performance can have Internal LCD-only setup: NVIDIA Optimus or Ultramon/Chung-Gun method. provides additional HDMI video+audio, s-video and VGA out provides dual-link DVI connection for 2560x1600 LCDs allows multi-monitor connectivity: AMD Eyefinity to provide up to 3 LCDs attached to any HD54xx or better card. Drive up to 6 LCDs to using a HD7xxx or better card supporting Eyefinity 2.0 AMD FirePro 2450, 2450x1, and 2460 to drive up to 4 monitors from a low power card NVIDIA Surround can connect up to 4 simultaneous LCDs. easy, on-demand attachment without a reboot if running Win7 can be reused after a system upgrade, or shared amongst multiple systems see an extra 30-60% in performance when attached to an expresscard 2.0 system, or do a x2 1.0 setup provides an additional USB port when connected to expresscard slot Time-share your desktop video card b/w your desktop and notebook system. perform CUDA/OpenCL processing for applications that support it like Adobe CS5/Premiere [NVIDIA graphics only] ability to use physX/hybrid physX & game detail components can become a stepping stone to a full deskop system if want higher performance Cons requires a 12V PSU to drive the desktop eGPU requires an external LCD/CRT/TV to connect to display at highest FPS may require booting DIY eGPU Setup 1.x from a disk image or USB stick to overcome error 12 issues restricted bandwidth: a x1/x2/x4 link represents 1/16, 1/8 or 1/4 the bandwidth of a x16 slot. PRE PURCHASE FAQ >>> -> moved to http://forum.techinferno.com/diy-e-gpu-projects/7969-pre-purchase-faq.html#post109073 FIRST STEPS >>> -> moved to http://forum.techinferno.com/diy-e-gpu-projects/7969-pre-purchase-faq.html#post109073 PERFORMANCE >>> AMD versus NVIDIA back-to-back benchmark results GTX560Ti vs GTX660 @x1.2Opt (int vs ext) (i5-2540M 2.6, bjorm) HD7770@x1 vs x1E (P8400-2.26, damir001 inc PCISpeedTest) HD7870 vs GTX660 at all expresscard/mPCIe bandwidths available (i5-3320M 2.6, Tech Inferno Fan) HD6970@x4 2.0 vs GTX460@x4 2.0 vs x16 2.0 (i5-2400 3.1, tomshardware) [email protected] vs GTX560Ti (i7-2820QM 2.3, carage) [email protected] vs [email protected] (i7-2630QM 2.0, timohour) NVS4200M vs [email protected] (i7-2670QM, Tom_ger) [email protected] vs x1.1Opt and GTX580 versus [email protected] (i5-2520M 2.5, arsenal243) GTX480 versus GTX560Ti@x1Opt (i7-620M 2.66, Mikjoa) GTX460-1GB versus GTX560Ti @x1.1Opt (i5-2520M 2.5, Warwickeo) GTS450 versus GTX460 @x1.Opt (i7-640M 2.80, docusyn) HD5750 versus GTX470 on x1, x1.Opt and x2 links (i5-430M 2.26, Tech Inferno Fan) HD5750 versus GTX460 on x1 and x1E links (T9300-2.5, ithildin) HD5750 versus GTX470 on x1, x1E, x1.Opt and x2 links (T6600-2.2/T2050-1.6/U7600-1.2, Tech Inferno Fan) Scaling Analysis (07-05-2014) [Performance] Desktop vs eGPU - GTX770 + R9 270x HD5870@x2 1.0 vs x16 2.0 (i7-720QM/i7-3820, kizwan) HD7970 versus GTX680: pci-e scaling x4, x8, x16 @pci-e 1.0, 2.0 and 3.0 HD7970: pci-e 3.0 x2, x4, x8, x16 scaling GTX580: x1.2Opt vs x1.1Opt +30% overclock & (i7-2920XM 2.4, Khenglish) GTX560Ti: x1.2Opt vs x1.1Opt [internal LCD vs external LCD] (i5-2540M 2.6, Tech Inferno Fan) HD5850: x16, x4, x2, x1 (~i7-2820QM, timohour) HD5870: x2 versus x1 (i7-720QM 1.6, kizwan) GTX580+GTX460: x2 vs x1 vs GTX260M (P8700-2.53, mangos47) [email protected] scaling analysis internal vs external LCD, +25% PCIe, +40% GPU core O/C ([email protected], Tech Inferno Fan) GTX460@x2 scaling analysis +20% cpu, +20% PCIe, ~20% GPU (T9400-2.53, khenglish) HD5750: x1 versus x1E (T9300-2.5, ithildin) Older MACBOOK >>> 04-03-2011 MacBook 17 T7600-2.33 with X1600 + HD6850 implemented with Win7/32 11-10-2010 Mac Mini T7200-2.0 + HD5450 implemented with Win7. 11-05-2010 MBP 17" T2600-2.16 with X1600 + GT240M result with Win7. 9-27-2010 MBP 15" Unibody T7500-2.2, 6GB RAM with 8600M GT+HD4650/HD5770-7LCDs impl. & & & with Win7. 8-11-2010 MBP 15" Unibody T7500-2.2 with 8600M GT + HD4870 implemented with Win7 and MacOS 10.6 For MacOS DIY eGPU implementations see DIY eGPU MacOS Experiences. CUDA/OPENCL APPLICATIONS >>> Octane Render: 10x faster than CPU-based rendering. Badaboom: CUDA based video transcoding NON-VIDEO PCI-E CARDS >>> Creative SB X-Fi Titanium desktop sound card via the ExpressCard slot. See details. NON ENGLISH eGPU FORUMS >>> Croatia (bug.hr): EGPU - Eksterna graficka za laptop and (pcekspert.hr): eGPU - Eksterna graficka i laptop Finland (murobbs.plaza.fi): DIY eGPU eli pöytäkoneen näytönohjain kannettavaan Germany (hardwareluxx.de): ATI HD5770 per ExpressCard am Laptop ! Germany (computerbase.de): [Erfahrungsbericht] [PE4H] externe Grafikkarte für das Notebook Hungary (prohardver.hu): eGPU tapasztalatok Indonesia (kaskus.us): [VGA CARD] DIY ViDock (Solusi External Graphic Card Untuk Laptop) Italy (techarena.it): eGPU Poland (notebookcheck.pl): Zewnetrzna karta graficzna, (DIY) ViDock, Magma Box i pochodne, czyli czym to sie je Spain (chw.net): Tarjeta de Video externa para Notebook DIY eGPU [REVIEW] Vietnam (vozforums): [Review]EGPU công cụ thêm card đồ họa cho laptop ARCHIVED NEWS >>> 06-05-2014 US$68 ThunderboltEX II PCIe-eGPU adapter mod 02-12-2014 Successful AMD HD6950 x1 Crossfire under Win7 10-1-2014 Thunderbolt eGPUs: Silverstone T004 = ASUS XG2 12-27-2013 US$250 SilverStone T004 TB enclosure ETA Q1-2014 12-15-2013 Hacking a NVidia Geforce into a Quadro/Grid Pro card 12-12-2013 Q: what do you want in the next BPlus eGPU adapter? 11-20-2013 Ivxy's GTX770/GTX660/GTX560Ti-448/HD4870 scaling 11-03-2013 BF4 vids on [email protected] [email protected] 10-18-2013 Lenovo X230 BIOS 2.56 for eGPU 09-23-2013 Future x2 2.0 M.2/NGFF (mSATA) slot eGPUs 08-24-2013 Howto: using eGPU under MacOSX 08-22-2013 20Gbps "Thunderbolt 2" sysboard released 07-27-2013 ~US$250 450W TB enclosure: Silverstone T004 07-25-2013 modding PE4L 2.1b for longer delay 07-15-2013 Acer ditches Thunderbolt in new systems 07-03-2013 PE4H 2.4a + EC2C/PM3N + PCIEMM-060B are not Gen2 compatible 06-17-2013 project saboteurs named 06-11-2013 Important: HIT Setup 1.x customers 02-02-2013 older PE4L/PE4H fails Gen2 testing 11-28-2012 LucidLogix Virtu MVP Mobile installation 02-05-2012 Khenglish's color depth perf analysis 02-02-2012 Internal Screen for AMD GPUs with Virtu Driver (timohour) 01-28-2012 US$55-shipped PE3A+riser (pci-e 2.0) (timohour) 08-28-2011 JediMasterZon's modded PE3A 06-30-2011 Kizwan's HD5870@x2 and x1 game benchmarks 06-04-2011 modded PM3N 1.1 to start CLKRUN when setting the jumper details 05-31-2011 Thunderbolt eGPU product preview 05-10-2011 Khenglish' request to unlock x1.Opt compression regardless of primary video. 04-01-2011 tabletpcreview's eGPU on Tablet PC's: experiences, benchmarks, setup, ect... 11-07-2010 DA-2 220W AC adapter mod 09-08-2010 i5-520M 2.4+HD4890@x1 NBR review 08-27-2010 Panzer's fuse bypass on PE4H 08-01-2010 Modded driver details 07-05-2010 Enzyme 1.4b3 versus Catalyst 10.6 Acknowledgements Many thank yous to all the members who have shared their DIY eGPU experiences for others to be able to learn from and duplicate. Special thanks to SimoxTav for the artistic touches. Project saboteurs of this community-driven project who halted/derailed the creative opportunities that pluggable, affordable eGPU graphics/processing provides.1 point
-
So, as here it wasn't posted in this forum yet, ill try to get some more Supporters. If YOU ever waited for an R4 as many people know, DELL won't produce it until we can change this! Sign up here (inofficial) or here (official) and please share it to everyone, so we can see the M11x Line continuing You can also sign up for an M12x here, but i would prefer to continuing. Thanks for reading and supporting! <31 point
-
Here is my bios shot, nothing special there ? I'm running A08. Not sure if it helped but before I pulled my 1333 RAM out I set the frequency in the BIOS to 1866, it wouldn't boot if it was at 1333 so I could then change it, just kept beeping, but again this could have been something else that went wrong lol1 point
-
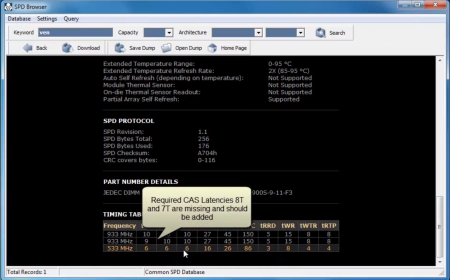
sadly this is the issue you are having there is no profile for 1600mhz on those. Its a major issue. as you see by this pic a stock corsair vengeance runs only 1866 or 1333 :/ there is a fix but you need this software. ive used it myself. watch all of these videos and you will see the etire issue and the way to fix it. Thaiphoon Burner - Official Support Website sorry @deadbydawn Corsair are assholes for not including a 1600mhz profile and all capable latencies like CL7/8/9/10 not just CL8/9 thats why you cant even load 1600mhz. Thats also why as is you should in any case still be getting 1866mhz even on a M18x R2 as the member Mazmorbid stated his is using a full 32gb's of 1866 corsair vengeance. Goodluck bro. Even if you don't bother messing with them again... I wanted you to know these important details.
 1 point
 -
HDMI out worked fine when I had Clevo 7970M Xfire in my M18x-R1.1 point
-
Uninstall the soundblaster software, delete the audio device in control panel and let Windows install its default sound driver and see if it resolves the issue.1 point
-
I personally blame Microsoft for these shenanigans. If not for win8 certification we would be able to enjoy modded bioses without any hoops to jump through.1 point
-
He will said we have to wait1 point
-
what is the version of your bios? Latest for HM series are 1.01.14 for the main bios and EC 13 for the bios that regulate the fan speed. P150HM will never detect the GTX680M or 7970m IN BIOS Menu. If you install a gtx680m, inf tweak will work (guide here to do yourself ) but you need a clevo GTX680M with vbios 80.04.29.00.01 or you need to downgrade to that vbios.1 point
-
Apologize for the delays... Thanksgiving holiday, had family over for a couple of days. Yes. If you don't have RAID, you can still set SATA Mode to AHCI. Sure. Yep, I will. No, never. http://www.msi.com/product/nb/GT60-0NE.html#/?div=BIOS Yes, if you look 50T/70T are for Win8. No. Don't do it. I don't understand why you are so insistent on a non-RAID version. What happens when someone adds a second HDD and RAID? Now they have to flash another BIOS. With the RAID-enabled BIOS all they have to do it set AHCI to RAID. Also, use the '@' to get someone's attention. For instance, @alkado will page you.1 point
-
might be a defective keyboard, how different is the shade ? is it bugging you enough to request another keyboard replacement ? if so, just give dell a call, they will dispatch a tech and replace it again.1 point
-
Metro2033 is only singleplayer if I'm right:confused: If this is true, it makes sense to activate triple buffering in favor of quality improvement, because in sp-mode you don't need super fast response. Overall it's a good thing to avoid input lag in fast-paced online-shooters and other games which behave similarly. Other games and applications behave better with activated triple buffering.1 point
-
Hey guys, I have figured out how to avoid the throttling issue on GT650m. Below is my solution: Tool: Nvidia Inspector How: 1) Launch Nvidia Inspector. Navigate to Over Clock panel on the right side. Select "Performance Level 1 (P5). 2) Unlock max. Adjust gpu clock and memory clock for your own, I prefer 700-750 Mhz for GPU and 2000Mhz for Mem. 3) Create a shortcut for this settings, it is saved at Desktop by default so you just run this file next time and no need to launch Nvidia Inpector 4) Create a Bat file (e.g: Gaming.bat) and place it in Nvidia Inspector folder where nvidiaInspector.exe locate in. Paste the command below into the Bat file nvidiaInspector.exe -forcepstate:0,5 Run: Each time you want to play game, just run the Clock shortcut first then run the Bat file. It will force the GT650m always performs at your configured clock Result: I tested my own and it works perfectly although the temp increased quite high (70-80). 81 is max of my laptop (I am from Vietnam, a hot country ) but I think this temp is acceptable. The test is performed with default Bios A09 TRY IT and let me know your result.I guarantee it works. // Sorry for my English1 point
-
There's a 'Thanks' button below each post, if you appreciate the post, click it. No need to write a post which simply contains a 'thanks'.1 point
-
My mum laptop broke down so i brought her to a shop to buy a normal notebook. On the desk we saw asus g75 and alienware m17xr4. So i ask my mum to consider the asus due to the price which is a lot cheaper.She only stream drama on laptop never even game. Instead she wanted the m17xr4 next to the asus g75 coz of the flashy lights on the keyboard nice screen and awesome build quality. The asus just pale in comparison. Alienware 1 Asus 01 point
-
everyone here knows the the purdy lights makes the computer run faster hahah i had both a wonderful and nightmarish experiences with tech support.1 point
-
Free workout included! At least if you buy an M18X and carry it around a lot.....1 point
-
This is what you get from Activision and Treyarch for 70$: Directlink On triplescreen systems the third screen on the right stays black. Activision/Treyarch have the issue not even on their known issues thread. The aspect ratio is also totally screwed, but this is a known issue with this "new" graphics engine. Thanks to the widescreenfixer developed by Dopefish the aspect ratio can already be adjusted: Directlink config files, known from previous Call of Duty parts, were also removed:76:1 point
-
Voltage mod for the Nvidia GT 555m of the M14x This is an Alienware M14x BIOS containing a modified VBIOS which has a slightly increased GPU core voltage at 3d clocks. The increased voltage will allow you to overclock the GPU core a bit more. So far people got it up to 850MHz, but each chip is different. The system will draw a bit more power and run warmer than before. If you want to see some results, -voltage-increase-nvidia-gt-555m-8.html#post12013"]P1900 and -voltage-increase-nvidia-gt-555m-8.html#post12027"]even more is possible in 3dMark11, thanks to this mod. Since the VBIOS of this system is part of the BIOS, modifying it isn't as easy as playing with a vbios of a dedicated GPU. I had find and extract the VBIOS file from the BIOS. Since I don't have a lot of practice with modifying Nvidia bios files I needed some help there, so thanks to Saltius from MVKtech for identifying the voltage strings and modifying the VBIOS. Also thanks @n3ocort3x for starting this project and @Ninjahunter for testing it, and thanks to everyone else involved! INSTRUCTIONS: Attached is the repacked BIOS which contains the modified VBIOS. Extract it and simply execute InsydeFlash.exe and it the flashing procedure will start. Remember to close all applications in the background before doing this and make sure your system doesn't accidentally shutdown during the process. After flashing, I highly recommend going to the BIOS, load the default settings, apply and reboot. This will cause the system to reinitialize the hardware and can save you from some issues in certain cases. As already mentioned, overvolting always comes with raised temperatures. Make sure your system can handle the additional amount of heat. Check the airflow, a dust-free system is important and reapplying the thermal paste can lower your temperature by several degrees.And keep in mind that this only changes the core voltage of the GPU, not the memory voltage. So this will only affect the maximum overclock on the core. Update: Repacked the unlocked BIOS A03 with the modified VBIOS, check the attachements. Update 2: Repacked BIOS A05 with the modded VBIOS. Update 3: Repacked the unlocked BIOS A05 with the modded VBIOS. Update 4: Repacked BIOS A07 & A08 with the modded VBIOS, attached below. Update 5: Unlocked A07 & A08 with modded VBIOS added. Update 6: New version of A08 uploaded, volt mod now works for GF116 as well. Users with the newer 555m revision (GF116 - check GPU-Z) seem to have issues with the original mod. So please use the updated A08 version attached at the end of the post ("GF116 fix"). It will also work for GF106 systems. I will upload a fix for the unlocked version of A08 as well, as soon as I get around to do so. UPDATE: Two new versions of A08 added which bring back the SATA behavior of A05, so GF116 users can enjoy more SATA speed as well. Or for all GF106 users which want to use the latest BIOS but keep the SATA behavior from A05. Standard and unlocked versions added. *************** If you like these BIOS releases, please consider a donation to Tech|Inferno. *************** _____________________________ #As always with such mods: You are responsible for all the changes at your system and do this at your own risk _____________________________ M14x A01 voltmod flash package.zip M14x unlocked A03 with GT555m volt mod.zip M14x A05 incl VBIOS volt mod.zip M14x unlocked A05 incl VBIOS volt mod.zip M14x [unlocked] A08 with voltmod.zip M14x A07 - voltmod.zip M14x A08 - voltmod.zip M14x A08 - voltmod - GF116 fix.zip M14xR1_A08_voltmod_incl_GF116_support_&_SATA_fix.zip M14xR1_A08_[unlocked]_voltmod_incl_GF116_&_SATA_fix.zip-1 points