Leaderboard


Popular Content
Showing content with the highest reputation on 11/26/12 in all areas
-
*************** Revised OC edition vbios added to the second post, Dell and Clevo. *** I tweaked the vbios a bit more, should give you the best performance so far. Overclocking per software enabled, higher limits. Voltage is untouched, the Clevo card will run at 0.987V at 3d. The Dell card has adaptive voltage and clocks, at least that's what I heard from @littleone, thank you for the feedback, and thank you as well [MENTION=119]Mr. Fox[/MENTION] - for testing and for the beers! Please let me know how it performs for you, voltage, clocks etc. The latest Nvidia beta drivers will result in a clock which is 13MHz lower than what is set in the vbios. Overclocking steps are 13MHz. @Clevo P1xxHM / P1xxEM users: Don't flash this vbios. Apparently it doesn't work on your machines. I can tweak the older vbios to perform similarly if people want this. Though I'd prefer to use the newer vbios, I think I can make it work on your systems. It does perform better. If anyone would like to test it, let me know. I don't see a reason why it should work when I adjust it a bit, but then again, the recent Clevo systems are weird when it comes to vbios and compatibility.3 points
-
Allright, I did the texture filtering tweak to high performance + disabled Windows Aero and now I got this result (still +200/+400): Note the max temp was 59. This is because I went home and it's quite cold outside (~0°C) and I did the 3dmark run immediatly after booting it up as well as FN+1 (full fan). Then I felt lucky and did a "Ghz-Edition" run (1006/2250, +250/+450 in AB): Note that also for this test I had FN+1 enabled. Max temp at over 1Ghz Core: 67°C And to directly compare it to @svl7 's last clevo vbios (the UV one), a run at 915/2250 (which is +160/+250 in AB): Note that I had automatic fan control enabled for this run, as I am going to use this as my 24/07 gaming oc and I just don't want my fans to spin at 100% all the time. Max temp here is 78°C, easily explained as the last fan level (100%) kicks in at 77°C for me. By forcing the fans to run at 100% (FN+1) I got the amazing temps in the previous 2 screenshots. Compared to the UV clevo vbios, this one resulted in ~250 3dmark points more at the same clocks! GPU points changed +500, but this is also related to my new texture filtering tweak I love this new vbios, it prooved to me that my 680M is not underperforming (what I have been afraid of). Also I'm glad my X7200 can cool the 680M properly as it's not officially supported and I have to use a 580M heatsink.2 points
-
My 1866 corsair have same issue. Set volts to auto or manually to 1.5v preferably auto though because i had issues setting it manually. Make sure there is no baseclock overclock because the corsair 1866mhz dont handle over that in my testing. If you have any higher volt set they crash right away. @deadbydawn i hope that helps. @Brian i also have those Hyperx too. I found you can use xmp 1 or 2. If you use stock use 1.5volts it runs 1333mhz at 9-9-9-24. Xmp1 set volts manual and mhz at 1333mhz manually 1.65v and i think it set 7-7-7-20. Xmp2 set 1600mhz manually, 1.65volts manually and all is stable at 1600mhz 9-9-9-27. Brian the corsair dont have or use XMP unless someone flashed the ram spd profile to have XMP since stock Corsair Vengeance 1866MHz are plug and play only at 1866 10-10-10-27 1.5v Here is hyperx pdf as you see the timings are tight on xmp so even though they say 1.5v to actually get stable you may need 1.55-1.65v. http://www.kingston.com/datasheets/KHX1600C9S3K2_8GX.pdf1 point
-
If you read the forum rules, you'd know why. Posts do not disappear, unless they are deemed as spam or double posts. This only applies if you are a new user, <5 posts. Instead, they take time to appear (approve by a moderator). Once you reach 5 posts, your posts will no longer have to be approved. I have deleted the first post now because it was a double post.1 point
-
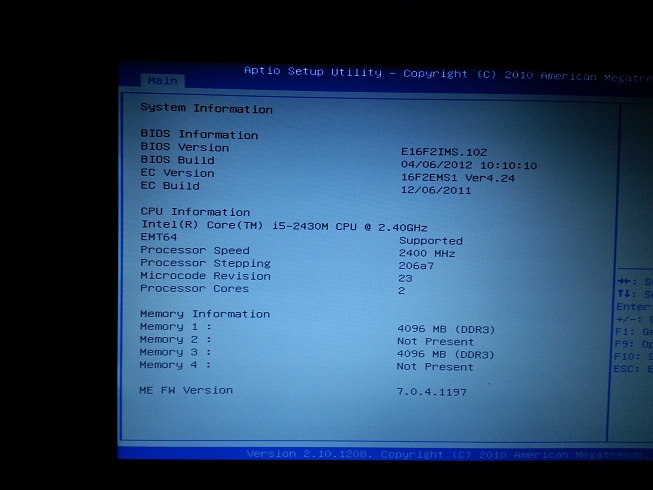
what is the version of your bios? Latest for HM series are 1.01.14 for the main bios and EC 13 for the bios that regulate the fan speed. P150HM will never detect the GTX680M or 7970m IN BIOS Menu. If you install a gtx680m, inf tweak will work (guide here to do yourself ) but you need a clevo GTX680M with vbios 80.04.29.00.01 or you need to downgrade to that vbios.1 point
-
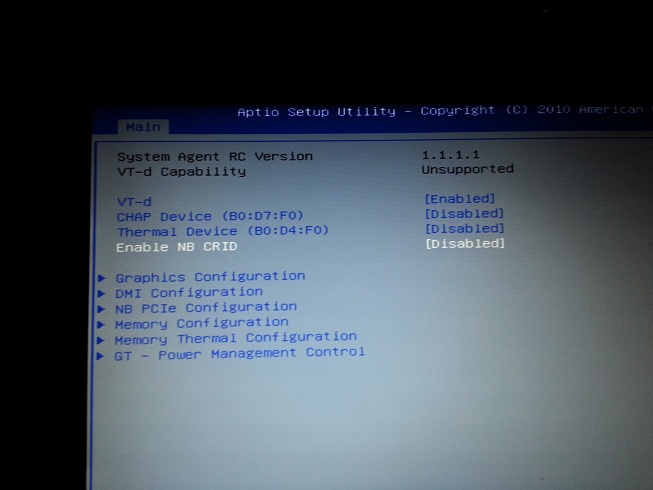
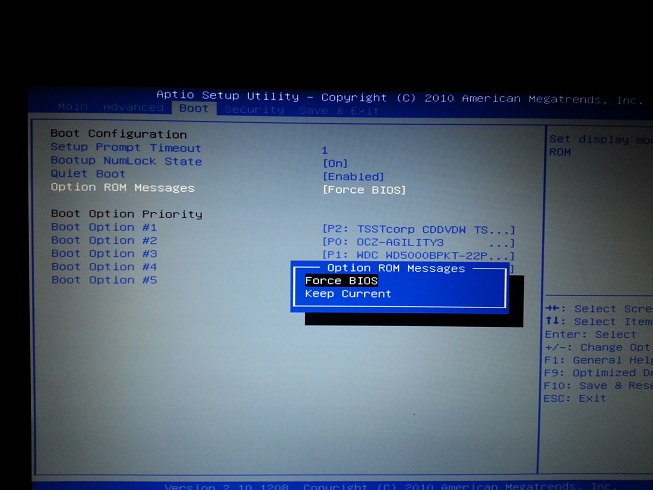
Found on the Forum's such a method to unlock the BIOS 162: <!--[if gte mso 9]><xml> <w:WordDocument> <w:View>Normal</w:View> <w:Zoom>0</w:Zoom> <w:HyphenationZone>21</w:HyphenationZone> <w:PunctuationKerning/> <w:ValidateAgainstSchemas/> <w:SaveIfXMLInvalid>false</w:SaveIfXMLInvalid> <w:IgnoreMixedContent>false</w:IgnoreMixedContent> <w:AlwaysShowPlaceholderText>false</w:AlwaysShowPlaceholderText> <w:Compatibility> <w:BreakWrappedTables/> <w:SnapToGridInCell/> <w:WrapTextWithPunct/> <w:UseAsianBreakRules/> <w:DontGrowAutofit/> </w:Compatibility> <w:BrowserLevel>MicrosoftInternetExplorer4</w:BrowserLevel> </w:WordDocument> </xml><![endif]-->~~~~ HOW TO OVERCLOCK 16F2 ~~~~ This is just a reminder. Follow these EXACT steps to overclock this board. 1. Open BIOS → ADVANCED → Intel ICC 2. Set ICC Watchdog Timer to Enabled 3. Save settings and exit. 4. Restart. 5. Open BIOS → ADVANCED → Intel ICC 6. Set ICC Watchdog Timer to Disabled (DON'T RESTART) 7. Open BIOS → ADVANCED → Intel ICC → DIV2S 8. Set base frequency to desired setting. (10400 = 104 MHZ) 9. Change clock spread spectrum to 0 (This stops downlocking) 10. Apply settings permanently after restart. (DON'T RESTART, EXIT TAB) 11. Set ICC Watchdog Timer back to Enabled. 12. Save settings and restart. (Your 16F2 should turn off) 13. Turn OC'd 16F2 back on... <!--[if gte mso 9]><xml> <w:LatentStyles DefLockedState="false" LatentStyleCount="156"> </w:LatentStyles> </xml><![endif]--><!--[if gte mso 10]> <style> /* Style Definitions */ table.MsoNormalTable {mso-style-name:"Обычная таблица"; mso-tstyle-rowband-size:0; mso-tstyle-colband-size:0; mso-style-noshow:yes; mso-style-parent:""; mso-padding-alt:0cm 5.4pt 0cm 5.4pt; mso-para-margin:0cm; mso-para-margin-bottom:.0001pt; mso-pagination:widow-orphan; font-size:10.0pt; font-family:"Times New Roman"; mso-ansi-language:#0400; mso-fareast-language:#0400; mso-bidi-language:#0400;} </style> <![endif]-->1 point
-
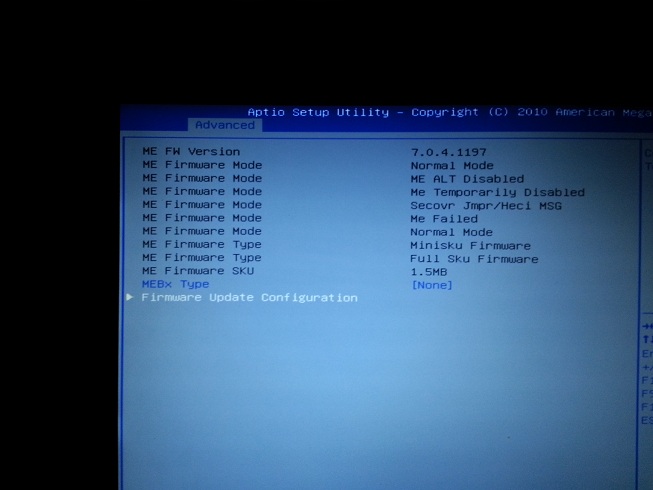
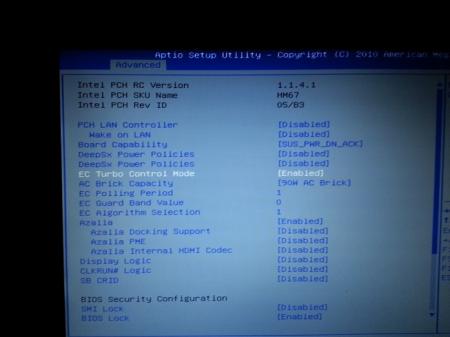
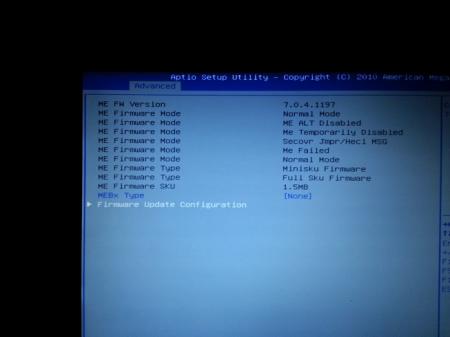
I've unlocked a lot of different features on my gt683dx that I couldn't see with the gt680/gt683 bios, I've been up for 34 hours looking for a way to access the mebx menu and now I'm trying to find a string in the bios where I can enable or find the key combo to enter the mebx which is integrated in the chipset, if this is possible I should be able to edit the me firmware too see if there's anything of interest in there. What I've learned is that dell uses ctrl+p, and others use ctrl+alt+f1 in post to access the mebx and the default password should be admin to gain entry to the management engine interface. Most other oem uses there own key combination I don't know if this is possible but I sure hope i might find a way around this.


 1 point
 -
Its A Fun and addicting game. Not like the usual mmorpgs you find everyday like WoW or Cabal. i just hit lvl 30 (max) not that long ago. But 2p is correct. Community doesnt care if your a noob or not.1 point
-
Use the 0.5mm to start with. If the pads don't make good enough contact, you can add an additional pad on top of the first to bring the thickness to 1.0mm. The Dell VBIOS should have no issues with the display, but your fan control will not work. You will need to use HWinfo to set a fan profile. Here is the guide which I went off of (its on a different forum): [Guide] Installing AMD Radeon Mobility 6970 / 6990 in your M17x R2 (Single GPU and CrossfireX). It will explain the different card versions and the different VBIOS and effects on said cards. Definitely try and safemode to remove the older AMD drivers. Follow the guide and check the last pages of the thread for updated drivers info. Check eBay for the bracket and screws if you need them. Best place is upgradeyourlaptop's eBay store. It's really Eurocom in disguise. The screws for the x-brackets should all be the same. But make sure to use the 6970m x-bracket. Don't try and modify the 4780m's bracket, no matter what, it just won't fit right.1 point
-
The drive officially supports 2x 9.5 or 3x 7mm HDD / SSD. You don't need to buy anything else, just install the new drive and off you go.1 point
-
i'm about to order an m18x-r2 with dual 680m and sell my 17x-r4 with the 7970m... just wanted to get my hands on one of those for a long time now! would you rather get 4 x 4 gb of corsair vengeance 1866mhz or 2 x 8 gb of kingston hyperx 1600mhz? that's what im' not sure about atm.1 point
-
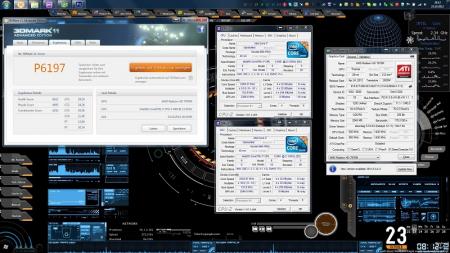
just made a quick benchmark with the new 12.11 beta driver, P6197 B-) custom clocks @ 950/[email protected] on all steps. Works just perfect cpu steps: 18x133mhz @ 65/62
 1 point
 -
I am pretty sure the m18xr2 would support such a configuration. As for the HDD, I don't see a reason to go SATA3 since it can't even max out SATA2 speeds.1 point