Search the Community
Showing results for tags 'bios'.
-
So i put a 7970m in my laptop because the 675m that was in it was broken but my laptop doesn't recognise it in the bios. My bios revision is A11 Any ideas?
-
Hello. Could someone help me, please? I'd like to flash modified BIOS to my laptop V3-371-584N. But unfortunately I get many times discussed error: InsydeH20 - Secure Flash Error : Invalid firmware image!!! I read, that modified BIOS could be flashed using Crisis Recovery Mode. But I can't even flash the original (not modified BIOS) to my laptop in such mode. I hold Fn+Esc buttons during Power up with USB flash drive in USB 2.0 port with the only file - VA30X64.fd on it. The only difference was in showing BIOS version during POST and there were no any Crisis Recovery procedures. What I do wrong? Maybe there is some other way to flash modified BIOS to this "top secured" laptop. I'll be glad to listen it. Thank you very much.
-
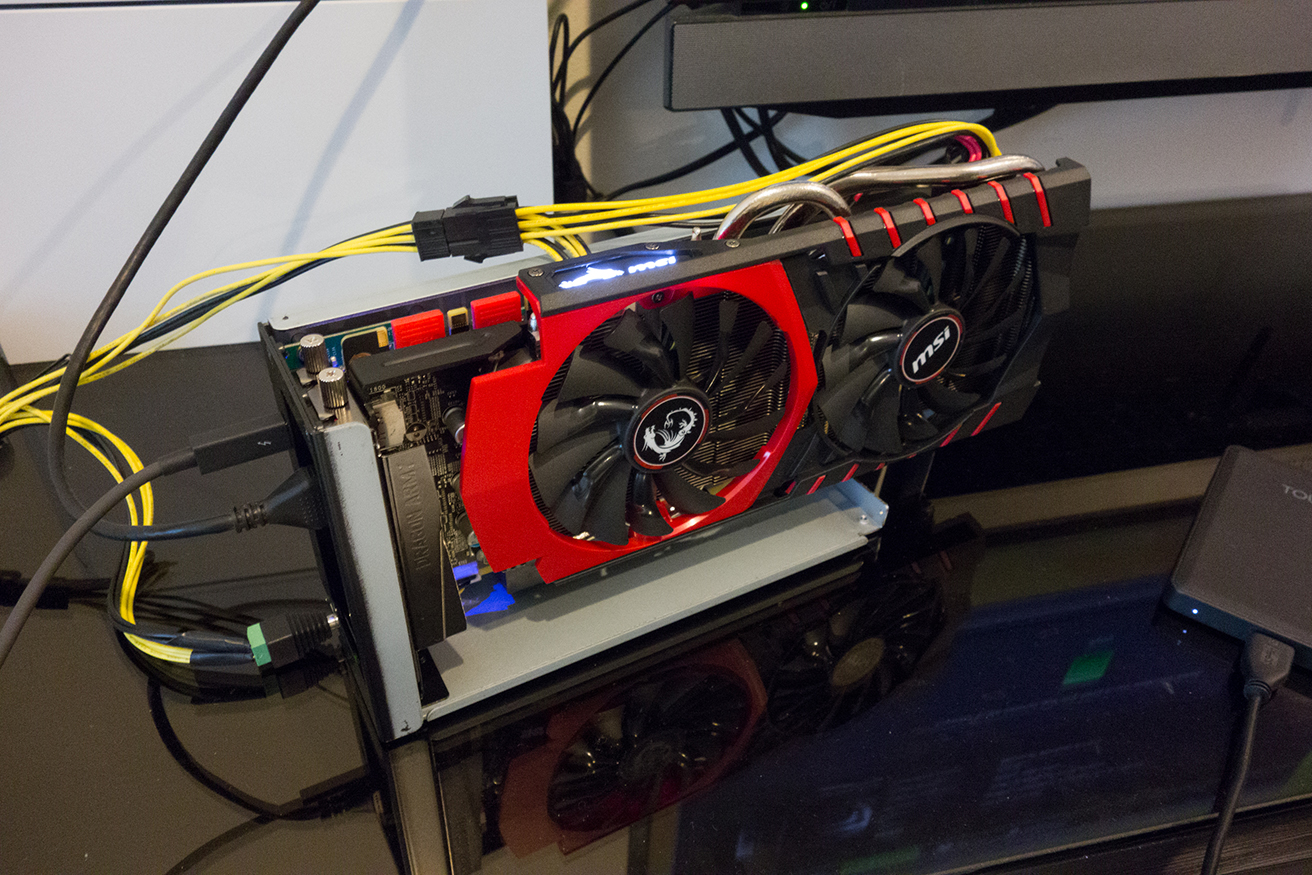
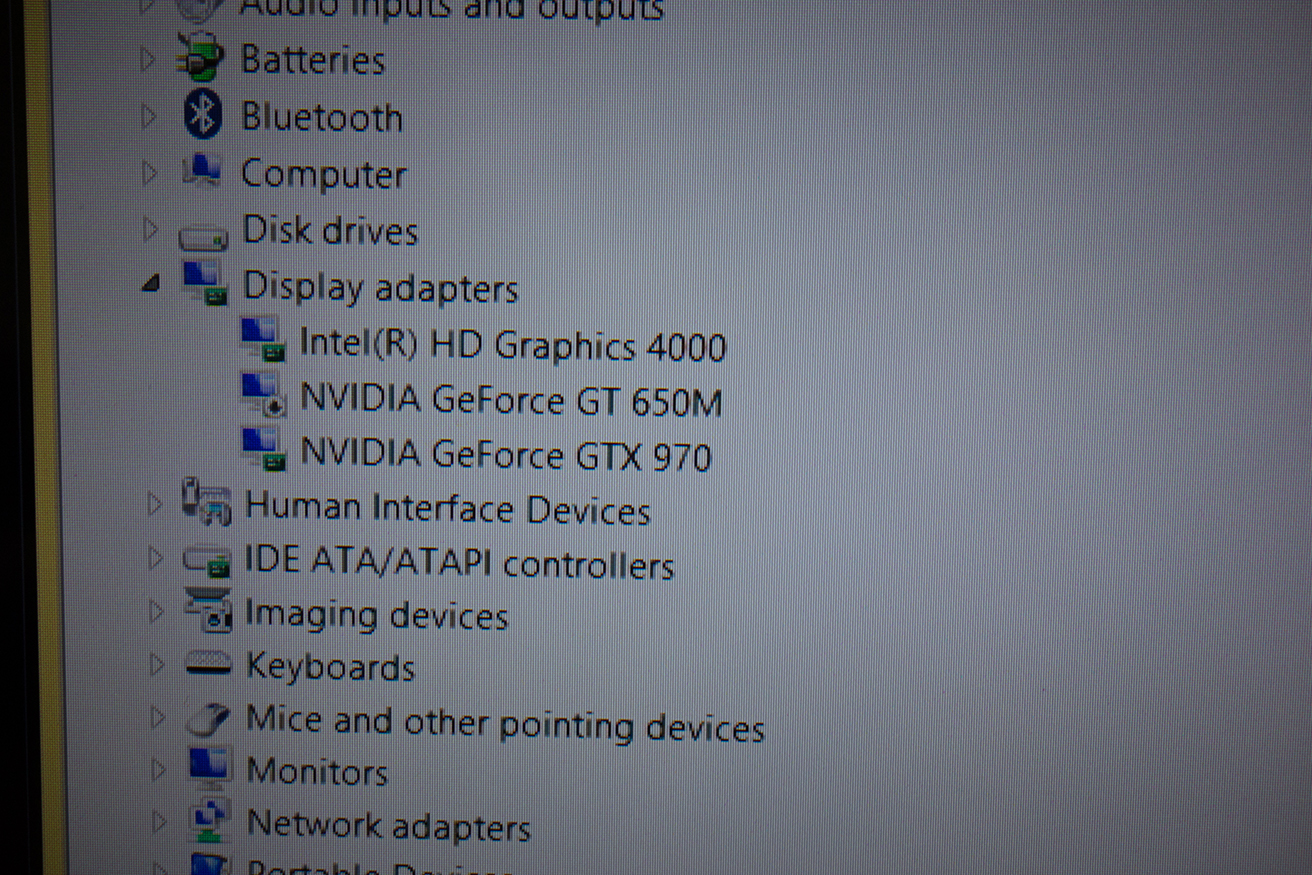
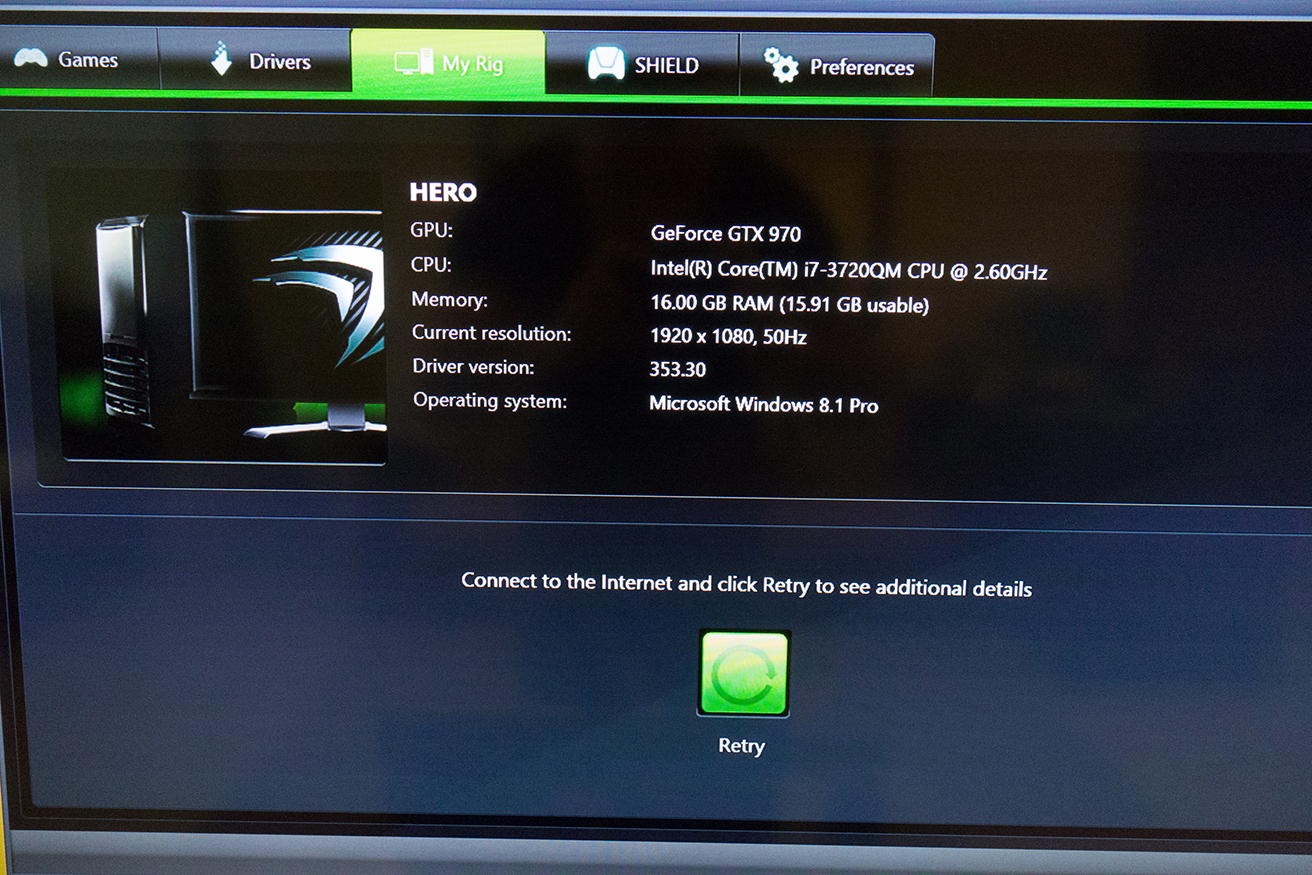
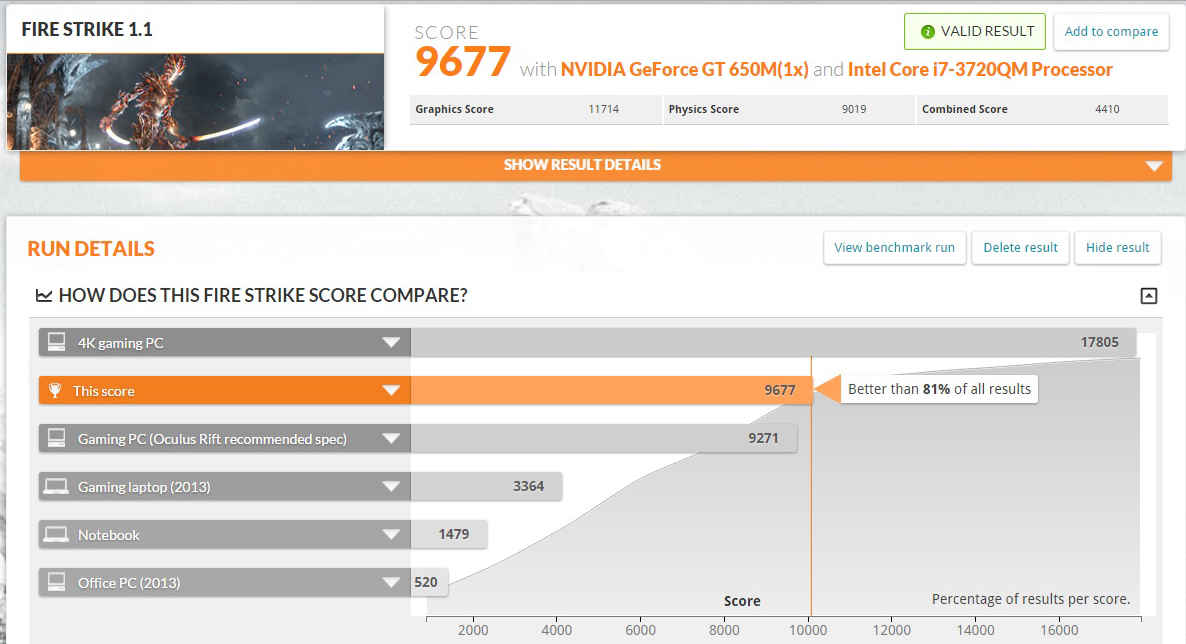
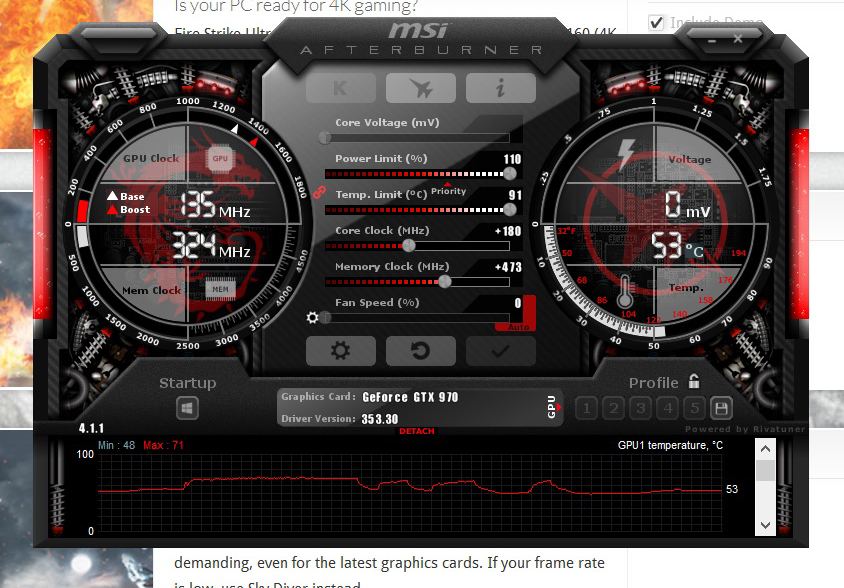
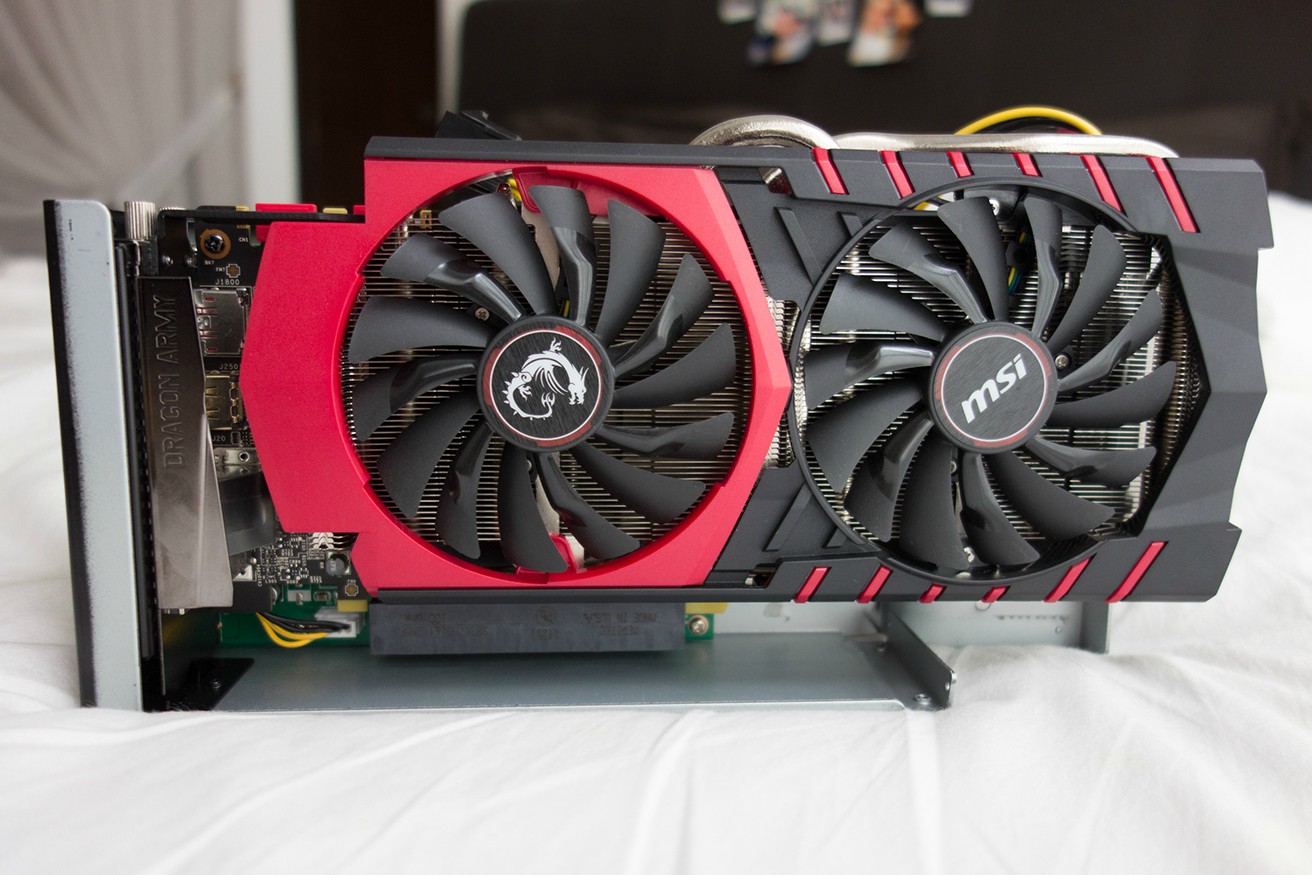
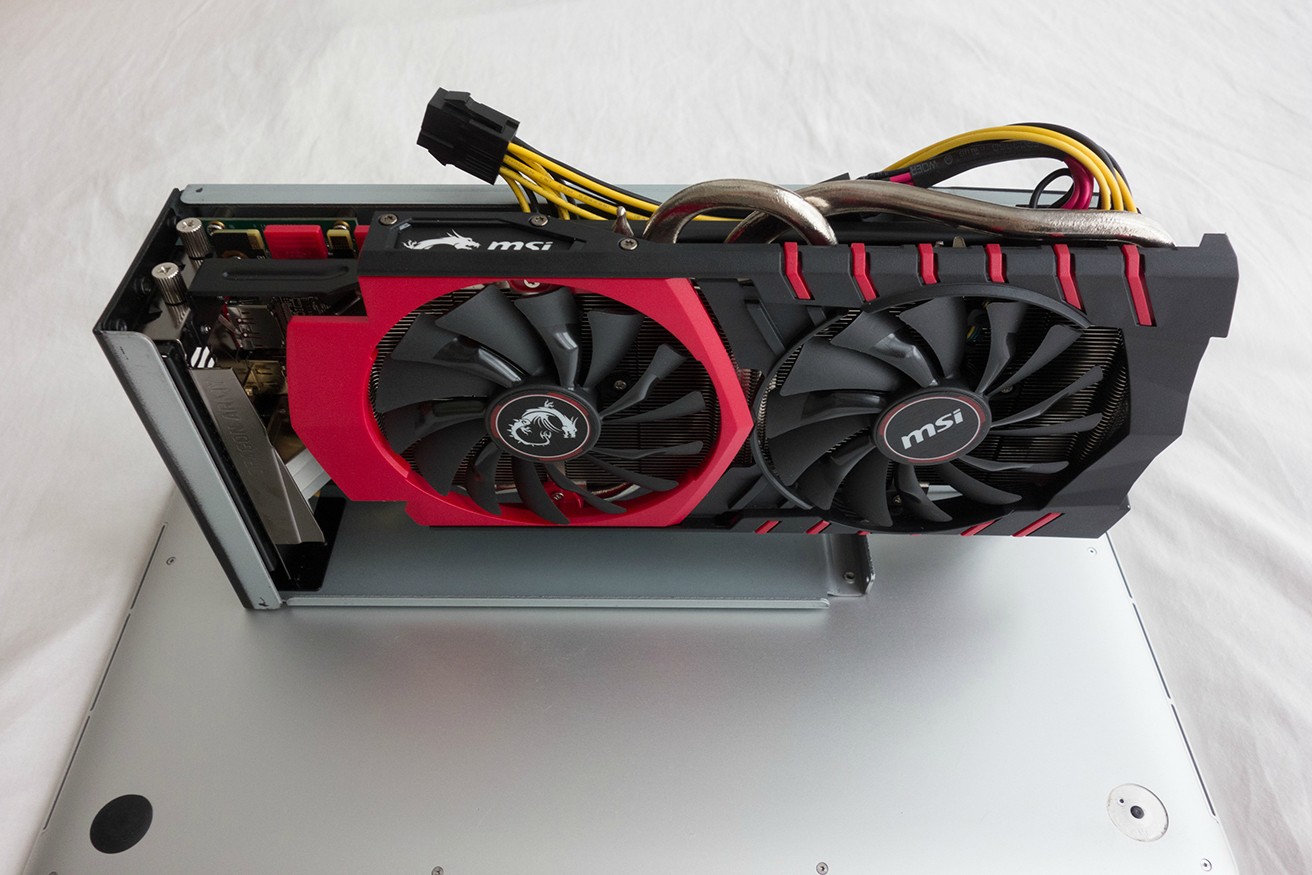
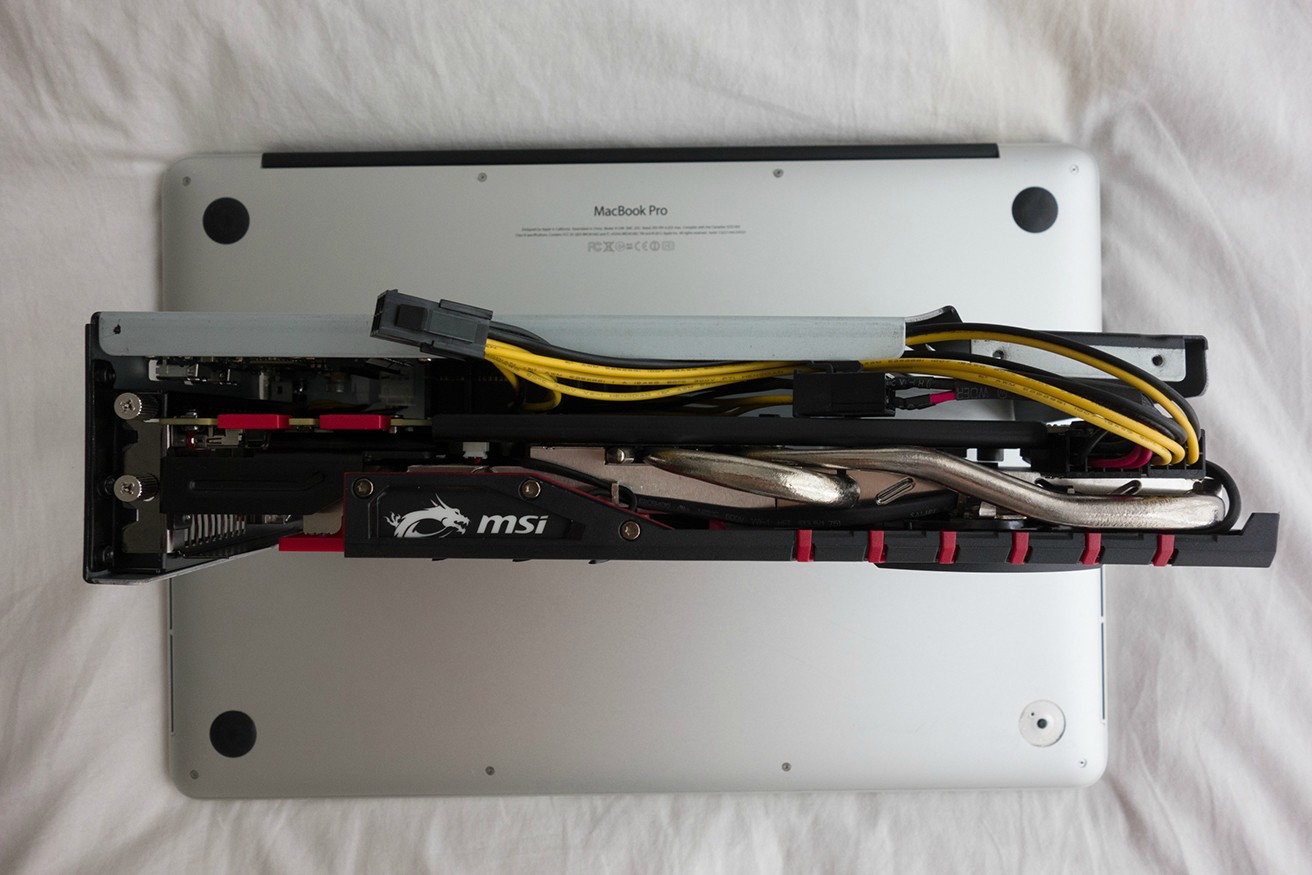
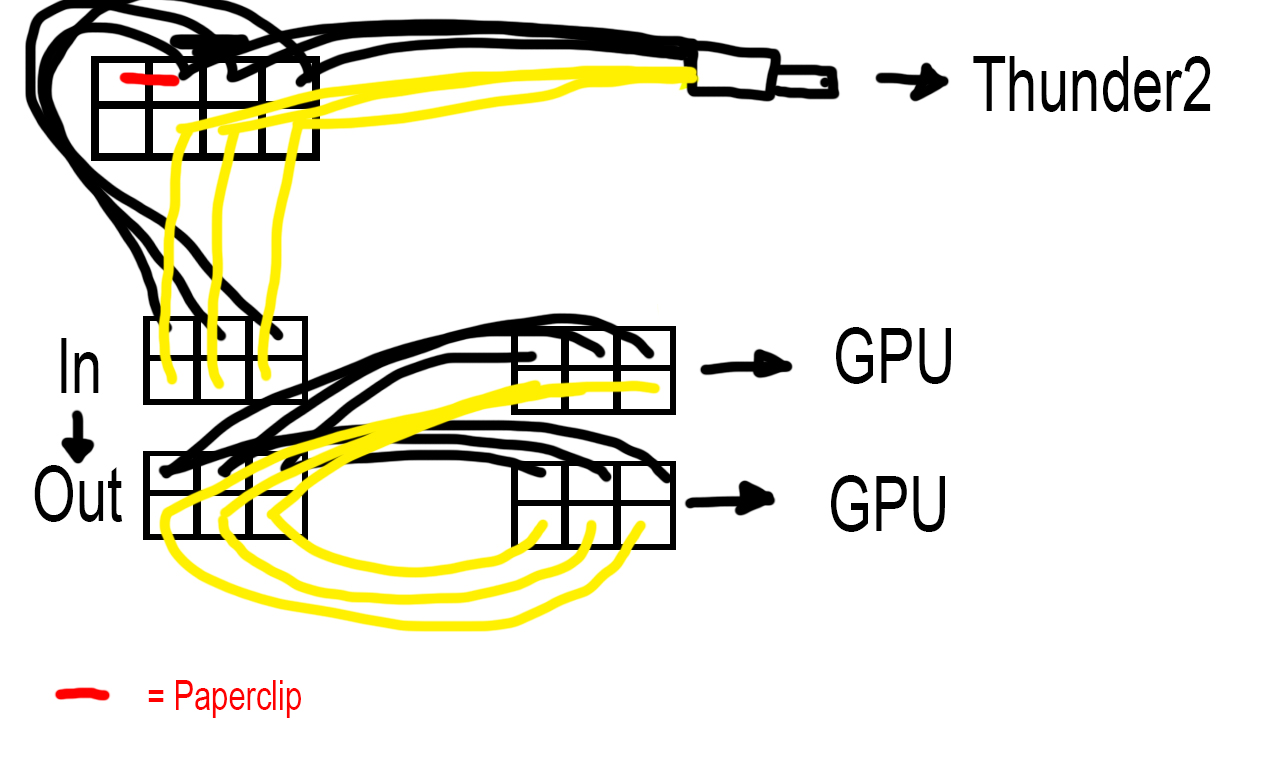
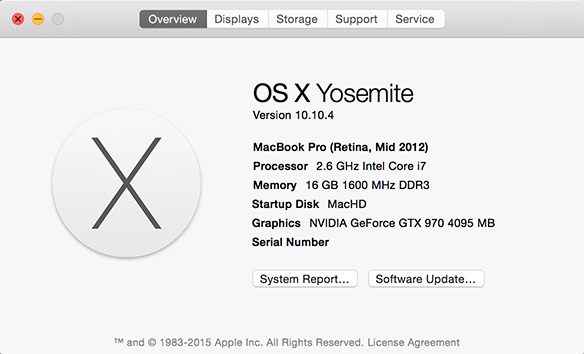
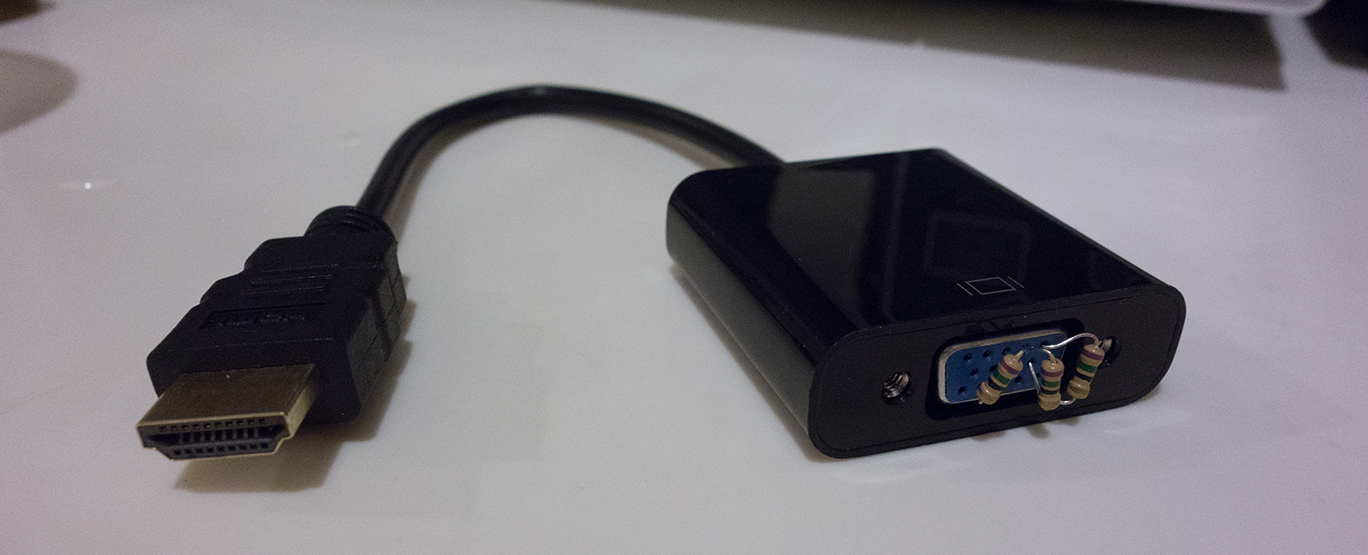
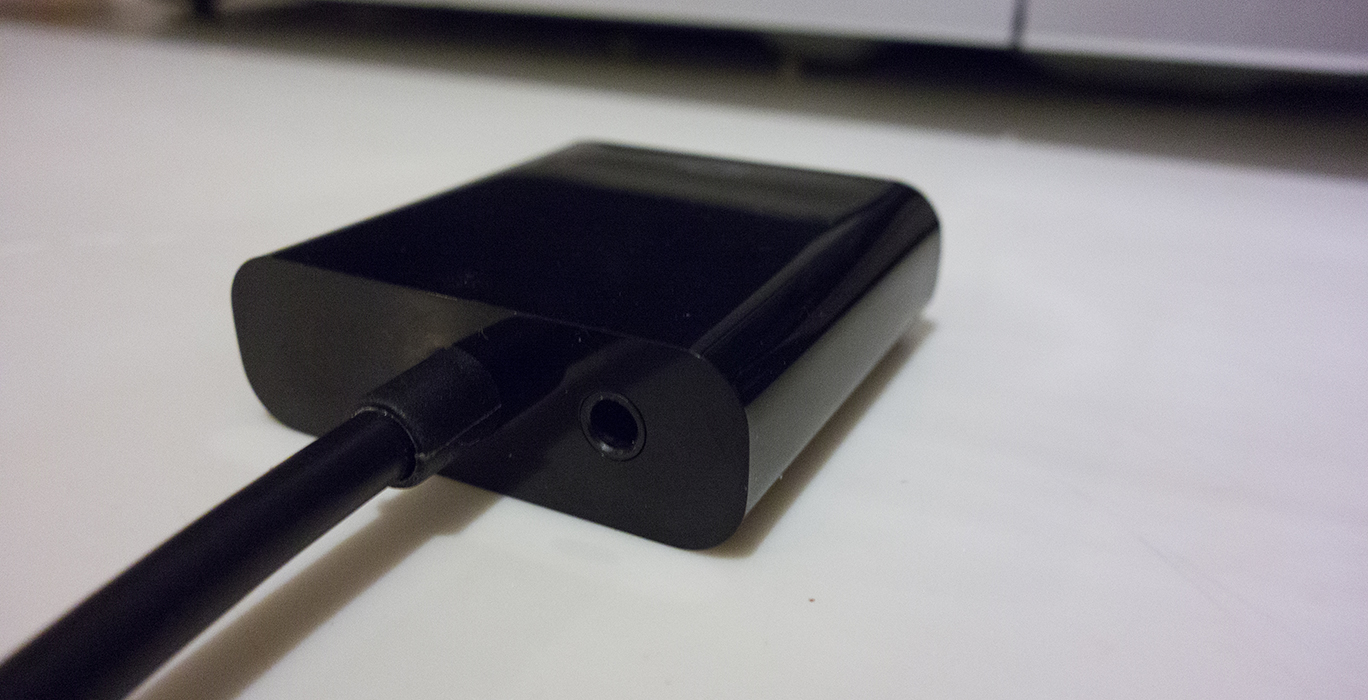
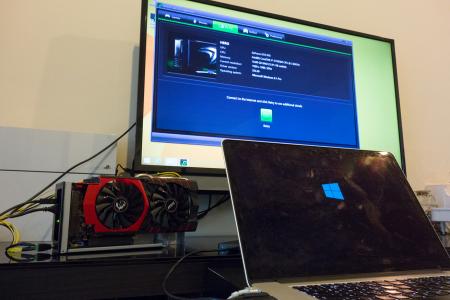
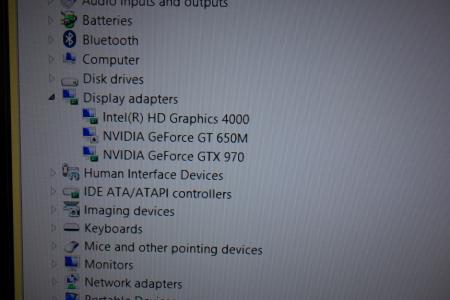
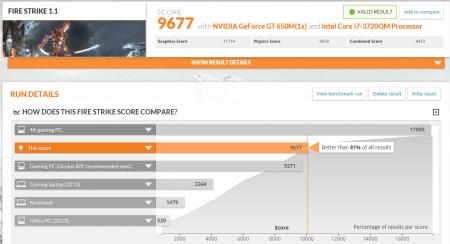
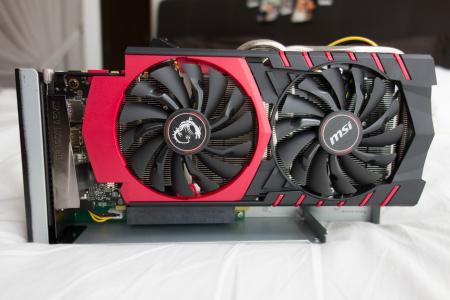
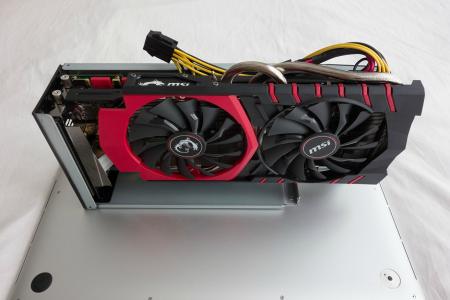
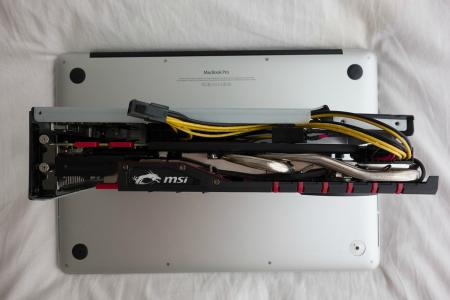
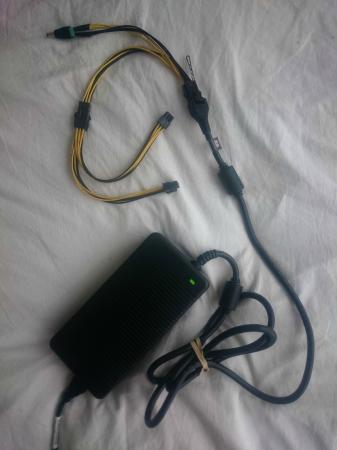
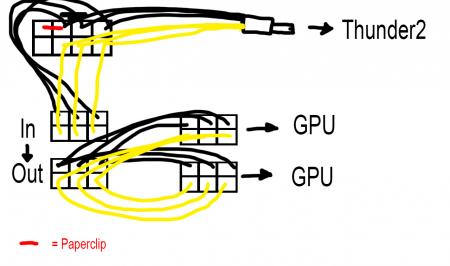
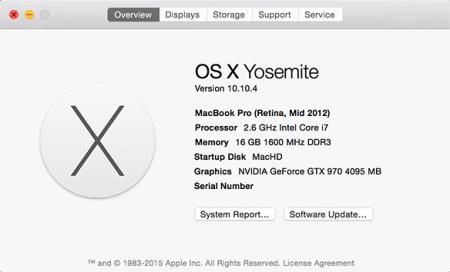
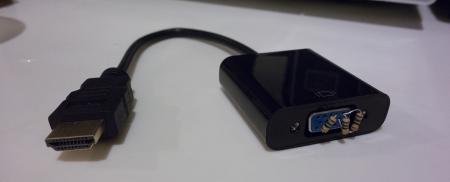
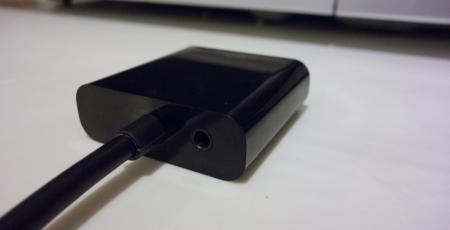
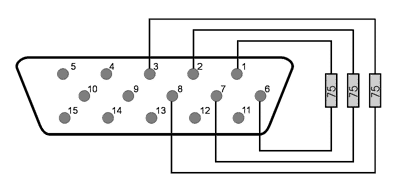
 Firstly I just want to thank everyone in this community. It's thanks to this site with it's information provided by the community that has made this possible.Update #1 - Now working with OS X 10.10.4Update #2 - Internal display working (no need for external display) - No performance loss, no paid software and still have sound Update #3 (27th September 2016) - No longer using Windows 8.1 on EFI, now using Windows 10 on Bootcamp (BIOS)So here is my guide!I have a Mid 2012 15" Macbook Pro Retina with Intel HD4000 + GT650M inside.I am running Windows 8.1 Pro which was installed via EFI (Not Bootcamp).This guide requires no extra software (you get plug and play eGPU) and no soldering.Parts list:1x Akitio Thunder21x MSI GTX970 4G Gaming1x Dell DA-2 220w power supply2x PCI-e 6-pin Male to Dual 6-pin Female Power Y cable splitter1x 5.5mm x 2.5mm DC barrel screw terminal adapter1x Electrical tape 1x Hair Clip 1x 6pin to 8pin PCI cable (provided with graphics card as mine is 6+8pin) Cost: £429.02 ($668.03 / €601.07)First off, the software:I used bootcamp to create a USB stick with Windows 8.1 Pro on it. Do not get the bootcamp software! (This caused the first problem for me later).I then installed Windows on my Mac via the EFI boot option. I followed this excellent guide right here: https://www.reddit.com/r/mac/comment...bootcamp_guideThis was a long process as it meant making an up to date Time Machine backup of my OSX, wiping the whole drive, installing Windows and then reinstating OSX from my backup, so this took some time.The next step is getting the drivers in Windows. If you have the same Mac as me, remember this! Usually if you install Windows via bootcamp for this model, you would use the 5.1.5621 bootcamp software. Do not do this. To get my drivers working in Windows I had to use bootcamp drivers from version 5.0.5033 instead of version 5.1.5621.Also before you install those, go ahead and remove the Nvidia folder. Go into the bootcamp folder, into drivers and delete Nvidia. Now you can proceed to install the 5.0.5033 drivers.A known issue with this model when installing Windows in EFI mode is you will not have sound on the internal speakers. I am 99% that there is no way to fix this issue. However due to the fact that also with this model Optimus does not work, meaning you must use an external display, this problem is then solved as you get sound via the sound device built into the graphics card.So that's it for software. The benefit to installing Windows in EFI mode is that it makes the eGPU plug and play!Update #1 - I now have my eGPU successfully running in OS X 10.10.4 too. Thanks to @goalque and his excellent script which automates the whole install process.The eGPU will only work with an external screen connected however. You must connect from the eGPU to the display (not from the Macbook to the display).The only thing to note here is that under 'Displays' in the system preferences, my Mac told me that the GT650M was powering the external display but it certainly was not. Also under system information you should see you eGPU and your display will be listed within that.Hardware: First thing is to connect up the power cables. It's pretty simple and requires no soldering at all.You can see my photo below and a shitty diagram I made too. Feel free to reply if you need help explaining this.If you have the paperclip/hairclip in the right place you will get a green light when switching it on like in the picture.Then it's was as simple as plugging the graphics card into the Thunder2 enclosure, and connecting it all up.Next I switched on the power for the eGPU, plugged the Thunderbolt cable in and switched on my Mac, proceeding to boot in to Windows.First off it was not being recognised at all in Device Manager. (It should show up under display adapters).The solution after much frustration was to simply plug it into the other Thunderbolt port on my laptop and plug it into the other Thunderbolt port on the Thunder2.Then upon bootup I was greeted with 3 devices under display adapters. Happy times!The final step was to install the drivers.I downloaded the Nvidia drivers for the card from the Nvidia website and proceeded to install them. Half way through instillation - black screen - followed by system crash and reboot. Bad times.I booted back into Windows again, went into Device Manager and under the display adapters I disabled the GT650M, then tried to install the drivers again and it worked. Upon reboot the Device Manger showed all three graphics cards (named correctly) as well as GeForce Experience showing the GTX970.So that's about it!I installed MSI Afterburner and 3DMark and played around with the clocks. I managed 8923 in Fire Strike 1.1 before overclocking and 9677 after. But oddly the results show up as from my GT650M. The card does show up on the results page as a secondary card though, and of course there is no way my GT650M would get that score! Also the clock speeds in the results for the GT650M are my clock speeds for the GT970. A little weird but I don't really care about that.Update #2 - Internal display working (no need for external display)So the two main limitations with this model of Macbook are the fact that you need an external display, and that you have no sound with an EFI Windows instillation. So I got around those limitations with this little device and three resistors:It's a HDMI to VGA adapter with audio out. You can see the audio out here:All you need to do is put 3x 75ohm resistors inside the VGA port to create a fake external display. You can see where the resistors need to go with this image:So the deal with this is, any program started on the 'external screen' (being powered by the eGPU) will use the eGPU. So what you'll want to do is set the fake display as your main display. Then anything started on that display will be running from the eGPU. Now there is a little limitation here; only games that run in windowed mode will work (which is most). You'll want to start the game on the fake screen in windowed mode and then drag it over to your internal display.So how do you grab from a display you can't see? Well, I found this free program called Dual Monitor Tools (it's free right here: Dual Monitor Tools - Home )and what you can do in this program is set a keyboard shortcut to move the selected window over to the other display. So you click on the game in the task bar, and hit the shortcut you assigned and it'll pop over to the internal screen, but because it was launched on the fake screen, it'll be powered by the eGPU.Simple as that, there's no performance hit either as you're just dragging the game to the other screen.A good tip is to have the internal display set as default first, launch the game, go to options and set the game to windowed mode now, then quit and relaunch after you've changed the fake screen as your primary. Otherwise you might not be able to switch it with the shortcut while it's in full screen.An issue I have: I don't know if this will apply to others but I simply cannot boot in to Windows with my GT650M activated. My startup process is very odd, so I'll document it incase others have to do this.To make my Windows even boot, I must have my GT650M disabled in device manger. But when I do this I cannot boot without the eGPU plugged in at all.So what I have to do is make sure my GT650M is down (boot in safe mode to do this the first time, no need for eGPU attached when doing this).Then with the eGPU plugged in, start up my laptop and chose the Windows boot option. The only way I know that Windows has successfully booted is the spinning white dots under the Windows logo on bootup will freeze. When my internal display freezes, I know Windows has loaded (this is when the desktop would appear on the external display) but of course we can't see that because it's a fake display.So once the bootup freezes, I wait until my keyboard backlights come on, then I know the desktop has loaded on the fake display. (Or just wait about 10 seconds after the freeze). Now the next step is to activate the GT650M in device manger so that my internal screen works. Now for this I did the process on a proper external display to learn the key combination to do it blind. For me it as follows:(Press START - cmd key)type: device manENTERTABDown arrow x8ENTERTABENTERENTERAfter I have done that, the frozen Windows logo will disappear and the screen will flicker for about 5 - 10 seconds before displaying my desktop. Success! I can now control Windows from my internal display. Opening up the resolution tool will show 2 displays, the internal, and the fake external.The only thing to remember is when I'm done, I must deactivate the GT650M in device manager again before shutting down. Deactivating it will not shut off the internal display, so it's not a problem to do that and shut down.So that's it. I hope you don't have to do that process, but for me, that's the only way to do it. it's a slight pain but not too much bother, and it's certainly great not to have to use an external screen! Update 3 (Removed EFI Win8.1, now using Win10 BIOS): So I decided I want to use Windows 10 now for DirectX 12 gaming. This was a pretty simple process to setup. Hardware-wise it's all the same as above, software-wise is as follows. Get yourself a copy eGPU Setup 1.2 (not 1.3). Big shout out to @Tech Inferno Fan for making it. If you don't have EFI Windows on your Macbook, continue to the next paragraph. I had to wipe my whole mac hard drive clean as the EFI partition of Win8.1 gets installed before OSX. So I made a Time Machine backup. Now to wipe the whole hard drive you must boot from a USB otherwise you can't wipe the drive you're using with the recovery on it. But I really didn't want to download 4GB or whatever size the latest OSX is just so I can use the recovery option (I don't need OSX as I'm using a Time Machine backup with it already). What I did was downloaded a piece of software called Carbon Copy Cloner (you can get a 30-day free trial), on here you have an option to clone the Recovery HD partition from you MacHD to another drive (in this case a USB). So I did this saving me the time of downloading the whole OSX just for it's recovery. So all there was to do next is boot the recovery from the USB, wipe the entire drive and restore from my Time Machine backup. Once in OSX load up the Bootcamp Assistant, plug in a USB (8GB or bigger), burn on Windows 10, download the drivers and create a Windows 10 installation. It's pretty straight forward with Bootcamp, just follow it all until you're in Windows 10 on your desktop. Once on the desktop I installed the Bootcamp software and shut down the system. I then plugged in the eGPU (not sure if you have to but I felt I should while installing the drivers for it), booted back up and installed the latest Nvidia drivers for my eGPU then shut the system down again. For the next steps I basically followed @w4vz's guide. Particularly just this part (I made some slight changes to parts that didn't quite translate to what I was seeing on my screen, I underlined the ones I have modified): Unzip eGPU Setup 1.2 to c:\eGPU run setup-disk-image (as admin user) Restart and load eGPU Setup 1.2, select option 2 Do PCI compaction all exept sata etc etc. After it's all done make sure you have PCI WRITE and ALL ALLOC showing yes on the right side panel Optional: If freeze at the bootloader: edit PCI.BAT replacing a:x.x and b:x.x with 0a:x.x and 0b:x.x (I only found A occurences in mine) (in the editor alt/option+F to access the file menu) Optional: If the settings are not kept after reboot: edit Startup.bat by adding REM in front of all "call vidinit" like so: REM call vidinit... (in the editor alt/option+F to access the file menu) Run startup.bat, then Test Run Chainloader, then Test. After this you should be taken back to the main menu Select eGPU Setup 1.2 again and now select (default) option 1 From now on all you need to do to get your eGPU working is boot Windows, select eGPU Setup 1.2 and press 1 Any questions just ask and I'll help in any way I can.
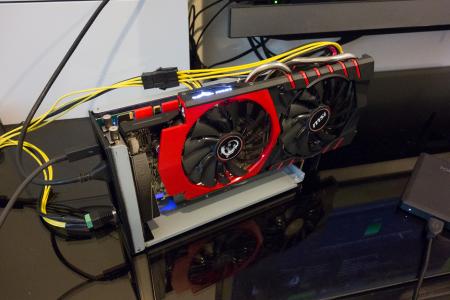


-
Hi, I know this might seem a bit counter-intuitive but I was wondering if there is anyway to enable the internal graphics on my cpu for this laptop? I know the CPU has a built in Intel HD 4000 graphics but for some weird reason ASUS has chosen to not have the option for enabling it. I wanted to use the iGPU for the quicksync for in home streaming for Steam. I was wondering if there are any "hacked" bios that allows you to enable said graphics. Thanks!
-
After updating my bios from 1.09 to 3.05 my GT 750m stopped working. Nvidia drivers can install but once installed none of the features work. No Nvidia control panel and all of the tabs in Geforce Experience except for the drivers tab are grayed out. The drivers tab does not recognize that the driver has been installed and the option to update the driver is available. Downloading the update and installing it leads to the same issue. With the tabs being grayed out and the driver tab showing that I can update the driver. When I look under Device Manager the 750m has a little yellow triangle and in the properties it reads a Code 43. I have used Display Driver Uninstaller multiple times to do a fresh driver install of both Nvidias drivers and Lenovo's Nvidia drivers. Those lead to the same issue. I can't reinstall the operating system because during the install phase the computer blue-screens if the discreet card is enabled in the BIOS. Right now I am running in UMA Only mode. On startup when using the discreet card the computer sits at a black screen for about 2 minutes until the computer switches to the IGP. So after a completely fresh driver install the card still fails. This only started to happen once I upgraded my bios. (I should have stuck to the "if its not broken don't fix it" rule). I upgraded from v1.09 to v3.05. So now I am wondering if it is possible to downgrade my bios from 3.05 to 1.09 or if that jump is too large. I looked in the bios mod thread and want to use the provided files to downgrade my bios without installing the modified bios. But I am wondering if I will have any issues with the version jump from 3.05 to 1.09 being so large. If that is the case then can I jump from 3.05 to 2.07 then to 1.09.
-
Hello, I own a Lenovo X130e with an Intel Celeron 857 CPU and Intel HD Graphics. Is it possible to overclock these by modding my BIOS? If so, would anyone be willing to assist me to mod by BIOS? Thanks.
-
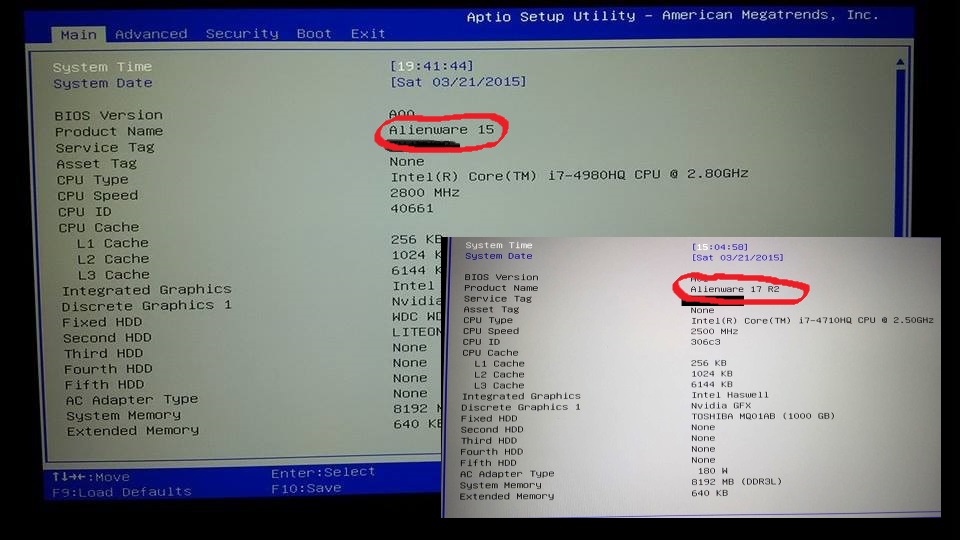
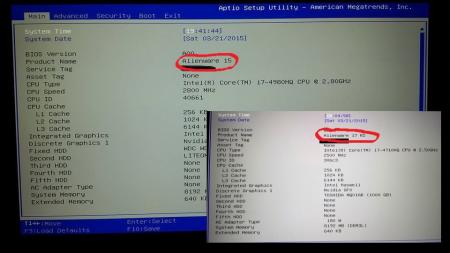
Hello everyone, I received technical intervention on my Alienware 17 R2 some days ago, the Dell technician replaced my defective frontal speakers and also motherboard, when rebooting the system he entered again my Service Tag on the BIOS but I think he did something wrong and now the BIOS shows Alienware 15 instead of Alienware 17 R2 as Product Name, I know there are different ways to edit these parameters, I'm asking you guys help or a software / tool to fix this error. TL;DR: I need to edit the Product Name on BIOS to change it from Alienware 15 to Alienware 17 R2. I'm attaching a picture. Thanks in advance for your help
-
Hey guys, so here I have a laptop with bad BIOS flash. It got stuck at 80% and after turning it on, I see XMG splash screen along with F2 for Setup and F7 for Boot Options. I can select them, but it won't do anything. Stays stuck in place. Keyboard lights up, fans turn, screen is working. I've already got the battery out and held power button for 15 seconds. Didn't help. Is there any other shot that I can take?
-
 I run svl7's unlocked BIOS, version A10, on my M17x R4. I ran it for nearly two years with 240GB Mushkin SSD SATAIII in 1st HDD bay, and stock Dell 750GB HDD SATAII in 2nd bay. It worked without issue. Recently I replaced the 750 with a 1TB HDD with a SATAIII interface and I see the laptop bluescreening when accessing both drives simultaneously (i.e. copying files from one drive to the other.) I remember there was an issue with these mobo's where there was instability when both drives were in SATAIII mode so Dell limited the 2nd bay to SATAII in BIOS A05 or A08 I think. However it looks like that restriction was dropped in the unlocked BIOS I'm using and HwINFO confirms that both drives are operating at SATAIII. Assuming I DO NOT want to drop down to the stock BIOS, is there a way I can limit the 2nd drive to SATAII, or do I have to shell out the $$ for a similar 1TB drive with a SATAII interface? Thanks guys.
 -
I am trying to install an Intel AC wireless card into a Folio 13-2000 Laptop but the BIOS is rejecting the card. Does anyone happen to have a modded BIOS for this laptop with the whitelist removed? Thank You
-
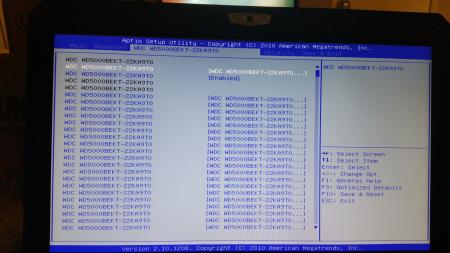
Hi, hoping to get some help with my laptop as this seems to be the most active forum for these old laptops. Some background : I have been having issues with the bios on my laptop for some time, the boot order selection screen decided to populate itself with many of the same option as seen below in the picture I figured that returning to the optimized defaults would reset the boot options, but it has no effect. I have also cleared the CMOS by removing the power from the backup battery to the mother board and holding the power button to drain whatever was left. No dice. Eventually I decided that flashing the bios would be a good idea, it wasn't. I created a freedos bootable cd ( cd because for whatever reason my laptop would not boot from any windows/dos based usb, linux images boot fine) and flashed the bios provided from msi's website for this laptop. The flash went fine, but upon rebooting the bios were not fixed. After another boot the laptop's power button would just flash, not booting into anything or spinning the fans. Frustrated I left the laptop alone for a week. I have decided to start working on it again, I cleared the CMOS like before a loh and behold the laptop booted into the bios and then into a bootable cd! Yippie! After some rebooting it became clear that the laptop would not boot into the bios any more. So what do I decided to do? Clear the cmos again as it seems to be the thing preventing a good boot.... this worked 3 times. Current status: As of right now the laptop refuses to boot into bios, it just sits at a blank screen, but the power button is not flashing and the cd drive sounds like it spins up. I am thinking of reflashing the bios to see if this does anything, using the blind-flash method mentioned in the stickied post for the unlocked bios. What is worrying me the most at the moment is that when I push the power button, the laptop powers on for half a second and then shuts off. If i power it back on right after it shuts itself off, it remains on, but still not booting into anything. If anything needs to be clarified please ask, and shoot me ideas on how to fix. Like I said it seems like this forum is my last hope before having to send it in, which won't happen any time soon as I am a broke college student at this point. TLDR: Bios were screwed up, flashed bios, thought it bricked, cleared cmos, booted fine once, failed to boot, cleared cmos again, nothing working now. Help Please!
-
Hi, I'm new! Firstly sorry for my, very, bad english. I've already unlocked some hidden menus in my VAIO's BIOS (AMI Aptio), but didn't flashed yet. I have some question about BIOS/EC modding. In BIOS I don't have any menu about UEFI boot (neither in Strings section). Could be possible to add it? What are the advantages in modding EC firmware? There's a tool to do this or is possible only via hex editor? Any link to a good guide? (I have some troubles with Windows 8, could be fixed with an EC mod?) Thanks!!! PS: I have a full dump of both BIOS flash and EC flash, made with an SPI R/W device.
-
Hello Tech Inferno, I have a P150EM in the form of a "PCSpecialist Vortex IV". I've had it for about a year, and quite often had hard crashes i.e. kernel panics with it in Linux (which I had at first put down to hardware compatibility problems under linux, kernel bugs, etc - the crashes vary in characteristics depending on what kernel i'm running - some kernels are more unstable when idle than when under load, and the crashes tend to be in the power saving functions - update_wait_time, try_to_wake_up etc), but I also occasionally get random BSODs under Windows 7 too (it's a dual-boot setup) - so I suspect I have a hardware problem. I have run memtest86, intel CPU diagnostics, and various other tools but none of them show any issues with the CPU/memory. However, more recently, when I am running games under Windows (e.g. Fallout 3) I am having a particularly nasty hard crash that makes me suspect the BIOS. The system freezes (playing the last few milliseconds of audio in a loop) and then gives me a BSOD with very little information - no stack trace, no sys file, just four memory pointers, two of which are zero and the other two I didn't have time to read. That may be normal for a BSOD, but it is what comes after that makes me suspect the BIOS. When I reboot the machine, windows will get to the "starting windows" screen with its four coloured orbs, and freeze dead just before it draws the orbs, with the HDD light on continuously. If I then power off the machine by holding the button in, and switch on again, it gives me the ominous error message "Disk read error - press ctrl+alt+delete to reboot". I can reboot a few times, power off / on the machine, and get the same thing - to the point of believing I really have a dead disk. I can even go into the BIOS and see that *both* of my Plextor M5M mSATA drives have disappeared! However - if I leave the machine off for a while, or if I unplug the power cable and battery, press the power button to discharge it, and then put them back and boot up again, it boots up normally (apart from the 'windows failed to start' screen), and I can check the disk with no errors reported. This isn't a one-off either - it has happened three or four times in the past month. This is a particularly spooky kind of crash that whiffs of a BIOS bug.. My question is has anyone else experienced something similar, or am I just overheating my machine? It has always got quite hot when under full load e.g. playing games, and I wonder if there is any way to clock it down (and perhaps make it quieter too) - certainly the stock BIOS gives no options whatsoever to configure any aspect of the CPU or cooling.. I'm inclined to try Prema's modded bios from these forums, but I don't particularly like the idea of bricking the machine entirely. What do you recommend? Cheers, cyberdemon
-
Morning all, First post . I have a Clevo P150SMA, it's about 6 months old now. Luckily I have some really nice temps at the moment:- CPU/GPU never seem to go above 60c. So I though let's overclock! I have flashed prema mod BIOS and now have no idea what to do next to overclock. I'm used to overclocking on AMD desktop machines but not Intel/nVidia laptops . I normally dual boot linux/windows, linux is my main OS and windows I use for gaming so I would prefer BIOS overclock, although for GPU this is not that important. MSI Afterburner does not allow me to overclock. So I far I believe the best thing to do is flash a vBIOS for the GPU to allow overclocking in afterburner and overclock the CPU in BIOS. My question is how do I overclock the CPU in BIOS and any other advice. A guide to prema mod BIOS overclocking would be great but I can't find anything.
-
I managed to start and have already learned many new things this week about bios and its structure but need more resources if any body can help . I actually learnt it all cause i needed to rset my forgotten bios password ... I bought Y500 a year ago and changed Bios Password and then never get it bios and forgot it forever now as it true . learning is awesome and really I'm a programmer o I enjoy knowing new things .I currently manged to decode and uncompress my bios structure but never managed to know if there is any resources where I can managed stored settings and how to get to it and repack bios to restore it back after modifications and if anybody like to share me this research and learn more together .. ?
-
Clevo W2xxHNx/W2xxHPx series Modded & Stock BIOS Note: This thread is no longer updated. You can find the latest info HERE. Notice: Make sure you have downloaded the correct Mod for your specific model and that the laptop's or a UPS battery backup is present during the update process. Disclaimer: I do not hold any responsibility for any problems that may occur by using the mods in a wrong way. Remember that you flash these at your own risk. I have personally tested the W25xHNx mod. Since the laptops mentioned here are of the same series and thus almost identical, you shouldn't face any problems with the rest of them. The same changes were made to all models after ensuring that their stock counterparts are identical to the tested W25xHNx laptop. Note: All mods contain both the Modded and Stock BIOS image files so that you can go back in case you want to. Use Mod.bat or Stock.bat at a DOS environment respectively. Check the Flashing Guide below for detailed instructions. W2xxHNx/W2xxHPx Mod Changelog: v1.2 Intel Sandy Bridge 206A7 CPU microcode 29 --> 2D v1.1 Intel Management Engine 1.5MB firmware 7.1.60.1193 --> 7.1.80.1214 Intel HD Graphics 3000 vBios 2170 --> 2171 Updated flashers to AFUDOS v3.07.01 and FWUpdate v7.1.50.1166 v1.0 Intel Management Engine 1.5MB firmware 7.0.4.1197 --> 7.1.60.1193 Intel HD Graphics 3000 vBios 2117 --> 2170 JMicron JMC25x Gigabit Ethernet Controller 1.0.9.0 --> 1.0.10.0 Intel Sandy Bridge 206A7 CPU microcode 12 --> 29 Removed redundant Intel Sandy Bridge 206A7 CPU microcode 14 Added support for Intel Core i7-2820QM ES/QS processor (W25xHPW) Fixed grammar mistake at Resuming from Hibernation image Fixed spelling mistakes at Advanced tab (Alart --> Alarm) Merged BIOS & EC firmware into a single image file Correct BIOS version & date reported in Windows Clevo W25xHNx series BIOS v1.01.07 & EC v1.00.06 [Mod v1.2] Supported Models (*): W251HNQ, W251HNQ-C, W255HN, W253HNQ1, W253HNQ, W258HNQ etc... Clevo W25xHPx series BIOS v1.01.07 & EC v1.00.08 [Mod v1.2] Supported Models (*): W251HPQ, W251HPQ-C, W255HP, W253HPQ1, W253HPQ, W258HPQ etc... Clevo W27xHNx series BIOS v1.01.05 & EC v1.00.04 [Mod v1.2] Supported Models (*): W270HNQ etc... Clevo W27xHPx series BIOS v1.01.05 & EC v1.00.05 [Mod v1.2] Supported Models (*): W270HPQ etc... Clevo W25xHPW series BIOS v1.01.05 & EC v1.00.04 [Mod v1.2] Supported Models (*): W251HPW, W255HPW, W258HPW, W253HPW1, W253HPW etc... Flashing Guide (Text & Video): 1. Create a bootable MSDOS/FreeDOS USB flash-drive using Rufus 2. Copy all files relevant to your model at the USB flash-drive's root directory 3. Plug the USB flash drive at your laptop's USB 2.0 port 4. Restart and press F2 to enter BIOS to make sure that you do not have any BIOS or HDD password protection 5. Restart and press F7 to enter the Boot Order menu at which select your USB flash drive 6a. To update your BIOS & EC to the latest modded version, type Mod 6b. To update your BIOS & EC to the latest stock version, type Stock 7. Follow the easy on-screen prompts to finish the update process 8. The first time after the update, the laptop will boot and automatically restart quickly 9. Press F2 to enter BIOS and Load Setup Defaults followed by Save Changes and Reset 10. You have successfully updated your BIOS & EC to the latest modded/stock versions (*) As shown at Clevo Bios Mirror and laptop Service Manuals Special thanks to Lordkag for the help and advice.
-
Hello, I was interested in merging my laptop's BIOS & EC together into one image and came to an interesting conclusion. My laptop is Clevo W25xHNx from 2011 (EOL). The latest BIOS is 1.01.07 and was released alongside EC 1.00.05. After some time EC 1.00.06 was released and no more updates after that. I opened BIOS 1.01.07 and EC 1.00.05 with AMIBCP and saw that both of them are based on the 1.01.07 BIOS which makes sense since they were released together. Next I opened EC 1.00.06 with AMIBCP and saw that it is also based on the 1.01.07 BIOS which again makes sense since it had to be based on the latest released BIOS. So I wondered whether I had to do anything to merge the 1.01.07 BIOS and 1.00.06 EC. I could just flash the 1.00.06 EC image (/E & /P /B /N) to update both EC and then BIOS. Obviously I had to make sure first that there were no other differences apart from an updated EC. Maybe the bare EC image didn't include parts of the main BIOS block. I opened both 07 BIOS and 06 EC with Beyond Compare and saw that only a small block was different on both of them. That block should contain the EC. However, since I don't know from where exactly I should copy-paste I decided to use UEFIExtract. I extracted both BIOS 07 and EC 06 and checked both folders for file differences with WinMerge. The only difference was a single 64KB "padding" file at the top of the main BIOS block: eW251HNQ.06.dump\2 BIOS region\0 Padding\body.bin I copied both files in a folder and after naming them appropriately I opened both of them with HxD hex editor. At the top I can see ITE which is the BIOS/EC chip manufacturer. Scrolling down a bit reveals the file's version number witch is 1.00.05 for the BIOS 07 one and 1.00.06 for the EC 06 one. This is definitely the EC firmware. Now, I want to test whether the latest EC_06 is a full 1.01.07 BIOS + EC 1.00.06 image. I opened both BIOS 07 and the extracted 64KB EC 06 firmware. The first line of the extracted EC file is 02 00 2E 02 00 0E 22 22 22 22 22 02 06 80 C2 AF. I search that at the BIOS 07 image and find it at offset 180000. I go back to the EC and right click > Select all > Copy. The length is 10000 as shown by HxD. Now I go back to BIOS 07 tab, click before the first hex number of the 180000 offset (02 in my case), Edit > Select block and enter the length of the EC file which is 10000 or 64KB. Then right click > Paste write. The 64KB that I replaced will appear in red. I save the result in a new file (TEST_BIOS07_EC06). In theory I have now created a 07 BIOS + 06 EC. So if I compare the stock Clevo 06 EC file with my TEST one, they should be identical. And I'm right, they both have the same SHA-1 hash. So that proves that the EC_06 provided by Clevo can be used on it's own to update both the BIOS & EC of a machine. So, in my case I don't have to merge the 64KB EC firmware, I can use the EC image by itself. Of course, IF EC_06 was based on the 04 BIOS for example (whereas the latest BIOS is 07) I would have to extract the 64KB EC and insert it manually like I shown above. But in THIS case, that's not necessary. Am I wrong?
-
Hello! Please can you help me to remove WiFi white list? -Model : Lenovo B590 -UEFI Bios Revision : H1ET69WW (v1.12) -UEFI Bios Date: 2012-11-15 -Embedded Controller Version: H1EC31WW (v1.11) -Machine Type Model: 62742BG -Bios backup link : BIOSBAKK_64.ROM Actually my problem happens while flashing a modded image, I got Error 104 - The 2 SPI flash devices do not have compatible command sets. "Screenshot": 2014-08-08 23.23.20.jpg Thanks a lot, regards.
-
Hi guys, I've got an R1 M18x, and I've just swapped out two 6990m for a pair of 780m. I flashed the BIOS to unlocked A05 before I swapped and the change seemed to go well...until I tried turning it on. Screen black, and all I'm getting is two short beeps. I've taken the ram out, swapped the order etc but to no avail. Any idea what the issue could be? Thanks for any help, Mark.
-
Today I was trying to revert my Alienware's Nvidia 460m card back to the A04 bios to remove the downclocking functionality. After I reverted the bios, I changed some of the settings in the f12 boot menu, mainly the gpu throttle temp (which I thought it wouldn't have) and made a few other tweaks which i don't remember. After it restarted, the display lit up but only gives me a black screen. I can hear the fans begin to start, but the stop and restart every second, after a few seconds I can hear a clicking noise after the fans start each time. I removed the computer and system batteries and heldthe power button for 30 seconds before rebooting but it didn't help, I've also tried to blind flash the bios but to no avail (though I'm not sure the flashdrive I'm using will work for a blind flash). Does anyone know what's wrong or have anything I can try? Recap of Symptoms - Black Screen - Fans start and stop - Clicking noise
-
 I have an Alienware m17x R3, 2720QM, GTX 580M, 3D, 120HZ. Because my GTX 580M broke down, I bought a GTX 780M with Eurocom. I followed all the steps described by J95 in GPU in the post on notebookreview Alienware M17x R3 460M to 780M - Questions/Concerns - Page 4. Got my card working, for a couple of days, and decided to do a clean Windows 7 install. First thing I did, was I reset the BIOS, and blindflashed the BIOS with the unlocked A12 bios. After that I was unable to enter in the BIOS. I get 8 Beeps and no post. LCD / or GPU faulty. Seeing that things were working before, I find it hard to believe something really broke, but... Anyone ideas? I know that in order to get the card working correctly I need to enter the BIOS and do the following: >Advanced Menu>Video Configuration >disable IGP >set display to PEG > Disable the Integrated sound card >F10 reboot I am suspecting it had something to do with my BIOS flash. Question: Can the A12 Unlocked BIOS be flashed with pre-modified settings: - disable IGP - display to PEG - Integrated sound card disabled. Thanks!
 -
Hi all, I am new here, so I am sorry if I have posted this in the wrong section. Also, I realise this question has been asked before, but all of the other threads are really old. So, my issue. I flashed the unlocked A08 bios with sata fix and everything worked brilliantly. Then, in my infinite wisdom I turned on UEFI mode in BIOS to see what would happen. What happened is it rebooted with 8 beeps (no screen) everytime I turned on. I looked at the other forums and did the whole usb recovery thing, however, I believed it was taking to long so I turned the computer off after the computer rebooted and beeped 7 times (cpu error). I tried taking out the CMOS to no avail. Now when I try the recovery USB the usb never seems to be loaded (light never comes on). Any ideas? Thanks for all the help, and sorry for any mistakes I have no doubt made.
-
Hi, I have the prema mod bios (w230st 1.1) installed for a long time, but since 2 weeks ago the hdmi output doesn´t work. With my normal monitor it works but it doesn´t work with the tv. When I start the pc with my monitor it works without problems in windows, bios, etc. but with the TV it´s impossible. I’ve tried everything, a new hdmi cable, other hdmi port in the TV... It´s says panasonic TV and i can change the 50/60Hz , resolution but no way. I´ve reinstalled windows 8 and linux. The only thing I can do is reinstalling the prema bios, can I do that? It´s not an update, it´s the same bios so I don´t know if y can do that.
-
 Hello all, I couldn't find any other forum pages relating to this laptop: Clevo W350ST (Sager NP7352) So I guess this is for all those who are scraping through the interwebs to find some useful modifications for it. I have noticed many custom BIOS's made for Clevo models such as the W350ET and W370ET and was wondering if there was any word on the updated Clevo models? I currently own a W350ST (NP7352) and I must say the performance is remarkable! TECH SPECS: -INTEL Core i7 4700mq @ 2.40GHz turbo boost to 3.20GHz (4 cores) and 4600HD IG -8GB 1600MHz DDR3 (Slow timings but no matter) -2GB NVIDIA GTX 765m -256GB Crucial C300 SSD -1TB 5,400rpm HDD -640GB 5,400rpm HDD -1920x1080 15.6" Screen -Webcam, USB 3.0 etc -£980 when purchased Battery life can range from 45minutes to 3 and a half hours at a stretch Some concerns with it though: -The BIOS is bare and has no configurable options relevant to anything -The CPU throttles constantly despite temperature -The fan control is completely illogical failing to kick fully in even after the 4700mq has hit 95 celcius -The fan control doesn't seem to be determined by CPU utilisation either -The BIOS screen likes to display itself twice before booting -There is no way for me to control CPU features like Turbo boost or SpeedStep etc (Windows Power features and INTEL XTU do close to nothing to help with this) I find that I can play a game like GTA IV on maximum settings for about 2minutes at 50fps before the CPU throttles itself and decides 20fps is far better Even less CPU intensive games like Dirt 3 are affected by this throttling issue. I have tried using Throttlestop but it changed nothing, I have unparked all CPU cores and still no difference. Aside from these issues though I figured I could bump up the GPU clock by modifying the VBios using Kepler BIOS tweaker, which unfortunately cause of CPU throttling makes no substantial difference to frame rate. I have found a website that holds the current updated bios versions for the W350ST: W35xST/W37xST Series I want to be able to customise this bios as 'Prema' did with the W350ET so I have access to as many features as I'd see on a Gigabyte z68 board for example. Has anyone any ideas on how to achieve this? Prema? Anyone?
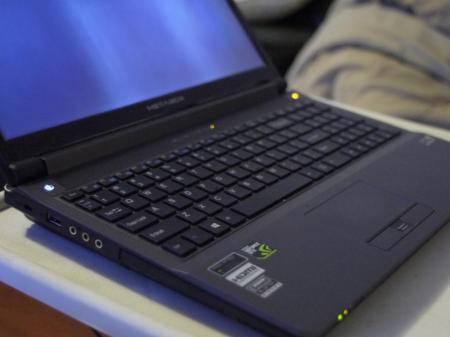
-
Hello guys, I have the notebook Lenovo Y500 with 2 Gt650m. I want more Performance with the Notebook, because I want play games with better grafics. Specialy i want play Arma 2 and Arma 3 with better grafics. I ha overclocked the 2 GT650M with msi Afterburner. The GPU Clock is 925mhz and the Memory Clock 1275 mhz. My bios is locked because i dont can download the unlocked bios because i havent enough posts. So i want ask you if you have any tips for more performance. I hope you can help me guys. noesges