Search the Community
Showing results for tags 'bios'.
-
Need a modded bios to unlock my feature restricted bios
-
Hi guys. i've bought a w350et from a friend of mine but it has a uk keyboard and it is realy strange to me and i cant find a pt-pt keyboard to sell. Also i cant find on the internet the latest drivers and utilities, and for bios updates i cant find anything from clevo. In my current bios i cant find anything about hyper threading and the thing to activate and deactivate igpu. Can u guys please help me find out this things? os win 10
-
So I pretty much overhauled my entire unit(removed battery, ram cover, and cleaned the GPU fan) and then after that my laptop started beeping 4 times. In response, I did the 60 seconds hold power button rule then it booted normally. Only problem is, the bios was obviously reset, so it started behaving strangely(getting high temps). Any bios versions you would recommend for me guys? And how do I bios upgrade it without using my battery?
-
 PROBLEM: Black screen of death on a Lenovo y580 (or probably most of the ideapad Y series since they all use similar bios software) after changing the setting for which video source gets priority (default is "SG"). SOLUTION: Rather than using the vast array of options that rarely work for anyone like heating up your video card by blocking the fan on a pillow for 20 minutes at a time until it "decides" to start working again - after much research I found the solution for setting the modified slv7 lenovo y580 bios back to its defaults in the event that you inadvertently disable your video. First, press power and immediately hold F2 until your laptop starts beeping, then release. If there is no sound hold it about 45 seconds. Second, press the following button sequence for 100 extra lives: left arrow (1x) down arrow (4x) enter (4x) At that point the system should automatically shut down and restart. If it does not, the settings may not have been changed correctly but go ahead and manually restart to find out. If you come back to a black screen again try the process over until you're certain that the cause is something other than your bios settings. This will save you hours upon hours researching CMOS bypass surgeries, blind usb jump drive bios flash procedures, and all those tedious and time consuming processes. I even started questioning whether my keyboard on my laptop worked at one point it got so screwy. I will add this, if you can use an external monitor and get a signal, do that. Use Fn+F4 to switch to an external signal and that will make your life much easier. Barring that, the above is the easiest solution I was able to track down. Best.. wissper [original issue] This has come up fairly often, and I've read every post I can find trying to fix it but with no positive results so far. I've got a lenovo y580, running a modified svl7 bios. I accidentally changed the video setting that was set to "SG" to some other setting, unsure what. Now I can't get a response from the laptop other than from the power button which simply lights up, but no other indications of life show any more. Early on there was a point at which I pressed some button combo and heard loud beeps, but that has not recurred. I've tried the typical blind default reset method (left, 4x down, 4x enter) which didn't help. I cannot access the computer remotely when it's been powered on which makes me believe that it is not moving past the bios to windows. (no ping response or net view access) I have been unsuccessful in getting an external display to work on the HDMI or VGA ports (though I am going to try VGA again to be sure). Most of the advice I've found says to unplug everything from the system (wifi adapter, HDD, SSD, Optical,etc.), insert a usb stick with various ROM/BIN files conforming to a particular name variant depending on your model, and to hold Fn+B continuously just after inserting power cord w/o battery installed and hit the power button. The 1 time I've tried this, I had copies of the bios w/ extentions .bi .bin .rom .fd with prefixes QIWY3207 or just QIWY3 (which was the suggestion from Andy's phoenix tool that was part of the instructions). If anyone sees a mistake I've made along the way, another method to try, or just knows the key pattern to reset the modified svl7 y580 bios to default I would really appreciate the help. I'm looking forward to buying another laptop about as much as choking down a bag of cement. Thanks! Wissper
- 7 replies
-
- 2
-

-
- black screen of death
- bios
- (and 3 more)
-
Not sure where to post this so I just added it to general. I just upgraded my M17X R4 120Hz from 675m to a 980m and I'm having a problem I hope someone here can help me with. To start: It was installed correctly and successfully on Windows 10 (I wanted to start somewhere more certain). Everything worked fine and everything read fine (as far as the graphics card goes). After I was sure everything was working properly, I reverted to Windows 7. As I read, with the current unlocked BIOS A11 (posted on this site) it's capable of running 9xxM series in windows 7. When I installed 7 on this laptop soon after buying it (reformatted old HDD, moved to bay 1, inserted 500GB SSD in bay 0 and installed 7 OS on it) I installed selecting the UEFI option and the drive is in GPT. As mentioned, I have Unlocked A11 BIOS (thank you to the maker on this site!). Anyway, once I reverted to 7 it started to boot up and said it needed to run startup repair. I allowed it and it froze once the bar filled at the bottom. Upon restarting I tried once more.. same thing. I tried to "start normally" and it starts boot looping. I then changed "Load Legacy Option Rom" from disable to enable. This causes the 8 beep post issue immediately upon power on. This problem doesn't exist when this option is disabled. I then utilized the HDMI trick (I made a separate post for this the other day. Connect HDMI out to any screen and it will cause post on the laptop screen [but not on the external device]. Can then immediately disconnect once post has occured and works fine with no error or beeps). This let it boot up and I'm able to get to the desktop and everything works fine. Can even run screen at 120Hz. I ran diagnostics on the card, checked drivers.. everything is reading correctly. This is workable, but far from an ideal solution as I need to have a cable and some kind of HDMI screen available just to boot up every time. I have two option here and I'm hoping someone can provide a little guidance one way or the other. I can either fix the boot looping issue on "Legacy Rom - disabled" (it hangs on classpnp.sys when I try safe mode if that information helps at all). OR, I need to find a way for it to post when "Legacy Rom - enable" without connecting to an HDMI device (just plugging in the cable doesn't work. It has to be connected to something on the other end). For the first, I have tried start up repair and tried repairing using my WIN 7 disc but it doesn't actually pull up the menu. It just shows the windows loading screen and then freezes after a while. For the second I have tried changing different video options in hopes it will post on boot without connecting to an external or tried to find a way to keep the HDMI port active without something being in it. I can make no progress with either of these as I'm unaware exactly what exaclty the selections change. I currently have it set to PEG. Also, I have tried bios reset through removing all power sources and the 2032 CMOS and holding power button 30 seconds. Didn't help. Any help or guidance would be greatly appreciated. Feel free to ask any questions you have that could assist in ascertaining the source of the problem in either instance. As a last resort, I could go back to 10, but I would really rather not. The R4 (in Dell's words) isn't being tested for compatibility. Many features don't seem to work, and overall I just much prefer 7.
-
 Hi there, a few days ago I accidentally activated the internal grafics of my M17xR3 via the Unlocked A12 BIOS fromthis site in order to fix a problem with my grafics card. The problem is though that that option isn´t available in a factory version of the Bios because the internal grafics don´t work together with the 120Hz screen. Because of that change the Laptop is unable to boot so I can´t even access the BIOS anymore. I already tried to change using Fn+F7 and an external scrren but that didn´t help. I also reseted the Bios, but didn´t work since the internl grafics are enabled by default. I don´t get any beeps. I thought of a few solutions to this problem: - I could buy a screen that is supported by the internal grafics. The problem is that I don´t know what the internal grafics support and if the screen´s plug would fit. Does anybody know something about the R3´s internal grafics? - I could blind flash the BIOS to another version. Now I´m not sure if that will work, because I don´t really know what an unlocked BIOS is. Is it a Bios with added features to give the user more possabilities or is it a version that makes options visible wich also existed in the factory version of the BIOS but were invisible because of technical limitations? I currently have an unlocked A12 for the Ailienware M17xR3 installed but in that Bios version the internal grafics are activated by default. However this is not the case in the factory version of the A12 BIOS. Do you guys think If it would fix the problem? I currently have Windows 8.1 installed but the system came with Windows 7. I plan to follow this guide for blind flashing: Link -I could blind flash the BIOS with the same unlocked BIOS that I have already installed. I know that wouldn´t change anything, but maybe I could manipulate the default settings so it would work again. Maybe someone has an Idea or two to help me out I would be very happy to be able to work with the machine again! (I mostly need it for Video editing) Loundlim - -
 -
Hi guys! So recently, I've been trying to make the BIOS Whitelist mod by svl7 work, because I really need to downvolt my GPU's but nVidia Inspector just won't let me. I've been able to follow the steps correctly until I reached the step where you were required to boot up the modded BIOS using a formatted USB. The problem was that the USB didn't show up in the BIOS and boot options, even though I formatted the USB correctly to FAT32. Also, I'm running Windows 10, if that helps. Anyone know why this is? If so, please help me. Thanks
-
Hey Everyone, I'm looking for some testers to see if we can get LEGACY SUPPORT for the m17xR4. Furthermore, I've also done MANY updates on this bios, too... I updated RAID (EFI & LEGACY) to v12.9.0.2006 (This may need to be downgraded as the chipset you have may NOT support this raid version, but this is the latest version that will work IF youre running RAID. It also supports TRIM in RAID0. If you are not running raid, I can update to v13 if you want, but we need to test one at a time!) Updated GOP Drivers & GOP Policy Updated vbios from 2098 to 2171 Updated Microcode for all cpu's Added M.2 Support Added NvMe support Updated Atheros Lan Firmware & PXE Boot Firmware Updated To Possibly Give Legacy Support, BUT....... I NEED TESTERS!!! Please contact me if you want to try. Understand, HOWEVER, that am NOT responsible for ANYTHING that happens to your system if it goes wrong. (Just a SMALL disclaimer, heh) Thanks, Swick
-

Version 2.0.0
570 downloads
Bios Release Version – v2.0.0 Updated or Modded Items: A11 UNLOCKED BIOS FOR m18Xr2 (UNLOCKED BY SVL7 AND FULL CREDIT GOES TO HIM FOR UNLOCKING!) SVL7 Also created the PRR2.EXE tool that allows you to flash the new bios by unlocking it. (FULL CREDIT GOES TO HIM FOR THAT FILE PRR2.EXE) Here are ALL the things I've added, modded, and enhanced on this bios - I've added FULL LEGACY SUPPORT ON THIS BIOS with ONE or TWO CARDS (SLI). You can FINALLY use Win 7 OS on your machine and run the 900 series GPU's! This is a MAJOR breakthrough! LEGACY SUPPORT Confirmed. Works with 900 series GPu's in single OR SLI formation Updated the Intel RST Legacy to v12.9.0.2006 (Supports TRIM in RAID0 - CONFIRMED) Updated Intel RST UEFI to v12.9.0.2006 (Supports TRIM in RAID0 - CONFIRMED) Updated the ONBOARD Video Card for the HD3xxx to v2171 - FROM v2132 Updated ONBOARD Video Card for the HD4xxx to v2171 - FROM v2132 Updated the LAN Firmware & PXE Boot from 2.0.5.9 to v2.0.6.6 ADDED NvMe Support for m18xr2 ADDED M.2 support for m18xr2 Updated CPU Microcode to v29 for the 2900 CPU's Updated CPU Microcode to v1c for the 3900 CPU's Updated GOP Driver for Intel Sandy Bridge CPU Updated GOP Driver for Intel Ivy Bridge CPU Updated MAIN GOP Policy module for the m18xR2 Eliminated some code that wasn't used in the m18xR2 Updated CSM Module (v2) Streamline some coding to make mod(s) run a little more efficiently (v2) Added FPARTS.TXT to rar file in v2. (I had forgot to add it in v1) v2.5 to be released shortly. I've updated a few more modules that I didn't realize could be updated. (It's only 3 modules, but it's still an update!) It should be released in about a week. Hope this helps ya'll! Instructions to flash: Use a flash drive to create a boot disk into dos Unzip ALL files into the root of the flash drive (flash.bat, r2final.bin, fpt.exe, flash.bat, prr2.exe, fparts.txt,m18r2.hdr, m18r2.hdr.bin, readmefirst.txt) BOOT INTO DOS – Note, that when you set the bios to legacy in order to boot into dos, you MAY have to reinstall OS! (Just be prepared to reinstall no matter what) Once you boot into dos, run the file flash.bat It will unlock your bios (THANKS TO SVL7’s BIOS UNLOCKING TOOL – ALL CREDIT TO HIM FOR THIS TOOL!) Let it flash… Reboot your pc, and enjoy the MASSIVE updates! Be on the lookout as I do plan to release newer version with more updates in the future. However, it wont be for at least a few weeks as I'm now working on legacy support for the m17xR4 and several other systems. So please be patient! ENJOY! Thread link for more information and discussion: -
Hey Everyone, First off, YOU TAKE FULL RESPONSIBILITY FOR FLASHING THIS! YOU WILL NOT HOLD ME RESPONSIBLE FOR ANY PROBLEMS YOU MAY RUN IN TO BY FLASHING MY MOD! YOU WILL NOT HOLD TECHINFERNO RESPONSIBLE, EITHER! THIS IS YOUR CHOICE! Now on to the good stuff... I've officially cracked it - either by luck or persistence (I'm thinking LUCK, lol) - A11 UNLOCKED BIOS FOR m18Xr2 (UNLOCKED BY SVL7 - FULL CREDIT GOES TO HIM FOR UNLOCKING!) Here is what I've added/updated/modded/changed/etc... ADDED LEGACY SUPPORT FOR THE m18XR2 - You can now run Windows 7 with 900 series nVidia GPU's! Changed the Default GPU from PEG to IGFX - No need to tear down laptop anymore. 8-Beeps are a thing of the PAST! Updated the Intel RST Legacy to v12.9.0.2006 (Supports TRIM in RAID0 - CONFIRMED) Updated Intel RST UEFI to v12.9.0.2006 (Supports TRIM in RAID0 - CONFIRMED) Updated the ONBOARD Video Card for the HD3xxx to v2171 - FROM v2132) Updated ONBOARD Video Card for the HD4xxx to v2171 - FROM v2132) Updated the LAN Firmware & PXE Boot from 2.0.5.9 to v2.0.6.6) ADDED NvMe Support for m18xr2 ADDED M.2 support for m18xr2 Updated CPU Microcode to v29 for the 2900 CPU's Updated CPU Microcode to v1c for the 3900 CPU's Updated CPU Microcode for other supported CPU's if available! Sorry, I don't remember what version, but if it could be updated, it was!) Updated GOP Driver for Intel Sandy Bridge Updated GOP Driver for Intel Ivy Bridge Updated GOP Policy for the m18xR2 Raidriar added the "Package C-States Lock" to my bios mod - THANK YOU RAIDRIAR! YOU TAKE FULL RESPONSIBILITY FOR FLASHING THIS, AS FLASHING CUSTOM BIOS's HAS SOME RISK!! I AM IN NO WAY RESPONSIBLE FOR ANYTHING THAT HAPPENS TO YOUR PC BY FLASHING THIS MOD!! DOWNLOAD INFO: My BIOS MOD should be available in the download section of TechInferno! They have KINDLY offered to host the file, thankfully! You MUST meet the minimum requirements of T|I in order to download files from their download section! PLEASE NOTE: Do not distribute this file. Please tell others that want the file to download it from TechInferno, as the file is GUARANTEED to be clean if you get it from here. If you download it from anywhere else, there is a chance that the code will be changed, and may BRICK your laptop. Therefore, PLEASE make sure you download from here and ONLY here! I'd like to THANK the following people for testing my bios mods to make sure they are safe for the rest of you: Mr. Fox, Raidriar, Rengsey R.H. Jr! Thanks for testing, I'm grateful! RAIDRIAR, from nbr, needs an EXTRA shoutout for testing. He was UTTERLY amazing! He took risks no sane OR INSANE person would! I owe him for testing this! He deserves a LOT of credit for that! Also, I do have an UPDATE to Intel Management Firmware v8.1.64 (I think), but that is a SEPARATE package. If you are interested, you can do that upgrade, too. HOWEVER, PLEASE NOTE, if you plan on doing update you MUST do BIOS update FIRST - AGAIN, BIOS UPDATE MUST BE DONE FIRST! AFTER bios update is done, then you can do IME update. If you update the IME then BIOS, YOU WILL BRICK YOUR SYSTEM! YOU MUST DO BIOS FIRST, THEN THE Intel ME Update! If you like this mod that I've done, please donate a couple KEGS of beer to me, as I put a TON of work into this. I put more hours into this than I should have... LoL I can also confirm that this has been tested by MANY people. Mr. Fox, Raidriar, and a few others, and they had NO issues. EXCEPT that they were finally able to install Windows 7 while in legacy mode (set from within bios), and the GPU works completely. The only ting I am still working on is the throttling issue on ALL GPU's (Some worse than others). IF you use Mr. Fox's modded drivers, 355.20 I believe, the throttling issue is minimal with the 780m GPUs. Anything above those drivers seems to throttle all GPU's at a more extreme rate. I AM working on this throttling issue, but I am not sure it's fixable. But I will TRY! Again, I hope you ALL like this, and that it helps you out. Lastly, IF you flash my MOD and you decide to purchase another 900 series GPU, please make sure you use woodstackz, as he sells them at the best rates. Please let him know you are purchasing the GPU because of this mod, as it will help me out a little! I hope you like this! Swick Link To Donate: EDIT: I forgot to put fparts.txt in the rar file with all the other files. sorry about that. I'm including it here on this post! SORRY! PS. I AM working on porting ALL these mods to the m17xR4, but dont know if I can get LEGACY SUPPORT ported! I AM TRYING, but if I can't, I'll be able to port EVERYTHING else... File download link:
- 403 replies
-
- 15
-
-
Hi guys, i have one Macbook pro 13 Retina Late 2013 and he have broke EFI (BIOS) chip, i solder him out and make original dump back up via my mini programmer, all what i need good and clean EFI dump for my mac.Info about my system: Macbook pro 13 Retina Late 2013Model: A1502EMC: 2678Motherboard model: 820-3536-APlease help me to find that file, apple.com doesn't content anything like that, i don't need BIOS update file with .dmg extension,i need .bin with dump and of course without EFI lock.If people are interesting how to do that i can make post with photo and explanation how to open, disassemble, and chip programming.
-
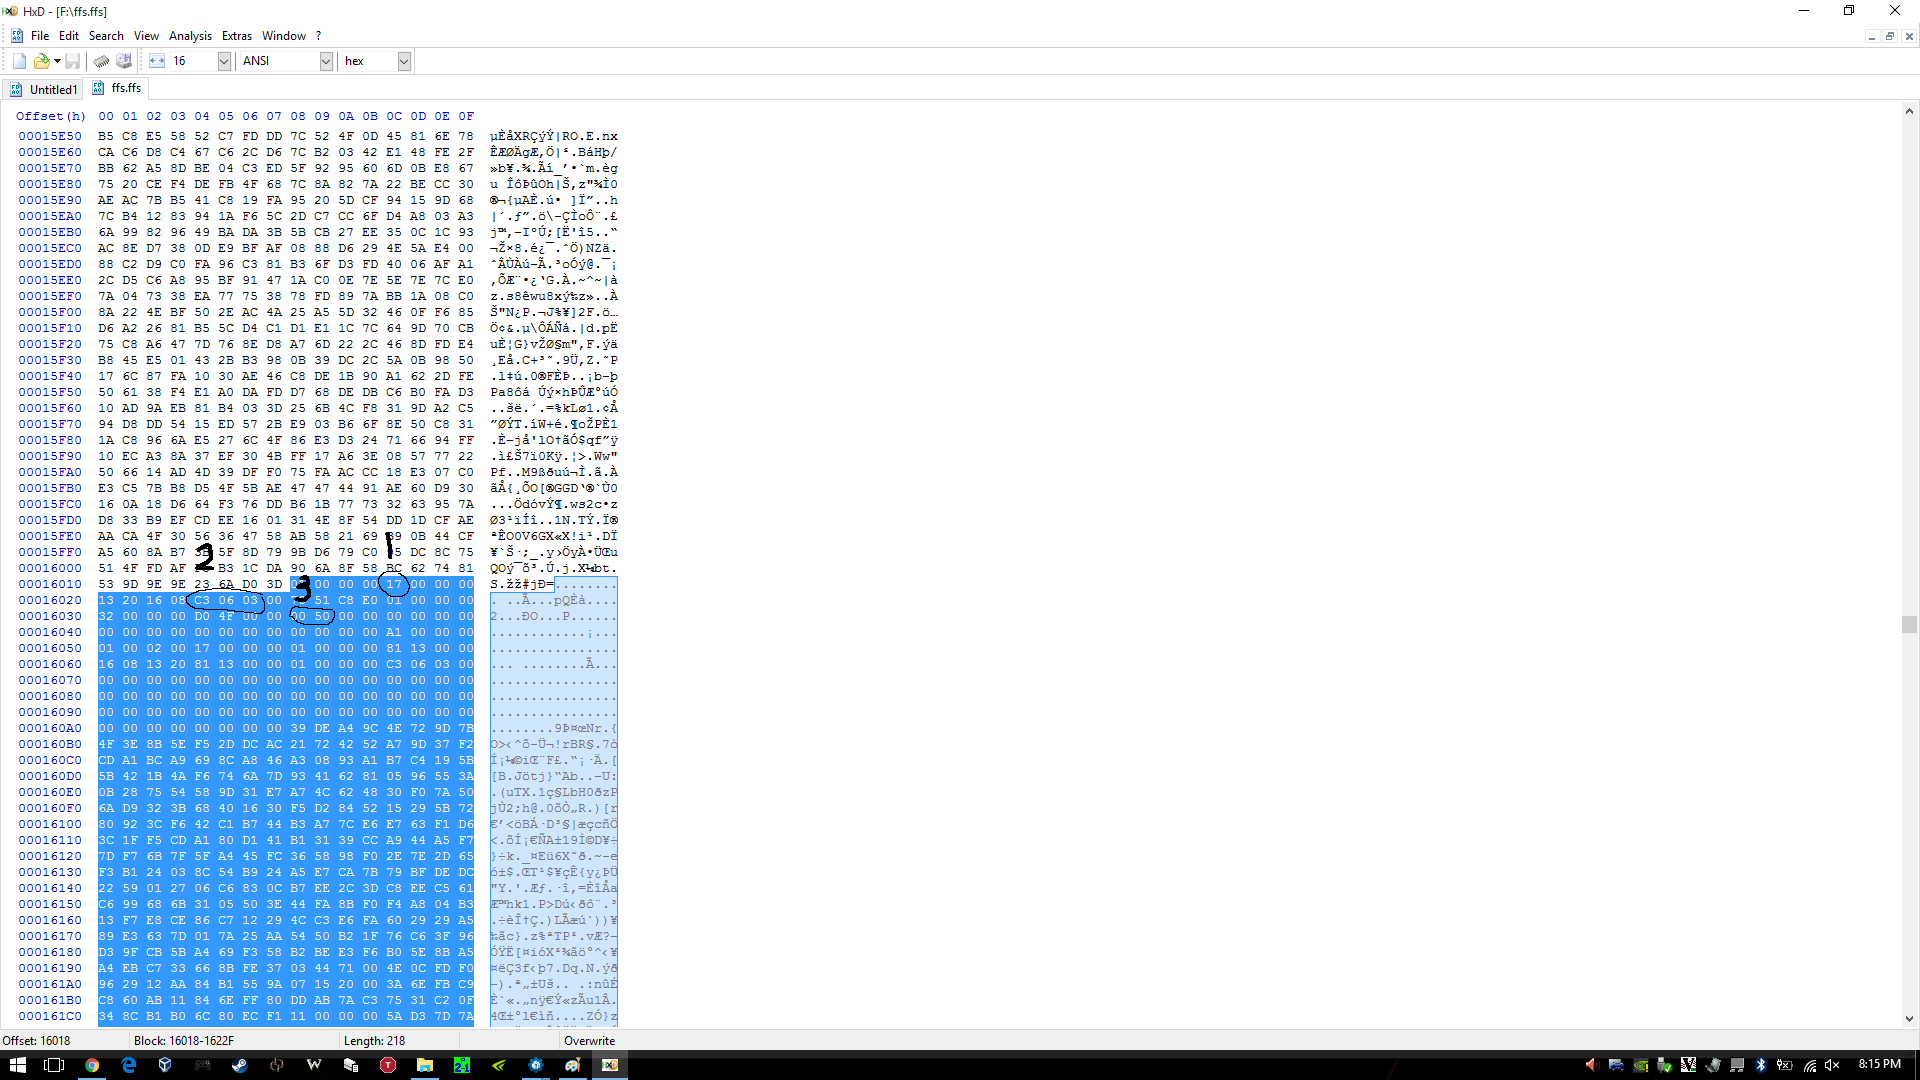
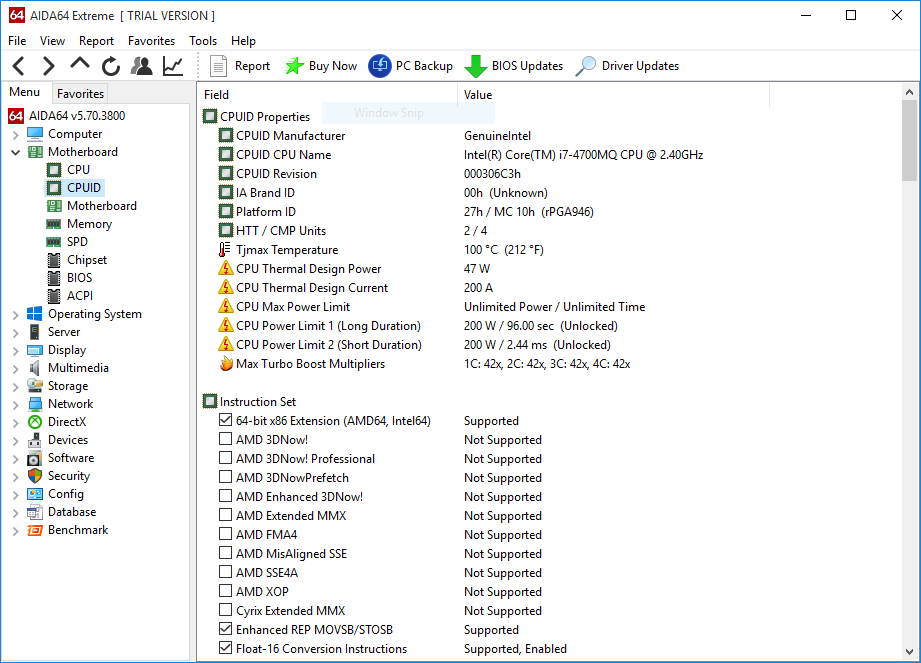
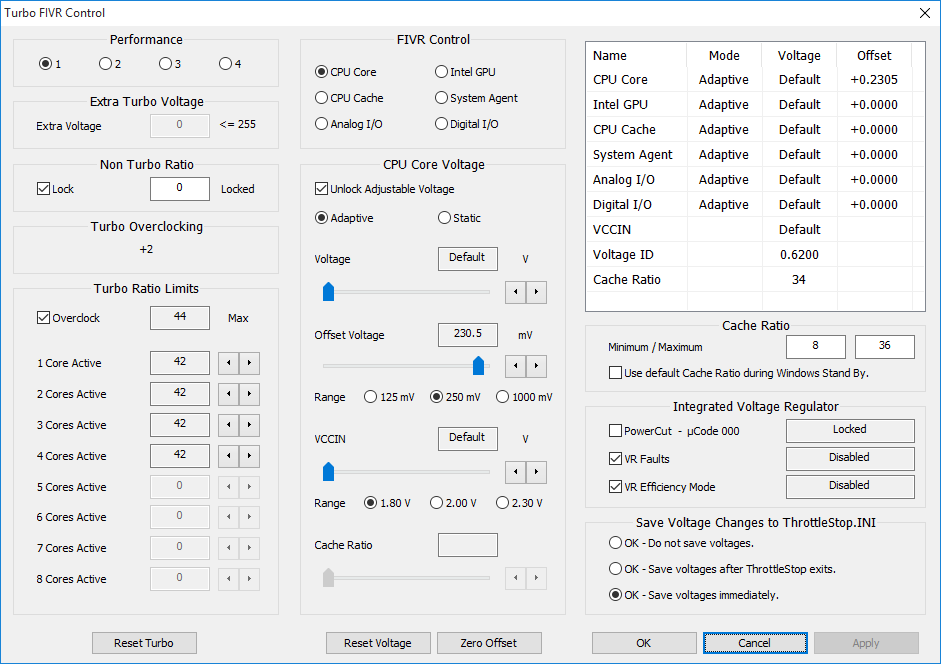
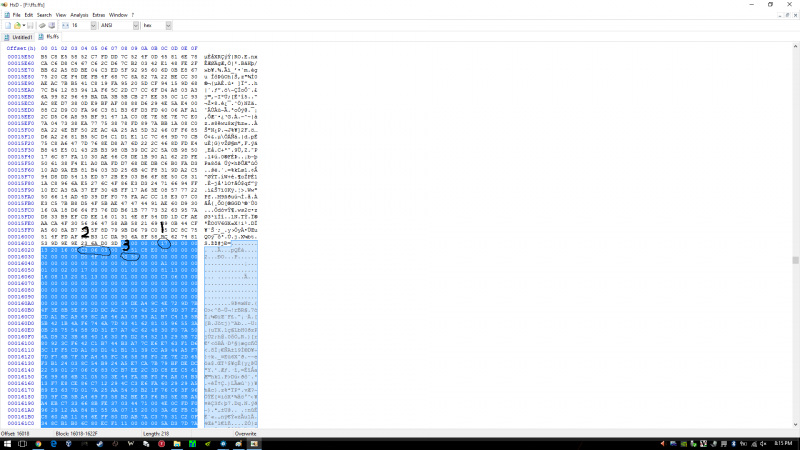
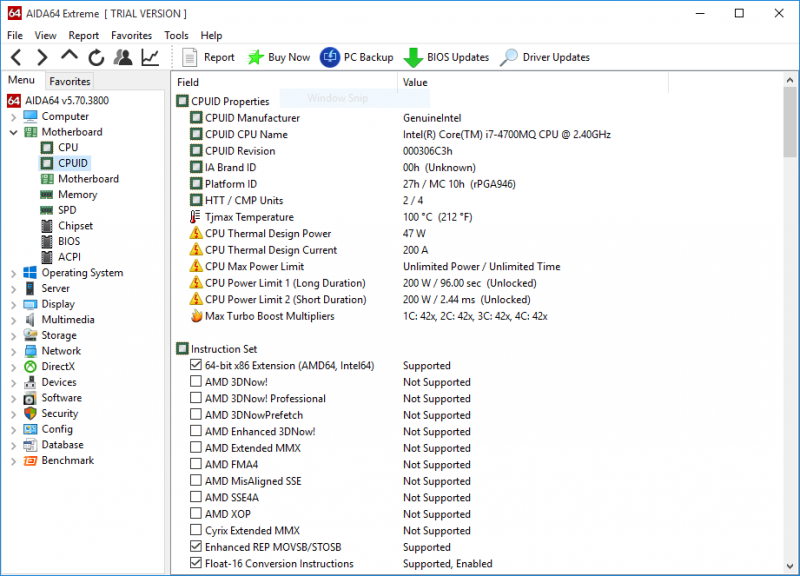
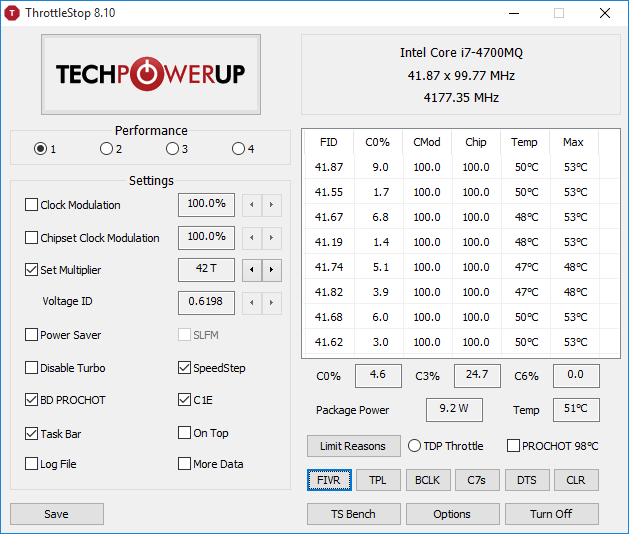
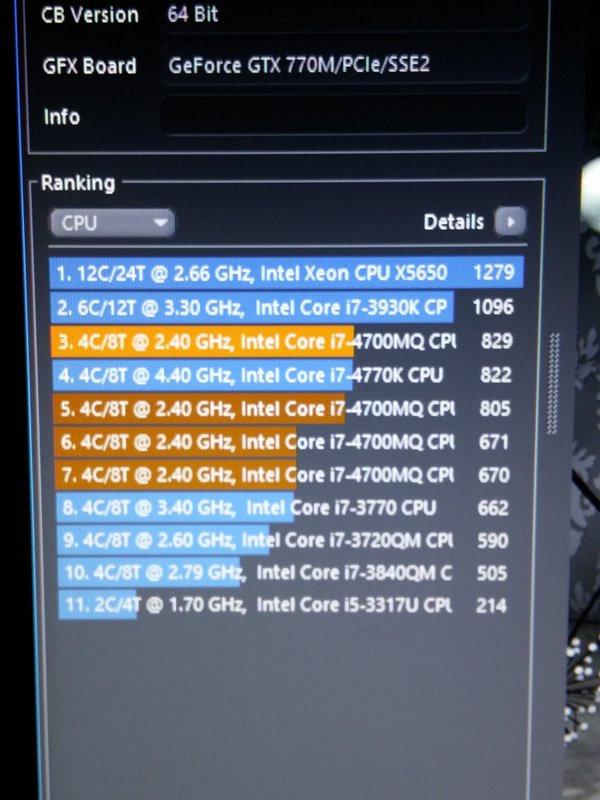
 Hi all, After I saw this result: http://hwbot.org/submission/2830783_0.0_cpu_frequency_core_i7_4700mq_4550_mhz , I got interested to replicate it with a similar method and decided to share my steps to score higher than a desktop 4.4ghz 4770k (according to cinebench ;)) Intel Stock microcode has a Turbo multiplier bin glitch that allows unlimited multiplier increase, I used prema's bios and removed a cpu microcode update to let the cpu run the stock glitched microcode. I will share the bios file, use it at your own responsibility and if you know what you are doing. 1) Download or dump your BIOS, if your bios is ami (my case) then use AFUWINx64 2) Get AMI Aptio UEFI MMTool v5.0.0.7 and UEFITool, HxD (or your fav hex editor) 3) Open your BIOS image with UEFITool, then File>Search, in our case Haswell has the following ID: , enter C3 06 03 in Hex pattern dialog click OK 4) You can see the last four Hex pattern result, double click the first result and a structure item in the main dialog will be highlighted, right click>Extract as-is to a folder (be sure to be neat and organized or you will mess things up) 5) Do the same with the third result and save it as a diff name other than the first one 6) Now in the folder you have saved the 2 files from step 4&5, open the first one with HxD(any hex editor) and look for be sure to choose Datatype:Hex-values then hit search 7) Press F3 to find again till you reach this pattern(highlighted): 8) (1) Indicates the microcode version, 17 in this case, we want 00 (cpu stock), (2) the platform ID (the search context we reached at) (3) the microcode length = 5000 (in my case) in reverse (important to know when the microcode ends in order to remove). 9) Adjust the cursor on the beginning of the highlight text/microcode (01) right click>Select Block>Length>5000 or whatever in your case 10) Delete the highlighted blocks (after step 9) then save the file 11) Do the same with the second result from step 3 to 10 then save 12) go back to UEFITool, double click the first result like you did in step 4, right click the highlighted structure in the main dialogue > Replace as-is then choose the FIRST file you edited in HxD 13) Double click the third result and follow step 12 with the SECOND file you edited in HxD 14) You will see "Rebuild" in action row, File>Save image as> P15SM04.PM2 in my case (can be any name as long as your flashing tool recognize it) 15) Open AMI Aptio MMTool > Load Image > your modified rom > CPU Patch Tab and verify there is no 06C3 in CPU ID 16) Be brave and flash your BIOS Windows Mod to remove auto update microcode on boot: Click on Start Type CMD in the Search box Right-click on CMD and choose Run as Administrator In the Command Prompt window and change to the directory where the file is located. To do this, use the CD command. You can follow the example below. to change to the Windows\System32 directory you would enter the following command and Press Enter cd \windows\system32 Now use the DEL command to delete the offending file. Type DEL mcupdate_GenuineIntel (and backup) Done! Overclocking: 1) Check CPU MCID:Download AIDA64 , open AIDA64>Motherboard>CPUID and look at IA Brand ID, it should be 00h 2) Download the latest beta Throttlestop (not stable) in my case 810b2 3) Make sure you don't have XTU installed or running (especially at startup) or it will reset any changes in Throttlestop 4) Open throttlestop, click FIVR and look at "[checkbox] Overclock [DIALOG] Max" and note it down 5) Now here is the magic! close FIVR and open it again, [DIALOG] Max value should increase by 2 (up to 80x max ~ 8ghz) everytime you open and close FIVR aslong as long as you increase one of the cores, LOL 6) Increase "Set multiplier" to maximum after your final changes in FVIR (Iv set mine to 42x all cores, so I increased set multiplier to 42 aswell - note voltage ID is messed up ignore it) 7) Increase voltage in FVIR for stability by using cinebench run 3 times instead of prime95, as it stresses FPU which increases heat and tdp instead... 8) Unlock maximum TDP and turbo wattage in TPL, in my case: 9) Done! Changes should be persistent as long as you dont save and exit from BIOS, here is my result in Cinebench with temp throttling (from 4.3 to 3.9 ghz), room temp 25-27 XD: (no.1 at 4.2ghz, no.7 stock latest microcode) UPDATE: OCed RAM from 1600 to 1866, [email protected], +200mV adaptive vcore: I'm also getting 852 with 4.5ghz with this adaptive voltage-like method: Note: You can maintain maximum turbo multiplier bin with latest microcode after setting it in throttlestop (imp: no crash when testing; make sure its stable) then flash the latest microcode for bug fixes (more stable on my side at x45 with only +230mv, depends on your CPU, i7-4800+ will require less voltage), and you will still be able to set the bin high (up to 80x) as long as you don't crash... Post your results and I'll copy it here. Tips: I highly recommend lapping heatsink and use liquid metal thermal paste or any decent tp ( I used collaboratory liquid ultra) before doing this -If your cpu throttles no matter what, try decreasing dynamic voltage in FVIR and look at maximum value the package power indicate while stressing, decrease the value by 10% in order to avoid rapid throttling (happens with bad TP) -Do not attempt the OC if you are looking after long service life wear&tear (I expect 2 years from now if I stress the cpu everyday for an hour, which i never do :P) Happy overclocking, and don't melt your laptop Thanks to Intel if they leaked this on purpose, kinda futureproofed my machine XD P150SM 1.03.05 modded bios (at your own risk): MOD EDIT: link removed, please use a clean BIOS base because of legal implications with Intel :
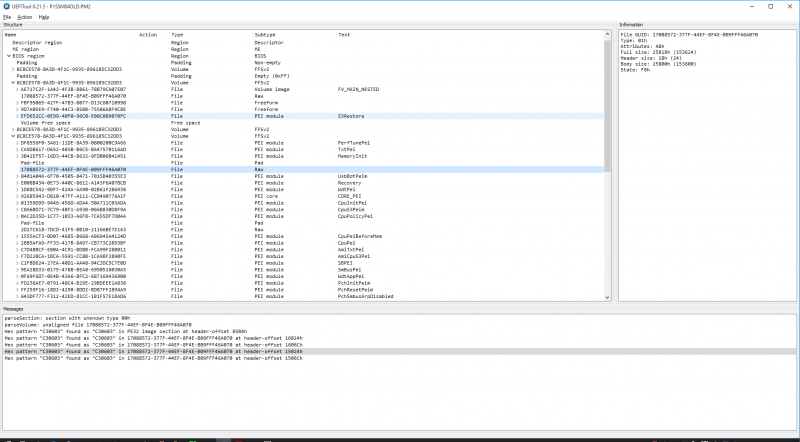


-
DELL Alienware M14X R2 Offical BIOS(A8)! http://downloads.dell.com/FOLDER00819821M/1/M14R2A08WIN.exe
-
DELL Alienware M14X R2 Offical BIOS(A13)! http://downloads.dell.com/FOLDER01498987M/1/M14R2A13WIN.exe
-
I have a I'm Running Windows 10 pro on..... 2011 2.4GHz i7 quadcore Mac Mini with 16GB ram Akitio Thunder2 pcie chassis with a EVGA gtx 750 ti SC (2gb) running over thunderbolt 1 400 watt continuous power EVGA psu with a barrel plug spliced onto an 8pin connector (4 yellow 12v) (4 black grounds) with paperclip trick applied Ok so I have a few different hardware monitoring apps and they all say that my 750 ti is running at .962 volts. That seems to low to me. I even successfully flashed the bios by following this tutorial http://cryptomining-blog.com/1014-how-to-increase-the-geforce-gtx-750-ti-power-target-limit/ I've played around with Msi Afterburner and PrecisionX 16 and nothing helps. I feel like the voltage being so low is the main reason why my gpu is very unpredictable and jumps frame rates like crazy. it will be running for example tom clancy's ranbow 6 siege on everything high @1920 getting over 60fps and then i'll start it up again and it'll be 8fps or something. I just don't know what to do. Any help would be appreciated, Thanks, Bill
-
Hey guys, I was wondering if anyone here would have a picture or a schematic drawing of the mobo. I am needing to replace the bios chip on my laptop however base on my research there are two bios chips on the board.
-
Purchased a Beast eGPU adapter with PCI-E cable but BIOS is blocking it. HP Pavilion dv6 4023-tx, win7 RSA signed (new HP protection to prevent flash unauthorised modified bioses) Because of this and I cannot use other PCI-E parts on my laptop and it somehow preventing the adapter driver to be install Can someone tell me what can I do? Thank you.
-
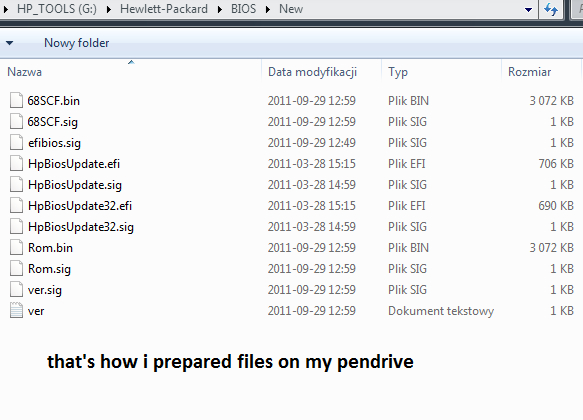
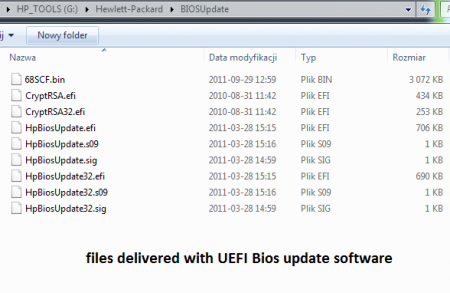
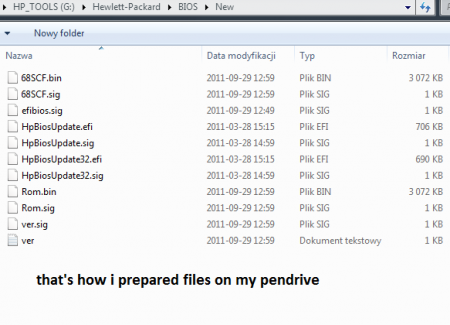
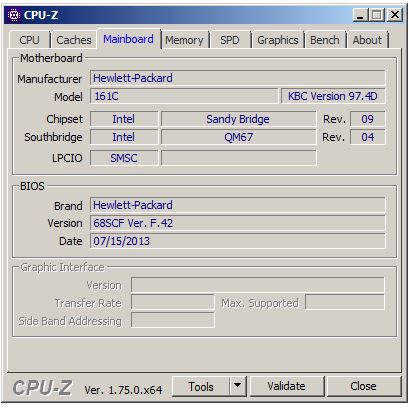
Hi guys, At the first, sorry for my language. My english isn't very good. I have a problem with my HP EliteBook 8460p. I bought a SSD drive for my laptop then i got info that my BIOS F60. is blocking SATA 3 option so i got only SATA 2. I found info on google that older BIOS F20. is still with SATA 3 config so i'm trying to install it but with no effects. Of course i've tried to install it from Windows ( HPQFlash ) but program says that is older BIOS so i can't change it. Then i've: -install "HP BIOS Update UEFI" and "HP System Diagnostic UEFI" on my pendrive, -put BIOS file ( 68SCF.bin ) in Hewlett-Packard/BIOS/New with .sig file ( signature file for BIOS file ) -restart my laptop, pressed F2 for "HP Advanced Diagnostic" -choose "BIOS Managment" -select install New BIOS -UEFI found 68SCF.bin in /New folder -but then i've got error says "The System BIOS update failed", "Signature of BIOS image failed verification" So there is a problem with .sig file of course. I try all .sig files that i have. No one of them worked. I try to change names of .sig files for "69SCF.sig" but without effects. Still no verification Any ideas?

-
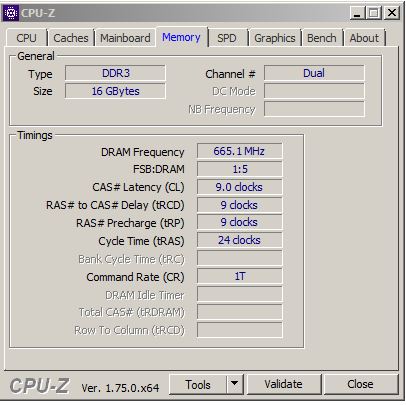
Hello everyone! I am currently running an 8460p with F0.42 Bios, and my curren RAM is just running with 1333Mhz. It might be because of 2x8GB Sticks beeing inside of it, but if i change the Bios (replaceing the bios chip ultimatively) ist it possible to run 1600Mhz like on the other Elitebooks? My 8460p is very similar to an 2560p can i use another bios? Greeetings Moes
-
Hello, I got a new motherboard for this laptop. Installed and 7 beeps. I remember saving M17X R3 with BIOS Recovery. Also had 7 beeps and wouldn't POST. Is there a way to do the same with 17 R1? BIOS files on USB, plug in, hold keys and so on.?
-
Hello fellow Aliens, My specs: Alienware M17xR4 got it back in Dec 2011 (Dell decided to upgrade my M17xR3 that crapped out on me) Intel Core i7 3940XM Upgraded from 660m to 780m 16GB Samsung 1600 RAM 2 500GB Samsung SSD in Raid 0 ( i know sue me) This will be a little guide with my journey of upgrading my dedicated GTX and CPU. Eagle vision activated and started the hunt on eBay for something that would not leave my bank with a massive dent. All i wanted to do is breathe more life into this monster that i have grown way too attached to. A quick search revealed people want way too much for their hard ware . How ever i started making offers and messaging people to negotiate a better price. I think it took me two days before i found a nice 3940XM listed for 350$. Messaged the dude and surely he replied with 200$ is a no go . But i can do 300$ . I had to come back with 280$ and to make the story short he accepted . Put my 3610QM after looking up on eBay they were going for 80$ give or take. So i listed it for 60$ with 4$ shipping . I got an E-mail from eBay; congrats on your listing...and your item sold . I did not want any negative feedback, so i removed the CPU wiped the thermal paste and decided to be with out my baby () until the 3940XM () arrived ( which took 3 days). That package was like a in my arms being delivered to its rightful owner. Reading all the replies on the offers i had made on 680m and 780m listings. From hell no to sorry you are crazy, there was a fellow that shared with me that the money is not a priority and his new 980m made him so happy he would sell his 780m for 300$ . Naturally i offered 280$ with paypal invoice = no eBay seller fees. What you know he accepted!!!! Listed my 660m for sale and till this day it is still there . I dont want to share my agony with you, waiting for a seven business day delivery by UPS ground , so lets fast forward to when i got the 780m and installing it. Seller advised i would need a 100W heat sink, which my poor 660m oddly had. So 780m is installed and a dual boot of Win10 and Win7 in order to see which Win the 780 preferred. Windows recognized the new hardware, so did the Bios, so i went to www.Nvidia.com and downloaded the latest drivers . The installer kept on saying no compatible hardware was found so that drove me . It was not until i googled " M17xR4 780m upgrade that i found out the 780m is not compatible the "Legal way" and a INF file modification was in place to get the drivers installed. Again googled M17xR4 780m upgrade drivers, and i found numerous of people crying for help as well. I thought to my self ( i will never see this work today, better try this in the morning, but before i went to sleep i needed some wisdom of a fellow Alien to come to my aid. A guy that goes by tanzmeister replied and guided me. Here is a copy paste for yas. These are the links you should check in order to install drivers properly:Flashing vBios:1- Guide:http://forum.techinferno.com/nvidia-video-cards/2166-[guide]-nvidia-vbios-flashing.html2 - vBios for the 780mhttps://www.techinferno.com/index.p...king-editions-modified-clocks-voltage-tweaks/Modded drivers:http://forum.notebookreview.com/thr...od-for-780m-880m-and-980m-mobile-gpus.767644/I am not actually sure these drivers are modded... They might just be "Enhanced". So check out this link as well to learn how to mod drivers yourself (really not that hard)https://www.techinferno.com/index.php?/forums/topic/4055-guide-modding-nvidia-oem-inf-files/To install a modded driver you need to restart Windows with DSE disabled (driver signature). Please google this to find how to do it. I personally haven't tried MrFox's drivers but I read they yield fantastic results on Kepler GPU's (780m included) so you can give these a try. Everything worked!!!! Red Alert 2 and Age of Empires 2 were running!!!! Joking aside i launched Gta v and The witcher 3 which ran at a decent 30+ FPS. Castlevania Lords of Shadow 1 and 2 i could play at Ultra. I was genuinely happy with my rig. Until today, for some reason i wanted to try an unlocked Bios. I was on A13, looked up Drivers on Dell's website and downloaded A12, A11, A10 and A05. Did you guess what i did next? I flashed them all one by one, A12 first which was a sucess, A11 which also yielded good results. A10 finished flashing and instead of restarting my Alienware decided to take a nap. Turn it on, and what i feared has happened. I HAD BRICKED MY BIOS!!!! Pulled my crappy Pentium laptop and googled M17xR4 bricked Bios. Thank the merciful lord of forgiveness, of light, of hope, of all that is great. I had stumbles on T|I: Following that i Blindly flashed A05 through recovery (which you really do not know what the hell is going on, Put the file on a flash drive, insert it in eSata. Shut down and remove both battery and AC adapter. Hold the END button on your keyboard and plug in your AC-adapter. Fans turn on 100% All the lights where showing, but then it started beeping and i had to go to work in 30 mins so i left it and proceeded to a warm shower. Finishing up and coming back to the room it was still beeping so i unplugged the AC-adapter reinserted the battery and AC-adapter. Pressed the and voila my tears were sucked back in. Thank you for reading, i know i am not much of a writer, but i just wanted to share my journey if someone was thinking of doing the 780m upgrade.
-
Hi guys So i think im going to run into an issue and may need some help I currently have a M17xr3-3D with a 580m.. Which died its the 3rd one, which is in need of an upgrade anyway. So i'm planning on buying a 780m which i will need an unlocked bios for. Only problem is i believe i need to access the bios to get the new card working As i've seen this in the sellers info installing their card in a M17x R2 R3 1. Flash bios with (R2) A10 or (R3) A12 , unlocked Bios 2. a) Disable onboard HD audio (/R3 Disable onboard grahpic card <- this don't apply to me as i have the 120hz 3d) Disable IDT GPU in advanced settings //R3 change display model from SG to PDG 3. Install Card 4. Install this driver with the .ini mod (easy): Is there anyway i can get my hand on a bios with those settings preconfigured so i have blind flash? otherwise im just going to keep getting beeps?
-
 Hey Everyone, Well, I was FINALLY able to MOD a fully UNLOCKED A05 Bios for the m18x R1. I created several BIOS's that have the following Intel Raid OpRom v10.5, 11.2, 11.6, 12.9, 13.5. I'm told that 12.9.0 is the BEST version to use with our m18xR1. Also, these ROMS are modded to give TRIM on a RAID0 system! I've tested it and can confirm it does work! I also have an intel ME Firmware upgrade that you can do, as well, but I only sugest people that know what they are doing use it. Only because, for some reason, if you flash the ME firmware, then the Bios, there is a problem and you can brick your ME Firmware. (You'd need a new motherboard). It locks your firmware. Anyway, if you flash the bios that you want, and not even deal with upgrading the ME, then you're fine. But, if you do the ME firmware upgrade like I did, if you flash and bios's, you will need to downgrade the FW, before any BIOS flashing... (I THINK). In any case, you may just want to stick with the BIOS upgrade, as this will give you TRIM in RAID0 support (confirmed with trimtool). If interested, please let me know! Thanks, Swick
 -
Hey guys! Earlier this week I upgrade my laptop with a new network card. I bought a Intel WiFi AC 7260 for my Lenovo Y510p. So most of you probably know, Lenovo's BIOS has a whitelist. So I flashed the BIOS so that I could use the new network card. This happened without any problems, I installed the network card and booted my laptop. Drivers worked the moment I logged in and connecting to a network was easy and fast. Checked speedtest.net for the up and down speeds, perfect! There is a problem I encounterd though, it has nothing to do with my BIOS (I think) or my new network card. It has something to do with my GPU's. I run an SLI configuration of 2 x Nvidia GeForce GT755m. (one main, one ultrabay) I was following a guide made by @svl7 about flashing the BIOS. After the part of flashing the BIOS there was something about flashing the vBIOS too, because if you are running 2 GPU's it was not going to work properly. When flashing the vBIOS I encountered the problem. As explained by the guide, I used NVflash to flash vBIOS, when using the command "nvflash -a" to view adapters and their "index" they were on "0" and "1". I tried to flash both of them, "1" flashed easily without any problems, "0" did not flash at all. Now the error displayed was: "ERROR: GPU NOT DETECTED." Has anyone got an idea of how to fix this? I'm not able to flash one of the GPU's. If I play a videogame on my laptop, every now and then (intervals of 1-5 minutes) my screen goes black, audio stutters and comes back to normal after a few seconds. Hope you guys can help me out! If there's any info you need let me know and I'll edit the post!