Leaderboard


Popular Content
Showing content with the highest reputation since 05/03/23 in all areas
-
Hello, my notebook SVS15126PGB Specifications | Sony SG3 points
-
Hello! How to install BIOS? Are there any specific programs or similar tools required? Thank you.3 points
-
BAKED BIOS FOR TM, KM, DM, P6, P4 SERIES WITH MOST MENUS AND OPTIONS UNLOCKED PLUS OTHER MODIFICATIONS NEW: I HAVEN'T BEEN ACTIVE IN A WHILE BUT I MIGHT FIND SOME TIME SOON TO WORK ON AND RELEASE NEW MODS. I STARTED WORKING ON V3.0 A WHILE BACK WHICH WILL INCLUDE UPDATED UEFI DRIVERS, MICROCODE, BIOS SCREEN SHOT SUPPORT AMISCE SUPPORT(For some models) PLUS MORE. ALL TM, KM AND DM SERIES ARE V2.0 AND NOW HAVE WINDOWS FLASHER INSTEAD, JUST EXTRACT AND RUN FLASH.BAT WARNING! BIOS FLASHING IS RISKY SO MAKE SURE YOU KNOW WHAT YOU'RE DOING BEFORE PROCEEDING. FLASHING THE WRONG BIOS OR INTERRUPTING THE FLASHING PROCESS WILL BRICK YOUR SYSTEM! USE AT YOUR OWN RISK! TM, KM AND DM SERIES P6 AND P4 SERIES INSTRUCTIONS
 2 points
 -
Can you help me? I'm a fan of games by Yoko Taro and games with a strong emphasis on storytelling. My laptop can't handle RPCS3 for Nier Replicant/DoD3 and Nier Automata even on minimum settings, and it only runs at 18 FPS. I would like to build a decent computer for maximum enjoyment and experience of these games, as well as the highly anticipated CyberPunk 2077. Of course, I would love to have an RTX graphics card, but I don't have any experience with building and working on gaming PCs. I can't afford top-of-the-line graphics cards and processors at the moment, but I would like to know where to start with the build. I think my budget would be around $2000, and I would like to know what can be built with minimal expenses for maximum game settings and staying within the budget. I know there are guides available, and I have a good understanding of technology myself, but I still need advice from those who have practical experience and knowledge. Thank you.2 points
-
Hello, I have a Miix 320-10icr lying around with 2GB of RAM and 32GB of internal storage, running Windows 10. It's running so slow that it can't open anything. I'm interested in changing the operating system to Windows or another OS because it's unusable in its current state. I would like to use it as a typewriter and for reading, but I'm also experiencing unknown issues with the touchpad—it barely responds to touch, even though it hasn't been exposed to water or dropped. I suspect it's due to the operating system or a faulty touchpad. Could anyone assist me with this issue?2 points
-
Is the topic still relevant? Could you please send me your progress via email?2 points
-
2 points
-
Hey guys, I didn't see an "Introduce Yourself" thread or subforum, so I guess I'll start one here in OT. I've been registered at T|I for over a year on another account, but I've decided to keep my account name the same as the one I've had on NBR, so I just registered this one today. My name is Mike and I'm a notebook enthusiast, just like you all. My first gaming notebook was a Gateway P-7811FX, which was a great buy at the time, until the dreaded GPU problems started to surface. I did a review at NBR on it. My first taste in modding (software & hardware) started with that machine. Last year, I purchased a MSI 16F2 barebone which was a hell of a deal and I can't wait to put a 7970M in that baby, or possibly a 680M GTX if everything plays right with that card and my machine. I've also unlocked most of the MSI 1st and 2nd generation-core i notebook's BIOS which I posted at NBR. I was hoping to get the multipliers unlocked for my XM CPU, but unfortunately, AMI has let us down . At the very least, the BCLK is unlocked for a measly 3-5% OC. As you can see, I really loved NBR and notebooks, I was one of the oldest members there, having lurked for a good year before deciding to register, but things weren't all rosy in the end. So, how did I end up at T|I? Actually, I've been lurking T|I for a long time. The ICD7/24 thread, TS and svl7's threads are what got me started here. You guys aren't just reposters, you are hands-on people, original devs. I've grown incredibly tired of the lack of respect at NBR. I haven't bothered to continue my work on the BIOS after MU went down, as people were reposting my work and taking credit for it or begging. While it is free and I didn't take any donations for it, I was the one who did all the Googling, trying to decipher bad translations, downloading files with no documentation or clue as to what they did and had to figure it out on my own, and lastly, I was the guinea pig. I put my $1,200 notebook on the line for the better of the community and I would still get PMs filled with bad attitude and idiots who bricked their notebooks and blamed me for it because they couldn't read or had an incredible lack of common sense. The least one could do was give credit where credit was due, like I said, I never asked for a penny, unlike most BIOS unlocking forums. Heck, anyone who PM'ed me asking how I did it, I would straight up tell them everything, including linking the files needed and all directions. For a good week or two of my time and a some bad headaches, they had it handed to them on a silver plate in 5 minutes. The most frustrating PMs would be that I was rep whoring and anyone could have done the work I did. Well guess what? You didn't do it and I never rep-whored once I my life, if you look at the original post I give credit to my original testers, but I never say +rep me for my work. So, my journey at T|I posting starts today and I hope I can be of value here just as I was at NBR. I don't carry a vengeance against NBR, but the overall quality of the news page and forum has diminished significantly to a point where I barely enjoy browsing it. Also, this not a PG-13 forum, hurrah. So how about it, let's here how you all got started at T|I and a little bit about yourselves? FYI, the links are for reference, I'm not plugging my links for clicks/views as I don't benefit from it. I'm also not attempting to start a flame NBR thread (If there is an issue you can delete this thread without warning, I understand), but I notice that many of T|I members are also NBR members or were at one point so I believe a connection can be established.1 point
-
Worked. Amazing job. Thank you brother.1 point
-
Hi! Ok. Your bios with unlocked Wi-Fi whitelist done. Check PM.1 point
-
If someone wants upgrade Wi-Fi card and remove witelist, or unlock hidden additional menus and settings, or unlocked vbios for overclock NVIDIA card, then you can post your request in this thread.1 point
-
Hi! No, your laptop model does not support 16GB sticks of RAM. In your laptop maximum supported sticks of RAM is 8GB. This is a hardware limitation and is not related to the BIOS.1 point
-
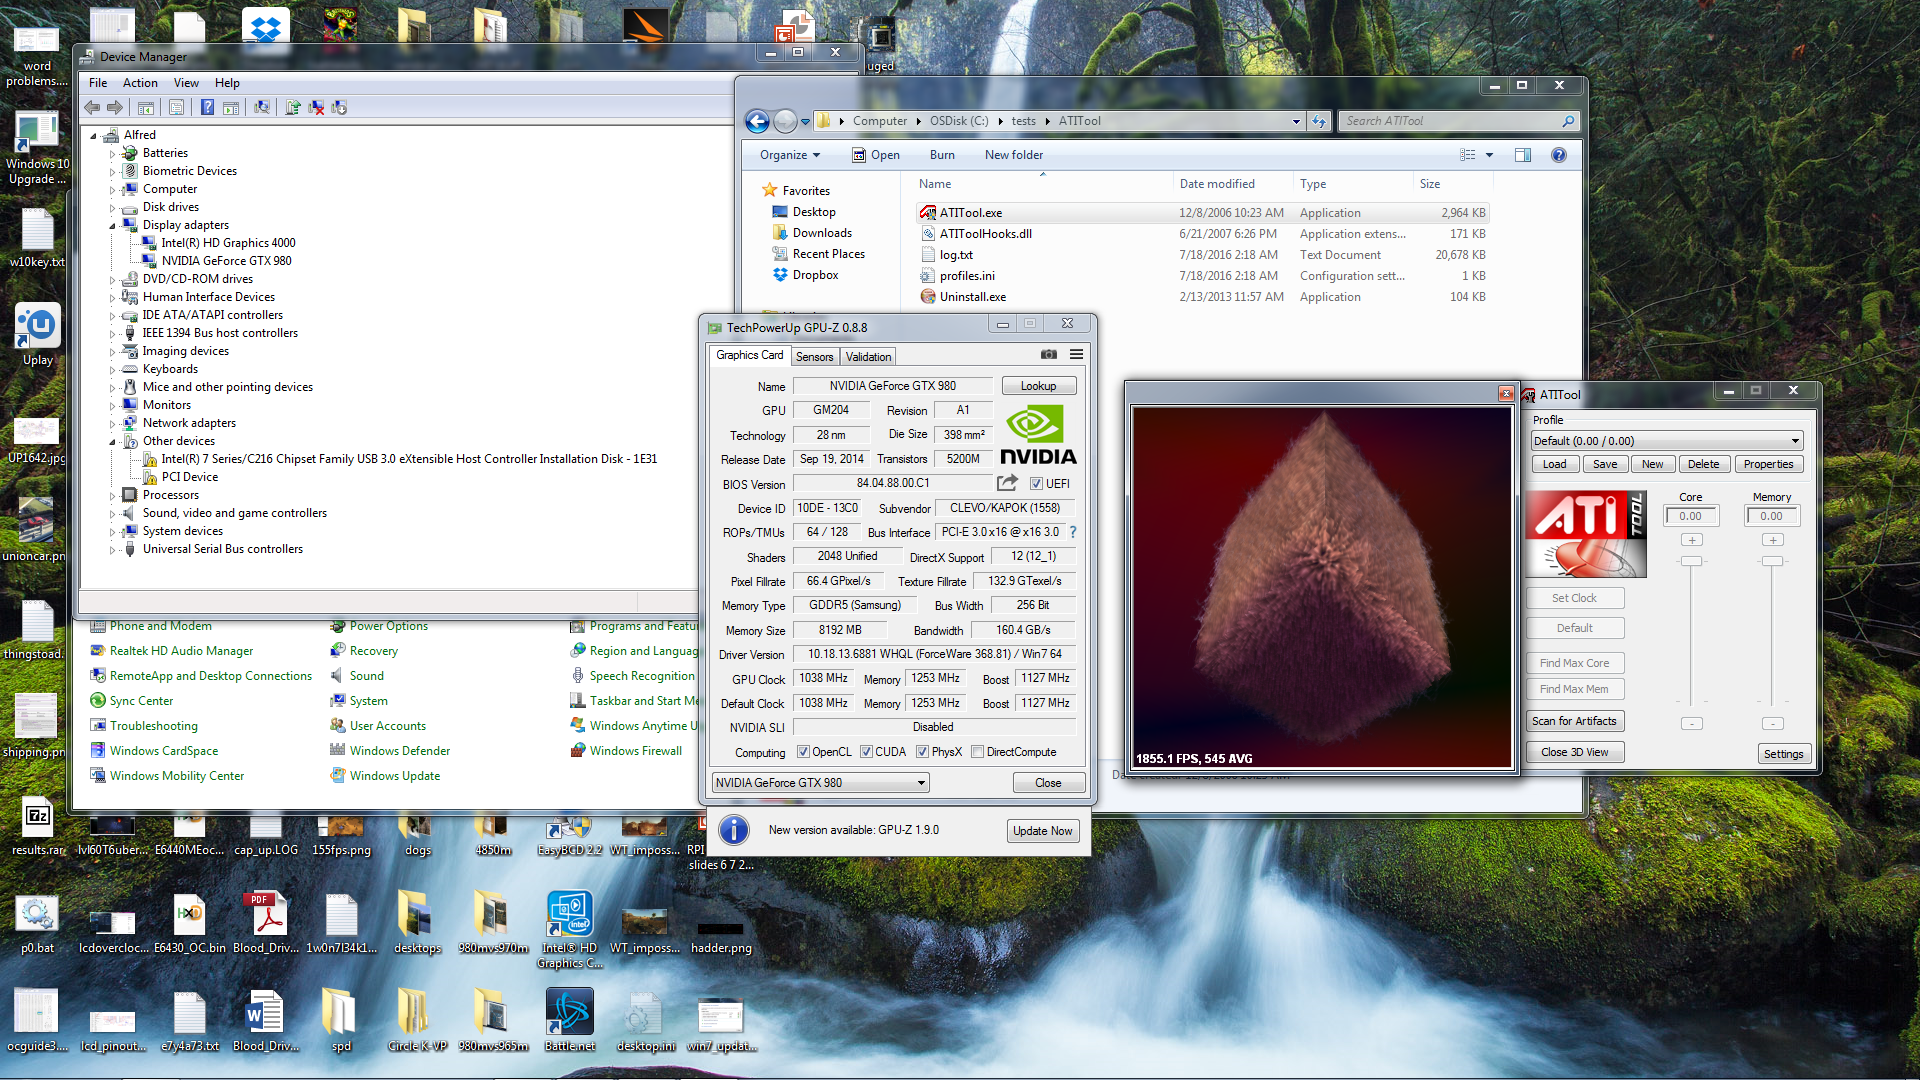
Hi! Ok. Your unlocked vBIOS done. Check PM. 1. Completely uninstall MSI Afterburner (if it installed) with all settings. Reboot laptop. 2. Download the program DDU (NVIDIA drivers uninstaller). Run it and completely uninstall all NVIDIA drivers. 3. Download and extract archive Ant4rez.rar 4. Flash unlocked vbios (just run the command file flash.bat ). Reboot laptop. 5. Now install NVIDIA drivers with enabled option "Clean Install". Reboot laptop. 6. Done. Now you can run Nvidia Inspector utility and try overclock your card.1 point
-
anyone have collection of dell vbios for m3000m and m4000m? it is to try out on precision m6600 to see if there's a chance if one of them could work. cause there also one version of vbios of m3000m said to work on nvidia optimus is vbios 84.04.49.00.19 that version i would like to have to test it. i flashed quadro m3000 se (could display on dp on m6700 but not the laptop screen) with m3000m cause it was similar and it enable to display on latop screen. i didnt fully try it out cause it wasnt properly thermal paste like didnt change. the gpu i got is artfacting even tho i flash it.1 point
-
Ok. Your bios with unlocked Wi-Fi whitelist done. Check PM.1 point
-
Hi! You can post here your bios backup (bios dump). To create bios backup use attached utility. Extract attached archive directly on the Desktop and run utility as Administrator (right click mouse, choice "Run as Administrator"). Utility will create archive "results" directly on the Desktop. You can post here this archive "results", or upload it into any fileserver and post the link. https://www.sendspace.com/file/mxoavw1 point
-
Hi! In Lenovo ThinkPad T440s, any modified bios can be flash using hardware SPI programmer only, exactly the same as described in the first post of this thread: So, to create bios backup (dump) you need to use hardware SPI programmer.1 point
-
Hi! Ok. Check PM.1 point
-
Hi! Ok. Check PM.1 point
-
Hi! Ok. Your bios with unlocked Wi-Fi whitelist done. Check PM.1 point
-
Hi! Ok. Your bios with unlocked Wi-Fi whitelist done. Check PM.1 point
-
Hi! Ok. Check PM.1 point
-
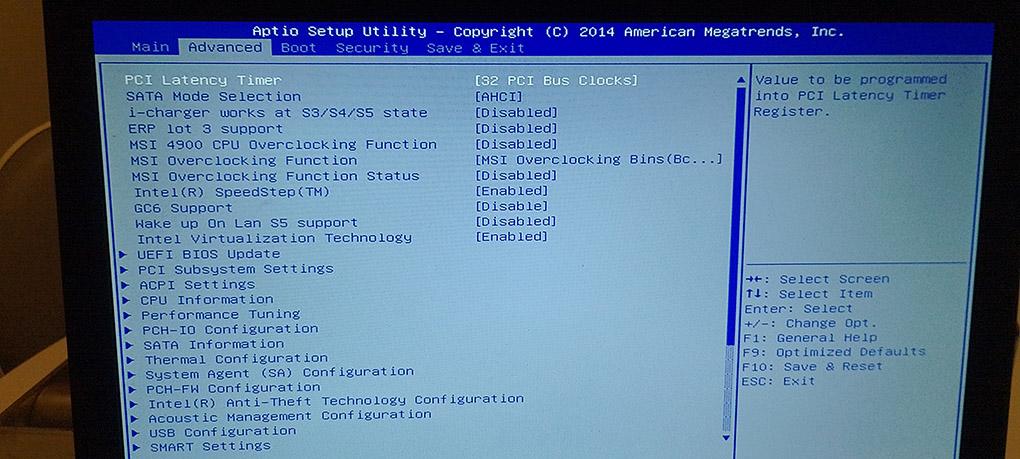
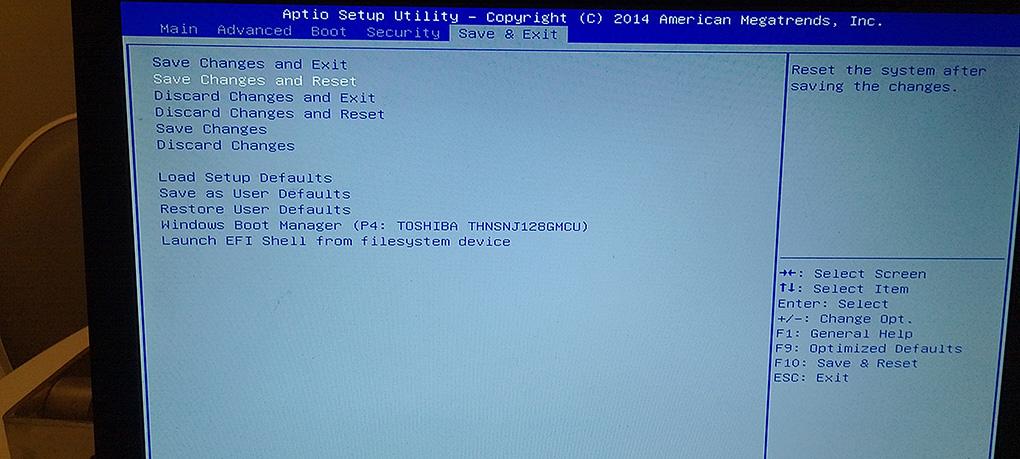
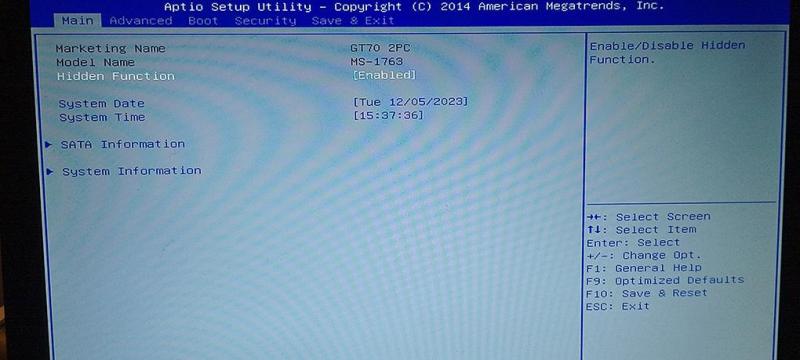
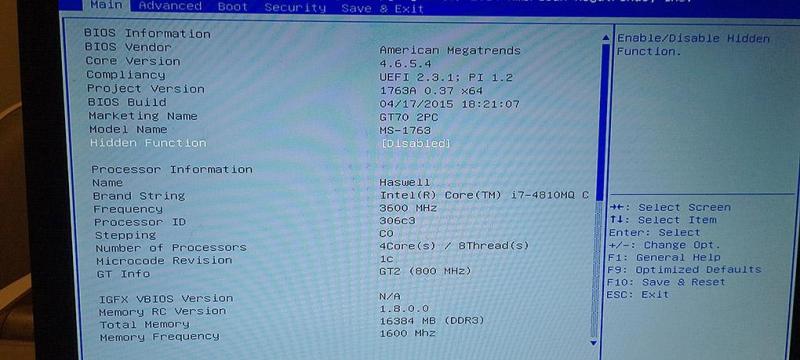
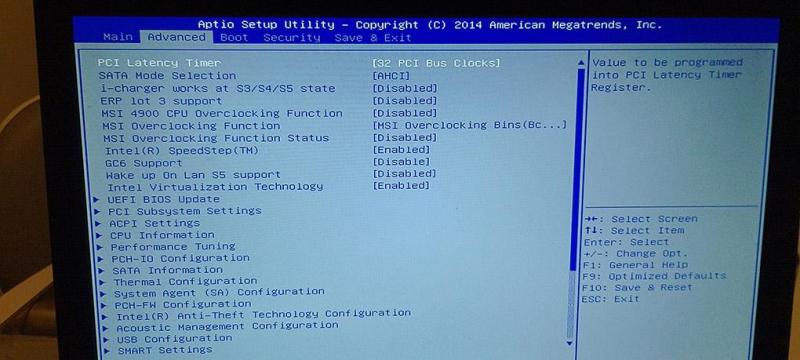
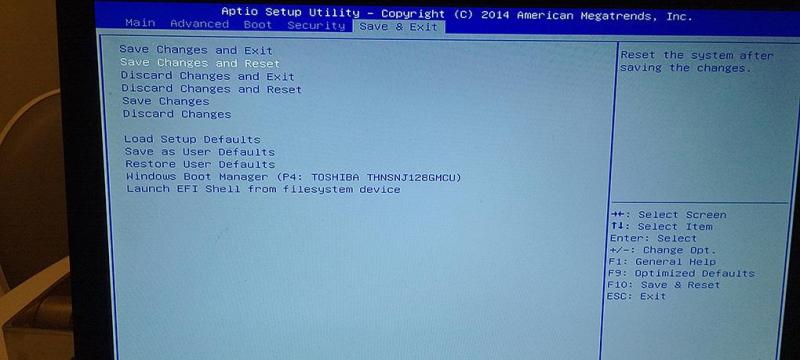
Unlocked BIOS Rom for MSI GT70 2PC Dominator (MS-1763) Original Rom File: E1763IMS.51D **ONLY APPLY TO 51D MODEL - CHECK YOUR BIOS FIRST** Modifications Made: Hidden Menu Option Enabled (Main Tab) Instructions: ============= 1) Create bootable USB using Rufus (FREE-DOS) 2) Copy AUFDOS.exe and bios.rom onto bootable USB 3) Boot to BIOS and change from UEFI to Legacy 4) Boot from USB 5) Use command: AFUDOS bios.rom /GAN 6) Restart, Boot into BIOS and in the Main tab set Hidden Menu from 'Enabled' to 'Disabled' No that's not a typo, 'Disabled' unlocks everything for some reason Features: ========= Unlocks ALL Options for Each BIOS tab (Main | Advanced | Boot | Security | Save & Exit) Included: ========= READ ME.txt rufus-4.2p.exe AFUDOS.EXE bios.rom LOCKED_MAIN.jpg UNLOCKED_MAIN.jpg UNLOCKED_ADVANCED.jpg UNLOCKED_SAVE.jpg https://drive.google.com/file/d/1RS-VaySxhxx0do5alnej1DyaJZb2RnNX/view?usp=drive_link
 1 point
 -
What problems did you encounter after installing the m.2 NVMe 1TB SSD?1 point
-
Hi! Ok. Check PM.1 point
-
Two top gaming keyboards pitted against each other. Both support rapid trigger and use Hall effect switches. Watch the full video to see who comes out on top!1 point
-
Hi! MSI GT780 DXR ( MS-1761 ) use mobile Intel HM67 chipset. Mobile Intel HM67 chipset does not support 3rd generation processors. CPU microcode update can't help in this case, it's hardware limitation. Choose any processor from the 2nd generation. https://web.archive.org/web/20181211054350/https://ark.intel.com/products/52809 https://www.cpu-upgrade.com/mb-Intel_(chipsets)/HM67_Express.html1 point
-
Hi! This is for you: GTX780m.rom If you like my work, my link for beer: https://www.buymeacoffee.com/ekushukovZ1 point
-
This week's highlights in gaming offers a whirlwind of excitement, from gaming showcases to highly anticipated game releases. Summer 2023 Gaming Showcases have been a saving grace after the cancellation of E3 2023. Major events include Sony's PlayStation Showcase unveiling games like Metal Gear Solid 3: Snake Eater remake and a Marathon series revival by Bungie. The Meta Quest Gaming Showcase focused on Meta Quest 2, Pro, and 3 games, including Samba de Amigo, Bulletstorm VR, and Asgard’s Wrath 2. Capcom's Monster Hunter Rise Sunbreak: Final Digital Event on June 7 delivered Monster Hunter Rise updates, while the Guerrilla Collective Showcase on June 7 highlighted indie gems. Geoff Keighley's Summer Game Fest on June 8 unveiled games like Mortal Kombat 1, Marvel’s Spider-Man 2, and Final Fantasy VII Rebirth. September 2023 Game Releases are also turning heads. Bethesda's expansive open-world RPG, Starfield, launched on September 6. NBA 2K24, dedicated to Kobe Bryant's legacy, arrived on September 8 with gameplay and visual improvements. Car enthusiasts reveled in The Crew Motorfest on September 14, set in Hawaii. Classic gaming franchise fans rejoiced as Mortal Kombat 1 received a fresh reboot on September 6. The long-awaited sequel, Payday 3, released on the same day, offering co-op shooting in New York City. Additionally, the gaming lineup for September includes Final Fantasy VII Ever Crisis, Fae Farm, Eternights, Nour: Play With Your Food, Super Bomberman R 2, Pokémon Scarlet And Violet: The Hidden Treasure Of Area Zero – The Teal Mask, Monster Hunter Now, Lies of P, and Cyberpunk 2077: Phantom Liberty. Moreover, EA Sports FC 24 is scheduled for September 29. Gamers can anticipate more exciting releases in October, including Assassin’s Creed Mirage and Marvel’s Spider-Man 2. September 2023 indeed promises a treasure trove of gaming goodness, from showcases that keep us informed to game releases that keep us entertained.1 point
-
Ok. Thanks for your feedback.1 point
-
Thanks Mr.Klem, the flashing was successful, I can indeed swap any NIC I'd like and unlocked BIOS. Before / After1 point
-
Hi! You can download it using these links: 1. http://rweverything.com/download/ 2. https://files.fm/u/95q6qrp5q 3.1 point
-
In 2022, I wish you a thousand good things. Please teach me how to unlock Bios to overclock Dell M6700 with 3940XM and K5000M. I have difficulty and do not know who to turn to for help until today... I don't have much money to upgrade another laptop while needing a higher configuration for work. Please spare me a little of your precious time. I am extremely grateful. I just flashed the Vbios K5000M by @Klem, and @Pseudodeed. Grateful for that Sorry for my English.1 point
-
Hi there, This is the quick step, if you don't want read more: 1. download intel graphics driver 21.20.16.4839 2. Do the inf hack, looks into the Graphics directory, find the file igdlh64.inf, modify it. Add this line into windows 7 install section [IntelGfx.NTamd64.6.1] %iKBLULTGT2% = iSKLD_w7, PCI\VEN_8086&DEV_5917 3. Find the file igdumdim32.dll, edit it by a hex editor, like winhex or ultraedit. Search this binary string in it: 83 F8 13 75 43 F7 42 04 00 00 00 02 modify the following two bytes into 90 90 4. Find the file igdumdim64.dll, edit it by a hex editor, like winhex or ultraedit. Search this binary string in it: 01 76 17 83 F9 13 75 44 F7 42 04 00 00 00 02 modify the following two bytes into 90 90 5. install the driver, restart. 6. install/reinstall the discrete video card driver, not recommend a newest one. I use nvidia 397.64 driver on my MX150. 7. enjoy it with full fucntion works. Start from here: As you know Intel didn't support graphics drivers for 7th and 8th CPU on windows 7, I do lots of research on web found some inf hack to resolve it like this: https://www.youtube.com/watch?v=J6nPLoRtipA This way looks work, but not perfect, I found when I playback video, player always crash on my UHD 620 (Embedded in I7 8550U) , whatever I used. And someone said replace some dll file will let playback work normal, but 3D function couldn't work, like this guy: https://www.techinferno.com/index.php?/forums/topic/12141-intel-core-i7-8th-gen-with-windows-7-intel-uhd-graphics-620-driver-dell-inspiron-5770/ I try all methods in the post found the same issue, so I try to dig into this problem, and finally I hack the driver binary file(DLL file) successfully. I must say this is not easy, you need some hacking background to understand how it work. First things, choose a right driver version. I do a lot testing work to test different version.I try to merge some of them but all of them couldn't work stable enough. Finally I did some research the about the display drivers difference between winows 7 and windows 10. Basically, the display drivers support windows 7 must follow WDDM 1.1, but on windows 10 it support WDDM 2.0+. This means you must choose a version which support WDDM 1.1 and it support 6th or 7th CPU at the same time. Another words, your driver version must support both windows 7, and then can support graphics like HD 620 on windows 10. Drivers can match this demands isn't too much, the newest you can found officially is version 15.45.23.4860 (21.20.16.4860): https://downloadcenter.intel.com/download/27360/Graphics-Intel-Graphics-Driver-for-Windows-15-45- This version is OK, but I didn't use it, because I found drivers in same series 21.20.16.xxx, which is 4839 is listing on the windows update catalog directory by Microsoft. This means it should be more stable, you can download it from here: https://www.station-drivers.com/index.php?option=com_remository&Itemid=352&func=fileinfo&id=3256&lang=en The windows catalog version is here: https://www.catalog.update.microsoft.com/Search.aspx?q=21.20.16.4839 Then, the inf hack work, this is most easy part. You can learn how to do it on youtube from my first link. Here's some notice, the UHD 620's device ID is PCI\VEN_8086&DEV_5917, add the line in windows 7 section which should be like the following part. Here I use a new marco iKBLULTGT2R , and this can let you name your device, but not use HD 620's name, ;===================================================================== ; Windows 7 Install - DT Only ;===================================================================== [IntelGfx.NTamd64.6.1] ; SKL HW %iSKLULTGT1% = iSKLD_w7, PCI\VEN_8086&DEV_1906 %iSKLULTGT2% = iSKLD_w7, PCI\VEN_8086&DEV_1916 ... %iSKLWSGT4% = iSKLD_w7, PCI\VEN_8086&DEV_193D %iKBLULTGT2R% = iSKLD_w7, PCI\VEN_8086&DEV_5917 And add some lack parts for UHD 620, this is not really important thing, if you don't do it's OK. Add these lines follow the 5916 section: HKLM, Software\Wow6432Node\Intel\MediaSDK\Dispatch\iKBL_5916, DeviceID, %REG_DWORD%, 0x5916 HKLM, Software\Wow6432Node\Intel\MediaSDK\Dispatch\iKBL_5916, VendorID, %REG_DWORD%, 0x8086 HKLM, Software\Wow6432Node\Intel\MediaSDK\Dispatch\iKBL_5916, APIVersion, %REG_DWORD%, 0x108 HKLM, Software\Wow6432Node\Intel\MediaSDK\Dispatch\iKBL_5916, Merit,%REG_DWORD%, 0x08000015 HKLM, Software\Wow6432Node\Intel\MediaSDK\Dispatch\iKBL_5916, Path, %REG_SZ%, "%16422%\Intel\Media SDK\libmfxhw32.dll" HKLM, Software\Wow6432Node\Intel\MediaSDK\Dispatch\iKBL_5917, DeviceID, %REG_DWORD%, 0x5917 HKLM, Software\Wow6432Node\Intel\MediaSDK\Dispatch\iKBL_5917, VendorID, %REG_DWORD%, 0x8086 HKLM, Software\Wow6432Node\Intel\MediaSDK\Dispatch\iKBL_5917, APIVersion, %REG_DWORD%, 0x108 HKLM, Software\Wow6432Node\Intel\MediaSDK\Dispatch\iKBL_5917, Merit,%REG_DWORD%, 0x08000015 HKLM, Software\Wow6432Node\Intel\MediaSDK\Dispatch\iKBL_5917, Path, %REG_SZ%, "%16422%\Intel\Media SDK\libmfxhw32.dll" HKLM, Software\Wow6432Node\Intel\MediaSDK\Dispatch\iKBL_5921, DeviceID, %REG_DWORD%, 0x5921 HKLM, Software\Wow6432Node\Intel\MediaSDK\Dispatch\iKBL_5921, VendorID, %REG_DWORD%, 0x8086 HKLM, Software\Wow6432Node\Intel\MediaSDK\Dispatch\iKBL_5921, APIVersion, %REG_DWORD%, 0x108 HKLM, Software\Wow6432Node\Intel\MediaSDK\Dispatch\iKBL_5921, Merit,%REG_DWORD%, 0x08000015 HKLM, Software\Wow6432Node\Intel\MediaSDK\Dispatch\iKBL_5921, Path, %REG_SZ%, "%16422%\Intel\Media SDK\libmfxhw32.dll" And here: HKLM, Software\Intel\MediaSDK\Dispatch\iKBL_5916, DeviceID, %REG_DWORD%, 0x5916 HKLM, Software\Intel\MediaSDK\Dispatch\iKBL_5916, VendorID, %REG_DWORD%, 0x8086 HKLM, Software\Intel\MediaSDK\Dispatch\iKBL_5916, APIVersion, %REG_DWORD%, 0x108 HKLM, Software\Intel\MediaSDK\Dispatch\iKBL_5916, Merit,%REG_DWORD%, 0x08000015 HKLM, Software\Intel\MediaSDK\Dispatch\iKBL_5916, Path, %REG_SZ%, "%16422%\Intel\Media SDK\libmfxhw64.dll" HKLM, Software\Intel\MediaSDK\Dispatch\iKBL_5917, DeviceID, %REG_DWORD%, 0x5917 HKLM, Software\Intel\MediaSDK\Dispatch\iKBL_5917, VendorID, %REG_DWORD%, 0x8086 HKLM, Software\Intel\MediaSDK\Dispatch\iKBL_5917, APIVersion, %REG_DWORD%, 0x108 HKLM, Software\Intel\MediaSDK\Dispatch\iKBL_5917, Merit,%REG_DWORD%, 0x08000015 HKLM, Software\Intel\MediaSDK\Dispatch\iKBL_5917, Path, %REG_SZ%, "%16422%\Intel\Media SDK\libmfxhw64.dll" HKLM, Software\Intel\MediaSDK\Dispatch\iKBL_5921, DeviceID, %REG_DWORD%, 0x5921 HKLM, Software\Intel\MediaSDK\Dispatch\iKBL_5921, VendorID, %REG_DWORD%, 0x8086 HKLM, Software\Intel\MediaSDK\Dispatch\iKBL_5921, APIVersion, %REG_DWORD%, 0x108 HKLM, Software\Intel\MediaSDK\Dispatch\iKBL_5921, Merit,%REG_DWORD%, 0x08000015 HKLM, Software\Intel\MediaSDK\Dispatch\iKBL_5921, Path, %REG_SZ%, "%16422%\Intel\Media SDK\libmfxhw64.dll" And don't forget add the new display name at the end of this file: ; KBL iKBLULTGT1 = "Intel(R) HD Graphics 610" iKBLULTGT2 = "Intel(R) HD Graphics 620" iKBLULTGT2R = "Intel(R) UHD Graphics 620" iKBLULTGT2F = "Intel(R) HD Graphics 620" iKBLULTGT3E15 = "Intel(R) Iris(TM) Plus Graphics 640" iKBLULTGT3E28 = "Intel(R) Iris(TM) Plus Graphics 650" iKBLULXGT2 = "Intel(R) HD Graphics 615" iKBLDTGT1 = "Intel(R) HD Graphics 610" OK, now save the file and run setup to install the drivers, it should be work. After restart, you will found the Aero came back again. And run dxdiag to check if the 3D function can work, it should work. Here you even can play some 3D game now. But the player crash couldn't stop. And the video tab of intel configure panel will crash too. Most tutorial on web will end here, but my hacking is just begin. Here I must claim someone wants try to merge file to let this work, I don't think this will work. Because the different WDDM support in diffferent system, if one driver only support in windows 10 it couldn't be run on the windows 7. I tried merge the windows 10 driver into windows 7, and resolved tons of DLL missed and function redirect, modify tons of improt table of DLL, The drivers can be loaded, but it won't work. Just like you install a defalut VGA driver, no 3D function will work correctly. I started from the player crash, it reported that it crash in igdumdim32.dll @0x59c4EA0C, the igdumdim32.dll and igdumdim64.dll is the Intel's user space graphics drivers' core file, the Intel's graphics has a small kernel part called miniports, it only open the tunnel between userspace application and the hardware, the real working part is in the DLL, like 3D function, video acceleration and Direct draw. Use a debuger like ollydbg to debug it I found it's a function do some setting work: 59C4E948 8B87 0C010000 mov eax, dword ptr ds:[edi+10C] 59C4E94E 53 push ebx 59C4E94F 57 push edi 59C4E950 FFD0 call eax 59C4E952 8B8F 00010000 mov ecx, dword ptr ds:[edi+100] 59C4E958 8BD8 mov ebx, eax 59C4E95A 8D45 DC lea eax, dword ptr ss:[ebp-24] 59C4E95D 50 push eax 59C4E95E 57 push edi 59C4E95F FFD1 call ecx 59C4E961 8B56 10 mov edx, dword ptr ds:[esi+10] 59C4E964 8B0A mov ecx, dword ptr ds:[edx] 59C4E966 F7C1 00002000 test ecx, 200000 59C4E96C 74 0C je short 59C4E97A ; igdumdim.59C4E97A 59C4E96E C746 18 2404655>mov dword ptr ds:[esi+18], 5E650424 59C4E975 E9 84000000 jmp 59C4E9FE ; igdumdim.59C4E9FE 59C4E97A F7C1 00000004 test ecx, 4000000 59C4E980 74 09 je short 59C4E98B ; igdumdim.59C4E98B 59C4E982 C746 18 5C04655>mov dword ptr ds:[esi+18], 5E65045C 59C4E989 EB 73 jmp short 59C4E9FE ; igdumdim.59C4E9FE 59C4E98B F7C1 00000020 test ecx, 20000000 59C4E991 74 09 je short 59C4E99C ; igdumdim.59C4E99C 59C4E993 C746 18 9404655>mov dword ptr ds:[esi+18], 5E650494 59C4E99A EB 62 jmp short 59C4E9FE ; igdumdim.59C4E9FE 59C4E99C 85C9 test ecx, ecx 59C4E99E 79 09 jns short 59C4E9A9 ; igdumdim.59C4E9A9 59C4E9A0 C746 18 CC04655>mov dword ptr ds:[esi+18], 5E6504CC 59C4E9A7 EB 55 jmp short 59C4E9FE ; igdumdim.59C4E9FE 59C4E9A9 8B45 DC mov eax, dword ptr ss:[ebp-24] 59C4E9AC 83F8 15 cmp eax, 15 59C4E9AF 74 1C je short 59C4E9CD ; igdumdim.59C4E9CD 59C4E9B1 83F8 16 cmp eax, 16 59C4E9B4 74 17 je short 59C4E9CD ; igdumdim.59C4E9CD 59C4E9B6 83F8 13 cmp eax, 13 59C4E9B9 75 43 jnz short 59C4E9FE ; igdumdim.59C4E9FE 59C4E9BB F742 04 0000000>test dword ptr ds:[edx+4], 2000000 59C4E9C2 75 A3 je short 59C4E9FE ; igdumdim.59C4E9FE 59C4E9C4 C746 18 AC05655>mov dword ptr ds:[esi+18], 5E6505AC 59C4E9CB EB 31 jmp short 59C4E9FE ; igdumdim.59C4E9FE 59C4E9CD 8B42 04 mov eax, dword ptr ds:[edx+4] 59C4E9D0 A9 00004000 test eax, 400000 59C4E9D5 74 09 je short 59C4E9E0 ; igdumdim.59C4E9E0 59C4E9D7 C746 18 3C05655>mov dword ptr ds:[esi+18], 5E65053C 59C4E9DE EB 1E jmp short 59C4E9FE ; igdumdim.59C4E9FE 59C4E9E0 A9 00008000 test eax, 800000 59C4E9E5 74 09 je short 59C4E9F0 ; igdumdim.59C4E9F0 59C4E9E7 C746 18 0405655>mov dword ptr ds:[esi+18], 5E650504 59C4E9EE EB 0E jmp short 59C4E9FE ; igdumdim.59C4E9FE 59C4E9F0 A9 00000001 test eax, 1000000 59C4E9F5 74 07 je short 59C4E9FE ; igdumdim.59C4E9FE 59C4E9F7 C746 18 7405655>mov dword ptr ds:[esi+18], 5E650574 59C4E9FE 85DB test ebx, ebx 59C4EA00 74 0D je short 59C4EA0F ; igdumdim.59C4EA0F 59C4EA02 8B4B 04 mov ecx, dword ptr ds:[ebx+4] 59C4EA05 85C9 test ecx, ecx 59C4EA07 74 06 je short 59C4EA0F ; igdumdim.59C4EA0F 59C4EA09 8B46 18 mov eax, dword ptr ds:[esi+18] 59C4EA0C 8948 0C mov dword ptr ds:[eax+C], ecx <============ crash here 59C4EA0F C746 1C 1800000>mov dword ptr ds:[esi+1C], 18 59C4EA16 C746 20 4000000>mov dword ptr ds:[esi+20], 40 59C4EA1D C746 24 4000000>mov dword ptr ds:[esi+24], 40 59C4EA24 C746 28 4000000>mov dword ptr ds:[esi+28], 40 59C4EA2B C746 2C 0400000>mov dword ptr ds:[esi+2C], 4 59C4EA32 C746 30 1000000>mov dword ptr ds:[esi+30], 10 59C4EA39 C746 34 1000000>mov dword ptr ds:[esi+34], 10 59C4EA40 C746 38 0008000>mov dword ptr ds:[esi+38], 800 59C4EA47 C746 3C 8000000>mov dword ptr ds:[esi+3C], 80 59C4EA4E C746 40 2000000>mov dword ptr ds:[esi+40], 20 59C4EA55 C746 44 0008000>mov dword ptr ds:[esi+44], 800 59C4EA5C C746 48 2004000>mov dword ptr ds:[esi+48], 420 59C4EA63 C746 4C 4004000>mov dword ptr ds:[esi+4C], 440 59C4EA6A C746 50 2000000>mov dword ptr ds:[esi+50], 20 59C4EA71 C746 54 1000000>mov dword ptr ds:[esi+54], 10 59C4EA78 56 push esi 59C4EA79 C786 B8000000 3>mov dword ptr ds:[esi+B8], 59C4D630 59C4EA83 C786 BC000000 1>mov dword ptr ds:[esi+BC], 59C4E410 59C4EA8D C786 C0000000 3>mov dword ptr ds:[esi+C0], 59C4D830 59C4EA97 C786 C4000000 4>mov dword ptr ds:[esi+C4], 59C4E440 59C4EAA1 C786 C8000000 A>mov dword ptr ds:[esi+C8], 59D71FA0 59C4EAAB C786 CC000000 1>mov dword ptr ds:[esi+CC], 59C4DB10 59C4EAB5 C786 D4000000 8>mov dword ptr ds:[esi+D4], 59C4E680 59C4EABF C786 D8000000 1>mov dword ptr ds:[esi+D8], 59C4DC10 59C4EAC9 C786 DC000000 8>mov dword ptr ds:[esi+DC], 59C4E680 59C4EAD3 C786 E0000000 8>mov dword ptr ds:[esi+E0], 59C4E880 59C4EADD C786 E4000000 2>mov dword ptr ds:[esi+E4], 59C4DD20 59C4EAE7 C786 EC000000 6>mov dword ptr ds:[esi+EC], 59C4CE60 59C4EAF1 C786 F0000000 D>mov dword ptr ds:[esi+F0], 59C4CED0 59C4EAFB C786 F4000000 8>mov dword ptr ds:[esi+F4], 59C4CC80 59C4EB05 C786 F8000000 F>mov dword ptr ds:[esi+F8], 59C4E8F0 59C4EB0F E8 7CF8FFFF call 59C4E390 ; igdumdim.59C4E390 59C4EB14 8B4D FC mov ecx, dword ptr ss:[ebp-4] 59C4EB17 5B pop ebx 59C4EB18 5F pop edi 59C4EB19 33CD xor ecx, ebp 59C4EB1B 5E pop esi 59C4EB1C E8 7354EEFF call 59B33F94 ; igdumdim.59B33F94 59C4EB21 8BE5 mov esp, ebp 59C4EB23 5D pop ebp 59C4EB24 C2 0400 retn 4 This function is setting some thing according a flag which read from call on @59C4E95F, and the following part is a complex branch to select correct arguments for the function call @59C4EB0F. I tried some trace route and found we need let branch @59C4E9C2 goes false, so here we make it to nop like this: 59C4E9B1 83F8 16 cmp eax, 16 59C4E9B4 74 17 je short 59C4E9CD ; igdumdim.59C4E9CD 59C4E9B6 83F8 13 cmp eax, 13 59C4E9B9 75 43 jnz short 59C4E9FE ; igdumdim.59C4E9FE 59C4E9BB F742 04 0000000>test dword ptr ds:[edx+4], 2000000 59C4E9C2 90 nop 59C4E9C3 90 nop 59C4E9C4 C746 18 AC05655>mov dword ptr ds:[esi+18], 5E6505AC 59C4E9CB EB 31 jmp short 59C4E9FE ; igdumdim.59C4E9FE 59C4E9CD 8B42 04 mov eax, dword ptr ds:[edx+4] 59C4E9D0 A9 00004000 test eax, 400000 59C4E9D5 74 09 je short 59C4E9E0 ; igdumdim.59C4E9E0 OK, the most important part comes, translate the RVA into file address, and modify it. Sounds really hard isn't it? Good news is there is a more easy way, and this is the signature about this fix: 83 F8 13 75 43 F7 42 04 00 00 00 02 Search this hex string in the file, modify the following two bytes into "90 90" 00291280h: 74 09 C7 46 18 5C 35 C6 14 EB 73 F7 C1 00 00 00 ; t.荈.\5?雜髁... 00291290h: 20 74 09 C7 46 18 94 35 C6 14 EB 62 85 C9 79 09 ; t.荈.??隻吷y. 002912a0h: C7 46 18 CC 35 C6 14 EB 55 8B 45 DC 83 F8 15 74 ; 荈.??險婨軆?t 002912b0h: 1C 83 F8 16 74 17 83 F8 13 75 43 F7 42 04 00 00 ; .凐.t.凐.uC鰾... 002912c0h: 00 02 90 90 C7 46 18 AC 36 C6 14 EB 31 8B 42 04 ; ..悙荈.???婤. 002912d0h: A9 00 00 40 00 74 09 C7 46 18 3C 36 C6 14 EB 1E ; [email protected].荈.<6?? 002912e0h: A9 00 00 80 00 74 09 C7 46 18 04 36 C6 14 EB 0E ; ?.€.t.荈..6?? We need the do same thing for file igdumdim64.dll, but because this is 64bit dll, so the signature is different: 01 76 17 83 F9 13 75 44 F7 42 04 00 00 00 02 The modify should like this 002d56f0h: 73 09 48 8D 05 1F AD A7 04 EB 6D 0F BA E1 1D 73 ; s.H?..雖.横.s 002d5700h: 09 48 8D 05 48 AD A7 04 EB 5E 85 C9 79 09 48 8D ; .H?H.隵吷y.H? 002d5710h: 05 73 AD A7 04 EB 51 8B 4C 24 20 8D 41 EB 83 F8 ; .s.隥婰$ 岮雰? 002d5720h: 01 76 17 83 F9 13 75 44 F7 42 04 00 00 00 02 90 ; .v.凒.uD鰾.....? 002d5730h: 90 48 8D 05 30 AE A7 04 EB 2E 8B 42 04 0F BA E0 ; 怘?0.?婤..亨 002d5740h: 16 73 09 48 8D 05 AE AD A7 04 EB 1C 0F BA E0 17 ; .s.H???.亨. 002d5750h: 73 09 48 8D 05 67 AD A7 04 EB 0D 0F BA E0 18 73 ; s.H?g.?.亨.s OK after modify the two file, replace it into the windows directory, if your windows is 64 bit, put igdumdim64.dll into windows\system32, and igdumdim32.dll into windows\sysWow64. This must be done under the safe mode, restart windows and press F8 before windows startup, goes into safe mode to replace it. After reboot, you will get all things work. PS: In my system the nvidia's video card cause some problem, it will let system hang sometime, I highly recommand to reinstall the nvidia's drivers after install the Intel's drivers. and choose a lower version, but not the newest version. I have UHD 620 and MX 150 in my system, and after I reinstall the 397.64 nvidia drivers the problem gone away and the laptop works like a charm.1 point
-
Hi! Official v3.05 BIOS provided by Lenovo: https://files.fm/u/s4sbpjmv21 point
-
Hello, What PC do you currently have?1 point
-
Hi! New link: https://files.fm/u/tf84ctkbq1 point
-
Hi! Ok. Check PM.1 point
-
It's pretty much plug and play from what I remember, There could be something required to change in the BIOS but i would have to try and remember. The only issue is that the MXM slot provides constant power when the adapter is installed, even when power is removed so if you have the adapter installed then it will draw power. If you have the mains power turned off then the battery will drain. If you have the power on then the NVMe will log usage hours. You need to keep it unplugged and the battery removed when you're not using it. It's not much of an issue with the M18x as the battery is so easy to remove. It's a pain on the Alienware 18 though. Finding the adapter can also be a challenge, I think Aliexpress could be the only place these days.1 point
-
I'm getting that error even though the file is way under the required size. Also getting some other weird error. Given up trying for now.1 point
-
The 17 R1 motherboard has both the LVDS port (60Hz) and the eDP port (120Hz). The eDP port is the one with the screw mounting holes and you cannot run the displays in the wrong port. If you want to upgrade to the 120hz display then you will need to find the panel and the display cable. The 60hz cable will not work with the 120hz panel. You can go to parts-people.com to find the part numbers you need. Here is a decent CFM fan, you'll just want to check with the seller that you will get the same one. This looks to be 10.55CFM https://www.ebay.com/itm/1339846156311 point
-
Hi! https://www.techpowerup.com/vgabios/?architecture=AMD&manufacturer=&model=R9+M290X&interface=&memType=&memSize=&since= https://www.techpowerup.com/vgabios/?architecture=Uploads&manufacturer=&model=R9+M290X&version=&interface=&memType=&memSize=&since=1 point
-
I've seen people run 4tb SSD's in the R2 so it should work. Never tried it myself though. Nice! I'm glad you managed to get the driver installed. I have never come across that error though so I won't be any help with that one. Maybe it has something to do with running Windows 7, no idea really though.1 point
-
Hi! Yes, with modified bios, your laptop should be support NVME SSD. But you will need to install a new Windows 10 on your NVMe disk. (not clone from old disk !!!). Important: The “BOOT” section of the UEFI BIOS and the shortcut to the “Bootable Devices” will not show the NVMe SSD, although it may be bootable! After having installed the NVMe supporting OS in UEFI mode onto the PCIe/M.2 connected SSD, you will see the new bootable system drive listed as “Windows Boot Manager”. Here are some advices about how to get Win10 properly installed onto an M.2 or PCIe connected NVMe SSD: Save the important data, which are currently on the NVMe SSD. Create an UEFI mode bootable USB Flash drive containing the desired Win10 image by using the latest version of the tool Rufus (important: choose the UEFI mode partition table = GPT). Here is a picture, which shows the most important Rufus settings: Rufus 3.17 Settings.png490×580 16.5 KB Important note: Usually the USB Flash Drive has to be FAT32 formatted to be bootable in UEFI mode, but this file system cannot be created, if any file within the ISO file (e.g. the install.wim) is bigger sized than 4 GB. In this case the tool Rufus will automatically format the USB Flash Drive by using the NTFS file system, but nevertheless makes it possible to boot the USB Flash Drive in UEFI mode (provided, that the “Secure Boot” option within the BIOS has been set to “Disabled”). Enter the BIOS and navigate to the “BOOT” section and - if applicable - the “SECURITY” or “Keys” section. Make sure, that the “Secure Boot” and “Fast Boot” options are disabled. The “Compatibility Support Module” (CSM) can either be set to “Disabled” as well (better option, but requires full UEFI compatibility of the graphics adapter) or to “Enabled” with the ability/preference to load EFI BIOS modules for the Storage Disk Drives. If you see BIOS options for the “OS type”, choose “other OS”. This will disable the Secure Boot setting. Tip to avoid SATA/NVMe interferences during the OS installation: It is recommended to temporarily unplug all SATA connected devices and additionally to disable the on-board SATA Controller(s) within the “Storage Configuration” section of the BIOS before starting the OS installation. These measures of precaution can/should be reversed once the OS installation onto the NVMe SSD has been successfully completed. Insert the prepared USB Flash drive and boot off it in UEFI mode (the related bootable USB drive should be shown by the Boot Manager with the prefix “[UEFI]”). When you come to the point, where you have to decide onto which Drive and which partition the OS shall be installed, delete all existing partitions from your NVME supporting SSD. After having done that, let the Win10 Setup create a new partition for your future drive C: on the related SSD. Then point to this just created partition as the desired future OS location. The rest should be done by the Setup automatically. You will get a message, that some additional partitions have to be created. Accept that and follow the advice of the Setup where to install the OS. Once the OS is up and running, shut down the computer, remove the bootable USB Flash driver and reconnect all your previously used storage drives. Before you restart your computer, make sure, that the NVMe SSD resp. its listed “Windows Boot Manager” is on top of the bootable storage drives.1 point
-
Any chance for a new download link ?1 point
-
M11x keyboard is ok, but I rather plug a normal keyboard with numpad.1 point
-
After most games being unplayable I opened the system up and repasted with liquid metal. Now i'm seeing sometimes 7x my FPS in some games. Cod4 went from the 20's o well over 100 FPS, rocket league went from single digits to playable in the 40's etc. Highly recommended. Just trying to find a good download for the updated a08 bios with the SATA mod so I can access the performance options.1 point
-
Hi! Here you go. prr.zip prr2.zip1 point
-
You're all going to have to accept the fact that you're basically going to have pay the $6 membership fee to have access to these files. I paid the price and it was completely worth it given the amount of time and headaches that were saved. I got the Intel 7260 AC card here: https://www.amazon.com/gp/product/B00MY9S692/ref=oh_aui_detailpage_o01_s00?ie=UTF8&psc=1 I have a Y580. My bios version was v2.07. I downloaded the file named "[Y580][Y480]-'unlocked_BIOS'_660mGHzEdition_WhitelistMod.zip" I got the error about the version not being newer than the current one I have, so I followed these directions: Open platform.ini in notepad. Find the line number 3: "SwitchString=ACEN DCEN CPVER:[1] FHRST RESSEN" Change the "RESSEN" to "RESSDIS" Save the file then launch InsydeFlash.exe. Done. Enjoy your new Wi-Fi card.1 point
-
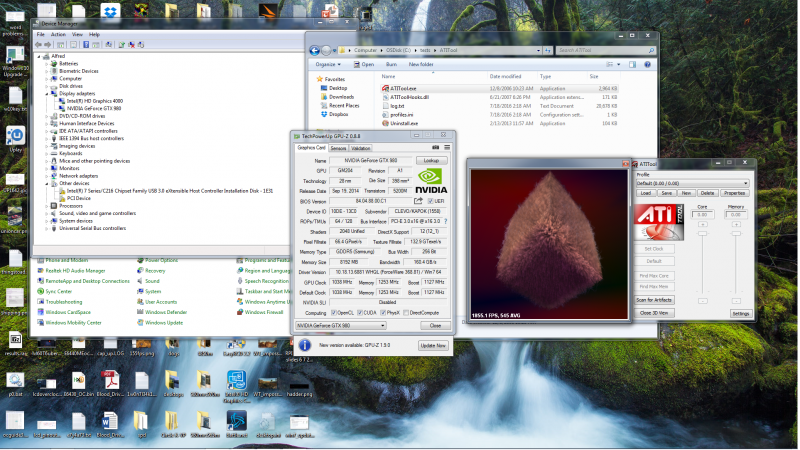
So it actually works with the 980m vBIOS. I tried modding too soon. I just needed to reinstall the driver. I only ran a very lightweight render test because right now the card is only running on 2 phases. I'm pulling the phase driver from my 980m now to get the 3rd phase back up.
 1 point