Leaderboard


Popular Content
Showing content with the highest reputation on 10/29/12 in all areas
-
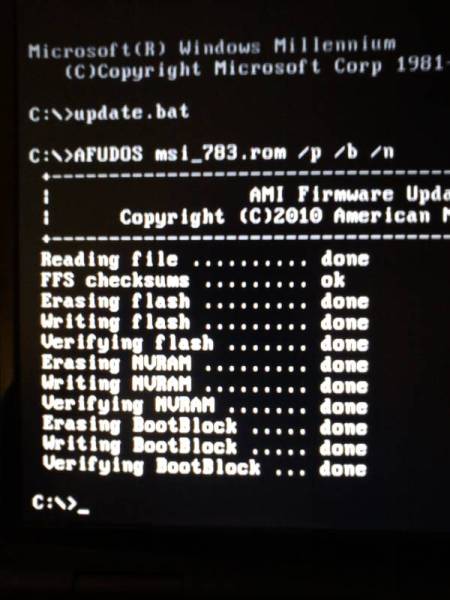
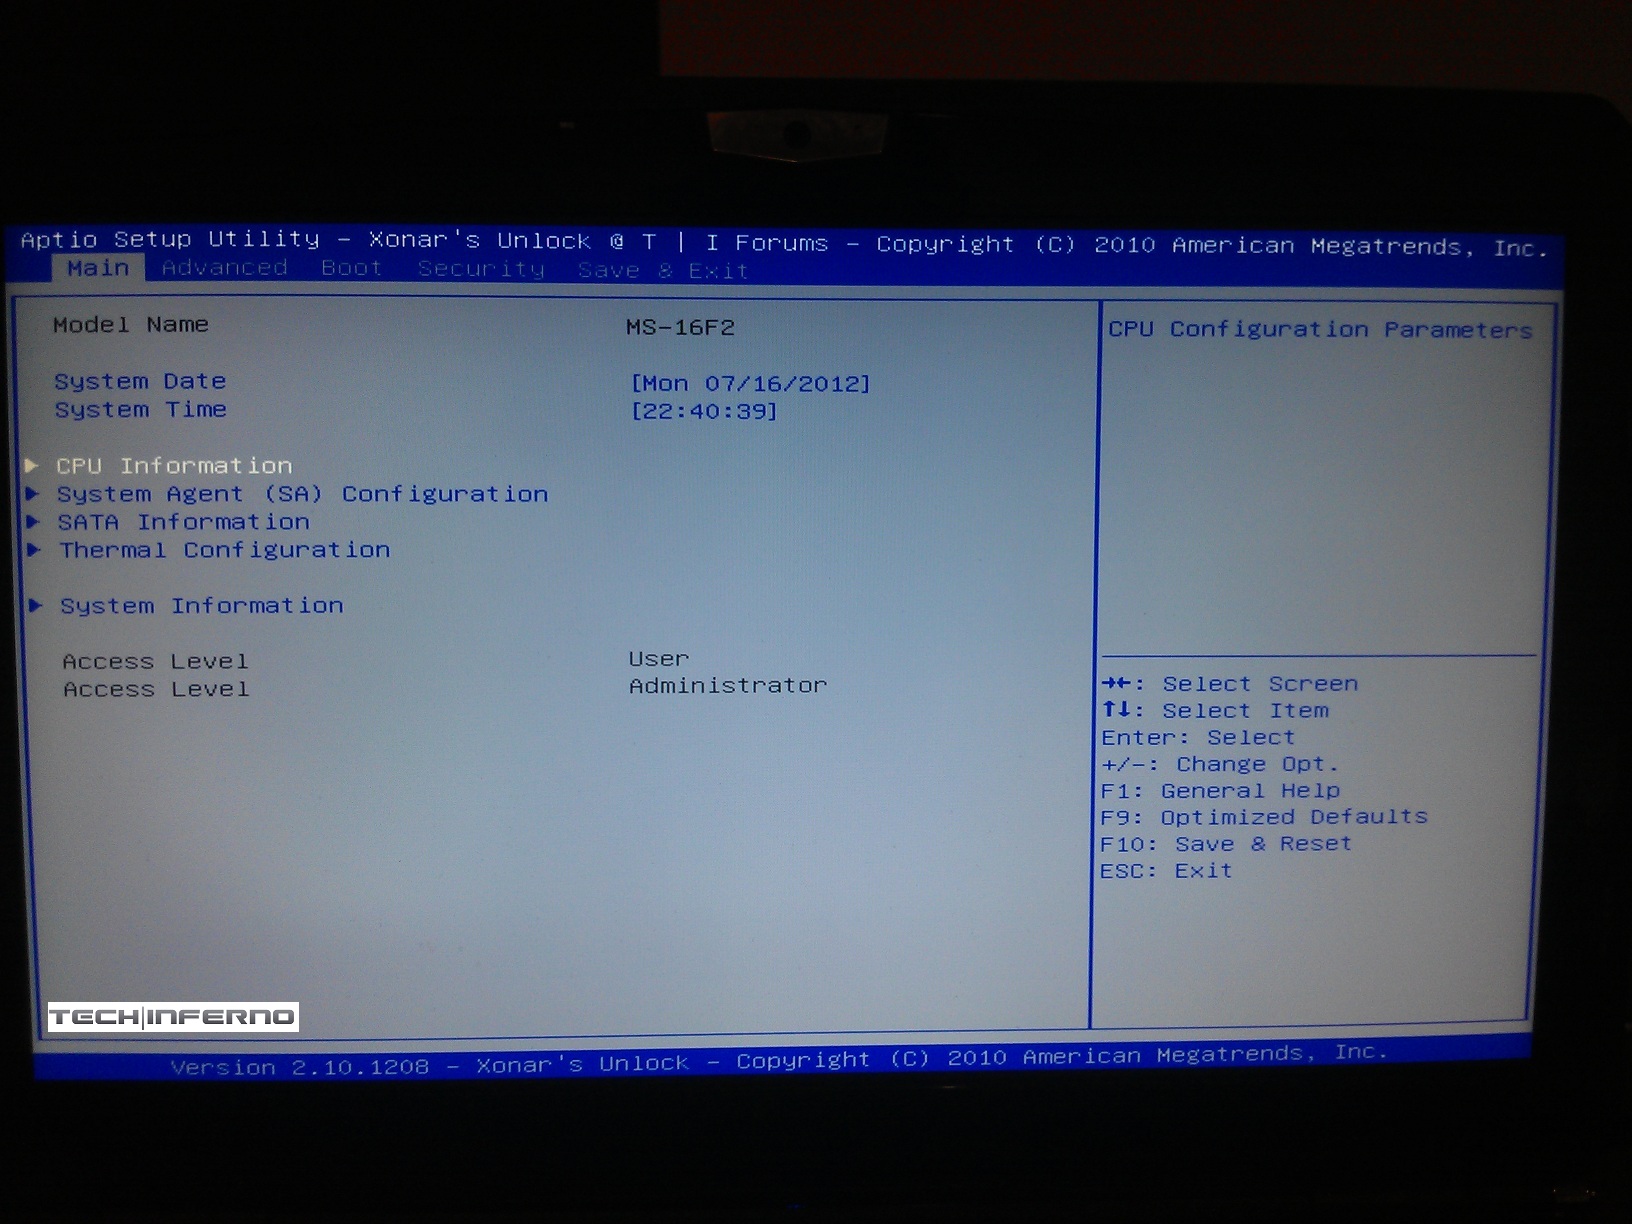
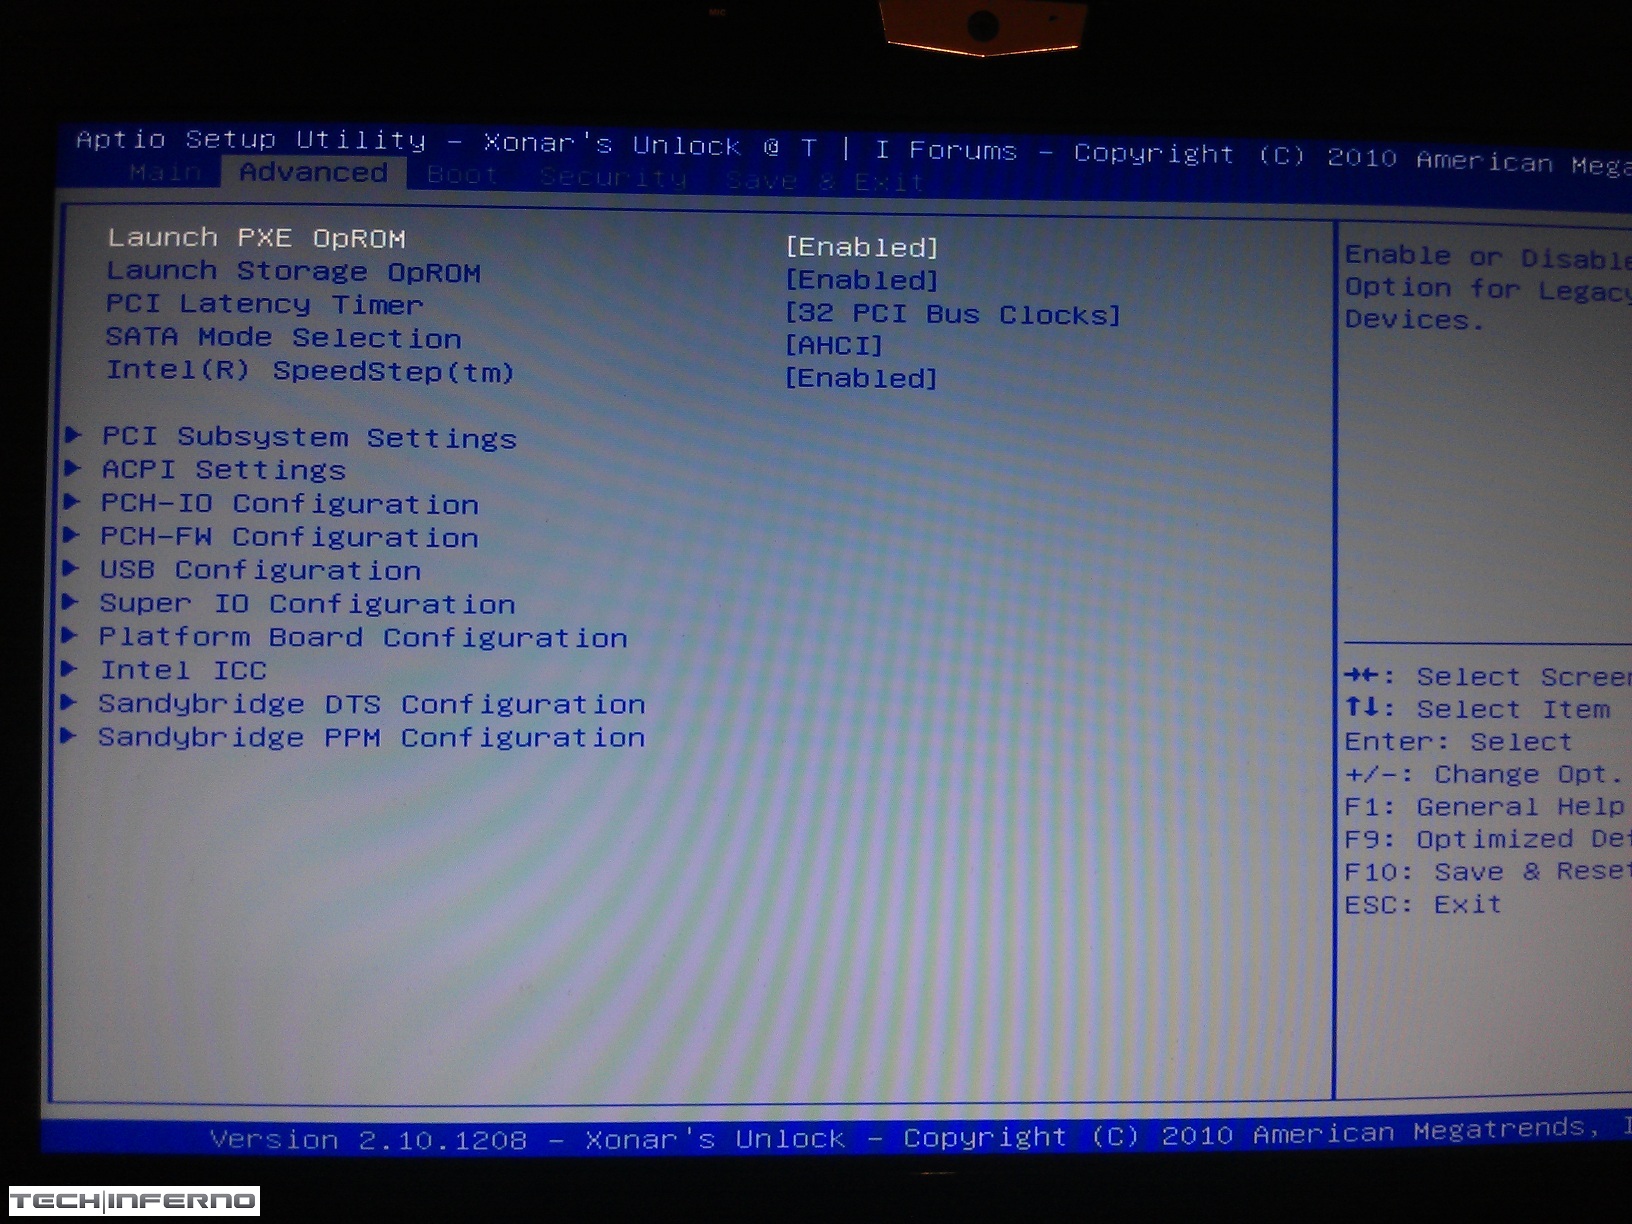
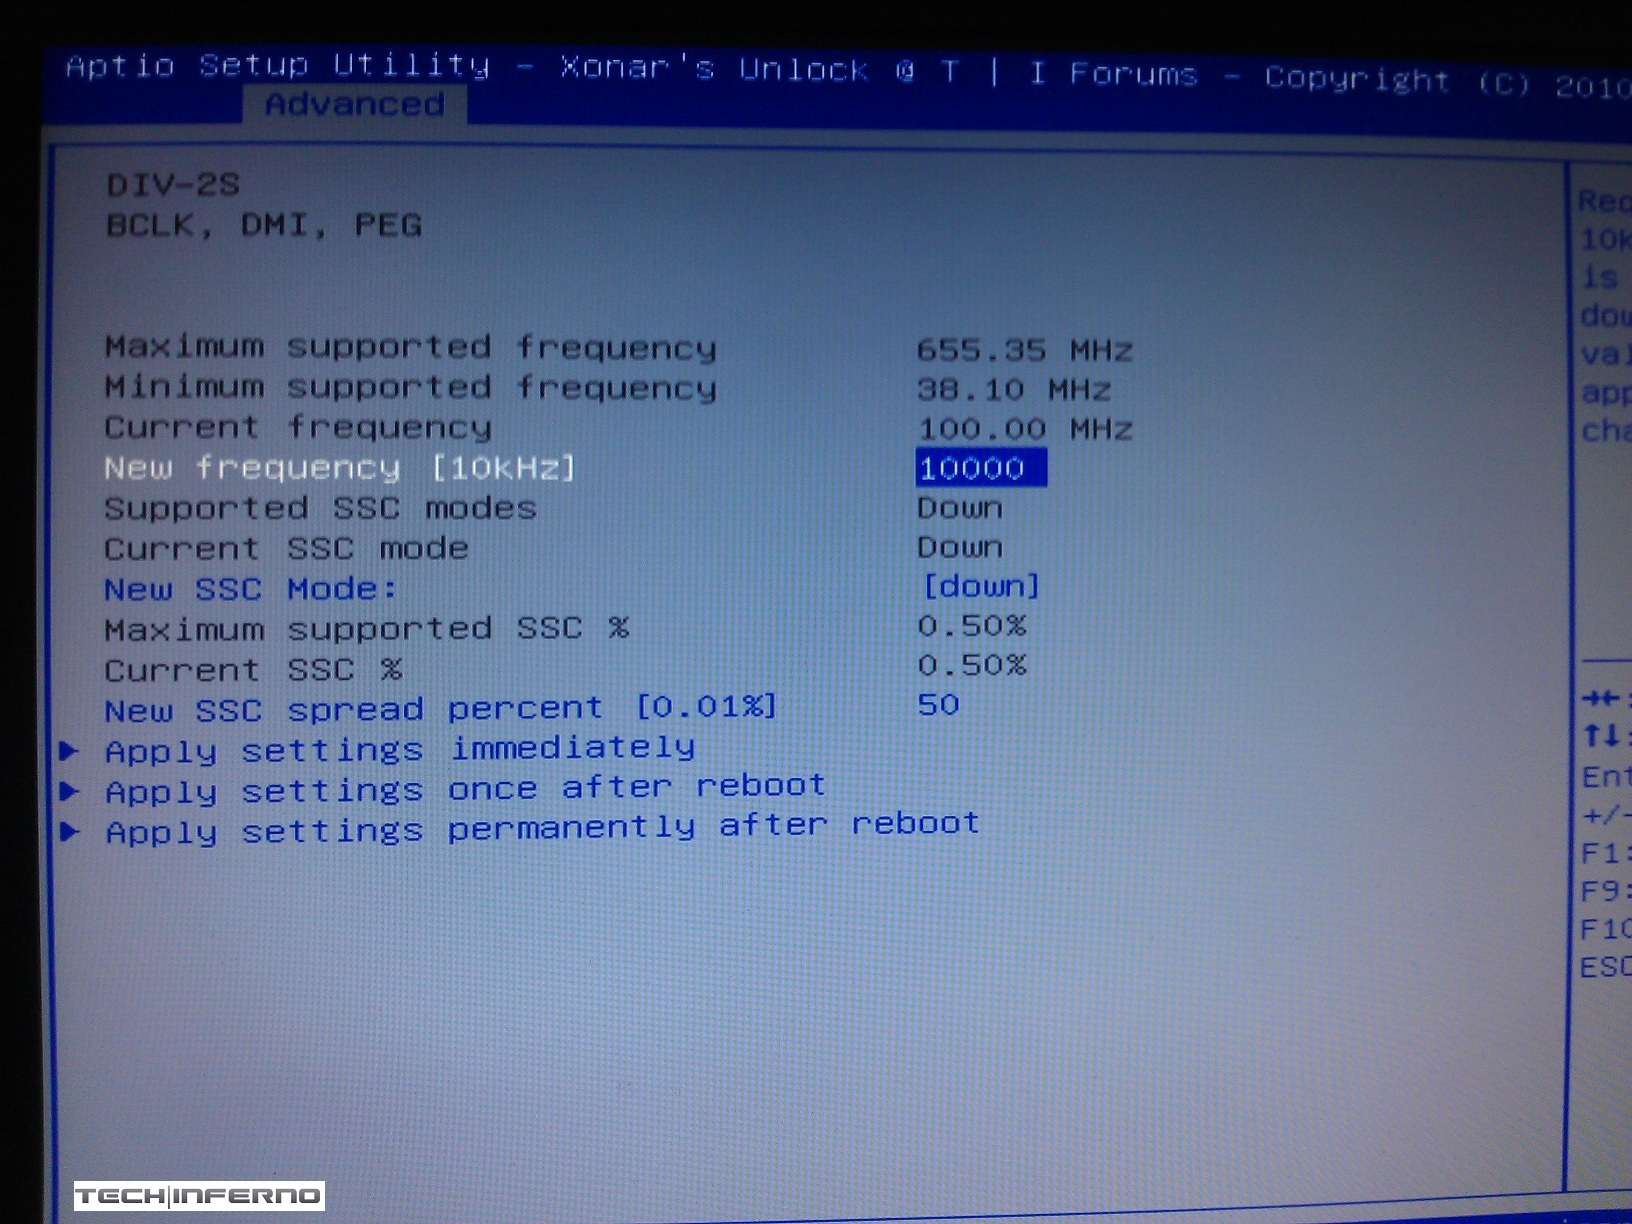
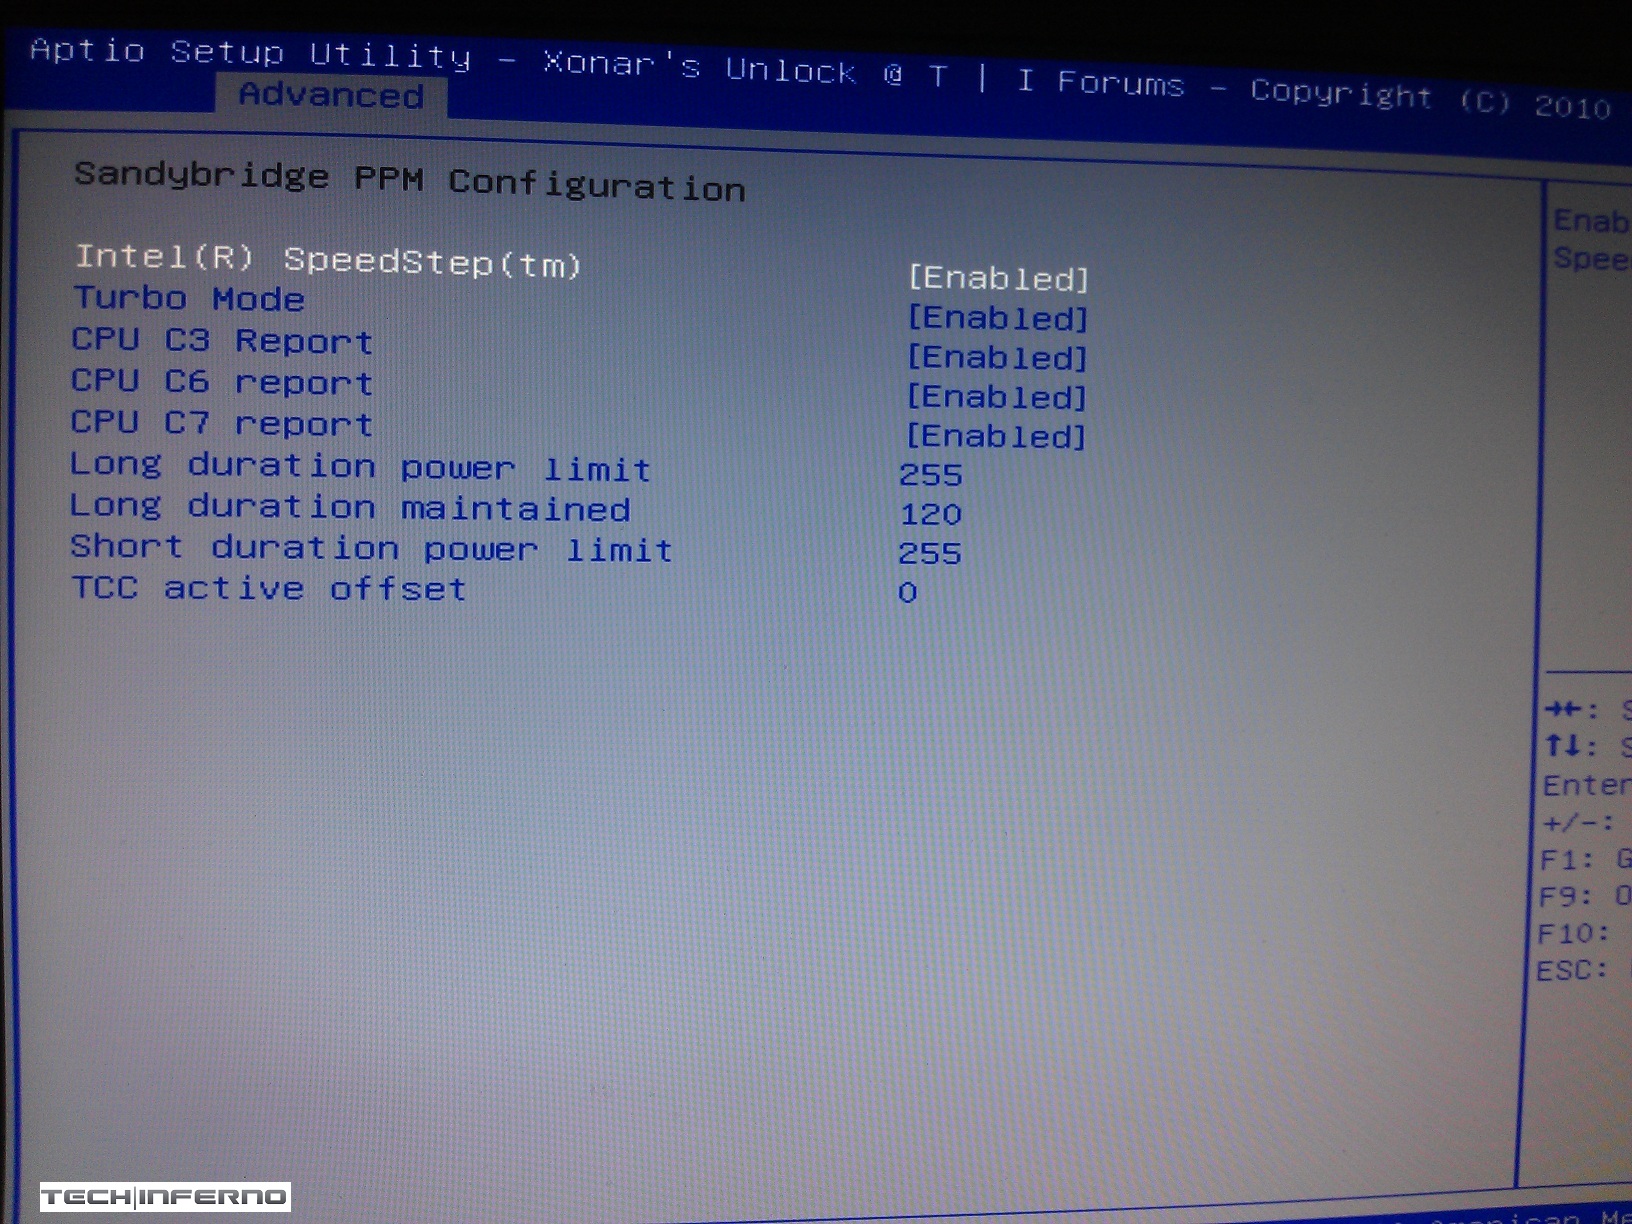
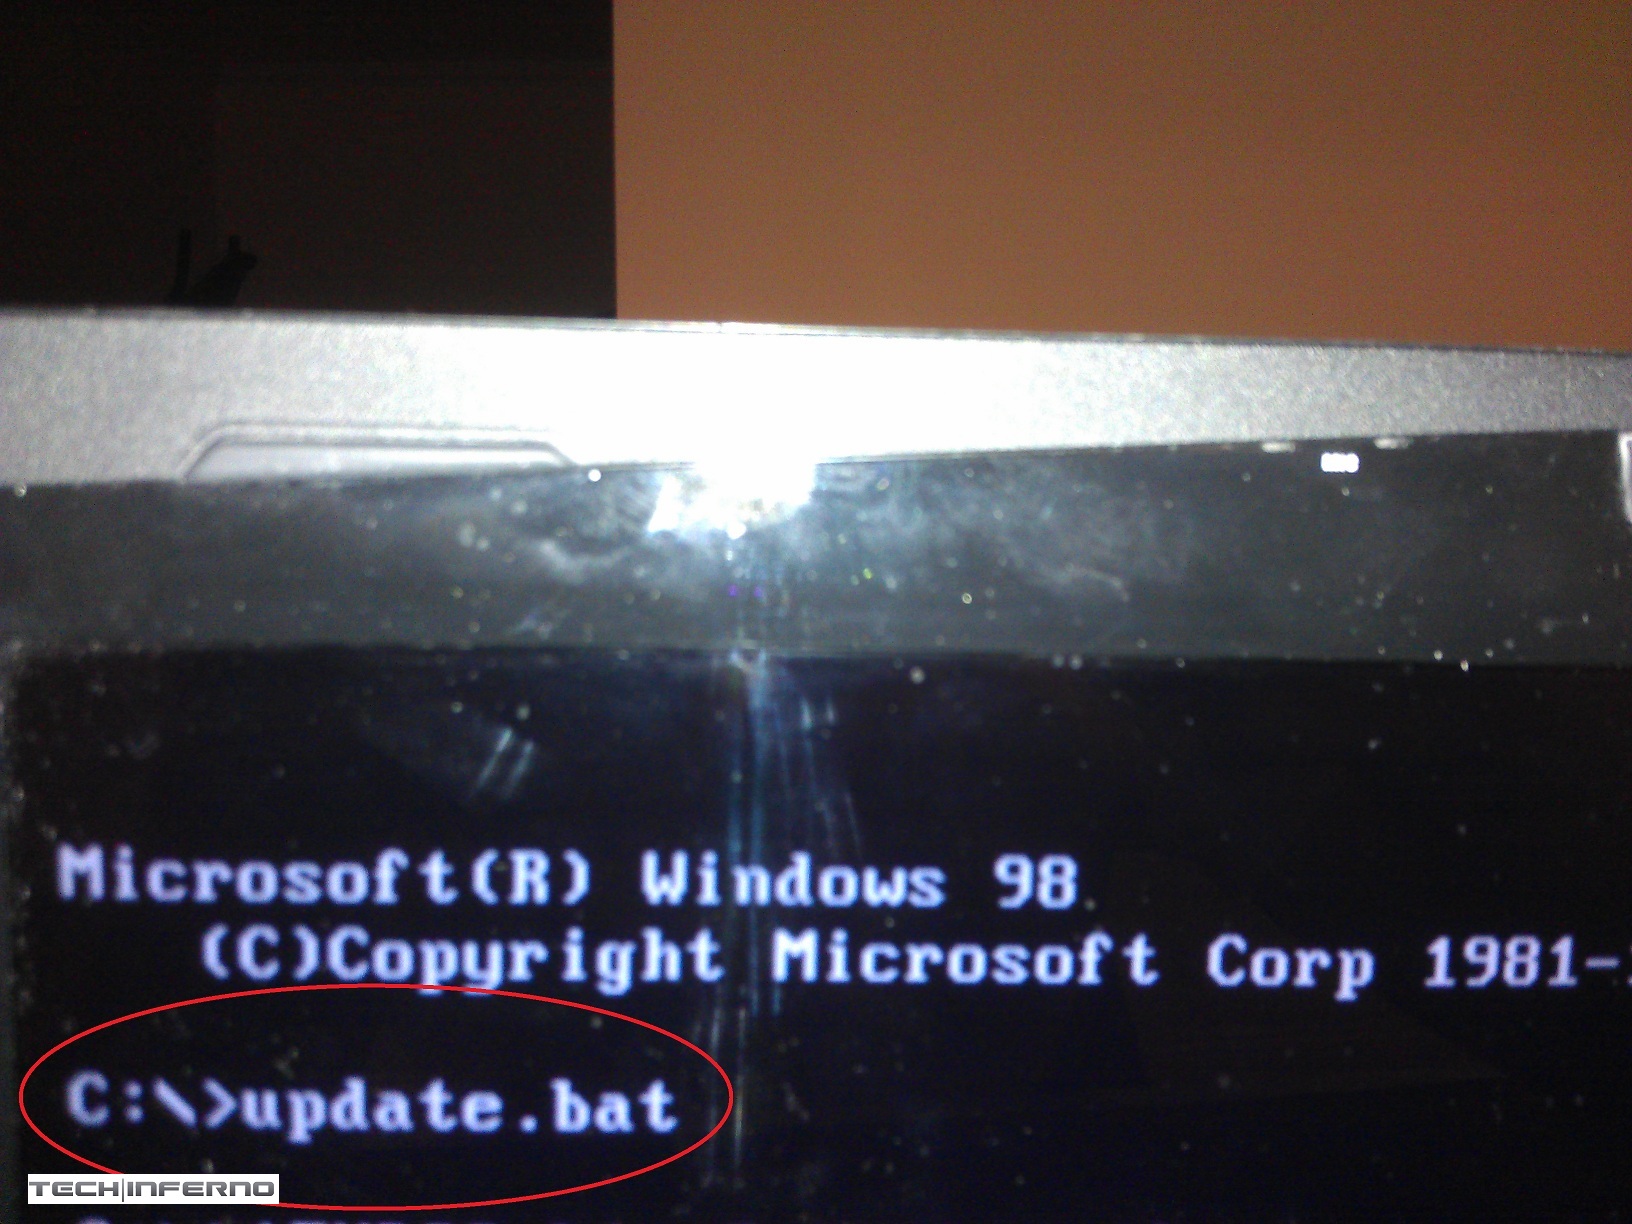
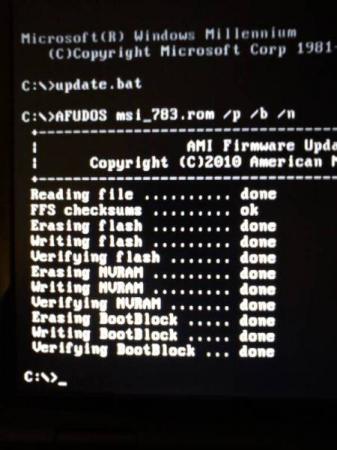
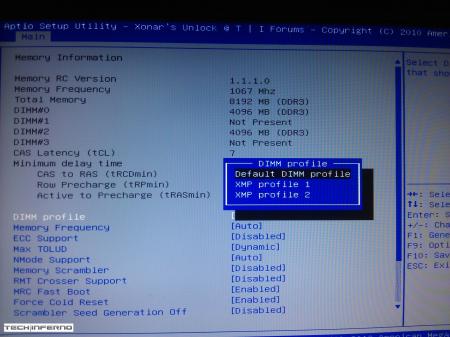
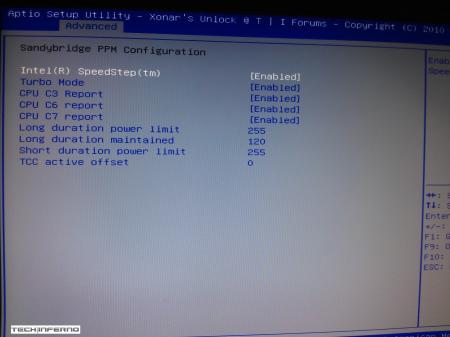
____________________________________________________________________________________________________________________________________________________________________________ *Note: This page is no longer updated, I am not taking requests anymore. Please do not PM me, because I will not respond. Other people have graciously posted their unlocked BIOS's within this thread, so you will have to do some searching to find the right one. I may come back to unlocked more later... I just don't have any time. Sorry. ____________________________________________________________________________________________________________________________________________________________________________ Welcome to my unlocked BIOS thread for MSI G-series gaming notebooks! Anytime you see an asterisk (*), it means that pictures for that part are included in the 2nd post. Introduction: In this thread you will find a list of MSI G-series gaming notebooks with their BIOS’ fully unlocked. Just about every feature that MSI has hidden is now available to be changed by the end user. This thread may be of particular interest to techies who love to squeeze every ounce of performance out of their notebooks or even the average person who is looking for a particular feature that has previously been locked. Should I Flash These BIOS? Anyone that owns one of the listed MSI G-Series notebooks is eligible. Who this does NOT apply to: - If you are afraid to brick your notebook, this is NOT for you. There is always a possibility for errors and accidents to occur. - If you do not understand what any or most of these acronyms mean, this is NOT for you. You will probably find little use for the unlocked features and the potential for risk is much greater than the reward. Who this applies to: - If you have an understanding of most of this thread and are willing to learn, continue reading. - If you are an enthusiast who loves modding and overclocking and have experience with this field, continue reading. Features: So what are these features that MSI had locked out? A short list would include: *- XMP RAM support (Up to 2133Mhz) [Warning: 4 DIMMs at 1866Mhz(+) may not be stable, 2 DIMMs are stable at 2133Mhz]. - BCLK Overclocking (Up to 5%, your mileage may vary, no guarantees). - TPL limits unlocked (With the combination of ThrottleStop, CPU throttling can be overcome). Necessary Tools & Knowledge: We’re going to need a couple things before we start flashing: 1. A bootable USB drive in DOS/ME/98. Guides can be found all over the internet. 2. The required BIOS file(s) for your specific notebook. 3. AC Adapter plugged into notebook. 4. Some common sense and bravery. Disclaimer: I claim no responsibility for any accident, damage, or brick caused by this, nor do I guarantee any technical assistance. Flash at your own risk. I am in no way affiliated to MSI, nor is MSI obligated to provide any support with these files. Proceed with caution! Your notebook's warranty will be compromised in the event of a repair! Redistribution of these files is not permitted without prior approval from me. You must contact me BEFORE you plan on hosting them. Thank you. Directions: 1. Add the three (3) files: "BIOS".ROM, AFUDOS.exe and update.bat to your flash drive. The root folder works best. Double check the READ ME.txt that you are about to flash the correct BIOS for your notebook. 2. Plug in USB drive and shut down your notebook. 3. Power on the notebook and during POST hit F11. This will bring up the boot menu, select your USB drive and hit enter. 4. In DOS, type:* This will start the flashing process. Warning: Once you hit enter, you CANNOT stop the flashing process. If you interrupt it via shutdown or remove its power source, you will brick your notebook with 100% certainty. 5. Sit back and wait for the process to complete itself. Note: Your fan will spin at 100% speed, it will be very loud. This is normal. Once your BootBlock has been verified and the command prompt comes back up, the process is complete.* Press Ctrl + Alt + Delete to restart your notebook and hit Delete to enter the BIOS. If your BIOS looks exactly the same as before and the flashing process came back with no errors, then you have to boot into Windows and shut down your notebook, NOT restart. Then check it out. Warning: The BIOS might reset the SATA mode into RAID. Please double check in the 'Advanced' tab that it is set to whichever mode you were using or else your boot manager may get corrupted. If this does happen, you will need to use your Windows 7 CD and repair the start-up process. Downloads: This part is under construction! More will be added. Taking requests as well. MSI Notebook Models: Version: Download Link: 1st-Gen Core-i Retail: MS-GX740(17''): 1.0F ms_gx740.zip Whitebook: MS-16F1(15.6''): 1.0L MSI 16F1 Unlocked.zip 2nd-Gen Core-i: Retail: MS-GT680/683(15.6''): .30Z MSI GT683 Unlocked.zip MS-GT780/783(17''): .30H MSI GT783 Unlocked.zip Whitebook: MS-16F2(15.6''): 3.05 MSI MS-16F2 Unlocked.zip MS-1761(17''): 3.06 MSI MS-1761 Unlocked.zip 3rd-Gen Core-i: Retail: MS-GT60(15.6''): .30M MSI GT60 Unlocked.zip MS-GT70(17''): .30M MSI GT70 Unlocked.zip Whitebook: MS-16F3(15.6''): MS-1762(17''): 3.0G MSI 1762 Unlocked.zip AMD APU MS-gx60(15.6'') 3.05 SecondGenAMDAPU.zip Recovery: Directions for making your notebook function properly if you encounter any errors. Case 1: In case of a GOOD flash, but you still cannot enter BIOS or boot into Windows: Common symptoms include: Endless looping reboots, inability to access the BIOS, permanent black screen, persistent BSODs in Windows or stuttering. The most likely cause was that your image was successfully overwritten, but some values may have changed internally and the BIOS may be having a hard time accepting them. If everything was a success and your notebook boots into one of the situations mentioned above, before trying a blind-flash recovery, UNPLUG the wire leading to your CMOS battery for 5-10 seconds.* This will RESET the stored values in the BIOS to their defaults. If this does not solve the problem, then a blind-flash will be required. Case 2: In case of a BAD flash, a blind-flash will be required. 1. Remove any files from your USB that aren't the necessary bootable DOS files. 2. Pick a ROM you want to flash (doesn't have to be the original), but it MUST be one for your notebook specifically. 3. Rename the file.ROM to AMIBOOT.ROM and put it on your flash drive. 4. Plug in your flash drive in a USB 2.0 slot. 5. As soon as your notebook turns on and nothing is displayed, spam Ctrl + Home (In my case, the MS-16F2 is Ctrl + Fn + PgUp or Ctrl + Shift + NumPad 7). 6. You should hear four (4) beeps and the BIOS should begin flashing itself. --------------------------------------------------------------------------------------------------------------------------- Redistribution of these files is not permitted without prior approval from me. You must contact me BEFORE you plan on hosting them. Thank you.2 points
-
Tech|Inferno reviews the top two GPU contenders in the mobile gaming world. The post AMD 7970M Xfire vs. nVidia GTX 680M SLI Review appeared first on Tech|Inferno. More...
 2 points
 -
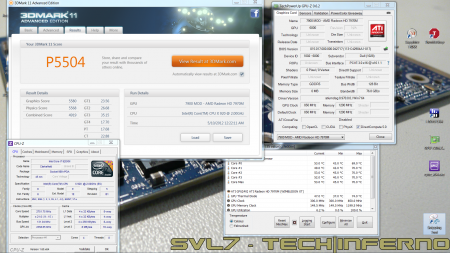
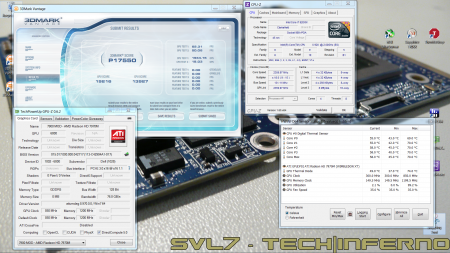
Excellent write up @Brian, [MENTION=119]Mr. Fox[/MENTION]. Some interesting results you guys have compiled there. Only complaint is to try to keep the colors the same in the charts throughout. In the Sleeping Dogs chart you have blue=min, red=avg. But then you switch it up for the rest and have red=max and green=avg. I suggest keeping them the same throughout as it confuses the reader when he/she has to re-read the legends in the tables (i.e. keep blue=min, red=avg and green=max throughout). Otherwise nice job you two.2 points
-
I also find taking out the DVD-Rom drive helps as well as using a old simcard. Just becareful with the S-Bar as you can break the clips. I have removed my S-bar a few times now swapping not only the wifi but releasing the keyb2 points
-
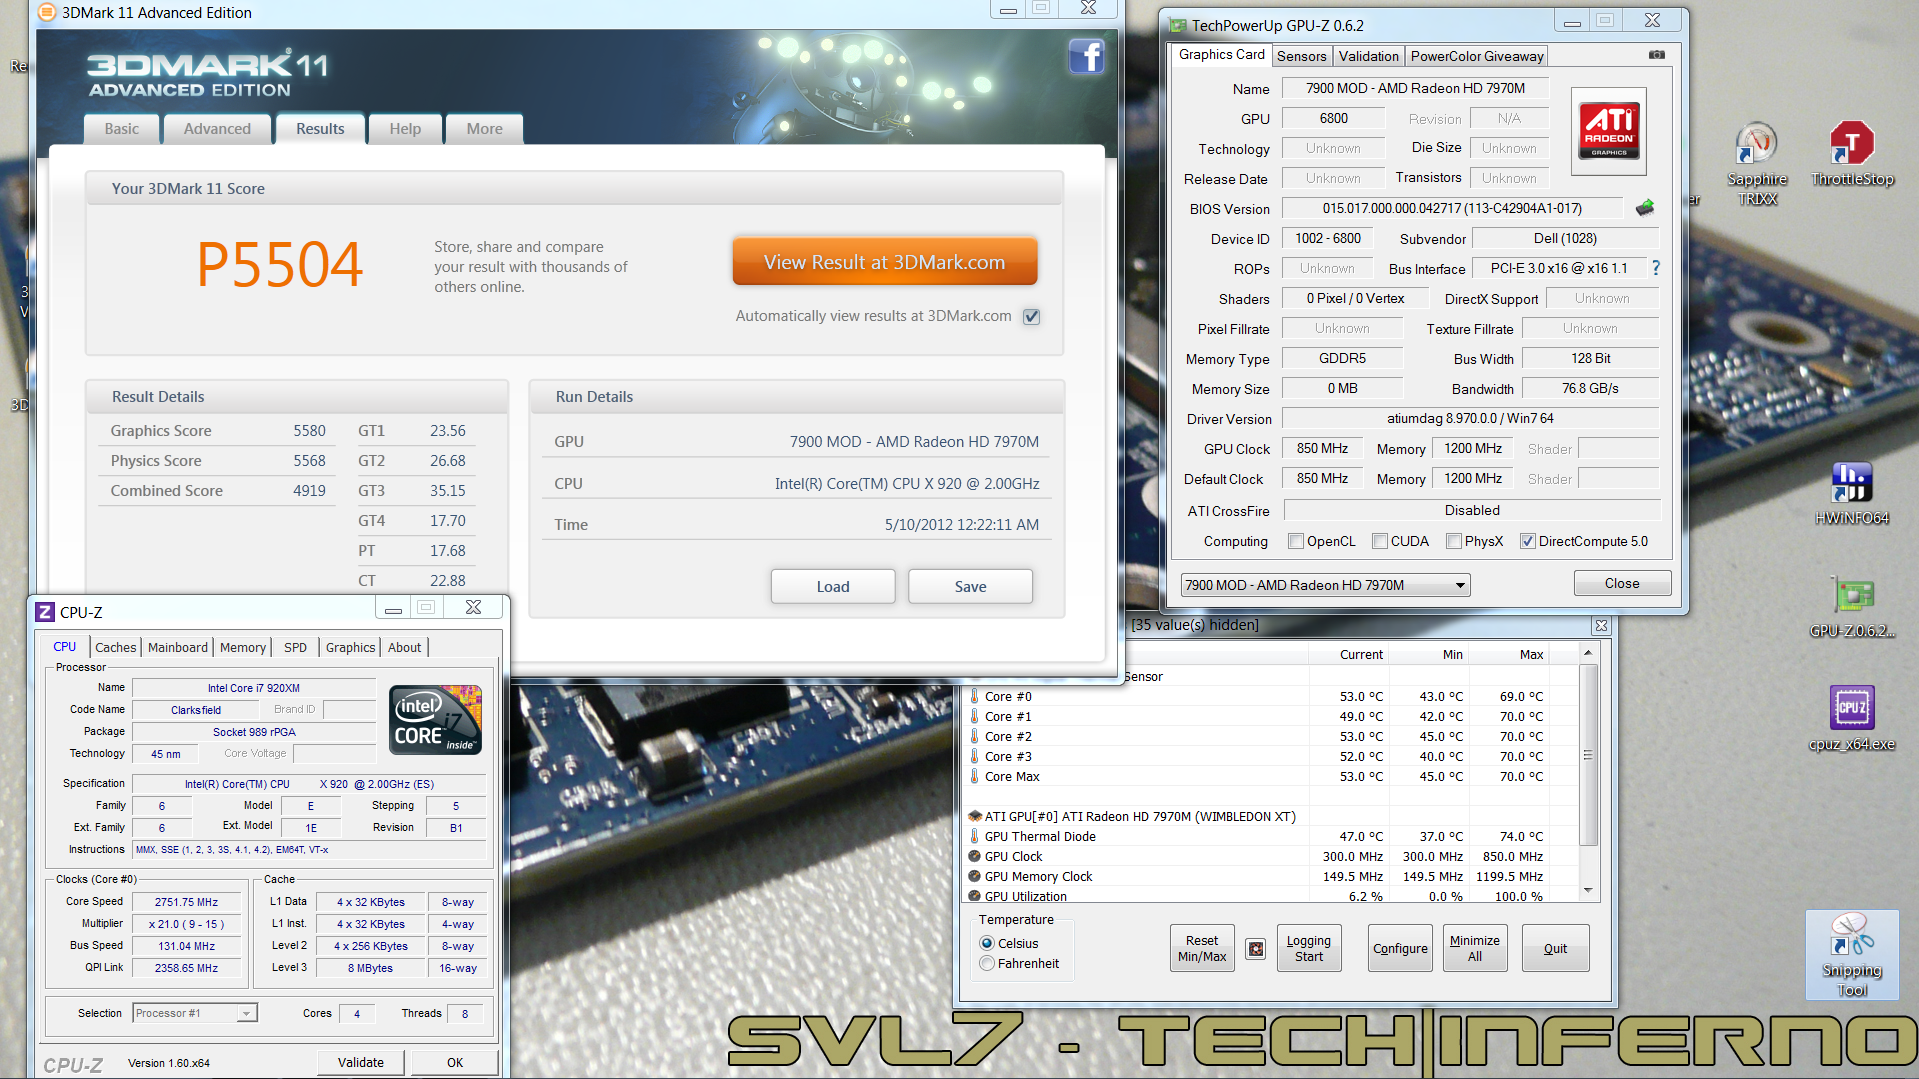
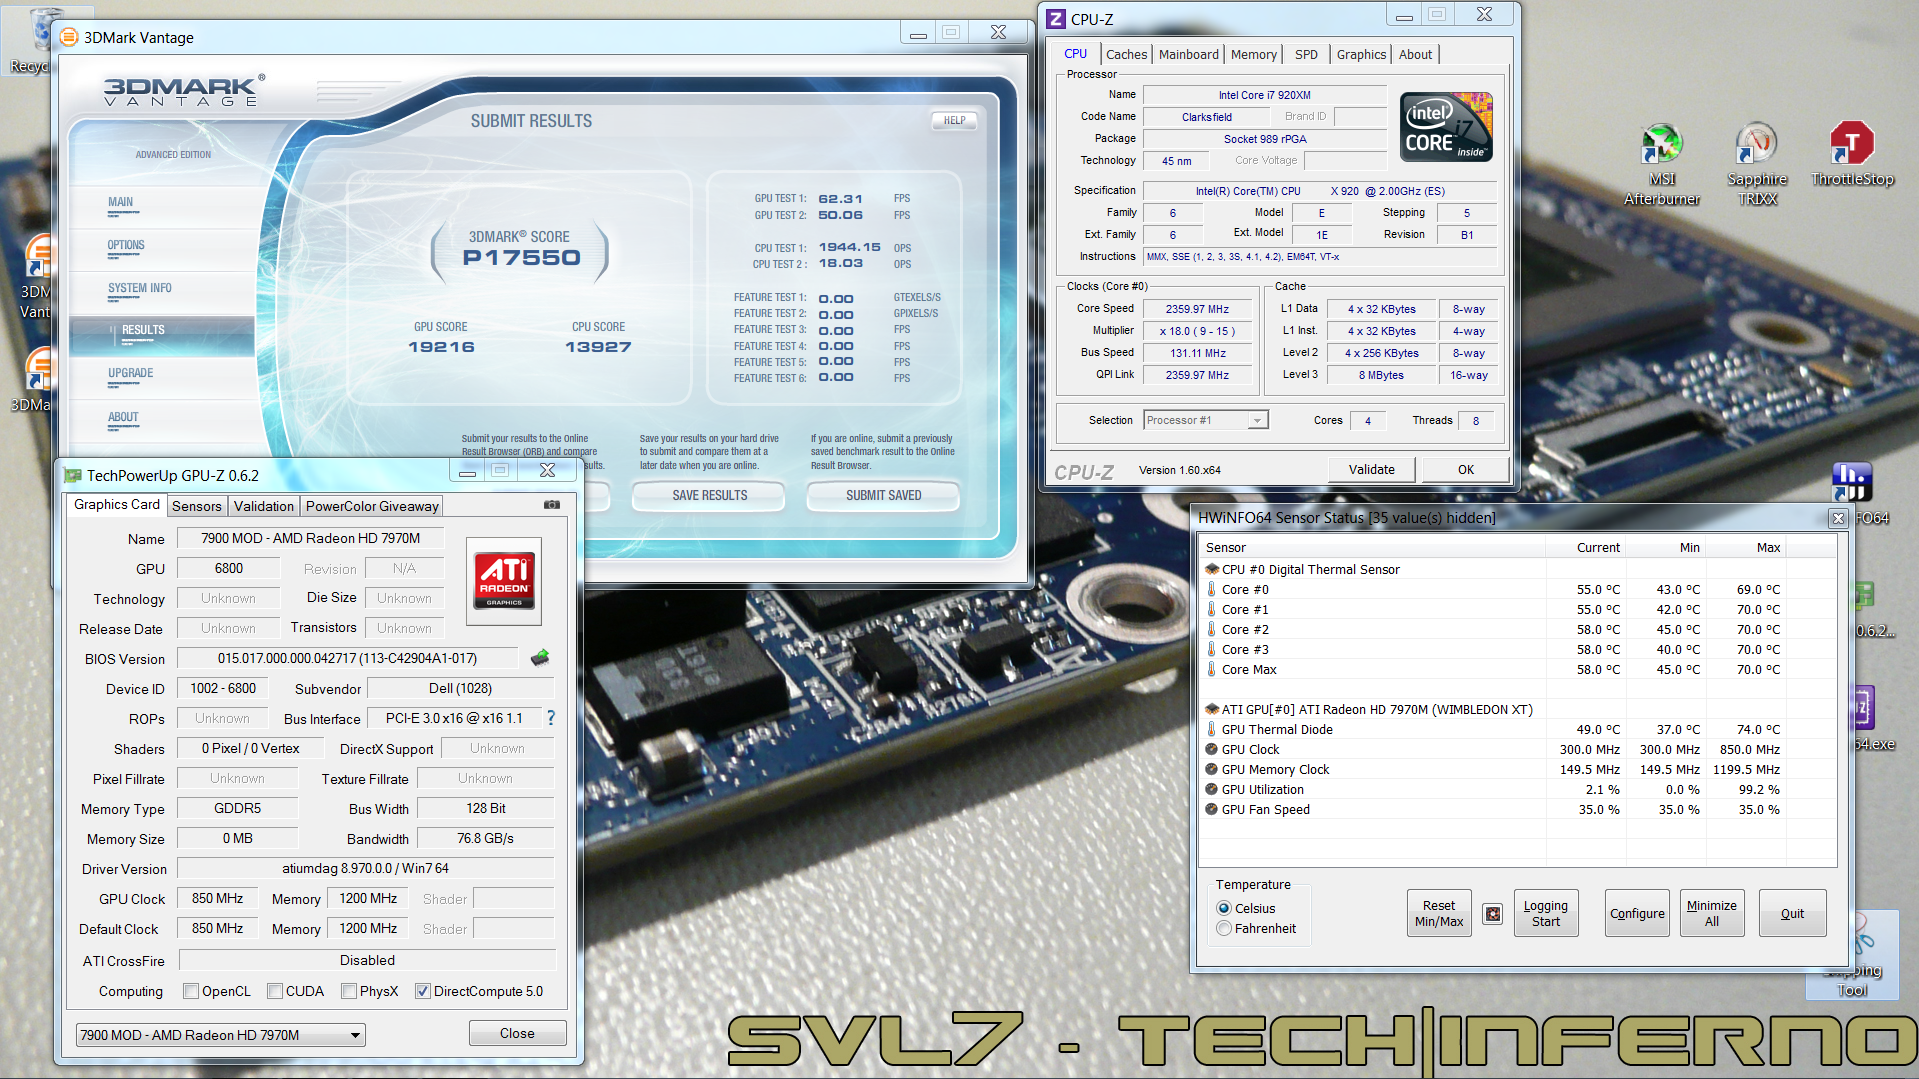
Got my Dell 7970m (ES) today... and so far it rocks! Native fan control, runs cooler than the 6900m series, and it simply kicks ass. It's pretty much plug-and-play, no issues so far, though I will need to continue the testing (and benching ). Only did a Vantage and 3dM11 run so far, with GPU and CPU at stock, Tess on, check it out, hehe: Confirmed for the Dell 7970m (part nr. 747M2) in the M15x: Fan control is working properly Sound per DisplayPort / HDMI is working GPU clocks and performs as expected Possible issues: The card runs slightly warmer than the officially supported cards, due to it's higher power draw. This also leads to less overclock headroom. The card works fine even if you have an i7 920XM in your system, but if you overclock the CPU too hard, the GPU voltage drops, resulting in a drastic performance drop. (This is actually not directly caused by a power limit due to the PSU... the CPU can draw as much power as it can get, but it seems that when the CPU draws more power than usual, the GPU voltage supply somehow doesn't get provided anymore with enough power, even though there's headroom power-wise, it's probably caused by the circuit design of the mobo). Things to do before changing the GPU: Download working drivers. At the moment you can either get the drivers of the M17x R4 from Dell, or the modified, but actually more recent (12.5) from "benchmark3d". Get some thermal paste, e.g. Arctic MX-4, or Prolimatech PK-1, or whatever you prefer, you'll also need something to clean the GPU die and heatsink, isopropyl alcohol or similar will do. I highly recommend using an ESD mat and wristband whenever working Get familiar with the upgrading procedure, respectively disassembling the system. Refer to the M15x service manual if you need help, or to this pictured guide which explains how to replace the GPU in the M15x. The upgrading procedure: Uninstall your GPU drivers. Make a power drain (Turn off your M15x, remove the power cord and the battery. Then press and hold down the power button (Alienhead) for about 10-20 sec. Remove your GPU - Here's a little guide with pics in case you need some help. Clean your heatsink, if necessary replace the thermal pads with new ones. Make sure the 7970m has the correct backplate on it. Insert your GPU, make sure that it sits properly. Apply the thermal paste, and attach the heatsink. More to come.
 1 point
 -
I m currently using Alienware M14 R2 with GT650M GDDR5, i heard that it is possible to flash GT650M into GTX660M without any problems. Hence, i have tried using different version of NvFlash to get it done...however still unable to get it done. Am i missing something in order to flash it? Is there any other programs besides NVFLash? Thanks in advance1 point
-
You would need to boot intel graphics for this to be un greyed.1 point
-
working great now, could of just been i was too friggin baked, hahah
 1 point
 -
So I have some news for those waiting for the 680MX to arrive. I've been informed by our vendor that 680MX is an exclusive part for Apple, it won't be available to other parties.1 point
-
Two different classes of notebook. 675 is going to be much more powerful than the 650/660. The 650 does a great job at most games at medium level at 1080p and high levels at 720p. I just prefer the quality of Alienware. Good luck, StevenX1 point
-
Well, some of the throttling seems to be power related. My guess is that they put a function in the vbios which calculates and monitors the power draw, might depend on several factors. Of course there's also the temp throttling, but you really shouldn't run into this, even in the M15x temps aren't an issue. Should allow you to overclock per software, with a higher limit than +135MHz iirc. I think it's all described here already, guess I should clean up the title posts when I get the chance.... OCeditionNew is stock, but should allow overclocking per software on any system, as just mentioned above. The other one is outdated. Subsystem ID mismatch doesn't matter. The tweaks I've done in the files you mention won't work in the vbios you posted. Not sure why your system doesn't work with it, that's odd. I can do a more moderate mod on the OEM vbios, that should work.1 point
-
Wow, great article guys. I was kind of outdated concerning graphic cards, but now I know what to buy, if I had spare money. ConkersGrillforce1337 posted a windows 7 windows 8 performance comparison yesterday. Would be interesting to see if this has the same effects on your benchmarks.1 point
-
Flashed without Problems Now i have to thank xonar and check the new options and how they work
 1 point
 -
Only is posible of A05 > A08 or A09 but not unlocked BIOS -A08 > A08 stock. Enviado desde mi GT-I9000 usando Tapatalk 21 point
-
Yep, and our cards do go over the limit when over clocked....just not exactly sure how much though.1 point
-
That version is overvolted and will probably throttle. Hence why I asked for the 900 core with no other changes, I think all these changes to OV and OC and all that just make the Dell card worse. The best bios IMO is the 850 no other changes and several people reported that 900 was stable at stock voltage. It will certainly depend on each persons card but I bet a large majority will be able to run 900 stock voltage and perhaps get no throttling. Of course, if you have a laptop that can software OC you can try it, just use the 850 no other changes bios and use EVGA Precision to add +50 to the core offset. It should be the same as flashing the bios and would let you test stability, I cannot do that because I am using an M17x R3 which does not do software OC at all on the 680m. It could be good for people who can't do standard 900 stable, if he did 875 as well then we would have 850, 875, and 900 which would represent basically the full range of "safe" (stock voltage) overclocks for people who want the free performance boost all the time. The 850 bios is already pretty sweet, just a nice performance boost with no downside.1 point
-
Overall, unless you need a notebook really urgently, I would wait a few more months, as there is a good chance you might get one with a 4k display... Apparently, Intel will showcase some of those notebooks in mid January 2013 in Beijing!1 point
-
mww86, Michael, StamastiX & svl7- Thanks for the warm welcome everybody! This type of "welcome" coming from you "highly respected guys" makes feel quite at home. Can't wait to start hitting the threads that will help me on my current M17xR2 build. It was initially supposed to be a somewhat long-term plan it terms of doing the upgrades, but I guess I was bitten by the "upgrade bug", as I've deviated from my plan and somewhat sped things up. LOL! I guess this is what sometimes happens.1 point
-
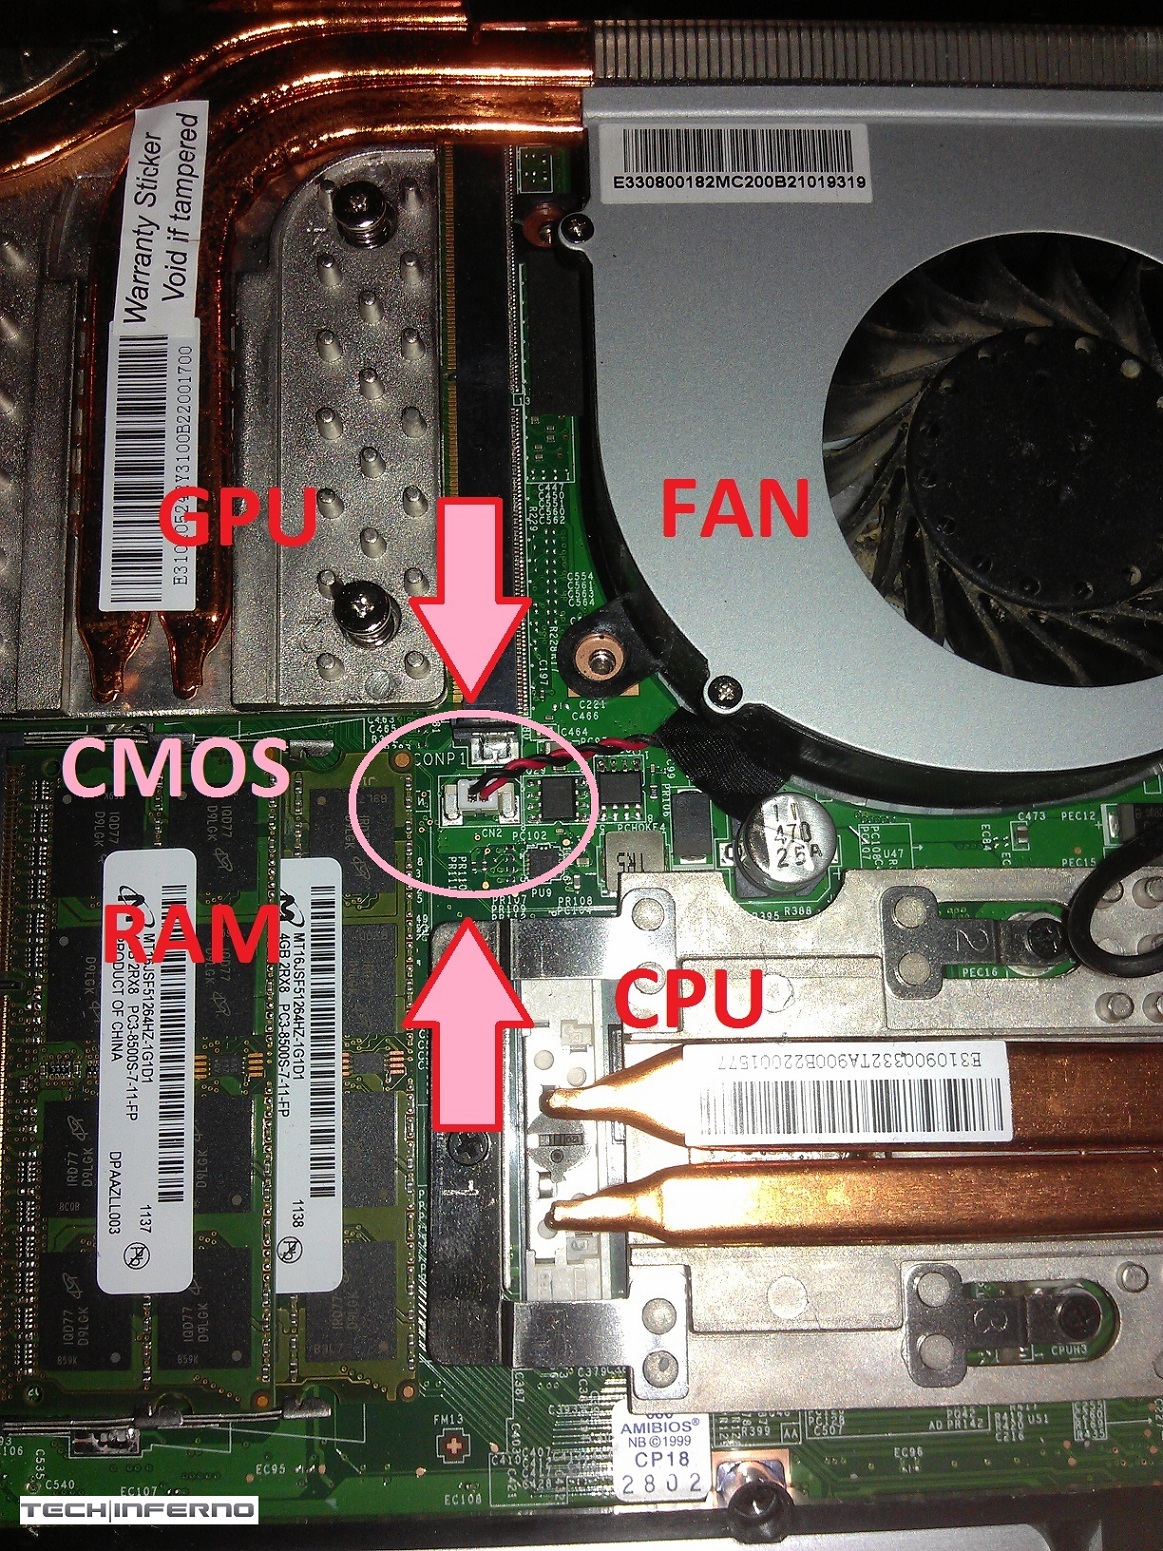
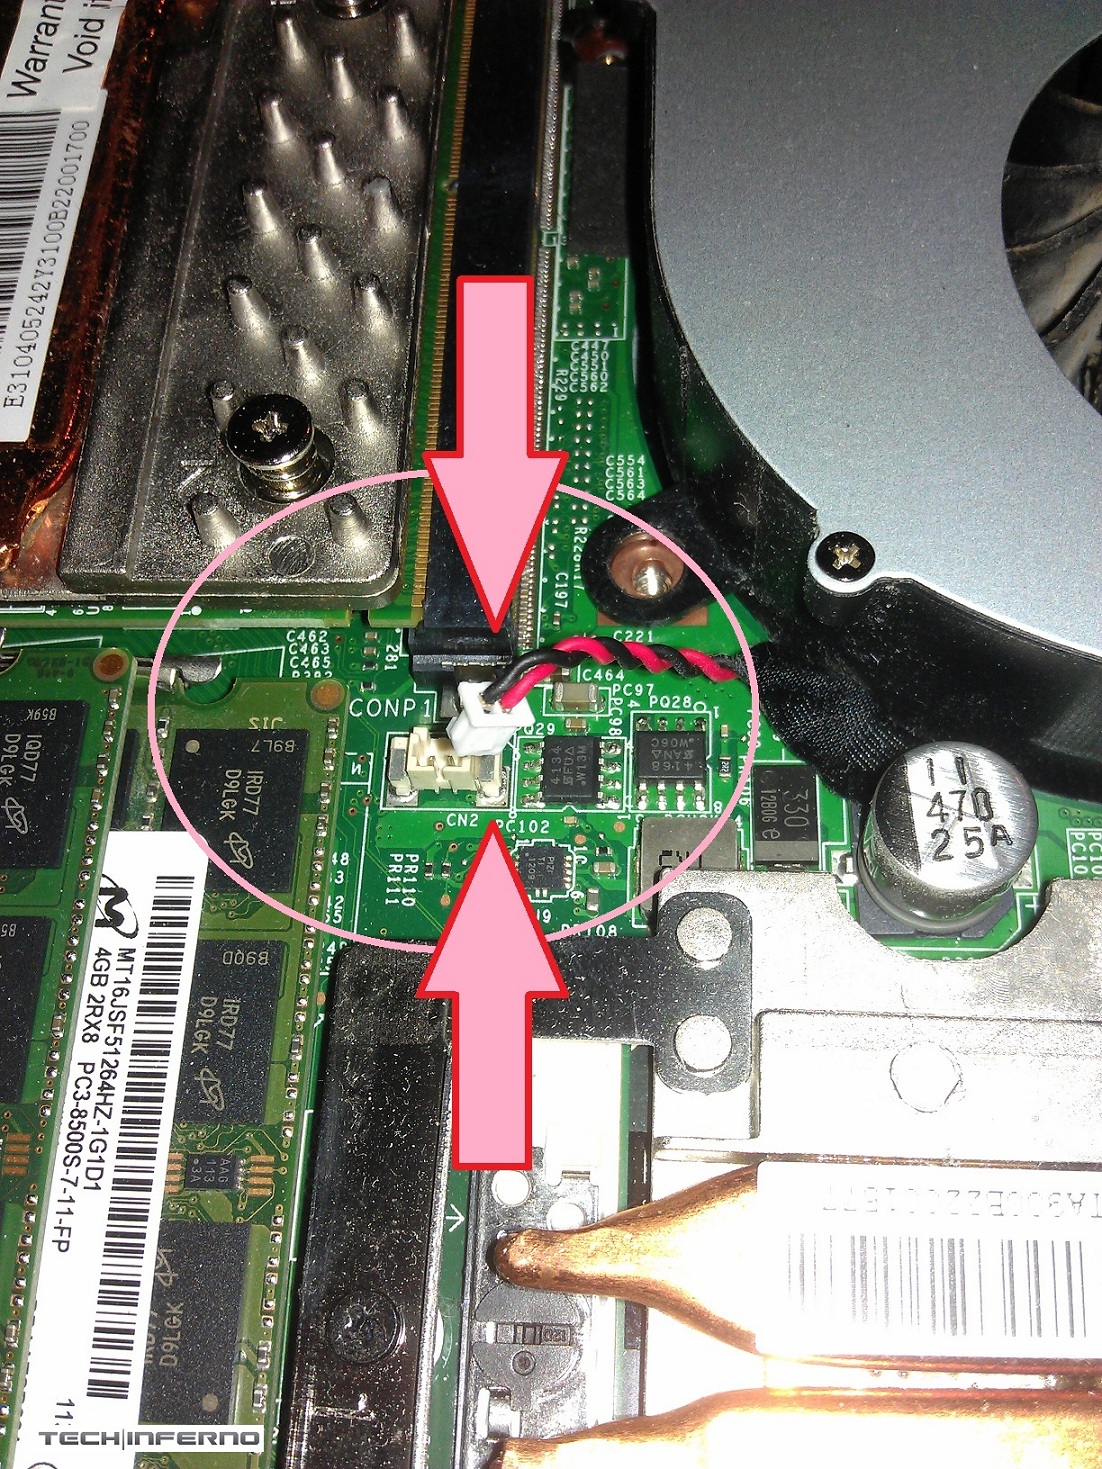
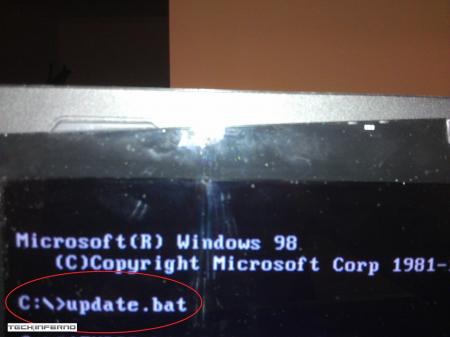
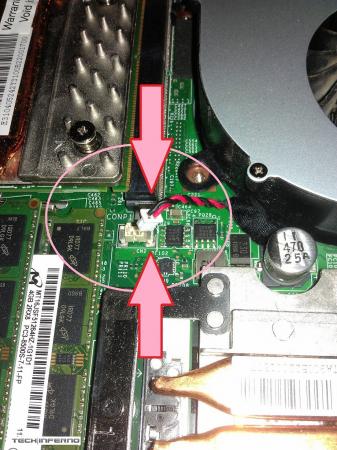
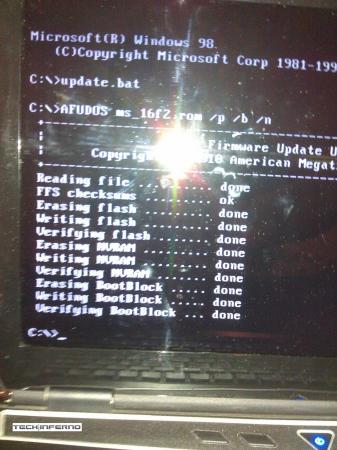
Pictures: Flashing Process: BIOS Options: Resetting CMOS Battery & Clearing the BIOS:


 1 point
 -
The m14x R2's SSD is an mSATA SSD. It is replaceable/upgradeable. And you can load Windows onto it if you want. The way the mSATA SSD is configured from factory is as a cache drive. That means the SSD will act as a kind of RAM to boost the speed of your regular installed hard drive. You can change this setting to make the cache drive into a regular partitioned drive, but I wouldn't advise it on an mSATA as small as 32GB. You can always remove the stock SSD and install a bigger one. The mSATA SSD is located under the battery, just to the left of the WiFi card. Here is an example of a larger capacity mSATA SSD; it has more than enough room for windows to be installed on it. Newegg.com - Crucial M4 CT256M4SSD3 mSATA 256GB SATA III MLC Internal Solid State Drive (SSD)-1 points