Leaderboard


Popular Content
Showing content with the highest reputation on 10/19/12 in all areas
-
. So... Dell/Alienware managed to confuse a lot of users with their latest BIOS updates from last week. Version A08 of the M14x R2 as well as the M17x R4 and also A07 of the M18x R2 made a quick appearance on the Dell support site, only to vanish again shortly after - apparently to be replaced with A09 respectively A08. To make the confusion perfect, Dellienware once more decided not to publish any change log, not even a tiny bit of useful information. (I already bothered some Dell reps with this, but no success so far... they're always telling that my emails will be forwarded to the proper people...). Anyway, even though severe, I don't want to discuss the change log problem at this place. So what's up with those new BIOS? It's hard to miss that some numbers are missing between the last bios update and the current releases. Anyone who's slightly familiar with software updates and naming will realize that this is already and indication that quite some changes have been made - obvious, right? Huge parts of the firmware got revised and new modules were added as well. To keep it short, the bios (or UEFI to be more precise) is now officially Windows 8 ready. You may have already read that Microsoft requires the OEMs to have certain functions in the UEFI available (namely Secure Boot) in order get the systems 'Windows 8 certified'. Just to quickly clarify something, you don't need a 'Windows 8 certified' machine in order to run Windows 8, neither do you require Secure Boot, but the OEMs are pretty keen on this certificate as customers seem to prefer systems with certain stickers on them. What's this Secure Boot stuff? And how does this affect me? Secure boot is a protocol, a part of the UEFI, designed to ensure that a system gets booted in a so-called trusted state. This means a state that is known to be secure, that the firmware code has not been tampered with and is a direct copy which comes from a trusted source (e.g. the manufacturer of the used UEFI variation). Secure boot handles this with a system of different functions and interfaces as well as a key system. It makes sure that all external images have to pass a predefined authentication before they get executed. It is designed to prevent attacks which target the firmware to OS handoff. What secure boot won't do is protecting the firmware from direct attacks, e.g. manipulated bios updates and similar ... and this is where we come to secure firmware updating. Some of you may have noticed or read that coming from an 'old' bios version it is no longer possible aynmore to (easily) downgrade to an earlier version once you have flashed A08/A07 or later. This is because Dellienware decided to implement a way to verify firmware updates, in the case of the Insyde UEFI it is 'secure flash'. The UEFI image, the drivers which are required at boot etc. are all digitally signed. Now if you want to update your BIOS, this is what happens (simplified): - Flash utility checks the firmware image for integrity. - If ok, the image gets sent to the system - System reboots, starts the pre-uefi environment and starts the authentication process on the file which is to be flashed - If this check passes, and only then, the software environment for the flash gets launched, firmware gets updated. I have to admit that secure boot without implementing a method for secure firmware updating makes pretty much no sense at all, so it's obvious that this would come sooner or later, especially with Microsofts requirement for the Win8 certification. The consequence of this is that the user gets locked out of his own system. A (hobbyist like me) is no longer able to tweak the firmware of his system in order to use hardware the way he wants. Same goes for benchers, power users, hardware enthusiasts etc. who like to flash a modified bios in order to get access to disabled settings or activate certain CPU extensions which the system manufacturer locked out. The digital signing which gets used in UEFI is really sophisticated, so don't even ask about creating own signatures or revers engineering it. This is the end of bios modding (and especially easy flashing) as we know it. While I have hope that it will be able to find some workarounds for the current AW systems, I have reasons to believe that it will be much more difficult to achieve this with a system which comes with the secure boot function implemented by stock. One thing is for sure, if you intend to use a modified firmware, secure boot needs to be disabled ...but it is obvious that the issue with the secure firmware update (in our case 'secure flash') persists, even with secure boot turned off (for the reasons mentioned above). I don't want to read all this / To much technical details, what are the conclusions of all this for me? Do you use / want to use a modified bios on a current AW system (M14xR2, M17x R4, M18xR2)? If no - doesn't really matter for you, just go ahead and update to the latest bios which Dell provides for your system. If yes... - If you're still on an 'old' BIOS (pre-A08/A07 when looking at the official releases) then you can for example stay there and flash forth and back between a modified and stock bios, as long as the stuff you flashes predates A08 respectively A07 (again, I'm only talking about public, official releases). If you want to update to the latest version, keep in mind that you won't be able to easily downgrade anymore once you're on one of those new bios. You won't be able to easily flash a modified version either, unless you directly flash a modified when coming from an 'old' bios. In this case the mod will flash fine, but the consequences are the same, you won't be able to downgrade anymore easily, neither will you be able to just flash a newer modified bios. And if you already flashed a unmodified new bios and want to get a modified one... shit happens. Contact me in the corresponding thread of your model and we might be able figure out something. Let me know if you have any questions, some explanations might not be sufficient if you're not a bit familiar with all this stuff.2 points
-
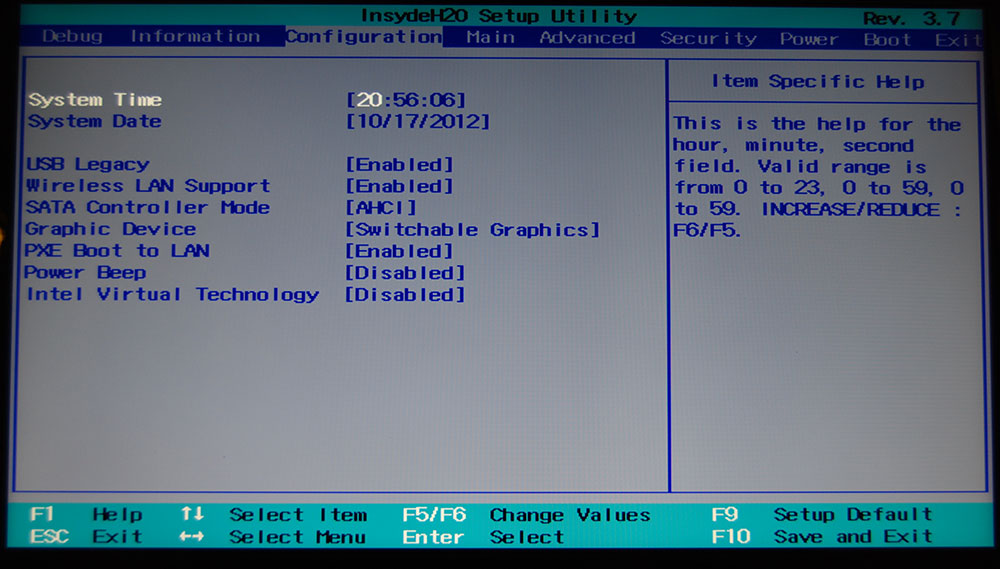
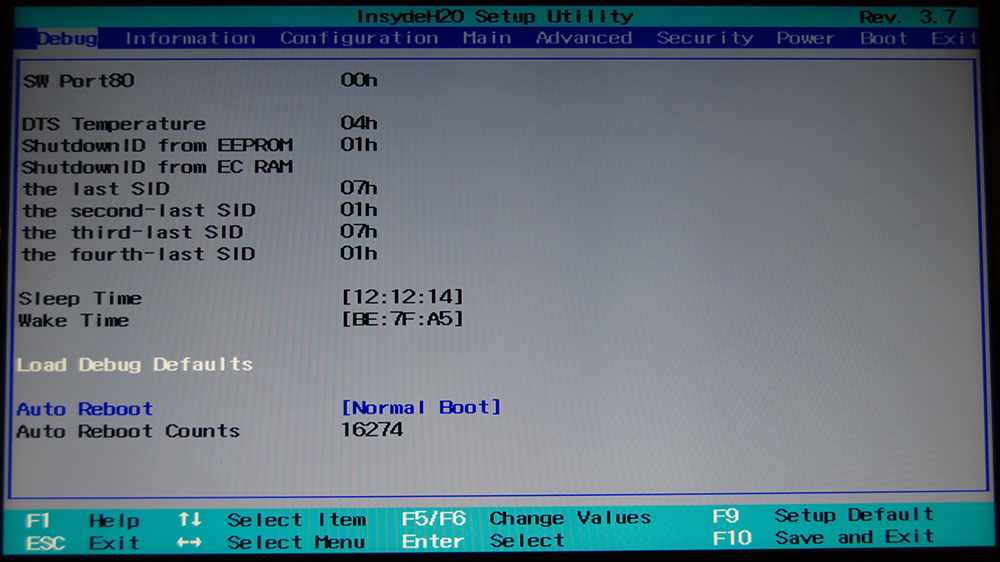
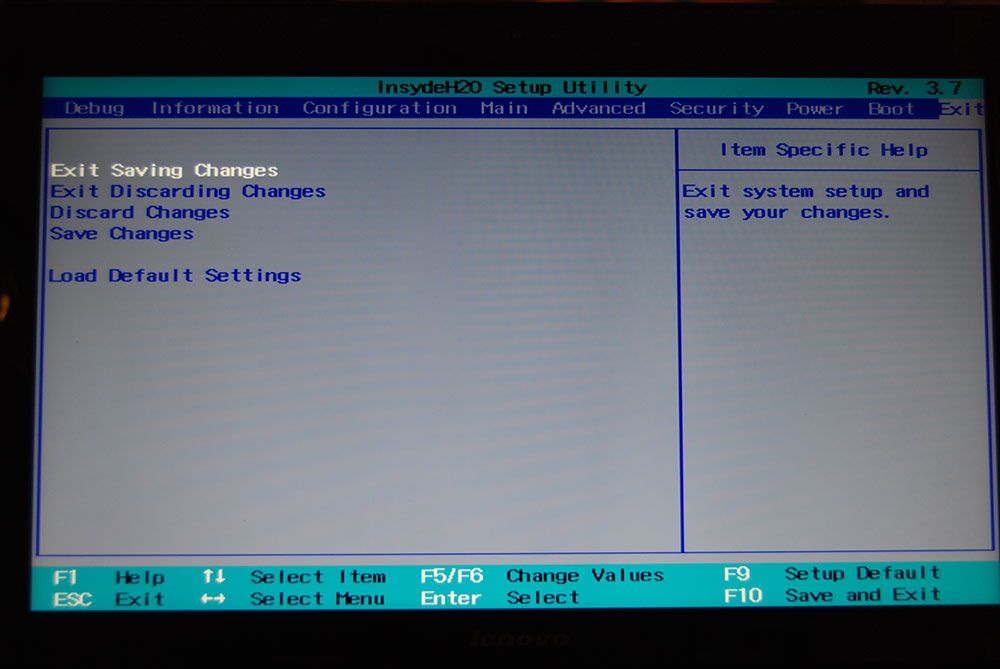
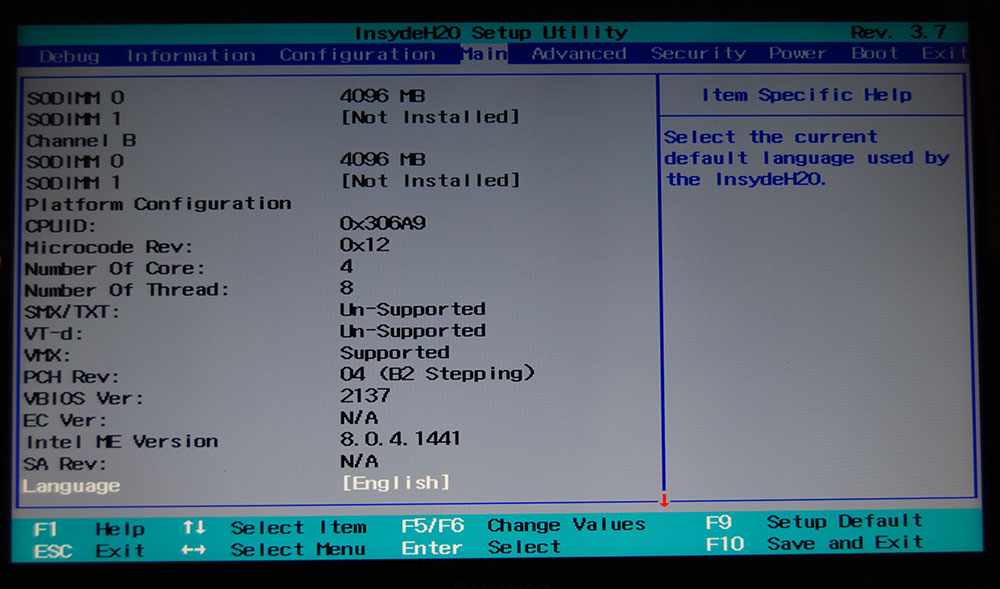
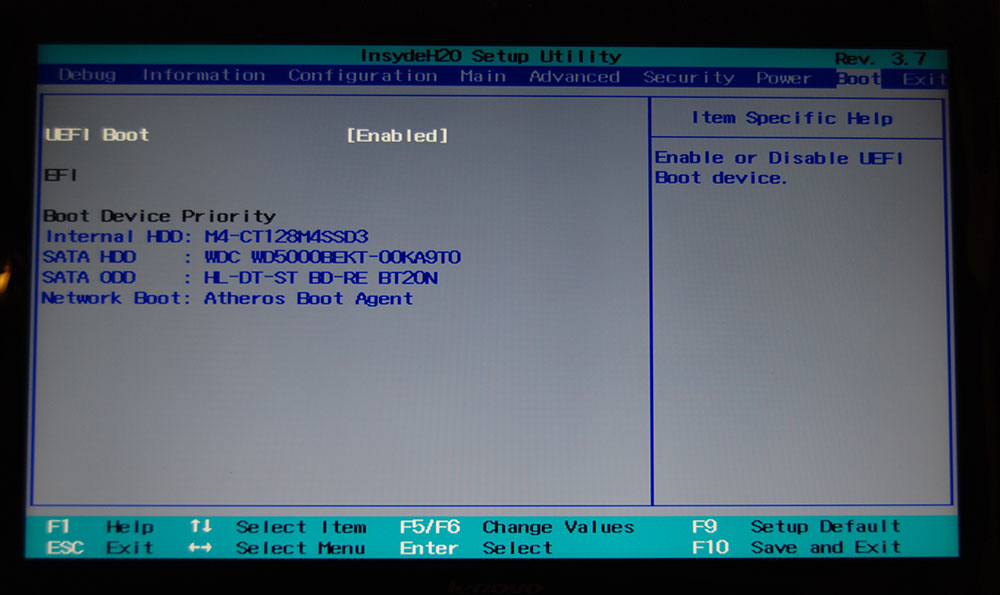
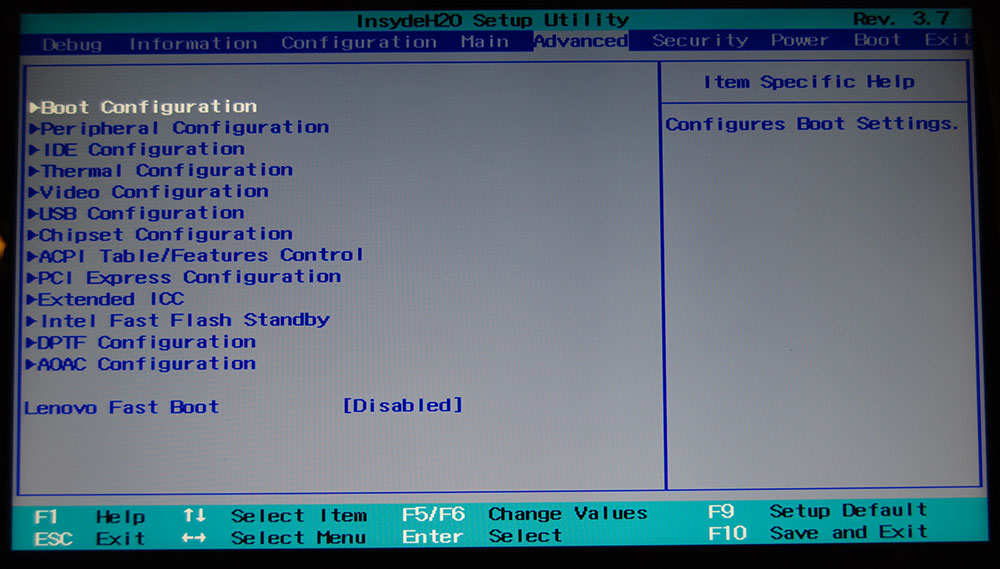
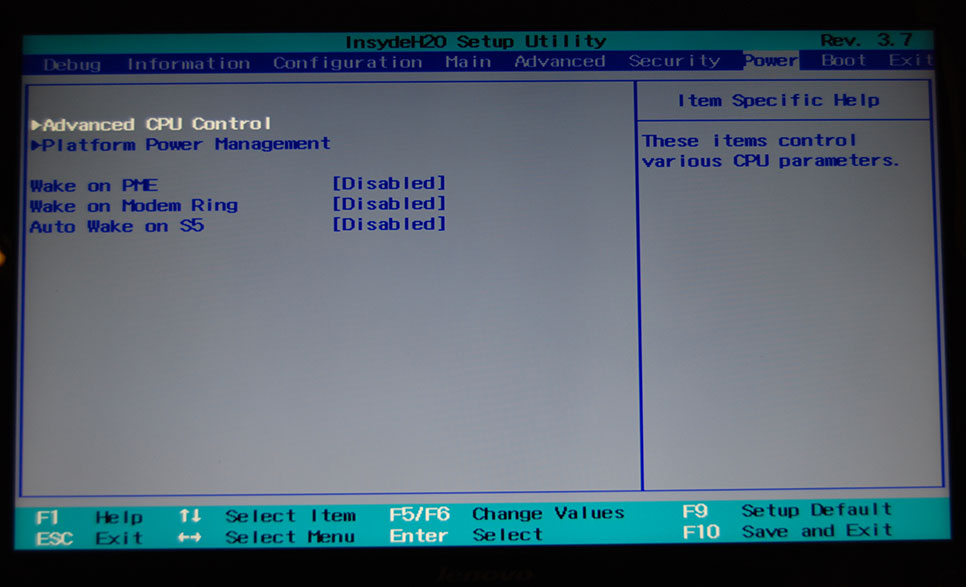
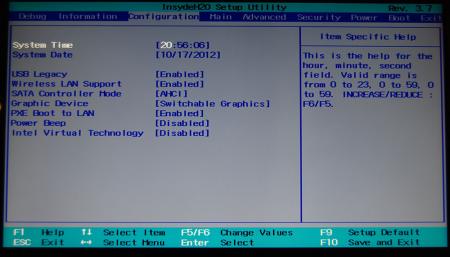
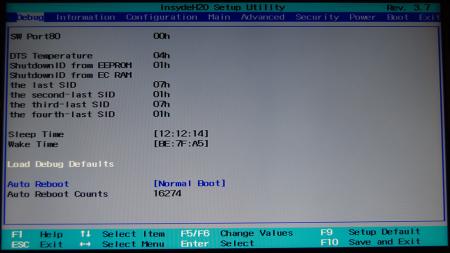
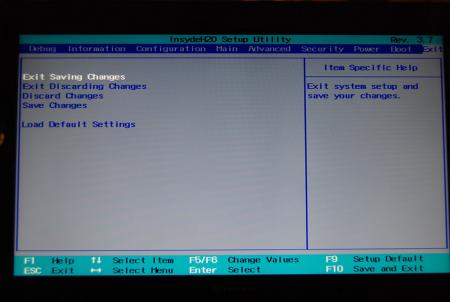
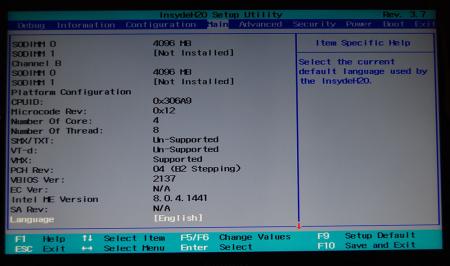
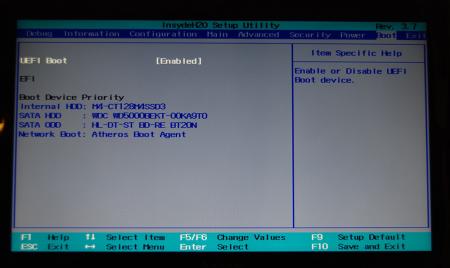
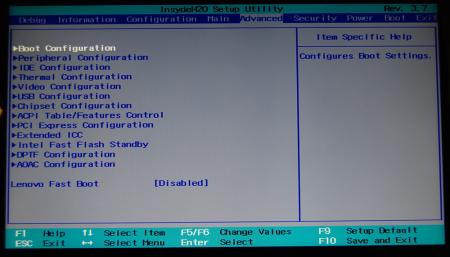
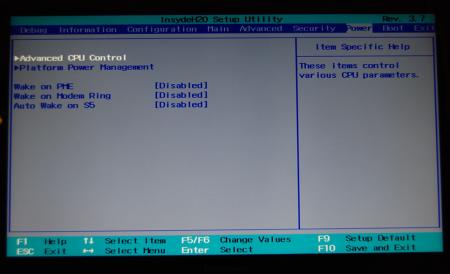
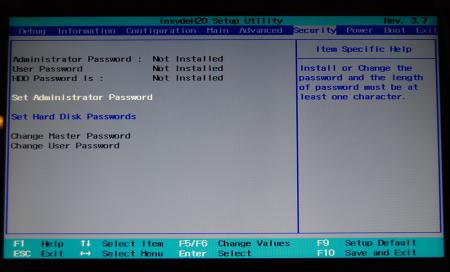
Hey all I have new pics. video config thermal config advanced cpu control IDE config > HDC config has 3 options: IDE - AHCI - RAID good if someone want to RAID a msata with a regular SSD... but not sure if it work2 points
-
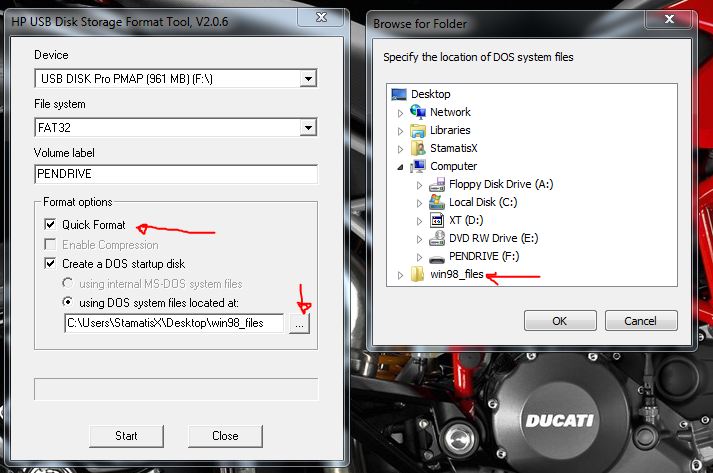
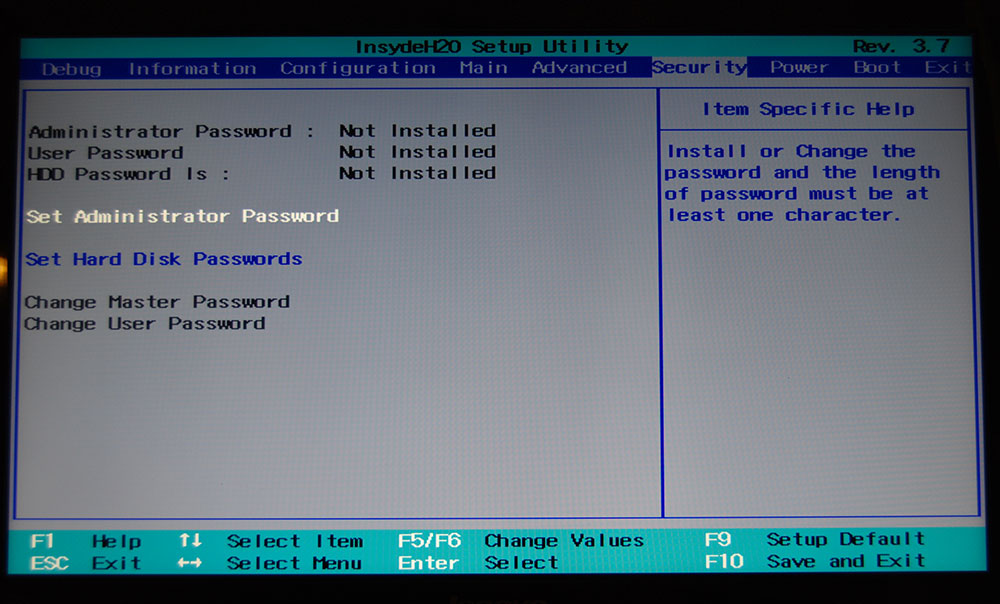
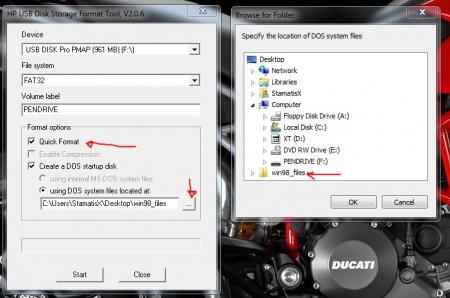
Lenovo Y500 - 'unlocked' BIOS / wwan-wlan whitelist removal The Lenovo Y580 / Y480 comes with a pretty locked down BIOS, and in addition to this with a whitelist which prevents the user from getting 3rd-party wwan/wlan cards to work properly. The modified BIOS versions here will take care of this. Keep in mind that not necessarily all options available in the modified bios will work. Some might not do anything at all, others could possibly leave your system in a state which will prevent it from booting. Use care when changing stuff in the modified bios, don't touch things you're not familiar with. Use all the mods and software posted here on your own risk. NOTE: This will only flash the bios region. It won't reset the nvars set in the bios. While it is technically possible to update from v2.0x to v8.01 by using the method described below, I can't really recommend it since the EC of your system won't get updated. While it might work (possibly even without any issues) I can't recommend it. Therefore if you're on v2.0x and want to update, the better option is to wait until Lenovo provides an official 8.xx firmware update with EC and BIOS. You can then still flash the modified version as described below, once you're on a proper v8.xx firmware. Attached you'll find a modified version of the Y580 / Y480 BIOS v8.01 (5DCN90WW). ----------------------------------------- >> For users with a v2.0x BIOS: << Download links Old version: Current 2.0x version: Lenovo Y580 / Y480 BIOS v2.07 (5DCN40WW) -> unlocked, whitelist removed, Nvidia 660m @ 1GHz default 3d clocks Flash with the included InsydeFlash utility. ----------------------------------------- >> Instructions for v8.0x BIOS users: << The attached BIOS ("Lenovo Y580 - Y480 BIOS v8.01 (5DCN90WW) - Mod") is unlocked, whitelist stuff removed and the 660m is tweaked to 1GHz default 3d core clock. The only way I know of which allows you to flash the modified BIOS for v8.01 users does unfortunately also describe certain information which you don't want to loose (serials, Windows licencse etc.). Don't worry, I got it all sorted out, but due to this the flashing procedure is a bit more complicated than usual. Make sure you follow the instructions carefully. Download the flash tool, for flashing you'll need the DOS version, but for creating the backup of your current BIOS the Win64 version will do as well, and it is faster. Get the prr tool as well. Grab the modified BIOS you want to flash and the Y580-Y480_BiosFix tool. Create a backup of your current BIOS using the flash tool you downloaded (first step) by runing the included backup.bat, or by using the Win or Dos version flash tool with this command: -d BackupBiosY500.bin -bios If you get and 'Error 104', grab 'Error 104' fix and replace the original fparts file with it. . Make sure you have the modified bios which you want to flash, the bios backup you just created and the "Y580-Y480_BiosFix" tool in the same folder. Run the Y580-Y480_BiosFix tool, follow the instructions on the screen. Enter the name of the files correctly, else you'll get an error. It will create a new file for you and will be named after the modified bios file you specified, with 'Fix' appended to it. Here's a screenshot of the tool in use (Y580 version looks the same). In the case shown here it will create a file called "modifiedBiosFix.bin" which you can find in the folder where you run the tool. Use that one for flashing. Put the fixed BIOS, the prr.exe tool and the fpt.exe (along with the fparts.txt file) on the root of your prepared DOS bootable USB drive, restart your system and boot from that drive. Execut the prr.exe, if you don't get an error message continue by pressing enter. Then flash the bios by using this command (filename.bin obviously needs to be replaced with the name of the file you want to flash). If you can't remember the name of your file, use the command dir to display all the files on your drive. Flash with this: fpt.exe -f filename.bin -bios NOTE: The name of the BIOS file mustn't exceed eight characters (not counting the extension)! That's a DOS limit, so make sure the name of your file isn't too long. Wait until the process is done. After flashing it will verify the data, in case there's something wrong with the flashed data it will tell you. In that case don't reboot, just flash again. It might look a bit complicated at first, but that's the easiest way I could think of. Let me know if anything is unclear. The attached v8.0x modified versions include: - unlocked menus - whitelist removed (wwan / wlan) - Nvidia 660m 'GHz edition' - 1000MHz default 3d clocks >> Here's the 'buy me a beer' link in case you like this. Modding makes me thirsty << Use at your own risk, you are responsible for your system and the changes you make on it. My programs come with absolutely no warranty to the extend permitted by applicable law. Thanks @X0pas1 for testing, and for some pics - see below: I'd appreciate it if someone could also post some pictures of the more interesting sub-menus, e.g. advanced CPU control, video settings and similar. UPDATE 1/17/16 DOWNLOAD LINK FOR FILES REFERENCED IN THIS POST:
 1 point
 -
THIS PAGE IS A RUNNING SUMMARY OF THIS LONG THREAD. >> SEARCH this eGPU forum. experiences [2.0] N E W S GETTING STARTED >>> Introduction A brief introduction with the story of the solution. Pros and Cons A summary of the pros and cons of a DIY eGPU Pre purchase FAQ Answers to questions before you commit First steps Parts/software/info for a successful installation Performance: AMD versus NVIDIA benchmark results Compares AMD and NVIDIA perf on the same sys Performance: Scaling Analysis Compare performance over x1, x1E, x1.Opt, x2, x2E links Implementations: Examples and Leaderboard PC and Macbook eGPU implementations by users Implementations: older Macbook Implementations on older core2duo Macs Implementations: CUDA/OpenCL Implementations using the GPU for applications+computation Implementations: non-video Non-video implementations: soundcards atm Non English eGPU forums eGPU forums in non-English speaking locales Archived news Misc other articles INTRODUCTION >>> This thread serves as a roadmap for those who wish to attach an external Graphics Processing Unit (eGPU) to a notebook/laptop computer. Connection may be achieved through an ExpressCard, mPCIe slot, or Thunderbolt port.This thread is a place for users to share installation and performance details for others to duplicate or reference. * SimoxTav's Video game benchmarking* Graw/TWE/MafiaII12" Len.X201t+HD5770* StarcraftII13"_Dell_M1330+GTX460* Star Trek Online15"_Macbook Pro+GT240 Gaming videos running on an eGPU implementation US$70 PE4L-EC2C (expresscard) or PE4L-PM3N (mPCIe) products $91 PE4H-EC2C (expresscard) or PE4H-PM3N (mPCIe) products HP 2560P GTX560Ti @x1.2Opt DIY eGPU impl playing NFS Shift on the internal LCD HP 2510P: [mPCIe] Swap wifi card via underside covers Note: For those running Windows 7, you can install the eGPU without rebooting your system. Simply and the turn the system to standby system and attach the PE4L. Your system will return to its desktop presets once it detects the PE4L. You will immediately see a significant upgrade in the performance. For example. a Inspiron 1440 using the x1E tweak saw 3dmark06 go from 866 to 9551. RE5 benchmark went from an unplayable 4.1FPS to a very playabe 60.9FPS. The HP 2560P's x1.2Opt link saw 3dmark06 increase over 4 times to 18340 and RE5 gave an average of 148.3FPS(!!), even allowing the internal LCD to be driven by the eGPU. PROS AND CONS >>> Pros Inexpensive: US$92-shipped PE4L with HD5770+120W=$200, GTS450+120W=$160, GTX460-1GB+430W=$210, GT430+72W=$130, HD5670+72W=$140. Add $66 for a x2 capable kit using a PE4H. can be used on any system with an accessible expresscard OR mPCIe slot has inexpensive eGPU enclosure examples if you want an enclosure 10 times or more increase in video performance can have Internal LCD-only setup: NVIDIA Optimus or Ultramon/Chung-Gun method. provides additional HDMI video+audio, s-video and VGA out provides dual-link DVI connection for 2560x1600 LCDs allows multi-monitor connectivity: AMD Eyefinity to provide up to 3 LCDs attached to any HD54xx or better card. Drive up to 6 LCDs to using a HD7xxx or better card supporting Eyefinity 2.0 AMD FirePro 2450, 2450x1, and 2460 to drive up to 4 monitors from a low power card NVIDIA Surround can connect up to 4 simultaneous LCDs. easy, on-demand attachment without a reboot if running Win7 can be reused after a system upgrade, or shared amongst multiple systems see an extra 30-60% in performance when attached to an expresscard 2.0 system, or do a x2 1.0 setup provides an additional USB port when connected to expresscard slot Time-share your desktop video card b/w your desktop and notebook system. perform CUDA/OpenCL processing for applications that support it like Adobe CS5/Premiere [NVIDIA graphics only] ability to use physX/hybrid physX & game detail components can become a stepping stone to a full deskop system if want higher performance Cons requires a 12V PSU to drive the desktop eGPU requires an external LCD/CRT/TV to connect to display at highest FPS may require booting DIY eGPU Setup 1.x from a disk image or USB stick to overcome error 12 issues restricted bandwidth: a x1/x2/x4 link represents 1/16, 1/8 or 1/4 the bandwidth of a x16 slot. PRE PURCHASE FAQ >>> -> moved to http://forum.techinferno.com/diy-e-gpu-projects/7969-pre-purchase-faq.html#post109073 FIRST STEPS >>> -> moved to http://forum.techinferno.com/diy-e-gpu-projects/7969-pre-purchase-faq.html#post109073 PERFORMANCE >>> AMD versus NVIDIA back-to-back benchmark results GTX560Ti vs GTX660 @x1.2Opt (int vs ext) (i5-2540M 2.6, bjorm) HD7770@x1 vs x1E (P8400-2.26, damir001 inc PCISpeedTest) HD7870 vs GTX660 at all expresscard/mPCIe bandwidths available (i5-3320M 2.6, Tech Inferno Fan) HD6970@x4 2.0 vs GTX460@x4 2.0 vs x16 2.0 (i5-2400 3.1, tomshardware) [email protected] vs GTX560Ti (i7-2820QM 2.3, carage) [email protected] vs [email protected] (i7-2630QM 2.0, timohour) NVS4200M vs [email protected] (i7-2670QM, Tom_ger) [email protected] vs x1.1Opt and GTX580 versus [email protected] (i5-2520M 2.5, arsenal243) GTX480 versus GTX560Ti@x1Opt (i7-620M 2.66, Mikjoa) GTX460-1GB versus GTX560Ti @x1.1Opt (i5-2520M 2.5, Warwickeo) GTS450 versus GTX460 @x1.Opt (i7-640M 2.80, docusyn) HD5750 versus GTX470 on x1, x1.Opt and x2 links (i5-430M 2.26, Tech Inferno Fan) HD5750 versus GTX460 on x1 and x1E links (T9300-2.5, ithildin) HD5750 versus GTX470 on x1, x1E, x1.Opt and x2 links (T6600-2.2/T2050-1.6/U7600-1.2, Tech Inferno Fan) Scaling Analysis (07-05-2014) [Performance] Desktop vs eGPU - GTX770 + R9 270x HD5870@x2 1.0 vs x16 2.0 (i7-720QM/i7-3820, kizwan) HD7970 versus GTX680: pci-e scaling x4, x8, x16 @pci-e 1.0, 2.0 and 3.0 HD7970: pci-e 3.0 x2, x4, x8, x16 scaling GTX580: x1.2Opt vs x1.1Opt +30% overclock & (i7-2920XM 2.4, Khenglish) GTX560Ti: x1.2Opt vs x1.1Opt [internal LCD vs external LCD] (i5-2540M 2.6, Tech Inferno Fan) HD5850: x16, x4, x2, x1 (~i7-2820QM, timohour) HD5870: x2 versus x1 (i7-720QM 1.6, kizwan) GTX580+GTX460: x2 vs x1 vs GTX260M (P8700-2.53, mangos47) [email protected] scaling analysis internal vs external LCD, +25% PCIe, +40% GPU core O/C ([email protected], Tech Inferno Fan) GTX460@x2 scaling analysis +20% cpu, +20% PCIe, ~20% GPU (T9400-2.53, khenglish) HD5750: x1 versus x1E (T9300-2.5, ithildin) Older MACBOOK >>> 04-03-2011 MacBook 17 T7600-2.33 with X1600 + HD6850 implemented with Win7/32 11-10-2010 Mac Mini T7200-2.0 + HD5450 implemented with Win7. 11-05-2010 MBP 17" T2600-2.16 with X1600 + GT240M result with Win7. 9-27-2010 MBP 15" Unibody T7500-2.2, 6GB RAM with 8600M GT+HD4650/HD5770-7LCDs impl. & & & with Win7. 8-11-2010 MBP 15" Unibody T7500-2.2 with 8600M GT + HD4870 implemented with Win7 and MacOS 10.6 For MacOS DIY eGPU implementations see DIY eGPU MacOS Experiences. CUDA/OPENCL APPLICATIONS >>> Octane Render: 10x faster than CPU-based rendering. Badaboom: CUDA based video transcoding NON-VIDEO PCI-E CARDS >>> Creative SB X-Fi Titanium desktop sound card via the ExpressCard slot. See details. NON ENGLISH eGPU FORUMS >>> Croatia (bug.hr): EGPU - Eksterna graficka za laptop and (pcekspert.hr): eGPU - Eksterna graficka i laptop Finland (murobbs.plaza.fi): DIY eGPU eli pöytäkoneen näytönohjain kannettavaan Germany (hardwareluxx.de): ATI HD5770 per ExpressCard am Laptop ! Germany (computerbase.de): [Erfahrungsbericht] [PE4H] externe Grafikkarte für das Notebook Hungary (prohardver.hu): eGPU tapasztalatok Indonesia (kaskus.us): [VGA CARD] DIY ViDock (Solusi External Graphic Card Untuk Laptop) Italy (techarena.it): eGPU Poland (notebookcheck.pl): Zewnetrzna karta graficzna, (DIY) ViDock, Magma Box i pochodne, czyli czym to sie je Spain (chw.net): Tarjeta de Video externa para Notebook DIY eGPU [REVIEW] Vietnam (vozforums): [Review]EGPU công cụ thêm card đồ họa cho laptop ARCHIVED NEWS >>> 06-05-2014 US$68 ThunderboltEX II PCIe-eGPU adapter mod 02-12-2014 Successful AMD HD6950 x1 Crossfire under Win7 10-1-2014 Thunderbolt eGPUs: Silverstone T004 = ASUS XG2 12-27-2013 US$250 SilverStone T004 TB enclosure ETA Q1-2014 12-15-2013 Hacking a NVidia Geforce into a Quadro/Grid Pro card 12-12-2013 Q: what do you want in the next BPlus eGPU adapter? 11-20-2013 Ivxy's GTX770/GTX660/GTX560Ti-448/HD4870 scaling 11-03-2013 BF4 vids on [email protected] [email protected] 10-18-2013 Lenovo X230 BIOS 2.56 for eGPU 09-23-2013 Future x2 2.0 M.2/NGFF (mSATA) slot eGPUs 08-24-2013 Howto: using eGPU under MacOSX 08-22-2013 20Gbps "Thunderbolt 2" sysboard released 07-27-2013 ~US$250 450W TB enclosure: Silverstone T004 07-25-2013 modding PE4L 2.1b for longer delay 07-15-2013 Acer ditches Thunderbolt in new systems 07-03-2013 PE4H 2.4a + EC2C/PM3N + PCIEMM-060B are not Gen2 compatible 06-17-2013 project saboteurs named 06-11-2013 Important: HIT Setup 1.x customers 02-02-2013 older PE4L/PE4H fails Gen2 testing 11-28-2012 LucidLogix Virtu MVP Mobile installation 02-05-2012 Khenglish's color depth perf analysis 02-02-2012 Internal Screen for AMD GPUs with Virtu Driver (timohour) 01-28-2012 US$55-shipped PE3A+riser (pci-e 2.0) (timohour) 08-28-2011 JediMasterZon's modded PE3A 06-30-2011 Kizwan's HD5870@x2 and x1 game benchmarks 06-04-2011 modded PM3N 1.1 to start CLKRUN when setting the jumper details 05-31-2011 Thunderbolt eGPU product preview 05-10-2011 Khenglish' request to unlock x1.Opt compression regardless of primary video. 04-01-2011 tabletpcreview's eGPU on Tablet PC's: experiences, benchmarks, setup, ect... 11-07-2010 DA-2 220W AC adapter mod 09-08-2010 i5-520M 2.4+HD4890@x1 NBR review 08-27-2010 Panzer's fuse bypass on PE4H 08-01-2010 Modded driver details 07-05-2010 Enzyme 1.4b3 versus Catalyst 10.6 Acknowledgements Many thank yous to all the members who have shared their DIY eGPU experiences for others to be able to learn from and duplicate. Special thanks to SimoxTav for the artistic touches. Project saboteurs of this community-driven project who halted/derailed the creative opportunities that pluggable, affordable eGPU graphics/processing provides.1 point
-
NVIDIA GeForce GTX 680M video card benchmark result - Intel Core i7-2960XM Processor,Alienware M18xR1 score: P13383 3DMarks1 point
-
I hope rockstar will aply more work on the new GTA game next year, i have already pre ordered that game! so i'm glad if it will rune fine on my m14x r2....1 point
-
Hey y'all! Found this forum about a week ago and registered 2 days ago. I've seen a lot of impressive work/mods and usefull tips so far and I'm sure that's not the last of it. Happy to be here! /Rob1 point
-
Start at 2:55. You basically use your fingernails to pry it out from the sides and then you pull up on the media bar.1 point
-
You come here to work and help and yet THIS is your first post... Good one.... Either participate and gain the right to download files or become an elite member. Thread closed.1 point
-
To be honest, it doesn't surprise me that AMD needs to drop some employees. I pretty much saw it coming as they have suffered from several factors. The first one is, as you mentioned, the Bulldozer disaster. That definately turned off most of their "loyal" customers and early adopters, causing newcomers often to not even consider AMD's CPUs an option. But they learned the lesson and more or less halted their Desktop CPU developement and mostly switched to developing Smartphone/Tablet CPUs. The second critical failure was ignoring peoples demands and suggestions towards the GPU driver (Catalyst) development. While AMD's graphic cards are predominantly on par with Nvidia counterparts in terms of hardware, they were hold back by their driver support. I learned this myself as I bought my Clevo x7200 with two AMD 6970M's. The drivers offered became worse and worse over the months, causing new deal-breaking bugs and problems while often fixing unnecessary things. This definately killed my trust in AMD, maybe for good. I estimate I am not the only one, so perhaps many "AMD first-timer" will never look at AMD again if they encounter only half of what I went through. Also, just look at what AMD did with Enduro to their new mobile flagship, the 7970M. It can't even be turned off in most recent Clevo Notebooks, hence crippling the performance by approximately 20% in many games. And I know AMD promised a fix for that, but the card is out like half a year now and according to polls in the NBR-Forum a large number of people are unhappy with their 7970M. And that is a shame since the 7970M has the power of performing equal to the 680M while costing like half as much. The pricing definately attracts people, but does not convince them to stick with AMD in the long run, hence I don't expect AMD to become more dominant in either of those 2 markets again. People often consider Nvidia overpriced, and it is true that their pricing is sometimes ridiculous. But at the same time, they don't leave their customer behind with a bad feeling for purchasing their product after one month. They develop "proper" drivers, which are crucial in the mid- to long term to satisfy the customer. I am glad I god rid of my 6970M's and switched to a GTX 680M, which is not even officially supported in my Notebook and yet performs without a single issue in any game and application I tried.1 point