Leaderboard


Popular Content
Showing content with the highest reputation on 10/04/12 in all areas
-
temporarily uploaded it here till the Dell's works again: http://jahnsinn.no-ip.org/M17x-R3_A12.zip3 points
-
Just came across this. The dude remove the ID chip and connected it directly to the mobo on a Dell laptop and it seems to work with any adapter. The article is old though (2009) so there may have been changes since then.3 points
-
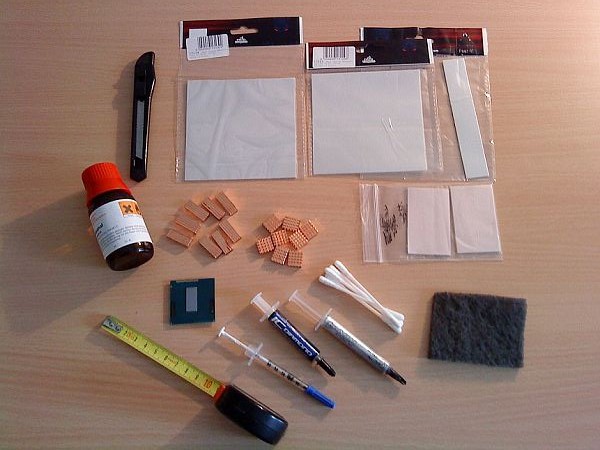
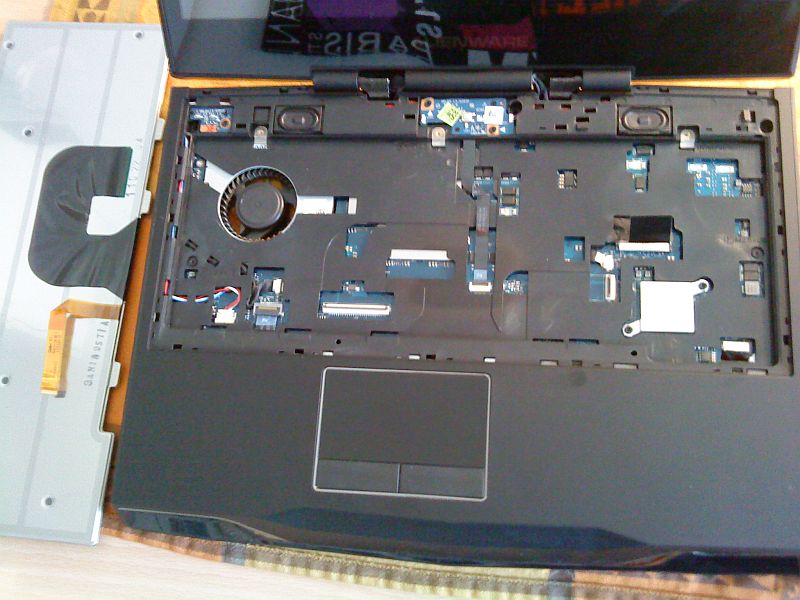
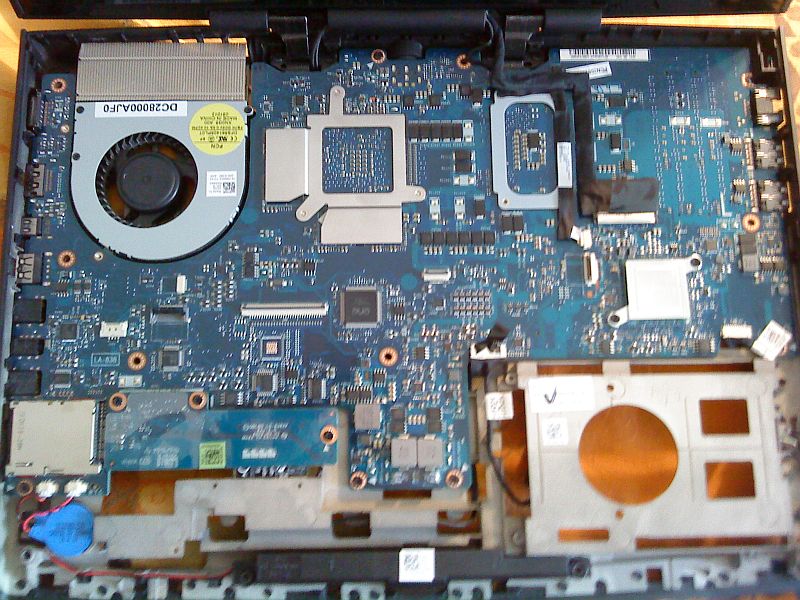
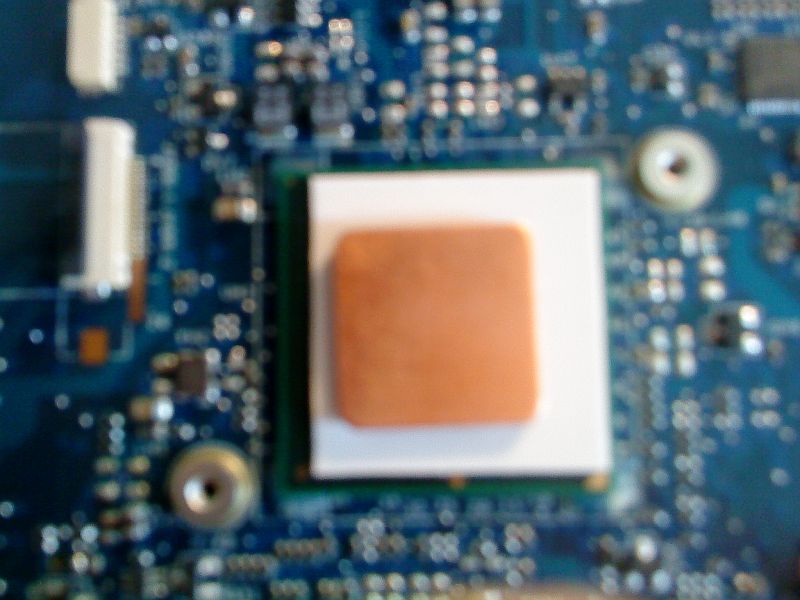
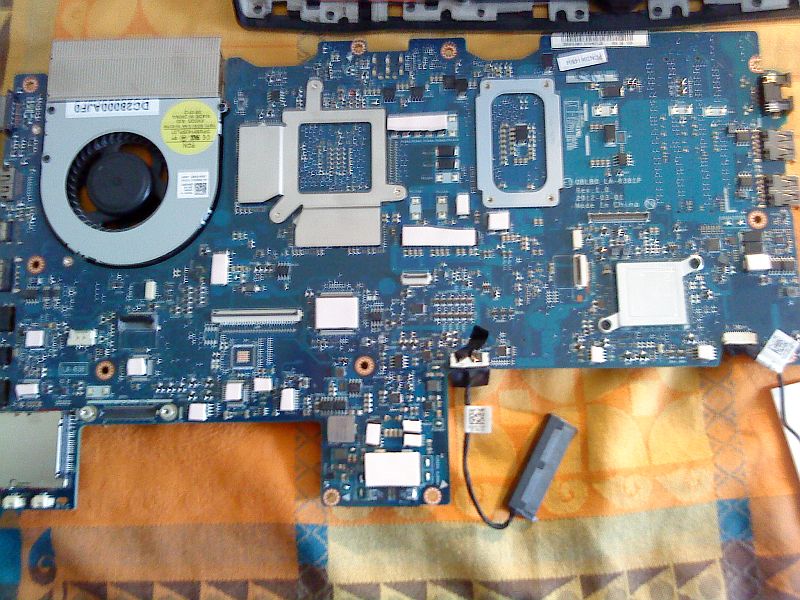
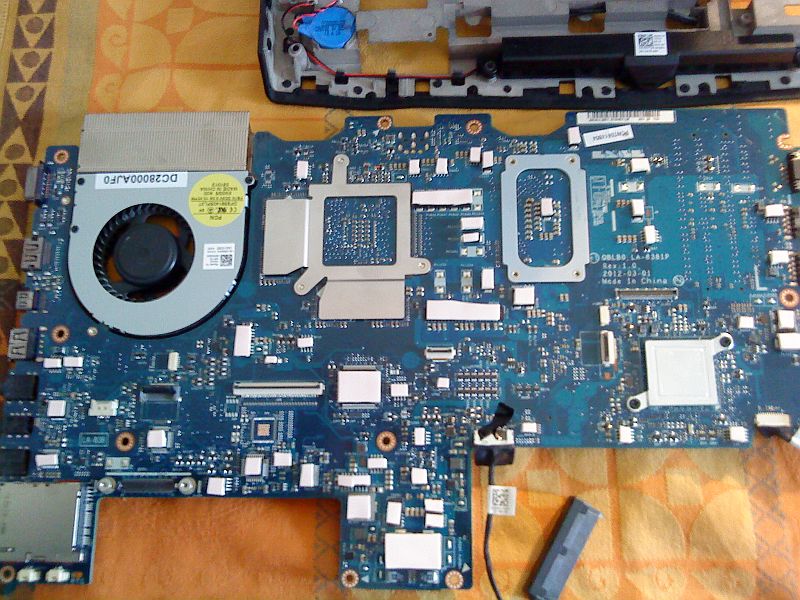
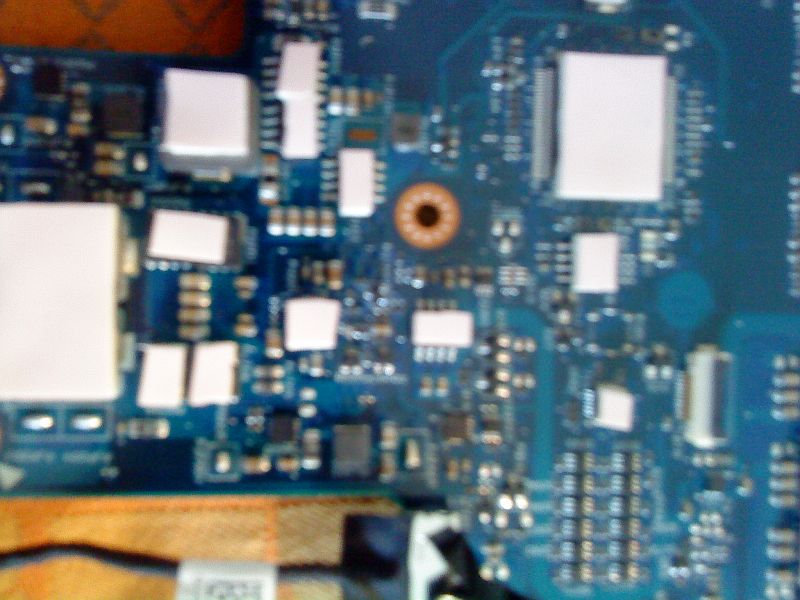
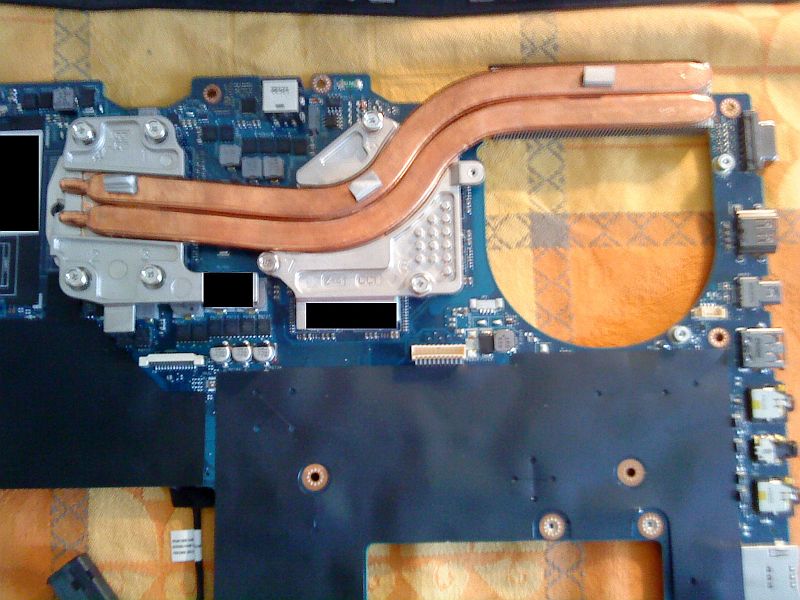
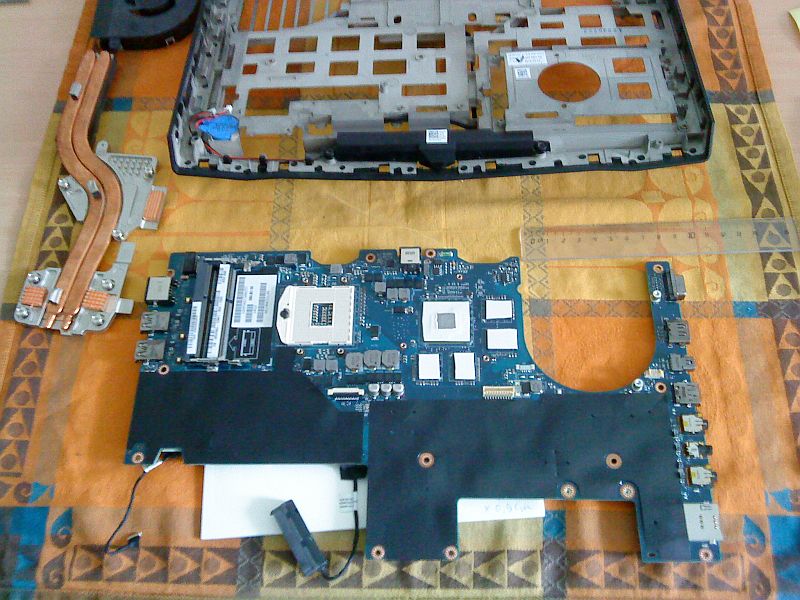
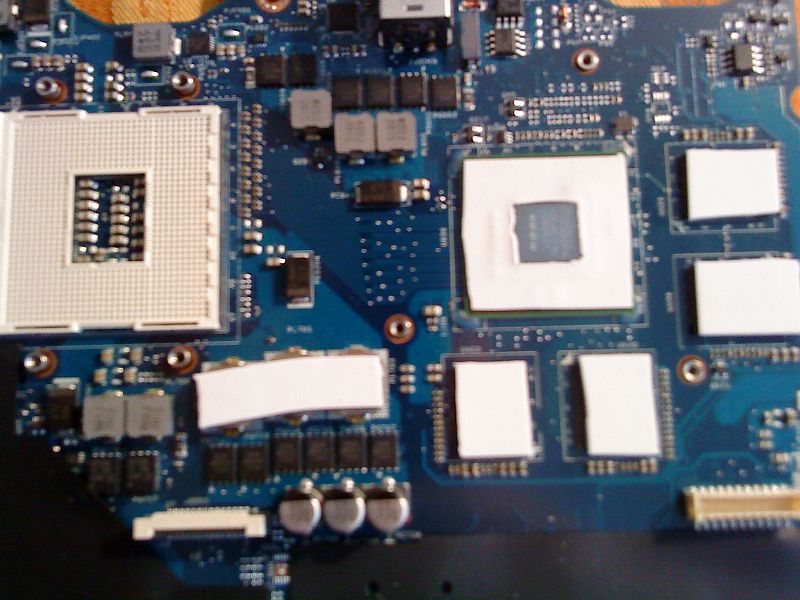
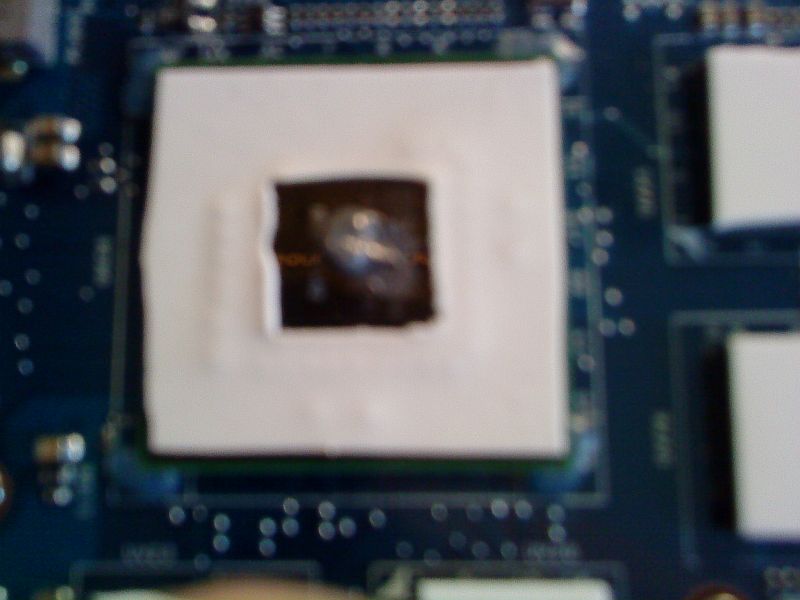
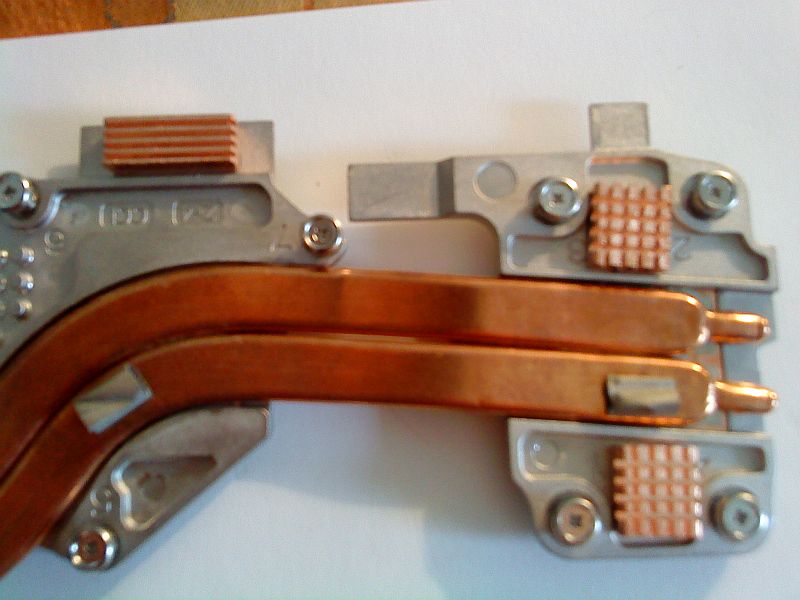
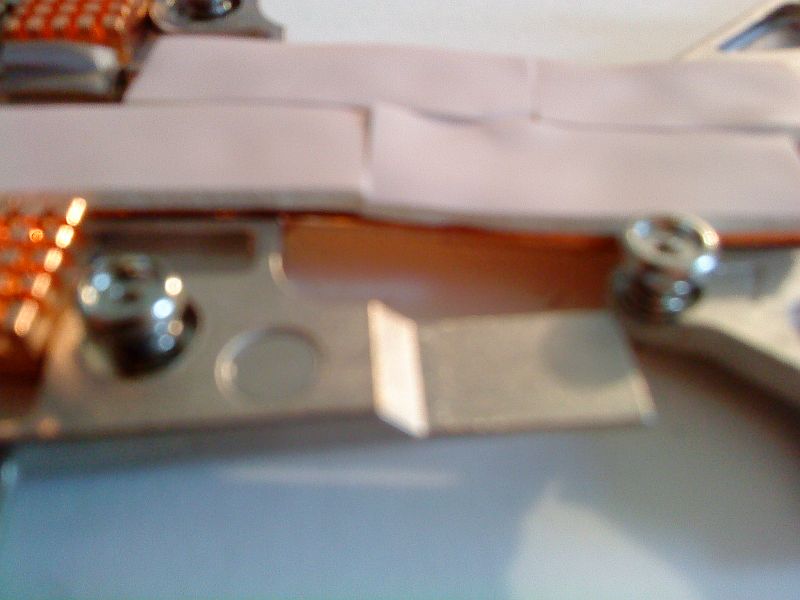
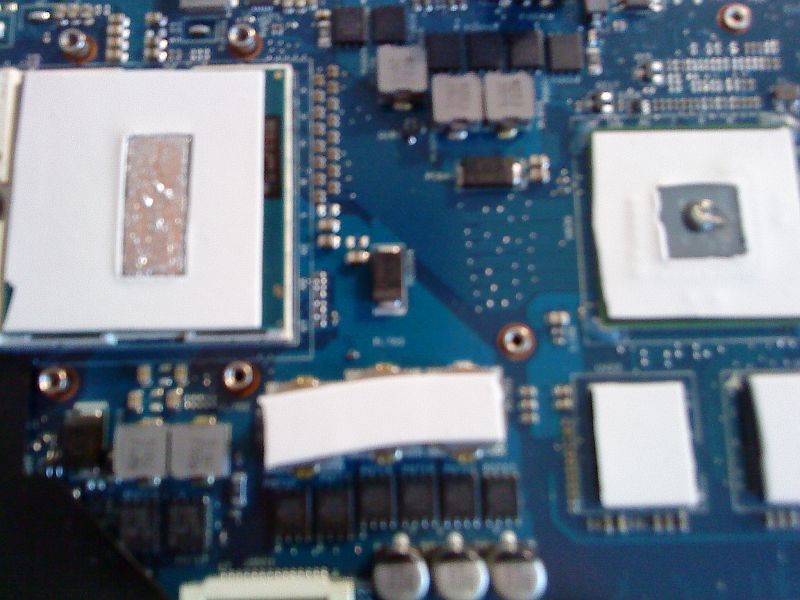
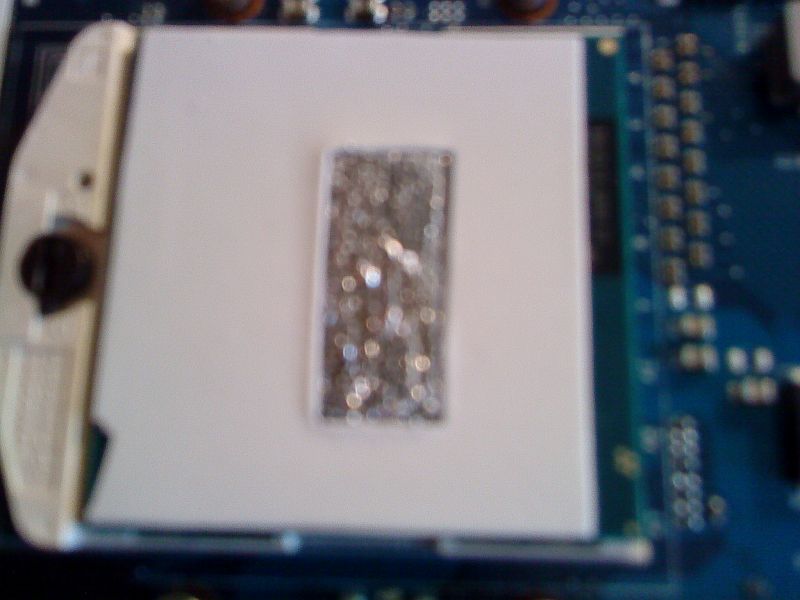
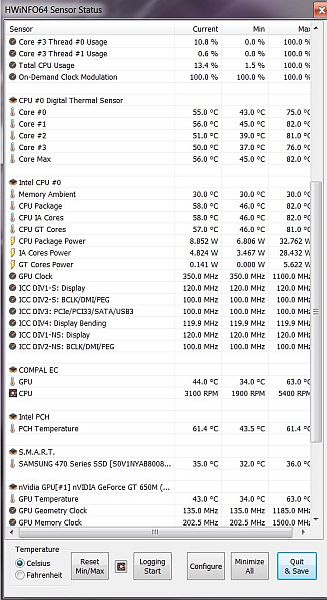
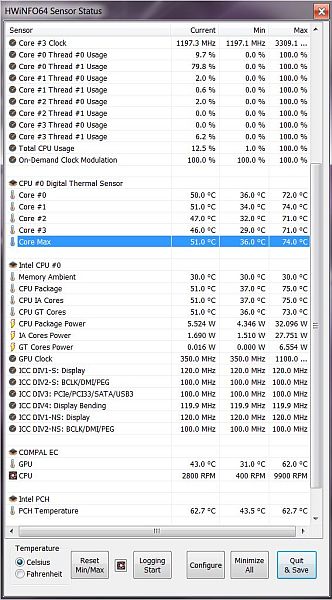
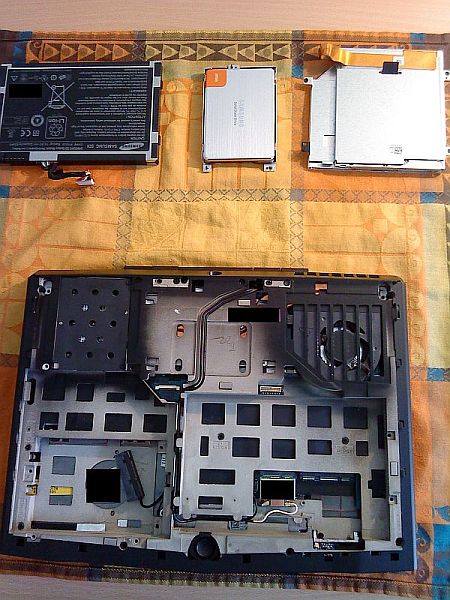
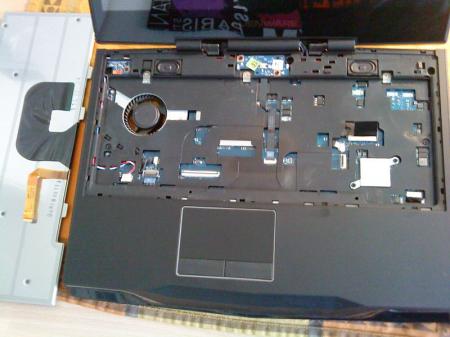
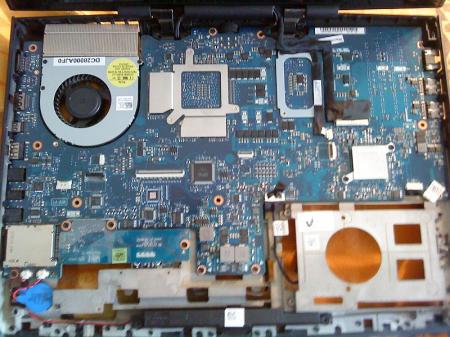
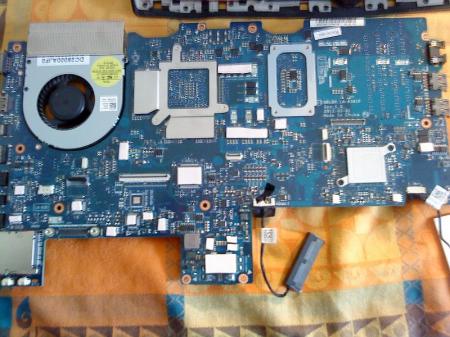
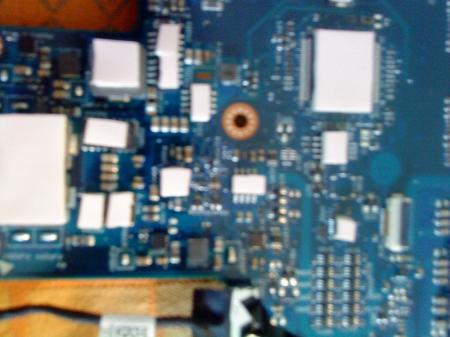
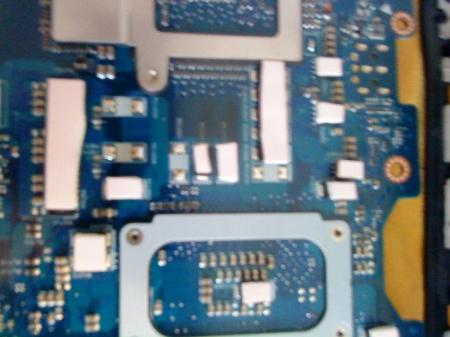
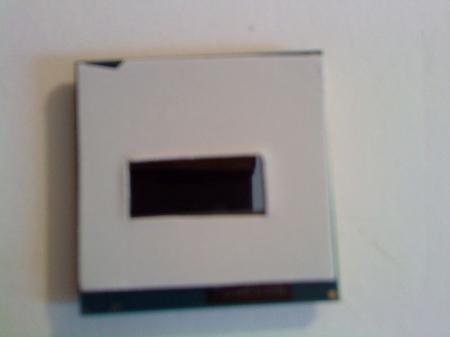
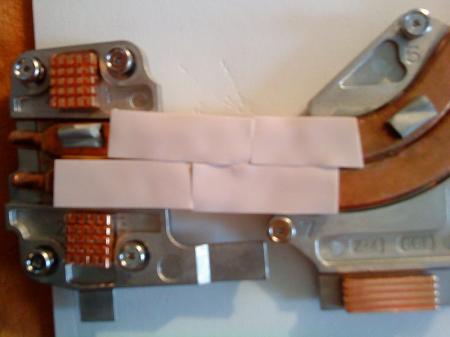
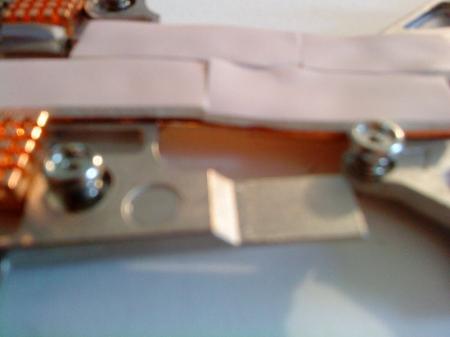
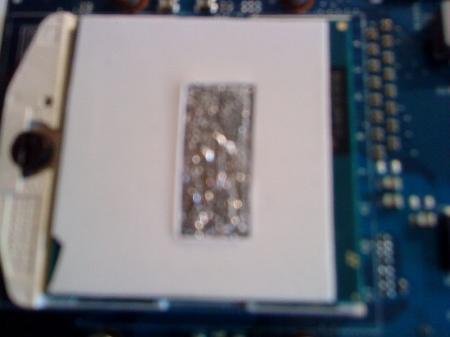
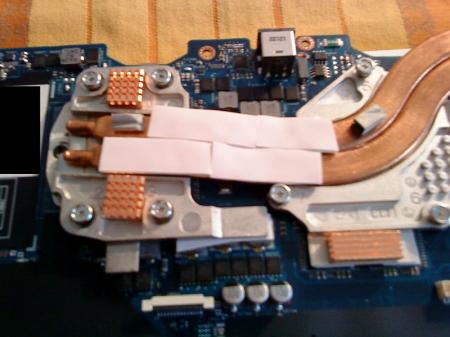
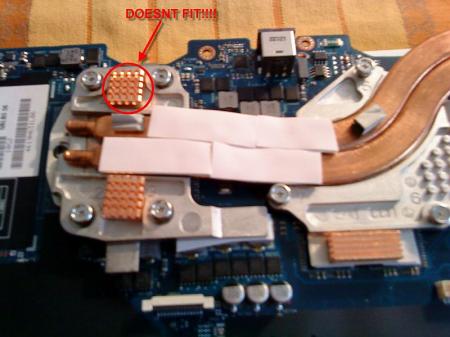
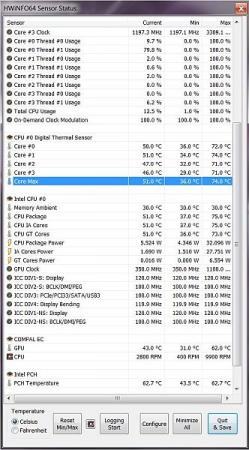
So after gathering different ingredients i did my first "experimental cooling mod" for the M14x R2. The idea was to use this awesome formfactor powerful toy at full performance without disturbing fan noise, too high temperatures and extreme wear off effects. My first idea was to repaste it with better thermal paste since alot of people did this with great success. i used MX4 before and now in this mod IC Diamond for both CPU and GPU. Then i did a PCH cooling mod you can find details about in my thread : http://forum.techinferno.com/alienware-m14x/1874-my-m14x-r2-pch-cooling-mod.html The next step was to cut alot of fitting peaces of 2mm thick 1 w/mk adhesive thermal pads for all voltage converters / chips on the upper mainboard side since heat dissipates upwards and there are alot more surfaces on the upper side of the board (not the GPU / CPU side). Since overclocking also raises temps of these chips and converters + the fact that wear off due to heat is a big issue in all electronic components i thought this wont be a bad idea. After this i cut pieces of 0,5mm thick Phobya 7 w/mk thermal pads for the CPU and GPU so the heat can dissipate also horizontal and reaches more surface of the heatspreader downside. I also added 1 layer for the PCH as an addition for the PCH cooling mod. Then i tried to stick as much copper heatsinks as possible on the heatpipe / heatsink to add more surface as a passive cooling addition. However success was not too great due to the highly compressed vertical design and i ended up only sticking 2 of my bought 16 copper pieces on the heatsink. It wasnt possible to reassemble the chassis with more than these 2 pieces attached to the heatsink or pipes. So i used bigger parts of the 2 mm 1 w/mk thermal pads on top of the CPU end of the heatpipe since it can be pressed to 1/2 of its size. The most trickiest part was the many small thermal pads on chip / converters thingy since you have to be very patient with all the tiny pieces that stick to everything but not the surface you wanted it on. The result of my mod is very good. Now i can use my M14x R2 with Turbo on without the horrible hair dryer mode and no 80 C + temps no matter if i do OC or not. GPU stays at max 62 C in stress tests / 59 C while gaming. CPU never reaches 80 C anymore and stays in the mid 70´s C. The only downside is that the temps do climb down slower now but i think this is a small tradeoff for the fact that i can use Turbo all the time now without noise and heat problems anymore. Plus the fact that my system can survive much more years as with temps of 80 C +. Here is the step by step with result comparison. 1. Preparations and Ingredients 2. Disassembly 3. PCH mod addition before 4. Thermal Pads 1 w/mk 2mm thick upper mainboard voltage converters and chips part 1 closeups: 5. GPU thermal pad 7 w/mk mod + GPU layer mod + IC Diamond Repaste before: 6. CPU + Heatsink mod thermal pads 1 w/mk + 7 w/mk + copper heatsinks (note the upper piece marked in red doesnt fit!!!! check pics and dont try this at home!!!) (Here is a pic just to make sure where you can see which heatsink doesnt fit!) (also note that the liquid metal you can see on the CPU was removed before reassembly and exchanged with IC Diamond) Result comparisons: temps before this mod using Turbo + max OC + PCH cooling mod part 1 temps after this mod using Turbo + max OC + PCH cooling mod part 2 The 9900 rpm fanspeed is a bug i dont know why but the max fanspeed was 4200 rpm at 74 C but mostly it was max at 3800 rpm which is very quiet compared to before 5400 rpm hairdryer mode. Before my first repaste and without this mod it even reached 89 C and the fan hit 5800 rpm which was extreme disturbing. So i can say this mod was very successful in addition to a simply repaste and my PCH cooling mod. Im looking forward to use my M14x now for years without the need to open it again. Pros +lower temps and noise even when extreme OCing +better longlivity Contra -temps go down slower but not very significant I hope my results help you to figure your own awesome mod out that helps you with your system to achieve max performance gains by a DIY way. edit: as always this is my way to contribute for all the helpful work of svl7, mw86, StamatisX and all the productive, competent and helpful users in this forum.


 1 point
 -
Yeah... believe it or not, but Dell just posted a new bios for the M17x R3. ... and (*surprise*), they even give a tiny bit information about the changes they made. Under 'fixes & enhancements' it says: "Alienware M17XR3 A12 BIOS add GPU switch option in F2" Here's the link to the official Dell site: Drivers and Downloads | Dell [united States] Please let us know how it works out! As the Dell server currently seems to have some issues regarding this file, I also attached it to this post. I'm waiting for your reports. If there's enough interest I can unlock and apply the Sata tweak (if necessary). M17x-R3_A12.zip1 point
-
Instructions for flashing the VBIOS of a NVIDIA video card: You'll need: A VBIOS file you want to flash The latest version of NVflash, a DOS utility to flash the VBIOS of Nvidia cards. A USB drive, formatted to boot DOS, in order to use NVflash How to create a bootable USB flash drive: The flashing procedure: Put the NVflash files to the root of your prepared (DOS bootable) USB drive. Do the same with the Vbios you want to flash. NOTE: DOS has a limit of 8 characters per file name (not counting the extension). So make sure to rename your files appropriately before putting them on the USB drive. Make sure the USB drive is plugged into a port which is active at boot, reboot the system and go to the boot manager. Choose to boot from your prepared USB drive. As soon as you see the command line you're ready to go, write dir and hit enter to display all the files on the USB drive. Display all Nvidia adapters in the system: nvflash -a or alternatively the longer version of the command: nvflash --list This command will return you a list with all Nvidia adapters present in your system. Here's an example output of this command run on my M15x with a 680m in it: NVIDIA Firmware Update Utility (Version 5.117) NVIDIA display adapters present in system: <0> N13E-GTX (10DE,11A0,1028,02A2) H:--:NRM B:02,PCI,D:00,F:00 The number in the <> brackets is the index of the corresponding device. SLI users will have more than one entry and flash each card separately. Backup your current VBIOS: Never forget to keep a backup of your original VBIOS before you flash anything non-stock. Use this command to save a copy of the firmware to your USB drive: nvflash -b filename.rom or with nvflash --save filename.rom Flash the VBIOS to your card(s): For a single card it's really straight forward, you don't need to worry about the adapter indices. Just use this command: nvflash -6 vbiosname.rom -6 will allow you to override mismatches of the PCI subsystem ID. In case of a mismatch you'll need to confirm the flash with 'y'. NOTE: Users with a non-US keyboard might need to press 'z' or similar, because the 'y' isn't at the same location for all keyboard layouts. SLI users will need to flash each card separately. The concept stays the same, but you will need to use the corresponding adapter index to flash a card. How to figure out the adapter nr. is described above. Flashing goes like this: nvflash -i[index] -6 vbios.rom [index] represents a number, namely the index you found with the 'nvflash -a' command. So a command example to flash a card which has index 0 is: 'nvflash -i0 -6 vbios.rom' When the flashing starts, just wait until it says that it's done. Then reboot with Ctrl+Alt+Del and remove your USB drive. Pro tip: Let me know if I missed anything important or if you have questions.1 point
-
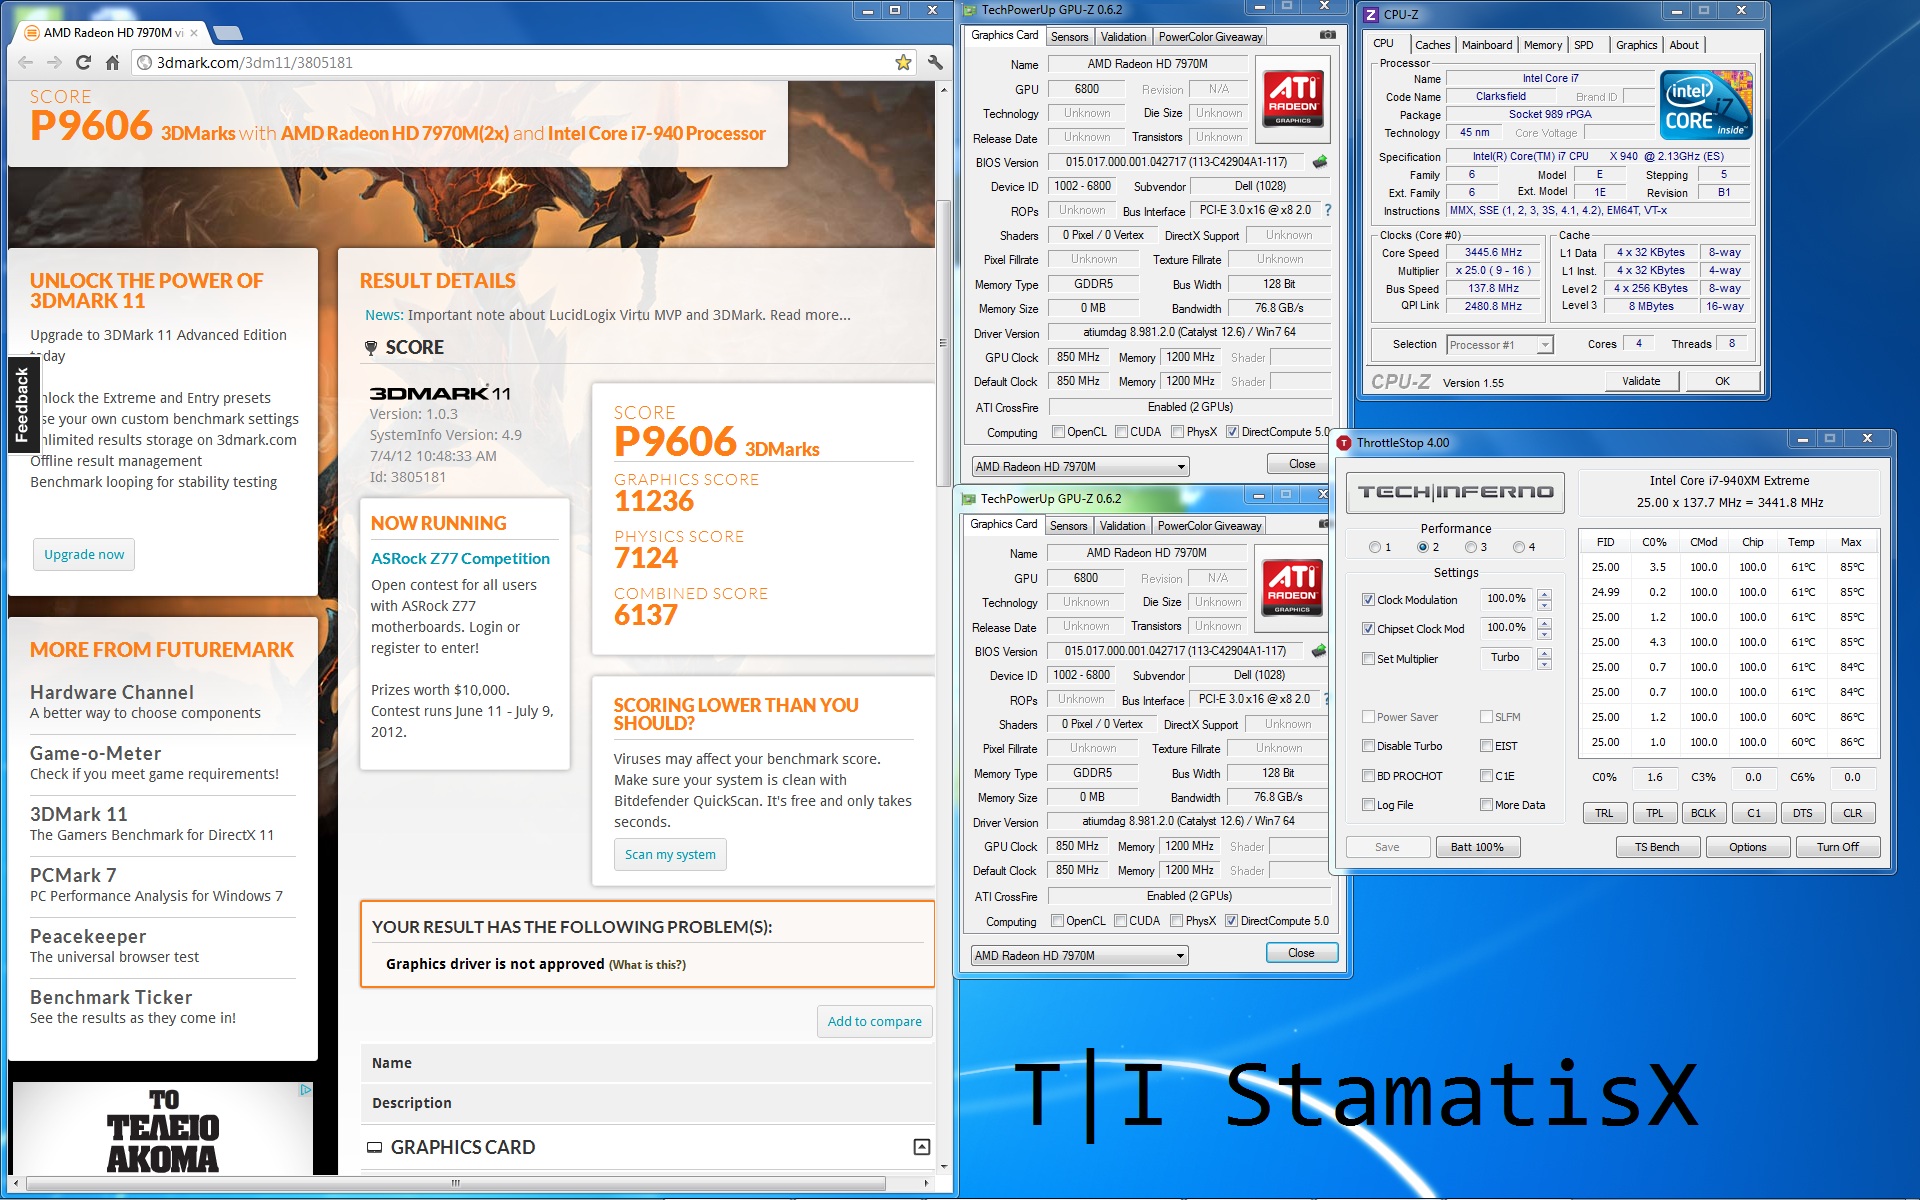
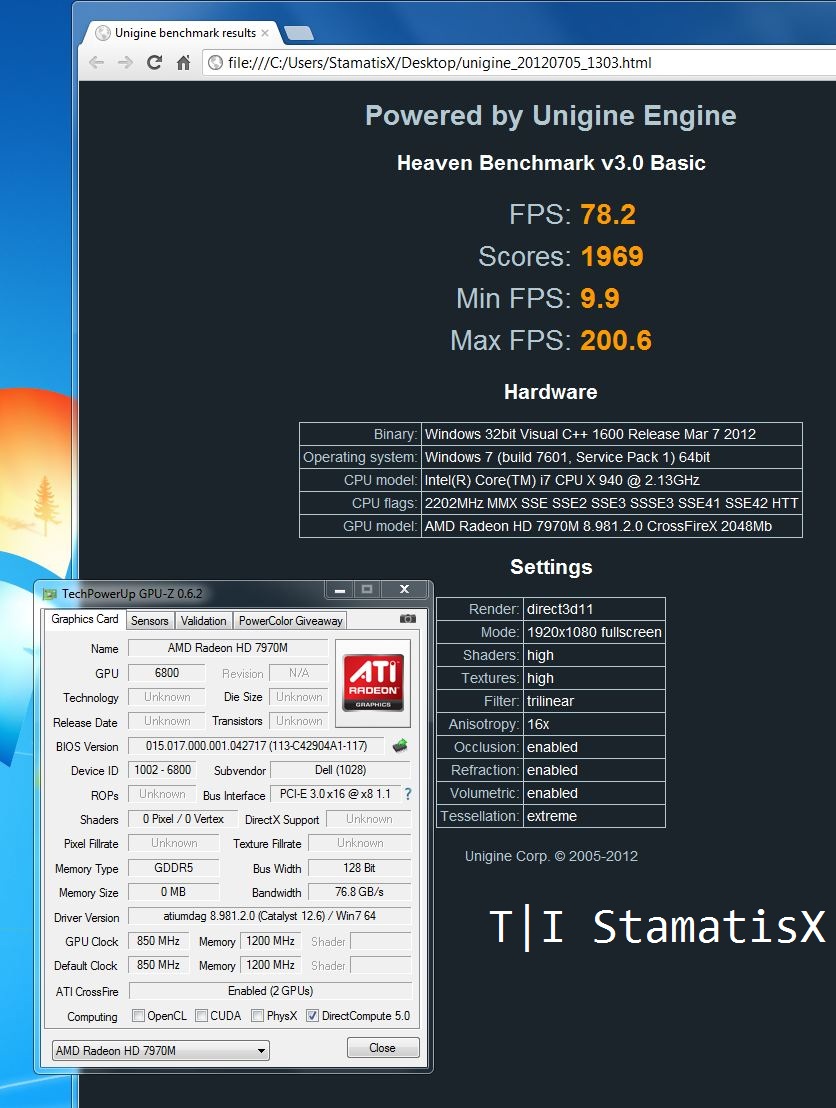
I received early in the morning a couple of 7970Ms and a cfx cable from MXM Upgrade Home Page 3DMark11 Unigine If you are upgrading from the 5870Ms, the screws are a bit bigger in diameter and they won't fit the backplate of the 7970M (probably a clevo card? I will find out soon). Other issues I encounter is that both display and HDMI port don't work so I attach my Dell 2410 with a VGA cable... Temps are fine and I am idling at 56-58 C with the external monitor attached (which brings the clocks up to 300/1200 @0,825V) so not that bad. 7970M.zip
 1 point
 -
By now you've heard of PSY and "Oppa Gangnam Style" and are probably tired of it. But this college humor take on Mitt Romney is pretty damn funny, especially when Paul Ryan shows up in yellow: http://www.collegehumor.com/video/6830834/mitt-romney-style-gangnam-style-parody1 point
-
lol. I actually prefer the background )))))1 point
-
new vid with my new mini piece1 point
-
Good by DR650se M17x R2. We had some sick overclock sessions. Hd5870m @1ghz+ FTW I look forward to reading of your next endeavors. Good times bro. Hexacore plus 4drives ftw. Good by Alien. I cant wait to see how you paint it. Would be cool to see hexacore plus 7970m/680m Sent from my Paranoid Samsung Galaxy S3 on Sprint using Tapatalk 2 Jelly Bean flavor included1 point
-
Grats on the new system, looking forward to your comparison. Hopefully you can at least upgrade to 7970m xfire. Seems some are making progress on 680m sli as well. Sent from my GT-N70001 point
-
Well I figure that with the P150HM, all we need to do is enable the flash descriptor and then flash the me firmware from the P170HM. As some may know, the P170HM bios and EC can be flashed onto the P150HM, that's what I am running right now. But the ME firmware will not flash, nothing I can do to flash it yet unless I go for the hardware mod. Still hoping someone will know a workaround using a simple key combo or something along those lines.1 point
-
If some people are willing to test some things I might be able to patch something together...1 point