Leaderboard


Popular Content
Showing content with the highest reputation on 09/17/12 in all areas
-
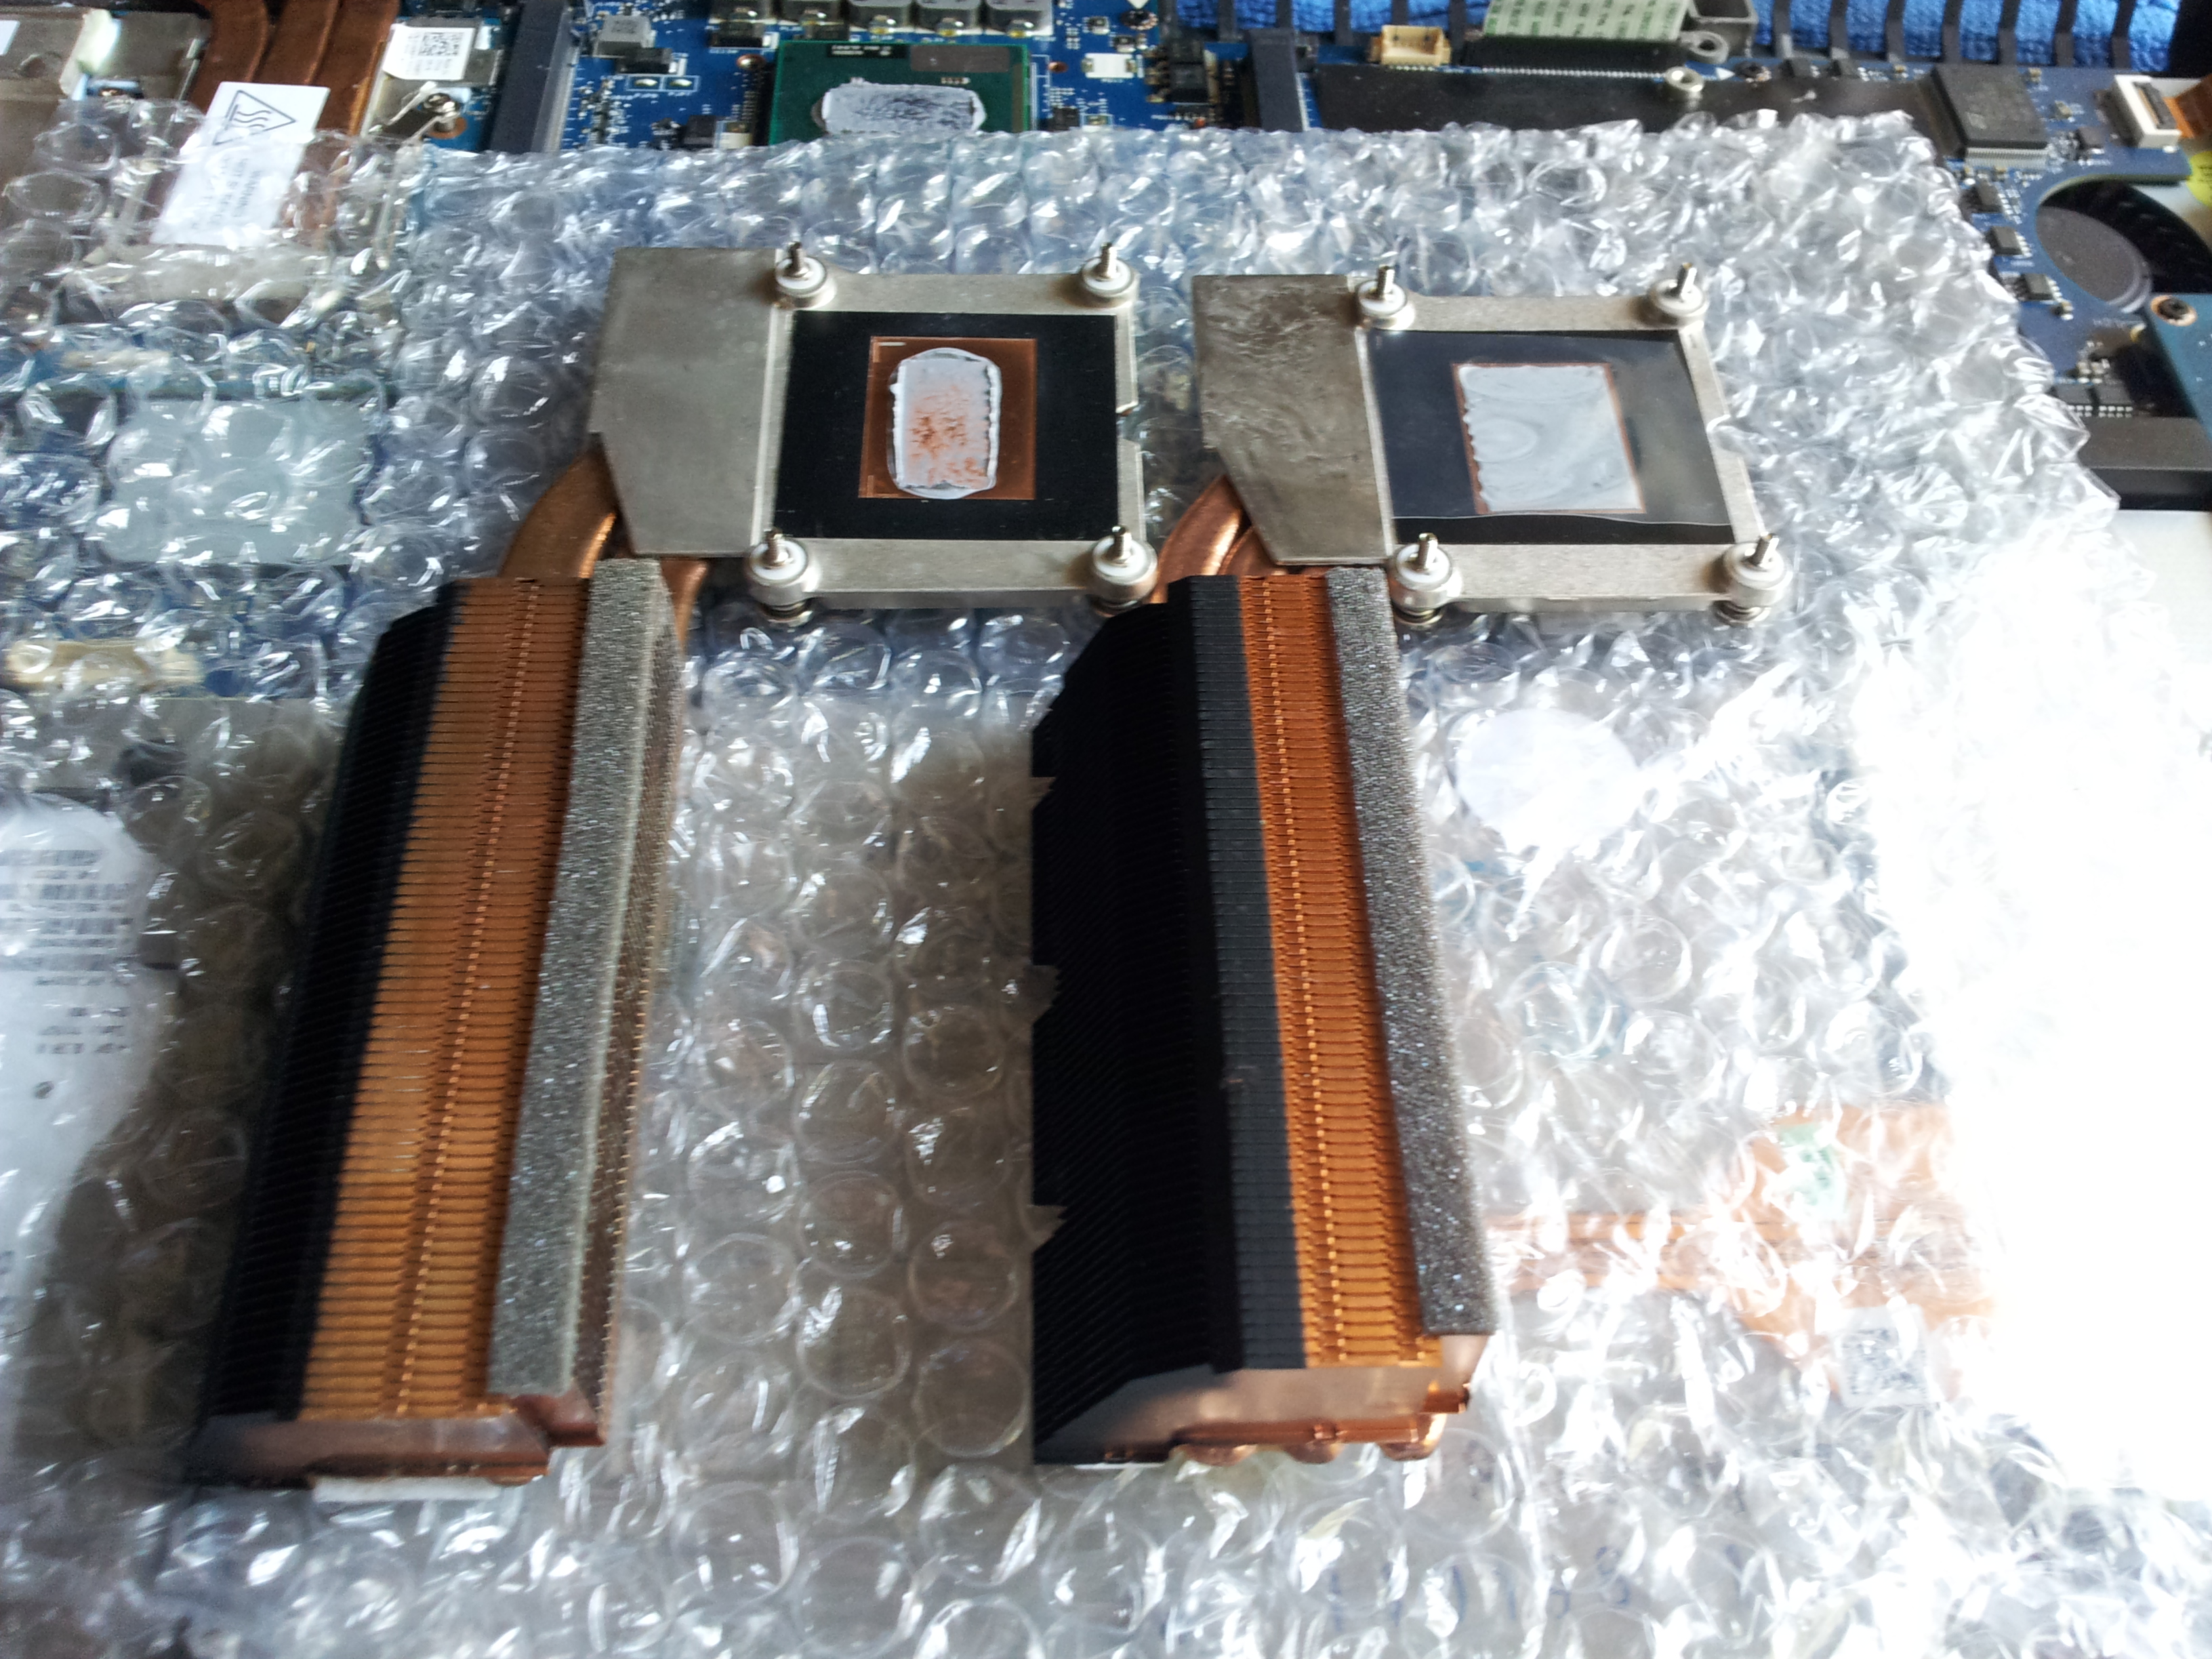
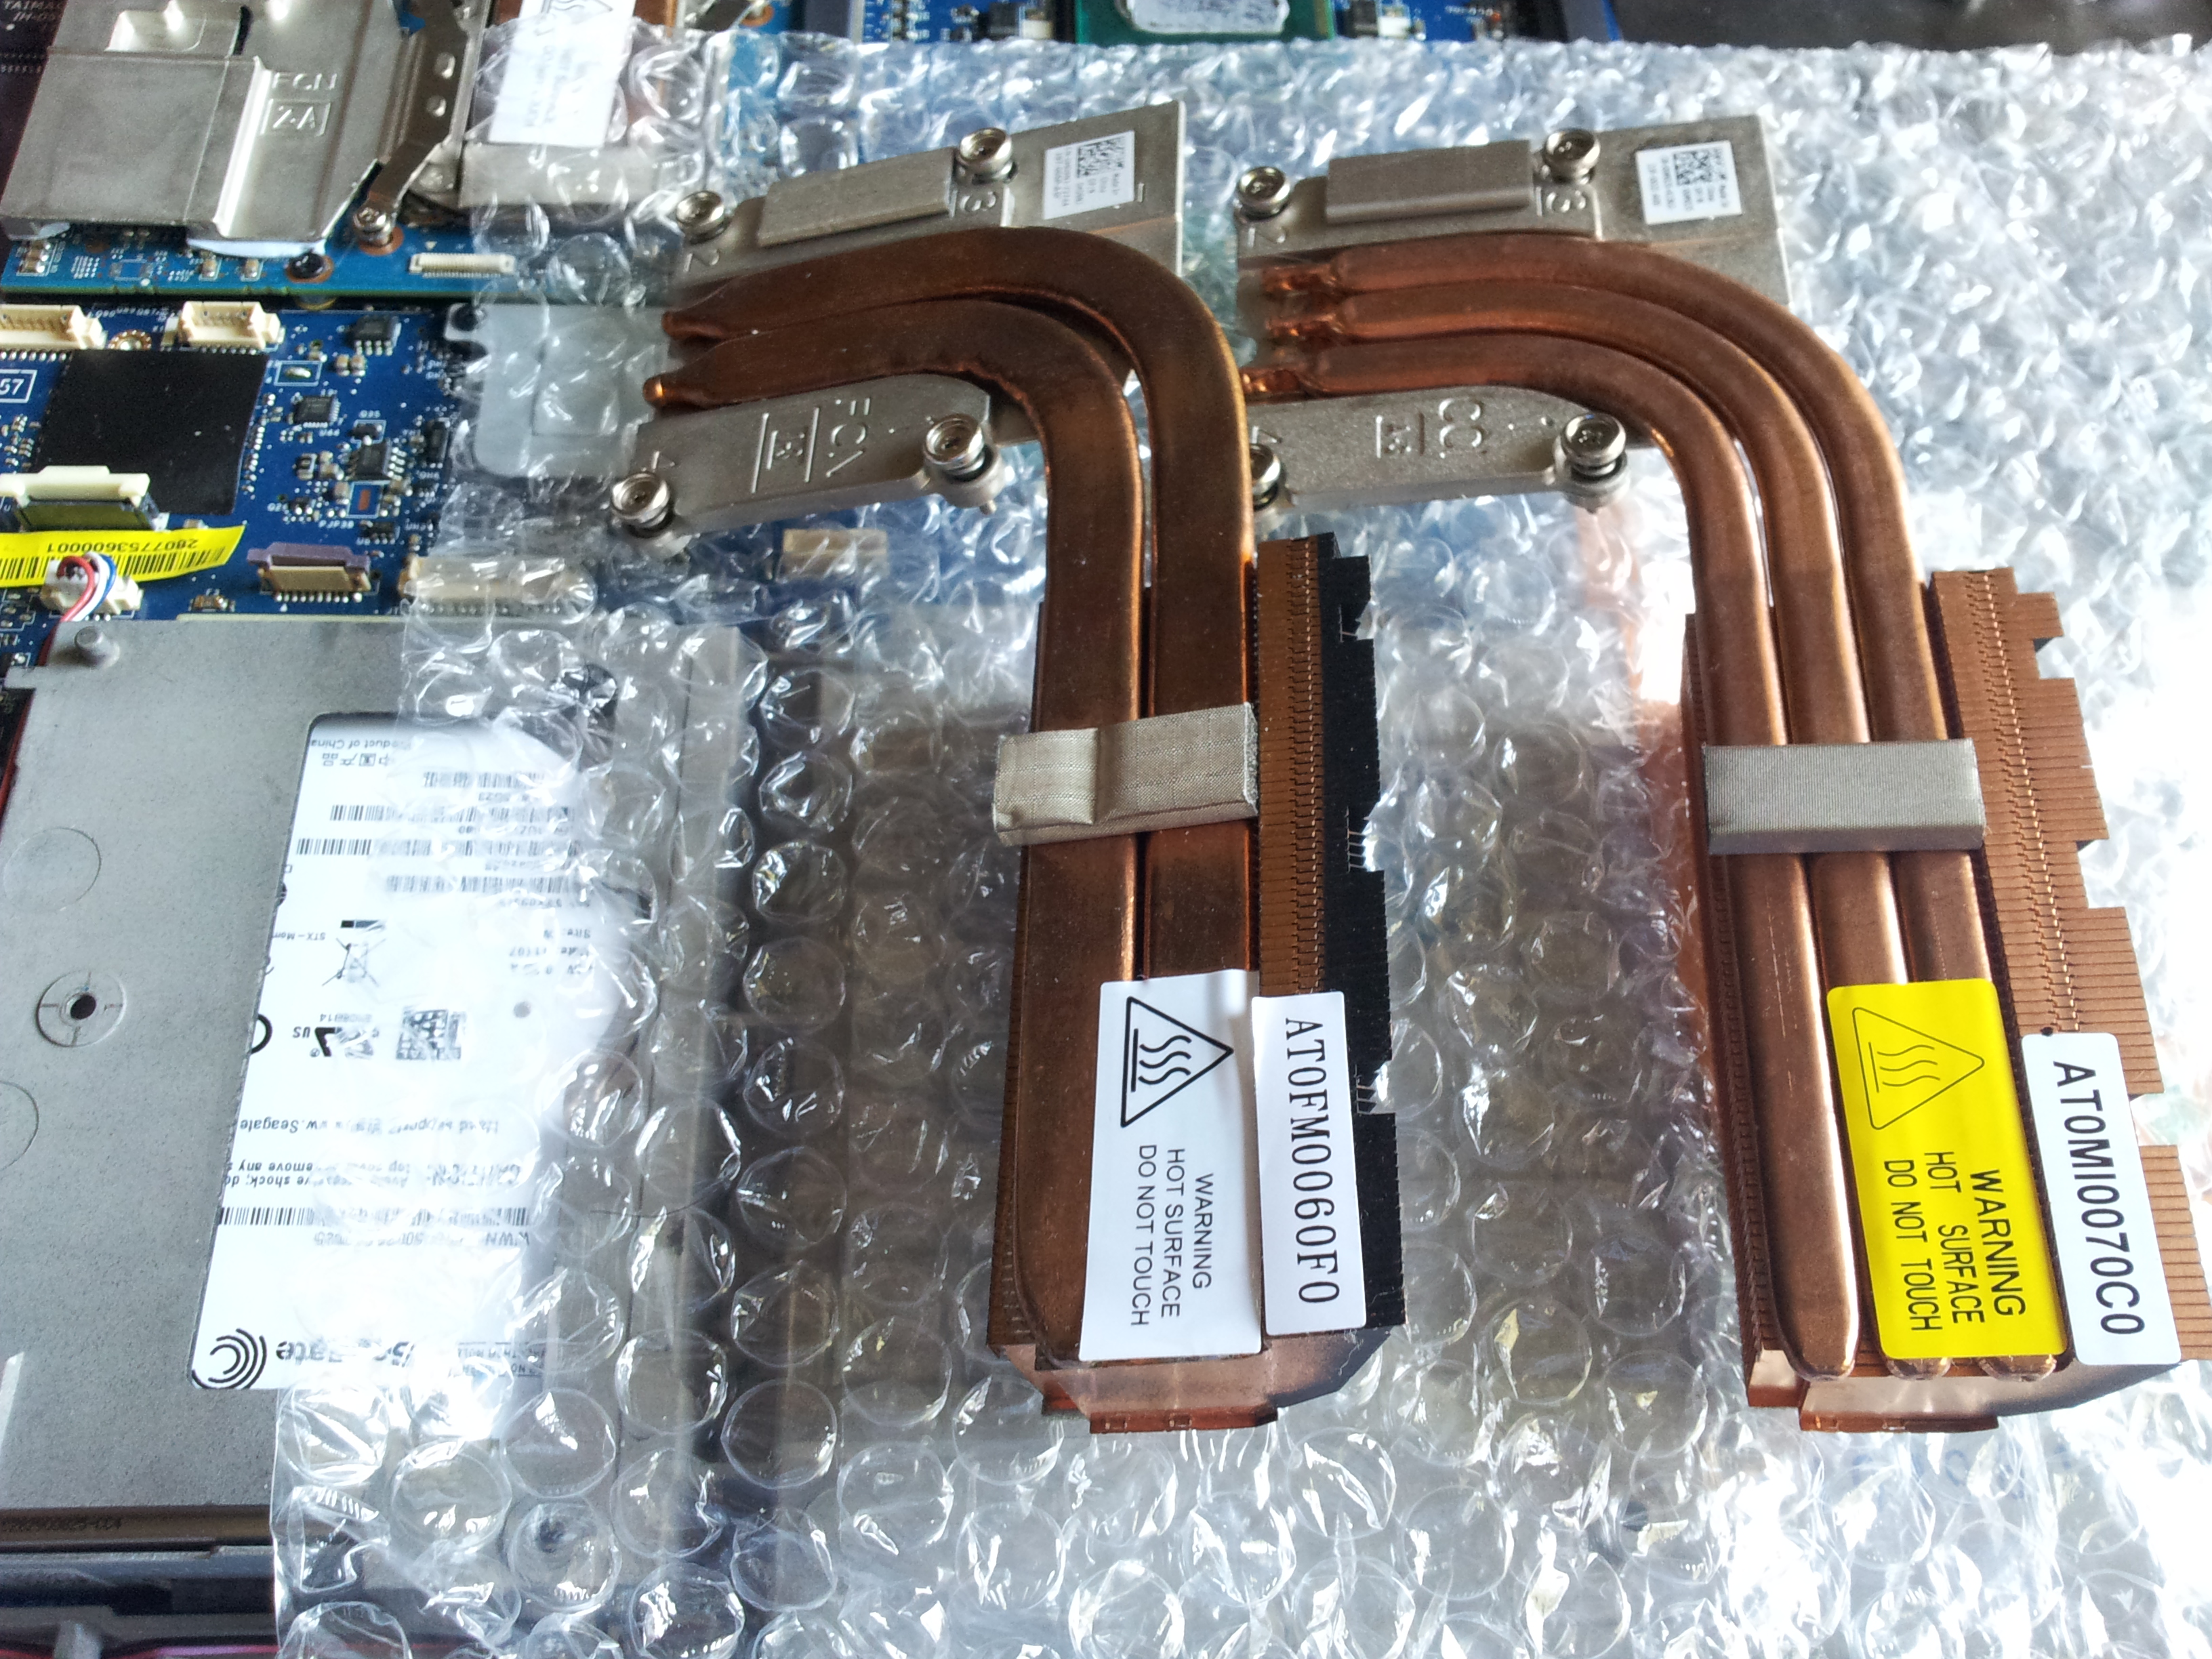
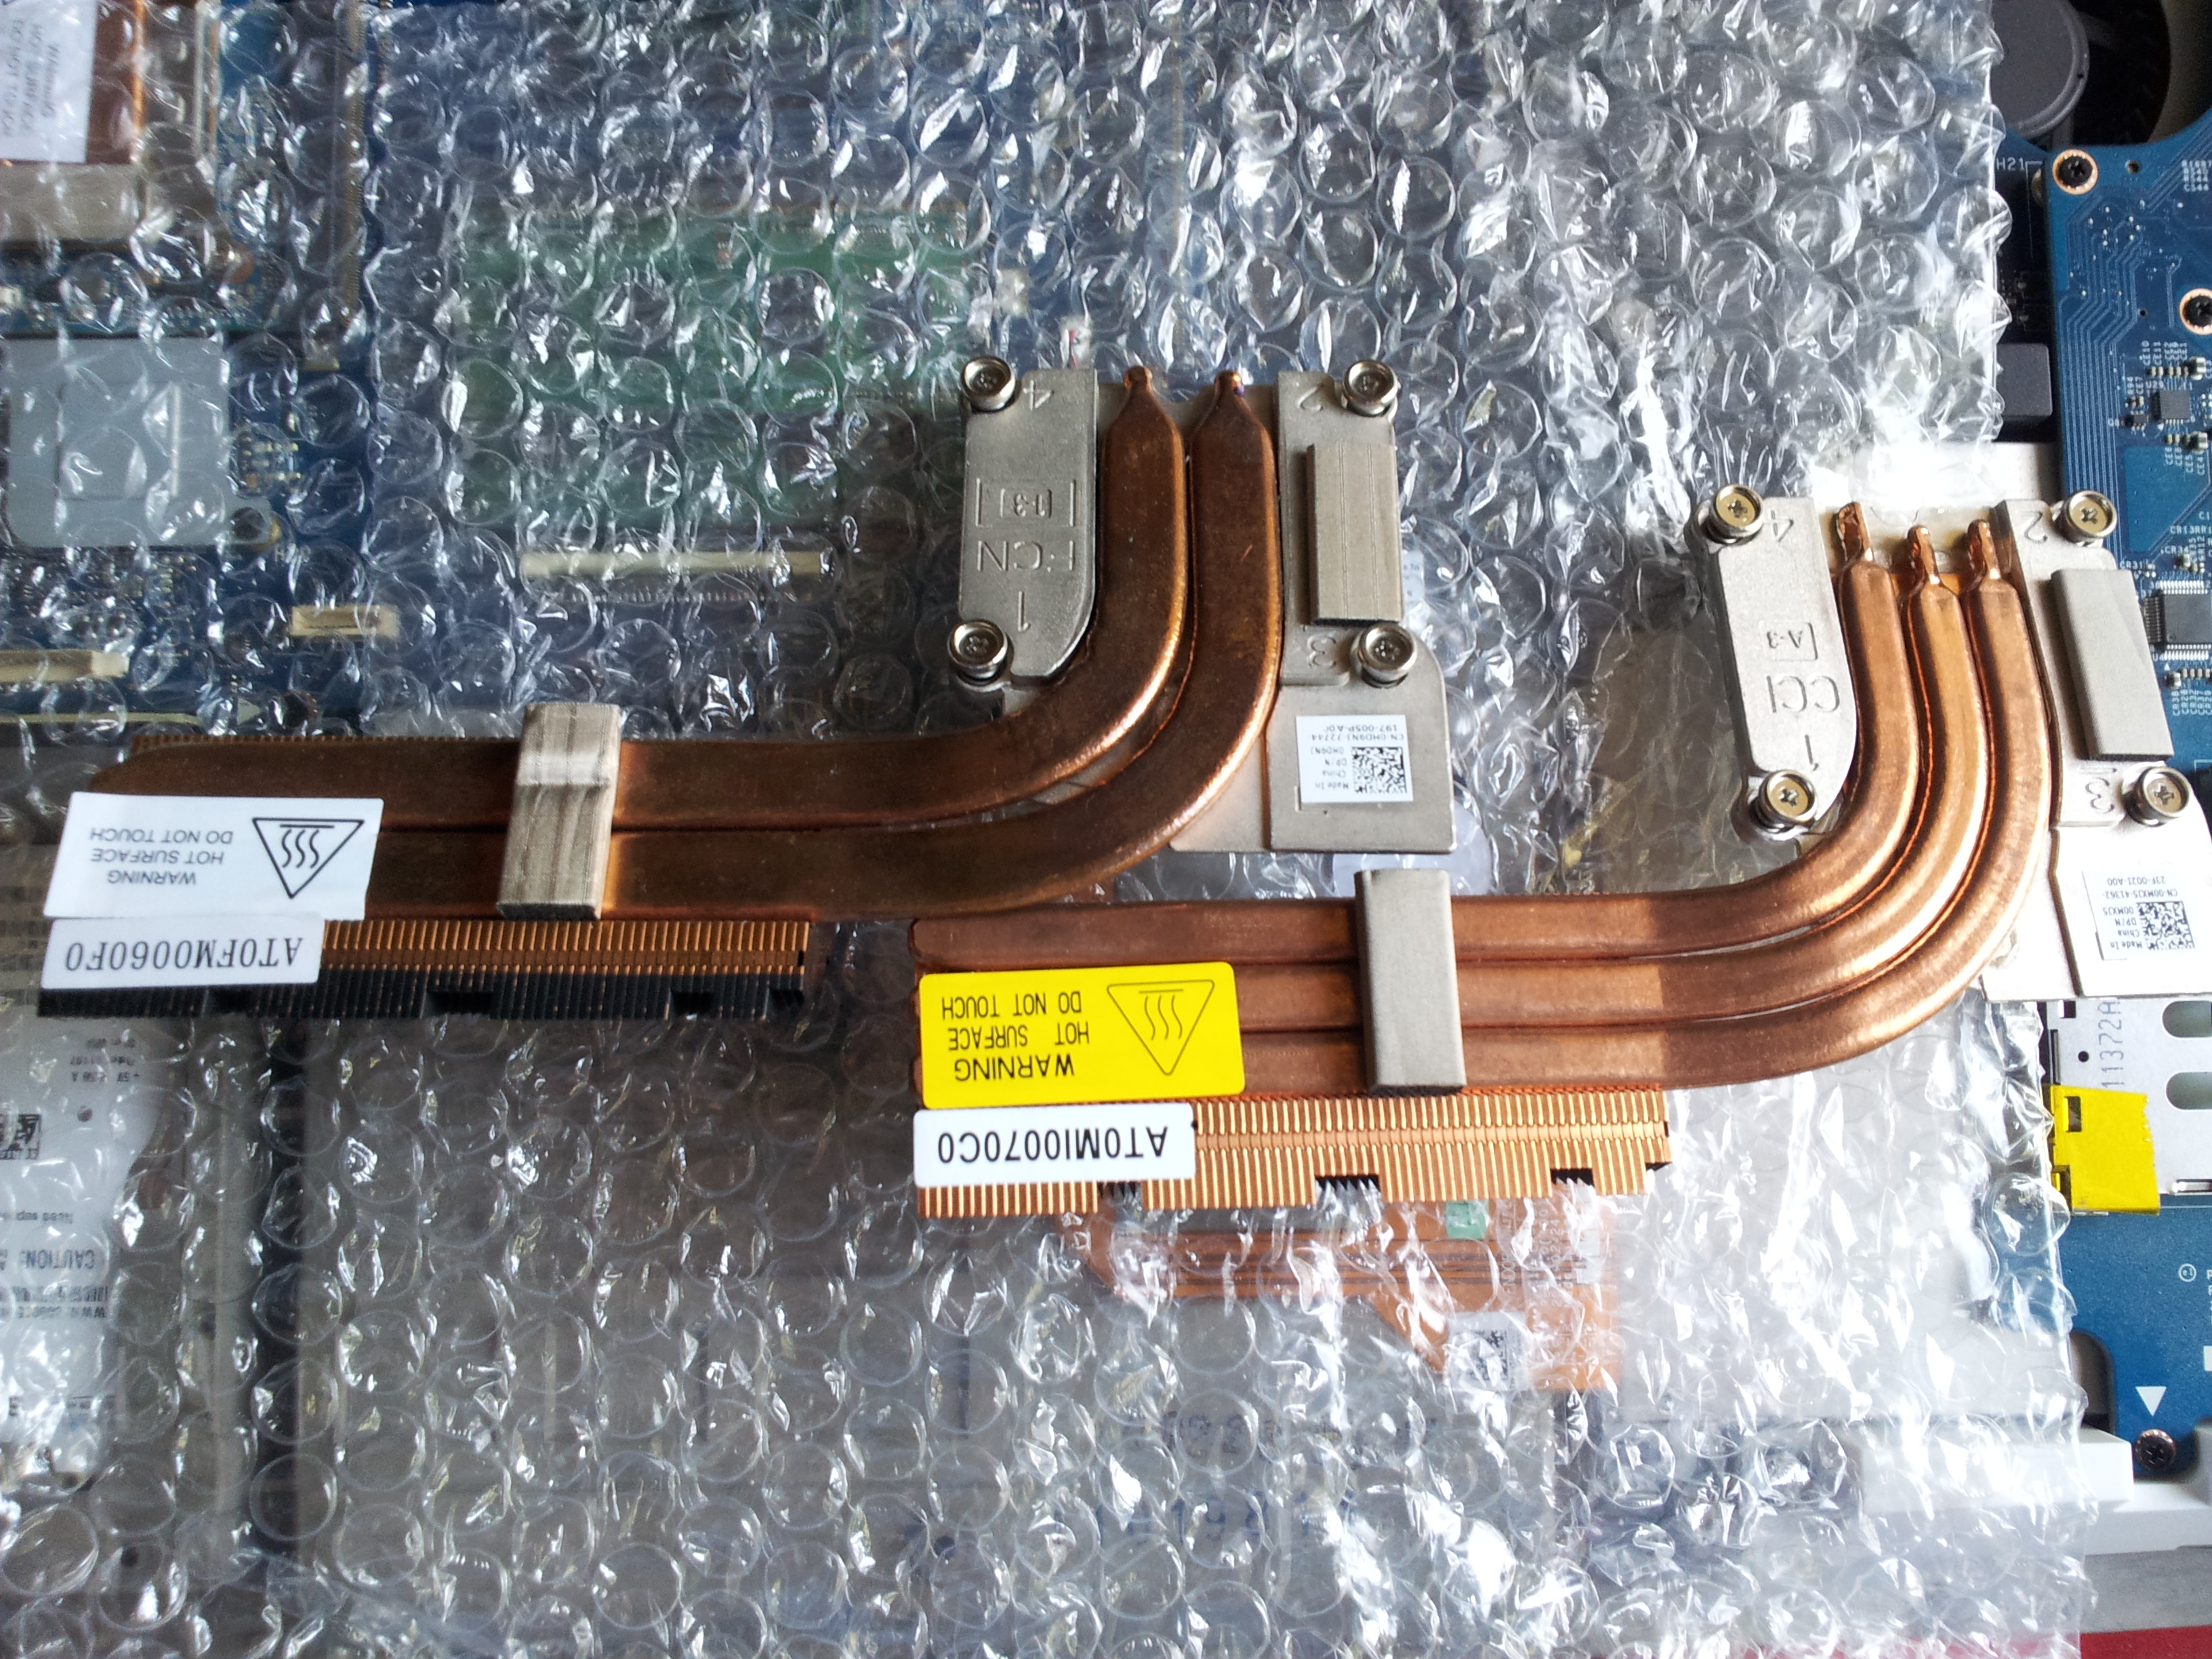
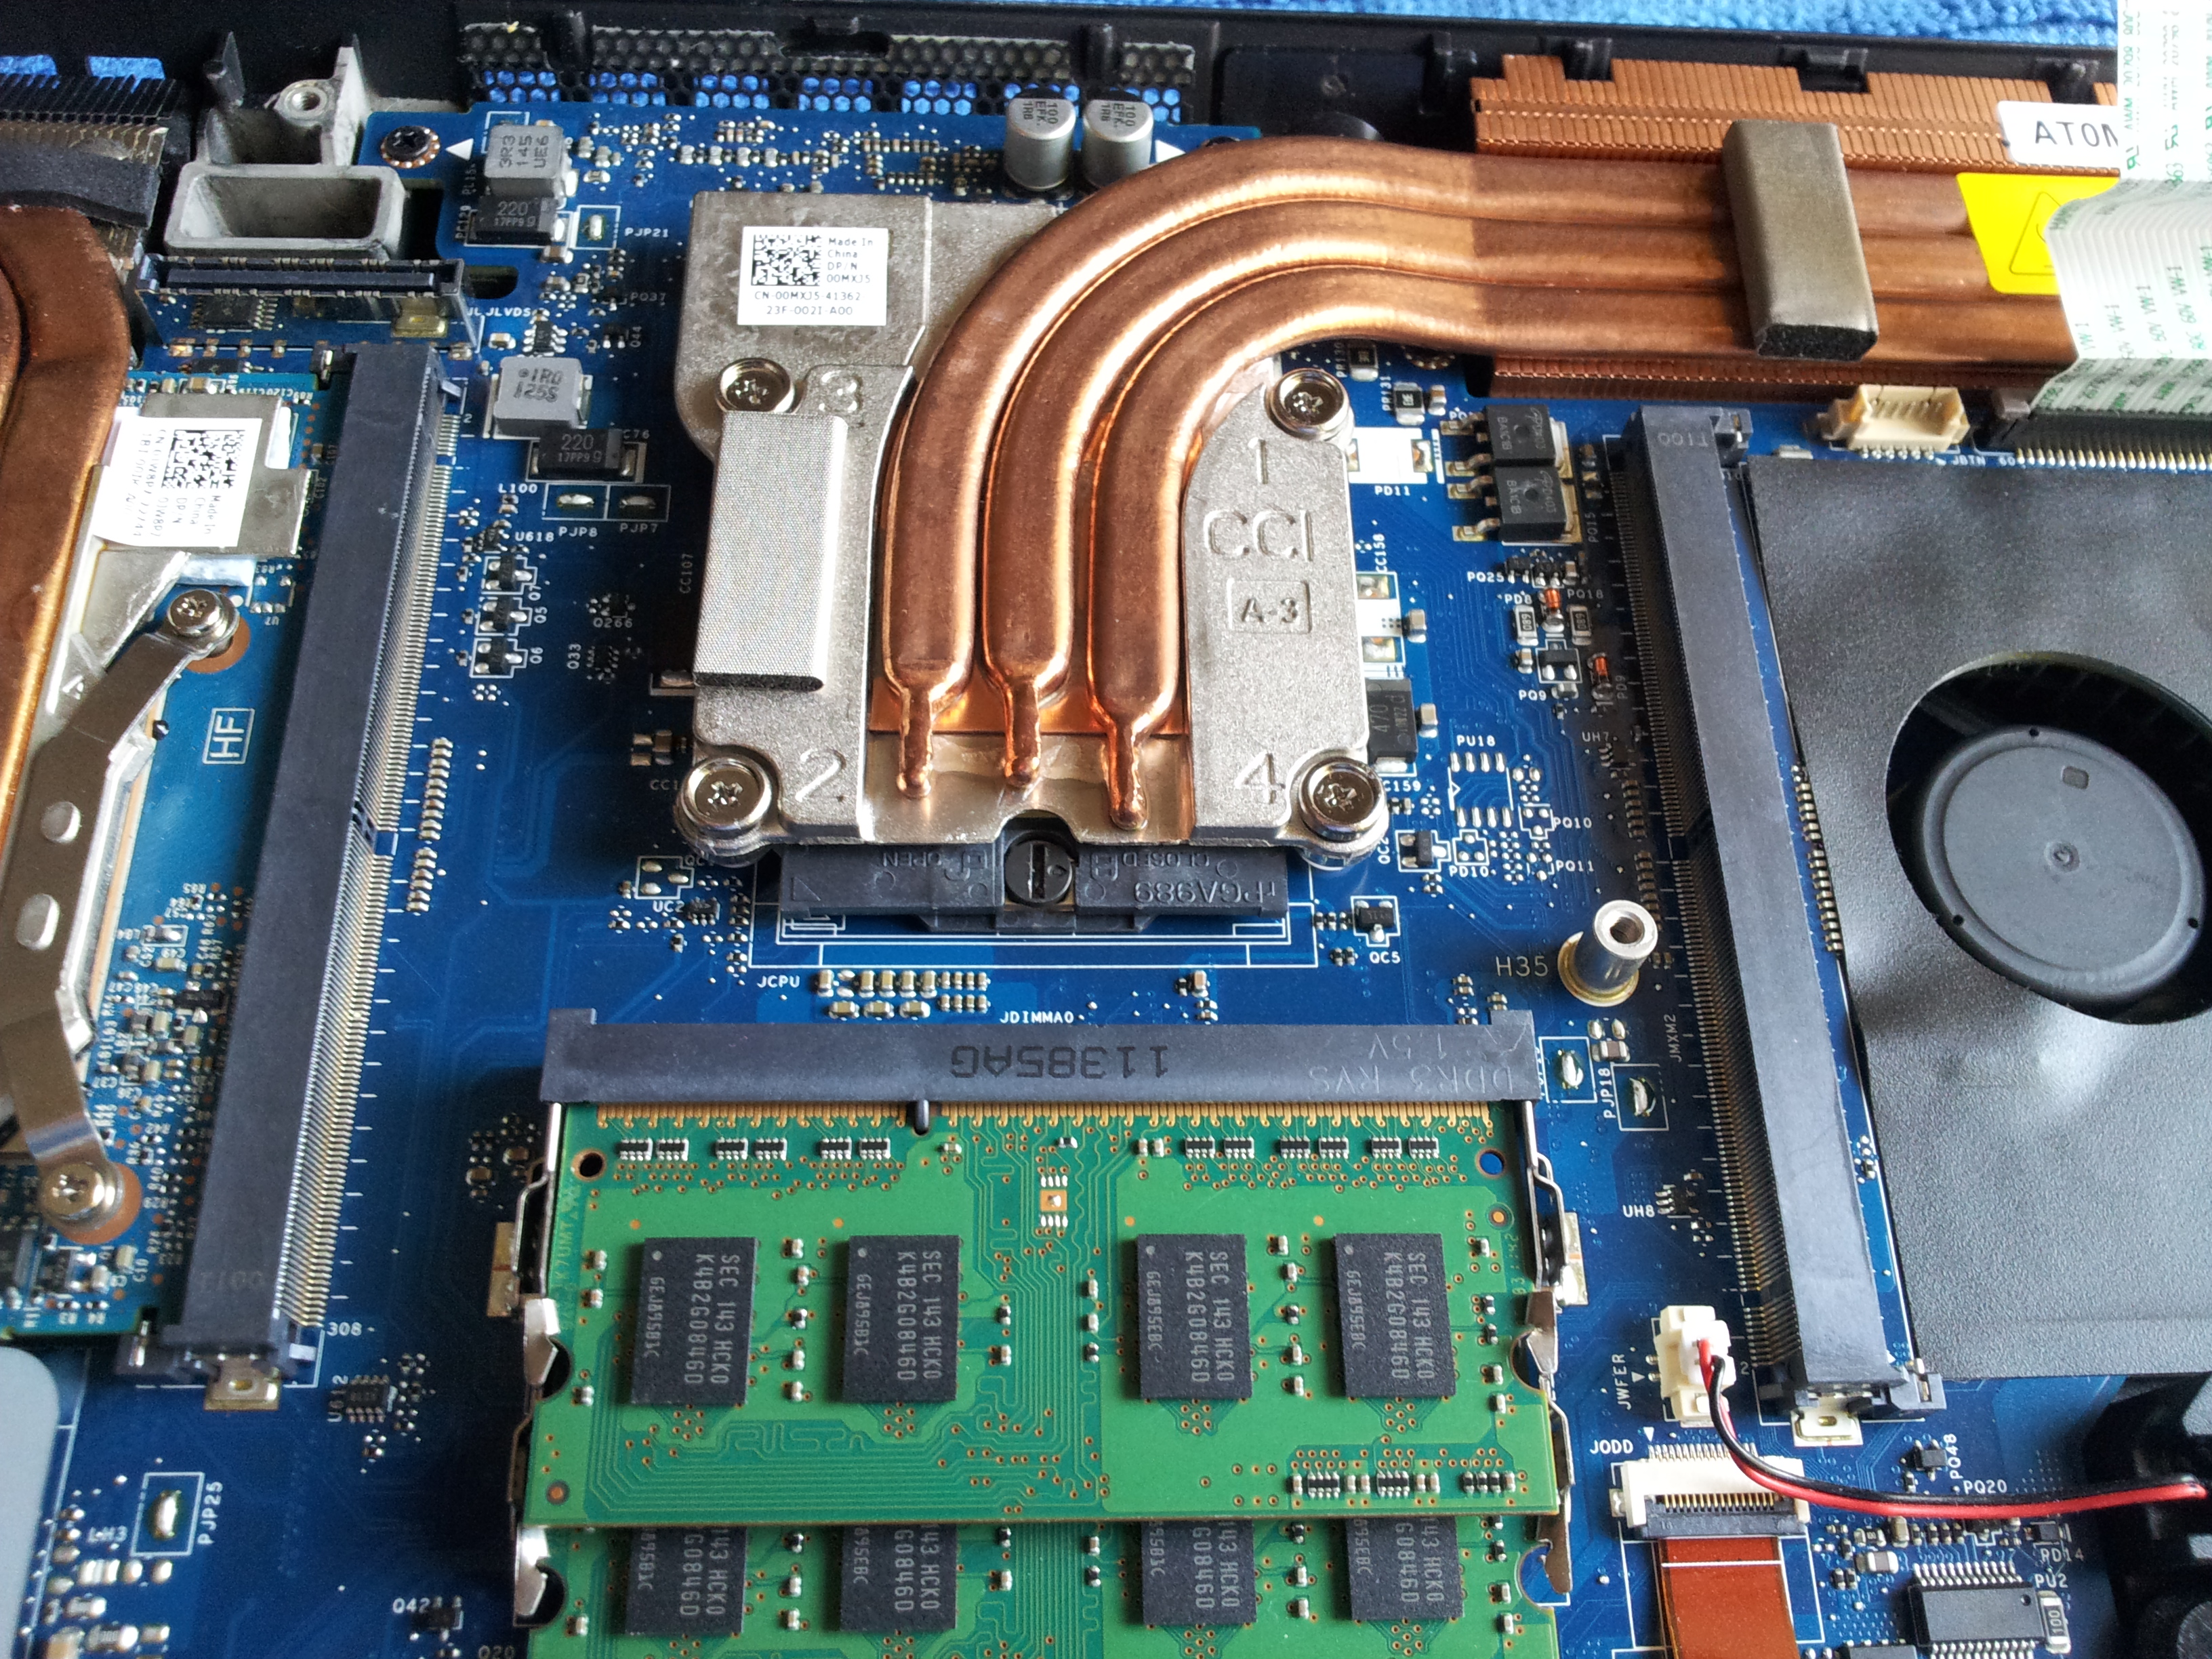
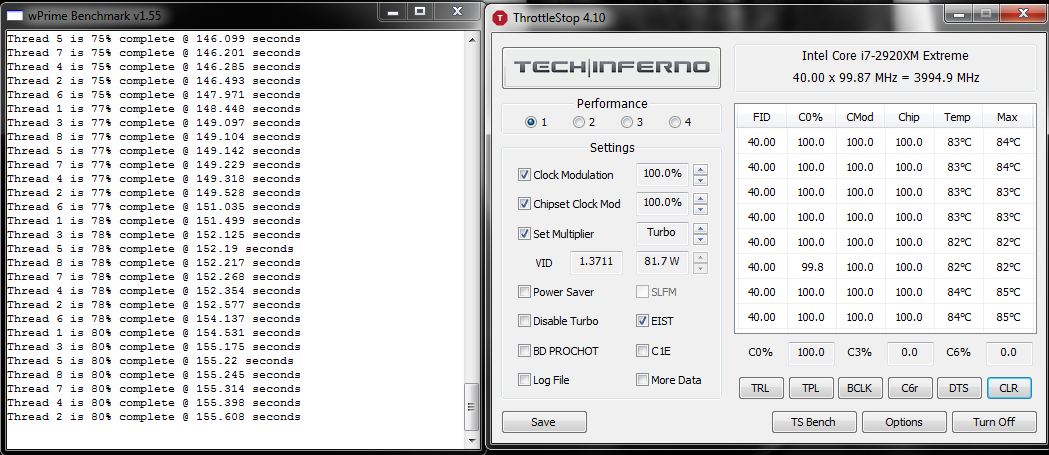
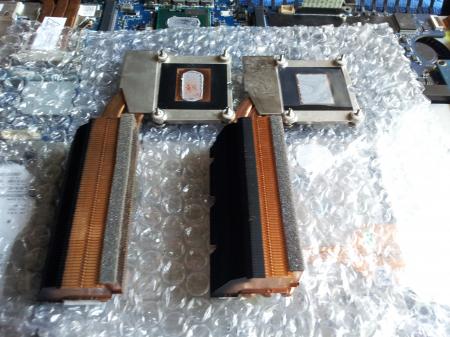
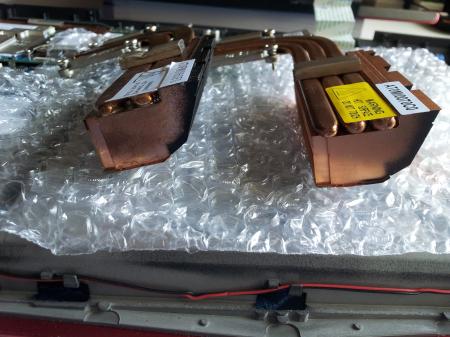
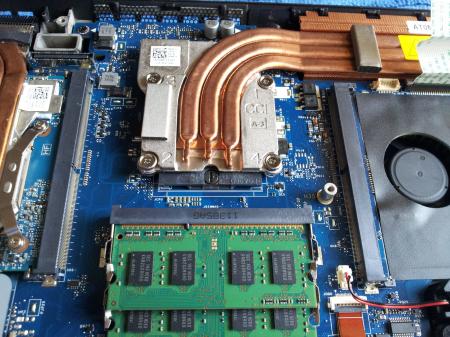
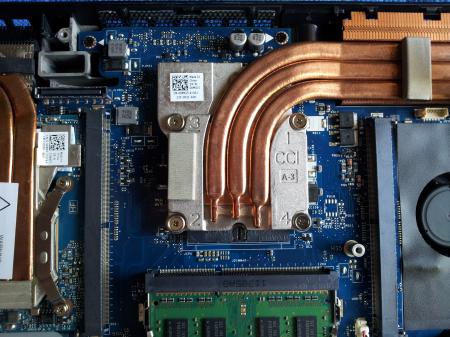
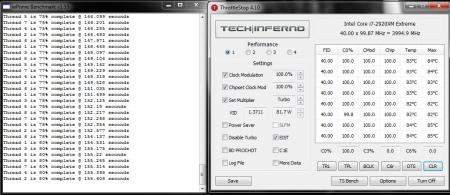
I ordered the M18x-R2 triple pipe CPU sink from Alienware last week and today it finally arrived. Since I had a new palm rest + control cover sitting around to install, I figured I'd get them all out of the way at the same time. Initially I was a bit skeptical about how it would perform vs the 2 pipe CPU sink I already had since the 2 pipe CPU sink has thicker pipes vs the 3 pipe one. However, after installing it (and sticking with the Dell thermal paste), I was simply blown away by the results! The 2 pipe CPU sink with FRESH MX-4 running at 4 GHz would often yield temperatures ranging from 92-98C and was simply not feasible for daily use in this hot Arizona weather so I had to drop my clocks to 3.8 GHz. However, with the 3 pipe CPU cooler, this has all changed and I think I can easily go above 4 GHz. The best part about this upgrade is that the CPU does not throttle to base multiplier after extended use, instead it stays at a constant 4 GHz so performance is markedly improved with sustained load times. Here's some installation photos + comparison shots of the 2 pipe vs 3 pipe: Performance and temperature at 4 GHz: M18x triple pipe cpu cooler part number: 0MXJ5, cost is around $32. Special Thanks: @Alienware-Pablo_R


 2 points
 -
Count me in in your boat, cause i just arrived moral hazard from N|R recommended me this forum here so i will see how everything goes. I hope i can help out people too cause my experience with PCs is pretty decent and after i got my P150HM i actually am more interested in Gaming NB too, after i got the 7970m there isn't even a thing that i can't too mobile. So yeah im registered at G3D.com too if anyone is curious and yeah ask me something if you want (not that great at introductions )2 points
-
Alienware M14x R2 - Modified BIOS versions containing tweaked VBIOS files Similar to the original M14x (aka R1 nowadays), the GPU of the M14x R2 is astonishingly powerful and has much more power than it reveals at stock settings. The relatively low default clock and base boost as well as the apparent +135MHz core overclock limit holds back a lot of GPU power. These BIOS versions here will unlock this software overclocking limit and / or increase the clocks of your GPU and allow you to get much more power from your system. Mods based on M14x R2 BIOS A03: - A03 @ stock clocks, unlocked overclocking limits - more to come Instructions are included, refer to the READ ME file. Please provide feedback and leave a comment. I'm also still looking for some versions to be tested once in a while, if you're interested please take a look at this thread: http://forum.techinferno.com/alienware-m14x/1787-%5Bm14x-r2%5D-vbios-mod-higher-boost-clocks-test-versions-only-5.html *************************************************************** F.A.Q.: Why do I need to flash the BIOS in order to get higher clocks? Isn't the VBIOS responsible for the GPU settings? Answer: How can I revert to the original Dell BIOS? Answer: What exactly got changed compared to the original BIOS? Answer: *************************************************************** Credits: I want to thank all the testers, especially @Stevenxowens792 and @deadbydawn, also @lh6kean, @thanats007 and all the guys I forgot to mention. And remember, you are responsible for the changes you make on your system, flash at your own risk. M14x_R2_BIOS_A03_-_[unlocked].zip
 1 point
 -
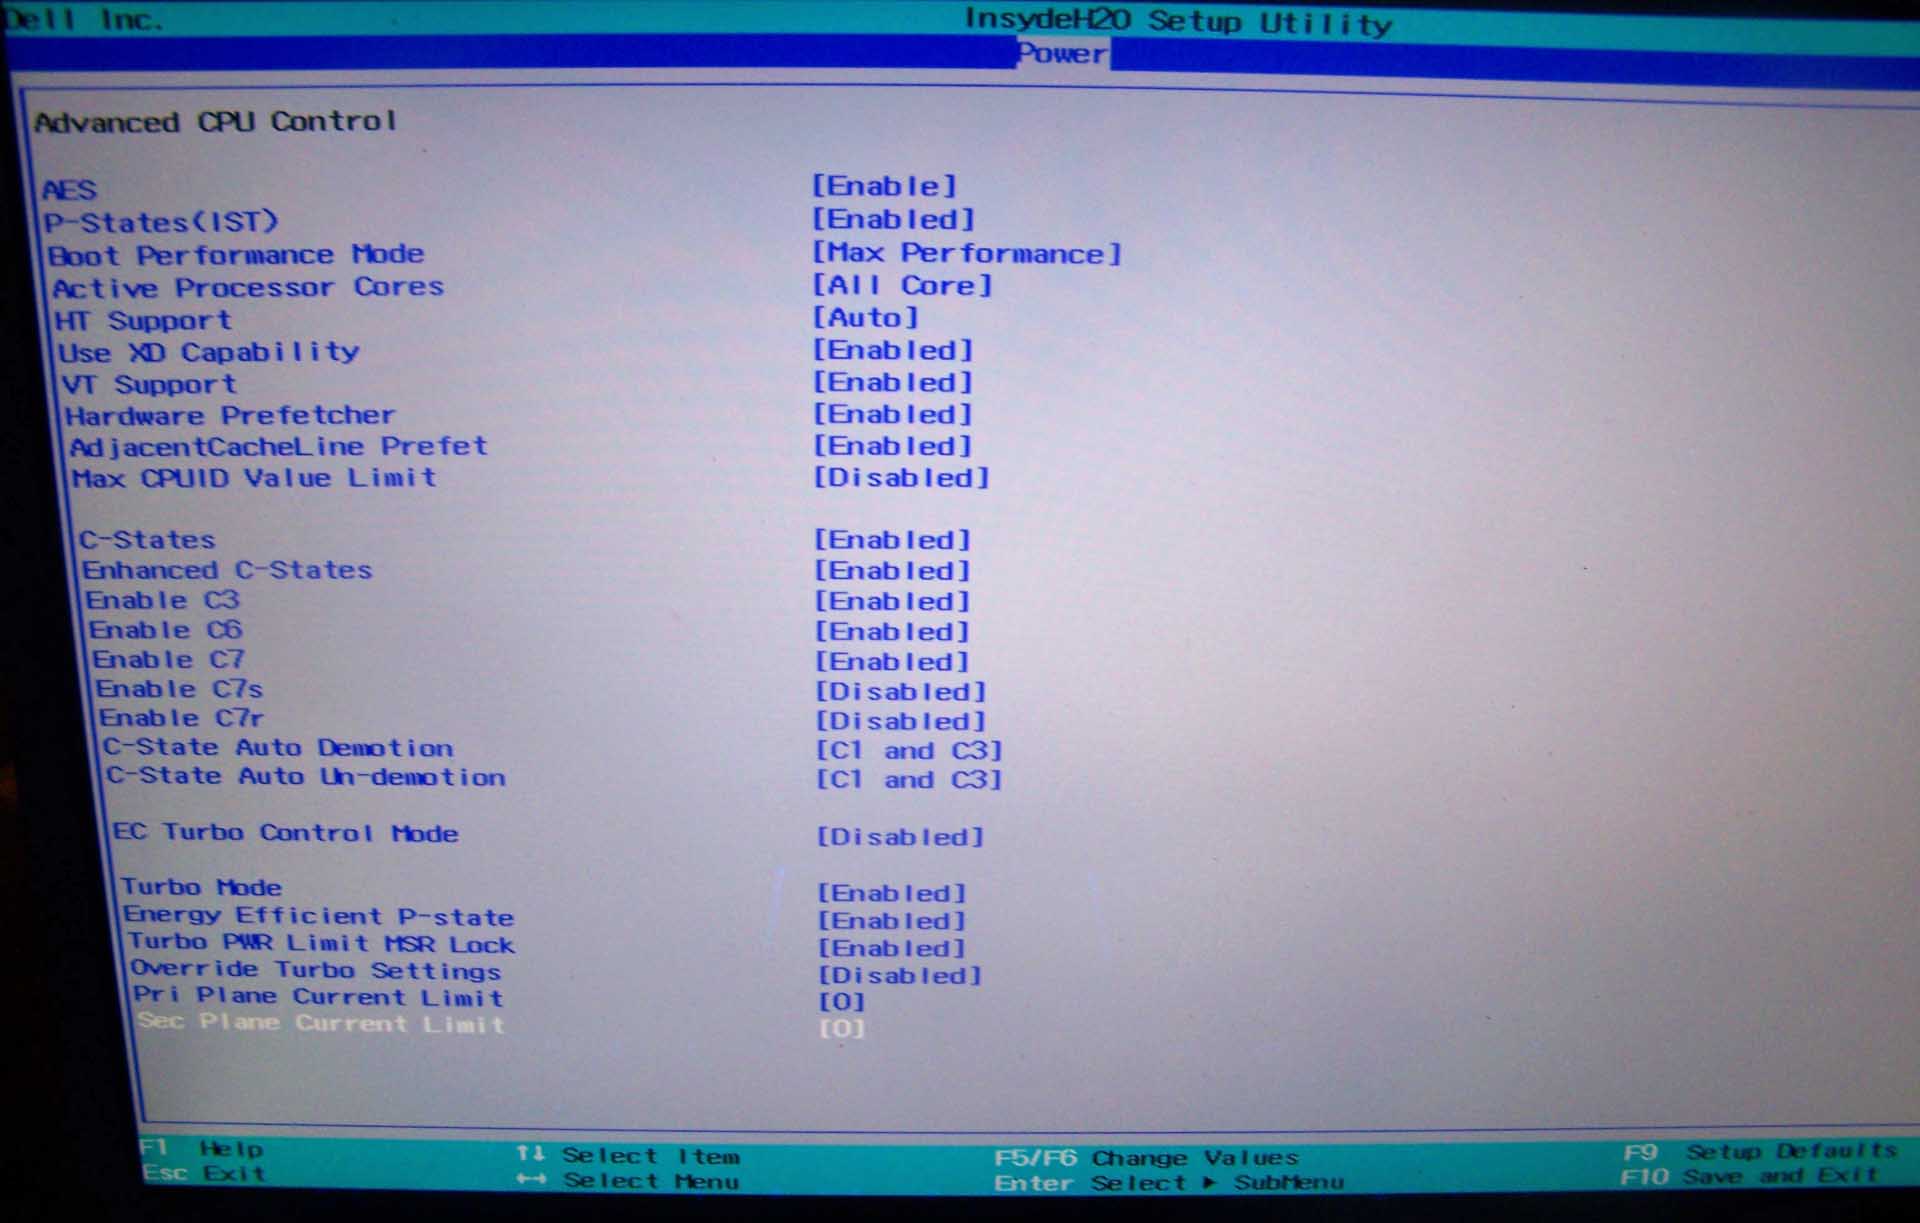
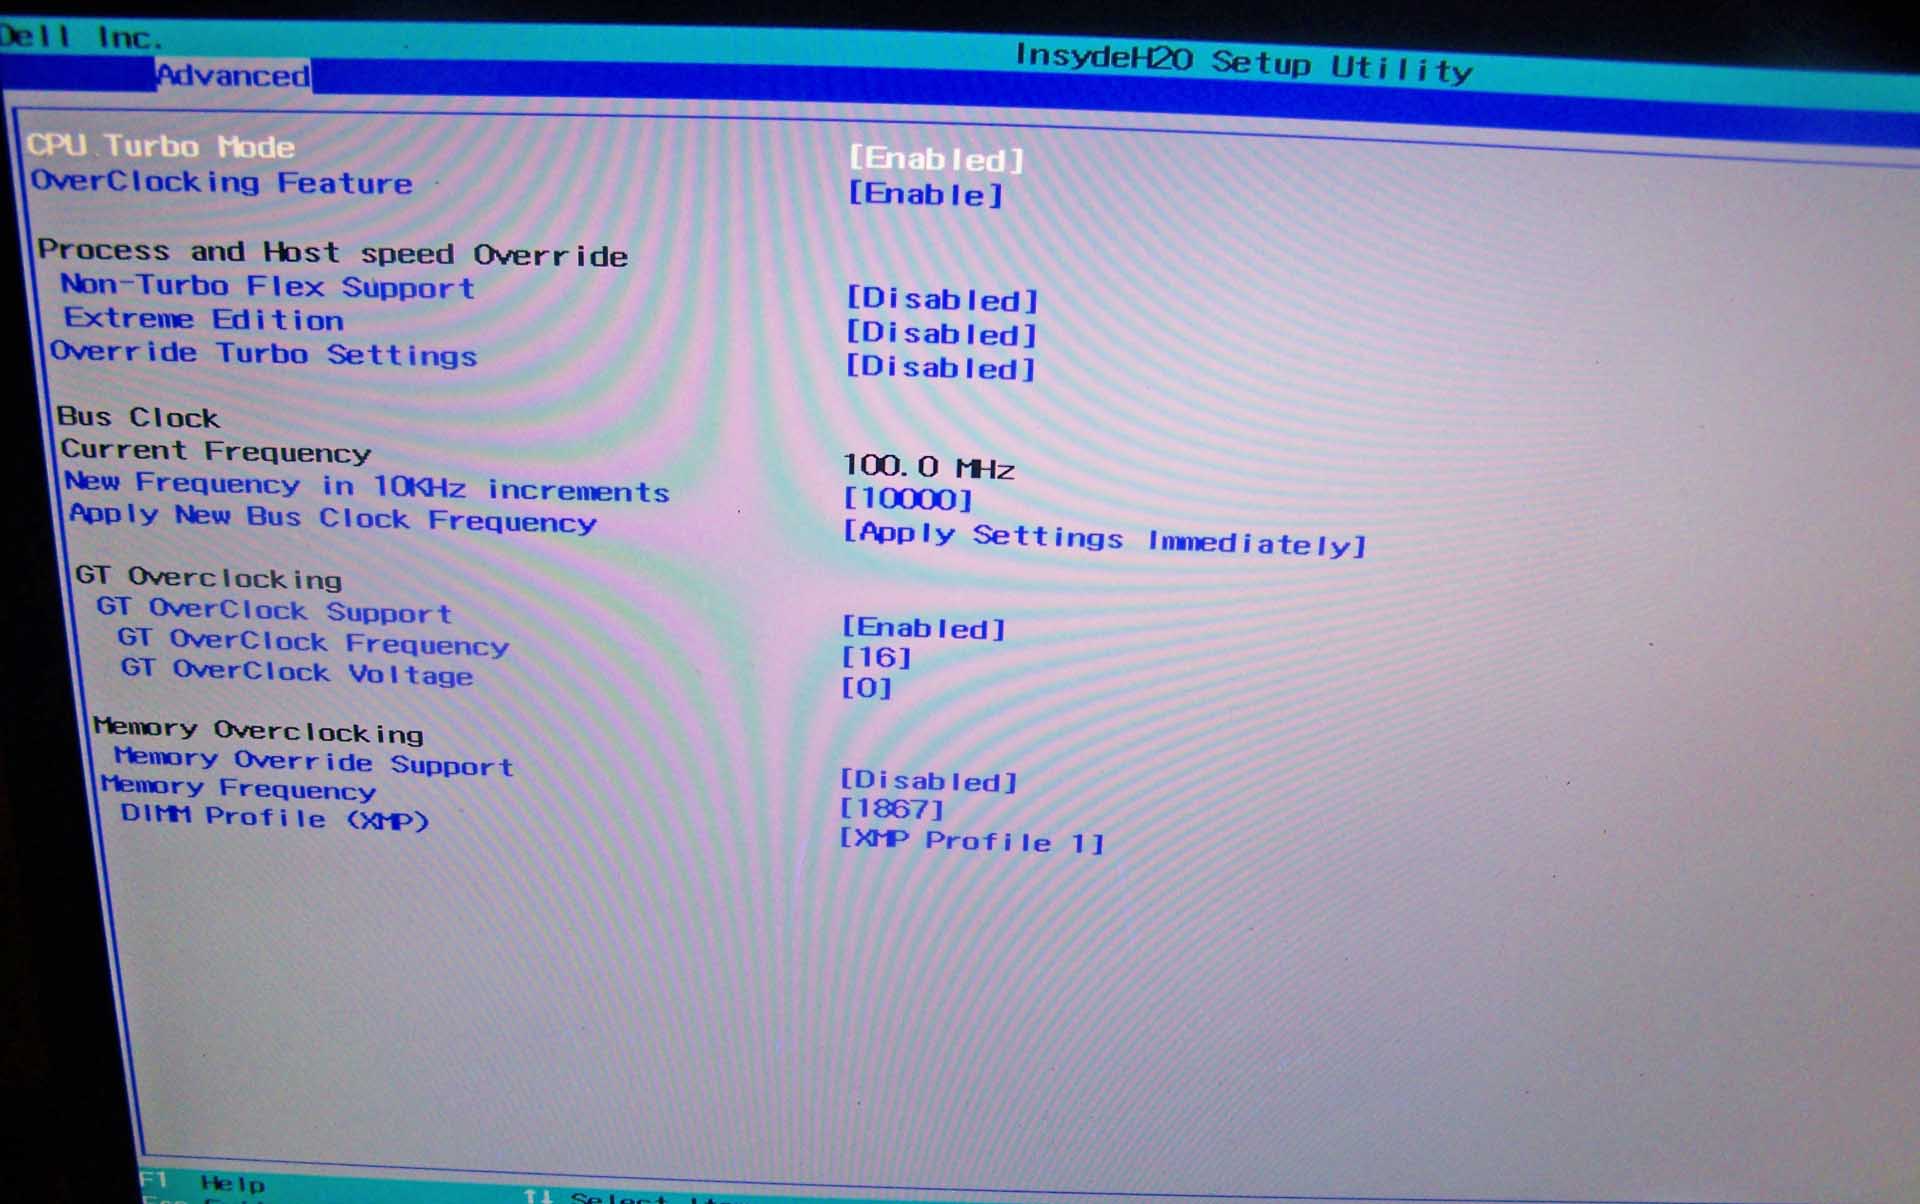
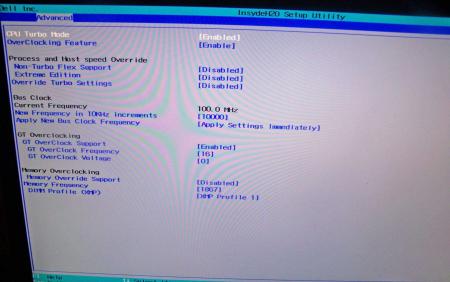
.If you're interested why not all modified BIOS versions can be flashed the 'usual' way with the official tools, read this:http://forum.techinferno.com/alienware/2252-information-about-bios-updates-a07-a08-higher-m14xr2-m17xr4-m18xr2.html M18x R2 - 'unlocked' BIOS versions The following BIOS of the Alienware M18x have been modified so that all hidden menus and options are visible. It will allow you to further tweak your system and optimize its peformance. Most of the options are only meant for advanced users. Don’t change anything you’re not sure about. It's possible that you see options which don’t work for your system, so be careful when changing settings. In case you mess up and your system refuses to boot applying new settings, remove the AC adapter, battery and coin cell battery in order to clear the non-volatile ram of the BIOS. This should fix most issues. *UPDATE*Instructions: There are two ways to flash the modified BIOS: Downgrade to stock A03 by using the USB recover procedure. (Thanks @Scott Matusow for summarizing the procedure). Make sure to closely follow the instructions, and wait until the system is done with the flash. Once you're on A03 flash the modified BIOS using the regular way (using the tools provided by Dell)..This method seems to work very well on the M18x R2, at least as long as you do as instructed. It can be a bit scary though since you can't see what's happening. .. Flash the BIOS from DOS with the FPT tool. This will only flash the BIOS part and leave out the EC and so on. It's a really safe option when done properly and less scary since you see the progress and information on the screen. For the USB recovery method follow the instructions in the link above. Second possibility - flashing from DOS: Prepare an USB drive so that it can boot DOS. If you don't know how to do this, check the instructions in the spoiler. . Grab the DOS version of fpt for flashing, and my 'prr tool' to circumvent write protection.. Download a '[FPT]' labeled version of the unlocked BIOS. Put the DOS version of the flash tool on the root of the prepared USB stick (fpt.exe and fparts.txt), along with the prr.exe and the file you want to flash (plus the included flash.bat). . Restart the system and boot from your USB stick. Run prr.exe, then flash the bios by executing the flash.bat file. Wait until the tool completes the flash. If the verification is okay, reboot, else flash again.. Go to the bios, load the default settings and reboot. Done. NOTE: If you want to use an unlocked BIOS newer than A03 I highly recommend to first flash the desired version of the unmodified BIOS (grab it at the Dell download site). Once you're on the version you want to unlock, follow the DOS flashing procedure described above. If you want to go A03 or earlier, the best thing to do is using the USB recovery method. Here two pics of the most interesting options: ********** Thanks @Riri-Fifi for the pics and testing! Thanks @johnksss for testing my prr tool! ********* Flash and use at your own risk. I don't take any responsibility for possible damage on your system. ___ The software which I provide here ('prr tool') comes with absolutely no warranty to the extent permitted by applicable law. Download the bios files referened in this post from here:

 1 point
 -
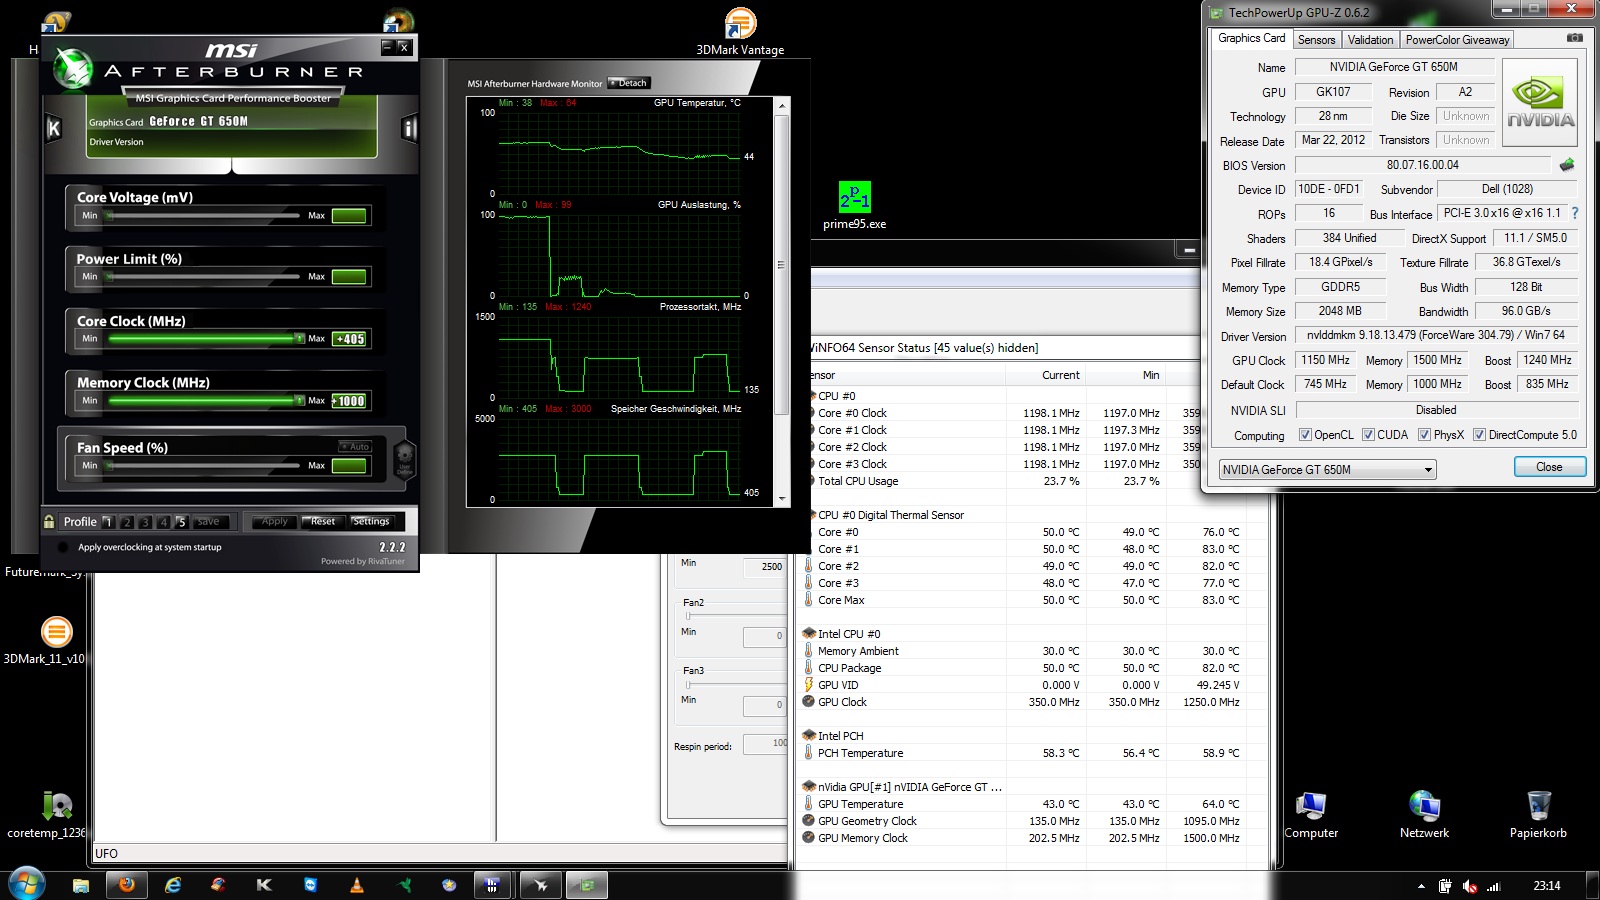
So you've got hold of a 4GB version of a GTX 680m, figured out how to flash the vbios and it runs well. However, there are some things missing such as GPU boost and the ability to actually install drivers easily. Perhaps you are reluctant to run a vbios that ups to voltage to 1.037v. This thread aims to have everyone owning a 4GB GTX 680m get the most out of their GPU including enabling a GPU boost hack. This is not an overkill thread, but more about getting things working well with a good performance, quality and stability improvement over stock. There will be no crazy high voltages so everything should be safe short and long term however I take no responsibility for burnt or bricked cards. Please proceed at your own risk, there will be vbios flashing. First of all, the GTX 680m is similar to the desktop GTX 670 but severely downclocked. By OC'ing, one can get the core speed up to speed and beyond but clocking the memory @3Ghz (6GHz effective) in an attempt to reach its 192GBit/s bandwidth is very risky and likely dangerous. However, if the memory is clocked to 2250 (4.5Ghz effective) then the bandwidth is identical to that of the GTX 660 Ti @144GBit/s. Both desktop GPUs have the same base and boost clock at 915Mhz and 980Mhz respectively. This brings me to the vbios. Kindly created by master hex maestro svl7. The vbios (attached below) clocks in @915/1125(2250)Mhz exactly the same as that which I mentioned above. Those specific clocks are also what makes the GPU boost work well (I'll get to that later). The vbios is engineered from the MSI ES(FD) vbios and has a voltage of 1.025v and settles @1.0v during constant load. Not amazingly(potentially dangerously) high but there is still plenty of headroom for overclocking. Flash this, and verify with GPUz. Of course the memory clock can be anything but I chose 1125 as they are nice and neat as well as offering a mild but significant boost in performance. Next, drivers. The recent nvidia drivers are great but digging deep into the source code, we find that there are image quality hacks that trade image quality for performance. Plus some drivers just plain won't install if the GTX 680m is an aftermarket upgrade on unsupported mobos. These drivers are winners though: http://files.laptopvideo2go.com/Dox/geforce306.02.2-modded.exe Modded by the infamous Dox, all hacks are removed, quality is optimsed and support for all nvidia devices is included and should install without a hitch on any system. Drivers are uber stable but not great benchers as image quality is improved at some cost to performance. but I'd happily trade performance for decent quality and stability and use another driver to bench. And finally, enabling GPU boost. This method is not actually GPU boost but it functions in exactly the same way, call it "fake" GPU boost. What we need to do is to download Nvidia Inspector: NVIDIA Inspector 1.9.6.6 download from Guru3D.com Put that in a safe place and run it, allow overclocking and set the base offset to +65 to achieve 980Mhz, the same as the desktop cards. Now some of you may think that this is plain overclocking however, this is not the case. After applying the clocks (keep Inspector open), run a mild to moderately intensive GPU task such as playing HD video or opening the settings dialogue of Furmark (but not starting any test yet) and you will see that the clocks will still show 914.5Mhz. Start a game or Furmark and that will jump to 980Mhz similar to GPU Boost. Now click on "Create clocks shortcut" and a new shortcut should appear on the desktop. Drag that to your "Startup" folder in the Start menu and Fake GPU Boost should be enabled on every restart without any user input needed. I tested other base clock speeds ranging from 900Mhz up to 1000Mhz and and every boost clock speed from +1 to +100 and 915 -> 980 was the only combination that worked. Most other base clock speeds would always change to 928Mhz and without the 915Mhz baseclock, all other fake boost clock offsets would go to 966Mhz unless I went way beyond 1Ghz which I don't recommend anyway. Either it was coincidence that those clock speeds are identical to the desktop ones or that they are the only clocks that work on the GK104 which is why nvidia set them to the desktop ones in the first place. Please report back if you have any issues. I've only tested this myself but it should apply to all 4GB GTX 680m users. EDIT by svl7: Vbios is outdated, grab the latest one here: http://forum.techinferno.com/general-notebook-discussions/1847-nvidia-kepler-vbios-mods-overclocking-editions-modified-clocks-voltage-tweaks.html1 point
-
Alienware Windows Customizations - All are tested and work on Windows 7 platform - 64bit PC Related - Wallpapers, login screens, Avatars, etc. --------------------------------------------------------------------------------- Alienware Wallpapers Alienware Wallpapers Alienware Avatars Alienware Avatars Alienware Login Backgrounds Login backgrounds Custom Login background changer by svl7 Login Background Changer Alienware Karet Font AlienKaret pack Alienware Screensavers Alienware Protector Screensaver Screensaver 2 Alienware Sounds Alienware Startup - Shutdown sounds Alienware Dreamscenes/Movies - Br33d Br33d Dreamscene Br33d movie Alienware Icon packs ***Use at your own risk*** These are good looking and installed fine, however my system slowed some after installing and I had to install the Alienware Theme from dell and restore windows look to Windows default. The Alienware theme is listed below from Dell's site. Alienware Icon pack Blue Alienware Icon pack Green Alienware Icon pack Red Alienware Windows 7 theme Alienware Windows 7 Theme by Dell Restore Alienware branding to your System Information screen How to restore Alianware branding to your system in formation screen by Michael Custom Alienware Stickers Custom AW stickers - PM ILoveBoobs Ultimate Windows Tweaker Ultimate Windows Tweaker - Found by ILoveBoobs PCFx - AlienFX lighting PCFx - AlienFX lighting by Ixel ------------------------------------------------------------------------------ Feel free to PM me if I need to modify these or you have some to add!1 point
-
This is a modified version of BIOS A10, with all the hidden menus made available. The archive with the BIOS and the necessary files to flash it are attached to the post. After flashing, go to the BIOS menu and load the default settings, save, exit and reboot. As always with such modifications, you alone are responsible for your system and what you do with it. If you flash it, please report back and let me know whether everything is ok. (I'm sure it is, but I don't have an M17x R3 myself to test it ) The menus look exactly the same as all the previous "unlocked" R3 BIOS versions. Tested and confirmed to work, thanks @Staff Sargent !! *********************************************** Please consider a donation if you like this modified BIOS. *********************************************** UPDATE: Had to correct some things, this works fine. Keep in mind that A10 is no longer officially available on Dells support site, I don't know the reason for this, they might have to fix some things. Update 2: BIOS is available again on Dell's site, nothing changed between the version which was on there earlier and now... lol. M17x R3 - [unlocked] BIOS A10.zip1 point
-
OK - I've found the problem and it was an unusual but stupidly simply fix. For some reason my picture decided it wanted to output (through the hdmi) to another display. It has never done this and was very random + just after a bios flash. Phew. Relieved. StamastisX thanks for you help anyway buddy. *Mods you can close this thread - apologies for the clutter*1 point
-
The latest Nvidia "verde" driver got just released. Download link (direct): http://us.download.nvidia.com/Windows/306.02/306.02-notebook-win8-win7-winvista-32bit-international-beta.exe Supported cards: Changelog: (The complete version can be found here: http://us.download.nvidia.com/Windows/306.02/306.02-win8-win7-winvista-notebook-release-notes.pdf) Have fun!1 point
-
Awesome thats what we want to hear bro! Im glad your all set now. Thanks a lot Littleone! I owe you one bro.1 point
-
Thanks for that mw86. Littleone gave me a hand via PM. Thanks again Littleone. So, there was no need for me to do a Noob-guide since I was hooked up with a one click Windows based flash/installer. I'm a happy chappy. May my SSD's live a long and prosperous life with TRIM. Gentlemen.. Thankyou1 point
-
Awesome, you know you can also hit up the wonderful reps here which would next time gladly assist you from the start. Just check the forum leaders list and you can PM a specific Alienware rep if you would like. I hope your gains are vast! Just noticed you only have two posts so you'll be able to PM by post five. So let me formally welcome you if you haven't been already. Welcome to Tech Inferno bradleyjb and thank you for becoming an Elite member.1 point
-
Welcome to T|I Scerate!1 point
-
Okay. I got my "pulled from new computer 100% tested" motherboard from eBay. The LVDS connector had been repaired. Brightness is stuck on low. Checked for the brightness PWM signal from the EC to the panel, nothing. So whatever took out the LVDS on this board also took out the EC's PWM. So the EC is bad and I will have to send it back. However, it still works so I did some testing while I had it. I flashed my MXM-modified SBIOS, but no change. According to the MXM software spec (which has disappeared from the internet at the moment) the MXM card should respond on SMBus before any other signals such as power_good become valid. So I hooked up my logic analyzer to the MXM SMBus line. My LA doesn't have a good sample depth because it has a high sample rate, so I couldn't get a good picture of no MXM module vs. a working MXM module. I needed to get the whole sequence to compare, but my LA only has a 256k buffer so I can only sample for a second or two. The bus runs at about 67kHz so I need 500kHz sample rate for the I2C decoding to work properly. An interesting thing I found was that the board is built to prevent the MXM module from receiving SMBus communication. It's buffered through a switching transistor to only allow the MXM module to write to the bus. I tried shorting the drain/source of the transistor so the module could receive replies but it evidently doesn't because nothing changed. What I did figure out with my 6970m is that the SMbus lines are in some sort of tri-state condition. They don't switch with power on and stay around 1.7V. This is an invalid bus condition. Since SMBus is the first thing that is supposed to happen, things don't look good. I don't think I will pursue this any farther as I have no way to verify that the 6970m is actually working. I also don't have a logic analyzer at the moment with sufficient sample depth to get a clear picture of the SMBus activity on startup. AMD ignored my request to join their development group so I don't have any data for the card. I will probably put it back together when I get a working MB and sell it for a newer release.1 point
-
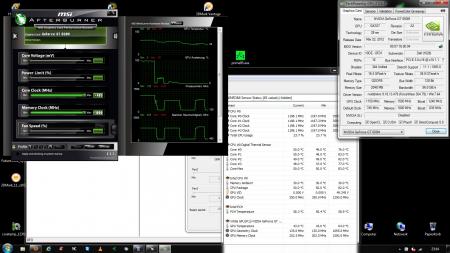
So far my new killer card is working great!! Seems like ping times as well as download times have improved. Thanks to mw86 for the advice on drivers and such.1 point
-
Well, not quite my league. Xen is one thing..., Citrix, well let me think how to say this... - too proprietary. But maybe if you have more specific questions I could be of help.1 point
-
@rodarkone I recommend a clean driver install normally isnt a priority but if you having bsod on install. Try using DriverSweeper's new improved version called Driver Fusion. Phyxion.net First uninstall via normal AMD driver uninstall. Dont restart. Open Driver Fusion select AMD and analyze or clean after and it will ask to restart before clicking okay to do so, open CCleaner free app and use the registry cleaner you may see another aMD file show up or so and have it delete it. Close ccleaner open device manager and check the video card now says vga adapter. If not uninstall that driver there and check the box "remove driver files" hit okay and go back to driver Fusion and let it restart. Windows will boot and show likely a low resolution screen. Proceed to locate and install the driver 12.8 which you should use the whql from AMD's site thats whats in my system now. Now hopefully it works that time. Dont install the hdmi audio driver and it may save from error i see where the normal IDT audio software crashes on install. I install anyway ignore that error and proceed and its no prob and continues install. Restart even if it says there was install errors i check log and driver and all still installs so ignore. Once restarted install AMD CAPS 12.8 version 2. I hope this helps. If you still get bsod then it can be a few things, some SSD drives like vertex 3 if you have a drive with similar controller sandforce based try updating your firmware. You could make sure your ram is seated properly and also could test ram for errors. Have you installed any new software. Is this as is from factory the OS i mean or have you done a clean install of windows? Bios updates are important but likely not cause of your bsod. If anyone else has suggestions feel free to chime in.1 point
-
Ok, should be possible I guess. But there's always a slight risk involved... I'm not going to do this if in the end no one will flash it... It's quite a bit of work after all. Also, is there a serial number / service tag or similar in the BIOS? (Go to the BIOS menu and check). Because if there is, then chances are that it can be found in the dumped BIOS... which is a bit problematic. Edit: Do you know how this bios was dumped? Some tools don't necessarily dump the whole bios...1 point
-
I wish svl7 the best, and a speedy safe return. Great dude.-1 points