Leaderboard


Popular Content
Showing content with the highest reputation on 09/22/11 in all areas
-
Here's a little article about lead-free soldering, if possible you should use lead-free solder since the parts on the video card have been soldered on with lead free solder as well. It's a lot harder to work with than with standard tin solder, at least in my opinion, but you can get used to it after a while. I recommend starting with normal tin/lead solder before going to lead-free, it's easier to get the feeling. That's a pretty good video tutorial (unlike a lot of the solder vids you find on youtube):2 points
-
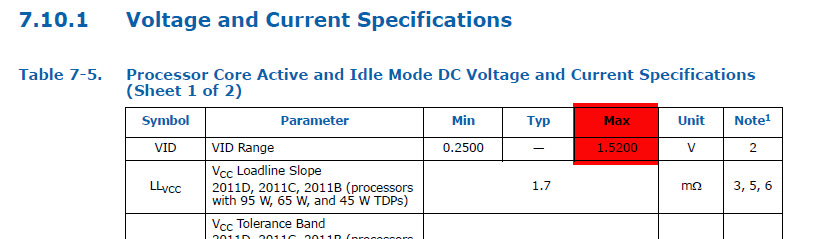
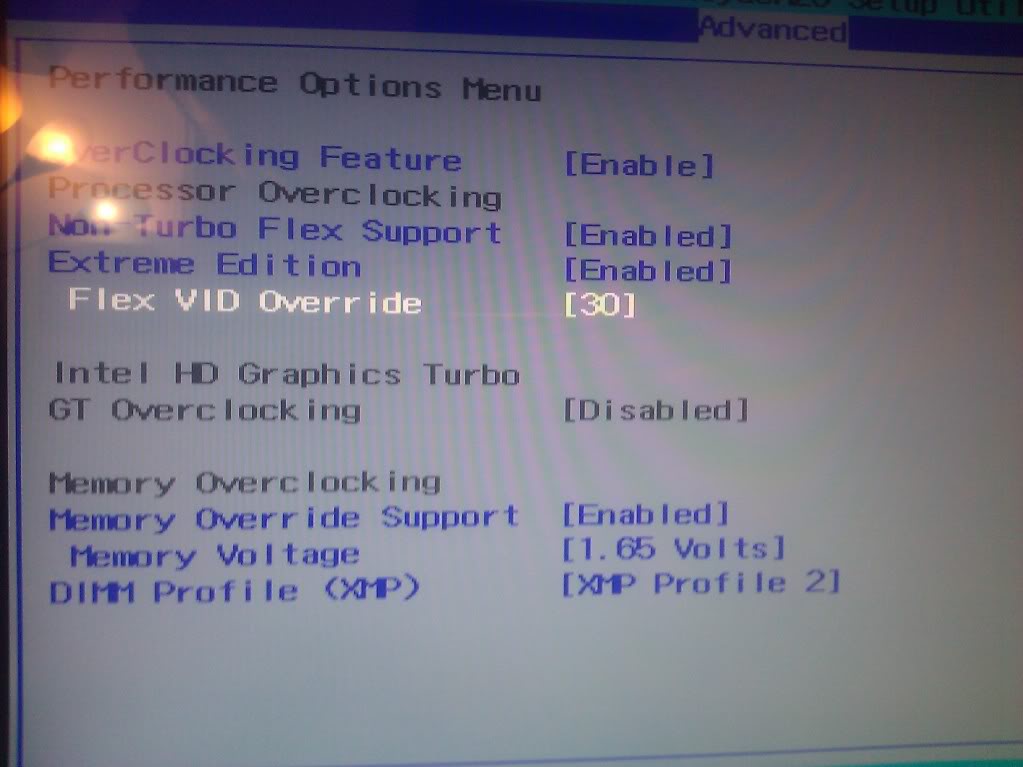
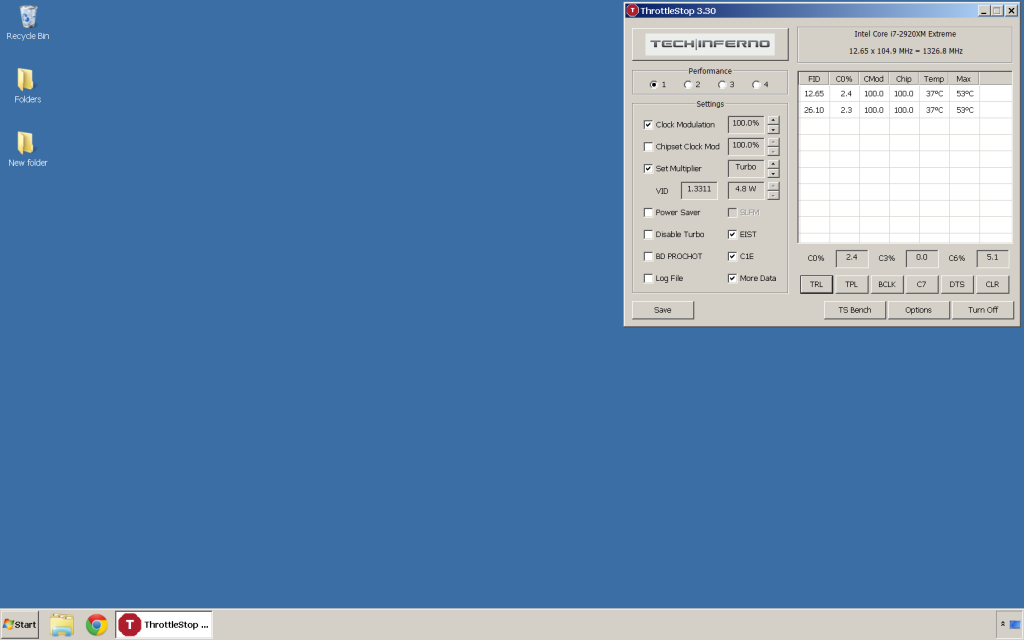
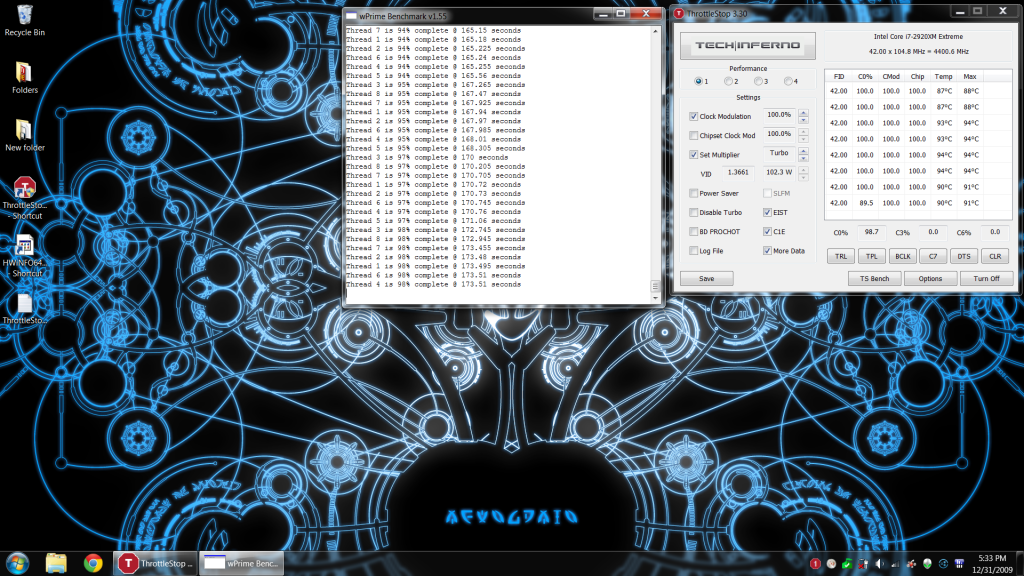
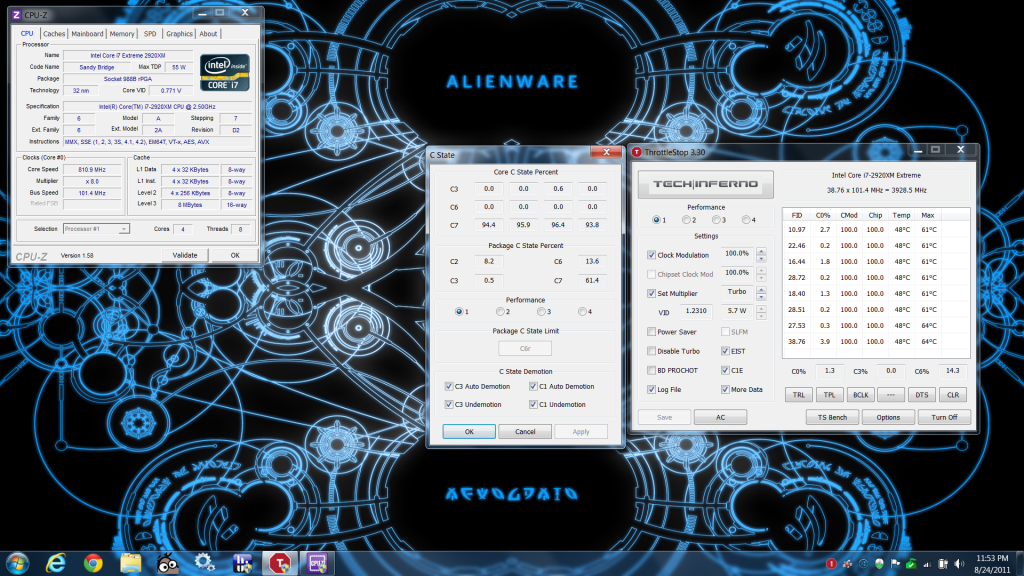
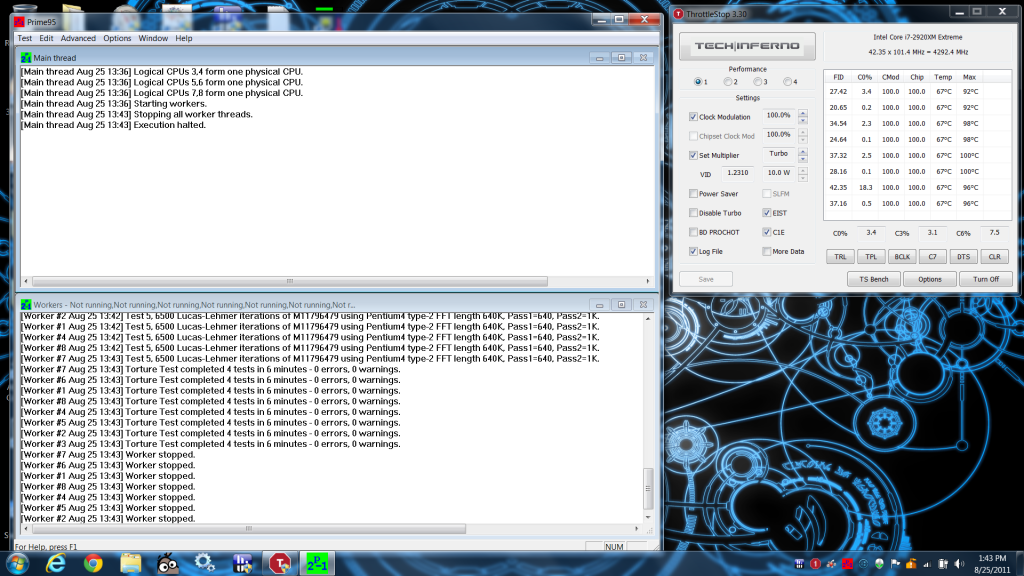
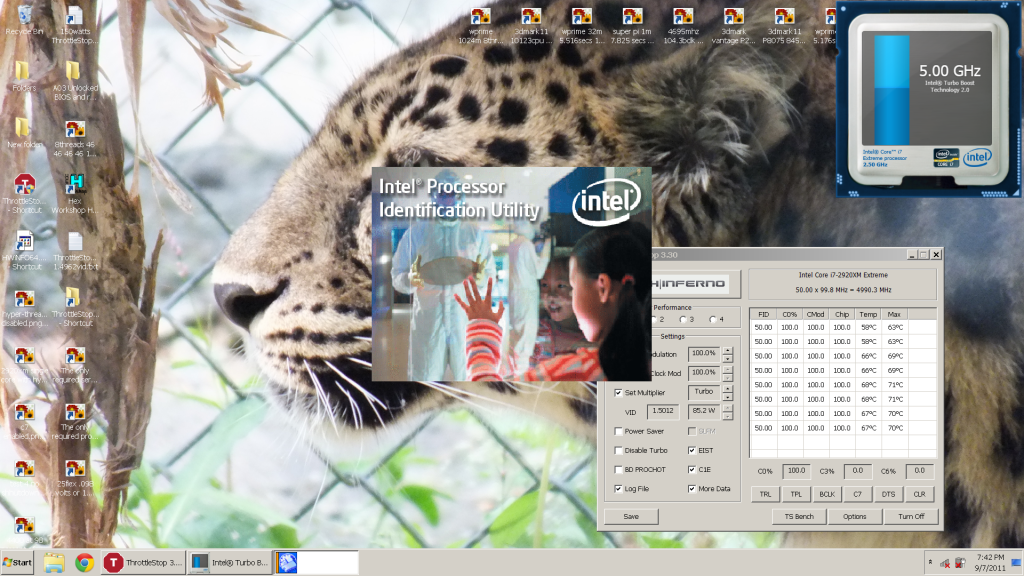
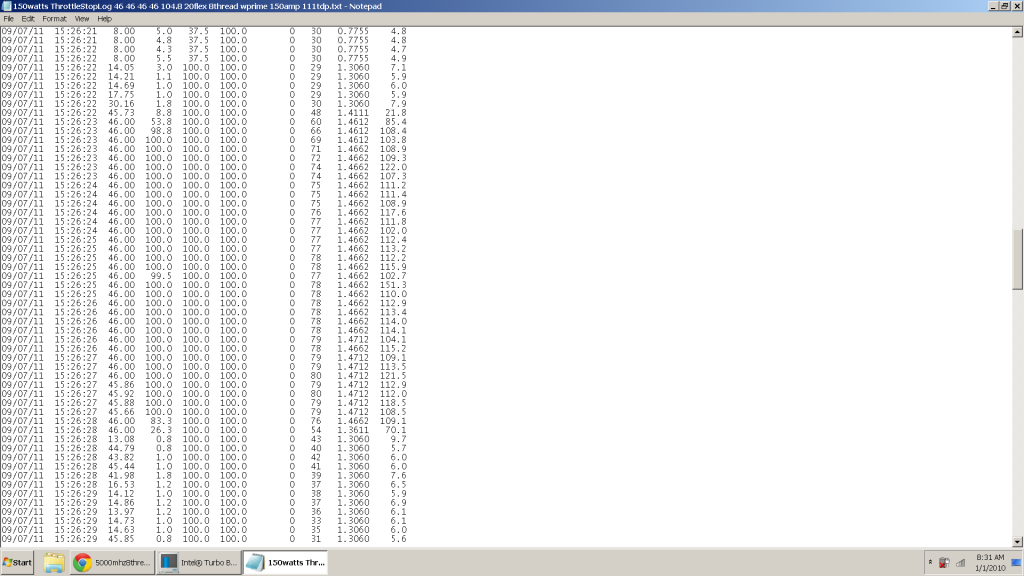
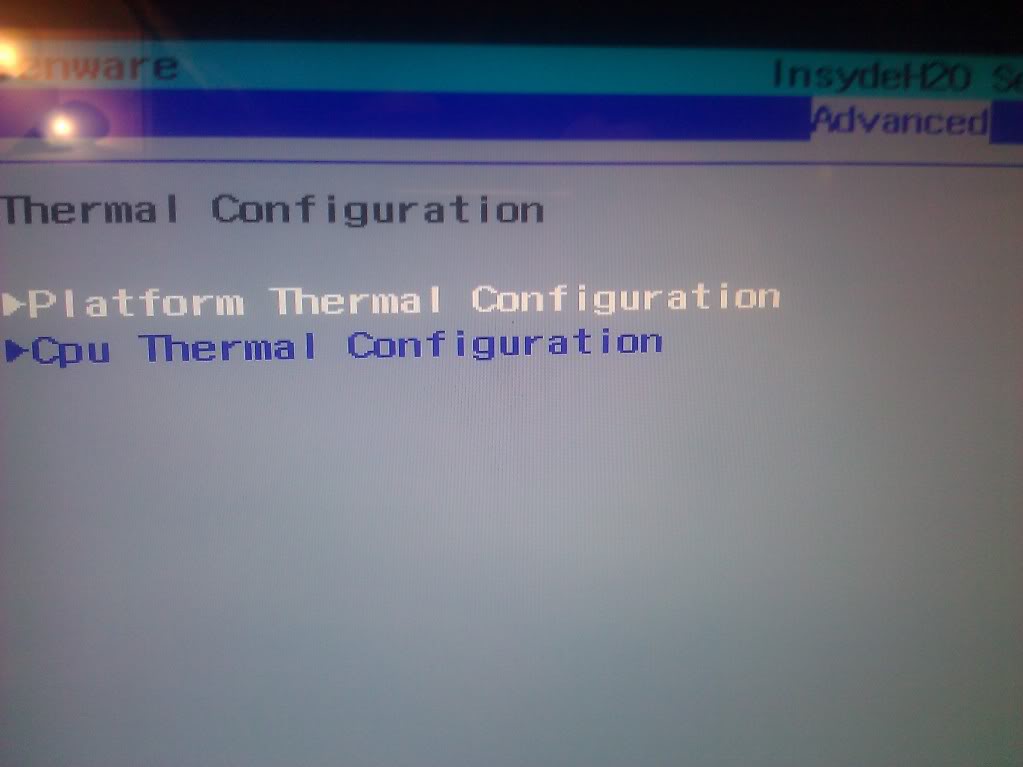
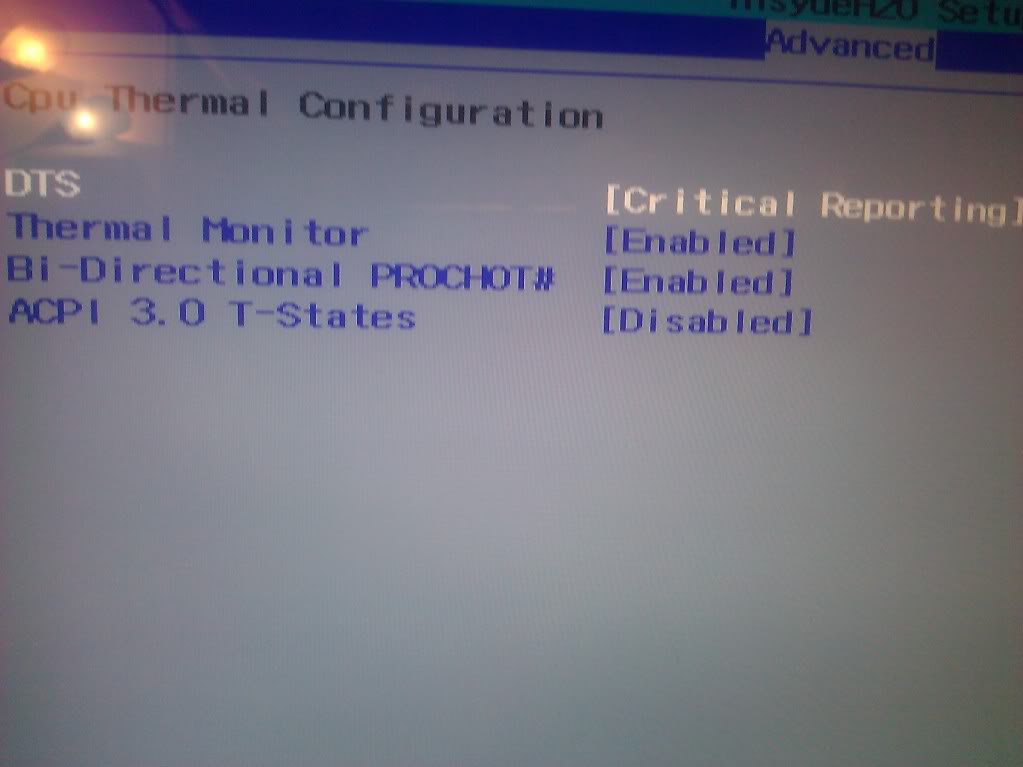
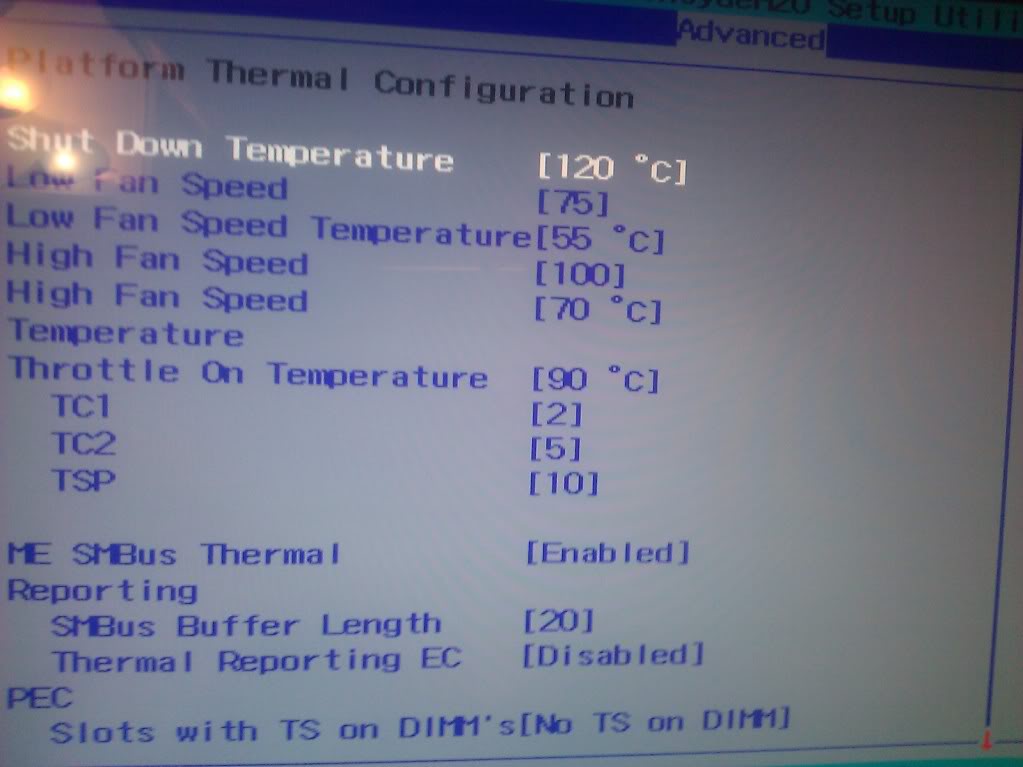
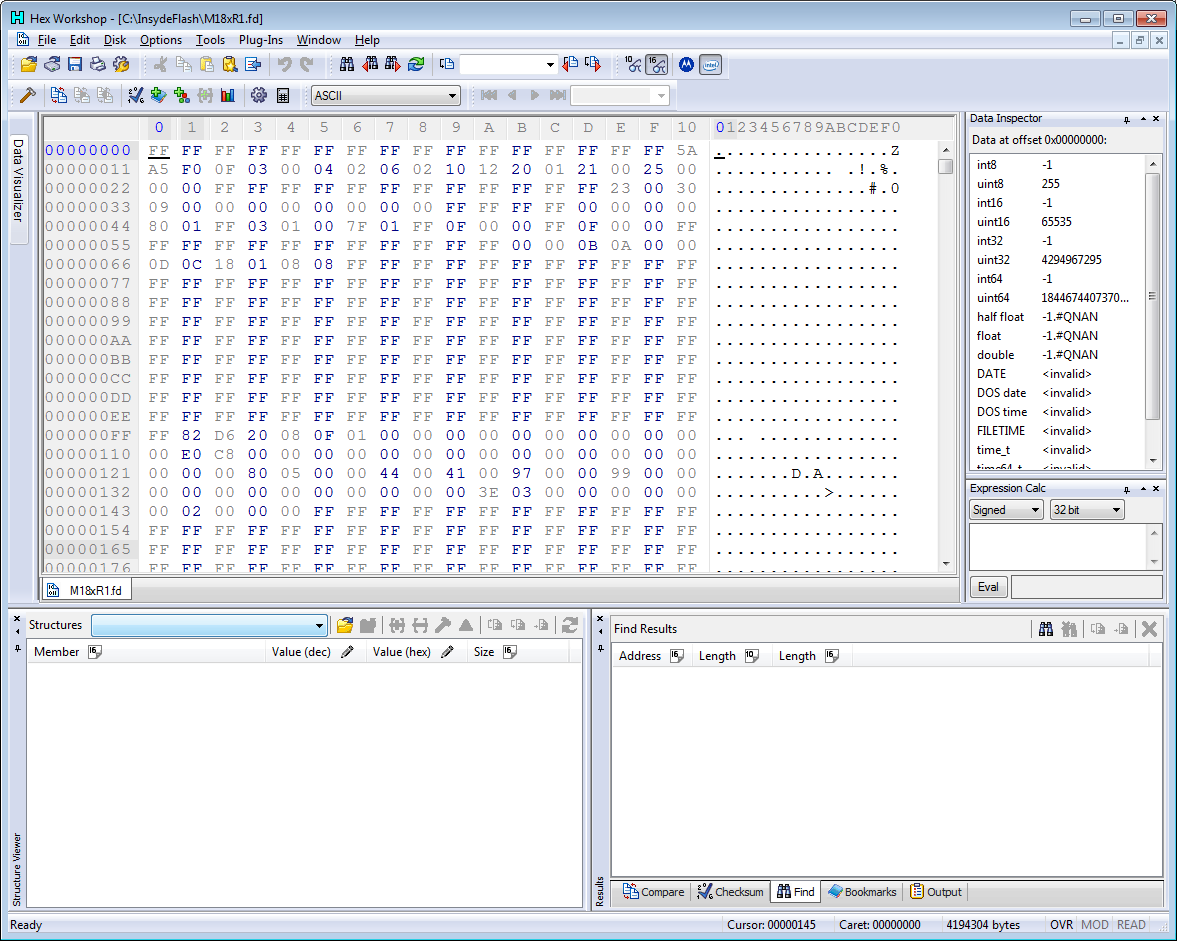
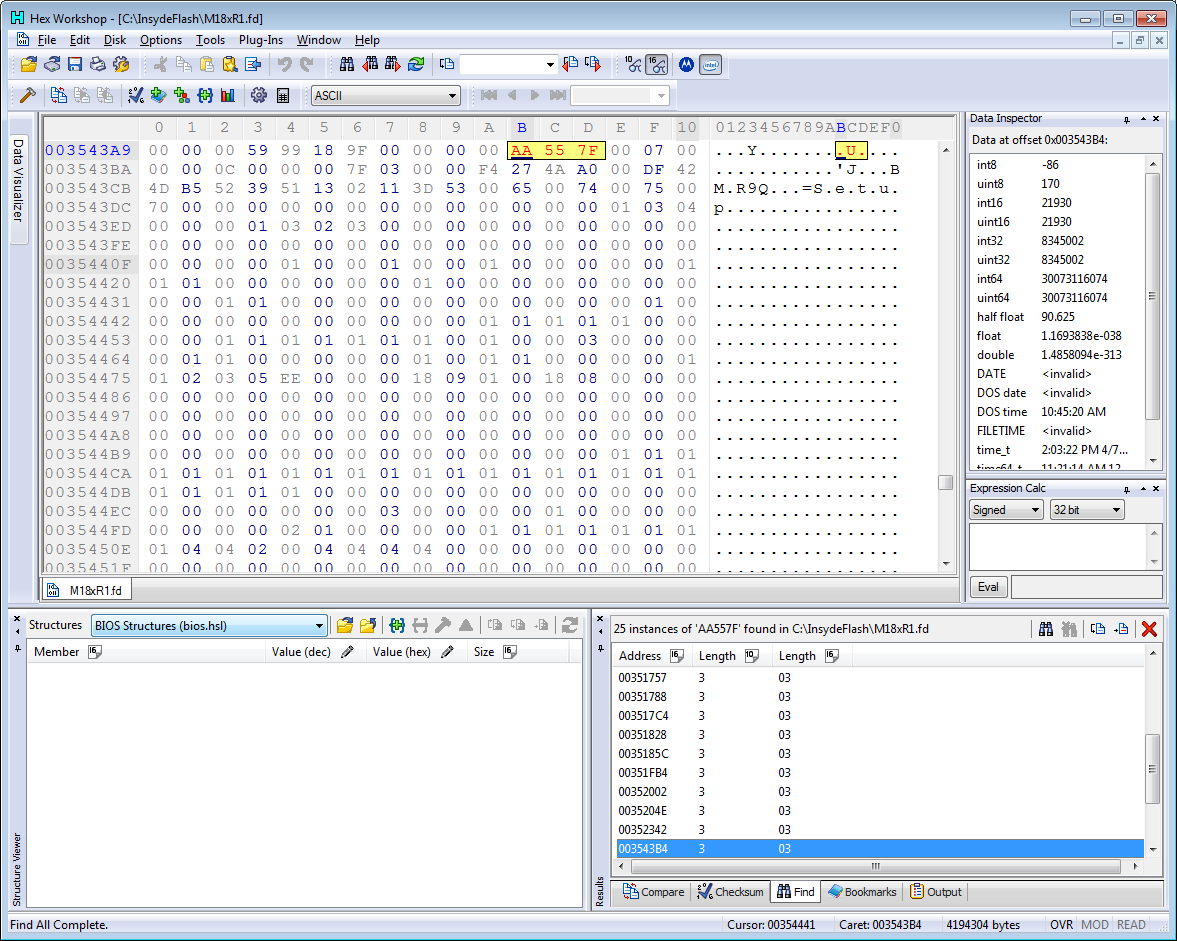
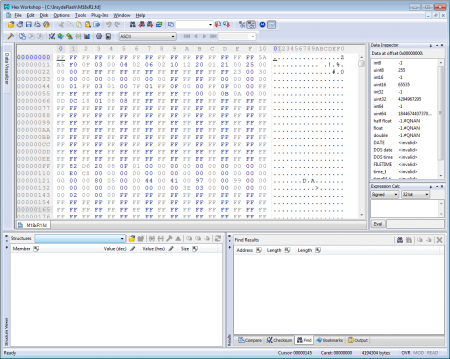
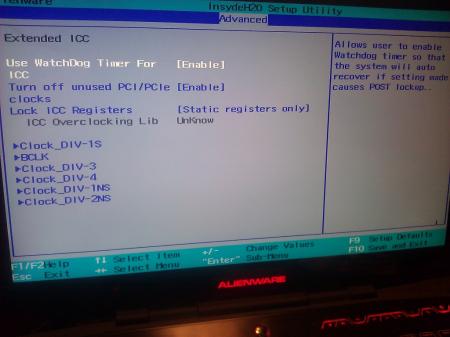
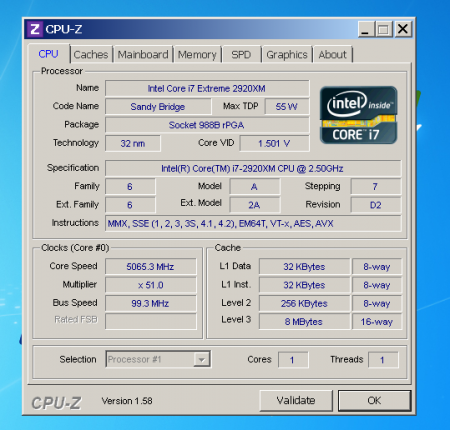
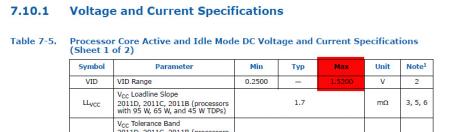
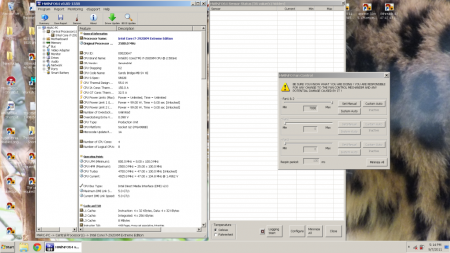
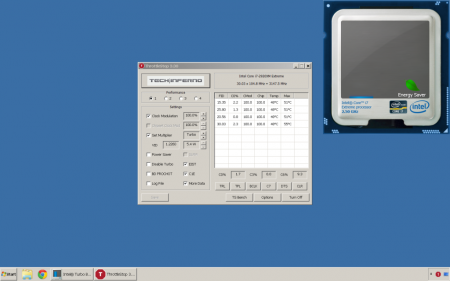
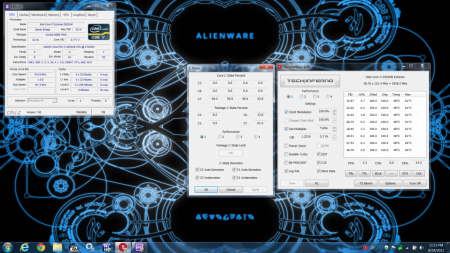
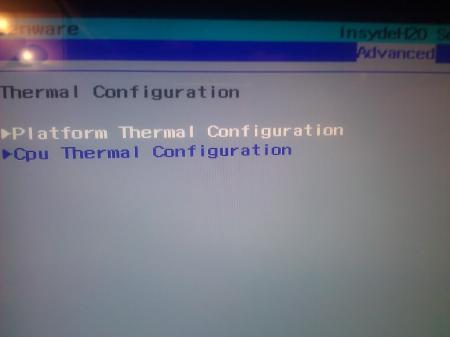
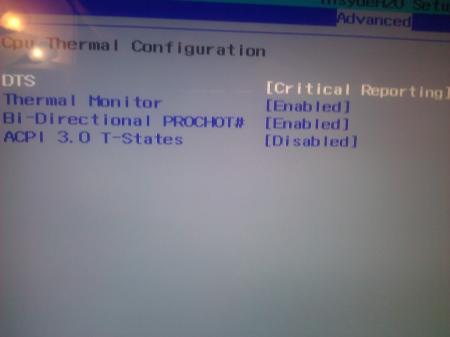
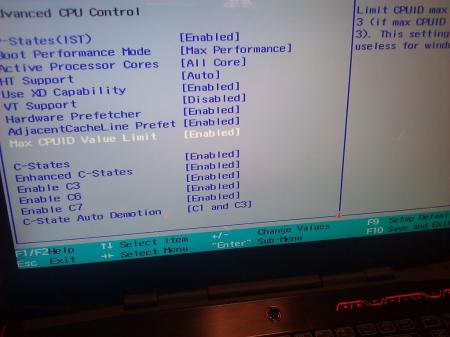
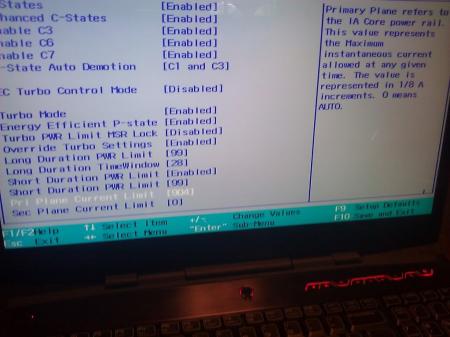
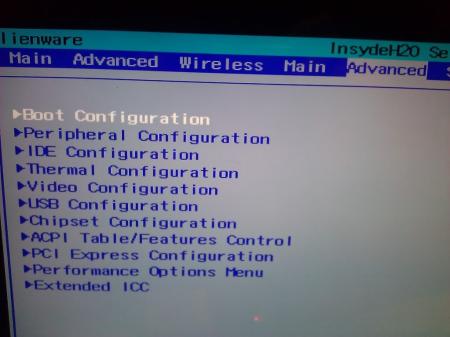
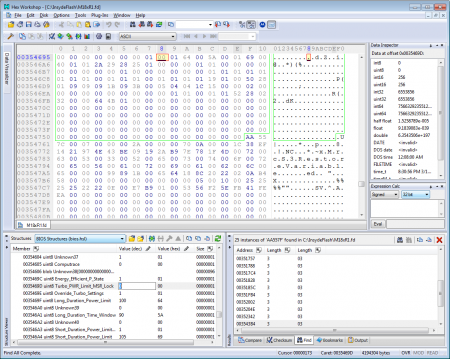
Warning: *First and foremost download and install the Dell stock A03 Bios and install it as normal. *Without exception all software, files, methods and anything expressed here in and their respective owners or creators are not responsible for any damage to your system. You do not need to do any of this. You probably want to have more performance for the same amount of money but the risks are yours and yours alone. *Warning all these options unlocked and even procedures if set wrong or done wrong can result in a bad flash or an unbootable system. Experimenting with unknown options is not recommended. Commonly if just changing options in the unlocked bios menus and a restart renders a unbootable system don't panic. remove the cmos battery with the system off and turn it on, it will beep turn it off and replace battery and at boot your system will be on stock bios settings.The most important thing is consult your peers, ask questions there are helpful people in these forums. When modding the unlocked bios below use an external mouse since the internal mouse and keyboard can freeze till the process is all done. For the keyboard your options are an external keyboard or use the on screen keyboard in start menu>programs>accessories>ease of access-on screen keyboard. *I have not needed a recovery from a bad flash after hundreds of flashes so far but if it fails you need to do a "blind flash" to recover. A blind flash means you cant see anything on the screen but hold a couple buttons before powering on you computer with a special prepared USB stick with a bios file etc formatted in Fat file format to launch the file blindly and restore the bios. Just hope you don't need to but here is where the guide is if needed:Blind BIOS Recovery process for all M18X incase of corrupt BIOS Section 1: Download and flash this file here: http://forum.techinferno.com/alienware-m18x/1123-m18x-bios-a00-a02-a03-unlocked-bios-provided-bios-mods.htmlThis is the A03 Unlocked bios which Ahmed - BiosMods has posted in this thread: DELL M18X A03 BIOS THROTTLE REMOVAL GTX580M SLI This BIOS deserves much appreciation for its complete unlocking with all settings providing full functionality with only the exception being the thermal fan controls. Donations are encouraged they deserve it for all the hard work but the four heroes here kindly do not require it. Ahmed - BiosMods is one of them. Unclewebb's Throttle Stop is also a hero here. HWINFO software has fan control implemented for the M18x, accessed in the sensors window. Mumak is the name the creator of HWInfo goes by in forums. You can download his software at his website here: HWiNFO, HWiNFO32 & HWiNFO64 - Hardware Information and Analysis Tools Don't Forget *Please I reiterate if you like the functions of these files softwares or methods please donate to these amazing contributors. They are unlocking amazing potential in these systems for all users of the M18x's* Flash this and set all the options the way you want it hit f10 save and exit the bios. Note if you are going to edit the bios manually it would be because you want to set certain settings beyond the available numbers allowed in the unlocked bios menus. An important thing is to set the settings you can in the bios first and don't reenter the bios once you have flashed a modded bios based off the unlocked bios since some of the settings can reset to the numerical limits of the unlocked bios menus. So for bios modding and helpful settings continue on. *If you enter the Extended ICC menu pictured here and it freezes which happened to my system while in the bios if I enter it Requiring the power button held for 4 seconds to shutdown and then renter bios. So after re-flashing the original unlocked bios file this was fixed. So enter the Extended ICC menu and select to enable Watchdog(this option allows the bios to boot if you ended up setting a wrong setting in some cases and saving you the time of pulling the CMOS battery if your lucky. Other than that it would be good to get a feel for the settings available almost all settings have at least a very vague description from Dell next to them. Below is the Extended ICC menu Pictured and also the Watchdog option shown. Don't mess with anything else in this Extended ICC menu or it will freeze the bios too. Advanced Options Menu Advanced>ThermalConfig CPU Thermal Config Platform Thermal Config Advanced Cpu Control Do not enable "Max Cpu ID Value Limit" as show above you system wont boot after and you will need to pull the CMOS battery. Advanced Cpu Control Section 2: *Throttle Stop is useful to change your tdp watts up or down on the go once the msr lock is disabled in the bios under Cpu Power Options. Intel XTU can aso change your TDP but only up to 99 watts where as Throttlestop can set this as high as will register to the cpu plus it can show your current cpu state 8times per second and show cpu throttling other tools may not show and even better it is able to control and stop throttling On Sandy Bridge chips. A function of the log function in Throttlestop is there are 8 readings a second and readings include for sandy bridge wattage, battery wattage used when on battery, the cpu VID at the moment as well as the multiplier and if it was throttling and even the time. Having hotkey profiles and auto switching for battery and AC... this program is very handy for all Sandy Bridge CPUs just like its indispensable for i7 920/940XM users. The creator goes by Unclewebb in the forums. This is a very useful piece of software please donate if you like it. see Unclewebb's guide here http://forum.techinferno.com/throttlestop-discussion/23-throttlestop-guide.html for much needed background on cpus and how to use Throttle stop to get back control of your cpu. Download the attached files at bottom of guide. Here is Da_G's instructions for editing with Hex Editor. Da_G is a user who figured out a basic way to modifying and flashing the bios further. He is another person that needs recognition here, donate if you like the wares. Hex editor has a trial for awhile so give this a try but if you really like it and plan to edit often when your used to modding buy Hex Editor. Install the Hex Editor Hex Workshop: Hex Editor, Sector Editor, Base Converter and Hex Calculator for Windows. You will use the supplied platform.ini inside the insydeflash folder created in your temp folder after updating to Bios A03 to extract your bios for editing You can download this in "Insydeflash.zip" attached at bottom of post. Da_G's Guide on Modding your Bios with a Hex Editor~ *If you enter bios after having modified and flashed a bios at any point a lot of values can be reset within their limits of the normal unlocked bios if you enter a menu area showing such a value programmed beyond the limits. If your flashing often to try settings you don't need to continue to extract your bios unless you've changed your baseclock. Open the .fd file you saved from the first flash. You don't need to open bios.hsl after the first time it should be loaded so skip to selecting Edit-find-okay-select + symbol - select okay on setup vss- hit plus next to setup registers-edit-save over .fd file in .fd extension - open Insyde Flash hit okay to write over bin hit okay flash will finish and exit. Shut down manually. Remove power including battery to complete. Start up and settings are in effect. These are pics of the Hex Editor software Now to see the most these XM CPUs are capable of and or just set a few performance options for your non-cm cpu read on. Question: MooNiSLe @ Bios Mods *Guys don't use someone elses copy of a bios if not careful you can overwrite your service tag in this way. Answer: MW86 @ BiosMods Answer: MooNiSLe @ Bios Mods Answer: MW86 @ BiosMods Speedy Gonzalez's Recommended Settings Notes: Almost all the major bios options for overclockers exist in the unlocked bios and mirror a desktop system bios almost missing just the very fine tuning of desktop bios options. Noteworthy is you can disable Hyperthreading, which can help keep cores several degrees cooler while increasing single and dual core operations a little but lowers 8thread speeds as a side effect. AES can be disabled as which is a cpu security feature for encryption. Enabling Core State 7 is available in the unlocked bios which lowers the lowest idle watts more and lowers idle temps more. You can also disable core states altogether in the unlocked bios and use throttle stop to force the max turbo multiplier without drop in multiplier unless load, heat and voltage are the factor with core states unchecked. Bi-directional Prochot will make your cpu throttle under certain extreme situations and the system can heat up real quick if this is disabled. One can disable thermal throttling altogether by setting "Thermal Monitor" to disabled in the unlocked bios which would show in HWiNFO under summary windows as TM1 and TM2 in red(disabled). Disabling Virtualization is good if you don't use Virtual Operating Systems at all and is a normal bios option. The short term time limit can only be set to as high as 128seconds up from 56seconds max by bios menu... any higher doesn't only shows as 128. Shutdown temp can be set to 120 in bios and there's no need to go high by editing since this is way too hot already. Cpu Power limit in amps: divide the number by 8 and that's how many amps your are setting 0 is 97.5 amps automatically. The value in bios can go astronomical... So 140 amps is probably way too high. For the watts short or long by editing you can set anything over 99 but don't go too high as there is no limit this way so 140watts again is probably too high. Throttle on I have set to 100-120 and like Moonisle confirms there seems little difference over 100 but the chip may just do this due to required power draw rising as the temps do, so they may stop "thermal throttle" but your chip at that temp may throttle at those temps despite all limits raised above. Bios menu limits on turbo multiplier is 45 and using the edit method 51 is now the max.So now if you read to here you can see some of the capabilities and also settings needed to reach these speeds without means of dry ice extreme cooling. So follows is some peak performance and the settings used to attain these levels so use them as reference on my behalf all are welcome to learn from it. These levels aren't stable for 24/7 use but a setup for that is simply attained by utilizing a couple stress test for a longer period of time and monitoring temps and errors. Apps like Intel Burn Test at very high 8threads and Prime95. Most likely a stable overclock for 24/7 use will be multiplier limited by you to keep clocks from rising out of your bounds and not only lower but may require a little more flex vid to keep it stable in hot endurance conditions like gaming. So its up to you if your just interested in benchmarking or if you want your rig the fastest it can safely be for gaming etc (both in my case). Either way this is the way to do it. The 3Dmark Vantage score that says Cpu is a physics tests that runs solely on the cpu meaning its number is a good way to compare cpu power. 3Dmark11 has a cpu only test and its just labeled physics but also has the same bearing as the Cpu test in 3dmark Vantage. Wprime is commonly used tool to compare I use 8thread testing on the stability test since its longer called 1024m. Those kinds of benchmarks are not very accurate but can provide a fair comparison of hardware components performance You can set HWinfo to run fans automatically Mumak said: You can start it at start up via Task Scheduler and setting HWinfo to start at logon as a "basic task" and set open with highest privileges. http://forum.techinferno.com/hwinfo32-64-discussion/65-alienware-fan-control-10.html#post14158 For the desktop overclocking theories for Sandy Bridge check out the guide here (great to get an idea of Sandy Bridge): Sandy Bridge Overclocking Guide & 5GHz CLUB Some notable information from the above guide are: Thank you PureOverclock.com 1.52 seems to be Intels max recommended Voltage ID on desktop. Try to stay within these Limits... Which may be an equivalent of 43Flex about 1.519volt max. I wrote a guide here for some additional operational basics of the 2920xm such as basics based on the stock bios limits so it can give you a better feel of programming the chip the way you want it. (was posted a few months ago but had to be restored due to database error). M18x Stock Bios Guide I provided a guide on getting higher performance for Benchmarks here such as if you want to help at Tech Inferno's HWBot.org Team: http://forum.techinferno.com/off-topic/1124-general-overclocking-advice-record-breaking-benchmarks.html The following pics are scores from benches on the following system, meant to be reference for all who would like to try similar speeds so I show all the settings I used so everyone has a place to start so there is less guessing for everyone else. Cheers. Now the key is right in a secondary menu that appears to be a copy of a normal stock menu in the bios. Go here and you can raise your vid even higher than what 25flex equaled. I have tested to 99Flex and it appears to actually raise the overclock voltage. But seemingly 1.5volts may be the limit although up to 99flex HWinfo seems to report the .2volts in the main window unhiding the menu next to 2920xm in processor shows specs and seems to report the voltage increases properly here. *Be safe no one is responsible for any damages incurred or any income lost as a result. Happy overclocking.* Unlocked Bios and Modding Examples: 30 Flex set out of 99flex max on unlocked bios where 25flex is max on stock bios *Alienware M18x R1/2920XM OEM/16Gb 1600mhz HyperX 9-9-9-27 @1.65volts/ATI 6970M Xfire/basic 750gb HD/Fans at Max with Hwinfo/Notebook Cooler Zalmon NC-3000/(no dry ice, no air conditioning, battery removed for its safety, all covers on laptop in my house no freezer) The pictures and captions show the rest. 25flex .098 added volts or 1.4962 2920xm singlecore with Hyperthreading 4 Active Cores Hyper-Threading Disabled 4400Mhz at 98 percent of wprime 1024M 8thread 4695mhz 104.3bclk 45 45 45 45 wprime 8thread 1024m 12flex c7 power State enabled No shutdown at 100celcius 8threads 46 46 46 46 104.8bclk 4800mhz 20flex 135amps 110watts 5000mhz 8threads 50 50 50 50 w/50 flex 100bclk With the 1.5volts to the core we can see a little usage in 5.0ghz range. Though 1.4 is probably too high.This was a very light 8thread load compared to anything like Wprime and Wprime is a light load compared to Intel Burn or Prime95. This type of setting could only last at 5ghz 8thread for a second or two.... more than 5 later would be a thermal shutdown from the heat produced. Single core would be more feasible than quad core at this speed possibly dual core if cooling is good. With flex at 56 I can pass a 1thread Intel Burn Test and not crash on an hour of large fft on prime95 in 1thread mode. Throttlestop log 150watt part1 Throttlestop log 150watt part 2 99flex set so +387mv in overclock voltage added 51X multiplier on 2920XM original guide.txt Da_G's original guide in a text file Hex Workshop: Hex Editor, Sector Editor, Base Converter and Hex Calculator for Windows required to edit bios Throttle stop download Hwinfo download Special Thanks goes to Ahmed and anyone else responsible for its creation, Da_G, Mumak, Unclewebb! *Thanks Barcode, Johnkss, 0x29 and anyone else whom tested the bios. ~If you like my guide let us know in a post. Have questions feel free to post them as well as suggestions if any or if you would like something tested and the results posted... If I forgot to mention you please PM me so I may make corrections.~ InsydeFlash.zip bios registers explained.txt


 1 point
 -
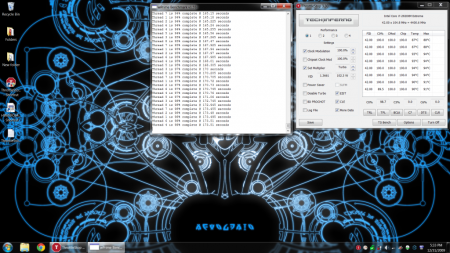
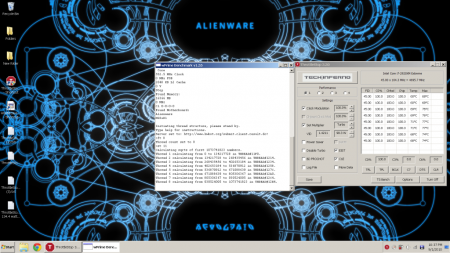
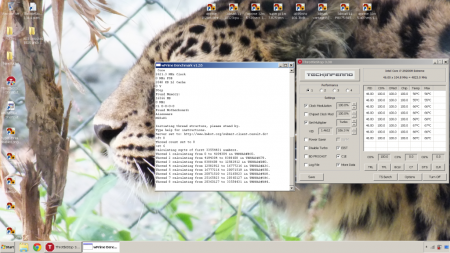
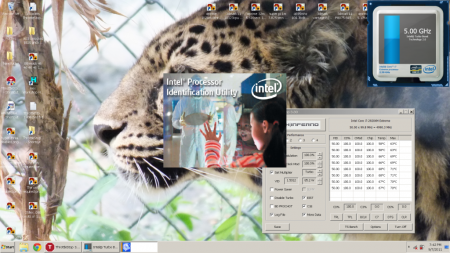
I've noticed it's difficult finding a comprehensive guide online for overclocking and monitoring the GPU respective to the M14x so I've comprised one of my own. It's important to note that this discussion strictly involves overclocking the GPU and not the CPU. Using the built-in Turbo Mode or other CPU overclocking software is officially NOT recommended in this thread. CPU overclocking has been known to cause serious overheating and even permanent damage to the physical composition of the laptop. In addition, most who have overclocked the CPU have noted that it does not significantly increase gaming performance and is not worth the risk. What this thread is not. A place to discuss CPU overclocking or compare benchmarks. What this thread is. A comprehensive guide on overclocking and monitoring the GPU of the M14x and related discussion. Feel free to share information about different software tools and configurations you have used for overclocking and monitoring your GPU. What overclocking/monitoring software have you had experience with? What are the pros and the cons of each software tool you have used? Once I have verified your information, I will add it to the OP. Overclocking/Monitoring Guide F.A.Q. Q: What is overclocking? A: Overclocking is the process of running a computer component at a higher clock rate (more clock cycles per second) than it was designed for or was specified by the manufacturer. (Thanks wikipedia!) Q: Is overclocking safe? A: It depends on your definition of safe. Generally, it will not blow your computer up if done properly but will shorten the lifespan somewhat depending on how high you overclock it. It's usually safer to OC the GPU rather than the CPU. Overclocking the CPU is much more dangerous and is therefor not covered in this guide. Using the following tools will normally not harm your computer HOWEVER going beyond the limit of most of these tools can potentially harm your PC. That doesn't mean that there aren't cases of simple overclocking harming a GPU or PC overall. It happens but it is extremely rare. Q: But don't I have to overclock my CPU and my GPU to get MAXIMUM PWNAGE PERFORMACE?!?! A: No. It has been thoroughly tested that for gaming (which is what most of us use alienware's for), overclocking the CPU does not produce significant enough results to be worth the risk. Q: Well I want to overclock my CPU anyway! How do I do it? A: Go away. Q: Okay so I'd like to try overcocking my GPU. Where do I start? A: First off, try playing the games that you want to play on your system as is with your desired settings. In many cases, overclocking isn't even necessary and you will get great framerates with the default settings. In this instance, overclocking really isn't worth it. Q: My games aren't running at my desired speed. Let's do this! A: Okay. Check out some of the tools below and choose based on your personal preferences and suggestions people have made. You're going to want at least 2 tools. One for overclocking and monitoring your GPU and (even though you're not overclocking your CPU) a CPU monitoring tool. CPU monitoring is still very, very necessary when overclocking your GPU. If you want to use multiple tools to utilize different unique functions, feel free but generally most people want to compartmentalize the process as much as possible. Q: What do I need to look out for? A: Start off slow. Don't max out your clocks, max out in-game graphics settings and hop on Crysis 2 for 8 hours straight. Be nice to your M14X. It is a beast but it is a cute and cuddly beast. We must treat them with care. Slightly increase your settings, load your game for 10 to 20 minutes, and monitor your temperatures. Rinse and repeat until you've found your comfort zones. The preferred CPU temp is 60-80°C. 80-90° is generally doable but anything above 90° is not recommended for non-advanced users. So far for the M14X the sweet spot is 750mhz core clock, 1500mhz shader, and 1080mhz memory clock. Anything above that, enter at your own risk! Q: So what type of results should I be getting? A: Here are a few graphics to give you an idea of what overclocking should be doing for you. Q: Okay I'm feeling froggy! I want to flex my stuff and post some benchmarks. What do I do? A: Hold your horses young buck. There's a thread for that. Overclocking/Monitoring Tools Nvidia System Tools pros: All in one GPU overclocking and monitoring tool. Made my GPU manufacturer, is safe and stable, has fan controls and basic system health monitoring. cons: limited in overclocking M14X GPU Nvidia Inspector pros: GPU overclocking tool with "unlock max" which allows you to maximize overlocking performance and basic system health monitoring. cons: Can't control M14x fans. (Please verify) MSI Afterburner pros: GPU overclocking tool with built in real-time onscreen monitoring of clock, voltag, temperature, fan speed, and framerate. Has built in benchmark and screen capture tools. Great reporting system. cons: Has overclock limit for M14x and some have reported glitches. Benchmark has been known to produce unreliable results. EVGA Precision pros: GPU overclocking tool with monitoring including GPU temp and usage percentage. Can apply new clocks at startup. cons: Cannot control M14x fans. "test" tool doest work with M14x. Riva Tuner pros: cons: outdated HWiNFO pros: Has advanced system health monitoring (temperature, voltage, fan, and power) and controls fan speed. cons: ThrottleStop pros: Great tool for overclocking and monitoring CPU with multiple profile settings. cons: Core Temp pros: Simple, compact, CPU monitoring tool that displays temperature and usage for all cores simultaneously. cons: GPU-Z pros: GPU monitoring tool that displays GPU temp and clocks. cons: Kind of pointless if you're using one of the better GPU overclocking tools but for those who want separate GPU monitoring this would be the tool. (If you have used other software, feel free to mention it. I will add it to the list.) note: All the opinions regarding each software tool is pertaining to performance with the M14x and the M14x ONLY!1 point
-
This is not very accurate. Overclocking will always shorten the life of the components since it leads to higher temps and larger power draw. It's hard to immediately kill a card with (sane) overclocking, but it does actually decrease the life expectancy of the components involved (GPU, CPU, and also the power supply circuits of those two, etc). Everyone should be aware of this before starting to overclock a system.1 point
-
hehe mods have an extra field below text editor that after replying to a post they can close the thread, it is quite easy to press it by accident, no big deal, our reflexes are fast1 point
-
The 2920xm (or at least the "model 0" engineering sample) works in the M14x, but no overclocking support and temps at load are pretty high, rsomeone tried it recently, though to be honest it wasn't really necessary to test it... the heatsink is simply not sufficient for such a powerful CPU, the TDP is 10W more than the other i7 chips (at stock). Best option for the M14x is a 2860QM, but whether it's worth it... it totally depends on what you do with your system. Generally spoken if you have to ask whether you need it, then you won't need it1 point
-
Or dump the vbios and upload it here, if it's from an ES chip it should be a rather early version.1 point
-
Like I said, when it comes to the M14x the only tools you really need are the ones I mentioned. There are tons of different tools for different purposes, but not necessarily for the M14x. Nibitor from mvktech.com is a great tool for Nvidia VBIOS editing, but the 555m isn't supported.1 point
-
Open it up. If it is on a black PCB, the word ENG on the die and the ram chips are hynix, then if you flash a Dell vbios to it, you may unlock extra shaders.1 point
-
I must admit, I was afraid for you good sir. Congrats on it being a non-serious issue.1 point
-
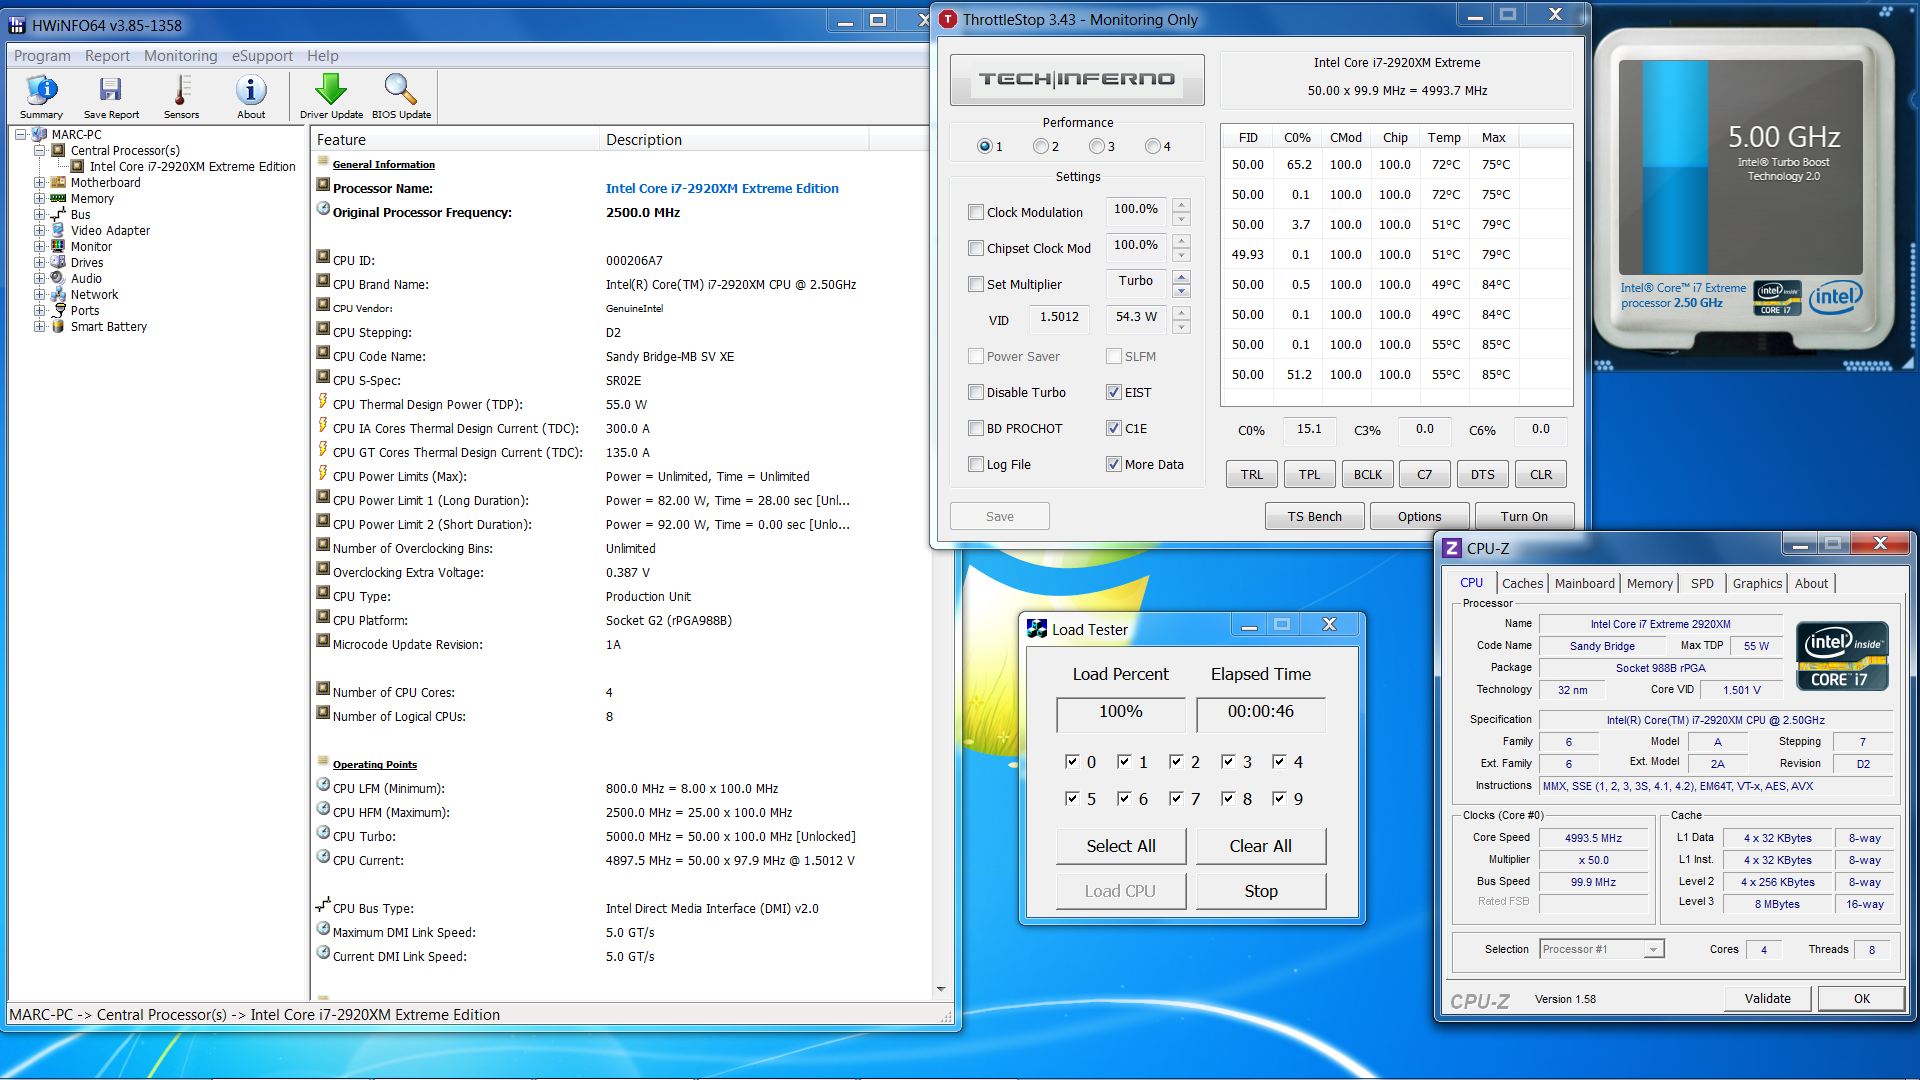
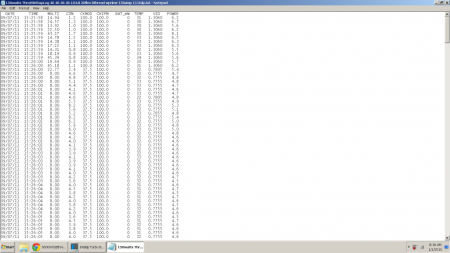
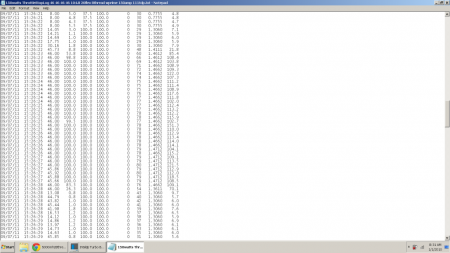
I can help... Throttlestop won't raise the multipliers you must extract your bios with the method above... open it in Hex editor and follow the steps to get to the registers... next scroll down till you see your multiplier 45/45/45/45 and edit them till they say the desired amount. If you are attempting 5ghz... you may need as high as 56flex or higher maybe but 37 probably minimum. BTW start with a basclock combo and multipliers that wont put you over 5ghz... get that to actually boot to windows ... then try to go higher so that way you know what it took to get 5ghz to boot. Temps are extreme when loaded like this... and 5ghz quad under the best scenario possible could only be about 1-2seconds long... but it seems with high enough flex like 56 I can pass a 1thread Intel Burn Test and not crash on an hour of large fft on prime95 in 1thread mode. @iPhantomhive s Those pictures show the Hex editor software. Basically this is the only way to set over 45X you can set up to 50X though. I was thinking of making a basic youtube video guide and put it in the guide above with Fraps and a video camera to document it... would this be something of interest to you guys. I have the free fraps so like Steven... i would have to do 30sec clips and combine them. ************************** added this info and pics to the guide just now too and a couple observations. **************** here are the bios registers explained and also the text from Da_G's original guide both in a notepad file.. ill attach here and also add to the guide above ************* bios registers explained.txt original guide.txt


 1 point
 -
No problem, btw if you want to mention someone use @ in front of her/his username (without space) :)ie @1 point
-
@StamatisX Thanks. Just got it fixed , i pulled off the CMOS battery. will try again for 5ghz1 point
-
Yeah download and install the latest vbios from Dell website and then head to AMD's website to download the latest drivers from there1 point
-
Thats (the Thinkpad W520 + 2920xm) a complete joke. I read about it on Lenovo forums, where even some users were defending the Lenovo in this case (I mean seriously... how freaking dumb can someone be?). Thinkpad W520 (the only survivor of the W-series) is supposed to be competing (I guess) with Dell Precision 15-17" workstation laptops, basically $3000 ball park with extreme CPU. For that money you get Thinkpad W520 locked to 2.5 GHz... but hey you can be happy when you run CPU-Z -- it says 2920xm. (@ 2.5 GHz but I guess had I bought it, it wouldnt be funny at all) I mean W520 obviously can't handle the new hardware like Intel's high-end extreme CPUs. If you look at the bottom panel it has a one cooler with an exhaust area 1/5 of what M17x-R2 has. Its not even comparable. From what I remember their previous 17" W701 had better cooling but it seems it has been discontinued. Also, it seems to have other issues as noted on NBR [see: Laptop Forums and Notebook Computer Discussion - View Poll Results and Please vote: Do you have any issues with your W520? ]. As for the WiFi, it does seem to warm up a bit. Even the one I have on X200t (3x3 antenna, connects @ 300 MBps on my home WiFi) warms up a bit even if you do like 1080p video streaming. Its also "conveniently" located right underneath where the touchpad is typically (I just have Trackpoint). But never got burning hot like the one on XPS (literally its too hot to touch).1 point
-
The only tools you need are Nvidia Inspector and HWiNFO. Nvidia Inspector is (imo) the best tool for Nvidia overclocking, HWiNFO is a superior hardware monitoring software, which also allows you to control the fans of the M14x. If you want to monitor your CPU get Throttlestop. Riva Tuner is totally outdated and mustn't be used anymore, MSI afterburner is nice, but as far as I know it has an overclock limit for the M14x. Also do some research, there are tons of tips, tricks and great advice here when it comes to overclocking the M14x.1 point
-
Reading through these we are blessed at this site to have great members and great advise. Gears, try all of these and let us know. Im sure your gpu will come back. Best Wishes, StevenX1 point
-
Hi, don't panic, this happened to me too a few weeks ago. Power off your machine. Unplug the AC and open the back cover. If you never opened the cover, be carefull when opening it, you have to slide / push it and NOT lift it. If you are unsure, just watch a youtube video on how to disamble it. After the cover is open, unplug the battery (just pull out the cable, no need to remove it). Now with the battery and the AC unplugged, press and keep pressing the Alien Button (Power on Button) for about 30 seconds. Reconnect the battery and reassemble the cover. Now boot into bios and load optimal defaults. Save and boot to windows. Normally everything should work as normal again. (The Geforce should also be listened in the bios again). //Edit// I just remember having trouble with the grafic card drivers when my accound did not have admin rights and the User account control was turned on. For some reason I kept getting blue screens of death.1 point
-
Because not every laptop with that GPU has the same cooling efficiency like M14x and of course they want to maximize stabily and minimize RMAs1 point
-
Yes it seems nothing has changed at all... same old probs. Wow maybe wifi cards need heatsinks lol1 point
-
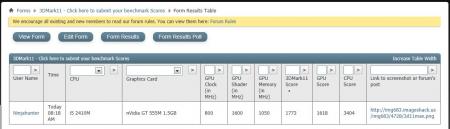
:D AMD Radeon HD 6970M video card benchmark result - Genuine Intel® CPU 0 @ 2.40GHz,Alienware M18xR1 score: P8563 3DMarks Search1 point
-
I'm pretty happy with #14 worldwide 2xGPU ranking. EDIT: #11 now1 point
-
I tend to use more of a dab technique until 90% is gone. Only have that stuff as I got it as a free gift, believe me though, it does a better job than isopropyl alone. Smells nicer too.1 point
-
Dude Your Shift Key Must Take Quite A Hammering. Good luck with dell.1 point
-
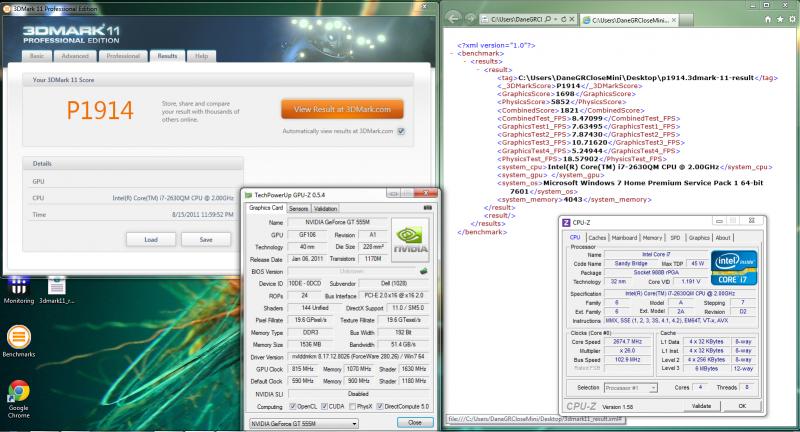
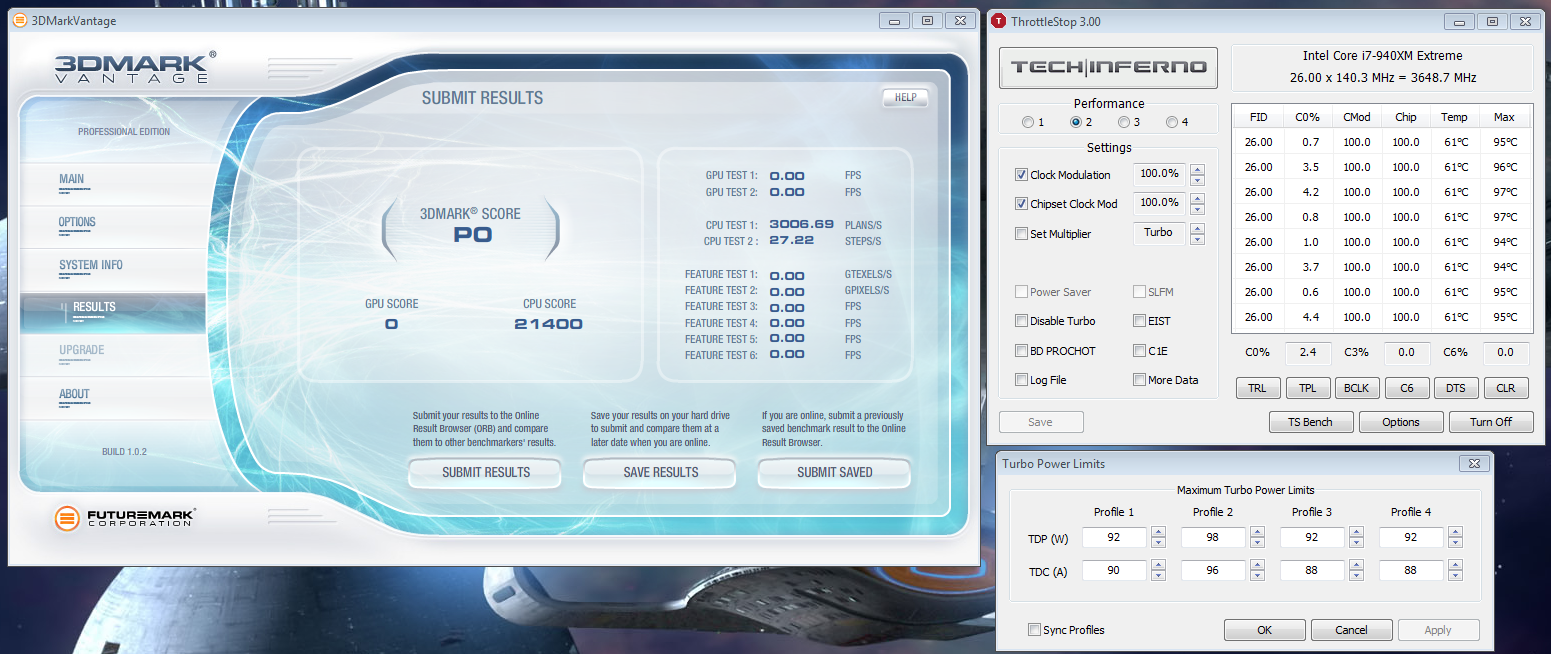
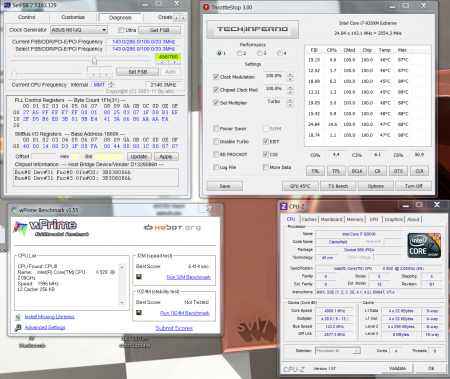
Got a chance to run the new bios with the packaged modded vbios, here's my best run on 11, more to come this weekend P1914
 1 point
 -
http://3dmark.com/3dm11/1659338;jses...tEqm7NM2a4ffCy [url=http://3dmark.com/3dm11/1659338;jsessionid=1ebp2hoaw52ky?show_ads=true&page=%2F3dm11%2F1659338%3Fkey%3Dhjvdb6qQ6srsQjUKtEqm7NM2a4ffCy]NVIDIA GeForce GT 555M video card benchmark result - Intel Core i7-2630QM Processor,Alienware M14xR1 score: P1872 3DMarks[/url]1872 3dmark11 score. Stock CPU no OC, gpu @805/1080 Driver 280.26 Core Parking EnabledThis is just my first attempt with this driver. :)StevenX1 point
-
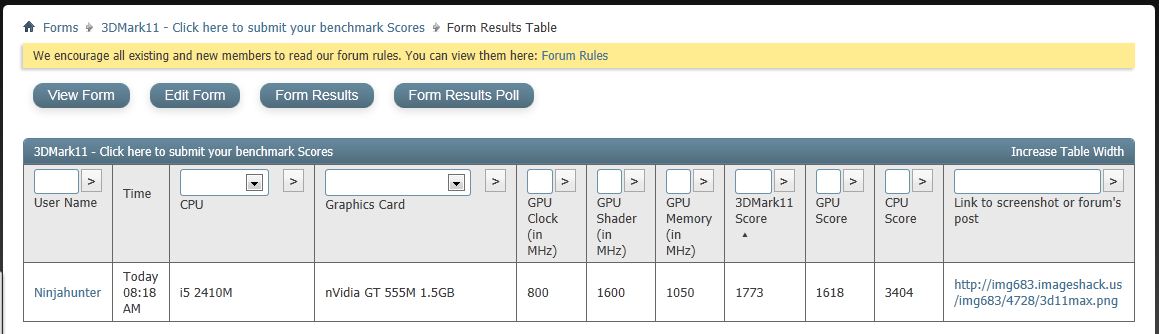
So far the ranking is this: 3DMark11 @mmskate13 if you submit your score you will be marginally first
 1 point
 -
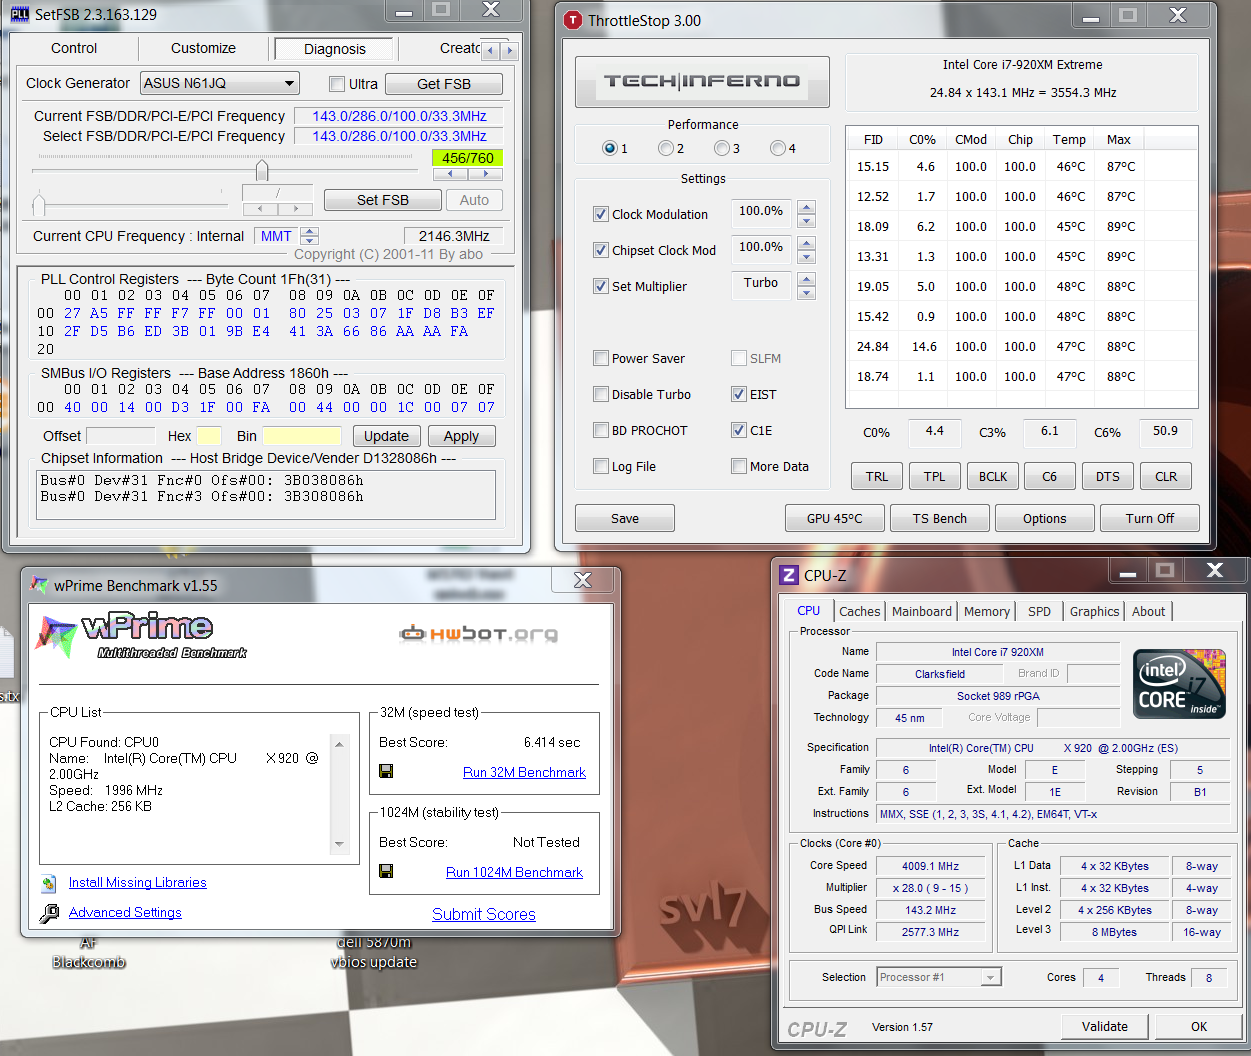
I have mine with the backplate removed and sitting on the cryo lx at 75mV and 140x26 with 98/96 TDP/TDC with temps maxing out at 97 C and it does the 1024M in 240sec. I need to try with an air-condition blowing some cold air from underneath... *EDIT* Same with vantage
 1 point
 -
I got my 240W PSU today, and some quick tests indicate that it indeed helps! I only did some very quick testing so far since I don't have sufficient cooling possibilites, but I managed some 32M wprime tests, not a single crash I pushed up to 28x on all cores and 143 Baseclock... hehehe. PSU peaked at 210W according to my kill-o-watt, the regular M15x PSU tripped instantly at about 200W. 6.414 seconds so far... more than 4GHz on eacht thread, though I guess some of the programs and processes running in the background slowed it down a bit. I'll do some real benching soon and then I'll see how much further I can push this.
 1 point
 -
Ok, it's a very recent (if not the latest) version of the Clevo VBIOS, very unlikely that you have an ES card, actually pretty much impossible. Keep in mind that it's a developer edition of win8, that's not even real alpha code... it's mainly there for the devs to allow them to get used to the new interfaces and start designing software.-1 points
-
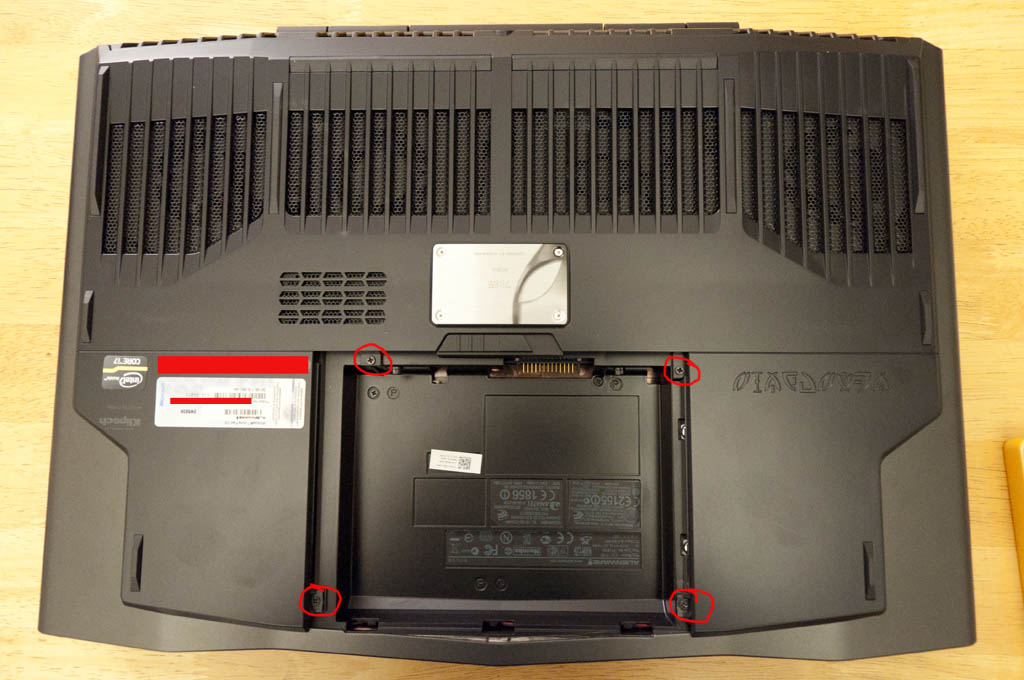
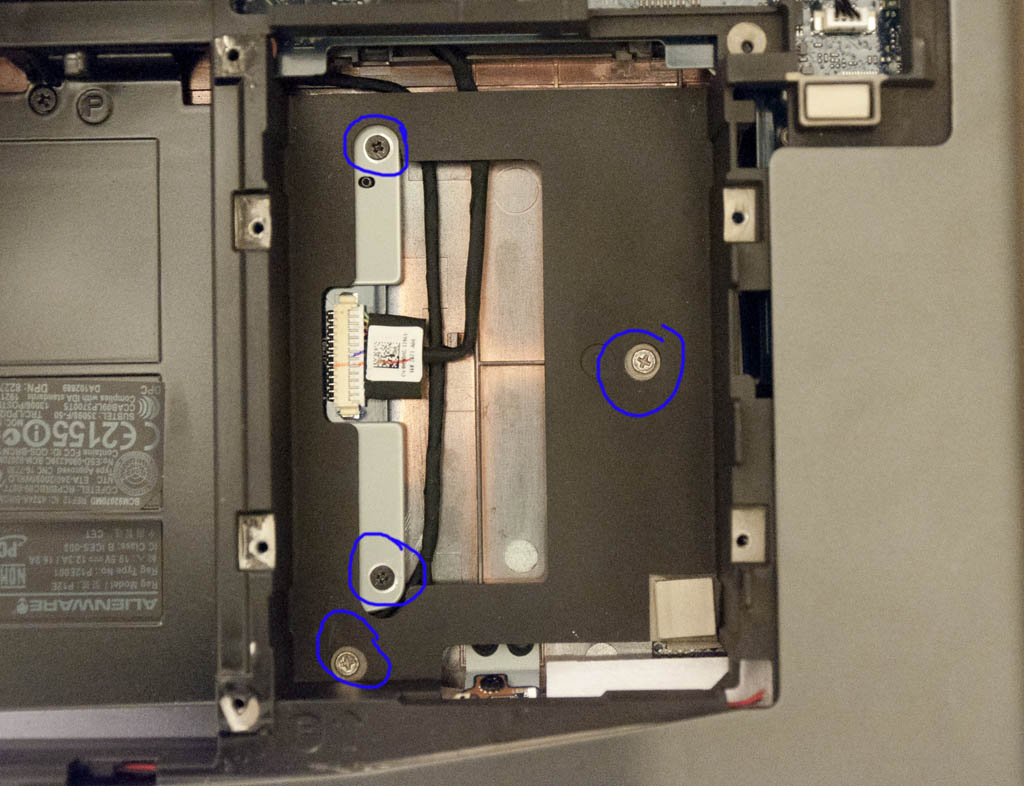
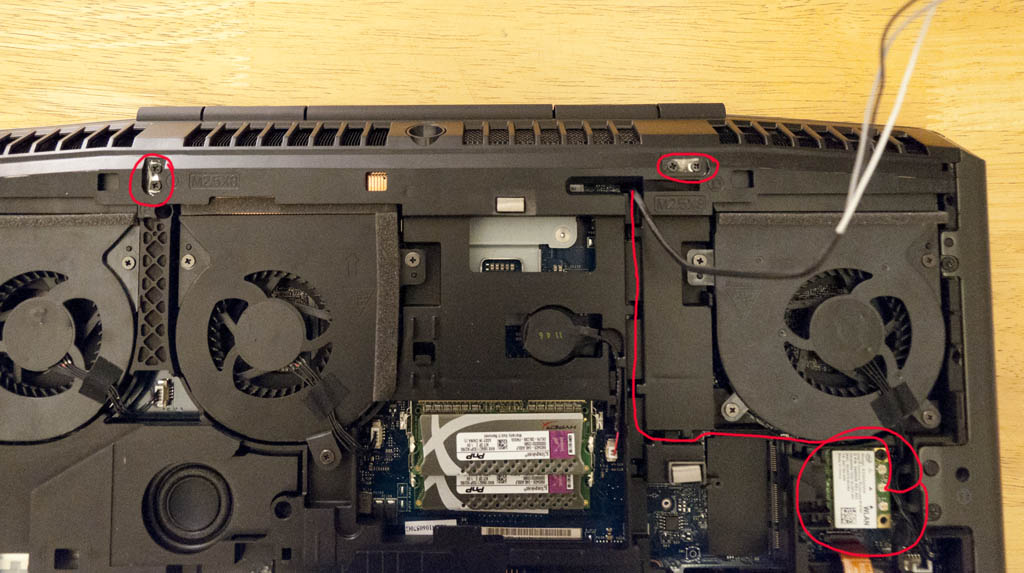
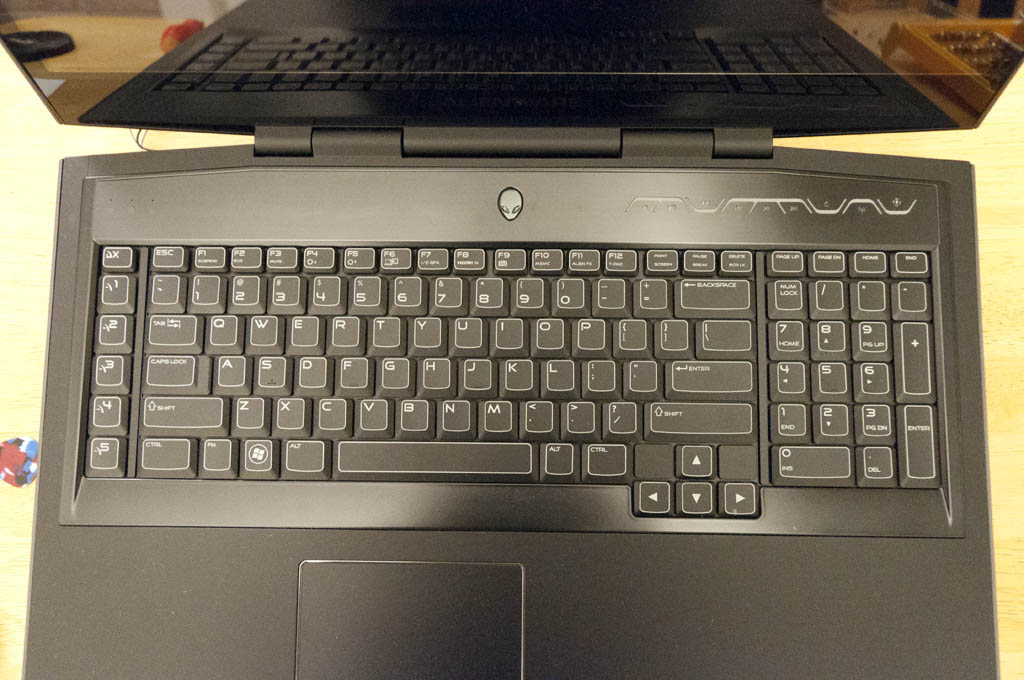
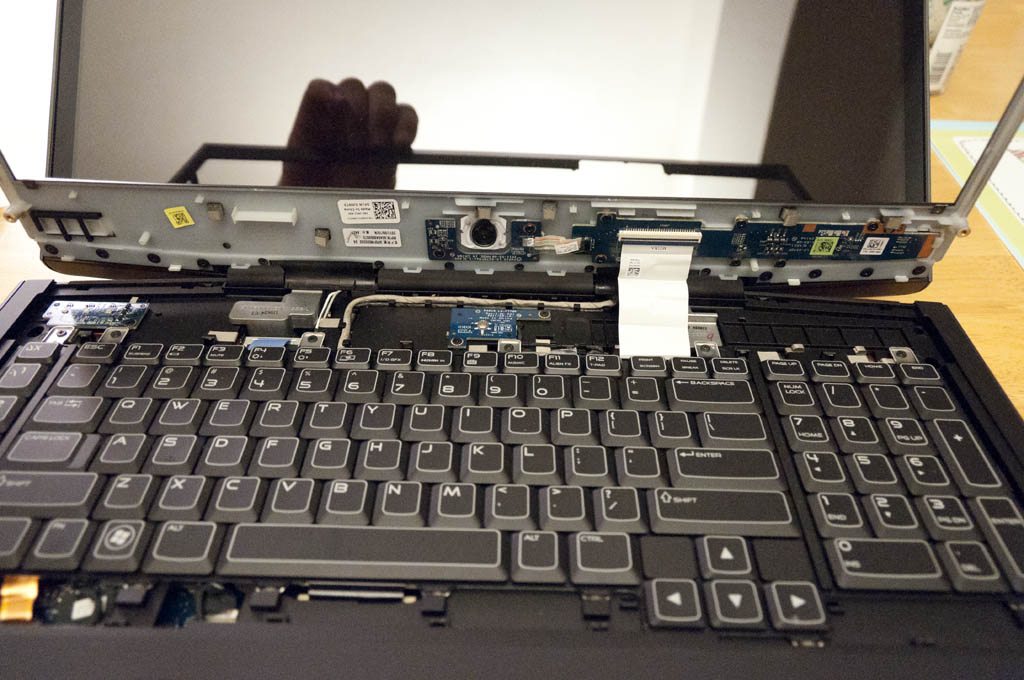
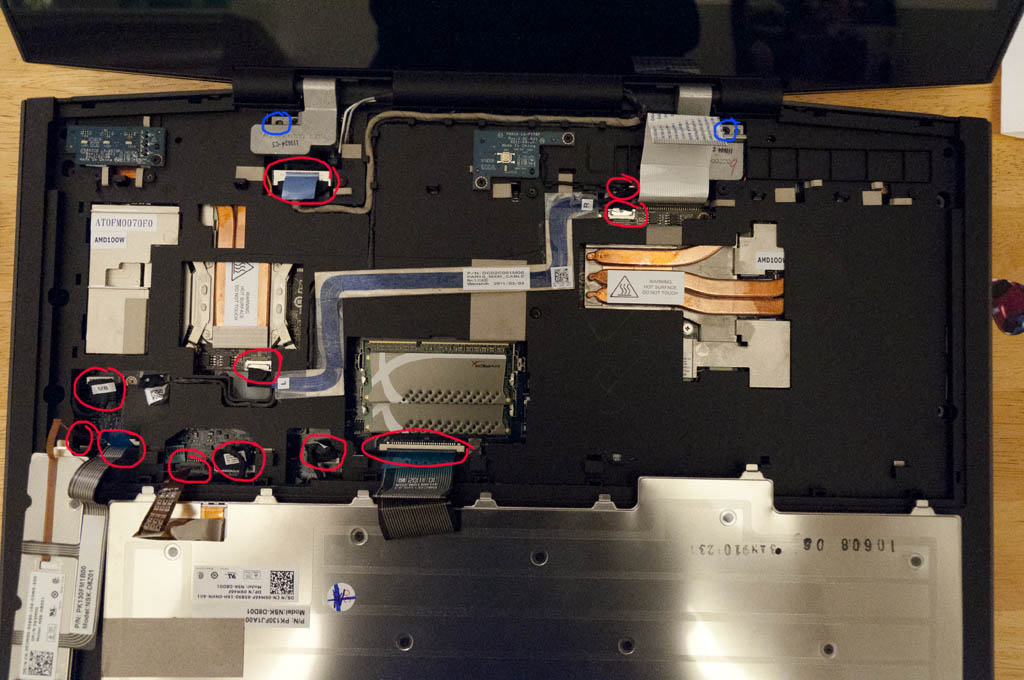
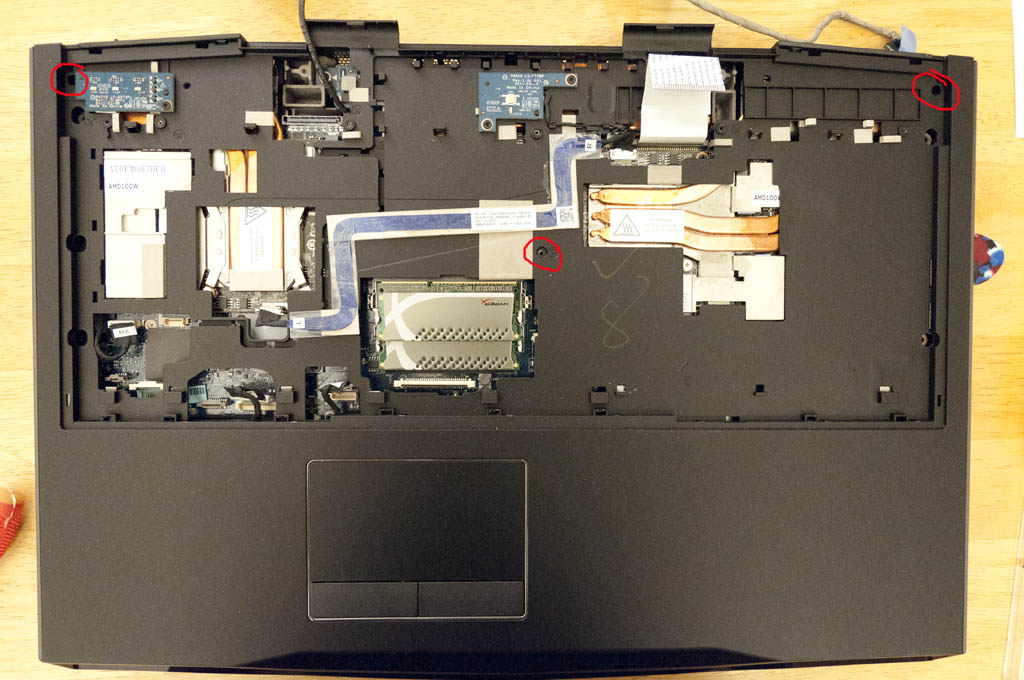
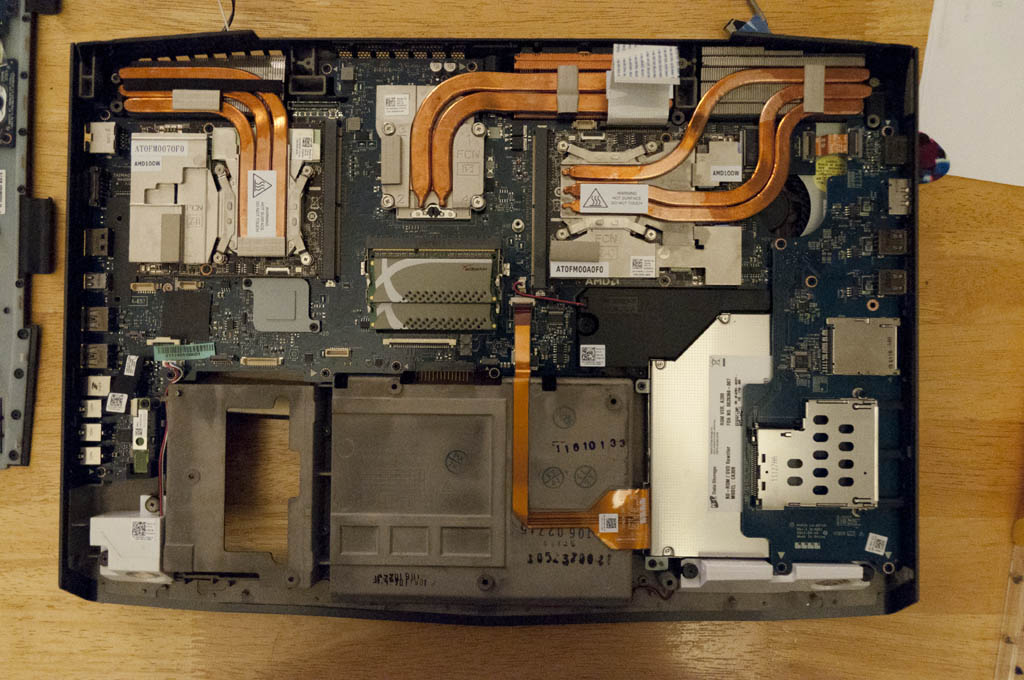
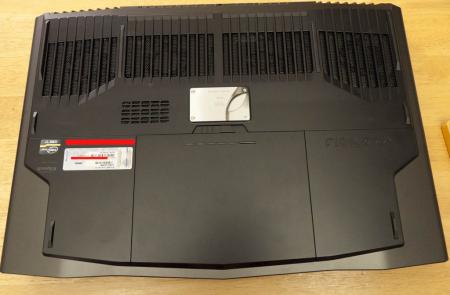
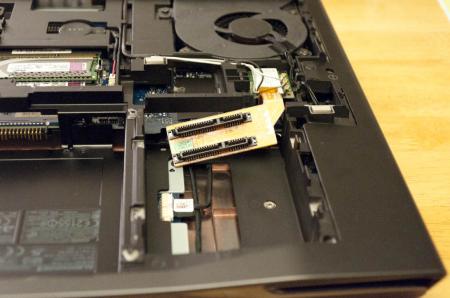
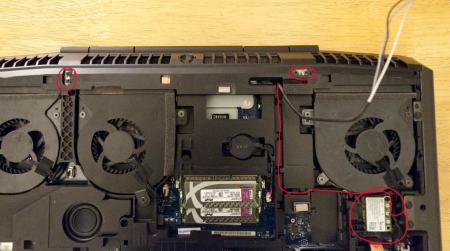
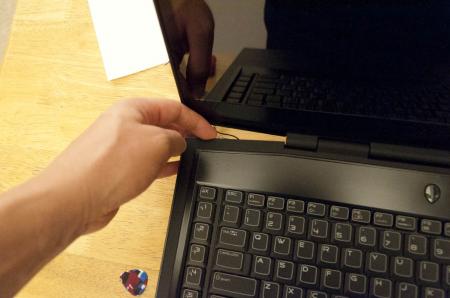
OK, people have been asking for this for a while so I thought since I can tear this down in about 10min, I should do a quick write-up. Like the title said, I did this quick so pictures wont be the best but you will get a better understanding on how to teardown the system enough to at least repaste etc.. Here we go 1 - Shot of the underside 2 - Remove battery and the 4 screws in red to remove bottom cover 3 - Bottom Cover Off: Remove Screws Labeled I (5 of them in Red), P ( 5 in Blue), and HD Bay screws (4 in Green) 4 - Remove Hard Drives 5 - Remove Screws In Empty Hard Drive Bay (4 in blue) 6 - Remove the LCD Hinge Screws ( 4 in Red) and disconnect the wireless antennae (circled and traced in Red) 7 - Flip System over and open screen 8 - Pop off the media control panel by lifting the back right and left corners until it "pops" off. I find using my guitar pick helps with this 9 - Once the back corners have popped loose, run the guitar pick around the edges to loosen the rest (around the keyboard) 10 - Picture of the media panel loose but still connected with the ribbon cable (disconnect this now) 11 - Remove the Keyboard and macro keyboard screws ( 6 in Red) 12 - Disconnect all cables from the motherboard and graphic cards ( 11 in total) and 2 more lcd screws ( 2 in blue) This includes: 2 ribbon cables for the macro keyboard 2 ribbon cables for the keyboard 3 for the handrest/trackpad (2 on bottom, 1 near the right crossfire cable connector) 2 for the screen (one toward the bottom left, one at the top left) 2 for the crossfire cable (labeled L and R on the cable) 13 - Remove 3 more screws securing the cover ( 3 in Red). You will need to pop off this cover starting at the back... just lift until it pops off. If it is being difficult, make sure all screws labeled "P" on both the top and bottom are removed. 14 - Once the cover is off, remove the screws (going from #1-4) on your heatsinks.... clean and repaste. If anyone wants pics of the heatsinks removed just let me know (I took a couple but not really necessary for this guide). Once again, I did this all very fast so I know it is not as polished as it could have been.... but I wanted this out sooner than later for everyone to use. Let me know if anything is unclear etc... D.


 -1 points