debaucher
-
Posts
37 -
Joined
-
Last visited
-
Days Won
2
debaucher's Achievements
T|I Semi Advanced (3/7)
112
Reputation
-
Fresh win 8 install missing pci express driver
debaucher replied to cwiggy78's topic in Alienware M18x / AW 18
You are correct. I came across this myself with a fresh win 7 install yesterday Sent from my ISW11SC using Tapatalk 2 -
I am about to do a reinstall.... Are these drivers worth using and do we retain brightness control?
-
Alienware fails to install Windows update
debaucher replied to arwenundomiel90's topic in Alienware M14x / AW 14
I had the same issue. What I did was just install one at a time (in order) until one did not work then did one at a time again starting from the last one. Maybe took me 2 reboots to install ask 8 updates. Good luck. D. Sent from my ISW11SC using Tapatalk 2 -
m18x - Teardown Guide (Quick and Dirty Edition)
debaucher replied to debaucher's topic in Alienware M18x / AW 18
Glad people are still finding a use for this. Sent from my ISW11SC (Galaxy S2 Wimax) using Tapatalk 2 -
m18x - Teardown Guide (Quick and Dirty Edition)
debaucher replied to debaucher's topic in Alienware M18x / AW 18
Ram should be fine.. .but you need to use the ram slots on the bottom of the laptop first (dimm slots 1 and 2) The slots under the keyboard (dimm slots 3 & 4) are for expanding to more than 2 sticks of ram. SO, either pull it apart and put the ram back into slots 1&2 (bottom of the system) or buy 2 more sticks of the same ram and put those into dimm slots 1&2 and have more fun D. -
OK, I just checked my latency using the dell 1103 drivers. I ran it while having both ethernet and wireless going as well as just wireless. Everything is green across the board (all around ~100 microseconds) unless I right-click on my wireless/network icon in the task bar to bring up available networks in my area. If I do that, I get a large spike around 5000-7500 microseconds. This happens with ethernet and wireless going, just wireless going but not when wireless is off (so the latency happens when the wireless card is searching for local access points). This is really the only time I get any red spikes. For example, if I turn off wireless.. I get a spike just above 1000 microseconds, but when I turn it back on (and it connects/looks at access points) it hits over 5000 microseconds (red). So, at this point there is really no reason for me to worry about changing drivers as I will only notice a latency spike when it tries to connect to a wireless network (or scan them) but does not happen while it is actually connected (unless it scans available access points when I right click the network icon to make it do so). This could be a problem if I had a poor wireless connection (at home or travel) but since I have a good signal at home and keep in wired most of the time.. this is fine for me. So, my question would be.... what is your 1103 doing when you get the spikes? Is it trying to locate/connect to an access point, is it sending out pings, etc..... D.
-
b00bs, which driver are you using? I have not checked my dpc latency since installing my 1103 but I am mainly on ethernet right now. btw, I am using the dell 1103 driver right now... will have to check my dpc when I get home. D.
-
HP 8540W - Quick and Dirty Teardown w/Heatsink MOD
debaucher replied to debaucher's topic in HP Business Class Notebooks
Just an update. After using the system for just over a week after the mod I have to say that overall I am quite happy. The system under normal usage is pretty much silent. On this system (with just one fan) the fan is always running, but at silent speeds about ~60% of the time. Every once in a while when I am doing something a bit more intensive, the fan speeds up to the mid range which you can hear but is still quiet... then the rest of the time it is at just under max speed (audible) but that is only when I am rendering something HUGE or playing a game. So, I would recommend a repaste on this system at the least.... but adding the copper to the GPU side of the heatsink I think is the biggest improvement since it was the gpu heating up and not dissipating heat as fast which made the fan rev up so much before the mod. D. -
HP 8540W - Quick and Dirty Teardown w/Heatsink MOD
debaucher replied to debaucher's topic in HP Business Class Notebooks
Thanks everyone. It would have been preferable to solder the copper sheets on, but my soldering skills are not nearly what they used to be and my older brother "stole" my torch years ago. I could have stopped by his house to use it, but he would probably not have the gas to run it anyways. I agree that every little bit helps and overall everything is running cooler.... (slower to reach max temp and faster to cool down) so I am happy. Plus, if I really need to increase cooling I could always run the fan on manual control (make some variables in HWInfo32/64) so that I can have the fan ramp up sooner than the HP default. Since this is my travel work machine (for when I am out an about and need the dreamcolor display) I usually just leave the fans at default and put one of THESE under the laptop D. -
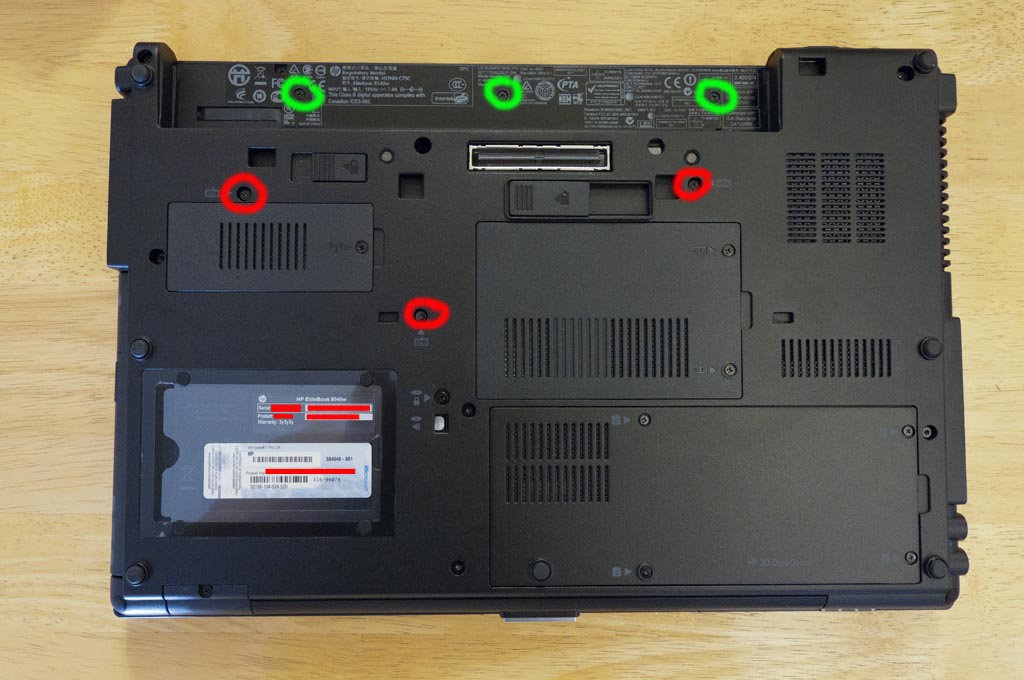
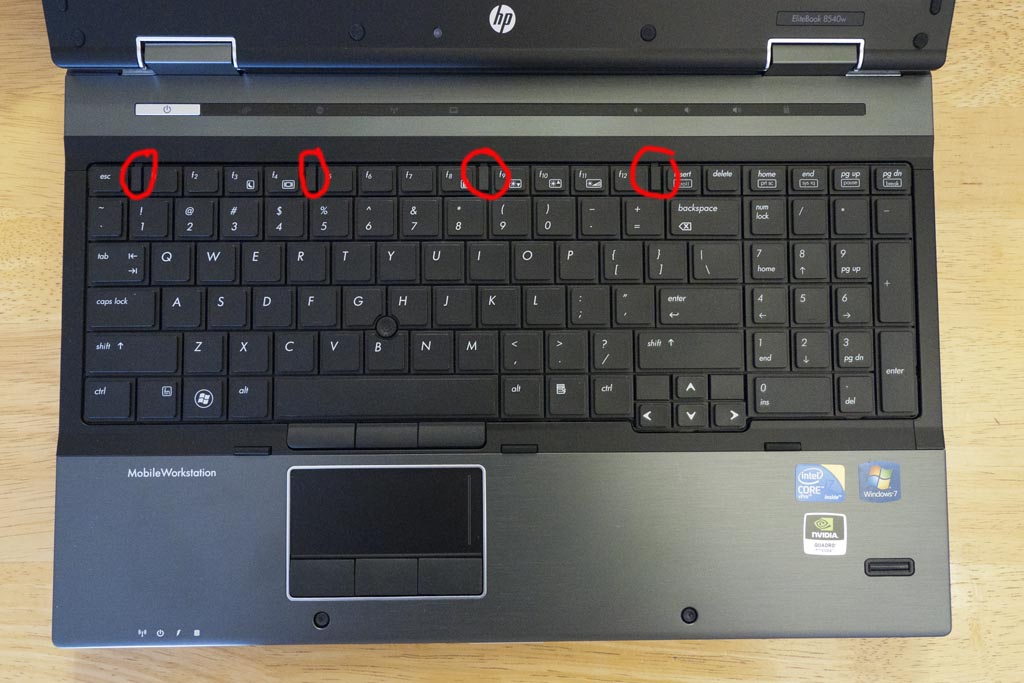
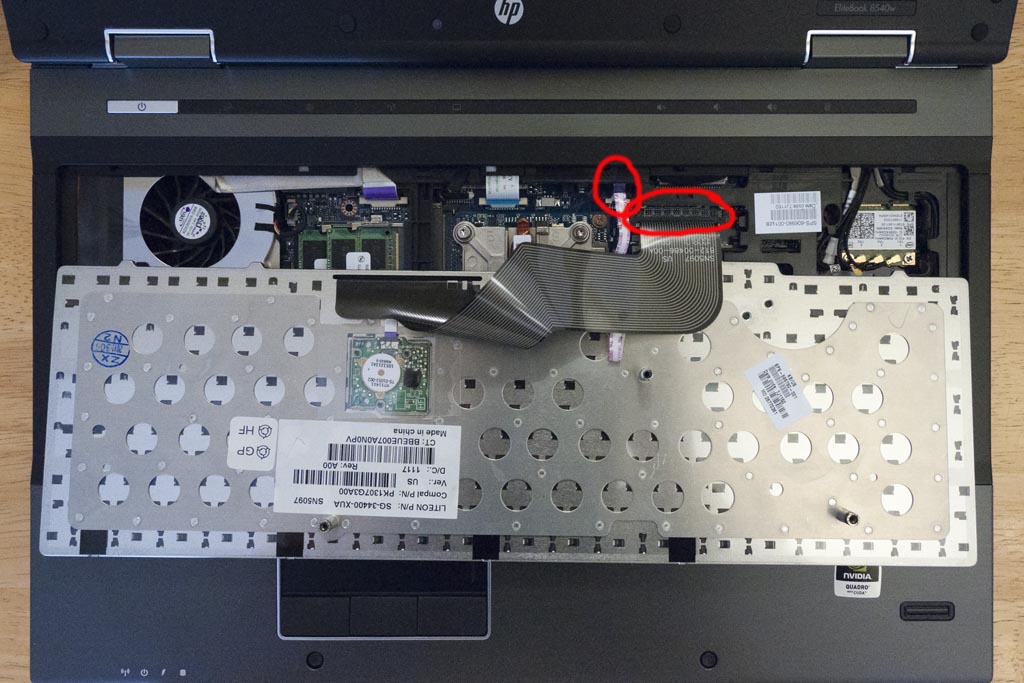
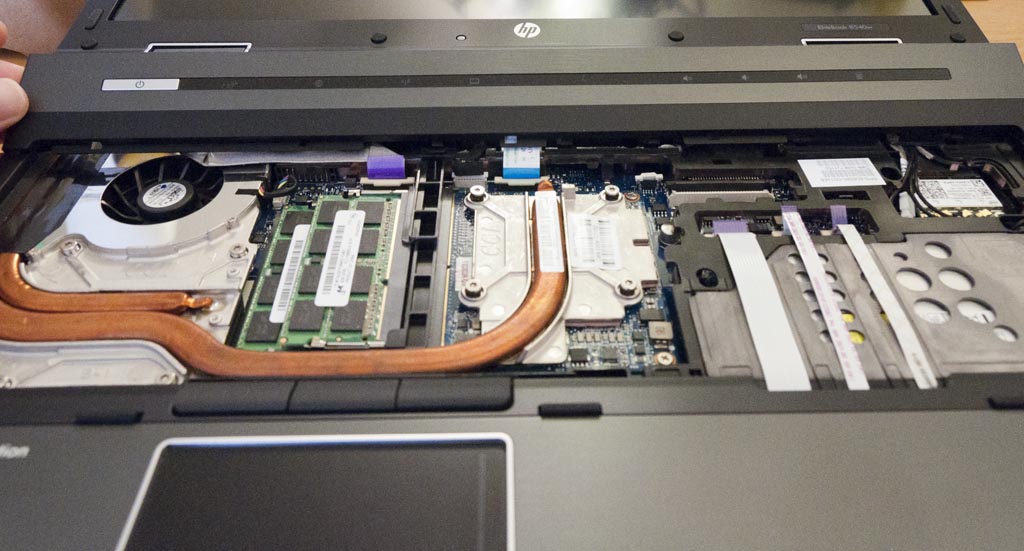
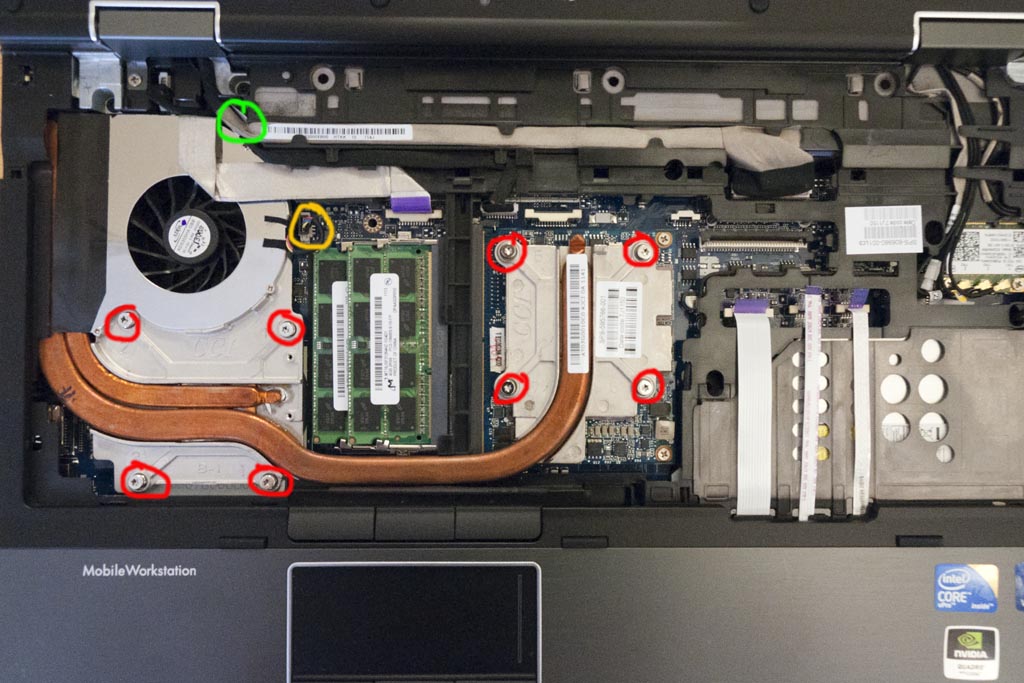
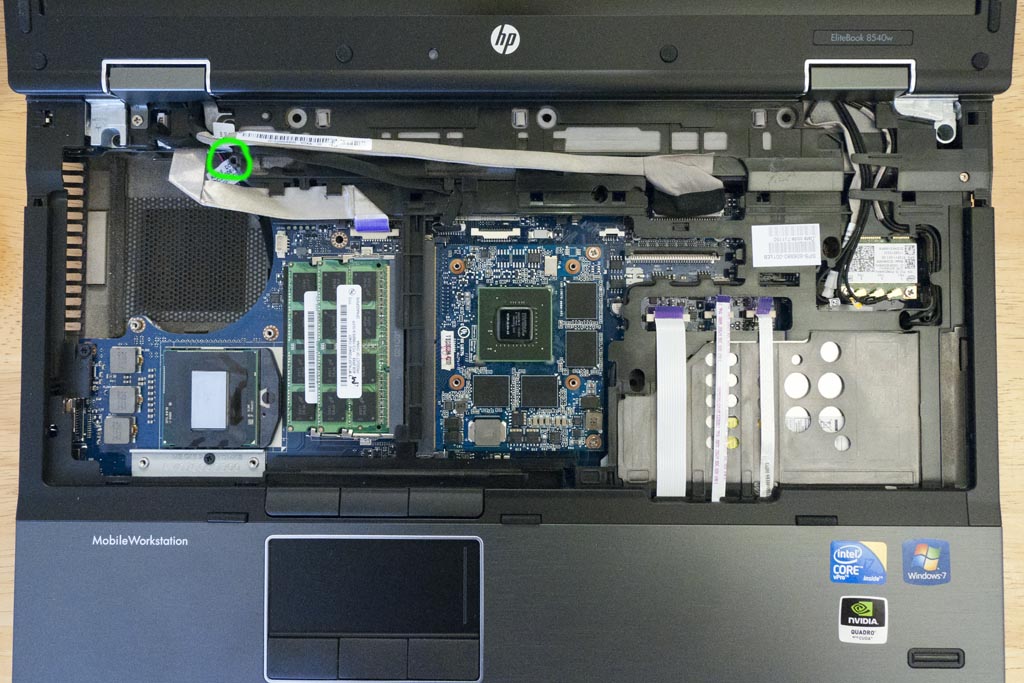
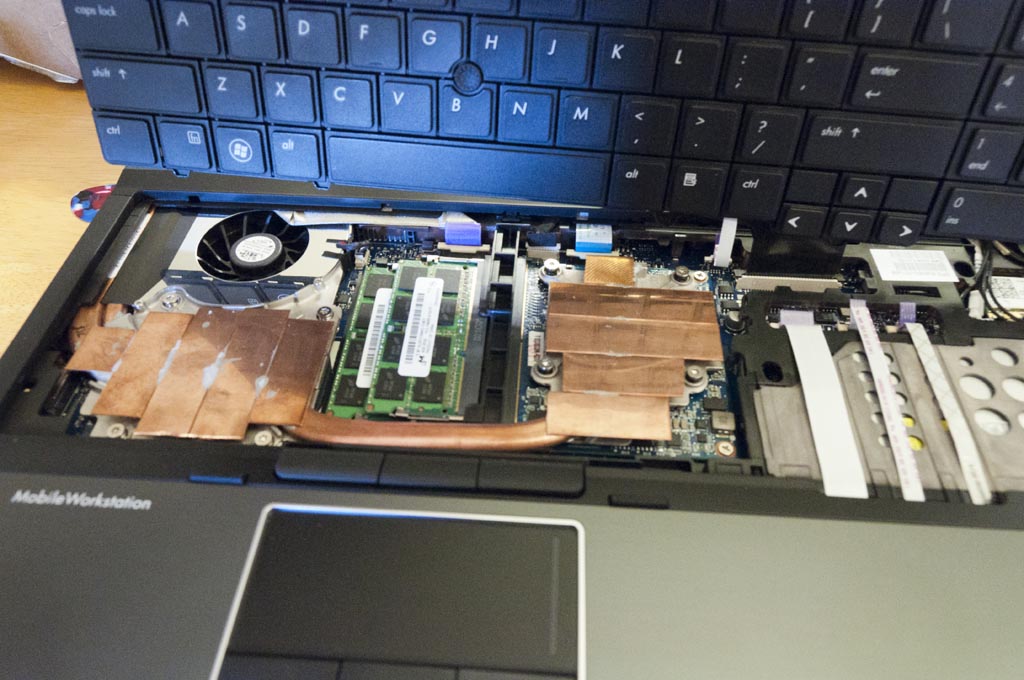
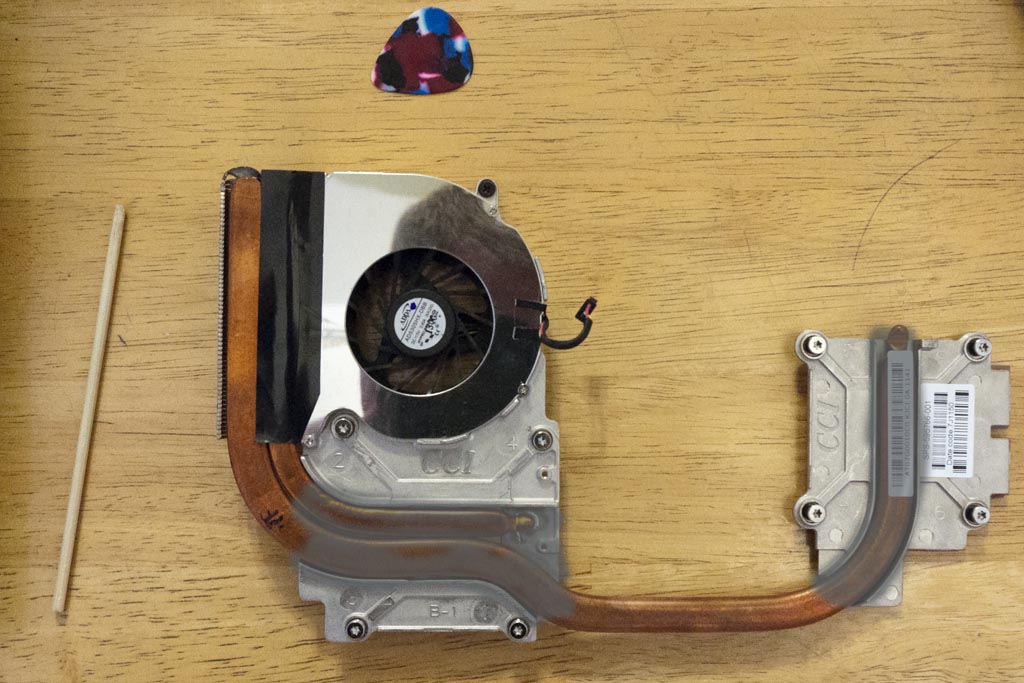
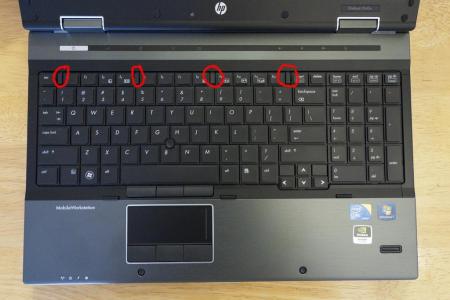
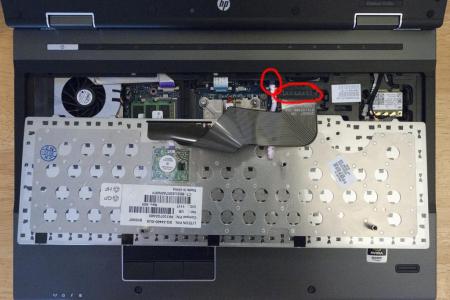
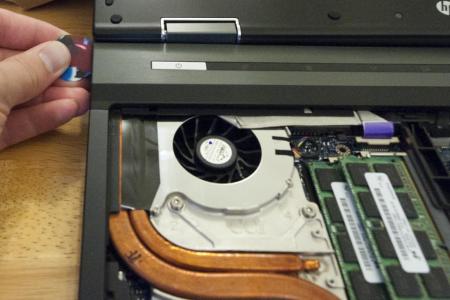
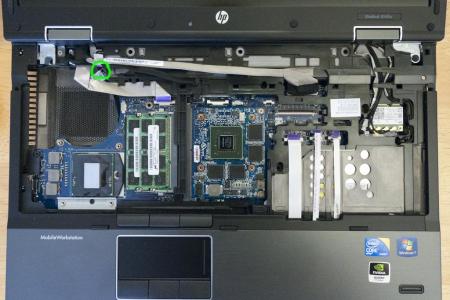
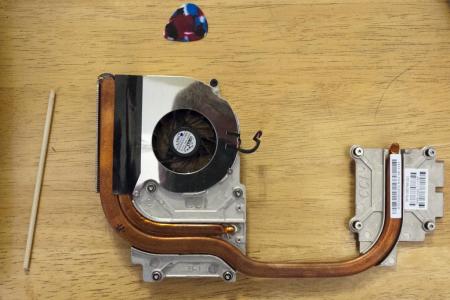
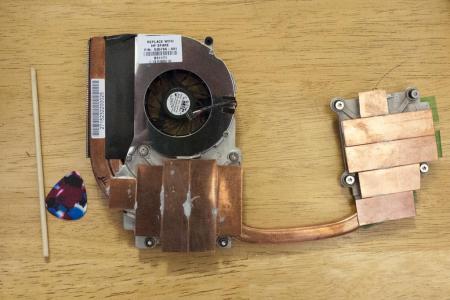
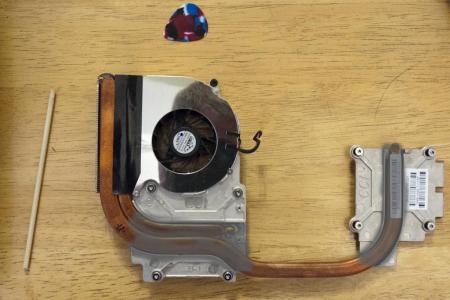
Hello Everyone. I decided to do another writeup for my 8540w. This will include how to tear it down far enough to repaste as well as a Heatsink cooling MOD The 8540W is VERY user friendly when it comes to after market upgrades, replacing parts and overall usage. 1) Remove Battery and the Keyboard screws (RED) and Media Panel screws (GREEN) 2) Flip System Over and push back the 4 Keyboard tabs to release (RED) 3) Flip Keyboard over and detach the 2 cables (RED) 4) Lift up Media Panel (I use my guitar pick to get under the edge and lift up) --- do this to both sides (left and right) 5) Picture of Media Panel Lifted Up 6) Remove The Heatsink (8 RED SCREWS and 1 GREEN) The screw circled in green is hidden beneath the LCD Cables, so just move them until you can get to it 7) Picture of system with Heatsink Out (Note the area where the Screw Labeled in GREEN is) 8) Picture of the Heatsink (PRE-MOD) 9) Picture of Heatsink (POST-MOD) 10) Picture of Heatsink Reinstalled Things to Note about this MOD. A) I already had IC7 24carat thermal paste on my cpu and gpu before this mod so temps are a direct measurement of the effectiveness of the MOD from before--->after I used 0.5mm thick copper plates (left over from another mod a ways back) C) I used I used Artic Silver Thermal Adhesive to glue the copper plates on ---a) When adding the thermal adhesive I applied it VERY liberally all around the heatpipes. My reason for this was I wanted the pipes to have contact with all edges of the original heatsink to increase thermal transfer to the heatpipes (see photo below where I painted the area's I applied thermal adhesive for illustration purposes) D) I am not sure if the copper plates actually help or not... but they do get pretty hot E) I also sealed around the heatpipe and fan exhaust with more electrical tape (not just the top as seen in the above picture). While the gap was VERY small on the sides and bottom, I decided to make sure it was sealed up as good as possible so that air would only flow out through the fins About the TEMPS: ----I did not have this on a cooling pad or anything similar... I had it sitting flat on a table with no elevation ----Overall system temp is down, heat does not rise as fast and fan never reached max rpm (5000rmp..... but it never did before the mod either) ----The fan is still controlled by the system and is set by HP to not really kick in until the system hits ~80C (never reaches full speed on the fan) ----It takes much longer for the temperature to rise than before, so the fan stays quieter (at a slower speed) for longer. ----The GPU has the greatest improvement in temps which is great since the heat of the CPU negatively affects the heat of the GPU due to the heatpipe/fan design. a) As the CPU heats up, the GPU did not raise as fast or reach as high of a temp as before the mod (after 10min of p95 on the cpu, GPU was at 78C before the mod and 75C after with the fans on 2nd to highest speed controlled by the system [4300rmp]) When running furmark the GPU did not raise temp as fast or go as high (87C max after 10min of Furmark before MOD, and was 83C after 10min of Furmark AFTER the MOD) ----The CPU max temps did not change a) After 10min of p95 (8 instances running) which were 85-87C across the 4 cores both before and after the MOD The fan speed never reached MAX but stayed at HIGH of 4300rpm (max speed is 5000rpm) c) It did take longer for the max temps to be reached and it also cooled down faster compared to before/after the MOD ---------> d) If I decided to force the fans to MAX (5000rpm) using HWinfo64 the cpu temps dropped down to a max of 79-83C across the 4 cores. So what are my overall conclusions on this MOD? ---I do not think the copper plates really helped (maybe a little.. but not so much as to make them necessary) ---I DO Think that the thermal adhesive bridging all the gaps between the heatpipes and the heatsink helped. ---A good thermal paste is important (I had IC7 diamond on both before and after this mod for both cpu and gpu) ---HP has a darn good cooling system designed for this system.... while it does run to the low/mid 80's this is due to the system not running the fan aggressively (I have never had the fan go to max rpm of 5000rpm unless I forced it to myself using HWinfo64) ---Since the cooling system is already darn good.. I think all one really needs to do is just replace the thermal paste with a good quality one to achieve good results ---It would help to either raise the back of the system or place it on a cooling pad to increase airflow to the fan There you have it... a lot of typing for you to go cross-eyed on just to say....... only worry about replacing the thermal paste D.


-
m18x - Teardown Guide (Quick and Dirty Edition)
debaucher replied to debaucher's topic in Alienware M18x / AW 18
You need to do these steps.. 1,2, The red screws in 3, 7, 8, 9, 10, 11 Hope this helps D. -
Last I heard he had a couple of custom bezels being tested. One had a carbon fiber vinyl covering and he was going between using english or alienware fonts for the engraving. D.
-
All the release notes say are "Support new CPUs"Probably the 4 new mobile i7's (2640qm, 2760qm, 2860qm, 2960xm) Core i7-2640QM 2 4 2.8 GHz 3.5 GHz 4 MB 650 / 1300 MHz 35 Watt Core i7-2760QM 4 8 2.4 GHz 3.5 GHz 6 MB 650 / 1300 MHz 45 Watt Core i7-2860QM 4 8 2.5 GHz 3.6 GHz 8 MB 650 / 1300 MHz 45 Watt Core i7-2960XM 4 8 2.7 GHz 3.7 GHz 8 MB 650 / 1300 MHz 55 Watt
-
m18x - Teardown Guide (Quick and Dirty Edition)
debaucher replied to debaucher's topic in Alienware M18x / AW 18
Couldn't help myself... went ahead and ordered a spare heatsink for my 8540w. SO, will mod it up and do a teardown guide for my 8540w in the coming weeks. D.