Leaderboard


Popular Content
Showing content with the highest reputation on 09/20/11 in all areas
-
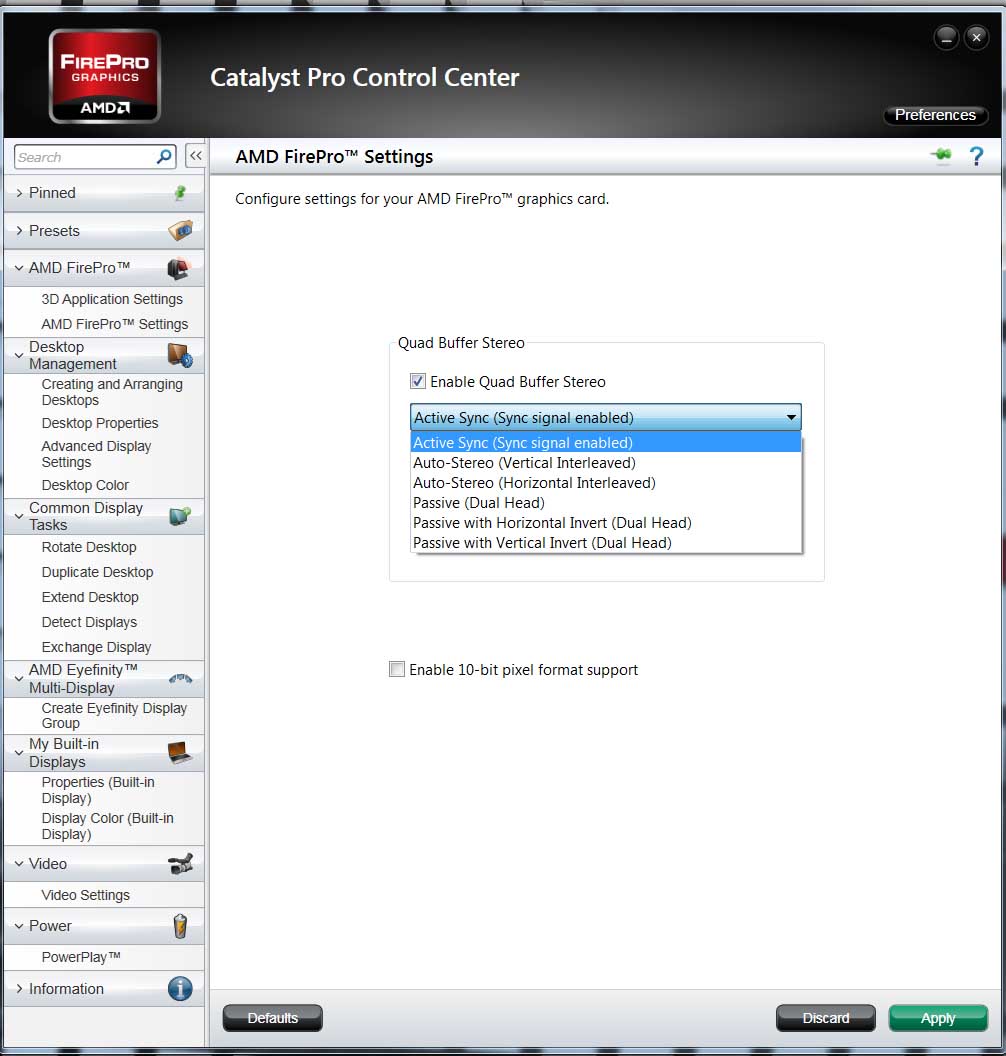
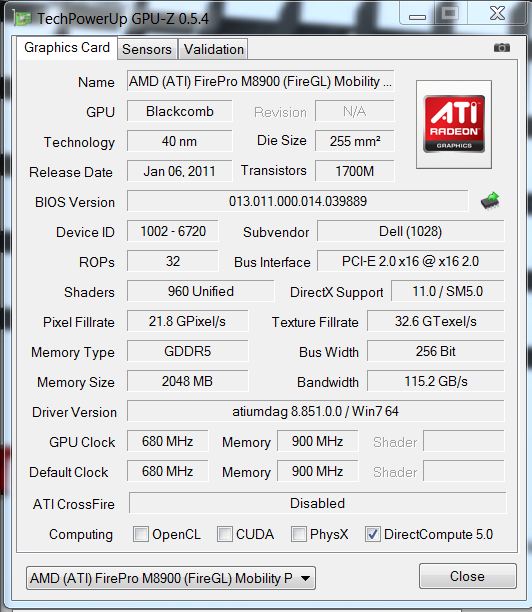
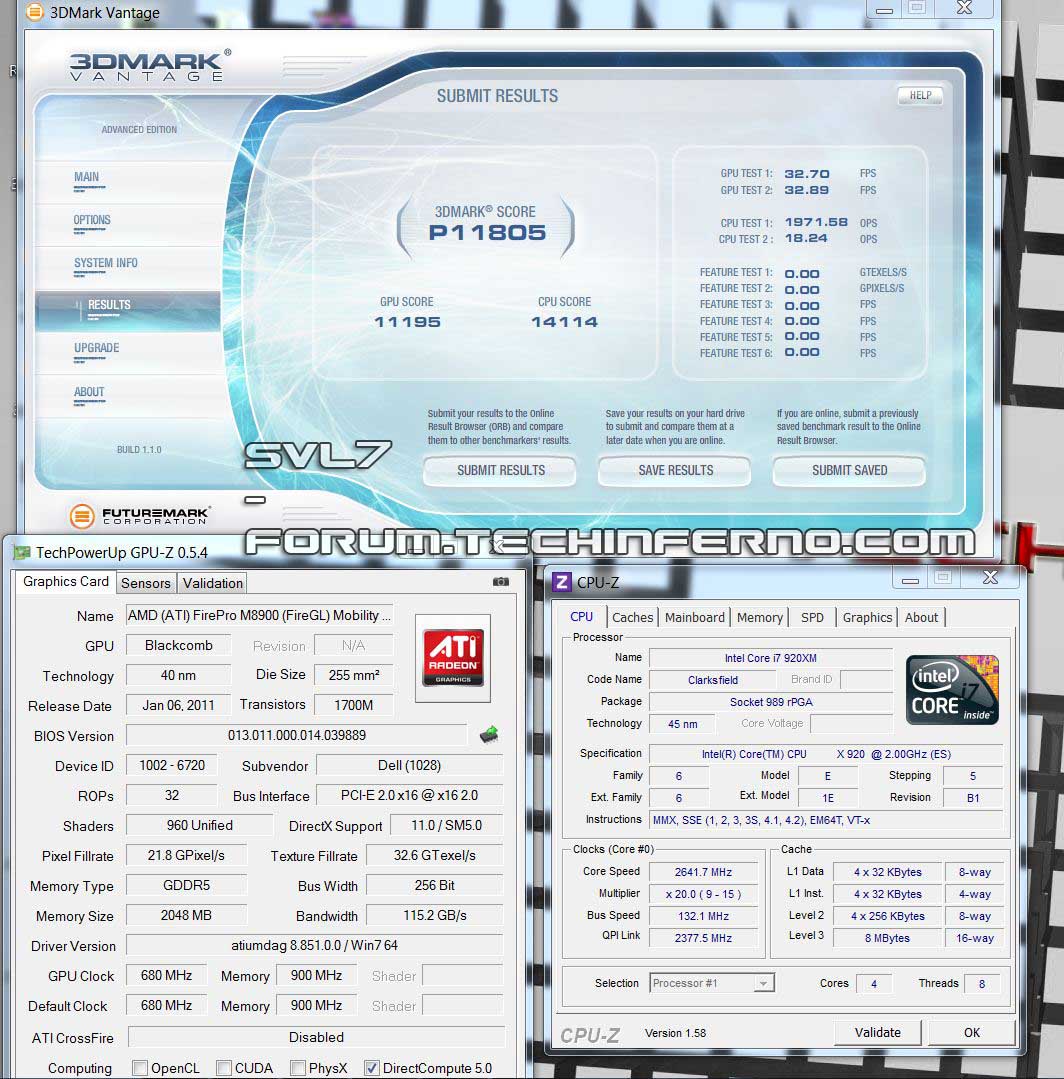
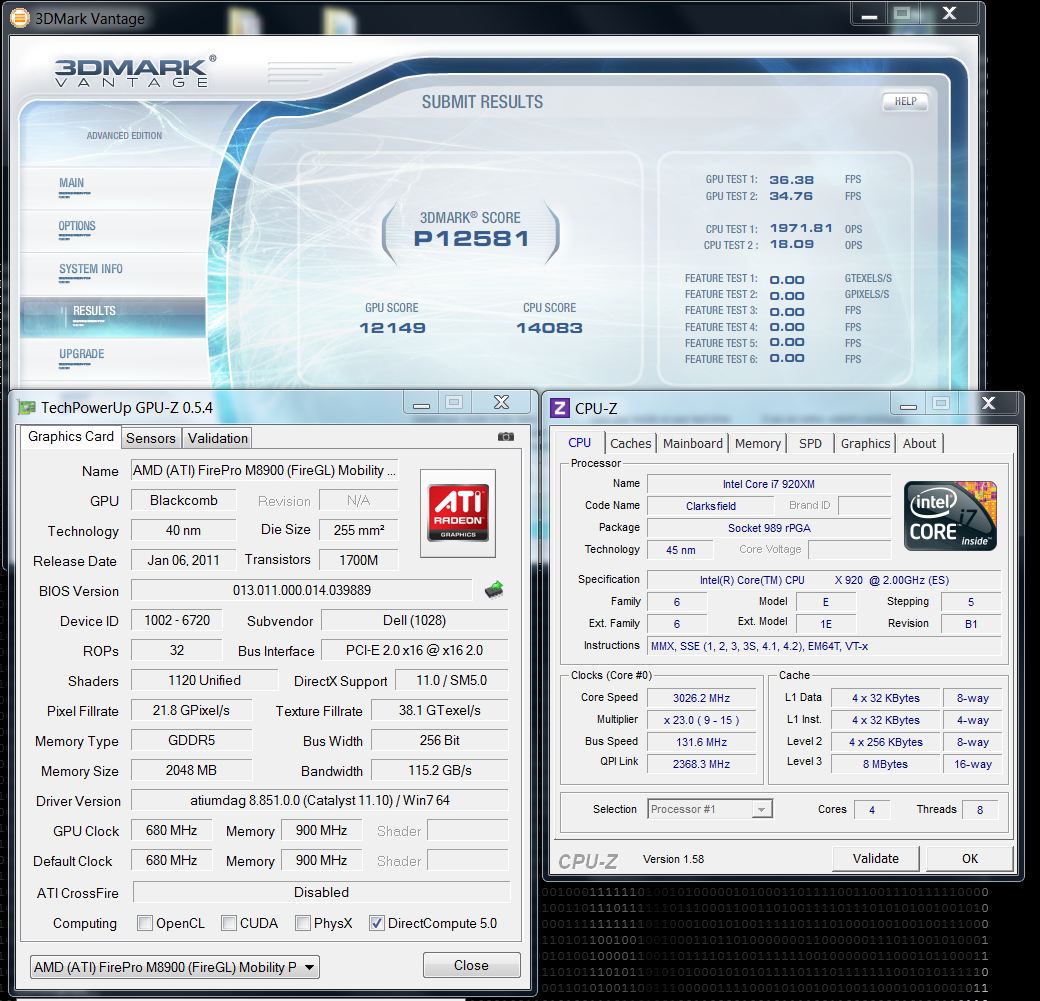
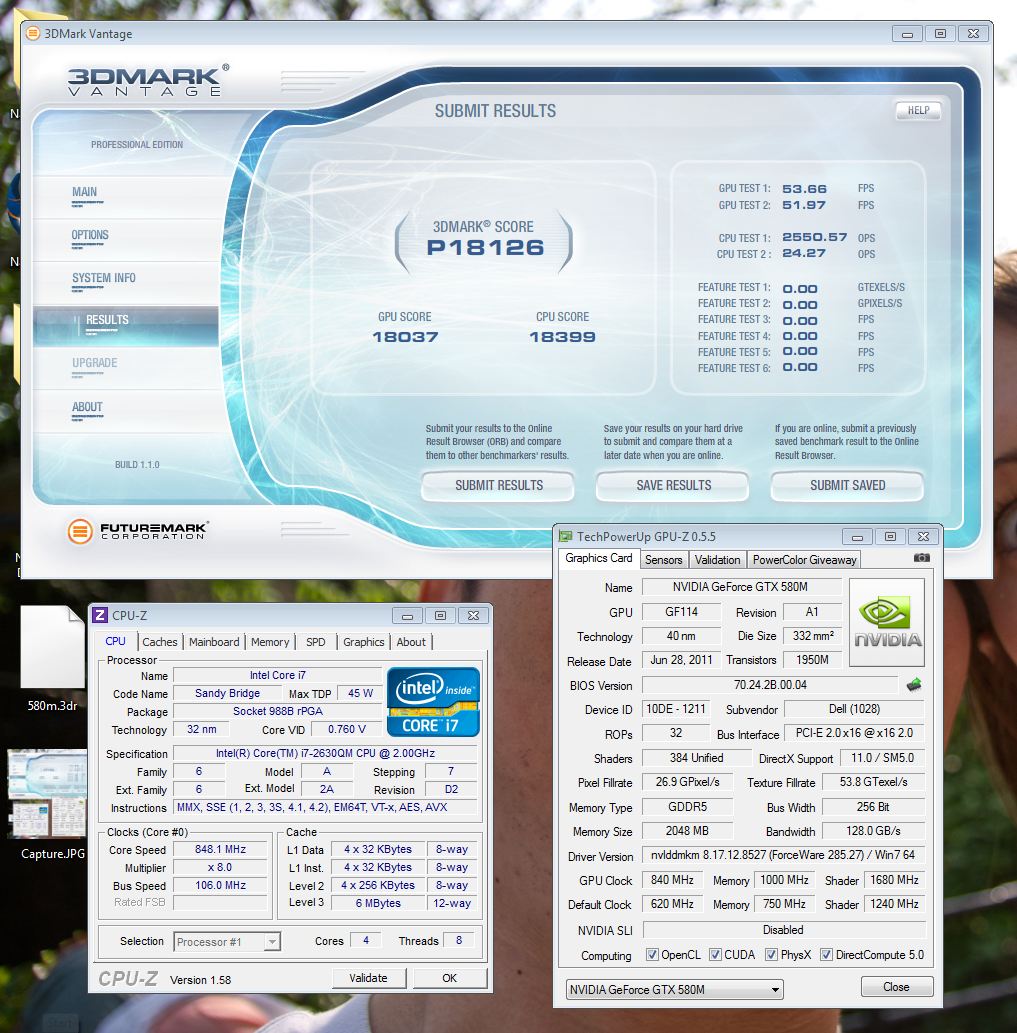
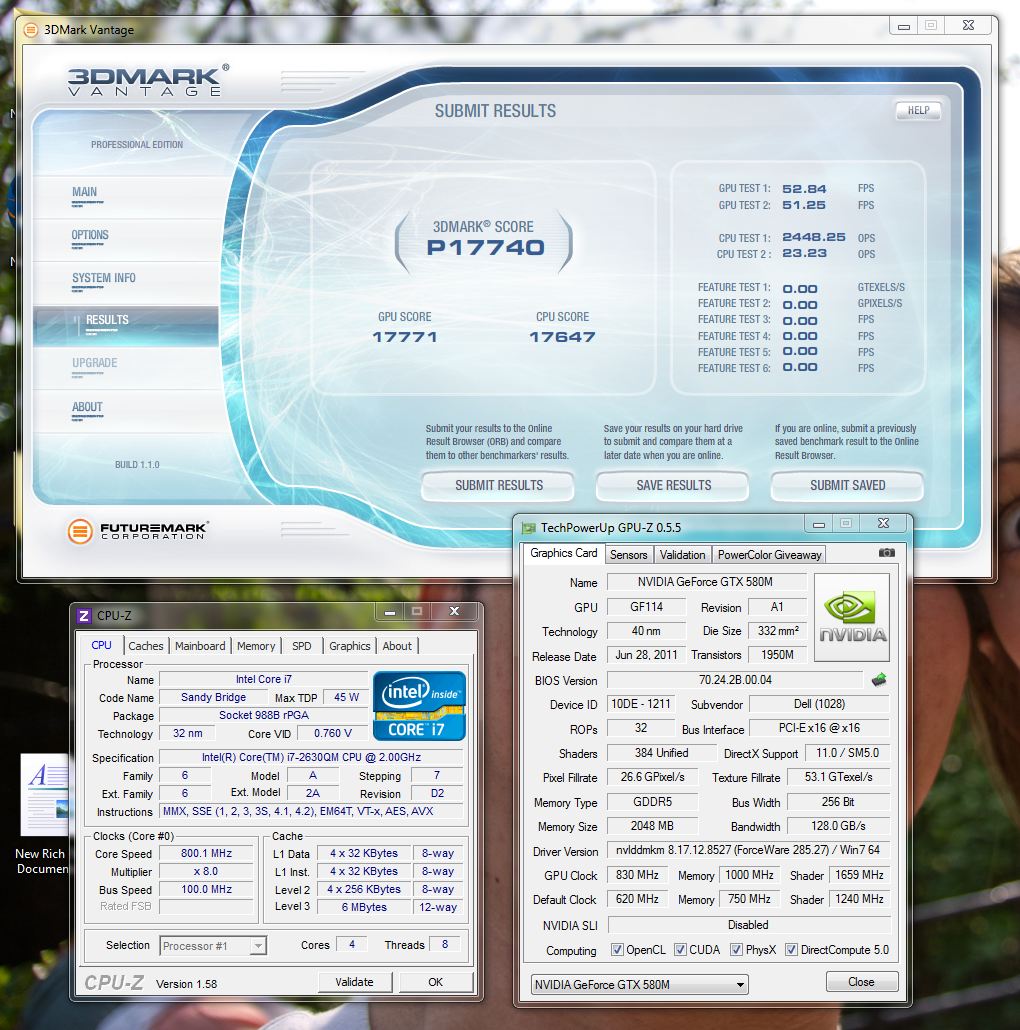
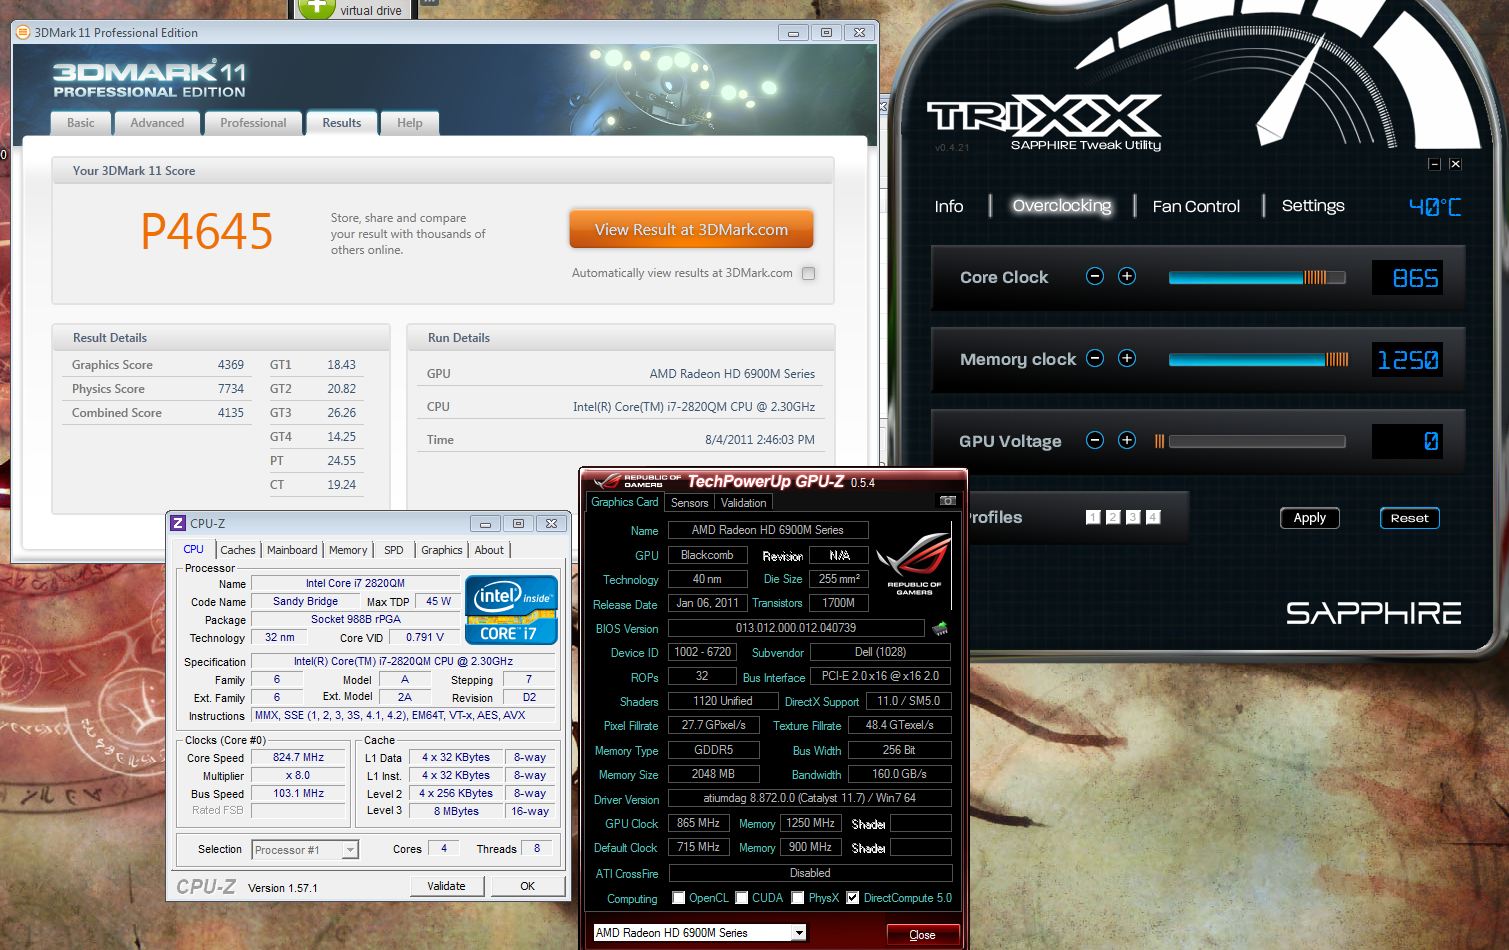
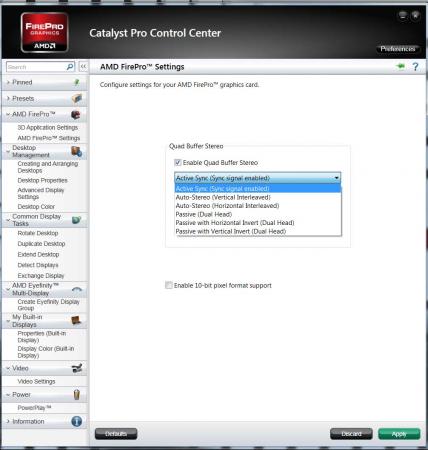
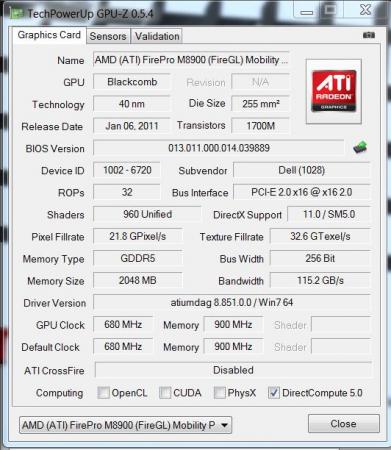
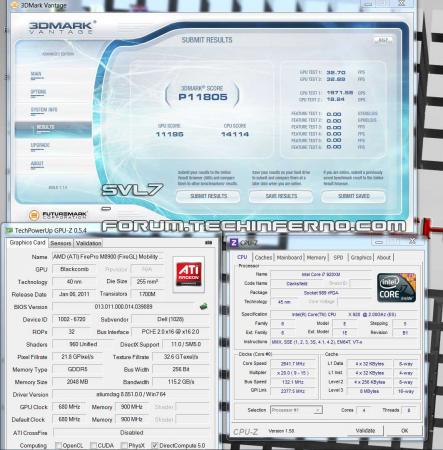
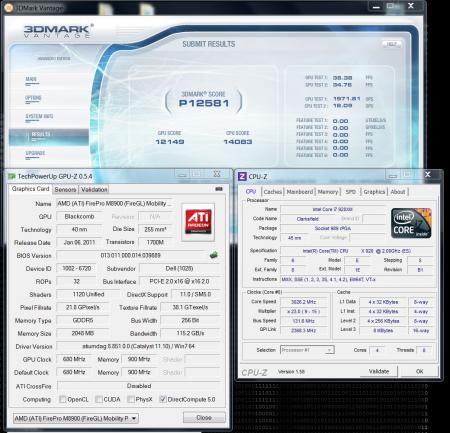
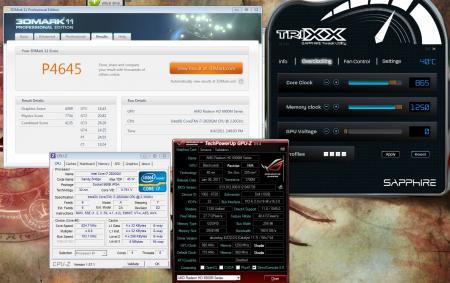
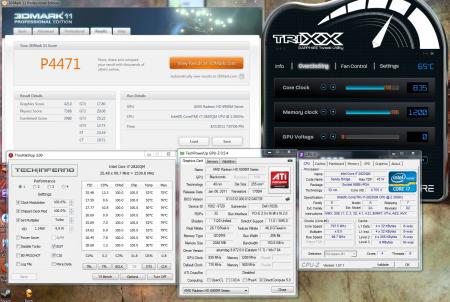
AMDs professional mobile GPUs (FirePro M Series) use the same hardware as their gaming equivalent (Mobility Radeon HD Series) The difference lies in the VBIOS and in the specialized driver. This allows to simply change a 6970m into a FirePro M8900 by simply flashing the appropriate VBIOS and installing the corresponding driver: (UPDATE: This also works with the 6990m, see the update at the end of the post) The advantage of the FirePro card lies in the better CAD and DCC performance, optimized OpenGL support, OpenCL features and AMD Eyefinity technology. In short: The card gets optimized for professional applications instead of games. A 6970m is very well capable of CAD work and a M8900 can still play games, but their performance is optimized for other tasks, and this can make quite a difference. A game uses a GPU differently than CAD software. For example you don't need a high frame rate when designing something with CAD software, but it's crucial that the rendering of your work is accurate and detailed. So if you have a 6970m and need to use professional software once in a while you might want to give this a try. I haven't installed any CAD software on my system at the moment, but the driver seems to work properly, haven't seen any issues so far.The procedure doesn't take long, you only need to flash the VBIOS, uninstall your gaming driver and install the professional one. You can use the M8900 driver of the Dell Precision M6600 workstation, you'll find it at the Dell drivers page. Maybe you find a more recent driver on the AMD homepage. Here are some screenshots of the Catalyst Pro Control Center, you'll probably notice some features which aren't available with the Radeon HD cards: I've done this with my Sapphire 6970m, it'll definitely work with the Dell 6970m as well and it's save to assume that this is true for the Clevo/Eurocom version too. Since there are some changes in hardware IDs you'll need to force the flash. NOTE: This should work just as well when your system has a FirePro M8900 and you want to optimize the gaming performance - simply flash the 6970m VBIOS and install the regular driver and you're done. The Dell 6970m VBIOS can be found in this post. Also a big thanks to @Star Forge for providing the VBIOS of the FirePro M8900!! Here's a 3dMark Vantage run with after applying the soft mod to the 6970m, everything at stock, also in the CPCC. Not too bad imo, same pretty much the same as the stock run I did when I got the 6970m in April. Would be interesting to see some gaming comparisions... but I haven't installed any games atm. EDIT: For M17x r3 users: You need to modify the driver, otherwise it won't install here the instruction, a big thanks goes to @devillucifer for investigating this problem and finding a solution. When I come around to do so I'll post a link to a modified driver so you don't have to modify them yourself. Detailed guide for flashing the VBIOS: UPDATE: This also works with the 6990m. Note that the M8900 VBIOS has the same clock speeds as the 6970m, so the 6990m is actually underclocked with this VBIOS. You can easily overclock it with software or modify the clocks of the VBIOS before flashing, so that you're back at 6990m speeds. But even at standard clocks the 6990m performs better than the M8900 or 6970m, the card has 120 additional shaders which will bring a little performance boost as you can see in the screenshot below, I about 1000 points more on the GPU score compared to the 6970m flashed with the M8900 VBIOS (at the same clocks). UPDATE 1/17/16 DOWNLOAD FOR AMD FIREPRO M8900.ZIP HERE:
 4 points
 -
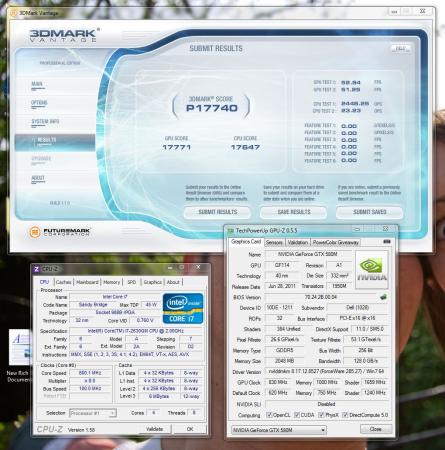
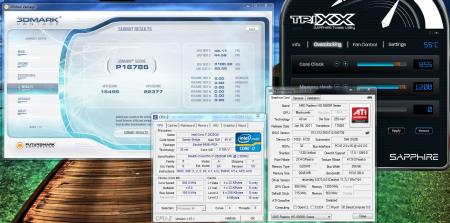
So, finally managed to hit 18k GPU in Vantage. Stock cooling, no dice, no AC, no hardcore stuff. See for yourself. Absolutely amazing on a single card!
 4 points
 -
:D AMD Radeon HD 6970M video card benchmark result - Genuine Intel® CPU 0 @ 2.40GHz,Alienware M18xR1 score: P8563 3DMarks Search4 points
-
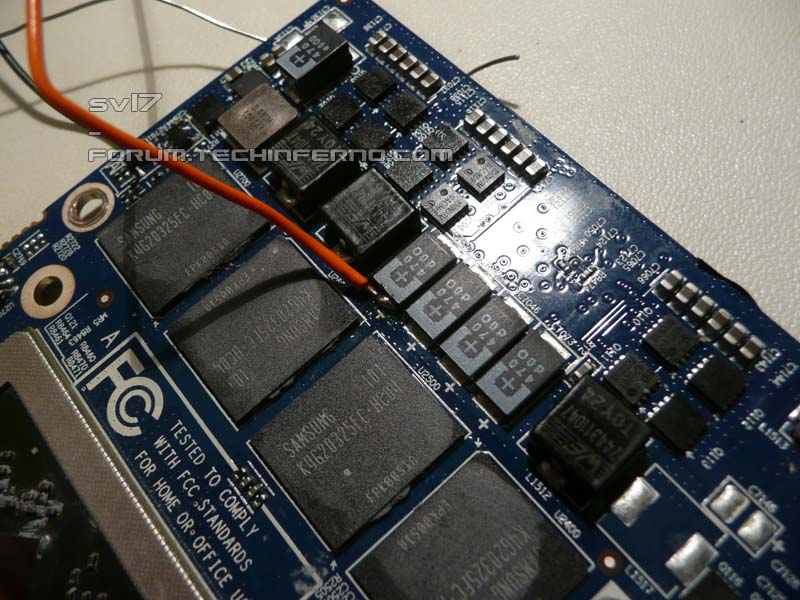
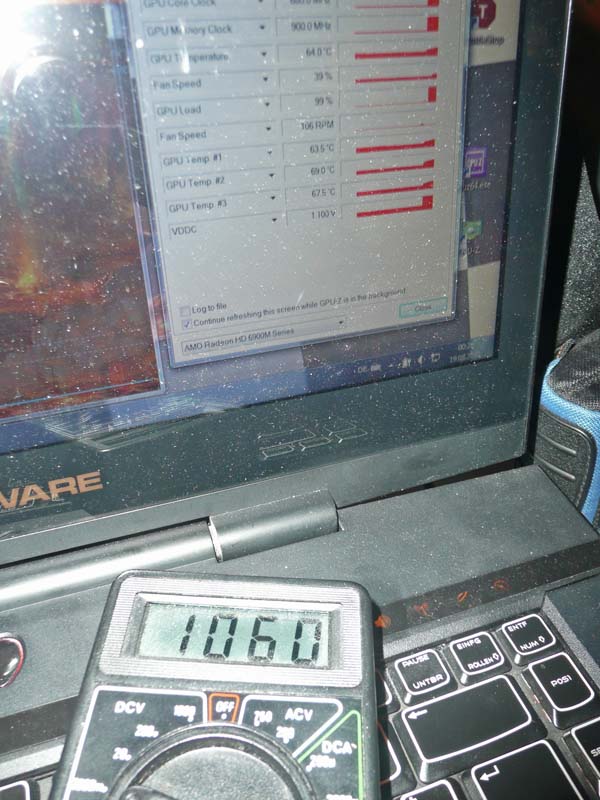
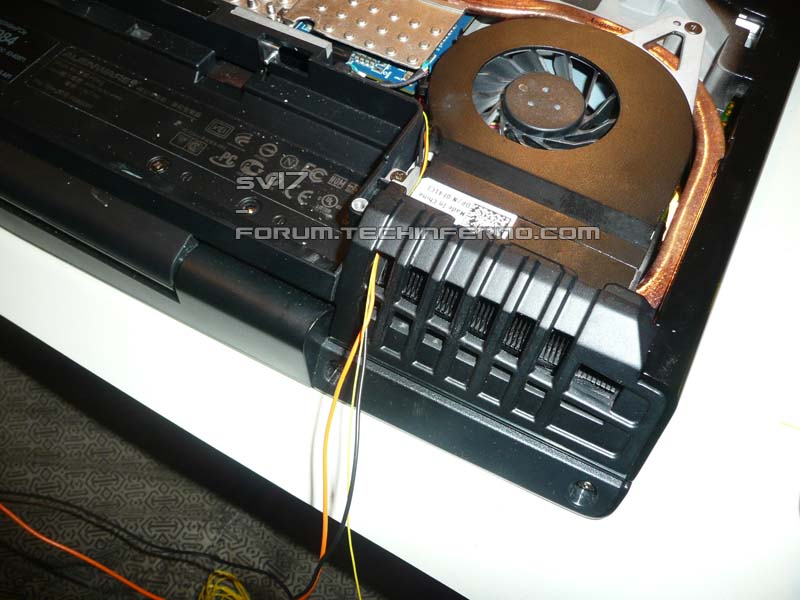
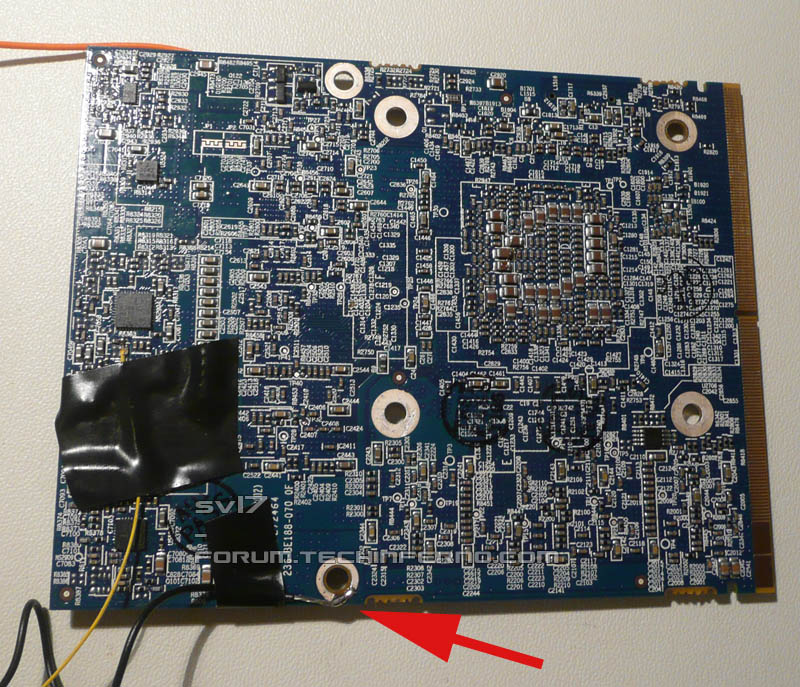
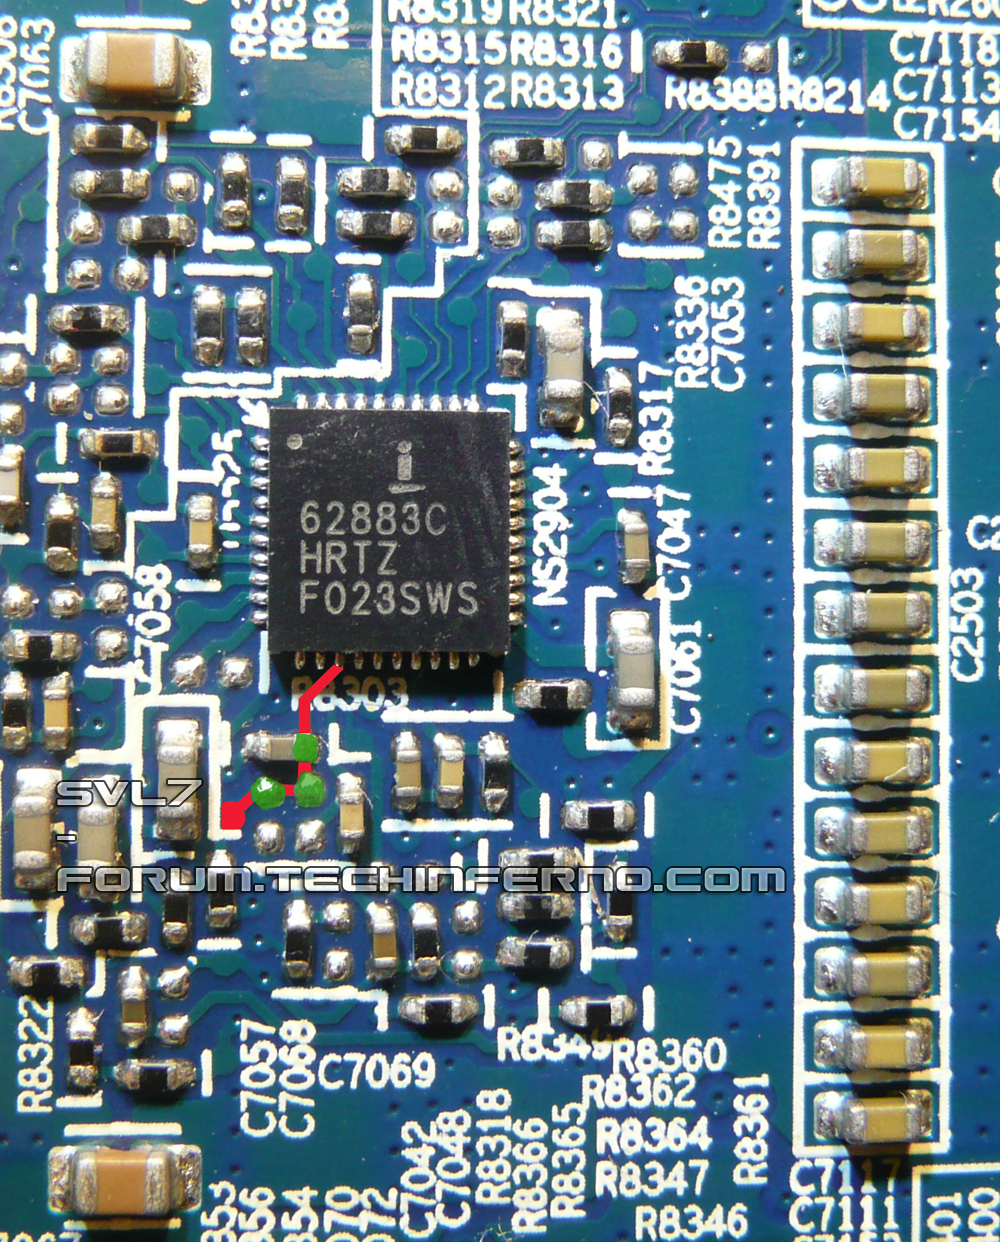
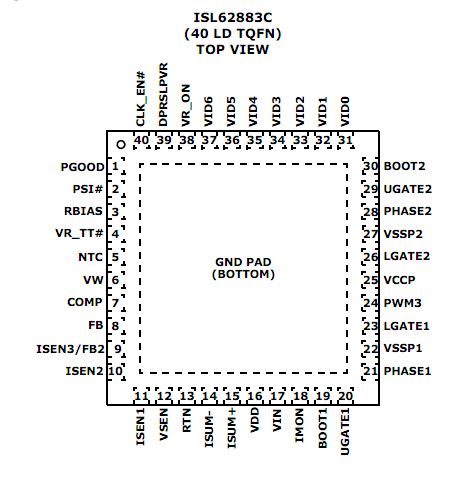
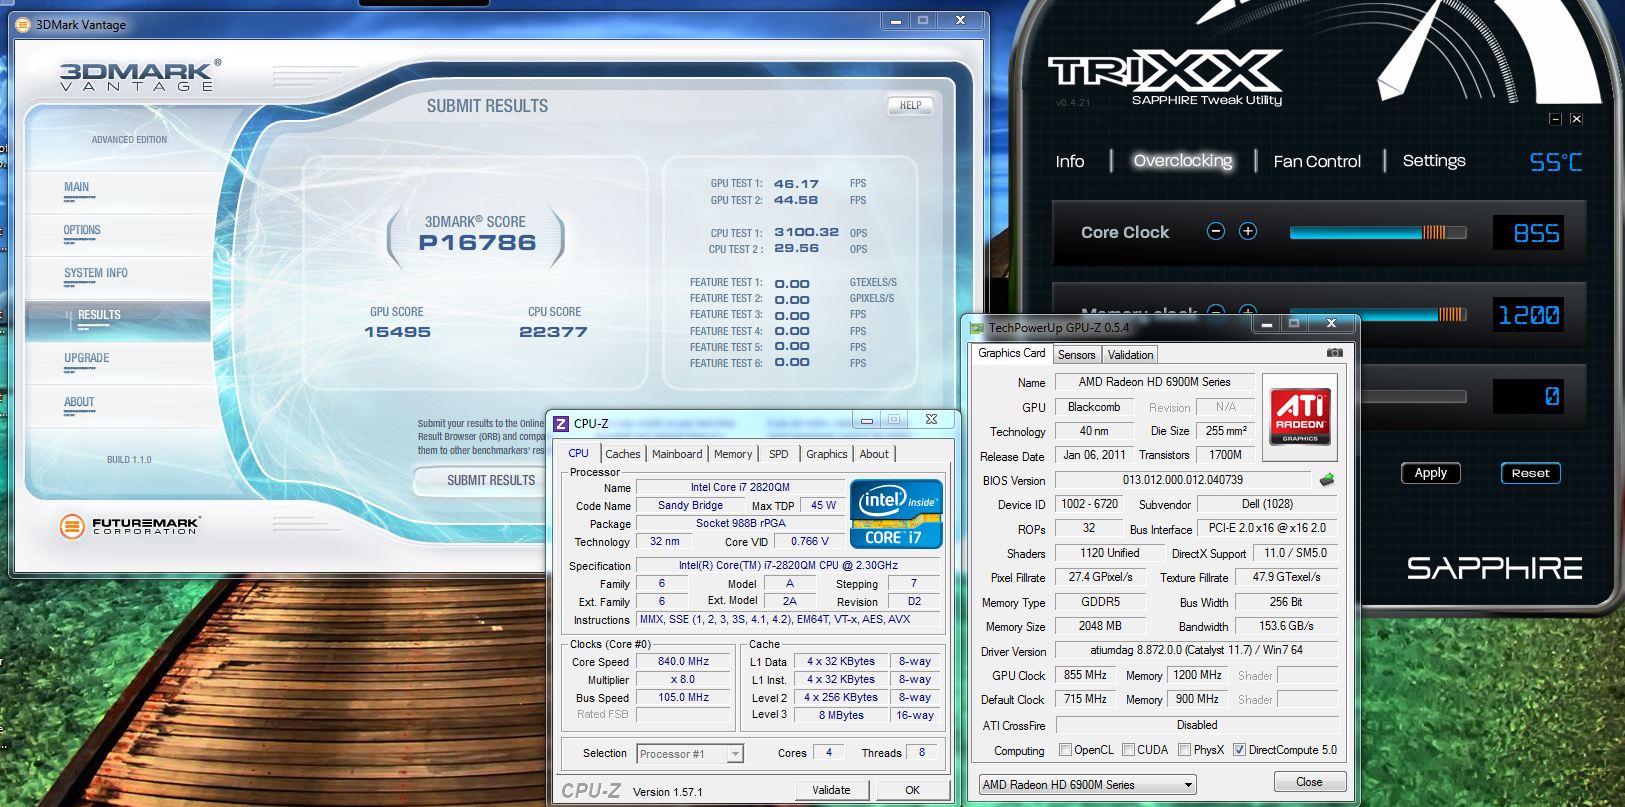
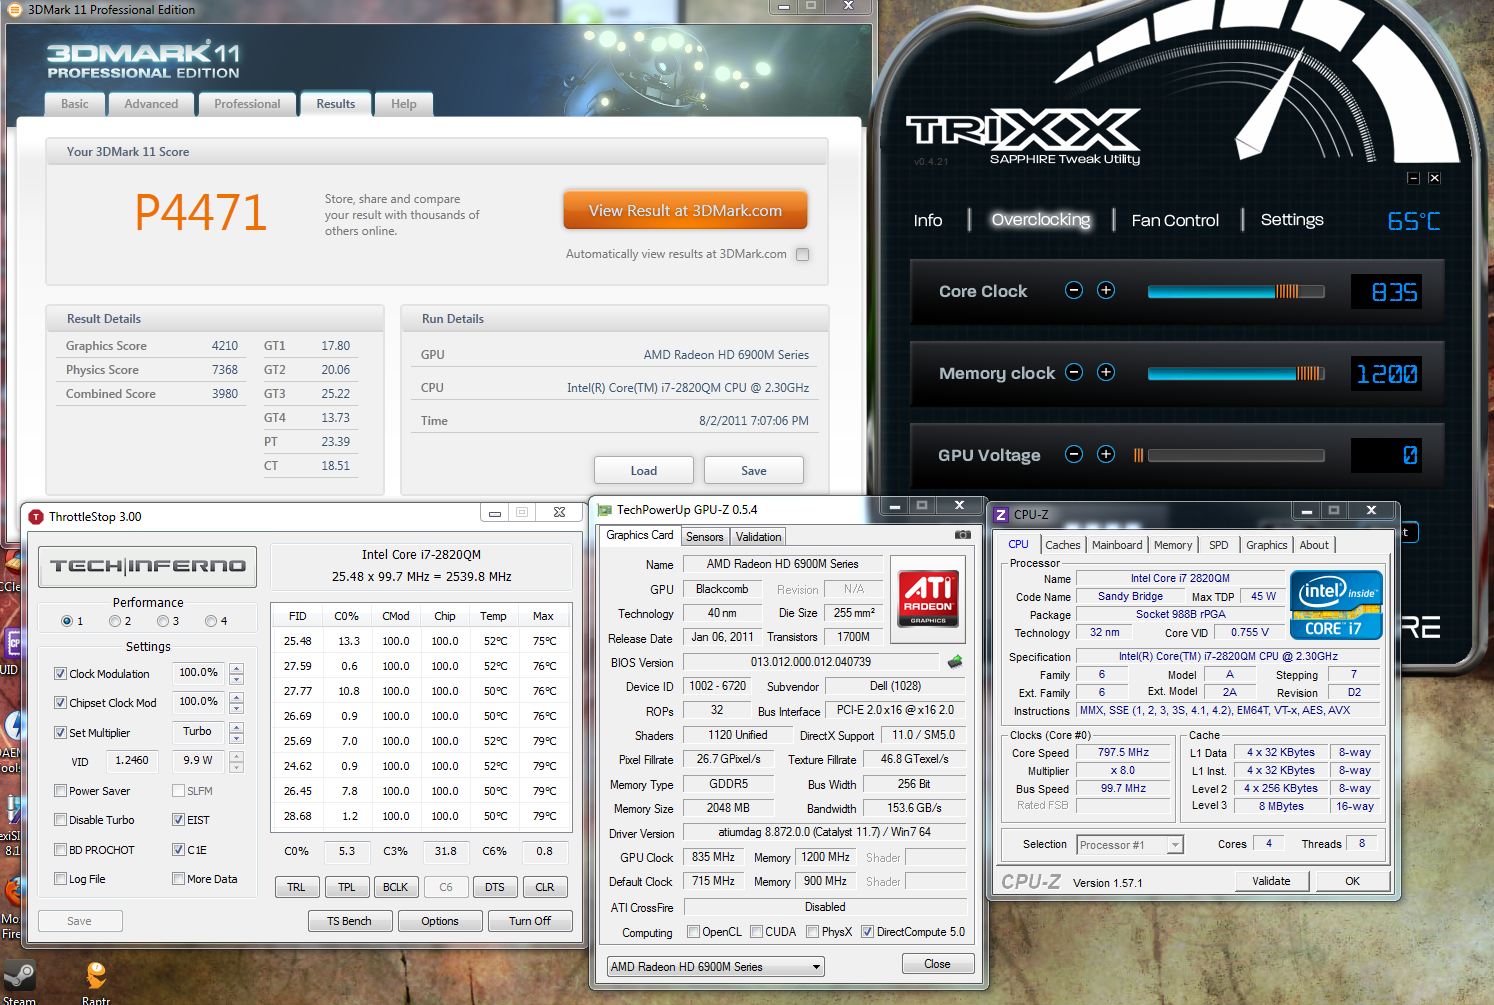
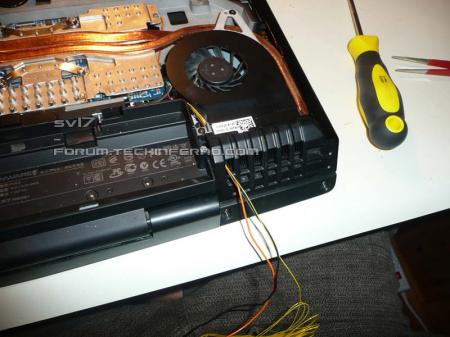
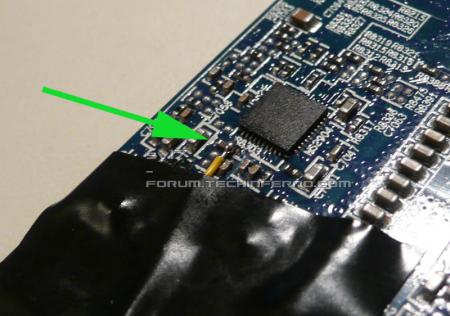
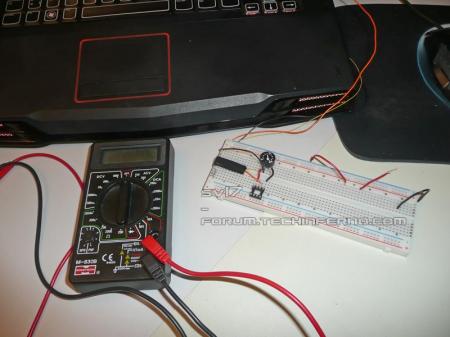
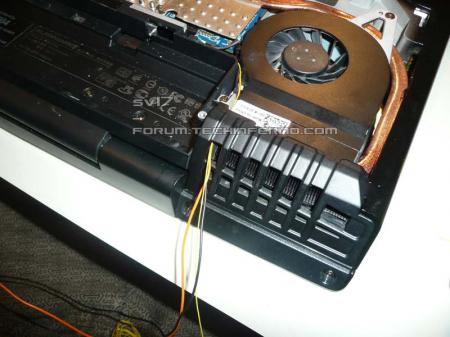
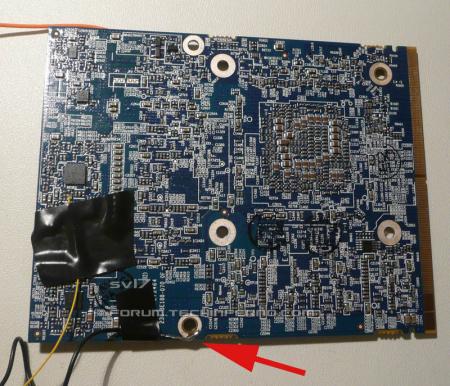
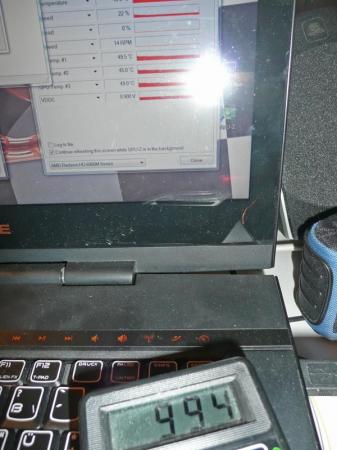
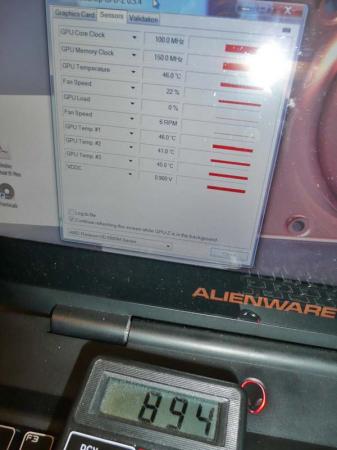
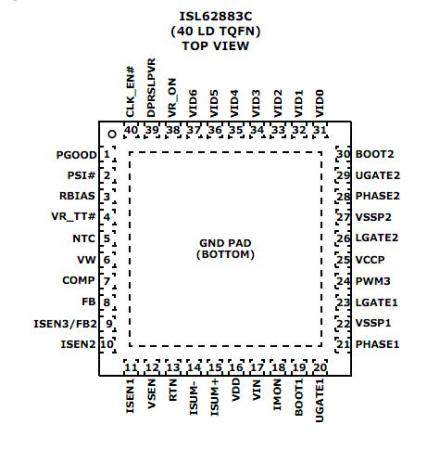
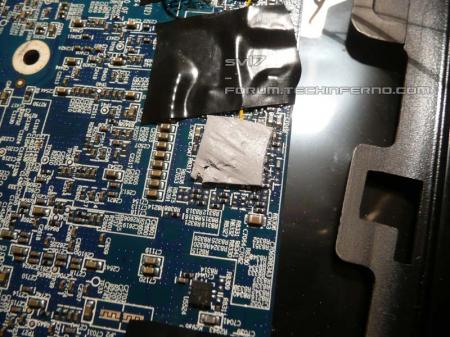
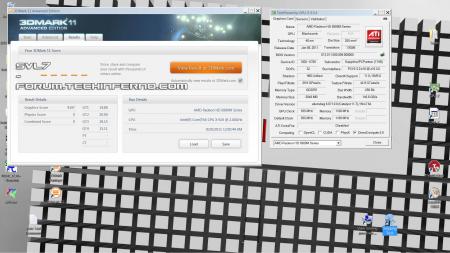
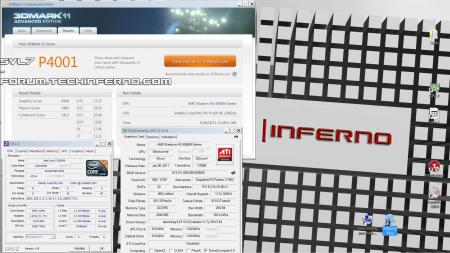
The AMD 6970m is an amazing card, great price performance ratio and really powerful. Only drawback I see is that there's no way to increase the voltage of the card through the VBIOS. This limits the maximum possible overclock and minimizes the benching capabilities of this card. To solve this I decided to do some modifications directly at the hardware which allow me to increase and also monitor the core voltage of the GPU How does it work? The core voltage of the GPU gets controlled by a PWM regulator made by intersil, the ISL62883C. It's a small 40 pin SMD chip, here you can see the pin configuration of it: The exact purpose of each pin is described in the datasheet which you can find at the end of this post as attachement. I won't go into details about how the chip exactly works, all that is needed for the voltage mod is Pin 12 (VSEN). This is the voltage sensing pin of the PWM controller, it monitors the current GPU voltage. As soon as the voltage drops below a certain level (e.g. because there's suddenly more load on the GPU), the chip will automatically give an additional PWM signal to bring the voltage back to the set level. So if the voltage at Pin 12 is too low, the voltage gets raised. This means if you trick the chip into thinking the current core voltage is too low (even though it isn't), it will automatically raise it (and thus overvolt the GPU). This can be achieved by slightly dropping the voltage at VSEN. The resistance between Pin 12 and ground is about 14Ω, putting a variable resistor between ground Pin 12 will allow lowering the resistance between ground an VSEN and thus lowering the voltage at VSEN. The resulting resistance is R1*R2/(R1+R2), R1=14Ω, R2 = potentiometer used for the mod. A 500Ω potentiometer will do the job, I use a 1kΩ which is fine as well. So all that's needed is: - a potentiometer between VSEN and Ground - a measuring point to monitor the GPU core voltage Here you can see the conducting path that leads away from Pin 12 (red), possible solder spots for the mod are marked with green. The parts are pretty tiny, you'll need a steady hand and a fine solder tip if you want to do this. It can be done without a magnifying glass, but it's good to have one for checking the solder joint afterwards. On the left picture you can see the cable which leads to one end of the potentiometer soldered to the card. Could be better, but it works. The other end of the potentiometer needs to be connected with ground. Since ground connection of the PWM chip isn't accessible (it's on the bottom of it) I had to look for a different possibility. I decided to go for an easy to solder spot, see the picture. This works fine, it has a big contact surface and soldering on a cable there is peanuts. Such a voltmod requires a possibility to properly monitor the GPU core voltage. You can't just adjust it without knowing how much it gets changed (unless you want to burn your card). Since this isn't a desktop system it's not possible to simply do some measuring with a multimeter while the system is running, you need to solder on a cable to a measuring point for the core voltage. The easiest possibility is to use one of the big electrolytic capacitors on the top of the card (the positive end obviously). Other possibilities are some of the ceramic capacitors on the other side of the die (which would probably be slightly more accurate). I tried this, but it's a PITA to solder there and I ended up going the easy way. For ground reference you can simply use the ground cable which is connected with the variable resistor. I also padded the VR with a high-end thermal pad. It'll run warmer than usual with the increased voltage. Hopefully it helps a bit. On the other pictures you can see the cables leading from the GPU leaving the system. Black is ground, yellow leads to VSEN and orange is the reference for the GPU core voltage. The picture on the very right shows my voltage control center The potentiometer mounted in a breadboard, this allows to quickly remove the mod. Here some quick tests. The first picture shows the system with the GPU idling, my multimeter reads 894mV and the VBIOS value is 0.9V (see GPU-Z)... perfect! Middle: System at 100% GPU load (furmark), multimeter reading 1060mV, VBIOS value is 1.1V. Right: GPU idle, I increased the voltage to 1V, card is still set to 0.9V (see GPU-Z) So... yes, it works, but... there's a huge problem. When I did some very quick tests with furmark, the voltage gets automatically set back... I raised it further and further, until it didn't get set back anymore and I had a voltage of 1.2V... but the core clock dropped to 400 MHz. I guess there's something limiting the maximum current, an overcurrent protection. Though what bothers me as well, was that according to GPU-Z, the VBIOS sets the voltage back to 1.0V when I raise it above a certain limit, so the VBIOS might be involved in this as well... I'm not sure. More testing will come as soon as possible, I'll also try to force the clocks in the VBIOS. I really hope to get this working. If you have any ideas, please let me know. Also if something needs a more thorough explanation, just aks. __________________________________________________- EDIT: This definitely works!! Just did some 3dM11 tests at 915MHz and more. I though I solved the downclocking issue, but it's still there, randomly. It's probably caused by software issues (driver, ... ). Since I was really annoyed by this I decided to simply mod the VBIOS and set the 3d clocks and the battery clocks to 915MHz (and later more). This worked, the clocks got forced to this level, so this indicates that it isn't caused by the card, but by software issues. Here's a 3dM11 test at 915MHz core, 1100MHz Memory: You may realize that it's not really a highscore for the M15x. I had to leave the CPU at stock settings, otherwise I run into serious power issues. Take a look at the graphics score, that's more interesting. As comparison, The Rev got 3965 GPU score on his best (submitted) 3dM11 test with the 6970m. This one is at 935MHz, only the GPU tests: I think there's even more headroom for the clocks, I upped the voltage to 1.25V, this should allow to get the clocks even slightly further, but I think I'll get limited by the VRAM at a certain point. Maybe I'll look for a voltmod for the VRAMs as well, but considering that there's already a power issue with this mod, it probably won't be of much use in the M15x. Run out of time, sorry, I actually wanted to do some more testing, but the term started again today and I'll be pretty busy from now on. Also I had some other software issues, I guess my bench partition needs some work... reinstallation and fine tuning. This was a very quick edit, just ask questions if something's unclear! ISL62883C - 6970m.pdf


 2 points
 -
Quoted just to show the spirit of people that T|I consists of really appreciated2 points
-
Yes, aarpcard made a nice mod, there's not that much information around, but he posted some pics and the schematics, check it out here. There's some more information scattered in posts in that thread. Yes there is Check this out.2 points
-
Yes... it works!! Just did some 3dM11 GPU tests at 935MHz, pretty cool, huh? And I think there would even be more headroom, I cranked up the voltage to 1.25V... yes, totally crazy - exactly how I like it. Check out the first post for some more details, I did a quick edit and added some pics and information. I wasn't able to do a vantage, it always terminated with an error just before the first test started, reinstallation didn't solve it this, I think I have to redo my bench partition. Also unfortunately I didn't have very much time for the testing, but at least I can confirm that it works. My previous limit was at about 860MHz core, now I run it with 935MHz and I bet there's still headroom, there's enough voltage M17x r3 may have even better results, I had to leave out the CPU overclocking due to power restrictions... it's weird with the M15x, I can crank up the CPU like crazy (+300mV), but the GPU seems to be limited, actually the CPU seems to leech from the GPU voltage supply, but the GPU can't do the same vice versa... too bad. Also I'm sure this will work for the 6990m as well, from the pictures I've seen so far it uses the same reference design as the 6970m, you only need to check the VR, especially the pins of it.2 points
-
Hey guys, camiloml at bios-mods.com has done some work on BIOS A05, should show now the hidden menus just like A03. Hope someone of you can test this and leave some feedback and if possible some pics of the menus as well. The BIOS can be found in the link above, just click on the second "here" in the signature of camiloml. I still can't test it for my self... would be a difficult task without a M14x Once it is confirmed to work I'll repack it with the modded VBIOS so you can keep on overclocking your machines. ___________________________________________________________________ EDIT: Confirmed to work by @Ninjahunter and @Nekojin, big thanks to both of them!!! And don't forget the modder of this BIOS, camiloml from bios-mods!!! Please leave some feedback on the bios-mods site as well, I'm sure he'd be very glad to hear that his work gets appreciated!! Here's a whole collection of pictures from all the menus, a special thanks to Nekojin for all his work, I highly appreciate this!!!1 point
-
America: Freedom to Fascism is a 2006 film by Aaron Russo, covering many subjects, including: the Internal Revenue Service (IRS), the income tax, Federal Reserve System, national ID cards (REAL ID Act), human-implanted RFID tags (Spychips), Diebold electronic voting machines, globalization, Big Brother, taser weapons abuse, and the alleged use of terrorism by government as a means to diminish the citizens' rights. The film examines the Federal Reserve System, including its genesis and functions. The film asserts that the Federal Reserve System is a system of privately held, for profit corporations, not a government agency, and that it was commissioned to print fiat money on behalf of the federal government, at a fee ultimately paid for by the personal income tax (through service on bond interest). The film also refers to the fact that the United States dollar is not backed by gold, and states that this means the dollar has no real backing other than future income tax payments. Consequently, the film states that Federal Reserve Notes represent debt instead of wealth. http://video.google.com/videoplay?docid=-1656880303867390173

 1 point
 -
No, gaming performance will decrease, the hardware gets used differently, not in a way optimized for games. Should still get a very decent performance though. Haven't installed a single game atm, so can't test it just now. Will see whether I can run a vantage or 3dM11 later to get at least some nubmers.1 point
-
Thanks, will check it out!!1 point
-
Here are some more ways to work on your services I have tried both and they are very useful. SMART requires a restart but game booster does not. SMART- set preset services at startup quickly change what services start-up restart and they take effect.. set default to go back to normal. http://www.addictivetips.com/windows-tips/windows-7-services-optimizer/ Game-Booster- Shutdown all uneeded services for gaming or benching and add ones to make the list customized... then hit a button when done benching or gaming and everything is relaunched and returned to normal, even includes a basic defrag funtion for all of your games. http://www.iobit.com/gamebooster.html Ramdisk- set upto a 4gb ramdisk for anything from virtual memory to an ultra fast ram based disk for free (ram can read and write faster than even some of the fastest SSD drives (if you have more than 4gb of ram it is worth trying this, with some comps having 6gb-32gb theres plenty to spare) Download RAMDisk 3.5.130 RC 19 - FileHippo.comry these out everything can help bring out the most performance from your computer.1 point
-
this is sooo AWESOME!!!!! you are my hero svl!!!!! maybe have to send you my 6990 to test out.1 point
-
Well, look on the bright side. From what I heard from other folks, if you think Dell is bad I wonder what you'd say about Lenovo outsourcing^2 (squared)1 point
-
Just start with some parts which are easy to solder (non-SMT). Resistors,capacitors, whatever you can get. You can scavenge parts for practicing from a defective PCB or from an electronic device which you don't use anymore. Easiest method to desolder parts is using a heatgun. Heating up the board and removing the parts is a quick process and will give you a lot of parts to practice with. (Or buy the parts, resistors and capacitors are really cheap) Get a perfboard from a hobby electronic shop and solder on the parts, this will give you a lot of practice and you'll learn what amount of solder you need, how long you have to heat up a component etc. For through-hole components I usually use 1mm solder wire with a flux core. This works for surface-mounted devices too, but sometimes a 0.5mm wire is needed. Once you're confident with through-hole components you can start with SMT parts, there are cheap SMT prototyping PCBs available which allow you to solder on the most common SMT parts, this is very neat for practicing. No need to repeat all the theory about soldering here, the web is full of guides I think there were some nice soldering tutorials at hackaday a while ago, take a look at them, and I'm sure there are tons of soldering vids on youtube... but you'll get the feeling for it after a while, just make sure you know the most basic stuff, no need to read hundreds of pages. In case you know someone who's confident with tiny soldering let him show you some tricks. In the end it's all about having a steady hand, enough patience to learn it and experience. Anyway, for such a mod you'll definitely need to have access to a very fine solder tip and a good soldering iron station which is able to keep the temperature at a constant level (unlike the cheap $20 stuff). The finest tip I have is a 0.4mm, but sometimes it's even easier to solder with a 1mm tip (imo). Also necessary is a magnifying glass, tweezers, multimeter, thin wire, maybe some additional flux, good lighting and I highly recommend an ESD-mat and wristband.1 point
-
Thanks, I just tested it. It works, but under the menu point "Extended ICC" -> Clock Div 1S the laptop just freezes. Didn't had time to test the other options. I am uploading pictures to upload.to and will post the link as soon as it is ready. The bios is way to complicated for me, but it would be nice if somebody could tell me if you can change the limitation for overclocking with this mod. On the default bios, you can only change the long duration pwr limit to 55, since the long duration timewindow is at 56 (you can't higher this number and the pwr limit has to be under the value of the timewindow). Hope you understand what I am trying to say Here are the pictures http://ul.to/1nzrqckx1 point
-
Ok so, All fans were maxxed, I simply can't push these GPUs any harder without more cooling or more voltage, dropping the memory speed doesn't help. But it is getting colder outside, possible 8600 tonight.1 point
-
Little update. I think this is the maximum I can take out of it. Anything above these settings causes instability, grafic glitches and temperatures above 76 degrees. So no big improvement: 2062 NVIDIA GeForce GT 555M video card benchmark result - Intel Core i7-2630QM Processor,Alienware M14xR1 score: P2062 3DMarks //Edit// Just out of curiosity I installed the stock driver and removed the oc on the cpu. I got 1321 Points on 3DMark 11. New drivers, voltage mod and overclocking gave me a 56% better 3DMark 11 Score. So why does nVidia set the basic clock to 590 Mhz if (even without the voltage mod) 770 works great with MSI Afterburner? Even those settings can easily give you +400 marks in the benchmark.1 point
-
Depends on the seller, if you need help with getting parts let me know, usually all German dealers ship to Switzerland.1 point
-
Yeah, cpu & gpus are on water. For now.1 point
-
Well, I can relate to that XPS support, but I didn't have much luck with AW support either. My old XPS M1330 still probably works warmer than your 5 GHz overclocked 920xm. In fact afaik, the actual author of the famous 'GPU copper mod' for the XPS M1330 had his wifi card melting the cables going around it. I can easily belive that... it can burn like crazy when you do some serious downloading. And thats not to mention their fantasic nVidia GPU with 80 C standby temp (underclocked). I see things have changed much since. I heard Dell Business support is good and their Latitude laptops are really good too, except for non-gaming GPUs. Tru dat.1 point
-
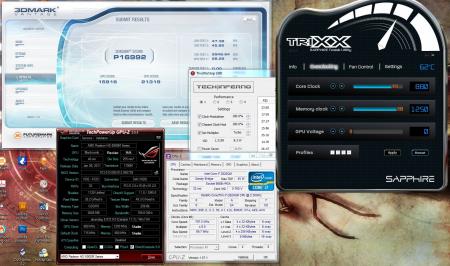
My best vantage so far, stock cooling, overvolted vbios, blind flashed A08 from A04 to remove throttling, repasted with something that isn't the cheese that Dell uses and finally, max temps of 67C thank you very much
 1 point
 -
Yeah, i believe Russo was one of the initiators of The Zeitgeist trilogy which basically discussed the same issues and more.1 point
-
You're categorised as xtreme if you use sub-zero cooling basically, including phase change/LN2/DICE etc. AFAIK that's the only difference. And everyone should bench everything, valid points or no. It's the meaning of life, don't you all know that already?1 point
-
Hah yeah ... I ended up returning the screen anyway due to dead pixels, pretty significant background light leaks, inability to calibrate the screen properly without an actual calibrator and the fact that battery life dropped by 30-40%. Later on I sold the laptop to a friend of mine and got X200t. The new X220 has an IPS screen so I am curious how would that stand vs RGB LED, but just due to the bugs alone (light bleed, burn in, low brightness) I doubt it would be better. Also the horizontal viewing angles on RGB LED are pretty good, its just the vertical ones aren't as good, but its still a TN screen.1 point
-
In an historic final interview, filmmaker and music promoter Aaron Russo goes in depth on the insider-knowledge given to him by a member of the Rockefeller family. Russo was told-- prior to 9/11-- of plans to stage terror attacks, invade foreign nations, and kickstart a high-tech police state control grid that would track the populations' every move with implantable RFID microchips. This information-packed presentation is filled with never-before seen footage. Throughout the film, Alex Jones breaks down the latest activities of the New World Order and how it ties into what Russo predicted. Aaron explains how the elite created the women's liberation movement to break up the family and tax working women. Russo breaks down the deception of democracy-- which is nothing more than mob rule guaranteed to produce tyranny.1 point
-
I don't see Intel changing the register locations in Ivy so ThrottleStop will probably work with them with only a minor update as long as the laptop manufacturer cooperates and doesn't set any of the lock bits. A bios mod will fix that if they do.1 point
-
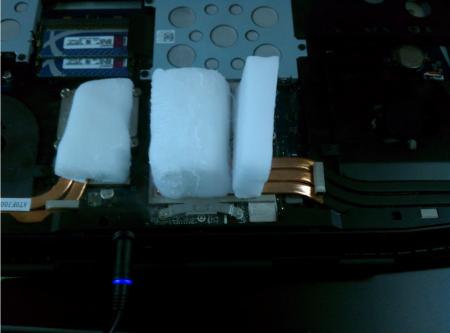
first attempt at dice.
 1 point
 -
some oc'ed 6990 benches
 1 point