


High_Voltage
-
Posts
122 -
Joined
-
Last visited
-
Days Won
20
Content Type
Profiles
Forums
Downloads
Posts posted by High_Voltage
-
-
30 minutes ago, MWichni said:
Hi and thanks for the reply. Just tested it and everything works fine.
So you're saying it works with internal screen now? This is awesome! What GPU model are you using? And did it only require disabling internal Nvidia in device manager or also in BIOS?
-
-
11 minutes ago, AllanDavidson said:
What is the purpose of the Arduino Mod?
To use any eGPUs on y500/y510p without modding the BIOS.
-
Glad to hear that you figured it out!
Wouldn't expect the Backflash option to be required in order to upgrade from any lower BIOS version, be it original or modified 2.07. But again, I haven't looked inside Svl7's 2.07 mod, only the 3.05 one, so it could well be that there's something that interferes with flashing process.
Also, that's really cool that you've succeeded with a 2nd gen adapter upgrade. Now after you verified that it works, everyone who has an older gen adapter can upgrade without hesitation.
P.S. It would be cool if people who got their setup running successfully with Nvidia eGPUs reported here. I think everyone would be especially interested in reports of successful operation with internal screen. In order to get that working the internal GT750 has to be disabled so that Optimus picks up the external GPU.
P.P.S. Don't forget there's also a Y500 version of the mod which works with Nvidia (and should work with AMDs too, although yet untested)!
-
@Blk6Jeff Well, you will definitely have to remove the aftermarket WIFI card. Otherwise you'll be unable to boot past the whitelist check after you flash the stock V3.08. Yet, the issue you described shouldn't be related to the WIFI card. This error message occurs if somebody attempted to modify the Win308.bin file before initiating the flash. Therefore. could you please verify that you're definitely flashing the correct BIOS from the Lenovo support pages for Y510p/Y410p. A good idea might be to download the file again in case it got corrupted.
P.S. I would still try flashing with the card removed, just in case...
-
Definitely sounds like an OS-related issue to me. Try different version of drivers, for example the one provided by Lenovo on the support pages. Still, cleaning the connectors won't hurt either.
-
@Luthercorp First of all, neither the original nor the modded bios store any kind of data on HDDs. The BIOS should function perfectly even if all of the drives are disconnected. Therefore, replacing the HDD with SSD should not have changed anything in BIOS and it doesn't have to be reflashed.
The issue you described might be caused by incomplete OS migration or driver-related problems in case it was a fresh install.
Also, how can you tell whether the card is detected in device manager or not, if as you say it causes PC to reboot and bluescreen whenever connected? I should also mention just in case, that the adapter does not support hot plug, therefore you shouldn't connect it to a PC while it's already running. Doing so might damage the card or the PC.
My recommendations would be to try the following:
- First of all, clean the connectors (both inside the ultrabay and on the adaptor) with some compressed air. Disassembling your PC in order to swap the drive could have caused dust to get into the connector and cause poor contact.
- Check that all your drivers are installed properly. Maybe, try installing the original HDD back and see whether it works as before. Try clean install of Windows.
- Try resetting the BIOS to factory defaults by either clearing CMOS or selecting the option in the BIOS itself.
-
 1
1
-
8 hours ago, YG-Zombies said:
Update Bios lenovo Y410p Bios 3.08 DC Detect Erro ?
Make sure your battery is connected and fully charged.
-
I don't quite understand what you mean by "updated" (possibly because I didn't read the entire thread related to his mod). This mod uses the version provided by Svl7 in the head of his thread, but manually ported to V3.08 BIOS by me. The Svl7's custom GPU VBIOS is not included with this mod.
-
From what I've learned while making those BIOS mods, it looks like this behavior is hard-coded in BIOS. Whenever you boot with Ultrabay GPU installed, the Intel GPU gets disabled and some SLI-related features are possibly activated. I think this is done deliberately because SLI systems don't support Optimus technology. When you remove your Ultrabay graphics, Intel GPU gets enabled and Optimus becomes available. Of course, such solution is not perfect, but it's still MUCH better than what they've done in Y500 series (they disabled the Intel GPU permanently even for when Ultrabay adapter is removed).
This way fiddling with drivers or disabling GPUs in hardware manager obviously won't help. There might be a way to design a BIOS mod that allows you to boot with all three GPUs at the same time, but I can't think of any practical use for this (as it will obviously break the SLI and would be equivalent to just booting without Ultrabay at all).
Theoretically, using any Nvidia-branded eGPU that supports Optimus with an adapter would allow you to play games on laptop's internal screen. There's plenty of information regarding how to do this across the Internet, including Techinferno. The procedure shouldn't be different to that for mPCI-e x1 setups. It might be that you'll need to disable internal GT750M, which should be possible via the Svl7's unlocked menu in BIOS. Moreover, it seems that there's a way to use laptop's internal screen even without Optimus (therefore it can be done on Y500/Y400 too). But this only works for games that run in Windowed / Borderless windowed mode.
-
4 hours ago, QDIR said:
I'm using it with an AMD Sapphire RX480 Nitro+ and its more stable then before.
Good to hear that! Although I think that with AMD cards you would get the same result by just flashing stock v3.08 BIOS. There's nothing changed in the modded bios that would affect operation with AMD cards.
4 hours ago, QDIR said:Ps: i had problem (DOS memory buffer 2 allocate failed) while fleshing the EC with freedos so i downloaded Rufus 1.1.7 and made a portable MSDOS on win7 (win10 doesent support this option just freedos) after that everything went fine :))
This is a really nice and important observation! Thanks a lot! Looks like I was right assuming that installing MSDOS by Svl7's insruction would solve the issue. Even though your method is different, it still requires Windows 7 (as does the HP Disk utility used by Svl7's). So, looks like people who encounter the error and still want their EC flashed have no other choice but to find a Win7 machine somewhere...
3 hours ago, Luthercorp said:I got the adapter a couple days ago and I am running a Nvidia GTX 780 with Windows 8.1, and it works like a dream!
Glad that it works! Enjoy your new Nvidia eGPU! By the way, it would be cool if you tried to get the eGPU to pass the image to laptop's internal screen by using Optimus. There are plenty of instructions on how to do it on the Internet.
-
26 minutes ago, balint234 said:
lright, thank you for your help and sorry for wasting your time. I have one last question for now: Should i cut at the cross you just showed me or should i ask my IT teacher at school to help me remove the resistor itself. Which one do you recommend?
No problem. You haven't wasted any time of mine (yet). Regarding the modification, I'd strongly recommend you to get the resistor desoldered if your teacher has access to soldering equipment (simply because you can always solder it back later if something goes wrong).
Anyway, good luck with the mod and please report back whether it worked.
-
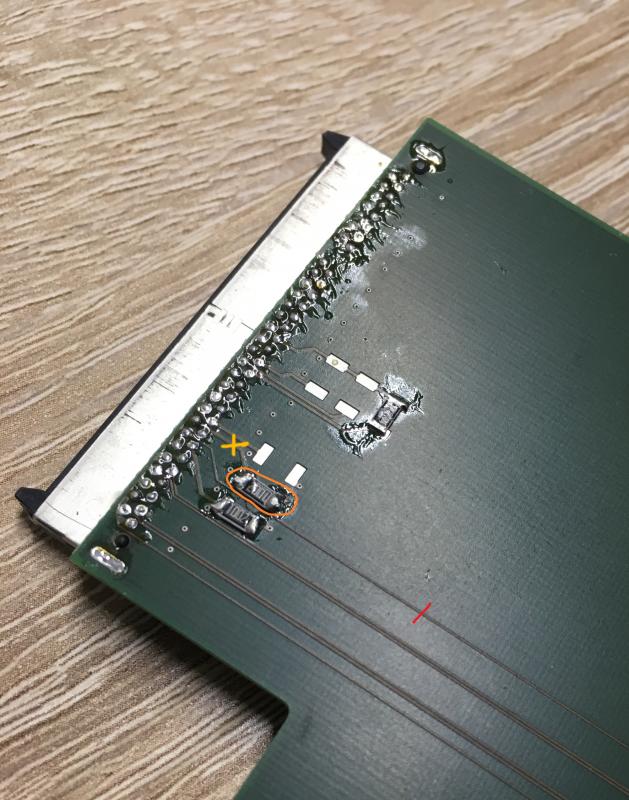
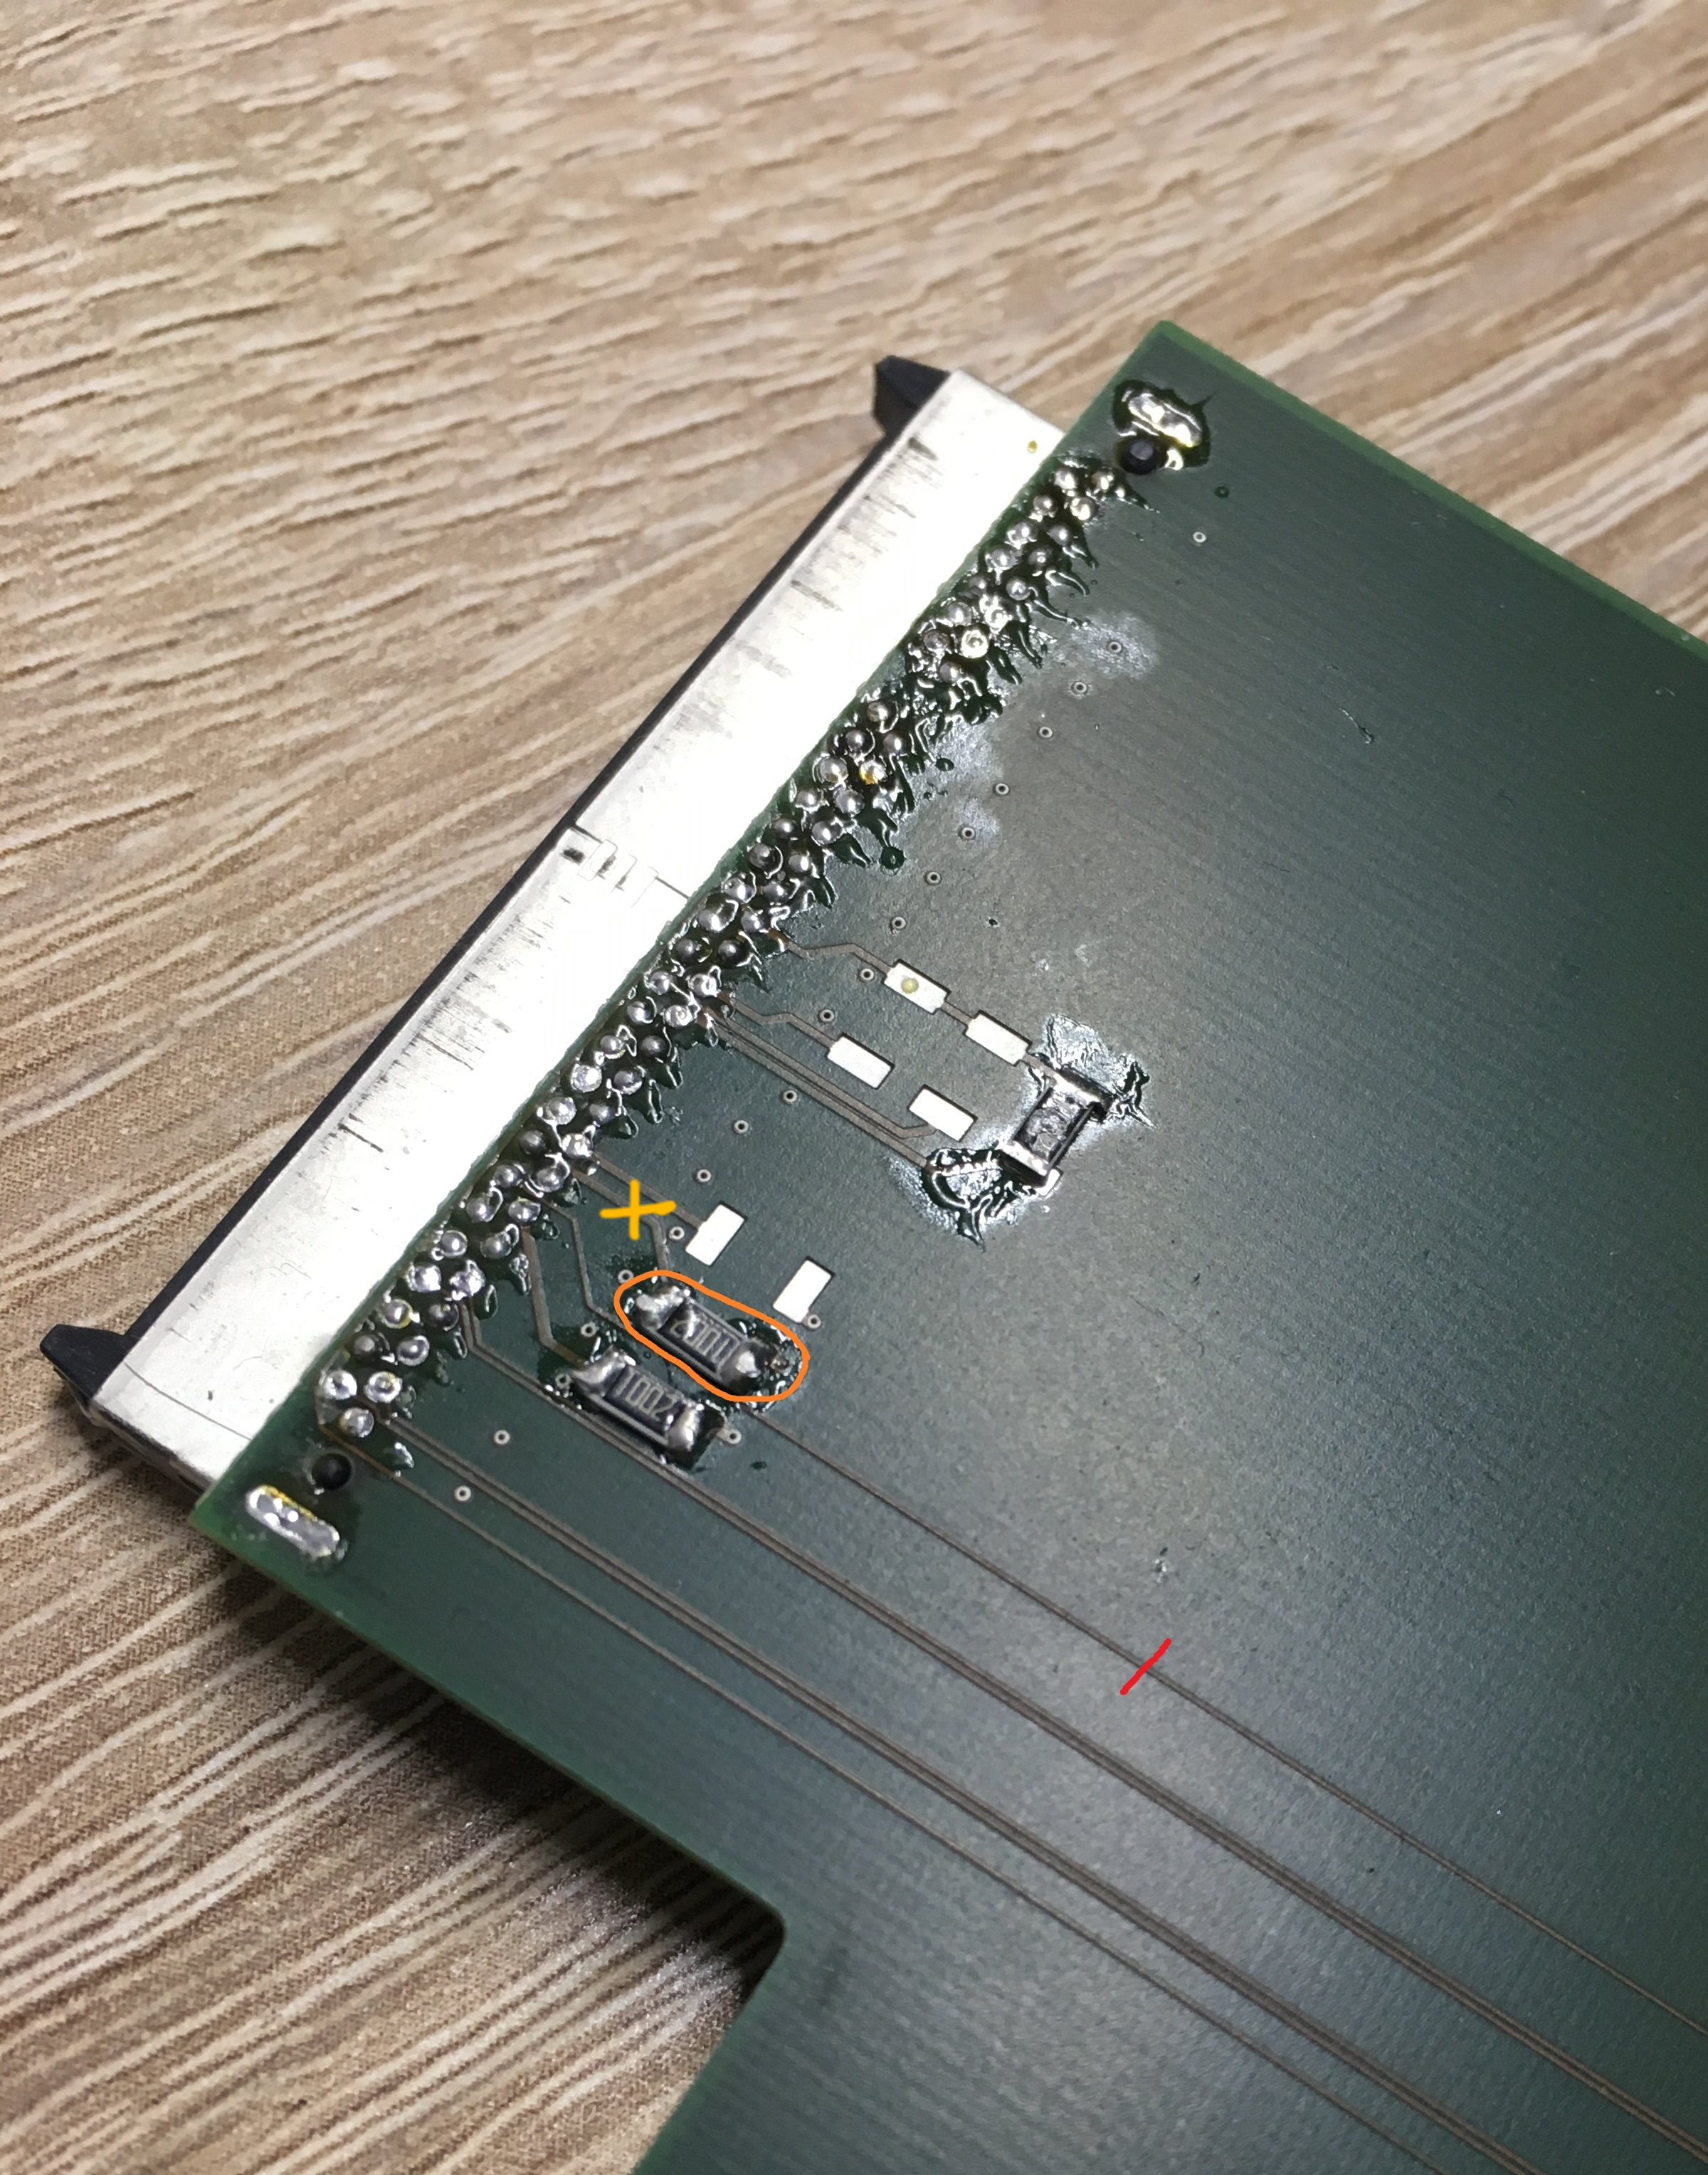
You have correctly identified the resistor, but the track you selected is not connected to the resistor and cutting it would render the adapter unusable. I've marked the correct one for you with an orange cross.
-
15 minutes ago, balint234 said:
Do you think i can make it to work without replacing or removing anything?
There is a very very small chance it would work on modified V2.07 BIOS (which I'd have to make). However, it's so much faster to just cut the track on the pcb with something sharp.
-
Hi everyone!
Here's the experimental mod for Y400/Y500: https://mega.nz/#!qBYE0BLa!Nos2gBVE8-_eOX8O5bSyxSEjgOQ154QSu4BWnk6C3qc
It is also based on Svl7's work and should enable both AMD and Nvidia eGPUs for Y400/Y500. So far, @Swung Huang has successfully tested it with GTX 1070 on his Y400, but I'd be grateful if more people verified that it works for them. Especially, would be interesting to hear whether AMD cards work too.
If everything is good, I'll create the separate topic for this one too.
-High_Voltage
-
2
-
-
On 3/17/2018 at 6:44 PM, balint234 said:
i would appreciate it a lot if you can tell me if i can use a GTX 1050 Ti on my older adapter. I own a 2nd generation adapter as far as i know
Sorry, didn't notice your edit straight away...
As far as I'm aware, the only difference between the two versions of the adapter is the pull-down resistor on #CLKREQ (middle one in the vertical column of three near the ultrabay connector). In the version 3 of the adapter it is changed from 1k to 10k. But let me tell you, removing it completely will have exactly the same effect. Your adapter will work with this BIOS mod afterwards.
-
1
-
-
43 minutes ago, FLY AWAY said:
On my side, some netizens have tested lenovo y410p and y400 for N CARDS, without setting, which is directly in the inner screen.
By that, do you mean it starts working with internal screen straight away, without any set-up?
-
1 hour ago, balint234 said:
Thank you very much for your hard work.
Is there a way with this mod to use the internal display?
There should be. @Swung Huang has reported that his friend got it working with internal screen. It would be great if he explained us all how to do it.
-
1 hour ago, Bos Maior said:
I'll modify the Y510p adapter configuration thread to incorporate information about your BIOS and hardware mods over the weekend.
That'd be great. Thanks!
-
Right! Who's ready for the next portion of cool things?
This time it's the hardware mod I was talking about a while ago. In theory, it should work with all the Ultrabay models including Y500/Y400/Y410/Y510p WITHOUT THE NEED TO MOD YOUR BIOS! So far, it worked on my Y510p. Looking forward to future tests.
I know, "hardware mod" may sound scary, but please consider this option too! Actually, it is beautifully simple!
It's so simple that I'm not even sure whether it needs a separate topic!
Download link: https://mega.nz/#!3AB0iSoa!v24VPHjNL2NkvEdeY3ZTkrmRWhcD1du_-N-JZfgTf7M
-High_Voltage
-
3
-
-
Hi, everyone!
As promised, the separate topic on the Y510p/Y410p Nvidia mod has been created today:
Therefore, I would suggest to continue the mod-related discussion there. You can also ask questions, describe issues and submit feedback on whether the mod worked for you, whether the instructions were clear enough etc.
-High_Voltage.
-
2
-
-
In case you own a Lenovo Y410p or Y510p laptop, you might be interested in upgrading its performance by installing an external graphics card. Ultrabay eGPU adapter designed by @gerald was proven to be a convenient plug-and-play option to do exactly that. However, for a long time only an AMD-branded GPUs could be used due to limitations in the Lenovo's stock BIOS. The purpose of the modified firmware presented here is to expand the range of available GPUs by enabling Nvidia support on Gerald's Ultrabay eGPU adapter.
Huge thanks to:
- @MWichni - For efficiently assisting me during the development of this mod. By flashing dozens of BIOS builds over the course of several weeks and thoroughly describing the effects observed (or the lack thereof), he enabled me to fully understand necessary parts in BIOS structure and come up with a final solution.
- @svl7 - Whose unlocked BIOS / Whitelist mod has served as a basis for this modification. His discovery of a security hole in V2.07 BIOS has provided us with a convenient BIOS flashing method that does not require a physical programmer. The Unlocked BIOS and WLAN whitelist mods originally designed by him are also implemented in this BIOS mod.
- @gerald - For designing the aforementioned adapter. Without it, all this work would make very little sense.
Key features:
- Resolves the "40-second reboot" issue normally encountered while using Nvidia graphics cards with Ultrabay eGPU adapter, thus allowing all Nvidia cards to be used.
- Based on the latest V3.08 BIOS.
- Includes Svl7's WLAN whitelist removal mod - for the convenience of aftermarket WLAN card users.
- Includes Svl7's BIOS debug menu mod - for the ease of experimentation with newly available features, e.g. attempting to use Nvidia Optimus to pass eGPU video back to laptop's display.
NB! Svl7's Debug Menu is not a toy! It contains a lot of options that are either not supported or partially supported by the hardware platform and/or can disturb its normal operation or prevent the PC from booting up at all. Any of the entries not originally present in the stock BIOS should be modified at your own risk!
DISCLAIMER:
ANY MODIFICATIONS YOU ARE APPLYING TO YOUR HARDWARE ARE PERFORMED AT YOUR OWN RISK! AUTHOR OF THIS MOD DOES NOT HOLD ANY LIABILITY FOR LOSS OR DAMAGE RELATED TO USING THIS SOFTWARE.Screenshots:
Spoiler

Installation instructions:
SpoilerWARNING:
BEFORE INITIATING ANY FLASHING PROCESS, MAKE SURE THAT THE AC POWER IS CONNECTED AND THE BATTERY HAS AT LEAST 20% CHARGE LEFT. AN UNPLANNED POWER-OFF DURING FLASHING PROCESS IS GUARANTEED TO RESULT IN A BRICKED MOTHERBOARD.
- Install fresh, unmodified V3.08 BIOS. The installation file can be found on official Lenovo product support page for your PC.
- Enter the BIOS settings (by hitting F2 during boot) and enable BIOS Back Flash option.
- Following the instructions here, download and use Rufus utility to create a bootable USB drive running FreeDOS.
- Copy the CONTENTS of THIS_GOES_TO_DOS_FLASH_FIRST folder into the root of your FreeDOS flash drive.
- Download Universal BIOS Backup Toolkit 2.0, then by running program as Administrator, read your BIOS dump and save it as backup.bin.
- Place a copy of the backup.bin into PATCHERS folder.
- Depending on whether your system is GT750m-based or GT755m-based, run corresponding patcher.
- Carefully study patcher's output. If the patcher reports success, MDDED308.bin file will be created in the same folder.
- Once you've acquired MDDED308.bin, copy it to the root of your FreeDOS flash drive as well.
- Install stock V2.07 BIOS (Provided). This is a necessary step because later versions of BIOS contain additional flash-protect features.
- Connect your FreeDOS USB drive to the PC, reboot into BIOS. In BIOS boot settings change Boot mode from UEFI to Legacy Support, and Boot priority to Legacy first. Press F10 to save and exit.
- Once you have booted into DOS environment, type BIOS and press Enter to flash BIOS.
- Then, once finished, type EC and hit Enter in order to flash the EC.
- Once the EC flash is over, the system will reboot. Both BIOS and EC versions should now be V3.08. Svl7's advanced menu should be accessible at this point.
- Enjoy your modded BIOS!
- Should you ever decide to revert to Stock BIOS, simply flash the original V3.08 BIOS using the official update file provided by Lenovo.
If things don't go right:
SpoilerIn case BIOS flash process was interrupted or didn't go as planned and your computer is unable to boot anymore, don't panic! The DOS flash drive you've created is conveniently supplied with the Crisis Recovery file. Just follow the instructions below in order to perform the Crisis Recovery:
Spoiler- Disconnect both battery and the AC power from your computer.
- Connect your flash drive to the USB3 port closest to the HDMI port.
- Reconnect the AC power cable while holding Win+R key combination.
- While continuing to hold the keys, turn on the PC.
- After some time, the access indicator on your flash drive will start blinking. At this point you can release the keys.
- Your PC will spin the fans and beep occasionally during the course of several minutes.
- After the operation is complete, you should be able to boot again.
It has also been observed that very rarely some users experience problems while flashing the EC. The system would report "DOS memory buffer 2 allocate failed" error. If this is your case, just reboot the system. You will stay at the EC version 2.07 which although is not recommended, doesn't seem to have any negative effect on the PC. If you still want to attempt flashing the EC to the latest version, you could try preparing Svl7's original DOS flash drive instead of Rufus FreeDOS one.
Error 43:
If you intend using the GTX10XX-series Nvidia card as the eGPU (which you probably do), you are very likely to encounter the infamous Error 43 in Windows Device Manager. This is a widely known issue in the eGPU community and is not related to this particular mod in any way. Following this guide thoroughly will in most cases resolve the Error 43 issue.
Download:
Get your copy here!
P.S.:
Version of this mod for Lenovo Y400/Y500 models is coming soon!
-
13
-
Oh, the ride never ends... I've just found the module responsible for reboot in Y500p bios. (it simply had the same name as the one in y510p BIOS!) The entire structure of the module and of the bios itself is incredibly similar. Looks like these are just two slightly different versions of the same program. Guess there's going to be Y500 BIOS mod coming at some point too...
@Swung Huang If you can update your Y500 to the latest version of BIOS and dump the backup file using Universal Bios Backup Tool, and then send this to me somehow, I think I could provide you with the working file like next weekend or even earlier. Of course, you'll have to hardware-flash it (raspberry pi will be perfect to do that) (or maybe Svl7's toolkit will be able to flash it from DOS, more research has to be done).
Update: Looks like Svl7 has released a mod for Y500/Y400 too! I might be able to use his toolkit the same way I did with Y510 mod. The Y500 mod with convenient installer might be coming really soon!
-
3 hours ago, Swung Huang said:
Yeah,I HAVE! An arduino nano,a raspberrypi B+,and an MSP430(
Oh, I wish i had more time right now... Being constantly distracted by this y510p BIOS modding, I'm now approaching so many deadlines at work... Yet, I'm pretty sure I could find a couple of hours in a week to figure out the hardware mod.
3 hours ago, Swung Huang said:having SDA,SCL to read/write i2c,which have something identical with smbus
SMBus is basically the i2c protocol under different name and limited to low speeds, so you are absolutely correct.
3 hours ago, Swung Huang said:How to write the fake Temp/fan values to SMBus? Any idea for that?
Easy! We first need to connect to original Ultrabay GPU's SMBus and understand what exact values get transmitted to Ultrabay address and what it responds back while it's running. Then we make the MCU program that responds with similar values. In my understanding, the communication between the Ultrabay and the EC should be ultra primitive.
3 hours ago, Swung Huang said:Also, is that same method to modificate the BIOS work on y400/500?
Quite possibly! I haven't studied Y500 bios yet, and not sure if I want to right now... As you have correctly noticed, the Y500 platform is not selective to the type of device inserted into the ultrabay, whereas the Y510p would only enable safety reboot if Nvidia-branded device was detected. I still have no idea why this is implemented like that. Yet, I think it might be possible to analyze Y510p UEFI module that contains this check and see if any of Y500 modules contain similar pieces of code.
Also, is there any way I could contact you privately? Like, email or any of the instant messengers?
-High_Voltage

Y510p Ultrabay Graphics card
in Lenovo
Posted
That'd be awesome! Thanks!