Leaderboard


Popular Content
Showing content with the highest reputation on 02/01/15 in all areas
-
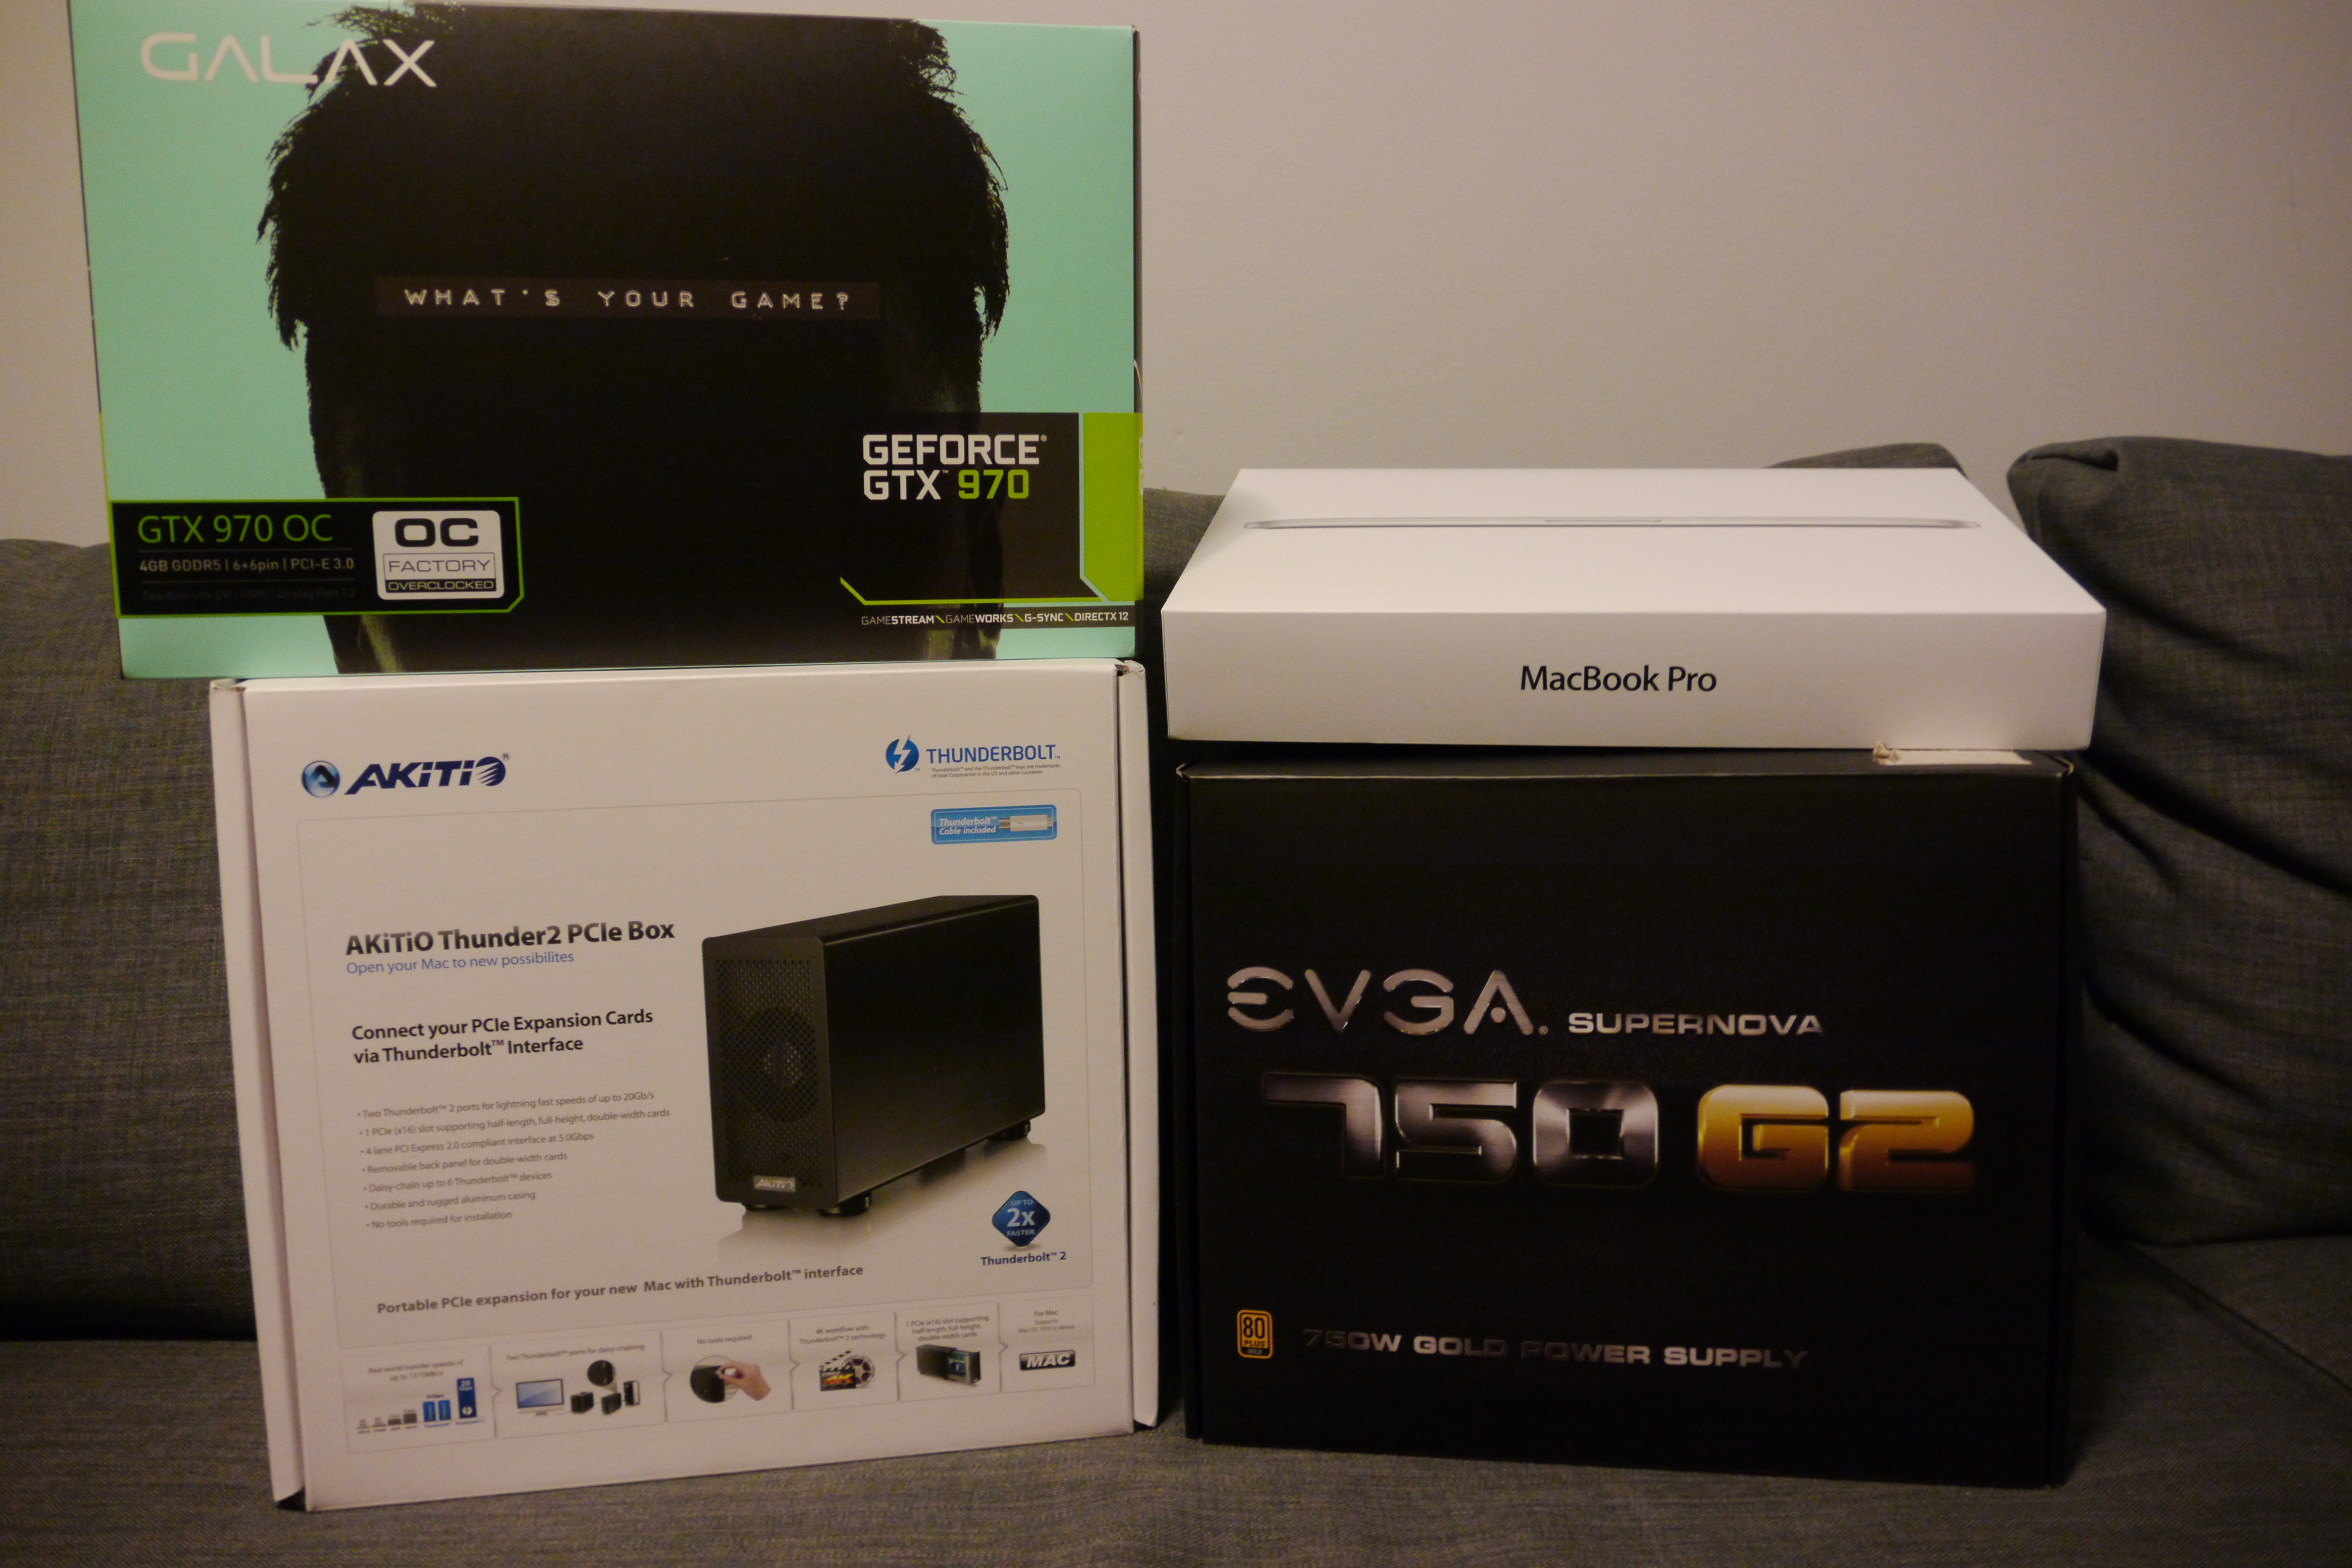
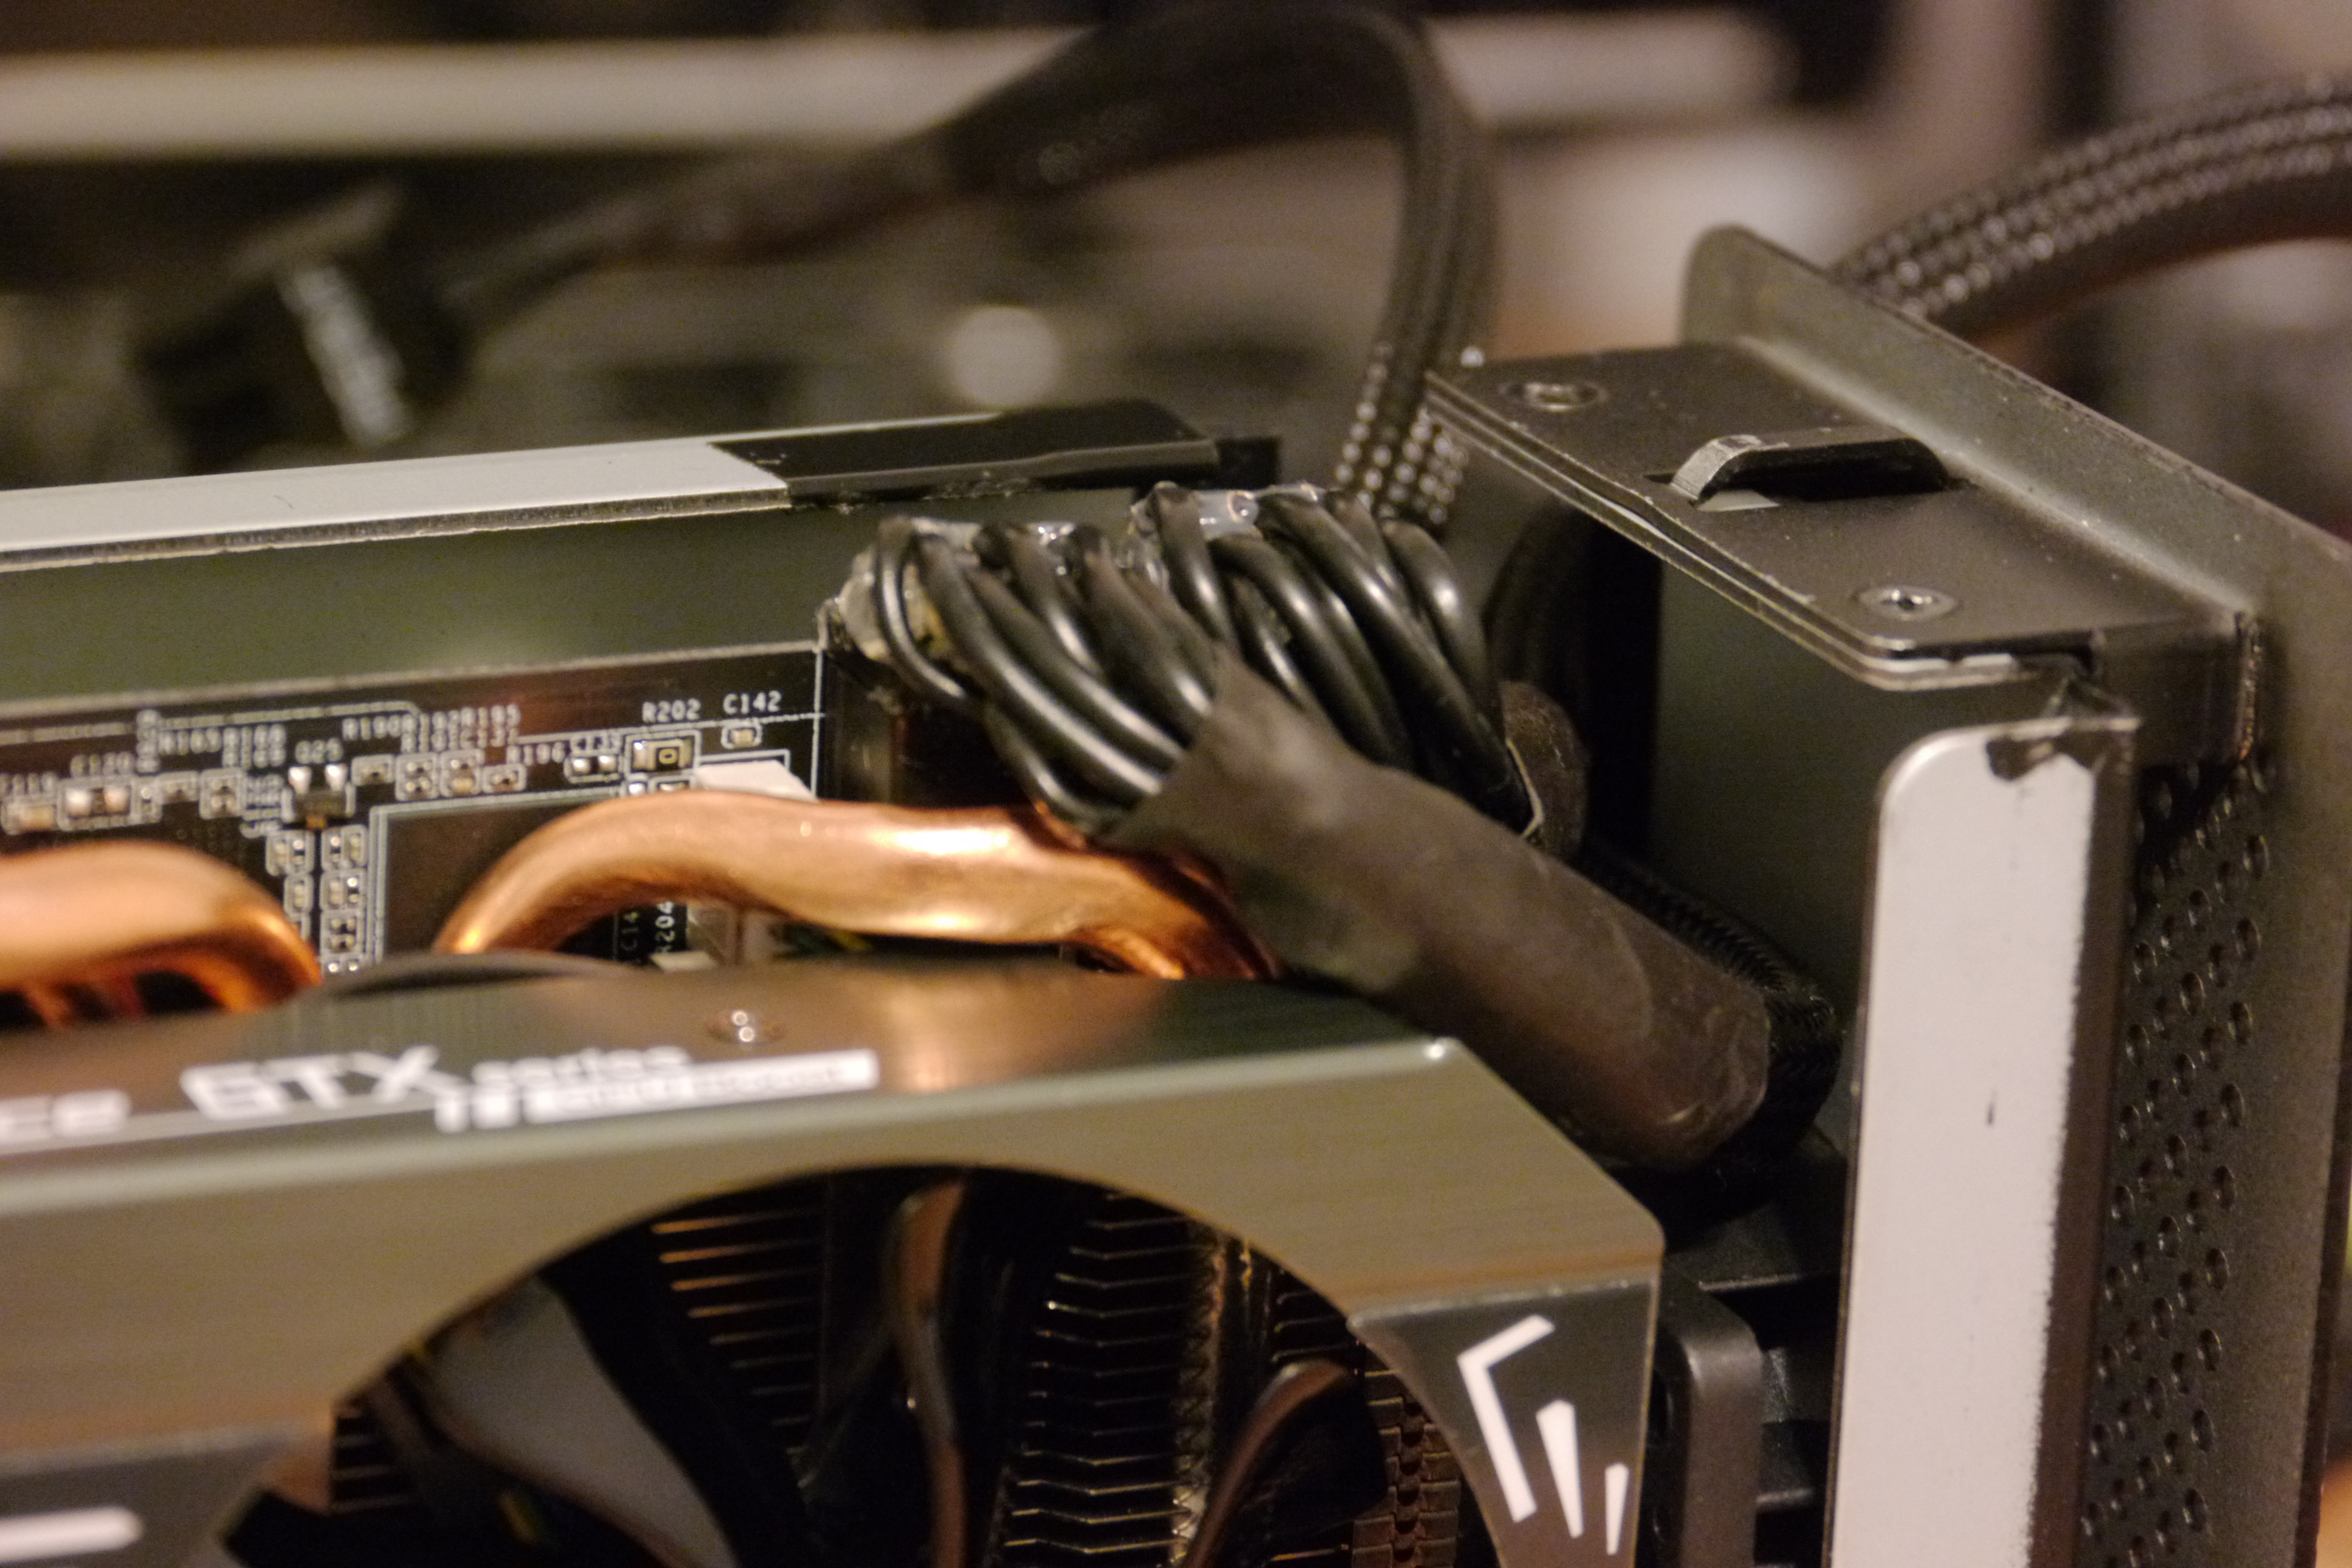
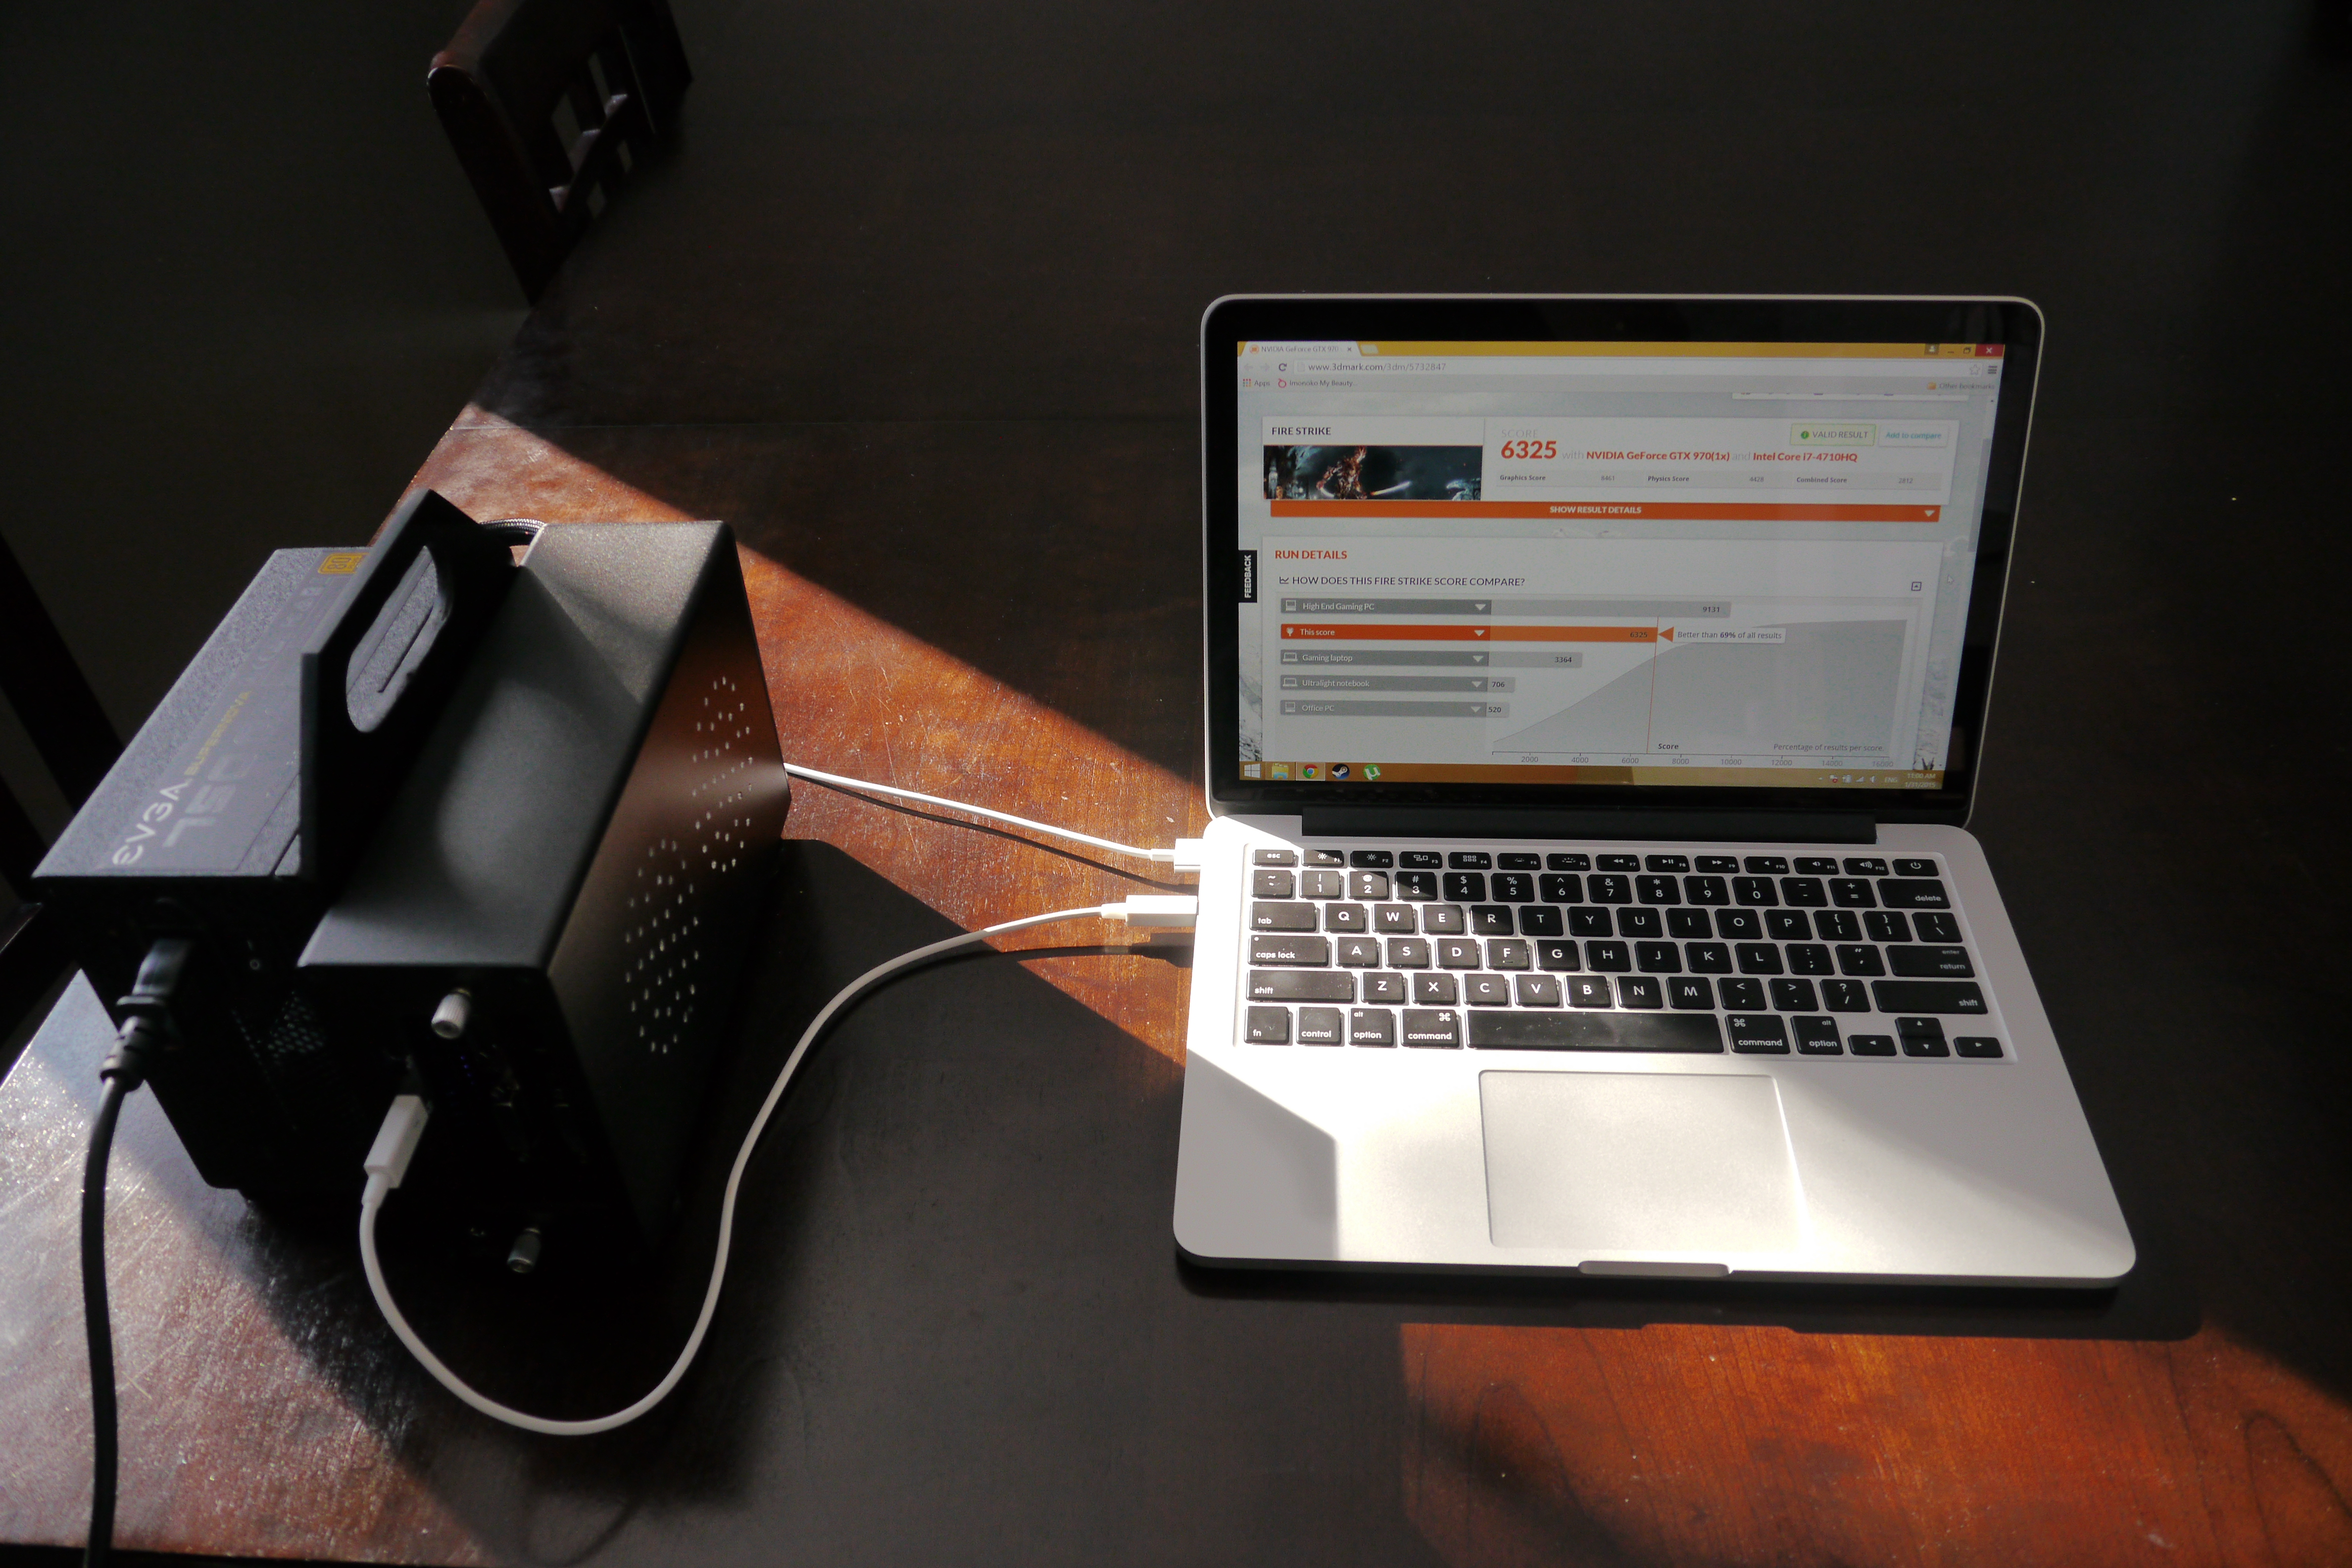
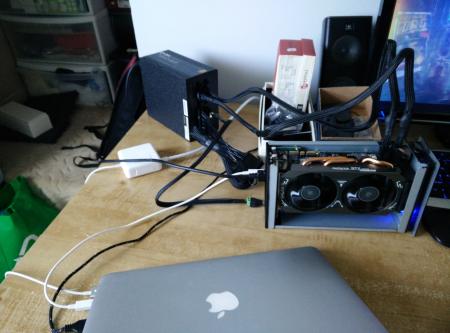
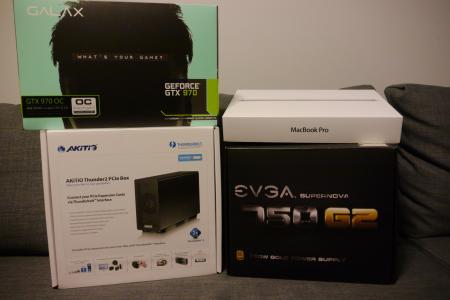
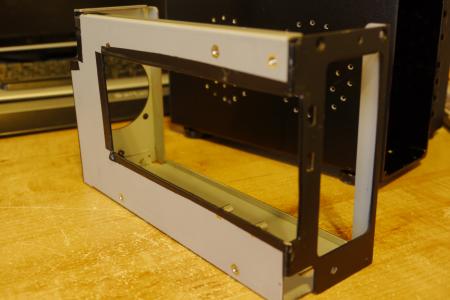
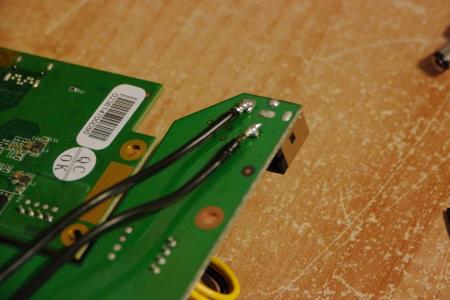
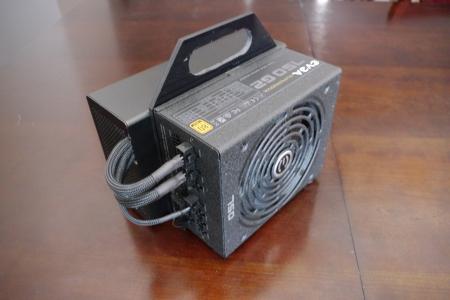
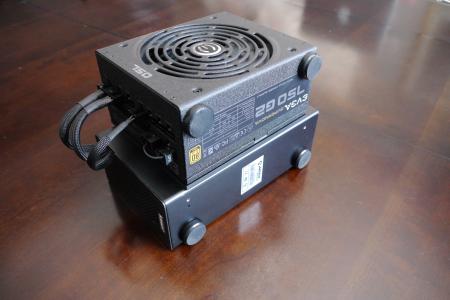
Hello! Just wanted to share my eGPU project. The goal of this build was to be a small, portable, yet powerful desktop gaming machine. A requirement was to have the smallest possible case with handle for easy transport. My plan was to use the existing AKiTiO Thunder2 case and 'make it work' overcoming any issues that came up. Build list: 2014 13" Macbook Pro Retina, 2.6GHz dualcore i5, 8GB ram, 256GB storage, Intel Iris Graphics AKiTiO Thunder2 PCIe Box EVGA SuperNOVA 750W fully modular power supply GALAX GTX 970 OC 4GB (179mm length) 18cm x 20cm black plexiglas Once getting all the components, I hooked it all up making sure everything works before going ahead with the build process. I tried without power riser and used a barrel plug while modifying the peripheral 6pin power cable from the PSU. Everything worked! Great! Now onto the case build. (Note: I didn't take pictures of absolutely everything, but I will upon request) First big problem is the 2x PCIe 6PIN power connectors. They are too tall to allow the shroud of the case to close properly. I searched around for right angle low profile connectors, but could only find some on eBay which were at a ridiculous price and still looked a bit tall. I decided to try my hand at making my own using the cables I got from the PSU. I removed the pins from the connector and cut it in half with a dremel. Popped a pin back in, but it was still a bit too tall... At this point its either give up and do something drastic like cutting a slot in the shroud to allow the top of the GPU to be exposed or try fiddling around with what I got. I found that giving the pins a slight bend would end up working for me. However because of how the pin is, they can only be bent in one direction (towards the clip of the connector). Bending in any other direction results it becoming too brittle and possibly snapping. Now I got 6 pins with a slight bend but a bunch of exposed leads (3/4 of the pin sticks out of the connector to allow the bend). Fixed that with some hot glue which also doubles as way of holding the bent pins in place. The inside of the black shroud also has some unnecessary material that is obstructing the path of my pcie cables by a few millimeters, dremeled that down smooth and put down some electrical tape in case of any contact or rubbing. That done and working, I found a ventilation hole pattern on google, printed it off, and marked the holes on the side of the AKiTiO shroud and drilled them out. Next is to attach the PSU to the AKiTiO box to have the ultimate compact device. I wanted to also have a sheet of plexiglas between the two with a hole cut into it to act as a handle. But how? There is just not enough clearance between the inner housing and shroud of the AKiTiO box to allow any fasteners. Some ideas were to use three sheets of plexiglas and sandwich the AKiTiO box and PSU together using threaded rod, or use some gluing/epoxy method to have one sheet of plexiglas between them. I realized that I could get the fasteners to work by cutting away some material of the inner housing. Between the shroud and the circuit board, since it is elevated by spacers, there would be plenty of room. I took apart the PSU to make sure everything was good to put screws through from the inside of that end, through the plexiglas, and into the AiKiTO. Next I got some 1/4" thick plexiglas (black) from a local supplier, cut the corners off of one side for a better look, made my handle hole, and drilled 4 holes in the middle, as well as through the PSU and AKiTiO shroud.Then it was just a matter of finding some proper length screws and nuts. ***WARNING: Please research the dangers of disassembling a power supply, how to discharge capacitors, and when/what is safe to touch*** While everything was taken apart, I hardwired the 12V connection to the circuit board to get rid of that ugly barrel connector at the front. I ran the cable through the inside and out the back along with the PCIe cables. Reassembling everything, I flipped the AKiTiO fan around to become an exhaust fan. Next I needed to shorten the PCIe cables, which required me buying a crimper ($35) and extra pins (can be bought at any cable modding sleeving online shop). And lastly was the motherboard 24pin cable, which was 24pin at one end and two connectors at the PSU end. I buzzed out the two needed pins and then harvested some unneeded connectors from extra cables that came with the powersupply. Connected them together and hot glued the connectors on. In the end, I still have the the 24pin motherboard cable and another pair of 6+2 PCIe cables if I ever want to re purpose the power supply. Conclusion: Firstly, I would have never imagined myself buying a Macbook before finding this forum. Always thought of them as too expensive considering their underpowered gaming ability. But a Macbook is perfect for this project considering what else is available, it has excellent build quality and great battery life for when not gaming. The great battery life comes in part of not having dedicated graphics built in, unlike other Thunderbolt 2 equipped laptops (that also happen to be heavier and run hotter). This build really is the best of both worlds of light use on-the-go notebook and powerful gaming eGPU machine when at home or when LANing. http://www.3dmark.com/3dm/5732847 Warning: You may void your warranty doing this mod


 6 points
 -
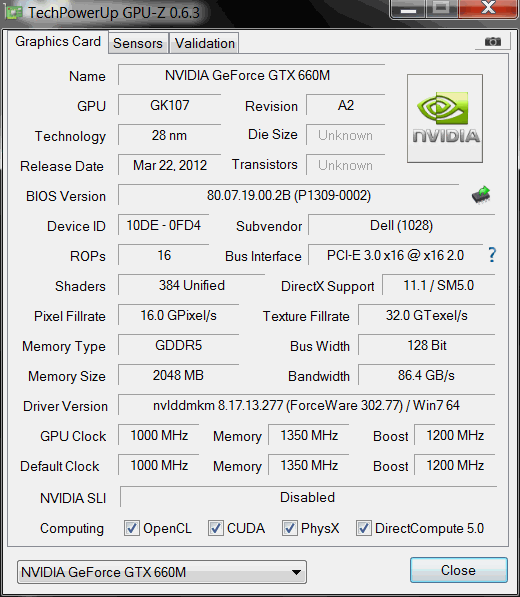
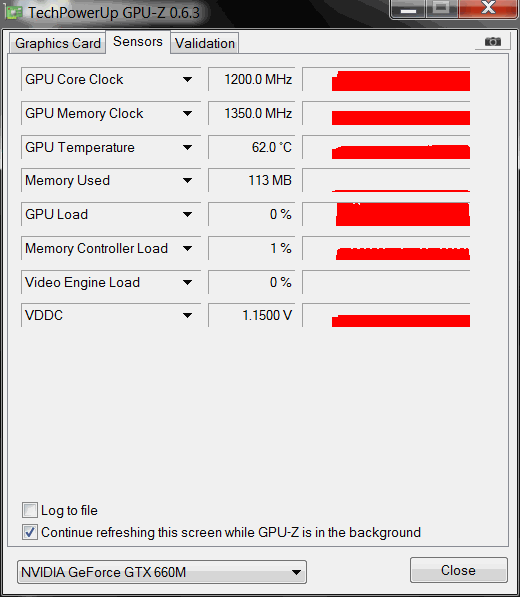
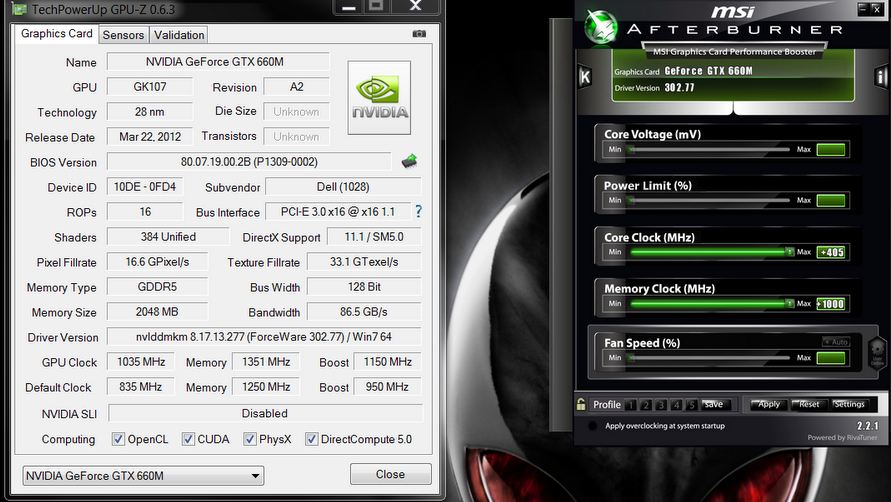
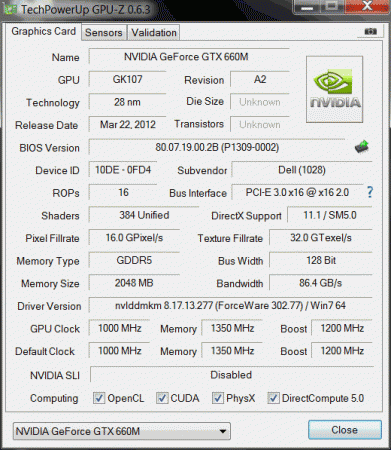
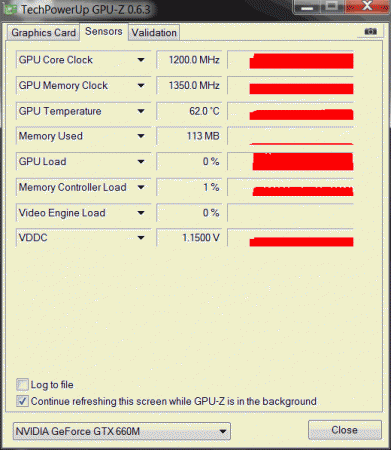
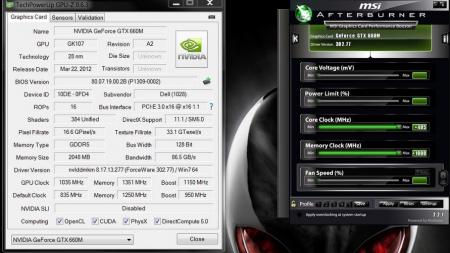
UPDATE: ALL DOWNLOADS LISTED IN THIS POST FOUND HERE. Nvidia 'Kepler' GPUs - modified VBIOS files >>> NOTE: More versions (including voltage mods) exclusive for T|I users can be found in the second post. <<< The 'Kepler' GPUs from Nvidia perform really well, even at increased clocks speeds they stay quite cool - a perfect behavior when it comes to overclocking and improving the performance. Unfortunately the mobile GPUs suffer from an artificial +135MHz core overclocking limit, so you can't go higher by using tools like Nvidia Inspector and similar. The modified VBIOS files listed here have this limit unlocked, some have increased stock clocks or tweaked voltages. Just refer to the description. All files have been modified by myself, if you like them feel free to buy me a drink, donation link can be found below GTX 660m: 660m_OC_edition__VBIOS_[DELL].zip- comes with unlocked software overclocking limits 660m_GHz-Edition_overvolted_VBIOS_[DELL].zip - default 3d clock 1000MHz, base boost 1200MHz,, memory (3d) 1350MHz, increased 3d voltage undervolted editions possible, depends on interest, tba Some screenshots: GTX 680m: Clevo_680m_-_80.04.33.00.10_'OCedition'_revised_01.zip Dell_680m_-_80.04.33.00.32_'OCedition'_revised_00.zip Increased software overclocking limits & optimized for no throttling. Read the included 'Read me' file before flashing. Instructions: I recommend flashing under DOS using nvflash . Donation link in case you want to buy me a beer Thanks and cheers! More to come. Testers: Thanks @eliteone (Dell 660m), @littleone562 (Dell 680m) For all mods: Use at your own risk.
 1 point
 -
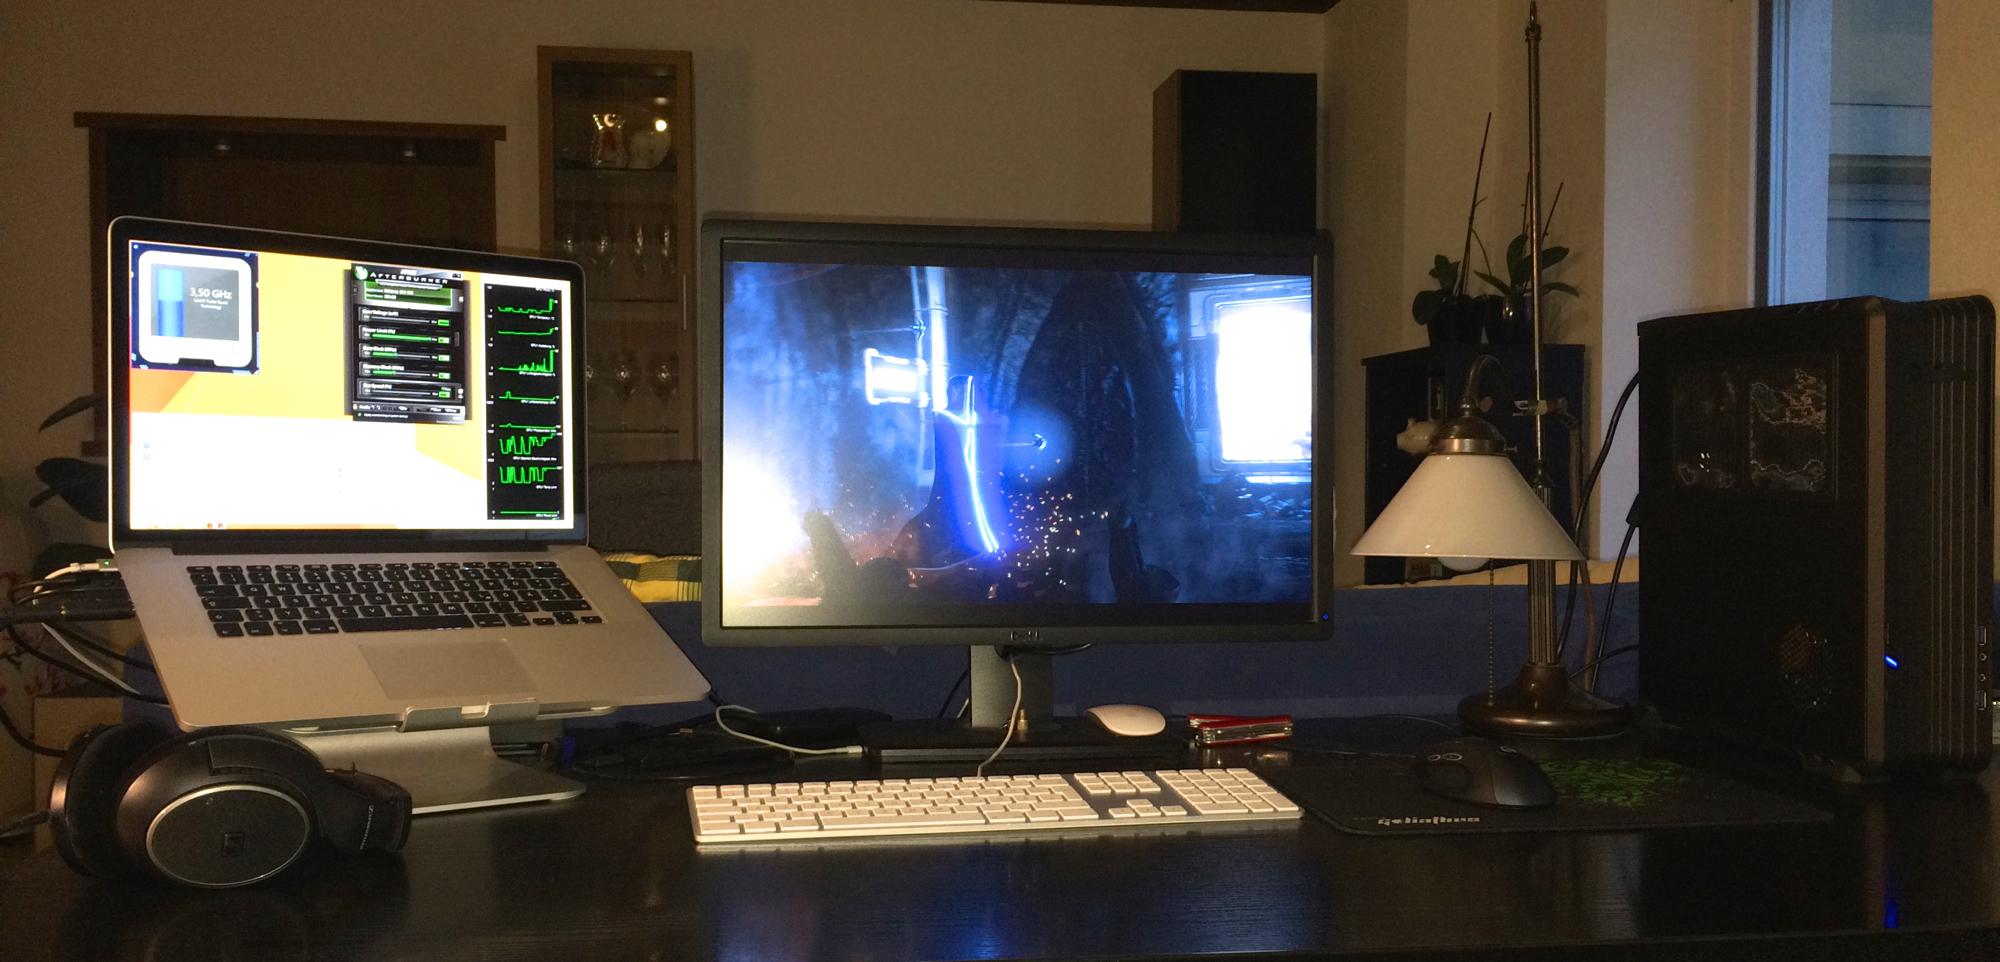
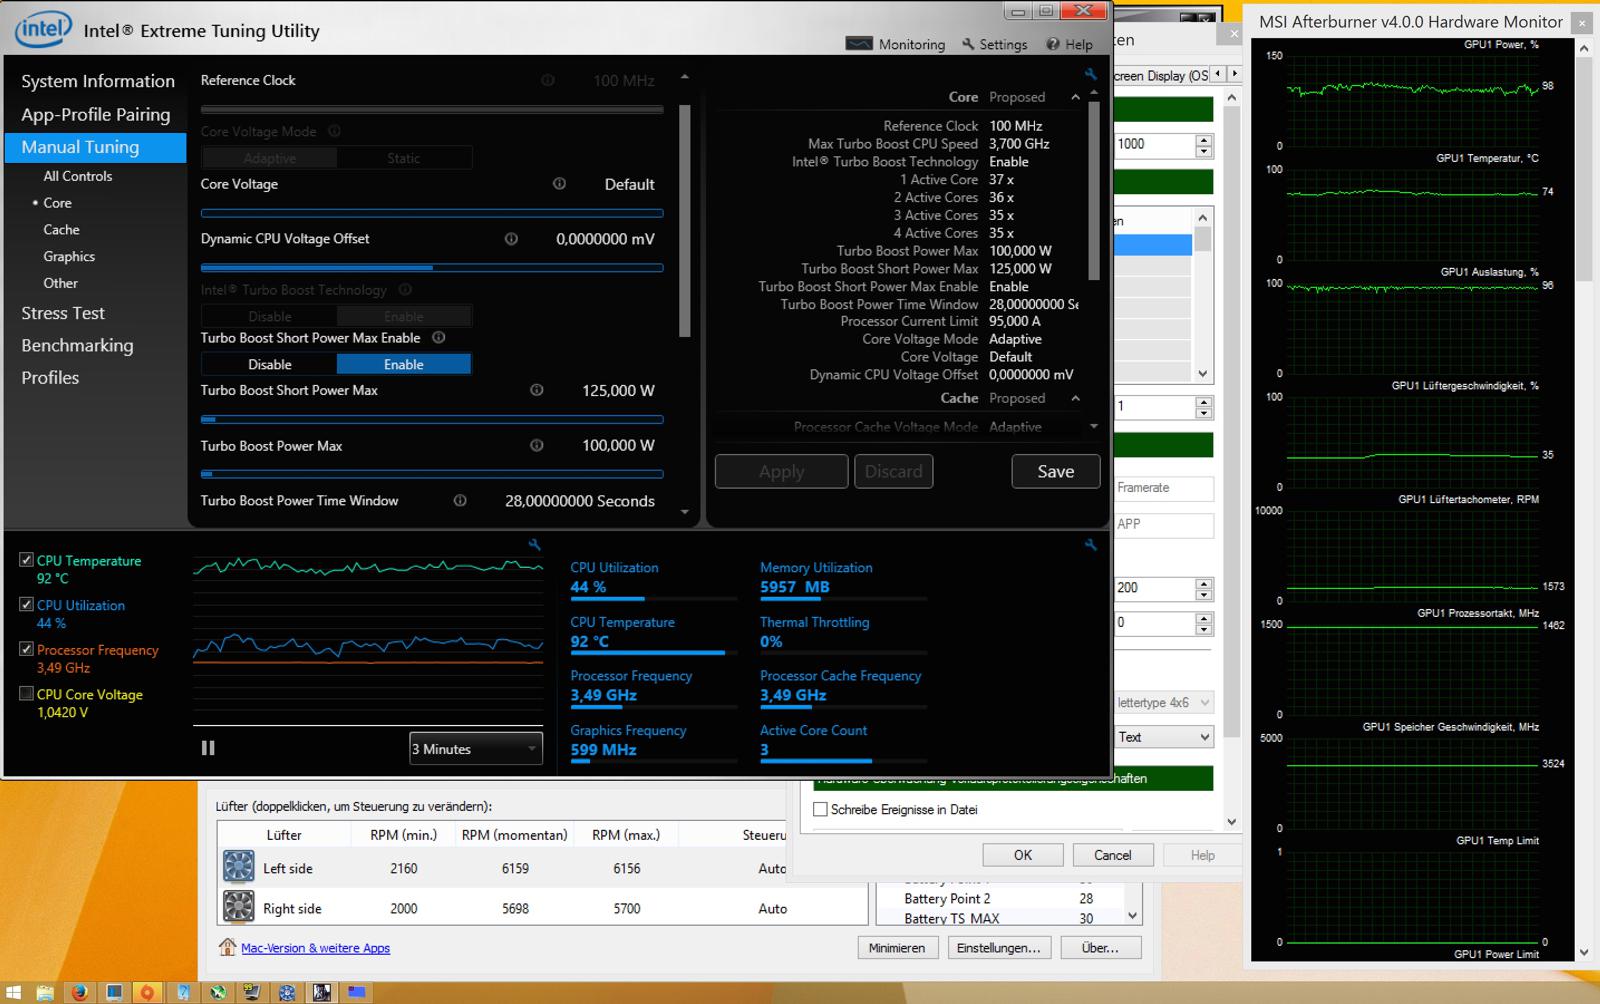
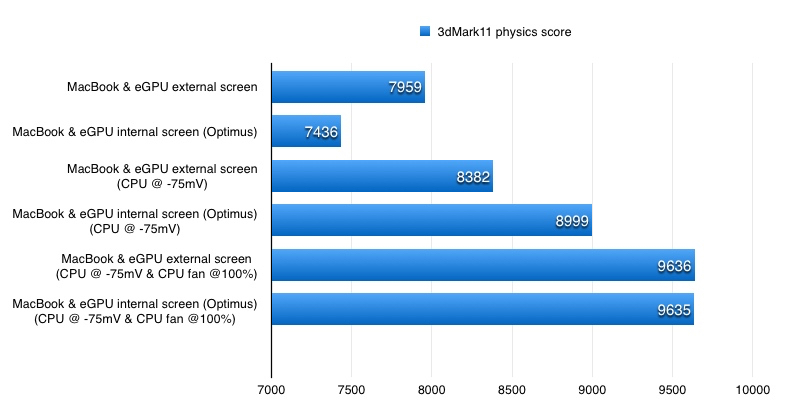
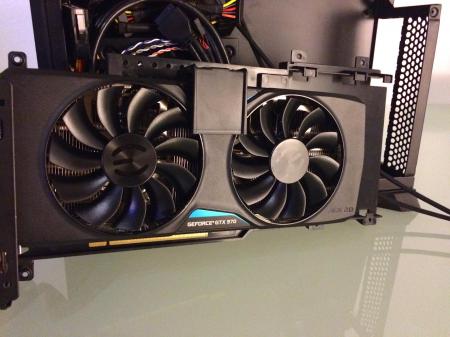
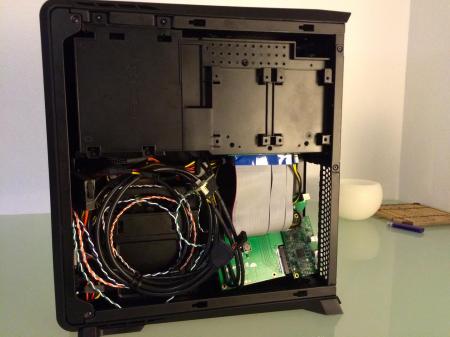
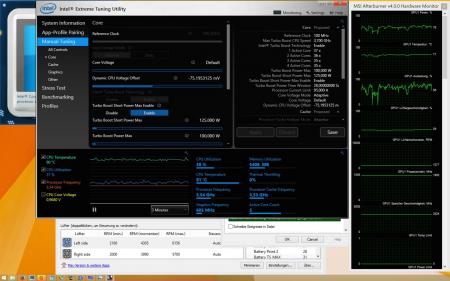
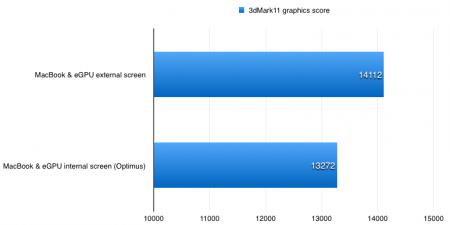
This guide is based on Evo*s guide. Made my optimus setup much more flawless. Other builds I made 3 builds until now: 2013 13" Macbook Pro + GTX970@16Gbps-TB2 (AKiTiO Thunder2) + Win8.1/OSX10.10 [Dschijn] 2014 15" Macbook Pro Iris + GTX970@16Gbps-TB2 (AKiTiO Thunder2) + Win8.1 [Dschijn] 2014 15" Macbook Pro Iris + GTX970@16Gbps-TB2 (AKiTiO Thunder2) + Win8.1 [Dschijn#2] PICTURES CONFIGURATION (Hardware) Apple MacBook Pro 15" Retina / i7-4870HQ 2.5Ghz / 512GB / 16GB (mid 2014), with Iris Pro graphics only AKiTiO Thunder2 PCIe Box Chieftec SFX-500GD-C Bitspower 24 PIN ATX PSU adapter to start the PSU EVGA GTX 970 FTW (Update 5th Feb. 2015: Switched to the new EVGA GTX 970 FTW+) PCIe 16x riser with powered molex - Please be aware that powered risers are not recommended to use. We strongly advice you to use a barrel plug instead: http://forum.techinferno.com/enclosures-adapters/8317-%5Bguide%5D-making-molex-barrel-adapter.html Apple 2m Thunderbolt Cable Silverstone RVZ01 Raven Why did I choose this case? I wasn't so pleased with the Cooler Master Elite 130. The footprint is too big and the GPU is struggeling to get fresh air (especially with a non Nvidia layout cooler). The Raven RVZ01 has the same footprint as the Sonnet III-D and is just a bit taller. It is still cheaper and offers better cooling options. I used a SFX-L PSU, which is the bigger brother of the regular SFX PSUs. It is using a 120mm fan to provide better cooling with less noise. Two slim 120mm fans (set to 7V) are pushing fresh air directly onto the GTX 970 (currently using 3 Noctua NF-F12 industrial PWM fans @ 7V. Will try to control them with the PWM signal of the GPU later). The more elegant case is the Silverstone ML07 Milo. It has the same footprint and functions but a more classic appearance. SOFTWARE INSTALLING Install Windows 8.1 64 bit from a USB stick by using ISO file. This is a standard Boot Camp installation. After installing Windows, download and install all Windows updates. Update Boot Camp drivers (Boot Camp Support Software 5.1.5640) and shut down Do the hardware preparing part 1-8 Install latest Nvidia driver Shut down MacBook Pro and continue from the hardware preparing step 8 Apply following steps to get Optimus internal LCD mode working: http://forum.techinferno.com/implementation-guides/8558-%5Bguide%5D-macbook-enabling-optimus-internal-lcd-mode.html#post110757 . Without this Optimus would only sometimes work. HARDWARE PREPARING Open AKiTiO's box by a normal screwdriver, take out the PCIe board, attach the riser and the GPU to its x16 slot Attach PSU's PCIe power cable to the GPU and do the "paperclip trick" or apply the adapter Attach the Molex power plug to the riser Attach DVI/HDMI cable to the eGPU Place something under the eGPU so that it will be steady Do not attach AKiTiO's 60W power plug to the DC jack of the PCIe board Connect TB cable Turn on MacBook Pro first Hold your "Alt" Key Power up AKiTiO/eGPU by switching on the PSU If your first boot with the eGPU fails, boot without the eGPU into Windows and power up the eGPU (and plug it into the MB) when you are in Windows. SOFTWARE Tools MSI Afterburner (overclocking and monitoring GPU): http://event.msi.com/vga/afterburner/download.htm Intel XTU (undervolting and monitoring CPU): https://downloadcenter.intel.com/Detail_Desc.aspx?DwnldID=24075〈=eng Macs Fan Control: http://www.crystalidea.com/macs-fan-control BENCHMARKS 3dMark Firestrike Please note, the computer benchmarks have been done with my first card (MSI GTX 970 4G gaming). With my 15" MBPr I used a EVGA GTX 970 FTW (power limit 110%, Core Clock +100MHz, Memory Clock +50MHz) eGPU Firestrike results with external screen NVIDIA GeForce GTX 970 video card benchmark result - Intel Core i7,Apple Inc. Mac-3CBD00234E554E41 eGPU Firestrike results with internal screen (Optimus, without external screen) NVIDIA GeForce GTX 970 video card benchmark result - Intel Core i7,Apple Inc. Mac-3CBD00234E554E41 3dMark 11 (All test done with: EVGA GTX 970 FTW, 110% power target, +70MHz GPU, +20MHz memory clock speed): 0mV external NVIDIA GeForce GTX 970 video card benchmark result - Intel Core i7-4870HQ Processor,Apple Inc. Mac-3CBD00234E554E41 0mV internal NVIDIA GeForce GTX 970 video card benchmark result - Intel Core i7-4870HQ Processor,Apple Inc. Mac-3CBD00234E554E41 -75mV external: NVIDIA GeForce GTX 970 video card benchmark result - Intel Core i7-4870HQ Processor,Apple Inc. Mac-3CBD00234E554E41 -75mV internal: NVIDIA GeForce GTX 970 video card benchmark result - Intel Core i7-4870HQ Processor,Apple Inc. Mac-3CBD00234E554E41 -75mV external (CPU fans @ 100%): NVIDIA GeForce GTX 970 video card benchmark result - Intel Core i7-4870HQ Processor,Apple Inc. Mac-3CBD00234E554E41 -75mV internal (CPU fans @ 100%): NVIDIA GeForce GTX 970 video card benchmark result - Intel Core i7-4870HQ Processor,Apple Inc. Mac-3CBD00234E554E41 POWER CONSUMPTION For power consumtion results, please take a look in my first guide: [GUIDE] 2013 13" Macbook Pro + GTX970@16Gbps-TB2 (AKiTiO Thunder2) + Win8.1/OSX10.10 VIDEOS Diablo III in 4k resolution (downsampling to 1980x1200) - FPS counter in the bottom right corner: Battlefield 4 - FPS counter in the upper right corner: Far Cry 4 - FPS counter in the upper left corner: The Witcher 3: GTA V: CPU TWEAKING By stressing the mobile CPU, it will reduce it's speed to adjust Intels CPU limitations. The CPU lowers it speed if: - a critical temperature is reached (sth between 95-100°C) - the max TDP (Thermal Design Power) is reached By lowering the CPUs voltage the CPU can more easily boost into higher frequencies / not too low throttle frequencies / hold it's boost frequency. With Intels XTU tool you can lower the "Dynamic CPU Voltage Offset" slider under "Manual Tuning - Core" to the left. Values around -100mV should be possible. After applying, test the stability of this new settings with Prime95 Small FFTs. With -100mV offset and without the offset) and fans set to 100% I get a higher 3dmark firestrike physics score (9751) because the thermal throtteling doesn't kick in and the CPU can constantly boost. I tested the settings in Geekbench (32bit) and Cinebench. Imo Cinebench is better, because the benchmark takes more time and the throtteling has a bigger impact as the quick Geekbench (or 3d Mark) where the thermal capacity of the cooler has a much bigger influence. Geekbench scores: 0mV 3187 - 11302 -50mV 3194 - 11916 -100mV 3180 - 12199 Cinebench scores: 0mV 1st 570cb -50mV 1st 584cb -100mV 1st 591cb 2nd 620cb 3rd 616 0mV fans 100% 1st 583 2nd 587 -100mV fans 100% 1st 642 2nd 638 3rd 643 As you can see, the lower voltage increases the results because the CPU can boost into higher states under full load and throttles less (hard). By setting the fans to 100% the slow increase of the fanspeed in the benchmark (stock) is excluded! In Battlefield 4 the CPU load is quite demanding and the CPU fan is working at full speed to prevent the CPU from throttling. With a very stable CPU voltage reduction of -75mV the fan speed is in a much lower area and much less annoying!


 1 point
 -
Hey, I've never heared about "Kepler bios tweaker" before, maybe thats the solution I need... Can I use this to rise base clock of my GTX770m above the +135 of stock vbios? Or do I need to unlock it somehow before?1 point
-
You are very welcome! Actually, I misspoke. The GPU will only "boost" if the value in the boost table is set higher than the base clock. Setting the base clock on the Common tab lower doesn't keep it from boosting. That being said, if you go to the Boost Table tab and set the Max Table Clock lower than the base clock setting on the Common tab, then the GPU clock will be clamped at the lower boost clock. I tested this and it works. If you want to set the TDP and Base Clock to 823.5 it won't hurt anything. The last test I did was to set the TDP and 3D Base Clocks to 993.0 and the Max Table Clock to 823.5. The highest the GPU would clock was 823.5 I don't think the voltage will matter. From the factory it's set lower than what Svl7 set it in the modded vbios. If you go too low then the card won't start up when you boot. Then you have a whole mess of a problem fixing that unless you can blind flash it or you have an Alienware. It would be a good idea to set your laptop to boot off of a USB flash drive if you decide to mess with voltages. Not recommended and really... not needed.1 point
-
That won't do it. My laptop always uses boost with the modded 880M vbios. I tested this for you. What it takes is to go the the Boost Table tab and used the slider to set the max boost to 823.5 and save it before you leave that tab. It would be a good idea to save the file as something else before you start monkeying with it. I called my uc.rom (underclock ROM). Here are the results.1 point
-
Weird, I used shadow play play to record and I also had the fps counter on but for what ever reason it is not on the video. I get a solid 60 fps, it does dip down though when I am running through vegetation. There are some stutters but it seems to be common in far cry 4 from the constant loading of the map. I'll try and get another video up.1 point
-
AKiTiO is unstable with the AMD cards on Win8.1: http://forum.techinferno.com/diy-e-gpu-projects/8844-targeting-akitio-thunder2-pcie-boxs-stability-issues.html External monitor is not a requirement, internal screen full screen apps will be accelerated by eGPU, if you install Virtu MVP 2.0: http://forum.techinferno.com/diy-e-gpu-projects/2967-lucidlogix-virtu-internal-lcd-mode-amd-egpus.html#post1204131 point
-
Maybe it would work… Not sure. @Hubo: From the performance point of view, go with the MSI. Quad Core CPU is important for gaming.1 point
-
Here is a Far Cry 4 video if anyone is interested, I am running a 970 through a GTX970. - YouTube1 point
-
[RIGHT]Internal Screen for ATI GPUs with Virtu MVP 2.0[/RIGHT] ATI eGPU + Internal Screen is today possible even for non windowed apps. Although Nvidia (with Optimus driver) when paired with an Intel onboard GPU can drive the internal screen at reasonable frame rates @ x1 2.0, ATI hasn't provided such driver solution yet. And, here comes the Virtu Driver. It is a 3rd party solution designed originally for Sandy Bridge and Ivy Bridge desktop systems which renders the image with the eGPU and displays on the iGPU. Virtu Driver 3.0.109 silent upgrade, can also be installed on laptops!!! Pre-requisities for Virtu functionality laptop with Intel 6, 7 and 8 series chipset with iGPU enabled. modern ATI GPU Internal screen for ATI Radeon HDs only? I am discussing about ATI GPUs cause Nvidia Fermi already have a solid Internal Screen solution and older Nvidia GPUs are not officially supported by the Virtu Driver. So we are actually talking for HD Radeon 4xxx, 5xxx, 6xxx, 7xxx and Rx-2xx. The official driver was not originally designed for notebooks and up to the previous version (3.0.107)it was almost impossible to install on a laptop, unless you had a desktop computer (check out nando's guide above). The installer would hang with this message. BUT with the latest update Virtu MVP 2.0 (3.0.109.29300) it will install even on an laptop PC a 30-day evaluation copy with HyperFormance and Virtual Vsync. It seems though that they don't sell it to customers anymore (I couldn't find any place to order it) How to install The setup is very easy. THIS STEP IS VERY IMPORTANT. UPDATE YOUR INTEL iGPU DRIVER TO THE LATEST DRIVER PROVIDED BY INTEL. It seems to solve most problems (if not all of them). On some machines you need to open Device Manager, manually uninstall the device reboot and then you will be able to install Intel driver. After you have finished driver setup of your eGPU reboot. Install Virtu Driver (after you attach your eGPU) and reboot. And here we go... Experience so far Although the first driver that Lucidlogix provided had many-many problems it seems like most of the problems have stopped and internal screen mode works without problems. I won't discuss here about HyperFormance since there are indications by other desktop and eGPU users that it does provide artificial results. On the latest driver they also gave the user the opportunity to change the settings for the floating icon, even disable it. I set this always on for benchmarks so I can be sure that it was running and my eGPU was rendering the screen. The only problem that I encountered was that I 3Dmark11 and 3Dmark13 would hang most of the time for no apparent reason. This hang also happens with older Virtu driver 1.2.114 so it could be something that has to do with my laptop. I could only ran a full 3Dmark11 test without problems and a custom 3Dmark13 test. Everything else that I tested works fine. Benchmarking implementation @ x1 2.0 & @ x4 2.0 Following tables show the results on both Internal & External screen. user/laptop Screen RAM GPU Direct X 9 Direct X 11 Ports 3D06 RE5 3D11 3D13 OVERALL SM 2.0 HDR OVERALL Graphics OVERALL Graphics timohour HP Probook 6470b @ 4Gbps i7 3630QM Intel HD4000 4GB 1600MHz External 4GB R9-280x x1 2.0 24144 8979 12305 183 P8669 9654 6342 7286 EC HM76 Internal R9-280x x1 2.0 17006 7285 6549 68 P6821 7068 ~5389 5529 EC HM76 Performance Difference ~29% ~19% ~46% ~63% ~21% ~27% ~15% ~24% average~30% goalque Macbook Pro @ 16Gbps i7 4702HQ Intel Iris Pro 16GB 1600MHz External 4GB R9-280x x4 2.0 26108 10058 13609 199 P8947 9164 [url=http://www.3dmark.com/3dm/5675981"]6129[/url][/CENTER] [url=http://www.3dmark.com/3dm/5675981"]6841[/url][/CENTER] TB2 Internal R9-280x x4 2.0 24370 9679 11415 144 P8092 8255 [url=http://www.3dmark.com/3dm/5676173"]5254[/url][/CENTER] [url=http://www.3dmark.com/3dm/5676173"]5635[/url][/CENTER] TB2 Performance Difference ~7% ~4% ~16% ~27% ~10% ~10% ~14% ~18% average~13% Many thanks to goalque for his test results. Verdict As I have said in previous review of the product internal screen performance is limited by bandwidth. Previous results that I had with x1 1.0 gave unplayable results, while @ x1 2.0 it varies with an average of 30% lower than the external screen. On the other hand using TB @ x4 2.0 (thanks to goalque) shows that the performance difference is minor (~13%), and any user with an AMD Radeon card can enjoy internal screen gaming at very reasonable framerates.1 point
-
How are you triggering PSU? Please note that as tedious as typing is, when you write "I tried every combo of booting it up. " we don't actually know what it means. But identical performance in both OS makes me think you didn't trigger PSU. 2nd guess is tough, you don't mention if you have an external display hooked up and if not, what exactly does "it didn't work" mean? Computer doesn't boot at all? Computer boots but there is nothing in System Profiler/Device Manager about eGPU? Computer boots but there is nothing in System Profiler under TB? We need info to help.1 point
-
¡WARNING! This process will require you to wipe out your hard drive, you might get it to work with pre-installed systems but I haven't had the chance to do so. As of now, brightness is not working on bootcamp, I'll need to research the issue. Detailed step by step guide: 1. Create a Win 8.1 EFI bootable flash drive using Rufus. 2. Create an Arch Linux bootable flash drive using Rufus. 3. Create a OS X Yosemite bootable flash drive using createinstallmedia. 4. Boot your computer using the Win 8.1 install flash drive. 5. When you get to the Windows install screen, press shift+F10 to get to the MS Shell. 6. Execute the following commands: 7. Proceed with Windows Installation 8. Once in Windows, click on start menu then type "cmd" 9. Launch diskpart again 10, Create your OS X Partition with the following commands: 11. Restart your computer and boot into the OS X Yosemite installer 12. Launch Disk Utility 13. Erase your newly created partition using HFS+ as the filesystem 14. Close disk utility and install OS X in there. 15. Boot into OS X. 16. You'll now have both Windows 8.1 and OS X installed in EFI Mode, now you'll need to install Arch Linux. 17. Boot your computer into the Arch Linux installation USB. 18. Launch the Arch Console. 19. Execute the following commands: Now, the first time I installed the bootcamp drivers I just selected the windows partition while holding the option key at startup. This to avoid the dual video card config. Then I deactivated the nvidia card, executed the gpu-switch command, booted into windows and installed the newest intel drivers, this is how my device manager looks like: Enjoy! Greetings Jose M. References: https://wiki.archlinux.org/index.php/MacBookPro11,x https://wiki.archlinux.org/index.php/GRUB#Alternative_install_method http://www.tswartz.net/blog/how-to-install-packer-the-archlinux-aur-helper http://www.reddit.com/r/mac/comments/2fy3be/by_popular_demand_my_better_than_bootcamp_guide/ https://wiki.archlinux.org/index.php/installation_guide http://lists.gnu.org/archive/html/grub-devel/2013-12/msg00442.html https://github.com/0xbb/gpu-switch Special Thanks to Andreas Heider and Tre87! </dev></username></username></username></username>
 1 point
 -
Can anyone help me? i need this to install 340.80 nvidia driver. Can't install... Thanks [h=2]PCI\VEN_10DE&DEV_13D8 &SUBSYS_110C1462[/h]1 point
-
NVMIi.inf (MSI). Win8/disable driver signing. Geforce 344.80 Beta NVMIi.inf_v344.80_MSI_110C1462_GTX_970M.zip1 point