Leaderboard


Popular Content
Showing content with the highest reputation on 07/05/14 in all areas
-
Ok guys I have supplemented my table with a AMD R9 270X and a AMD HD 7770. Furthermore, I will initially wanted to quit the eGPU subject because I have my GTX 770 packed into my PC. There, I have an Intel Quad-Core, which will be superior in the future games. But probably I continue to be active in the german Forum.Of the request of Nando4 here the table:My System; Lenovo X220, BIOS 1.39 (no-whitelist), i7-2640M, 8GB Ram, mSata-SSD 256GB and HDD 1TB and a PE4L-EC100A V2.1b Grafikkarten, Verbindung 3DMark 06 3DMark Vantage 3DMark 11 3DMark (2013) GTX 770, x16.2 ext. 19039* (100%) 25598 (100%) 10989 (100%) 246409 / 51774 / 7778 (100%/100%/100%) GTX 770, x1.2 Opt. ext. 20099* (106%) 27584 (108%) 8748 (80%) 145922 / 39660 / 6624 (59%/77%/85%) GTX 770, x1.2 Opt. int. 17943* (94%) 23062 (90%) 7993 (73%) 22746 / 21779 / 5781 (9%/42%/74%) GTX 770, x1.1 Opt. ext. 19837* (104%) 23786 (93%) 7818 (71%) 112794 / 35436 / 6212 (46%/68%/80%) GTX 770, x1.1 Opt. int. 12918* (68%) 15262 (60%) 6109 (56%) 11349 / 11220 / 4558 (5%/22%/59%) GTX 660, x16.2 ext. 19112* (100%) 22751 (100%) 6556 (100%) 232266 / 34004 / 4746 (100%/100%/100%) GTX 660, x1.2 Opt. ext. 18953* (99%) 20124 (88%) 5698 (87%) 131392 / 27756 / 4264 (56%/82%/90%) GTX 660, x1.2 Opt. int. 17612* (92%) 17849 (78%) 5524 (84%) 22995 / 18465 / 3980 (10%/54%/84%) GTX 660, x1.1 Opt. ext. 18860* (99%) 17670 (78%) 5355 (82%) 100774 / 25507 / 4068 (43%/75%/87%) GTX 660, x1.1 Opt. int. 12910* (68%) 12827 (56%) 4647 (71%) 11350 / 10606 / 3356 (5%/31%/71%) GTX 560 TI 448, x16.2 ext. 18905* (100%) 20781 (100%) 5201 (100%) 229377 / 33262 / 4330 (100%/100%/100%) GTX 560 TI 448, x1.2 Opt. ext. 19295* (102%) 18162 (87%) 4838 (93%) 126747 / 27255 / 3722 (55%/82%/86%) GTX 560 TI 448, x1.2 Opt. int. 17612* (94%) 17335 (83%) 4795 (92%) 22432 / 21072 / 3599 (10%/63%/83%) GTX 560 TI 448, x1.1 Opt. ext. 18999* (101%) 16092 (77%) 4614 (89%) 100186 / 24734 / 3495 (44%/74%/81%) GTX 560 TI 448, x1.1 Opt. int. 12964* (69%) 13553 (65%) 4300 (83%) 11352 / 11220 / 3113 (5%/34%/72%) R9 270X x16.3 ext. 24944* (100%) - 8275 (100%) 248341 / 40418 / 6163 (100%/100%/100%) R9 270X x1.2 ext. 16336* (65,5%) - 7273 (87,9%) 113338 / 34693 / 5417 (45,6%/85,8%/88%) R9 270X x1.1 ext. 15564* (62,4%) - 6585 (79,6%) 89156 / 30596 / 4848 (35,9%/75,7%/78,7%) Radeon HD 7770 x16.2 ext. 16636* (100%) 14667 (100%) 4044 (100%) 158657 / 19143 / 2868 (100%/100%/100%) Radeon HD 7770 x1.2 ext. 14427* (86,7%) 12387 (84,4%) 3595 (88,9%) 86402 / 17264 / 2610 (54,4%/90,2%/91%) Radeon HD 7770 x1.1 ext. 13667* (82,1%) 11173 (76,2%) 3405 (84,2%) 67712 / 15738 / 2429 (42,7%/82,2%/84,7%) HD 4870, x16.2 ext. 13975* (100%) 9312 - 124249 / 14395 / - (100%/100%/-) HD 4870, x1.2 ext. 4724* (34%) - - 72526 / 12044 / - (58%/84%/-) HD 4870, x1.1 ext. 3958* (28%) - - 49071 / 9670 / - (40%/67%/-) Intel HD 3000 int. 3837* 1446 - 28054 / 2673 / - * = total valuex16.2 = a x16 connection with PCI-e 2.0x16.3 = a x16 connection with PCI-e 3.0x1.2 = a x1 connection with PCI-e 2.0x1.1 = a x1 connection with PCI-e 1.0Opt. = Optimusext. = external Monitorint. = Laptop Monitor(XXX%) = total value of the CPU and GPU, as CPU and system differently, you should consider this value wisely.Soon, I supplement an AMD R9 290 / 290X.3 points
-
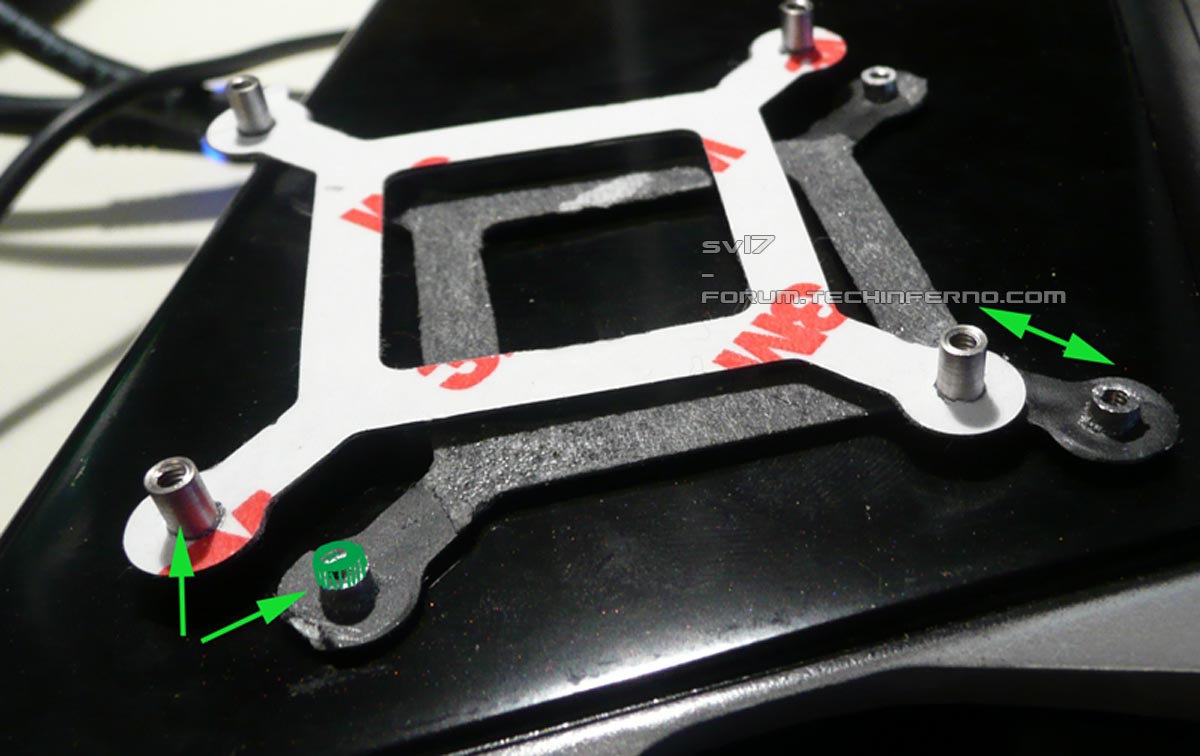
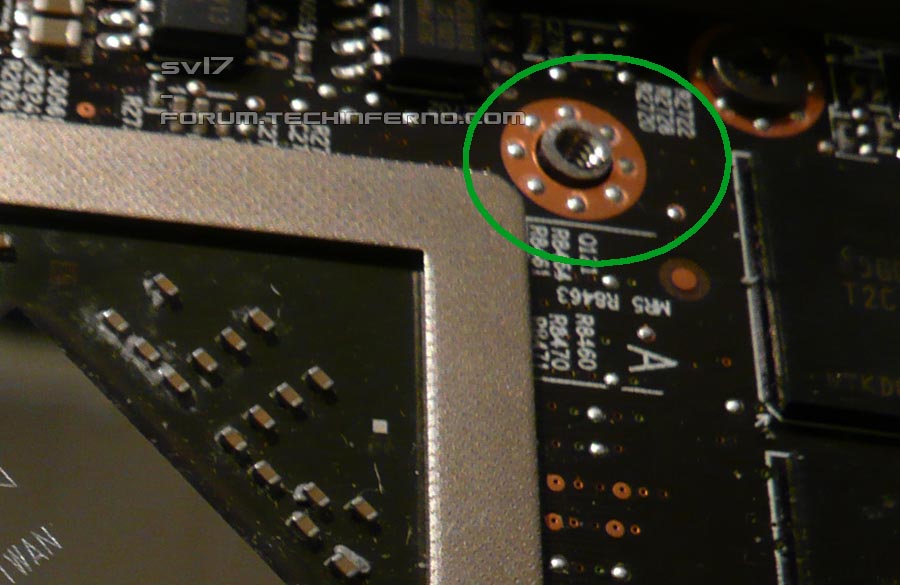
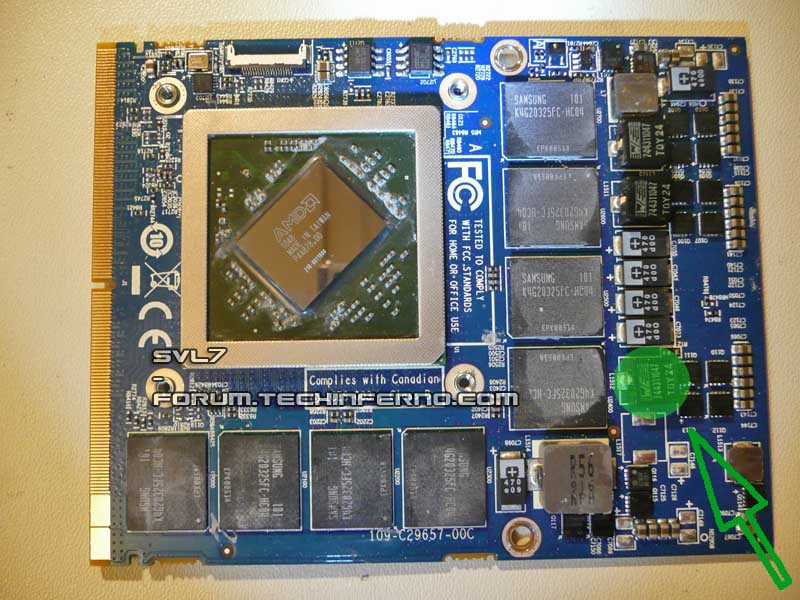
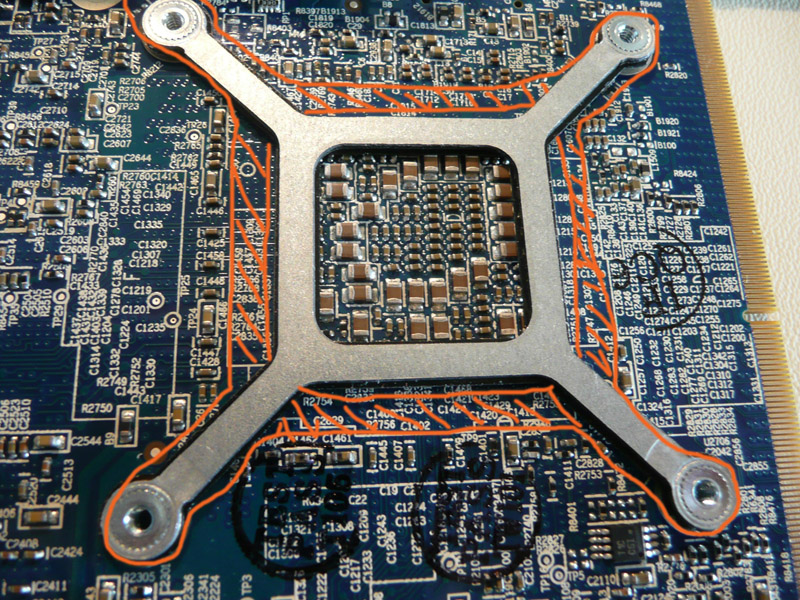
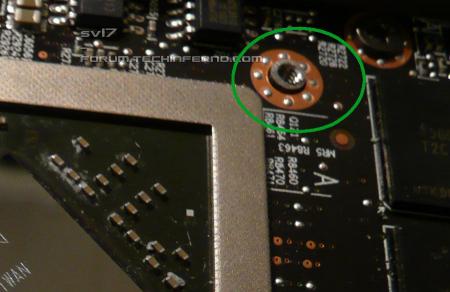
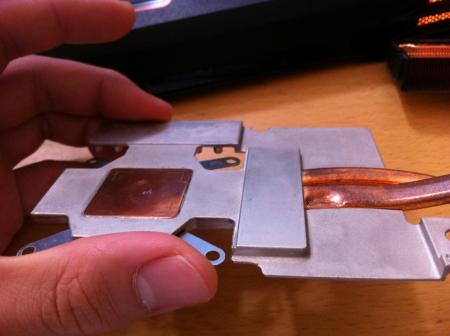
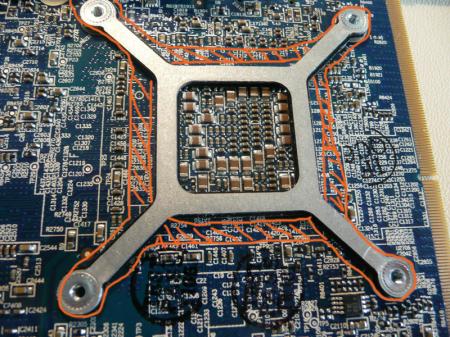
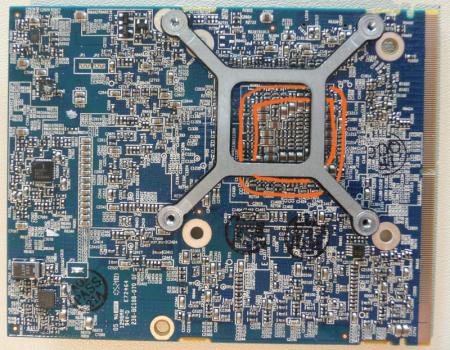
In case you have some additional info that should be included, or if I missed something important, let me know and I will include it. IMPORTANT: The 6970m is not officially supported by Dell. Upgrading to this card may void your warranty. The 6970m is a powerful card, it will draw more power and produce more heat. This card can significantly improve the performance of your system, however, the long-term effects of running this card in a M15x are currently unknown. But it works great so far Cards that are known to work: The card Dell uses in the M17x R3: This has only been tested for a short while so far, but it seems to work perfectly fine. Credits go to Rogue-OP and iloveb00bs. The first guys who tried to put a 6970m in a M15x. -DP/HDMI works, confirmed by Strigae, thanks!!. -Fan control works It seems you need to install the M17x R3 drivers first before you can get the official AMD drivers. I guess installing for example the modded 11.4 will work as well. Dell Part nr. is: V9XKH. Good luck when ordering one from Dell, depending on where you live and what kind of rep you get on the phone they might not want to sell you the card as it isn't officially available for your system. Call again in this case, or if you know someone with a M17x R3 let him order the card for you. 6970m from MXM-upgrade.com: Works great, but no fan control. The fans are constantly at a high speed, but not completely at full full speed. For now you'll need to manually control the fans with HWinfo32. -DP/HDMI works. Sound through HDMI works when you install the Dell 6970m vbios and the M17x R3 HDMI audio driver. -m15x-amd-6970m-everything-you-need-know.html#post3717"]Here are the instructions for this. Card can now be ordered for the M15x from mxm-upgrade. Clevo (and resellers) 6970m: The card from Clevo and resellers (Eurocom etc.) works as well, but make sure you get a version of the card which has holes for the back plate! Some of these cards have the screw holes for mounting the heatsink soldered on which makes it impossible to use the Dell backplate, and since Clevo uses slightly smaller screws than Dell you can’t simply put your heatsink on such a card. Contact your dealer in advance to make sure you get a card which doesn’t have the screw holes soldered to the PCB, otherwise you’ll have to remove it (which is difficult) or use some smaller screws on the heatsink. For all these cards the heatsink of the M15x fits perfectly. No modification needed. Cards from other vendors / manufacturers may work as well. If you got a different 6970m running in your M15x let me know and I'll upgrade the list. Things to do before exchanging the card: Download the drivers. This modded 11.5 should work, click on "MobilityMod Windows 7/Vista" in the linked thread. Also get GPU-Z for monitoring your video card and verifying it, Trixx, for under- and overclocking and in case you haven't got a Dell card also HWinfo32 (I recommend getting it anyway since it is a great system monitoring tool) Make sure you have thermal paste, maybe some new thermal pads as well as something to clean the heatsink (e.g. isoproply alcohol) and some cloths around. I also highly recommend using a grounded ESD-mat and a wristband. Know what you're doing. You need to partially disassemble your machine to get to the GPU. Prepare yourself thoroughly, check out the M15x service manual, as well as the if you don't know how to get to the GPU. It can be helpful to write down all the steps in advance when you're doing this for the first time. If something is still unclear about the disassembly procedure after looking at the video and checking out the service manual let me know, I can provide you some pictures if necessary. The upgrading procedure: Uninstall your GPU drivers. Make a power drain (Turn off your M15x, remove the power cord and the battery. Then press and hold down the power button (Alienhead) for about 10-20 sec. Remove your GPU - Here's a little guide with pics in case you need some help. Clean your heatsink, if necessary replace the thermal pads with new ones. Make sure the 6970m has a retention bracket on the back of the GPU. If not take the one from your old GPU and put it there. Also make sure you read the section about the "retention bracket problem". Properly insert your GPU, make sure that it sits properly. Apply the thermal paste, and attach the heatsink. Then (after reassembling your system), boot, install the drivers and reboot. Make sure the fans are running. Open GPU-Z and verify your card and the clocks. It should look more or less like this. Default 3D clocks are 680/900MHz (core/memory) and 150/100MHz when idling. Make sure PowerPlay is enabled in the Catalyst Control Center. Also make sure Stealth Mode is deactivated. Check your temperatures. Idle temps should be 40-50°C, depending on your ambient temp of course. While gaming or doing something similar GPU-intense the system will run significantly hotter, 70-80°C, maybe a bit higher. Note: By lifting the back of your system a bit (for example with a book) you can improve the airflow in the system. This can really help lowering the temps. The back plate problem: The retention bracket of the 6970m has a different size than the regular M15x cards (260m, 5850m etc.) When your card doesn't come with this x-plate you need to take the one you have on your old GPU, but this one won't fit properly. Nevertheless it works, even if it covers some resistors on the back of the card. Make sure you're not shorting anything. Usually the back plate has an insulating black plastic pad on it, this will work. However, if your x-plate doesn't have this pad on it, you must cover it with some thin, insulating tape. Here you can see the problem: In this picture I marked where the back plate should be: And in this one I highlighted the area which gets covered by the too small bracket of my 260m: The space beneath the card becomes pretty tight, but it works. My advice is contacting your dealer before buying the card and asking whether he can provide the correct x-plate. (In case he tells you that you should use the one from your old card tell him it has a different size.) The backplate problem part 2: In case you got your hands on a card with a proper backplate - cool! There's only one problem... the holes with the threads for fixing the screws are standing out just a bit too much. Compare it to the original backplate which came with your M15x, the difference is about 3 millimeters. Due to this, the heatsink applies almost no pressure on the die when you mount it on the card, resulting in high temps. A simple mod will solve this, just grind down the "screw holes" of the backplate a couple of millimeters, easy to do and very effective. This will highly increase the pressure which is applied on the die and bring down the temps. Just take it easy with fixing the screws, if you grind down the metal a bit to much and then fix the screws until you can't turn them anymore you might crack the die if you're unlucky. I recommend comparing the plate with your original M15x plate and just grind your 69xxm plate down until it has the same height. Here some pics which illustrate the problem. I cut of quite some material, you might want to leave a bit more to make sure you don't accidentally kill your card with the pressure. Heatpipe problem: It's possible that one of the coils on the cards is standing out just a little bit too much and thus touching the heatsink. This can lead to a small gap between the die and the heatsink which will lead to increased temps as well. To prevent this you can do a slightly crazy mod, as done by @widezu69... take a hammer and carefully flatten your heatpipe a tiny little bit at the problematic spot. If you work with enough care, it really works without killing the heatipe. Again, care is the keyword here. Here's a pic of the modded heatpipe as well as the problematic coil (marked with green): Power consumption: The power draw of the card is probably about 75-100W. I run this card together with an i7 920xm in my M15x and it works fine. Nevertheless you need to be careful, as the PSU of the M15x is only rated 150W. When doing some 3dM11 runs with both GPU and CPU overclocked I measured about 160-170W current draw from my system during the combined test. You really need to be careful when running this card, especially when you have an extreme processor (920/940xm). Pushing both GPU and CPU can (and will) bring the PSU to its limits (and above). Some numbers about the power draw when playing games, everything on stocks: Black Ops Zombies (everything on max): ~ 130-140W Portal 2 (everything on max): ~110-125W Medal of Honor (everything on max) ~140-150W Crysis 2 (set to "Hardcore) ~ 140-150W The device I use for measuring the power draw has an accuracy of about ± 10W. I'll update some more numbers later. Fan control: In case you have a card which makes your fans running at a high speed all the time you will need to use HWinfo32 to manually adjust the fan speed. To get to the fan control open HWinfo32 (sensor only) and press on the little fan next to the "Logging start" button. This will open the fan control window. Ignore the GPU2 fan, you only need to adjust the CPU fan and GPU1 fan value. The programm needs to override the fan setting of your system in short intervals all the time, the standard value is 100ms. (See the "respin period" box). But the fan needs some time to slow down again, even when the EC already reset the value of HWinfo32, that's called the respin time. If you set it to about 11000ms your fans should run all time at the value you set. If they start to slow down and then spin up again you need to decrease the respin period. For adjusting the fans set the slider to the desired value and click "Set Manual" You will need to do this for both fans. Update: It's now possible to create a fan control look-up table and let HWinfo32 automatically control the fan speed by temperature. 1. Click on the fan symbol 2. Click on "Custom Auto" 3. Choose the temperature sensor diode which you want to use as reference. 4. Set the desired speeds/temperatures according to your needs. Do this for both GPU and CPU, ignore GPU2 fan. I recommend using the hottest GPU diode (usually MemIO). A big thanks to Mumak, the developer of this fantastic tool. Here you can find the official Alienware fan control thread in case you find a bug or need to know more. ATTENTION: Adjusting the fan speed can be dangerous!! Always keep an eye on your temps and never forget to adjust the values before doing something CPU or GPU intense (in case you control them manually)! I'm still looking for a different solution. In case I'm successful I'll post the update here. Possible problems and solutions: Unable to install drivers. Solution: Try a different driver. Also contact your vendor, maybe he knows a specific one that works. Idle clocks are 250/900 instead of 100/150. Solution: Check your display settings and make sure only your internal notebook monitor is selected. 250/900 are the idle clocks when you're connected to an external monitor (or when your display settings are got messed up, probably driver related) Solved by iloveb00bs. The GPU temps are crazy high! Solution: Repaste. You probably did a bad job with the thermal paste. Also make sure your system is dust-free and that the heatsink sits properly and is making contact (also check the pads where the memory modules touch the heatsink). While idling the GPU clocks change from 2d to 3d clocks and back all couple of seconds. Solution: This behaviour can be caused by the M17x r3 6970m driver (A00). Get the latest AMD driver and you should be fine. If you have this problem with a different driver try another driver version. Feel free to ask questions! M15x GPU exchangement guide .pdf


 1 point
 -
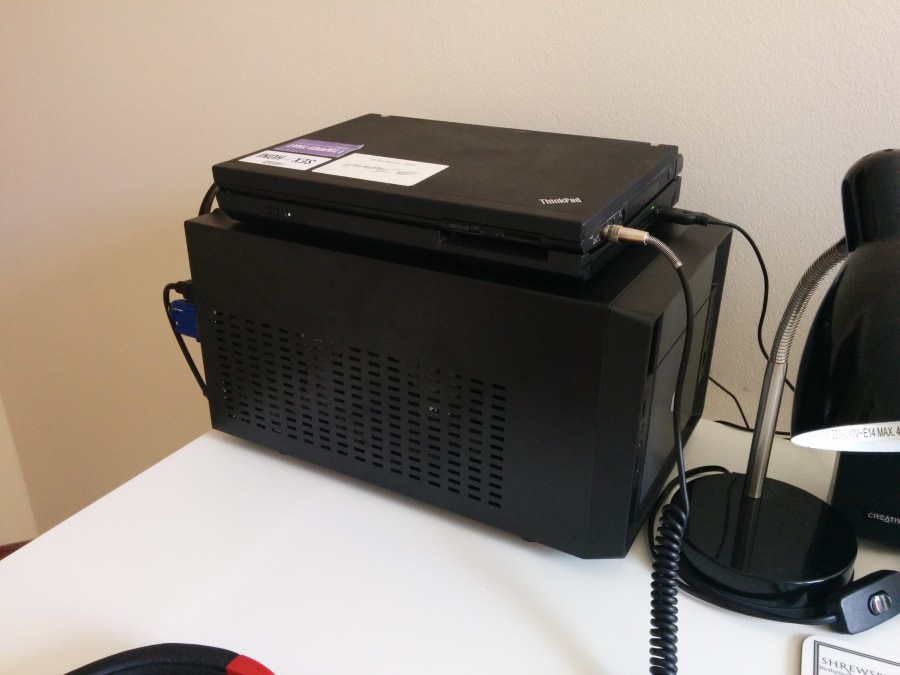
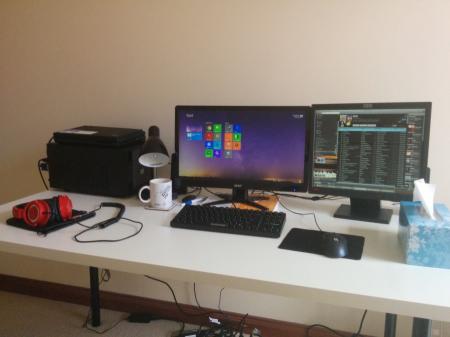
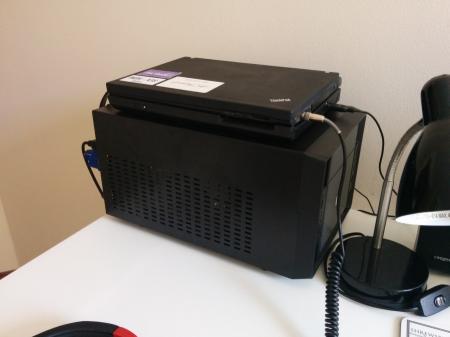
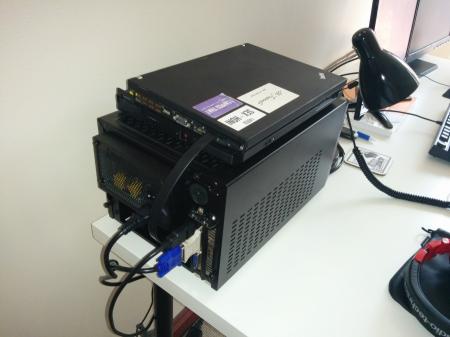
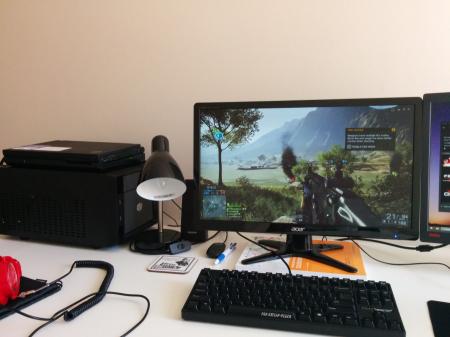
PHi guys. This was my first eGPU build, just thought I'd show for others interested in a similar setup. My goal was minimal time spent putting it together, and no software issues/dependency. Laptop specs: Lenovo ThinkPad X201 Intel Core i5-520m, 2.4GHz Intel HD Graphics (1st generation) ExpressCard 1.0 8GB RAM (2 x 4GB DDR3-1066) 256GB Samsung 830 SSD Ultrabase w/internal 1TB SATA drive Windows 8.1 Pro 64 bit eGPU specs: MSI GeForce 560 Ti Hawk w/1GB GDDR5 VRAM PE4L EC060A 2.1b Corsair CX430 PSU Cooler Master Elite 120 Advanced case The build process/design: The actual building was easy. I tested it all out of the case first to make sure there were no issues. The GPU is mounted normally in the case, propped up underneath by the PE4L. The PE4L is not screwed in, I have boosted it a little off the base of the case with a small bit of cardboard shoved underneath. The PSU is similarly mounted normally inside the case. Selected this PSU because it's quiet and modular (you'll struggle to fit all the cables for a non-modular PSU in this case). ExpressCard adapter comes out the back where the motherboard IO shield normally is. The way the adapter comes out works well since it just flips up right into the ExpressCard slot of my ThinkPad. Power is toggled by the main power switch on the PSU, the case button itself would only work if I kept it pressed in. The dock itself contains a SATA caddy, so I have an internal 1TB drive on that with all my games and video editing stuff. Docking and undocking: To undock, you need to open the laptop's screen, then disable the 560 Ti in device manager. Then you hit the undock button on the Ultrabase, disconnect the eGPU, and pull the laptop off. Docking is similar, just have to re-enable it in device manager. Means you never need to turn off the laptop or put it to sleep to dock/undock. Software: I couldn't find much in the way of answers to this online when I was setting mine up, but it's far simpler than the old resources you'll find imply. There are no notebook specific drivers you need to mod any more. Install the latest Nvidia desktop drivers for your GPU (mine were literally just the latest Forceware drivers) and it will automatically come to life. Optimus works so long as you have the right eGPU/iGPU combo, which I did. Nothing special needed, no boot procedures or programs. Issues: Chrome lags a lot on some websites. There seems to be no explanation for why some sites are very slow to scroll around, and some are fine. I've fiddled with the Chrome hardware acceleration flags, but something is definitely amiss. Has anyone else had a similar issue? It's fine at 1920x1080 if I am using my internal graphics. Performance is unpredictable, it depends on how the game or software works in terms of bandwidth demands. Battlefield 4 is great until you're on a large map and it's constantly streaming textures. Unreal Engine 3 games, Source Engine games etc all run maxed out at 1920x1080 without any issue, with something like 80-120 frames on things like Team Fortress 2, Mirror's Edge, and Mass Effect 2. Bodes well for Titanfall, which uses Source (just missed the chance to test the beta on the eGPU). Cost: I spent around $220 on parts besides the GPU, which was my desktop's old GPU. You could probably do it cheaper - the case is neat but unnecessary if you're not bothered or can build your own, the PSU was OTT and just a reliable and easy way to build it. You could probably salvage one and achieve the same results. Totally worth it though. Photos: The full setup on my desk. The case is sideways on the desk. Side view. Playing Battlefield 4.
 1 point
 -
I was obviously referring to the toshiba sattelite that the OP mentioned.1 point
-
@Tech Inferno Fan, you could click on the "?" near "Bus Interface" on GPUZ, click on "start render test" and see if the value changes from 1.1 to 2.0.1 point
-
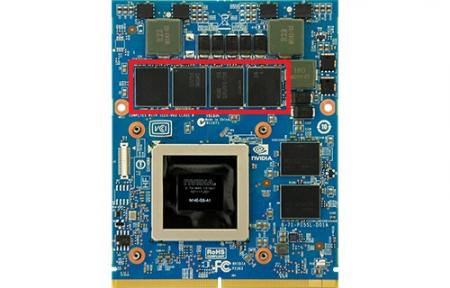
You need to rearrange the thermal pads to fit the 770m's slightly different layout, and if they are 0.5mm which is optimal you'll need to put either a 1mm or 2x0.5mm pads on top of each other on the 4 VRAM's here Do you have a modded .inf?
 1 point
 -
For the leaderboard this time. I hooked the HDMI cable to the video card and ran all of the benchmarks on an external screen while disabling my laptop's internal screen. 3DMark06 - 21269 NVIDIA GeForce GTX 650 Ti Boost video card benchmark result - Intel Core i7-3632QM,Hewlett-Packard 17DF 3DMark - Cloud Gate - 13554 / Fire Strike - 3549 / Ice Storm - 88497 NVIDIA GeForce GTX 650 Ti Boost video card benchmark result - Intel Core i7-3632QM,Hewlett-Packard 17DF 3DMark 11 - 5083 NVIDIA GeForce GTX 650 Ti Boost video card benchmark result - Intel Core i7-3632QM,Hewlett-Packard 17DF 3DMark Vantage - 18535 NVIDIA GeForce GTX 650 Ti Boost video card benchmark result - Intel Core i7-3632QM,Hewlett-Packard 17DF Heaven - 1135 With the exception of Ice Storm, my performance loss is around 10 to 15% when running on the internal screen. My Heaven score seems low, maybe I have some settings that are different than what everyone else has been using? Overall, I'm happy with the performance. These numbers are without overclocking, and apparently with OC many of these TiB cards can get to within 10% of a GTX660. Maybe a future project...1 point
-
But your problem with error 12 is, that your dGPU is not disabled. So if Magma Solution can disable the dGPU try it, otherwise try Setup 1.x to disable the dGPU.For better viewing of my case and information, look at the German side: 19039* (100%) 10989 (100%) 20099* (106%) 8748 (80%) 17943* (94%) 7993 (73%) 19837* (104%) 7818 (71%) 12918* (68%) 6109 (56%) 19112* (100%) 6556 (100%) 18953* (99%) 5698 (87%) 17612* (92%) 5524 (84%) 18860* (99%) 5355 (82%) 12910* (68%) 4647 (71%) 18905* (100%) 5201 (100%) 19295* (102%) 4838 (93%) 17612* (94%) 4795 (92%) 18999* (101%) 4614 (89%) 12964* (69%) 4300 (83%) 24944* (100%) - 248341 / 40418 / 6163 (100%/100%/100%) R9 270X x1.2 ext. 7273 (87,9%) 15564* (62,4%) - 89156 / 30596 / 4848 (35,9%/75,7%/78,7%) Radeon HD 7770 x16.2 ext. 14667 (100%) 158657 / 19143 / 2868 (100%/100%/100%) Radeon HD 7770 x1.2 ext. 12387 (84,4%) 86402 / 17264 / 2610 (54,4%/90,2%/91%) Radeon HD 7770 x1.1 ext. 11173 (76,2%) 67712 / 15738 / 2429 (42,7%/82,2%/84,7%) HD 4870, x16.2 ext. 9312 - 4724* (34%) - - 3958* (28%) - - 3837* 28054 / 2673 / - * = total value x16.2 = a x16 connection with PCI-e 2.0 x1.2 = a x1 connection with PCI-e 2.0 x1.1 = a x1 connection with PCI-e 1.0 Opt. = Optimus ext. = external Monitor int. = Laptop Monitor (XXX%) = total value of the CPU and GPU, as CPU and system differently, you should consider this value wisely. And now the tables with the differnet between the PE4L-EC060A and PE4L-EC100A: GPU, connection 3DMark 06 3DMark Vantage 3DMark 11 3DMark (2013) GTX 770, x1.2 Opt. ext. 60cm 27584 (100%) 145922 / 39660 / 6624 (100%/100%/100%) GTX 770, x1.2 Opt. ext. 100cm 27342 (99%) 143033 / 39567 / 6615 (98%/99,8%/99,9%) GPU, connection 3DMark 06 3DMark Vantage 3DMark 11 3DMark (2013) GTX 660, x1.2 Opt. int. 60cm 20124 (100%) 131392 / 27756 / 4264 (100%/100%/100%) GTX 660, x1.2 Opt. int. 100cm 20012 (99%) 131869 / 27698 / 4234 (100%/99,8%/99,3%) GPU, connection 3DMark 06 3DMark Vantage 3DMark 11 3DMark (2013) GTX 560 TI 448, x1.2 Opt. ext. 60cm 18162 (100%) 126747 / 27255 / 3722 (100%/100%/100%) GTX 560 TI 448, x1.2 Opt. ext. 100cm 16470 (87%) 109335 / 24423 / 3436 (86%/89%/92%) GPU, connection 3DMark 06 3DMark Vantage 3DMark 11 3DMark (2013) HD 4870, x1.2 ext. 60cm 72526 / 12044 / - (100%/100%/-) HD 4870, x1.2 ext. 100cm 58884 / 10320 / - (81%/86%/-) And as an extra to a table which shows different from HDD and SSD: Disk 3DMark 06 3DMark Vantage 3DMark 11 3DMark (2013) HDD 5400rpm 20208 132287 / 27751 / 4290 msata-SSD 20340 131863 / 27723 / 4288 difference HDD -> SSD + 0,27% + 0,65% + 0,84% -0,32% / -0,1% / -0,05% ...and today I will test the KZ-B26...PS: My brother gets to christmas probably an AMD R9 290, which I will also test.1 point
-
Nice tutorial, thank you! Did you use an isolation mat? What? Why? You opened the device completely in connection with so much work/time and you did not replace the termal past? *omg*1 point
-
Most of your page is blank, tried to reload it several times... either my browser has problems with it, or something else is wrong. So I can't make fun of your paste job, since I can't see it... Could you check whether it loads for you? And maybe put the guide in a spoiler, the post is so loooooooooooooong1 point