phillofoc
-
Posts
80 -
Joined
-
Last visited
-
Days Won
2
phillofoc's Achievements
T|I Semi Advanced (3/7)
52
Reputation
-
12.5" HP Elitebook 2570P Owner's Lounge
phillofoc replied to Tech Inferno Fan's topic in HP Business Class Notebooks
I had no issues installing RAID0 on a fresh install. I posted detailed instructions a while ago. Try installing the latest RST from Intel. If that doesn't work, make sure your caddy drive is formatted. Then make sure Secure Boot is off. If that doesn't work make sure both of your SSDs are formatted GPT, that could be causing your UEFI issues. I'm running 2x8GB Ripjaws no issues. Any good DDR3 memory should work well. The generic Intel drivers work very well on this laptop, I'm running the latest video, ethernet, and RST drivers from Intel. Windows Update also has newer camera drivers than HP. -
12.5" HP Elitebook 2570P Owner's Lounge
phillofoc replied to Tech Inferno Fan's topic in HP Business Class Notebooks
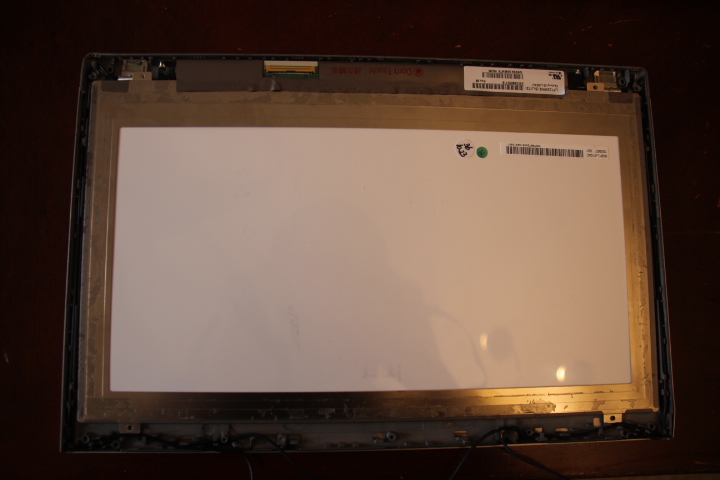
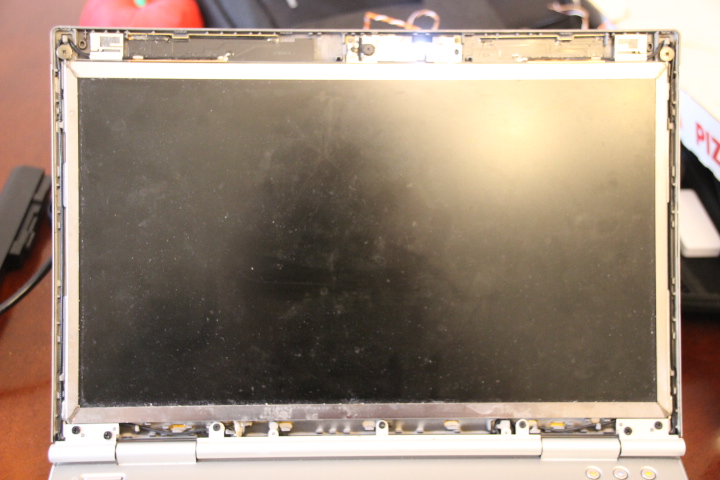
Hey all, it's been a while since I've posted but I figured that I'd provide some answers to questions and updates to tinkering that I've been doing. @Grzegorz - I hope the 3612QM is working well for you. I went with the other 35W quad core and am super happy with it! I'm running the 7260 AC wifi card. The 2.4ghz bugs are (finally) gone, so it's a good card. Windows 10 is working well, I formatted and have a UEFI install. I also have a dual boot setup so I can use the Grub2 bootloader and have Nando's power saving hacks enabled. I threw in the Ericsson WWAN card which works well enough for $15 to have for traveling. I finally got around to checking if there's a whitelist on the bluetooth USB port. To my (somewhat) surprise, there wasn't! I hacked in a female USB port onto the extra BT module cable I bought and booted into Windows with a keyboard/mouse combo, SD reader, and wifi stick. Warm and cold reboot worked too. The power line is only 3.3V, so if someone wants to hook up a hub you'll need 5V from elsewhere else. My plan tonight is to solder the WLAN USB lines to the BT so I can finally get rid of the crappy OEM BT chip. I'll be using twisted ethernet wires for the connection. If anyone's so inclined, a IPS LCD will fit in the stock bezel, albeit upside-down. It'll take a lot of hacking and a thin LVDS extension cable, and you'll lose your webcam/microphone/nightlight module. The webcam might fit in the bottom corner (like the new Dell XPS13) but that has yet to be seen. If anyone is familiar with a short/fat webcam, let me know and I'll give it a go. This project is in my future, but I have a business trip coming up and don't have time for this one just yet. The first photo below is of an upside-down and flipped LP125WH2 (SL)(T2) from ebay (to show the LVDS clearance), and the second photo is what the LCD lid looks like currently with the bezel removed for reference I was able to get a 3-cell battery while on my travels. Manufacture date of Dec2015, so HP is still making new batteries if anyone is looking. Having a flush battery is awesome, but the ~2hr battery life is not.

-
12.5" HP Elitebook 2570P Owner's Lounge
phillofoc replied to Tech Inferno Fan's topic in HP Business Class Notebooks
@Nando "Did you isolate pin 36+38 (USB) on the mSATA card? I believe some have an onboard USB controller to allow them to be used as USB. If detected as USB in the WWAN slot then it will give the bios unauthorized device screen." It's been a while, but I did isolate the 36+38 pins on the mSATA card. I had some weird behavior in that it wasn't detected beforehand, but after I hooked up the mSATA lines I got the unauthorized device with and without the USB pins covered. If anyone really wants to use mSATA, it may be worth getting a mSATA to normal SATA breakout board from ebay and hooking up a normal SATA drive to see if it works. Not sure why you'd want this except if you want a mSATA boot SSD, SATA storage HDD, and retain the DVD drive. There are some awesome USB DVD drives out there that are better than what came with the system. Also, what are your thoughts about the new Dell XPS 13 with the Thunderbolt 3 port? Too bad it doesn't have a quad core @invait53 - nice job with using a twisted pair USB for the usb wires. Did you pull the wires from an ethernet or USB cable? I ordered a used BT card and plug from ebay to see if I can trick the USB whitelisting on the BT port. From my experiments earlier, I remember that the power was cut from the whitelisted ports but I didn't check the data lines if you have an unauthorized device. @PityOnU - you might be able to change the display but you run into the following issues: 1. no direct swap is available for a 12.5" IPS 2. 12.5" IPS displays exist for Lenovo and Dell systems with LVDS but the controller board is below vs behind the screen AND the mounting holes are in the wrong place. It looks like the board is connected to the screen with two non-removable FFCs. I'm strongly considering purchasing one of these screens with the mounting holes on the top, soldering in long FFCs, moving the board to behind the screen to fit, building adapter brackets for the mounts, and using an extension 40-pin LVDS cable. I have to buy the screen before finding/buying the replacement FFCs. Doable? Yes, sort of. You'll need $100 US, a lot of soldering experience, luck, and patience. 100 bucks will buy you either 16GB of good RAM, 250GB Samsung 850 Evo SSD, or gets you halfway to a 3632QM so if you're new to the club then I would start your upgrades there as they'll change your experience much more easily and significantly than the screen. @johny328 - Have you tried a laptop cooling stand? Back when I had time for playing games I used one on this laptop and it significantly reduced the temps. I also replaced the keyboard with one from ebay. Although it's spill resistant, apparently that doesn't apply to the down key. I spilled a little bit of water at the bottom corner of the keyboard. I got a bare replacement from ebay, which means it's without the silver grille between the keys and the plastic underneath the keyboard. The grille is connected with some pins that protrude through to the underside of the keyboard, and there's orings that grab onto these pins to keep the trim in place. I had to superglue the orings to the pins, so if I destroy my keyboard again I'll need the complete assembly. I made my own underside plastic water shield by using clear plastic shipping tape, and cut holes where the original drain holes were. I hope to not try to check the water resistance of the new keyboard again. It was about half the price, but 4x the work getting it together. -
12.5" HP Elitebook 2570P Owner's Lounge
phillofoc replied to Tech Inferno Fan's topic in HP Business Class Notebooks
Just a heads up, I bridged the mSata pins and hooked up my Mushkin mSata card and got the unauthorized device screen. Maybe there's a whitelist in the bios. One question on your mod, why did you use a USB hub? There should be 3.3v aux power on the WLAN slot for the BT. Did you wire the hub in between the board and the docking pins so you can still use the usb 2.0 on the dock? I'm very interested in your hack, the stock BT device is crap. -
12.5" HP Elitebook 2570P Owner's Lounge
phillofoc replied to Tech Inferno Fan's topic in HP Business Class Notebooks
I bought a HS2340 for travels in the UK. Works great, and super cheap. About $15 USD. You run the risk of the hardware ID being not on the whitelist if you don't buy one that says "HP" in the description. If you want something cheap, go with this one if you're in the UK: Ericsson F5521GW HP HS2340 HSPA 21Mbps WWAN Card 632155 001 | eBay looks like 13 quid shipped within the UK. -
12.5" HP Elitebook 2570P Owner's Lounge
phillofoc replied to Tech Inferno Fan's topic in HP Business Class Notebooks
Try HPFanControl at the same page TPFanControl by troubadix Worked for me a while ago and would make the fan spin faster than the bios normally allows. You have to read the instructions and try the 8460p profile, or any profile until it works. -
12.5" HP Elitebook 2570P Owner's Lounge
phillofoc replied to Tech Inferno Fan's topic in HP Business Class Notebooks
When I got the card, the bug was really noticeable. It seems to be fixed with the latest drivers, and if not, then there's an easy fix. I'm running version 16.10.0.5 of the drivers. Even if you install "newer" drivers, if the update doesn't have anything for your wifi card it will leave the old driver. -
12.5" HP Elitebook 2570P Owner's Lounge
phillofoc replied to Tech Inferno Fan's topic in HP Business Class Notebooks
When the 7260s first came out, their operation on 2.4ghz networks were terrible. They would work great for 20-30 minutes, then the link speed would slowly drop to 1mbps and would lose the connection until you either turned off the wifi or rebooted (can't remember). It was no good for pretty much anything om 2.4ghz. There were two fixes that you can do to fix this issue, the first is disable power saving (where it drops the power) on your router and the second (best) is to go into your device manager and turn off your HT mode. This means that your connection speed will drop but you will have a stable connection (2.4ghz only). Other than that, it's a great card. I have an Asus RT-n56U router (N only) and regularly see 11-12 MBps, sometimes up to 16MBps depending on the time of day to my NAS (on Ethernet). Pretty much Usb 2.0 hdd speeds so im happy. I also taped over the aux 3.3v line to cut power from the BT side, but I don't think it has any real affect on power consumption. -
12.5" HP Elitebook 2570P Owner's Lounge
phillofoc replied to Tech Inferno Fan's topic in HP Business Class Notebooks
I'd go with the BCM 94352. The 7260 works but is buggy on 2.4ghz networks. Not normally a problem for me as I run 5Ghz but can be when I travel. -
12.5" HP Elitebook 2570P Owner's Lounge
phillofoc replied to Tech Inferno Fan's topic in HP Business Class Notebooks
@OeffOeff your 1866mhz ram is probably running at tighter timings than you think. Usually when faster RAM is running at a slower speed the timings are tighter. I have this kit: G.SKILL Ripjaws Series 16GB (2 x 8G) 204-Pin DDR3 SO-DIMM DDR3 1866 (PC3 14900) Laptop Memory Model F3-1866C10D-16GRSL - Newegg.com and when I look with HwInfo my timings are 9-9-9-28. No idea if that would result in a 3% increase, but I'm sure it helps. For your wifi card, you could give it a shot with using the WWAN leads for your 6300. I don't think the antennas have a good spread for MIMO, as WWAN antennas are usually right next to the WIFI ones, and I've seen laptops that will delete the camera if you use one of these 3x3 cards to allow for the third antenna to be in the middle of the display. If you don't have the card yet, it may be worth looking at getting either the Broadcom or Intel AC wifi WLAN cards so you can get an AC router when you're ready to upgrade. On another note, I'm probably going to attempt the IPS screen swap that has failed before. If I can't move the driver board that's on the bottom of the LCD, then I'm going to use a board like this one Amazon.com : sunkee M.NT68676.2A (HDMI+DVI+VGA+Audio) LCD/LED Screen Controller Board Diy Monitor Kit (Please remember to leave us your LCD Model Number before placing the order) : Car Electronics to make a DIY monitor. -
12.5" HP Elitebook 2570P Owner's Lounge
phillofoc replied to Tech Inferno Fan's topic in HP Business Class Notebooks
I'm running Win 8.1 here, just the UEFI flavor. I don't see why it wouldn't work with the legacy BIOS settings. Just make a good backup before you start. I did happen to trash my BCD, so just be careful about messing with that depending on the guide that you use. -
12.5" HP Elitebook 2570P Owner's Lounge
phillofoc replied to Tech Inferno Fan's topic in HP Business Class Notebooks
Nando, I did try your mod on UEFI and it does work (powercfg doesn't show the bios ACPI error). Sorry I didn't get back to you sooner. I didn't check if it causes the SD card reader to fall off the bus or if my power consumption was as low as the setpci configuration, the lowest I've seen was 4.9W with my setpci config idling on my desktop only and the brightness turned fully down. I'll try to get to it soon and report back, as modifying the memory registers would work for everyone out of the box vs having to check the setpci for each wifi card. If anyone's interested, Secure Boot doesn't work with either mod on my system. -
12.5" HP Elitebook 2570P Owner's Lounge
phillofoc replied to Tech Inferno Fan's topic in HP Business Class Notebooks
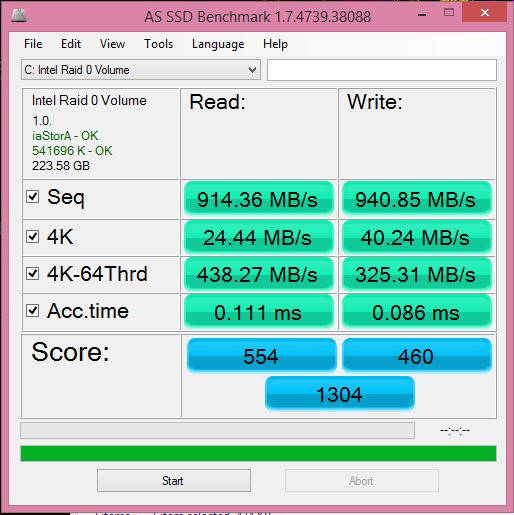
Hey all. This post has been a long-time in the waiting to be written as work doesn’t leave me much time to tinker on my 2570p anymore. But, in my free time over the last few months I’ve been able to do the following “mods,” if you will: RAID0 Samsung 840 EVO (120GB x2) Windows 8.1 UEFI install - better eGPU support than a MBR installation Grub2 + UEFI Ubuntu Install ASPM Tweak within Grub2 Here I wanted to consolidate all of the resources that I used in the event that someone (2570p or not) wanted to do the same. That and how to fix it when I break my setup. I had to use 5 or 6 resources to get the Grub2 and Ubuntu install to work correctly, and the significant ones will be included in their respective sections. I did all of this because I wanted UEFI Windows 8.1 to eventually have my eGPU up and running with hotplugging (not tested yet), and when I upgrade my OS I buy a new drive (in this case drives) so I don’t lose anything. In the @Tech Inferno Fan style, I’ll include everything in this post with spoilers to aid in reading. Thanks to @jacobsson for the RAID0 guide and motivation. Mods, feel free to do some format editing if you feel it’s necessary. Suggested software CrystalDiskInfo – can read the SMART status of each SSD, something the Samsung software won’t do CrystalDiskInfo - Software - Crystal Dew World GDisk – Can repair GPT disk errors within Windows. Needs both gdisk and fixpart. Best to run when everything's complete. GPT fdisk | SourceForge.net Suggested hardware Nimitz enclosure (cheaper on ebay). I removed the drive access LED. Amazon.com: Nimitz 2nd HDD SSD Hard Drive Caddy Adapter for Hp Elitebook 2560p 2570p with Bezel: Computers & Accessories StarTech eSATAp enclosure - If you’re pulling an existing drive and want to keep using it Amazon.com: StarTech.com eSATAp or USB 3.0 External 2.5-Inch SATA III 6Gbps Hard Drive/Solid State Drive Enclosure with UASP (S251SMU33EP): Computers & Accessories eSATAp cable Amazon.com: eSATAp Power Over eSATA Cable 5V and 12V - 3 Feet: Electronics (36inches) or Amazon.com: Power over eSATA Cable: Computers & Accessories (20inches) RAID0 Setup For RAID0, your sequential read and write speeds are significantly improved. If you do a lot (like, a lot a lot) of work with large files like databases or video editing then this is the setup for you. Or you want bragging rights or something different. I did it originally because I got the drives during a Black Friday sale and I wanted to cut the number of writes to each of the drives in half. Jacobsson did a great writeup that I followed here for how to install/configure RAID0 on a 2570p. One thing I didn’t see in there was that you should set your BIOS to “UEFI Native (without CSM)” which will make Windows install in UEFI mode, and probably is the reason that you've read this far. Basically, configure SATA mode to RAID, **change bios mode to UEFI Native (without CSM),** install drives, install windows to one of the drives (one might not take so use the other one), install Intel RST, configure drives to RAID0. If you're adding an enclosure to do this, then you may need to remove the diagnostic pin if you're having shutdown issues, as described here: HP Elitebook 8560p Won't Shutdown | NotebookReview Ubuntu Installation The Ubuntu install was a little more difficult. Apparently Intel RAIDs and EFI present their own problems when installing Ubuntu, so I had to figure out which one was creating issues and then find/apply the respective fix. This guide was the most helpful in getting Ubuntu up and running, with exceptions (detailed below): Install Ubuntu 14.04 alongside Windows 8.1 in 10 easy steps - Linux News ProLinux News Pro *Step 1 - Isn’t really necessary but will save time if you break something and have to start over *Step 2 - Won’t work on UEFI systems. Extract the Ubuntu ISO onto your USB device, or burn a DVD. You’ll probably have to use the "boot EFI file" F9 boot option and locate the .EFI file on your device yourself during boot. *Step 3 - I shrunk my Windows partition by 10GB for Ubuntu so I would have some space to install programs and play. Use the “Disk Management” program within Windows to do this. As a general rule, only modify Windows partitions within Windows, and Linux partitions within Linux. I’ve used gParted within Linux to modify Windows partitions, but only as a last resort and I had to fix errors on the next Windows boot. *Step 5 - I didn’t care about Secure Boot, and I couldn’t get setpci to work (for ASPM tweaks) with Secure Boot so I left it off instead of trying to fix it. *Step 6 - You’ll need to format your partition (10gb in my case) with gParted before installing Ubuntu while using the livelinux version. Leave a few mb at the end of the partition for your backup GPT table. I used the ext4 file system. Per https://help.ubuntu.com/community/FakeRaidHowto, you will need to install to the /dev/mapper/(random letters) partition. There is also a bug with the installer when you try to (re)format the drive using the installer because you’re using a fakeRAID (Intel software RAID), so don’t format it (again) and is the reason you did it before installing in the first place. *Step 7 - Don't use Boot Repair on your first attempt, as finding the Windows partition won’t work correctly with fakeRAIDs anyway. Only do as a last resort, and my fix for step 8 gives you a decent workaround for not booting to grub2 on the initial reboot that is addressed on steps 7 and 8. You will need to add your Windows 8 install within grub2 manually. Because of EFI and fakeRAID, the installer won’t be able to find your Windows 8 install partition. To add Windows 8 to your boot menu, follow the instructions at https://wiki.archlinux.org/index.php/Grub2 particularly the “Windows installed in UEFI-GPT Mode menu entry” paragraph. I ultimately ended up with the following entry in my 40_custom file, minus the setpci and pcie_aspm=force entries which were for the ASPM tweaks described below: menuentry "Microsoft Windows 8.1 UEFI-GPT" { insmod part_gpt insmod search_fs_uuid insmod chain insmod setpci search --fs-uuid --no-floppy --set=root 56EE-A46D setpci -s 0:1c.1 50.b=0x43 #expresscard setpci -s 0:1c.2 50.b=0x43 #Sd/mmc setpci -s 23:0.0 90.b=0x43 #Sd/mmc setpci -s 23:0.2 90.b=0x43 #Sd/mmc setpci -s 0:1c.3 50.b=0x43 #wifi setpci -s 24:0.0 50.b=0x43 #wifi new #setpci -s 24:0.0 f0.b=0x43 #wifi #pcie_aspm=force chainloader /EFI/Microsoft/Boot/bootmgfw.efi } I use and encourage the uuid method so that booting still works if you add drives to your system. You will have to change the Root UUID to whatever yours is following the instructions on the archlinux page. *Step 8 - YOU DON'T HAVE TO MESS WITH BCD TO MAKE GRUB2 WORK. Instead, enable Custom Boot in your BIOS as a boot option, then at the bottom, define the boot location as “\efi\ubuntu\shimx64.efi” and set Custom Boot as your first boot option. This way you can use the Windows Boot Manager to boot vanilla Windows 8 if your grub2 boot config isn’t working correctly and you don't break your entire computer. *Step 9 – Ubuntu will be the top entry. If you want Windows to be the top entry, you can rename 40_custom to something like 09_custom. Your backlight settings won’t work right now in Linux only. Change the LINUX_DEFAULT line with the following commands for backlight and powersave fixes: GRUB_CMDLINE_LINUX_DEFAULT="quiet splash acpi_backlight=vendor pcie_aspm=powersave" In the top of “\etc\default\grub” Run sudo update-grub You may be tempted to use Grub-Customizer or something similar. It broke my Grub2 (bad) and I had to fix it using my bootable usb. YMMV though, as maybe I was trying to do too many things at a time. I've also read reports that EasyBCD doesn't like EFI configurations, so use caution if using that software. ASPM Tweak This is old-school stuff from almost 4 years ago, but because HP won’t enable ASPMs on our laptops we need to do it from either grub2 or Setup 1.x if you want the power savings. I used to do this from Setup 1.x, and it was way easier to do so (worth the donation AND you get pacman!), but Setup 1.x doesn’t work with UEFI. Start here: https://wireless.wiki.kernel.org/en/users/Documentation/ASPM Review the “Enabling ASPM with setpci” section. Super convenient that you just installed Linux, huh? If you review above in my 40_custom entry, you’ll see that I double-tapped the PCIe port and device with force-enabling the ASPM. I haven’t tried if it will work without forcing both the port and device to use ASPM, but why not do both. The nice part is that you only should have to do this once for your WLAN device (unless you’re using a 7260 like me) as all of our other ports/devices should be the same. If you have a device that lives in your expresscard slot like one of these Amazon.com: GMYLE® ExpressCard 34mm to USB 3.0 Adapter (Dual Port): Computers & Accessories then you’ll have to do it another time for that one as well. I expect that the wifi device address (24…wifi part above) will be different if your wifi card is not a 7260, as Nando’s and mine were different and he's running something different. Results I’m not using a RAMDisk for my Firefox cache anymore as it wasn’t getting along with RST. I haven’t noticed a difference in load times in Firefox with the RAID0 setup. It also took a while to get used to a computer that was too quiet, but not that this is a problem anyway! Some benchmarks: I'm sure I took a performance hit by going with the 120GB 840 EVOs, but I don't need the space and the price premium for the 240GB versions wasn't worth it to me. If you want a good hack as to whether a RAID0 SSD array is good for you, check out here: RAID 0: Great For Benchmarks, Not So Much In The Real World - One SSD Vs. Two In RAID: Which Is Better?. I've idled at 4.9w before, but with firefox open it's usually somewhere in the 7-9 range. Before the ASPM tweaks, add 2-3W for each situation. Not bad, huh? Feel free to ask questions or make suggestions, this post is a compilation of things I've one since the end of November and my memory may be a bit fuzzy in some spots.

-
12.5" HP Elitebook 2570P Owner's Lounge
phillofoc replied to Tech Inferno Fan's topic in HP Business Class Notebooks
A few things that may help you: You can't downgrade from version F.50 unfortunately. There shouldn't be an issue with eGPU though, I doubt HP would have expended the effort to block that out if they haven't fixed the ASPM issues. I don't remember if people were consistently getting PCIe 2.0 speeds with the PE4C. It has a removable connector that was causing stability issues when trying to run at 2.0 speeds. If you post what card you're using we may be able to help. There are a few cards out there that need a DSDT override, but with my 650Ti Boost I didn't need it. The BIOS on these 2570p (and other HP laptops I presume) won't boot with the eGPU plugged in during boot. You'll need to do the F8 during boot, plug in, power on gpu, then continue booting Windows technique. Try the suspend, plug in/power on, then resume technique as well. Otherwise, grab a PE4L 2.1b and set your delay to 7 seconds. Worked great for me and no fiddling with the discussed techniques. Check your power connections to fix the wifi disappearing issue. I had to rewire my connections and chase a floating ground issue (IIRC) to fix that one. Crappy power supplies will give you weird and unrepeatable issues as well, so maybe it's time to get out the voltmeter. If the above doesn't work, SEARCH FIRST then ask on the eGPU forum if you don't find a response after a reasonable amount of time. Good luck! -
12.5" HP Elitebook 2570P Owner's Lounge
phillofoc replied to Tech Inferno Fan's topic in HP Business Class Notebooks
Check the manual of Liquid Ultra. In there it shows that it corrodes aluminum. IIRC our heatsink is made from aluminum...