Leaderboard


Popular Content
Showing content with the highest reputation on 03/01/14 in all areas
-
Hello NVIDIA GeForce GTX 780M video card benchmark result - Intel Core i7-4930K,Notebook P570WM2 points
-
You could try the BIOS that I use. I modded the vBIOS of svl7's unlocked bios to 1,2GHz core and 2,8GHz memory clock. I also tweaked the voltage, it stays always at 1,1V, so that the 660m can handle the 1,2GHz stable all the time. The last tweak is that the clocks of the 660m won't throttle. so beware of the temperatures. Try it out! For me it solved the problem with throttling in Crysis 3. But before flashing you should reset your overclock! You can add your +150Mhz later after trying Y580_v2.07_660m1,20GHz_steady Voltage_2,8GHzMem_nothrottling.zip2 points
-
Valid FM Link: NVIDIA GeForce GTX 780M video card benchmark result - Intel Core i7-4930K,Notebook P570WM2 points
-
Hey guys, I didn't see an "Introduce Yourself" thread or subforum, so I guess I'll start one here in OT. I've been registered at T|I for over a year on another account, but I've decided to keep my account name the same as the one I've had on NBR, so I just registered this one today. My name is Mike and I'm a notebook enthusiast, just like you all. My first gaming notebook was a Gateway P-7811FX, which was a great buy at the time, until the dreaded GPU problems started to surface. I did a review at NBR on it. My first taste in modding (software & hardware) started with that machine. Last year, I purchased a MSI 16F2 barebone which was a hell of a deal and I can't wait to put a 7970M in that baby, or possibly a 680M GTX if everything plays right with that card and my machine. I've also unlocked most of the MSI 1st and 2nd generation-core i notebook's BIOS which I posted at NBR. I was hoping to get the multipliers unlocked for my XM CPU, but unfortunately, AMI has let us down . At the very least, the BCLK is unlocked for a measly 3-5% OC. As you can see, I really loved NBR and notebooks, I was one of the oldest members there, having lurked for a good year before deciding to register, but things weren't all rosy in the end. So, how did I end up at T|I? Actually, I've been lurking T|I for a long time. The ICD7/24 thread, TS and svl7's threads are what got me started here. You guys aren't just reposters, you are hands-on people, original devs. I've grown incredibly tired of the lack of respect at NBR. I haven't bothered to continue my work on the BIOS after MU went down, as people were reposting my work and taking credit for it or begging. While it is free and I didn't take any donations for it, I was the one who did all the Googling, trying to decipher bad translations, downloading files with no documentation or clue as to what they did and had to figure it out on my own, and lastly, I was the guinea pig. I put my $1,200 notebook on the line for the better of the community and I would still get PMs filled with bad attitude and idiots who bricked their notebooks and blamed me for it because they couldn't read or had an incredible lack of common sense. The least one could do was give credit where credit was due, like I said, I never asked for a penny, unlike most BIOS unlocking forums. Heck, anyone who PM'ed me asking how I did it, I would straight up tell them everything, including linking the files needed and all directions. For a good week or two of my time and a some bad headaches, they had it handed to them on a silver plate in 5 minutes. The most frustrating PMs would be that I was rep whoring and anyone could have done the work I did. Well guess what? You didn't do it and I never rep-whored once I my life, if you look at the original post I give credit to my original testers, but I never say +rep me for my work. So, my journey at T|I posting starts today and I hope I can be of value here just as I was at NBR. I don't carry a vengeance against NBR, but the overall quality of the news page and forum has diminished significantly to a point where I barely enjoy browsing it. Also, this not a PG-13 forum, hurrah. So how about it, let's here how you all got started at T|I and a little bit about yourselves? FYI, the links are for reference, I'm not plugging my links for clicks/views as I don't benefit from it. I'm also not attempting to start a flame NBR thread (If there is an issue you can delete this thread without warning, I understand), but I notice that many of T|I members are also NBR members or were at one point so I believe a connection can be established.1 point
-
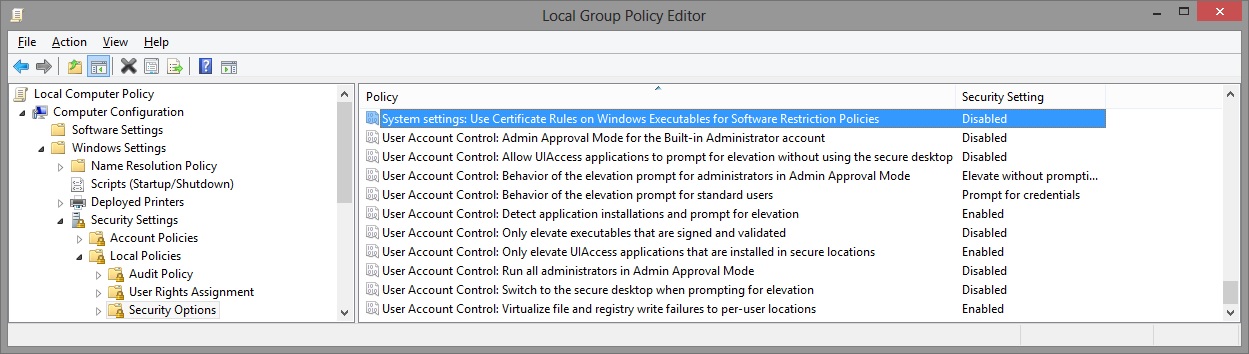
I've recreated the OSD Icons for the R1/R2/R3/R4 and R5 aka 17 as the standard ones are a bit dated. It should also work with the M15x though as my old M15x had the same setup for the OSD app. Regarding the R3 OSD, it seems its the same install for the M18x as well so it should work for you M18x owners too. I've also added the AW 17 OSD to the list. This exe is also compatible with the 14 and 18 as Dell uses the same OSD for all the new machines. There's also a set for you Area-51 m17 R1 owners. I've tried to give it a simular feel to the Invader Icon pack by Alienware. Hope you guys like it Install Instructions for R1 1. You need to end the OSD process in Task Manager since it may be using some of these icon files. Ctrl+Shift+Esc then find the OSD process and end it. 2. Backup your current icons if you want to revert to the originals (You can also uninstall and re-install the OSD application if you want to go back to the original icons) 3. Extract the attached "M17X R1-R2 & M15X.zip" contents to C:\Program Files (x86)\OSD\picture\. Overwrite if prompted. 4. Restart the OSD application. It is located in C:\Program Files (x86)\OSD\Launch.exe 5. Done! Install Instructions for R2 /M15x 1. You need to end the OSD.exe process in Task Manager since it may be using some of these icon files. Ctrl+Shift+Esc then find "OSD.exe" and end the process. 2. Backup your current icons if you want to revert to the originals (You can also uninstall and re-install the OSD application if you want to go back to the original icons) 3. Extract the attached "M17X R1-R2 & M15X.zip" contents to C:\Program Files (x86)\OSD\ICONs\. Overwrite if prompted. 4. Restart the OSD application. It is located in C:\Program Files (x86)\OSD\Launch_OSD.exe 5. Done! Install instructions for R3 / R4 / M18x 1. You need to end the OSD process in Task Manager since it may be using some of these icon files. Ctrl+Shift+Esc then find the AlienwareOn-ScreenDisplay.exe process and end it. 2. Backup the existing AlienwareOn-ScreenDisplay.exe by renaming it to "AlienwareOn-ScreenDisplay.exe.BAK" for example. Its in C:\Program Files (x86)\Alienware On-Screen Display\ 3. Extract the AlienwareOn-ScreenDisplay.exe from the appropriately named file depending on your OS and model to the C:\Program Files (x86)\Alienware On-Screen Display\ folder. 4. Restart the OSD application by double-clicking the file. 5. Done! Install instructions for 14 / 17 / 18 ** 1. You need to end the OSD process in Task Manager since it may be using some of these icon files. Ctrl+Shift+Esc then find the AlienwareOn-ScreenDisplay.exe process and end it. 2. Backup the existing AlienwareOn-ScreenDisplay.exe by renaming it to "AlienwareOn-ScreenDisplay.exe.BAK" for example. Its in C:\Program Files (x86)\Alienware On-Screen Display\ 3. Extract the AlienwareOn-ScreenDisplay.exe from the "AW 14-17-18 (Windows 8).zip" file to the C:\Program Files (x86)\Alienware On-Screen Display\ folder. 4. Restart the OSD application by double-clicking the file. 5. Done! The Area-51 m17-R1 install should be similar to the steps for the other laptop revisions above. They all basically follow the same process anyway, apart from filenames/paths. @robby_hd was kind enough to make a red version of these icons for the M17x R3 / M18x R1 which can be downloaded from his post here. **There seems to be a security issue with Windows 8/8.1 at this point in time since it doesn't allow modified exe's. I will update this post with a solution once it has been found. Also a few Alienware owners are having an issue with the unmodified OSD and Windows 8. Only the default Windows 8 OSD displays and not the Alienware version. Try the solution posted by Dell here and then attempt installing the mod. The below screenprint is a workaround by editing the security policies to allow the unsigned exe to run in Windows 8. If you are not aware of what these settings do and the repercussions of changing them, please do not attempt it. - Open the Group Policy Editor by typing "gpedit.msc" in the search or run text box. - Duplicate the settings below. Area-51 m17-R1.zip M17X R1-R2 & M15X.zip M17X R3-R4 & M18X R1-R2 (Windows 7).zip M17x R4 & M18X R2 (Windows 8).zip AW 14-17-18 (Windows 8).zip M17X R4 & M18X R2 (Windows 8.1).zip

 1 point
 -
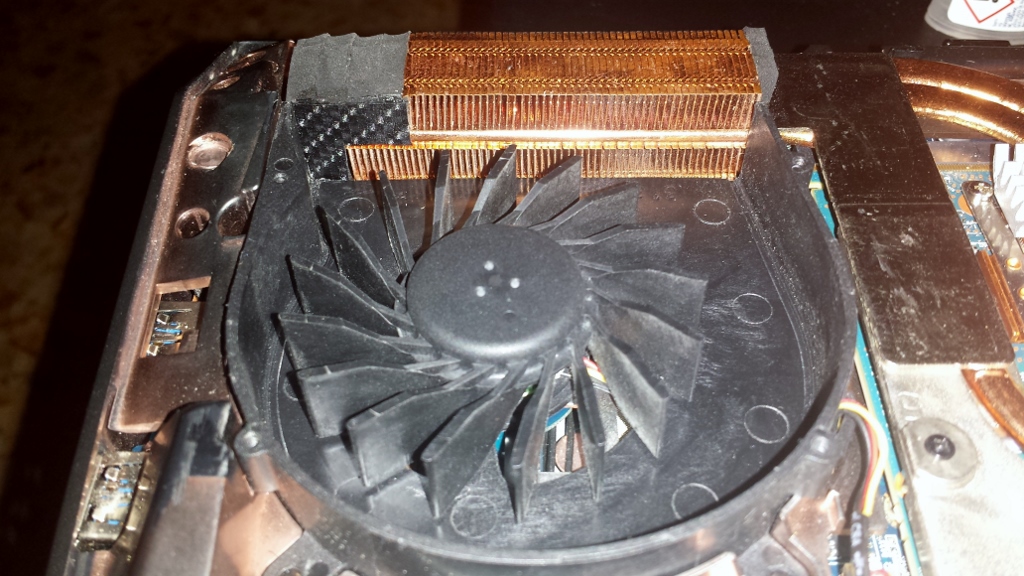
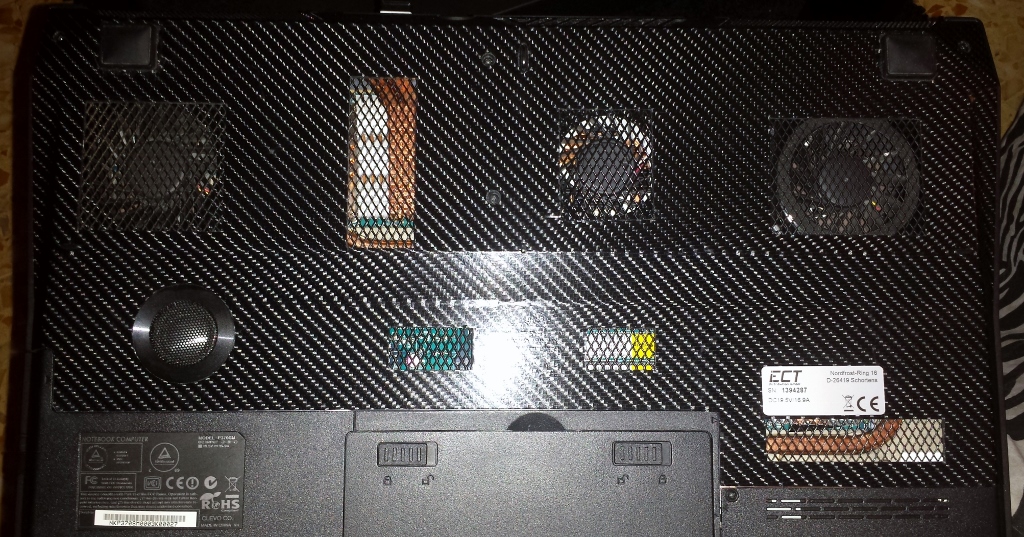
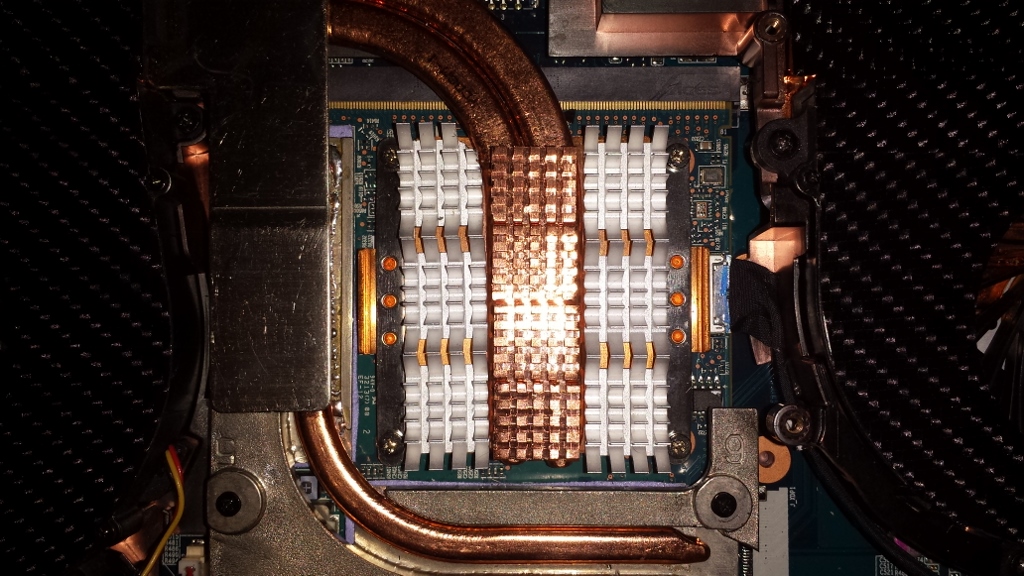
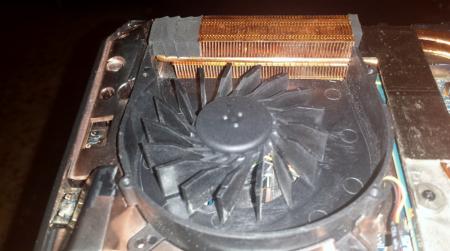
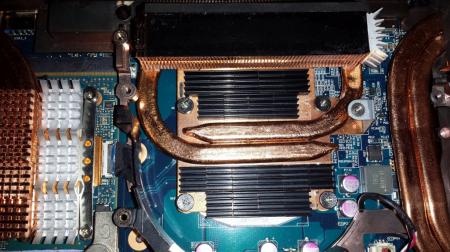
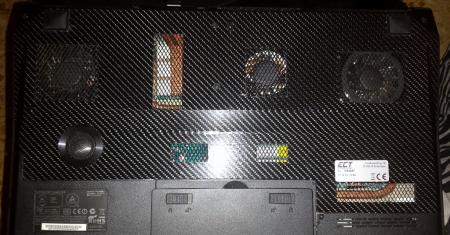
I was removing the cooling system for cleaning and noticed a hole between the fan and the radiator on the GPU # 1 that disperses the air flow. It can solve easily by applying a trimming in PVC, or any other material, closing the hole, avoiding the dispersion of air. (Gain -4 ° C) Before After I also applied the heat sink directly on the block of the GPU and CPU. CPU (gain -2°C) GPU (gain -3°C) I also modified the backcover, by increasing the air flow (Gain -2 ° C) Have Fun!! :not_ripe:

 1 point
 -
In my previous post listed here @ NP9380-S 120Hz SLI Glitch @svl7 and @Prema walked us though this fix for the issue that I myself and others who own the SAGER NP9380-S (Clevo P370SM3) were having with issues with these glitches we were seeing. This is an example of the issue that the NP9380-S has been having with it in SLI w/ 120Hz activated. Please select 720p HD for a better look. Note: Make sure your speakers are set low, because I had to add audio to the first video because my wife was talking to me. The reason why I am creating this new thread is to save people time from skimming though all the posts on the old thread and to save time. The fix has been found and it can be downloaded here at Nvidia Kepler vBIOS Mods where you have to scroll down to the end of the post and you will find the attached file named "Nvidia GTX 780m - OC edition - rev02.zip (127.0 KB)" NOTE: For new members or guests to the forum, you must have at least 5 posts to be able to see it / download it, or become a T|I Elite Member. This vBIOS mod is created by @svl7 and @johnksss so please make sure you thank them for their hard work and dedication for these vBIOS updates/edits. You can donate to svl7 at this link, please do so for his work. It is not required but highly recommended. To create a USB Flash Drive to load the vBIOS on and to make a backup of your old vBIOS please go to this link to learn how to do so. WARNING: It is possible to brick your GPU by preforming a flash upon it and you take sole responsibility if it were to happen. Possible problems you could run into would be that the GPU doesn't recognize the vBIOS and you wont be able to see anything, so before you decide to flash, have a back up plan or figure out how to "blind flash" or build a .bat file to automatically load your OLD vBIOS in-case something were to happen. YOU HAVE BEEN WARNED! DO NOT EDIT @ svl7's vBIOS, Doing so and flashing the edited vBIOS will brick your video card(s). NOTE!!! ANYTHING AFTER THIS POST IS JUST DISCUSSION!!! TO FIX THE FLICKERING/SCAN-LINES PLEASE DOWNLOAD SVL7'S 780m OC Edition vBIOS LISTED ABOVE! Thank you!1 point
-
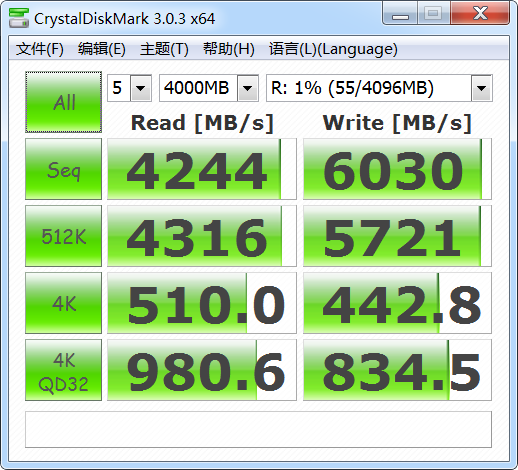
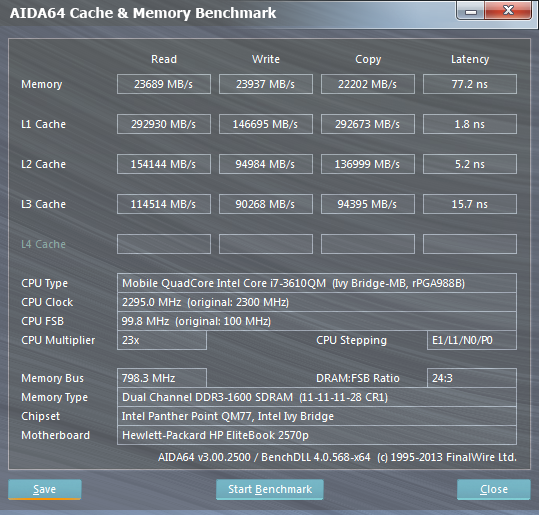
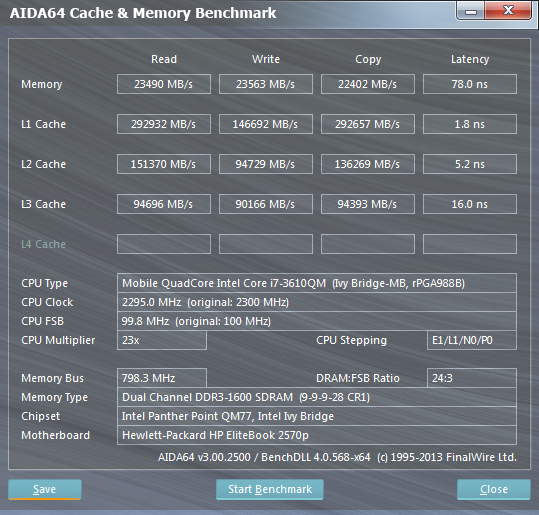
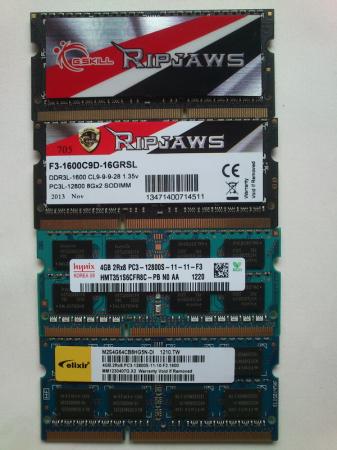
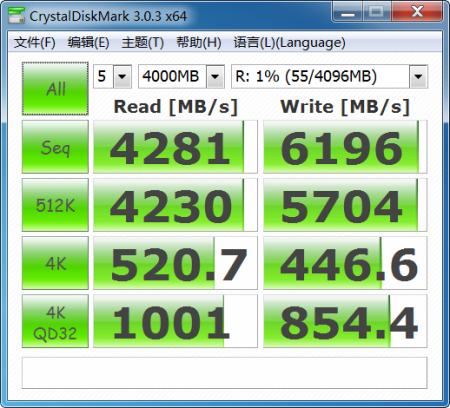
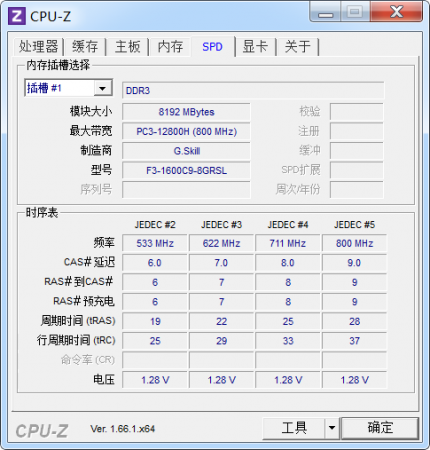
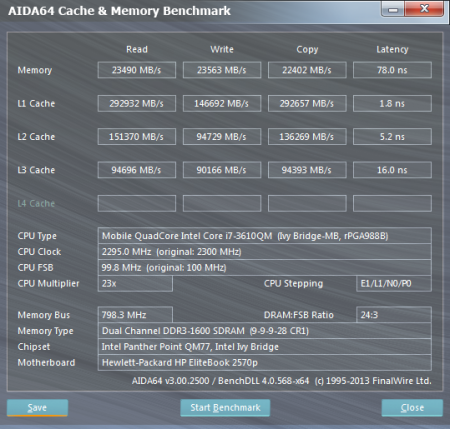
I've just upgrade 2x4G to 2x8G DDR3L, because 8G is not enougth for me. I used to creat 4g ramdisk to save temp files. And the test is below. It seems the same between them. Before: Hynix+NAYA 11-11-11-28 Now: G Skill 9-9-9-28 I am not sure if it can affect the HD4000 perform and the power supply, but the latency affect is no feeling as usual. If you have not enough ram, i recommend to upgrade 16g.


 1 point
 -
You've found 2x8GB 1.35V DDR3-L CAS=9 RAM. No problem there using it on 2570P though there are cheaper options available of the same spec RAM. HP 820 G1 keyboard with backlight (includes backlight cable and keyboard cable) spare part number is: 730541-B71 - for use in Sweden/Finland 730541-001 - for use in the US1 point
-
Prema you're the man. I just overclocked my measly 8Gb of Gskill 1333Mhz CL9 2N ram that I bought for 40 bucks, yes you read that right 40$ to 1600mhz cl9 1N. I gave it a go at 1866Mhz without messing with timings to see if it would stick, computer went unresponsive. Reseted the bios and and off it went. Still I'm rather happy with what you allowed me to do with my W230ST, 250gb 840Evo + Crucial M500 120gb in raid0 and 8Gb at 1600mhz + i7 running at 3.4Ghz. Dead silent in multimedia tasks. Clevo should be paying you, their performance laptops become even more powerfull with your tweaks. One day they'll be coming with your bios from factory(I know some resellers already do that)1 point
-
I installed the drivers yesterday. Installation went fine, but once I tried to play BF4, I got a BSOD from the display drivers and then one of the two cards had the fans spinning hard and was not recognised by the system. Rebooting didn't help, reinstalling the drivers didn't help either, so I had to uninstall them and install the previous ones back... I will give them a shot again tonight...1 point
-
More Battlefield 4 testing with Mantle vs DX11 Mantle testing in a desktop. Did everything the same as with the eGPU. Test range. Same route (ish). Comparison of hardware: \[/TD] Laptop Desktop [/TR] CPU i7-2620M (2.7->3.4GHz HT dual) i7-4770K (3.5->3.9GHz HT quad) RAM 16GB @ 1333MHz 16GB @ 2400MHz GPU R9 280X @ x1 2.0 R9 280X @ x16 3.0 Drive HGST 1TB @ 7200RPM Samsung 840 EVO 120GB [/TABLE] Laptop performance here: [URL]http://forum.techinferno.com/diy-e-gpu-projects/2109-diy-egpu-experiences-%5Bversion-2-0%5D-54.html#post82601[/URL] Mantle DX11 Desktop charts: Doesn't look like much of a difference (there isn't really), but just like with laptop eGPU performance, there was about a 10fps gain. Went from high-70s/low-80s to high-80s/low-90s. I didn't say in my laptop post since I didn't pay much attention to the fps as far as mentally logging it. But there it was high-50s/low-60s to high-60s/low-70s. I must say, that is a pretty impressive showing for a laptop eGPU implementation. I'd expect a bigger difference in more graphically intensive locations however.1 point