Leaderboard


Popular Content
Showing content with the highest reputation on 08/31/13 in all areas
-
http://imgur.com/a/tEBbd/embed#0"> Hey guys, At last I got my eGPU to work:haha: Since there is no guide on how to set up a double width full length graphics card with the native 10Gbps Sonnet Echo SE Thunderbolt to PCIe adaptor, I want to write down how it worked for me. Thank you Nando for supporting me. It was a bit of work to get me up and running My hardware configuration 2012 13" Macbook Pro 13 Retina, i7-3540M 3.0Ghz, 8GB RAM, 500GB SSD, Win8/64-bit US$310 Sonnet Echo SE or OWC Helios Thunderbolt-to-pcie 10Gbps 60W enclosure. They are . Only difference is the OWC Helios has a 3yr warranty (vs 1yr) and a black exterior (vs silver). ~US$8 PCIe x8 to x16 riser a salvaged ATX PSU NVidia GTX 660 Steps to get it working 1. You need to cut the gpu from power supply through the adaptor and reconnect it to the PSU. This is needed because the Sonnet Echo SE comes without a PCI Reset Delay. Done by following the wiring guide created by MystPhysX (here). 2. Wire everything up. 3. Install Windows 7/8 via Bootcamp 4. Boot with PSU/eGPU powered OFF 4.1 While booting hold alt/option key to get to the boot-menu 4.2 Power ON the PSU (eGPU should start) and wait 3 secconds 4.3 Select Windows 4.4 eGPU should be detected --> install driver 5. Install DIY eGPU Setup 1.30, run c:\eGPU\egpu-setup-mount to get drive v:\ and use notepad to create the two text files in the spoiler: v:\config\startup.bat call speedup lbacache :: wait for eGPU to appear on the PCI BUS call vidwait 60 :: initialize NVidia eGPU call vidinit -d %eGPU% :: Perform the pci-e fixups call pci :: Chainload to the MBR call chainload mbr :: Speed up end-to-end runtime of startup.bat using caching v:\config\pci.bat @echo off echo Performing PCI allocation for 2012 13" MBPr based off Tech Inferno Fan's findings . . . :: The X16 root port @echo -s 0:1.1 1c.w=6030 20.l=AE90A090 24.l=CDF1AEA1 > setpci.arg :: Underlying Bridges in order from high to low @echo -s 4:0.0 1c.w=5131 20.l=AB00A090 24.l=C9F1B801 >> setpci.arg @echo -s 5:3.0 1c.w=4131 20.l=A700A200 24.l=C5F1B801 >> setpci.arg @echo -s 7:0.0 04.w=7 1c.w=3131 20.l=A300A200 24.l=C1F1B801 28.l=0 30.w=0 3c.b=10 >> setpci.arg @echo -s 8:3.0 04.w=7 1c.w=3131 20.l=A300A200 24.l=C1F1B801 28.l=0 30.w=0 3c.b=10 >> setpci.arg :: The NVidia eGPU @echo -s 9:0.0 04.w=400 0C.b=20 24.w=3F81 10.l=A2000000 14.l=B8000000 1C.l=C0000000 3C.b=10 50.b=1 88.w=140 >> setpci.arg setpci @setpci.arg set pci_written=yes 5.1 save everything and shut down 6. Boot with eGPU powered off 6.1 when asked to boot Windows or DIY eGPU Setup, select DIY eGPU Setup and power on the eGPU 6.2 in DIY eGPU Setup boot-menu select "1. automated startup via startup.bat". It should do it's stuff without any errors or warnings. 6.3 you'll be asked to boot Windows or DIY eGPU Setup again. This time select Windows. 7. Your eGPU should work:Banane38: You can install any game you like and enjoy! Benchmarks 3DMark results: IceStorm CloudGate 17466: 3DMark06 result And some stats from my experience: Battlefield 3 Ultra graphics settings and Full HD --> 40 fps new Neverwinter MMO on all graphics settings maxed --> 35-40 fps Metro last light on maximum settings --> runs fluently (didnt check the fps but it looks nice)2 points
-
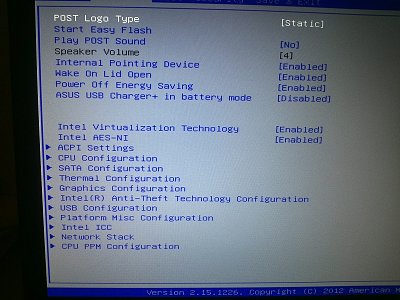
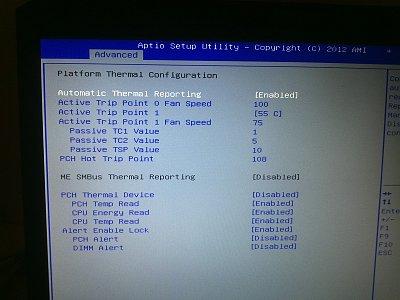
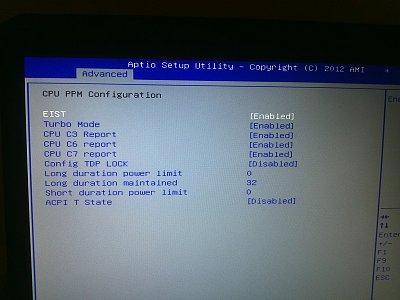
Asus G75VW - modified BIOS / VBIOS Here's a modified BIOS for the Asus G75VW. It enables some more options and settings in the BIOS setup. It also contains a tweaked VBIOS for the 660m. Detailed version information: mod02 'GHZ edition' - 660m 3d clocks at 1000MHz core - 670m @ 715/1650 (only in 'overclock edition') additional BIOS menus Pics of the most interesting BIOS settings (thanks @bobby7): Instructions: Download the BIOS you want to flash, as well as the flash tool (Win64). Put the modified BIOS (and included files) in the same folder as the flash tool . Make sure that your current BIOS version is the same as the one you want to flash. Then create a backup of your BIOS by executing the backup.bat file. . Download the 'G75VW-BiosFixer.zip, put it in the same folder as the flash too and run it. Follow the instructions on the screen, it will ask you for the BIOS backup you just created, as well as the modified BIOS file which you already downloaded. . If the tool doesn't come up with an error message, go ahead and flash the created file by executing the included flash.bat file. . Wait until the flashing is done, in case everything's okay you can reboot. NOTE: It's a good idea to go to load the default BIOS settings after flashing. Also I really recommend flashing the official version before applying the modified BIOS, as mentioned in the instructions. >>> Here's my donation link, if you like my mods feel free to buy me a beer <<< As always with such mods, use at your own risk. The program I provide here (BiosFixer) comes with absolutely no warranty to the extent permitted by applicable law. *** Asus G75VW - BIOS v223 - [unlocked] [overclock edition].zip G75VW-BiosFixer.zip Asus G75VW - BIOS v223 - [unlocked].zip
 1 point
 -
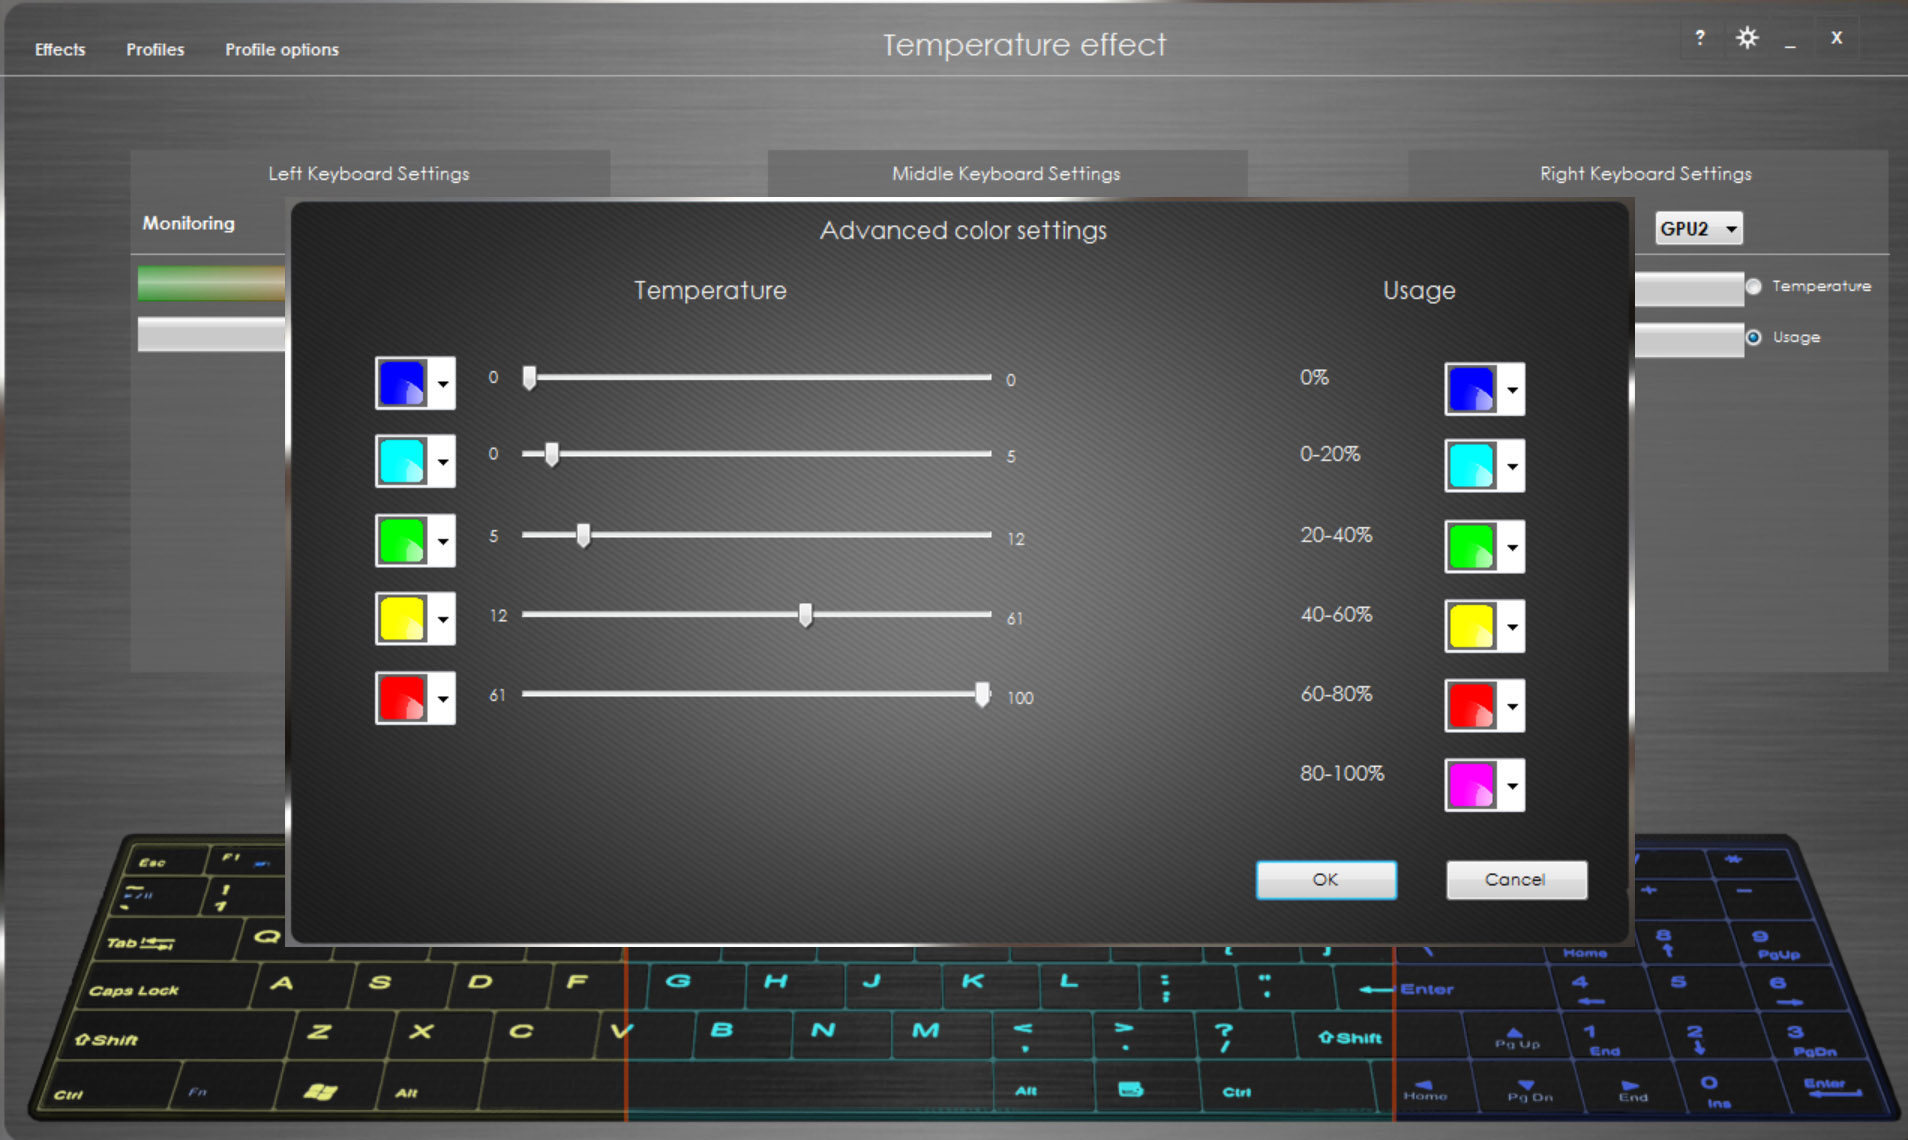
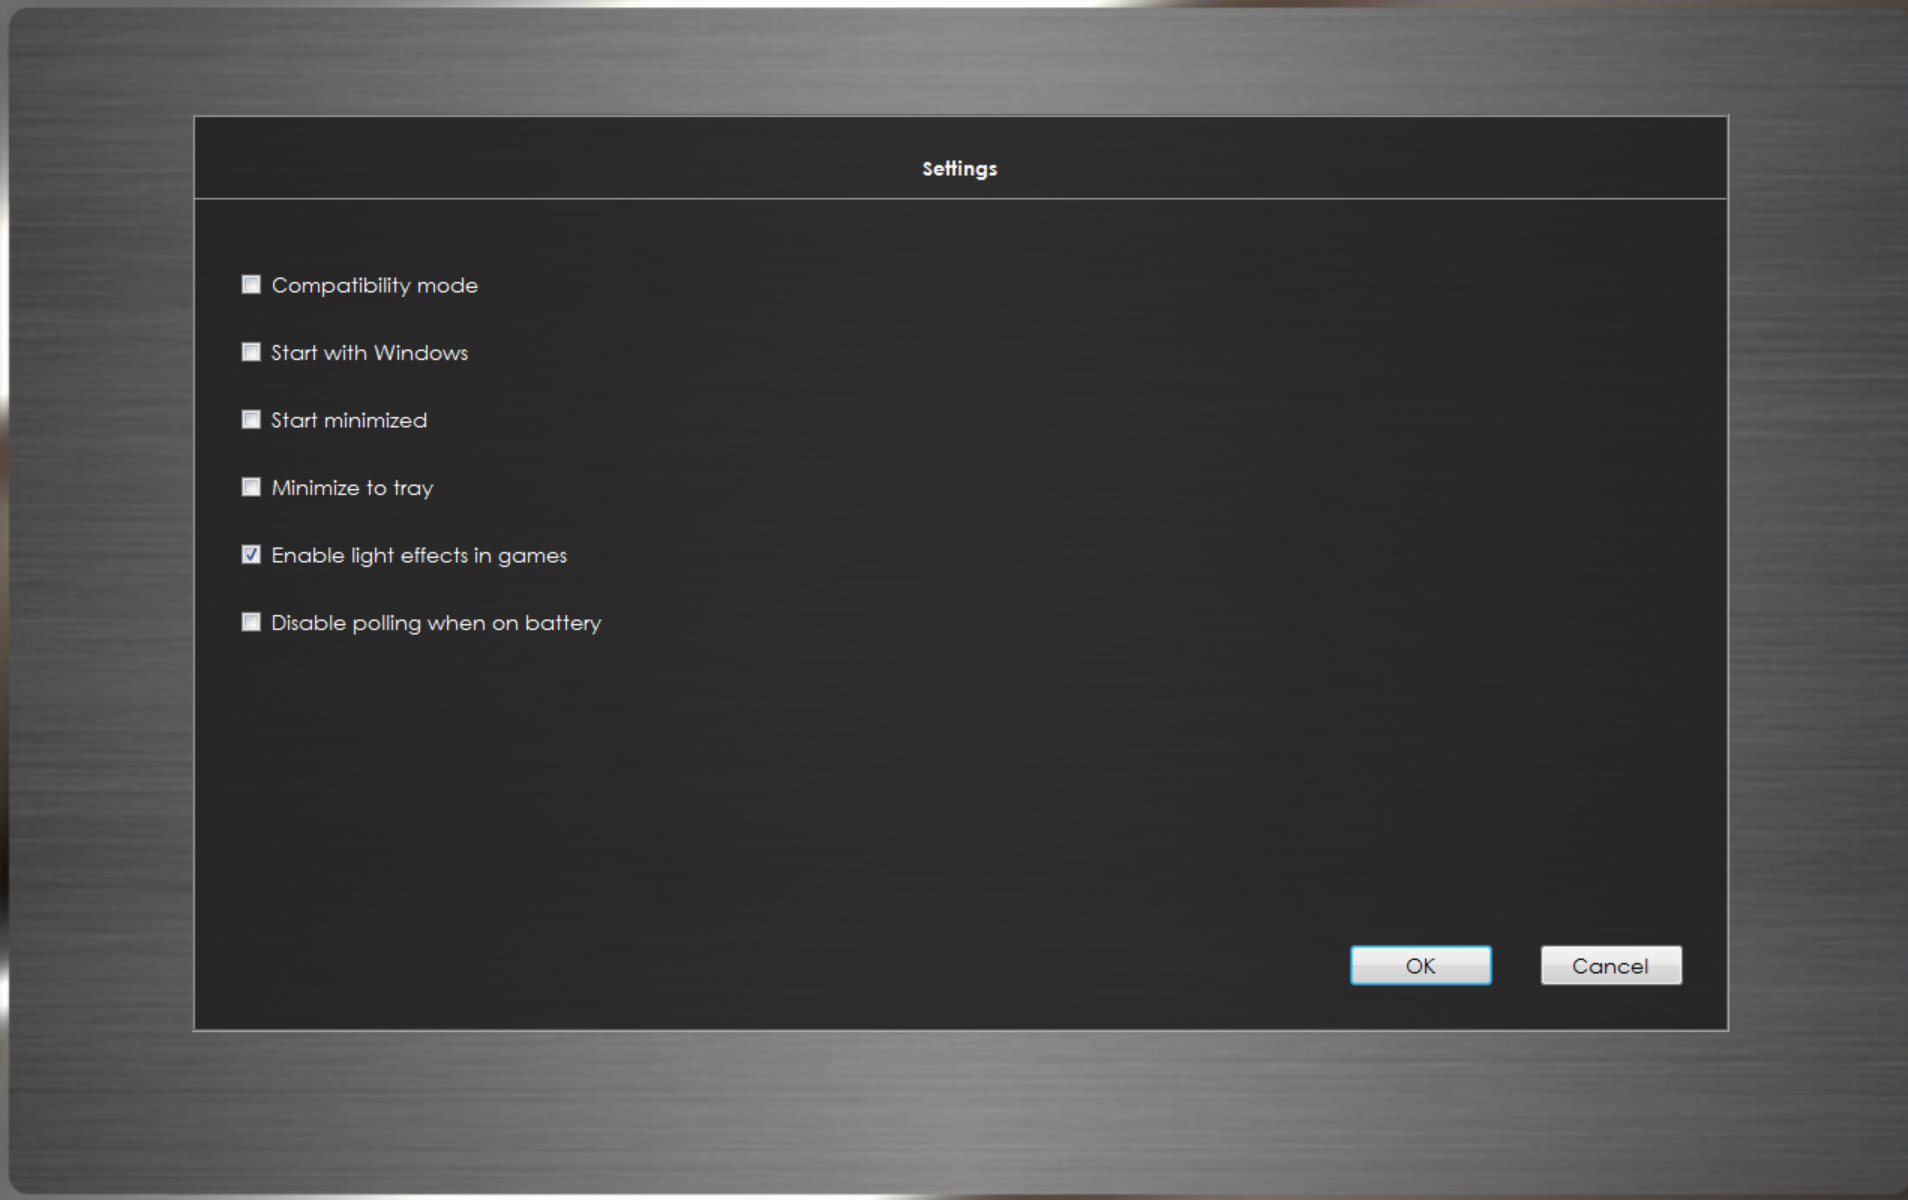
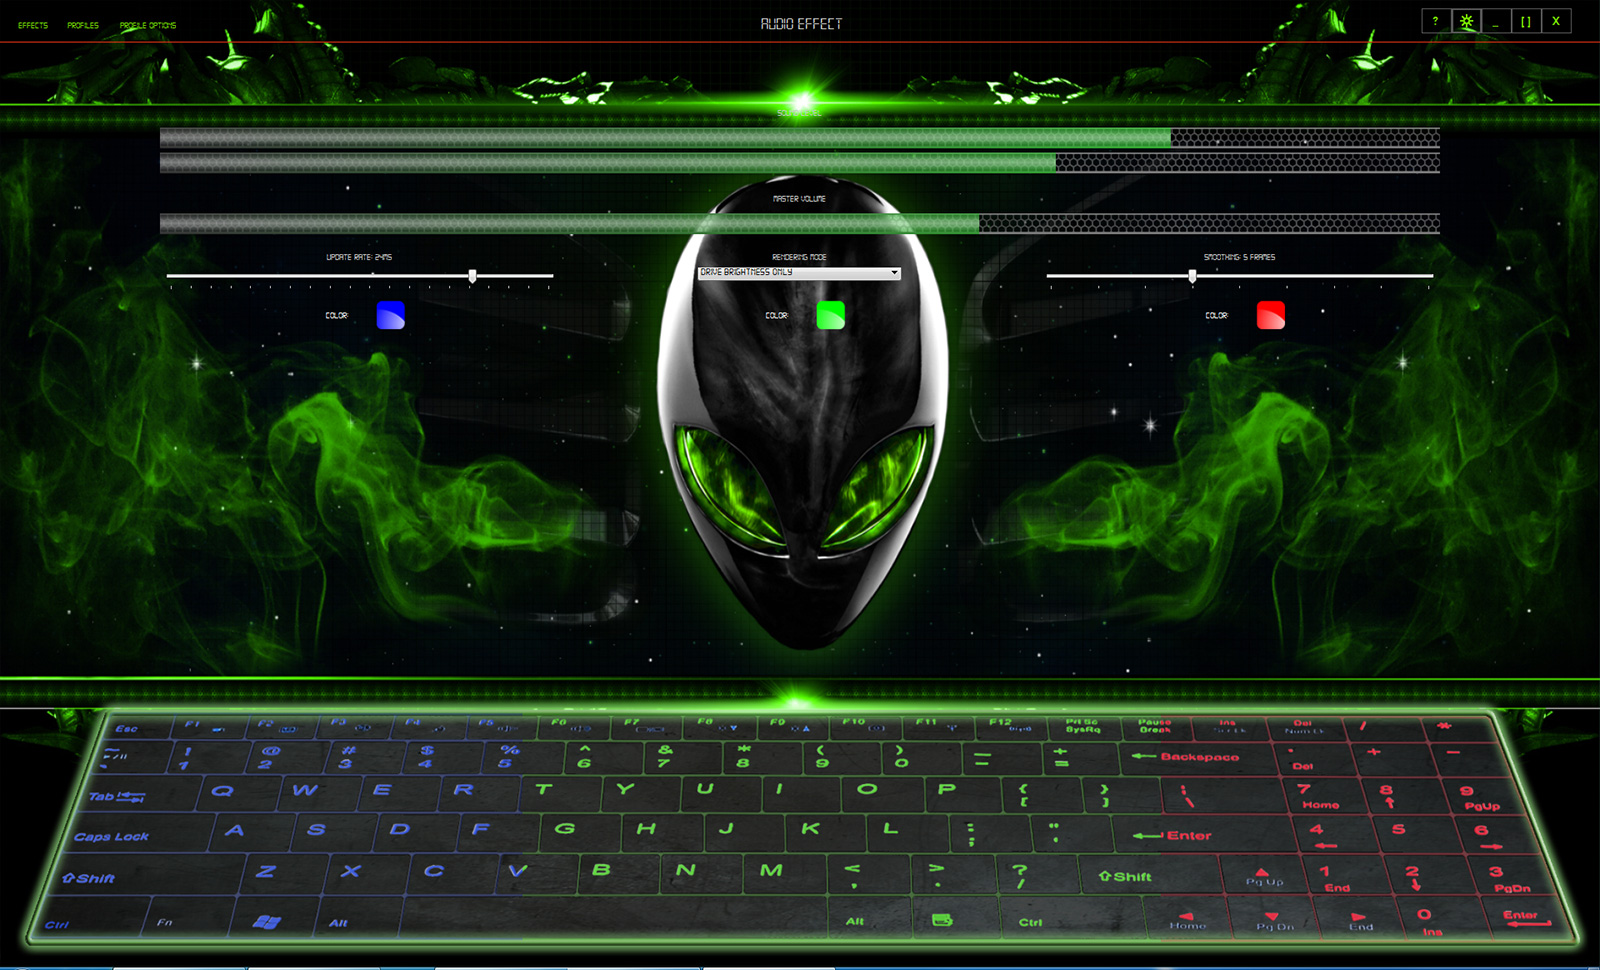
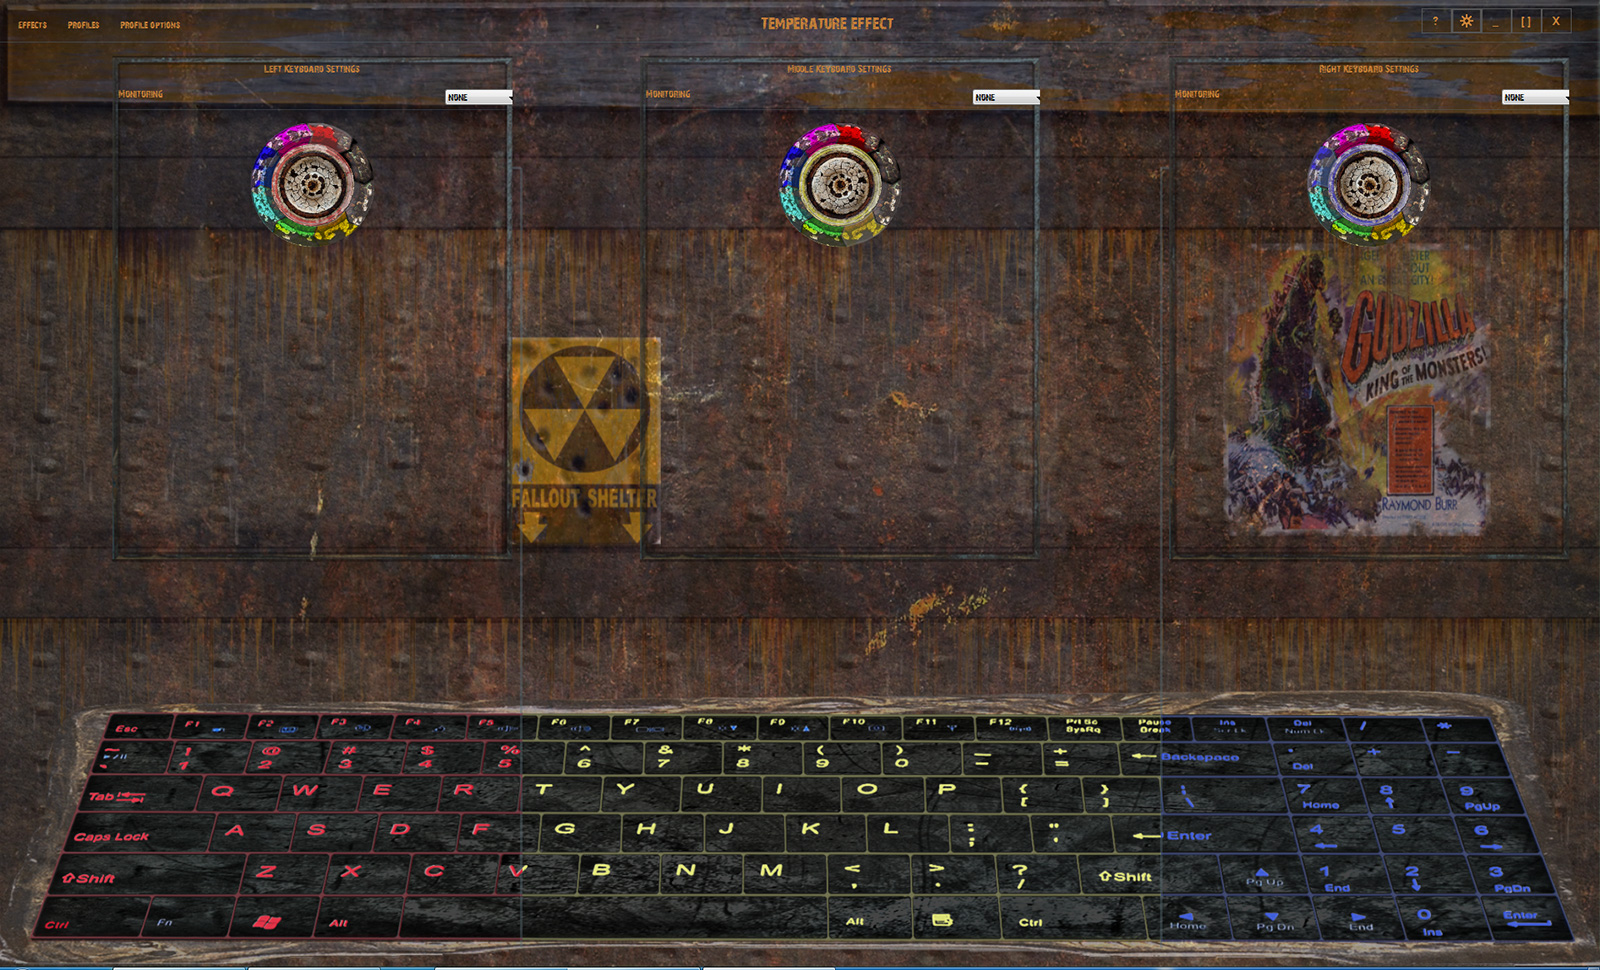
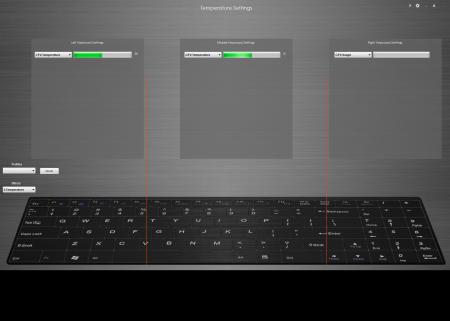
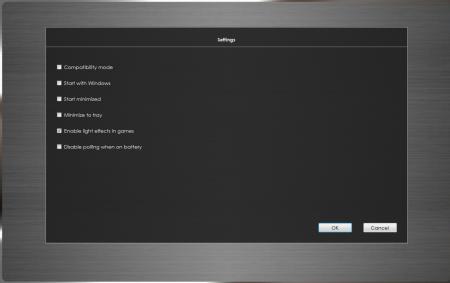
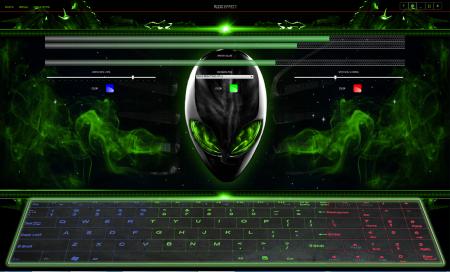
custom light controller (for 8 color keyboards only!) -What it is: This is a custom backlight controller intended for Clevo models with backlit keyboards. It is a replacement for the standard Clevo keyboard app. By default it works like the original. If you want to take advantage of some of the advanced effects you’ll have to set the app to start with windows (there are all sorts of option in the settings page, top right) -Project status: A first public beta is available for download -Issues/bugs: -Prerequisites: -Hotkey driver MUST be installed and working. -.NET 4.5 is required. Windows 8 have it by default. Other systems need to install it by hand. -Installation: Run the setup and follow the instructions -New effects So far we have 3 new effects: 1) Temperature/Usage lighting. Some of you will probably already know that one. It's using pizzadude223's code. Lights change depending on temperature of CPU/GPU. Dual GPU's supported 2) Audio lighting. Lights change depending on intensity of the music. Keep in mind that lowering the latency will increase CPU usage so try to find the sweet spot on your system 3) Heartbeat. Lights follow a heartbeat pattern that increases in speed according to CPU usage 4)Adaptive color effect This effect works for applications that run in non-exclusive mode. That means windows apps and games running in either windowed or borderless modes only (ie no fullscreen). This mode lets you color the keyboard based on what happens on the screen. You have 2 basic modes, “Aero” which basically colors the keyboard according to the aero color in windows and “Screen Average” which scans the screen to determine what the average color is. When you use Screen Average you have certain extra ways to tweak your color. You can choose whether to use a single color for the whole keyboard or use a different one for each keyboard region. When you use 3 colors, each color is decided based on what happens on the screen part that’s over that region. You can further tweak coloring by specifying what part of the screen will take place in the decision. You can have the whole screen or just the lower or upper half. That’s useful if for example you’re playing a game that most action takes place in only half the screen. For example in a racing game the upper half of the screen is usually just sky. There is an option that will affect the sensitivity to color changes, that’s what the minimum diversion does. Lower will be more sensitive. You can also choose whether you want brightness to vary with colors or not. The minimum brightness makes sure that the brightness will not fall under any circumstances bellow that limit. The update rate is like in other effects the speed by which the effect refreshes. A word of notice on this one, this effect is a very complex operation; it’s not a simple thing. If you overdo it you will get a SEVERE performance hit. I find that 50ms is a good compromise between speed and performance. Keep in mind that this is still a BETA. It means that bugs are normal to be found. We will try to address them in turn but you’ll have to be patient. I’d welcome any comments or bugs you may have to report but in order to make it easier I want you to always post your specs along with a detailed explanation of what you are reporting. Also make sure that the problem is repeatable. -Licenses This is freeware. You may use it freely. I would appreciate distributors interested contacting one us of first if you would like to support our effort: <form action="https://www.paypal.com/cgi-bin/webscr" method="post" target="_top"> <input name="cmd" value="_s-xclick" type="hidden"> <input name="hosted_button_id" value="DV2X6ELM4Q4SN" type="hidden"> <input src="https://www.paypalobjects.com/en_US/i/btn/btn_donate_LG.gif" name="submit" alt="PayPal - The safer, easier way to pay online!" border="0" type="image"> </form> -Themes Apart from the default themes (That you can switch via the settings menu) you can create your own too. The app’s theme engine is modular. It means that you can theme only the items you want, without the need to change everything. It is very flexible but it has it’s limits so be careful if you’re a newbie. If your theme crashes the app, just delete it and the functionality will be restored. The themes are each stored in a unique folder located in Hotkey’s installed location (c:\Program Files (x86)\Hotkey\themes). The theme’s name is its folder name. You will see that there is a “template” theme. It’s a guide to help you on your first steps. Be sure to read both the readme.txt as well as the theme.txt placed in there. They describe most of the stuff you’ll need… -Download You can download the app from here or from out site: clevomods | home of the Custom light controller and LightFX library -Changelog 0.0.6.0: 2/11/13 -added effect 'adaptive color'. Mode to drive colors/brightness based on aero color or average screen color -fixed colorwheel bug now showing properly on custom color panel -fixed not resuming after sleep bug -added tray access to effects& profiles 0.0.5.9: 14/10/13 -bugfix with non admin execution of app 0.0.5.8: 14/10/13 -added theme support -fixed colorwheel bug now showing properly on custom color cycle panel -added brightness driven only mode to audio panel 0.0.5.7: 25/9/13 -added new rendering modes to audio panel -added import/export in custom color cycles -added temperature/usage driven brightness in temperature panel -newer hardware monitoring library(better support for Haswell CPUs) -fixed application positioning when taskbar is in a position other than bottom -fixed tray icon bug missing sometimes -beat detection algorithm tweaks -audio panel tweaks -fixed flickering on progressbars 0.0.5.6: 12/9/13 -bugfixes crash during startup on some systems -better exception catching -better SM series compatibility -better tray temperature handling(for those who were experiencing hangs in temperature mode after running the app for some time) -better powersavings behavior -added installer -Also in this version you don't need to close ledkb in order for LightFX to work. When ledkb is running, it detects whether LightFX is in use. If it is, it "pauses" ledkb until LightFX is finished (i.e. you exit the game) and then resumes. 0.0.5.5: 5/9/13 -bugfixes hide from alt-tab when minimized to tray 0.0.5.4: 15/8/13 -bugfixes causing crash on startup 0.0.5.3: 12/8/13 -replaced colorstrip with an animated alienware style colorwheel -added brightness slider in custom color panel 0.0.5.2: 30/7/13 -Added new effect. Custom Color cycle. You can create a user specified sequence of lighting. -Added tray icons for temperatures in Temperature mode. 0.0.5.1: 17/7/13 -Fixed starting with Windows with Administrative rights (You will still need to run the app as Administrator in order to set this option) -Minor fixes in resizing -Fixes in trigger mechanism 0.0.5.0: 13/7/13 -Fixed Haswell CPUs temperature monitoring -Added windowed mode with floating resizable windows 0.0.4.9: 11/7/13 -Custom temperature colors and temperature ranges -Option to disable polling when on battery -Option to disable LightFX library (You still have to install it separately) -GUI is cleaner, most of the options are up top now Backlight Controller with LightFX v0.0.5.6.zip Backlight Controller with LightFX v0.0.5.7.zip Backlight Controller with LightFX v0.0.5.9.zip Backlight Controller with LightFX v0.0.6.0.zip

 1 point
 -
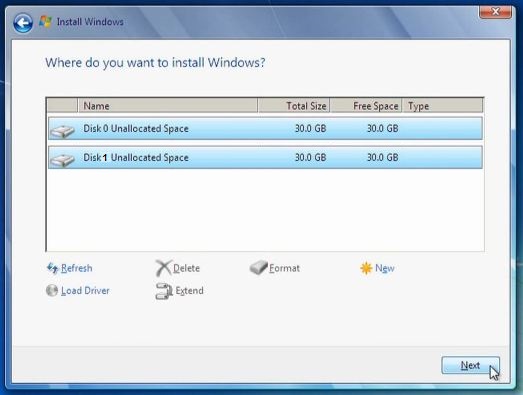
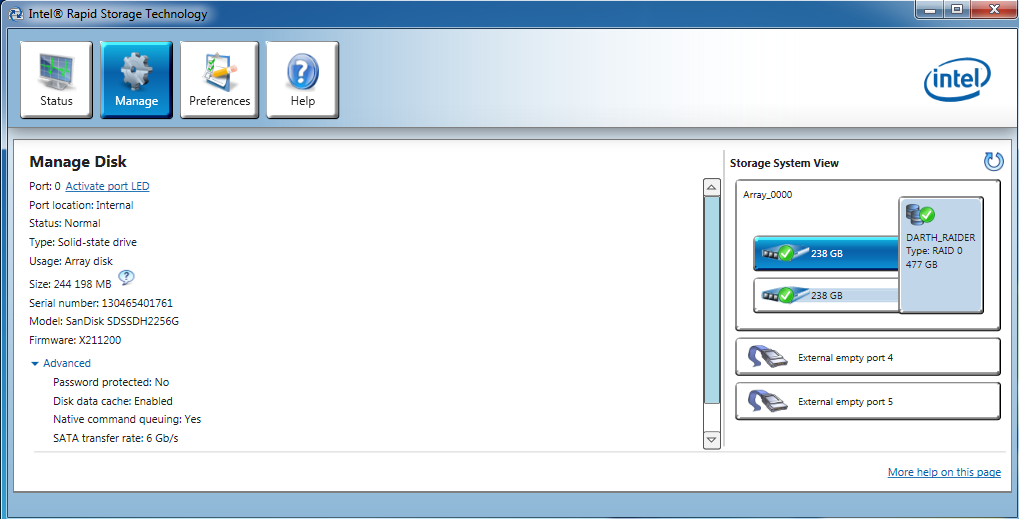
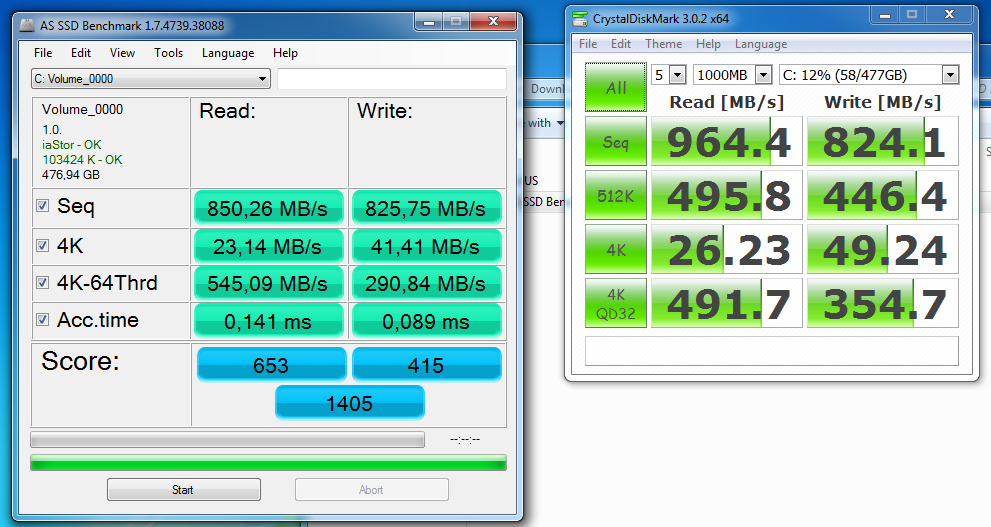
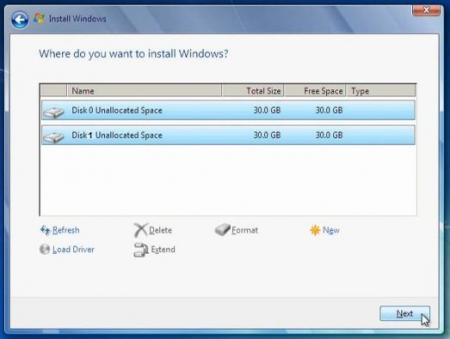
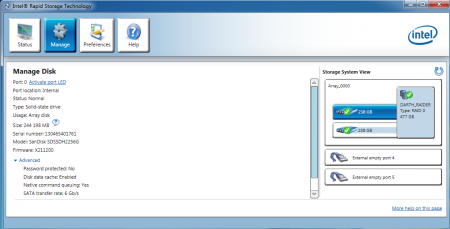
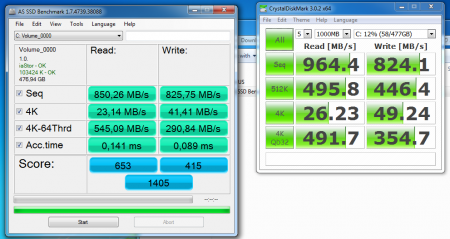
Introduction The RAID_0 was very easy to setup thanks to Mr.Fox's "windows installation guide", I've only made these instructions custom for 2570P users. What do I need? · 2 x SSD drives: I used 2 x 256GB Sandisk Ultra Plus · 9.5mm HDD caddy: $11 eBay · A knife · Some sturdy glue, I used LocTite Super Glue. · 4GB+ USB thumbdrive Instruction RAID_0 Setup for Win 7 Make an WIN7 USB installation with Windows USB/DVD download Tool and a Win7 ISO (fully legal) NOTE: If can't find Home edition of your language you can download Pro edition and delete \sources\ei.cfg to be able to choose home edition later on in the installation. In bios: Set ‘Sata Device Mode’ to RAID In bios: Set USB-boot in top of the list of BOOT Devices Boot up Win7 installation from the USB-drive Inside installation make sure to delete all partitions so that you end up with two unallocated disks (disk 0 and disk 1) Install Windows 7 one of the unallocated drives, for me disk 1 worked whilst disk 0 didn't (can’t explain why, but I guess it has to do with the RAID setting from BIOS). Windows should now be installed. Since we only have allocated space on one disk we need to enter Disk Management in Windows: type “partition” in start menu search field (no quotes) press enter. Inside Disk Management: Extend the allocated disk (C:\) with unallocated space of the second disk by choosing “Extend Volume”. Now it's time to create our RAID-array. Install RTS (Intel’s Rapid Storage Technology) from HP or Intel website. I took my RTS from HP's 2570P drivers archive. Under “Create” tab: You can create the RAID-array, choose RAID 0. Setting Stripe size? This is something I forgot to do and had to settle with default 32KB. I’m happy with it so I don’t really care. In other words, I have no clue what's preferred. Press next and wait some 30 minutes or so in order to migrate data from (in my case) disk 1 to disk 0. You’re done! Now it should look something like my "Darth_Raider" =) ODD Face Plate mod (text instructions only) 1. Remove the optical drive (one screw under the notebook's back cover) 2. Take pictures of how the original bezel is attached to the optical drive 3. Pry of the bezel off of your optical drive (no point of being careful) 4. Cut off all ‘hinges’ from the bezel so it’s then flat and nice 5. Remove the (very useless) bezel from the eBay caddy by removing two screws under the sticker. 6. Use a light touch of glue (or tape) to test-fit the odd bezel on the eBay caddy. I7. f you're happy (nothing is sticking out?), glue it on permanently! Results RAID_0 Benchmarks: AS SSD & CrystalDiskMark Boot-up Time (Video): ~16s from power on to desktop
 1 point
 -
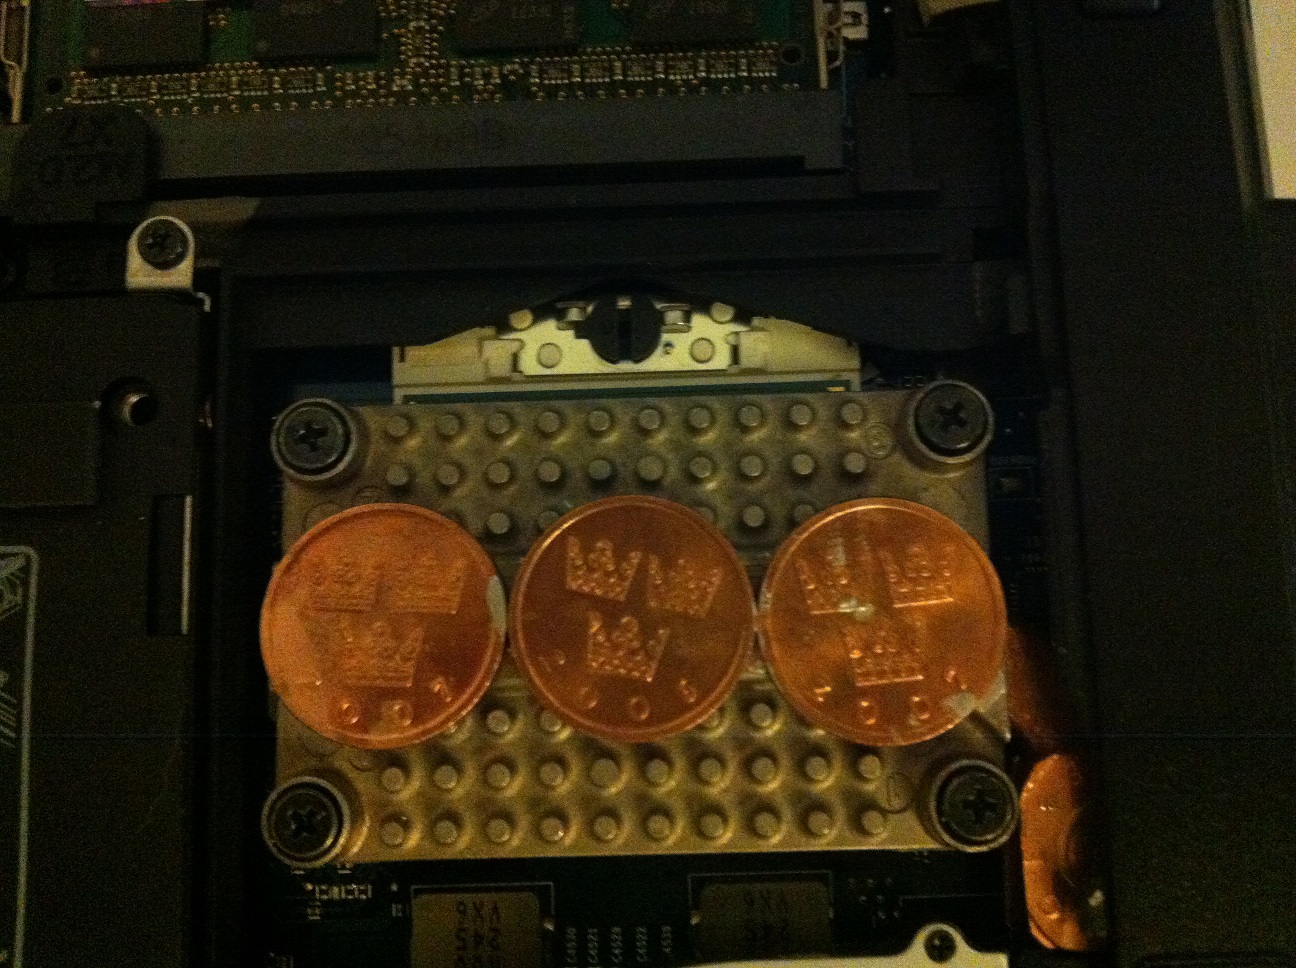
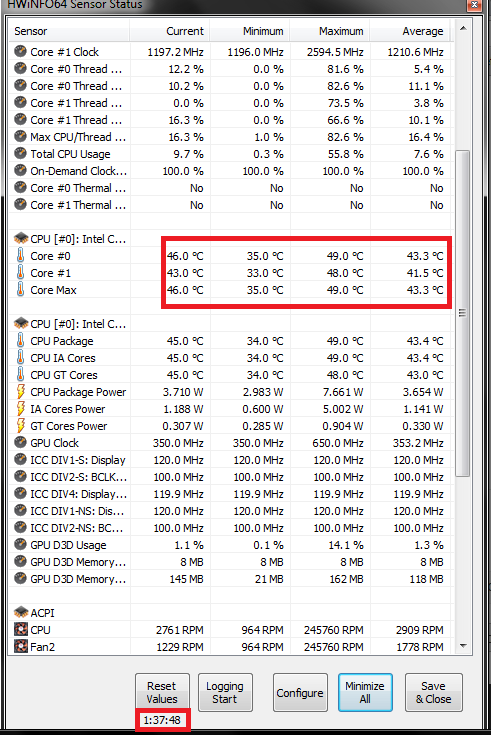
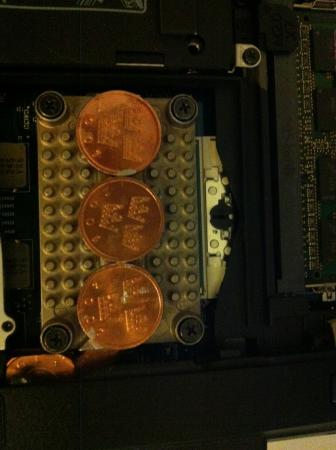
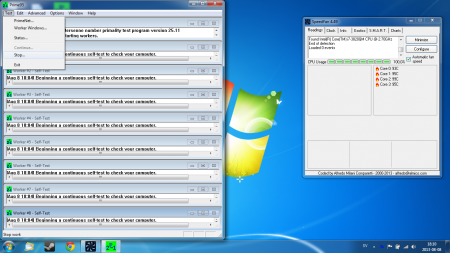
Introduction Why making this mod, isn't the stock cooler enough? My former laptop had a clumsy 15.6" screen with an average 35W 3612QM,I wanted make a mean and portable gaming setup so it had to go. I found that the 2570P is a 12.5" socketed little beast which allows for 45W Ivy-bridge CPU's, perfect choice for me! This mod is simply necessary in order to absorb more heat comming from the 45W 3820QM. Wait sir, you can't do high-end gaming with that integrated GPU right? No you're right, I paired up my socketed little beast with my GTX670 eGPU setup, see my sign for benchmarks. Instruction Materials used · $10 - 30$ 2560P/2570P heatsink from ebay · Copper coins, Cu 97% (coins or you’re not an anarchist) · Rasp (don’t worry it’s for the coins, not the notebook itself) · Cohesive thermal compound (I used Artic Silver) · Thermal paste for CPU (GC Extreme gav me best results) Coin sizes All coins: I choose to flat them down with the rasp on one the side, which will be the smooth contact surface on the heat sink. Heat pipe, coins: Flat down 2 x coins so that they obtain a rectangular shape in order have a snug fit when assembled in the notebook. Heat sink, coins: Depending on your coin size you have to test how many you can fit on the flat surface of the heat sink. It turns out the heat sink fits exactly three of my coins. [Pic 4] Applying coins On heat pipe: Check carefully that the coins will fit with the heat sink assembled; I taped mine to the heat sink in order to test. If not, trim them some more and try again. On heat sink: These coins should be good to go by now! Now mix your adhesive thermal compound (if 50/50 mix: just spread two equally long lines in parallel and mix them). Apply adhesive compound to the coins: I suggest that you begin with the coins for one side of the heat sink (and pipe), now let them dry. Now do the other side, let them dry. [Pic 5 – all coins of one side/last coin on other side] Apply the other thermal paste to your CPU, NO not the adhesive compound you crazy person! Carefully install your Anarchist Heat Sink, remember the space will be more limited for the heat pipe now so don’t scratch up your CPU. DONE, you’re now officially an anarchist! Results Mod Results Temp Results These are the temps for each core when completing the Prime95 Mixed test. Core #2 is always hotter than the others in all tests I've done and this is probably due to the fact that the CPU is an engineer sample. Prime95 Mixed test What about normal use temps? Idle (doing nothing): ~45c (seen it drop down to 39c for a while) 1080p, youtube (fullscreen): ~58c Battlefield 3: ~82c Chivalry: Medieval Warfare: ~75c Conclusion This mod helped, not only to clear the prime95 test with temps ~97C, but also make sure that normal use like browsing/streaming/gaming would not throttle my CPU, one have to admit that Prime95 doesn't correspond to near normal use. As you can see there is room for adding more copper to the heatpipe in order to have higher efficiently transporting heat from the heatsink, this will be in my next update!

 1 point
 -
results after adding one N40004 diode. http://forum.techinferno.com/hp-business-class-notebooks/2544-hp-probook-4330s-working-silent-fan-mod.html#post639321 point
-
I made an attempt to lower rpms in 2570p. I soldered one N4004 diode, it was a little bit tricky because wire is a really short. It was hard to solder and make it separated from laptop. Maybe I will try tomorow solder one more diode. Even know it's a little bit hard to close bottom cover cause diode is placed on fan. There is no space left to solder two diodes in wire under fan, nearer mainboard. Now we achieved 8460p/8470p rpms level but i'm little bit disappointed I didn't reach 2400rpms like friend above but even that laptop is significantly quieter than before mod. 255 = 0 -> 0 200 = 3072 -> 2700 128 = 3072 -> 2700 120 = 3072 -> 2700 110 = 3072 -> 2700 100 = 3034 -> 2700 90 = 3034 -> 2761 85 = 3034 -> 2891 80 = 3110 -> 3072 75 = 3276 -> 3276 70 = 3561 -> 3510 65 = 3780 -> 3840 60 = 4096 -> 4096 55 = 4551 -> 4468 50 = 4915 -> 4915 45 = 5461 -> 5585 40 = 6144 -> 5851 25 = 6642 -> 5851 0 = 6642 -> 5851 HWinfo after 1,5h using 2570p, on battery, power saving chrome x 7, foobar.
 1 point
 -
NEW Nvidia Geforce GTX 770M 3GB DDR5 MXM 3 0 Type B FOR Clevo Alienware MSI | eBay1 point
-
I'm using the 170 W Lenovo adapter and it's been fine so far when overclocking and overvolting. Others who have the 750M SLI system have remarked that 170 W is not enough when overvolting that configuration so they bought Dell Alienware 240 W adapters from Amazon with a conversion cable to fit the plug on the Y500. You can get any number of Alienware bricks of different wattages such a 180 W, 240 W, and 330 W from Amazon, and it may be preferable to getting the official Lenovo one even if you don't need the extra power as the Alienwares tend to be slimmer and cheaper. The conversion cable can be found here: X75 Power Connector - 7.4 x 5.08mm Female Jack to 5.5 x 2.5mm Male Plug1 point
-
Great, means my solution will work for you 100%. Good luck mate, enjoy T|I1 point