Leaderboard


Popular Content
Showing content with the highest reputation on 10/03/12 in all areas
-
By now you've heard of PSY and "Oppa Gangnam Style" and are probably tired of it. But this college humor take on Mitt Romney is pretty damn funny, especially when Paul Ryan shows up in yellow: http://www.collegehumor.com/video/6830834/mitt-romney-style-gangnam-style-parody5 points
-
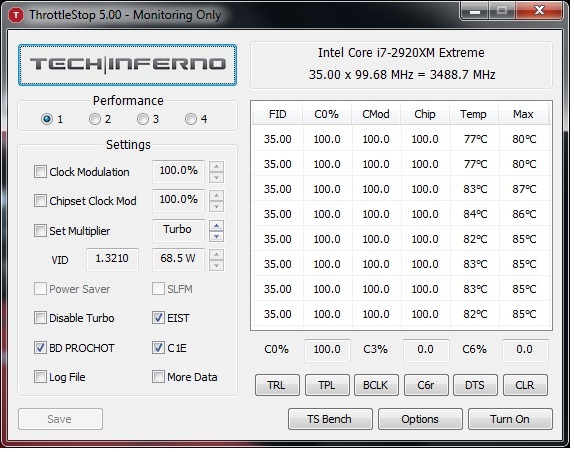
Hey Bradley I have more advice. Go to your bios and turn Turbo Flexvid in Performance options to 0flex if you haven't already. 0 flex should get you safely to 42x before needing to add any voltage. Turbo flex is the overvoltage applied over the normal voltage only while in Turbo Mode. If you have ot on default which is 25... Your temps will not in control since with more voltage it runs hotter and in this case you need 0 flex for those cpu speeds. If its 0 already do as Xonar suggested and try a new paste but if it was set to 25 or anything else set it to 0 in the bios and retest the exact same test in about the same conditions. Im hopin thats how you have it set becauss it may atleast help lower temps a few Celcius got my fingers crossed Sent from my SPH-L710 using Tapatalk 23 points
-
Hey all, the name is Joe... I've come across this forum, as many others have, as a result of nando's work with the eGPU community. I hope to become an active member of these forums (and hopefully get my x230t eGPU working). As far as my setup goes: Lenovo X230T i5 3320 2.6GHz 16GB Corsair Vengence RAM 256GB Samsung 830 SSD Windows 7 Pro x64 PE4L 2.1b EC----------\ Nvidia GTS250---------/ NOT WORKING ATT2 points
-
Today I decided to be helpful. If you're like me and you hate bloatware with a burning passion and you absolutely must ave a 100% clean hard drive, then you're reading the right post! This is a Windows 7 and drivers installation guide for the Alienware M14X R1 (not the R2). I downloaded the latest drivers (as of 8/26/2012)for you guys from the offiicial dell drivers website (Drivers and Downloads | Dell [united States]) and arranged them in order of installation. I also included the latest NVIDIA driver 304.79 (BETA) and other important installers you need after doing a Windows 7 installation. The files are inside the 4hared folder I linked, If you don't want to download from my link, you can track down and download the files yourself at these links: MY 4Shared folder (contains drivers and programs numbered in order of installation/ up to date as of 8/26/2012) : 4shared folder - My 4shared *Dell drivers: Drivers and Downloads | Dell [united States] *NVIDIA Drivers: NVIDIA Driver Downloads - Advanced Search *Alienware WMP Skins (They're at the bottom of the page): AlienGUIse Theme Manager - Alienware Arena *AlienAutopsy: What is the Alienware AlienAutopsy Software and Where can I download? | Dell *CCleaner (I recommend the portable version for less footprints): CCleaner - Builds *Wireless-N 1103 Driver (the one in dell' driver download section is full of bugs): Killer Gaming :: Support :: Driver Downloads *DirectX: Download: DirectX End-User Runtime - Microsoft Download Center - Download Details *.NET Framework 4: Download: Microsoft .NET Framework 4 (Web Installer) - Microsoft Download Center - Download Details *Adobe Reader: Adobe - Adobe Reader download - All versions *Adobe Flash Player: Flash Player | Adobe Flash Player 11 | Overview (You can download the Live! Central application from My Dell Downloads:https://smartsource.dell.com/Web/Welcome.aspx?ReturnUrl=%2fweb%2fmain.aspx ) *You have to have your login information to download the Live! cetral (and the bloatware)that came with your laptop (the Live! Central Is also in my 4shared link)* THIS IS A "FOR DUMMIES GUIDE" THIS GUIDE ASSUMES LOW EXPERIENCE IN THE SUBJECT FROM ITS READERS Windows 7 Installation *TIPS* * Before doing step 2, I suggest loading optimal defaults in BIOS settings. This can be done by pressing f2 instead of f12, after doing that you can press f12 after saving the changes you made. * If you plan on gaming on your laptop (which I'm pretty sure you are), after the steps above, press the right shift key five times and turn off sticky keys STEPS: 1. Insert the Windows 7 installation Disc that came with you laptop 2. Restart, then press F12 repeatedly 3. Choose Boot from CD/DVD 4. Choose your language 5. Click "Install Windows" 6. Click "Custom Installation" 7. Click "advanced" and format all partitions 8. Delete all partitions then click next 9. Wait for the installation process to finish 10. Click "Install Important Updates Only" 11. Create your new log-in information 12. Eject Windows 7 Installation Disc Drivers and Programs Installation *TIPS* * Ignore the BIOS (A08) and HDD Firmware (D2D5DEM1) file if you've already run that before * Don't be impatient and skip restarts, doing restarts prevents errors * Run the installer files from a USB flash drive r external hard drive so you don't have to waste about 1.5 gb of your hard drive with installer files that you'll only need once * Customize settings of applications and windows only after you finish all the steps below * Avoid windows updates until you are finished with the steps below (Step 2 being an exception) * If you trust me, you will use the drivers I uploaded as I have already extracted the installer files from the original dell drivers so that it doesn't clutter up on your hard drive and not make the C:/Dell folder where they extract the installer files. * I suggest keeping your driver files in a USB so that they don't get corrupted (corrupted driver= lots of BSOD's and errors) and don't clutter up space in your hard drive * If you don't want to follow TIP number 6, then download drivers only from the dell website I provided above * After step 23, you've still yet to restore your laptop to it's optimal state, I suggest doing the recommended steps to make your installation SUPER clean * Install all other programs (Skype, Steam, games, etc) after all step 23 and windows update (exception of microsoft office that would be optional step 27) STEPS: 1. Install Atheros driver 2. Plug in your ethernet cable then wait a few minutes for the first windows update to finish 3. Restart when asked by Windows Update 4. Install Wireless Card Driver then restart(the one I uploaded is for the Killer-N 1103 driver for others you're gonna have to download your driver from dell) 5. Install Intel Management Engine Interface 6. Install Intel HM67 Cougar Point Chipset Driver then restart 7. Install Realtek Card Reader 8. Install DirectX 9. Install .NET Framework 4 10. Install Adobe Reader 11. Install Adobe Flash Player (for Internet Explorer) 12. Install Intel HD Graphics 3000 Driver then restart 13. Install NVIDIA GT 555M driver then restart 14. Install Alienware Command Center then restart 15. Install Alienware OSD Application then restart 16. Install Realtek Audio Driver then restart 17. Install Intel Rapid Storage technology then restart after install and again after boot up 18. Install Synaptics Touchpad Driver then restart 19. Install NEC USB 3.0 Driver 20. Install Dell 375 Bluetooth Module 21. Flash Alienware M14x Camera Firmware 22. Install ST Microelectronics Free Fall Sensor 23. Install Live! Central Application Recommended Steps: 24. Download the "Customization" folder I provided, it contains original (not user made) alienware wallpapers, screensavers and avatars for windows 7 25. Put the files accordingly to where they should be. A Path.txt file is provided so you know where they should be 26. Customize the settings of Windows 7 (battery settings, wallpaper, screensaver, etc) also I provided all 4 alienware WMP skins OpS 27. Install MS office (and run every single program of it once and configure settings, click updates to the recommended setting) if you have it. If you dont have it, ignore this step. 27. Install Antivirus program NOW if you don't want to use the Microsoft Security Essentials that come with windows updates. (I highly recommend using MSE, it's an awesome, not annoying, super quiet anti-virus program, and it doesn't take much space) 28. Type Windows Updates, configure the schedule on it, check every check box on the settings and check for updates 29. Tick every single checkbox for important updates 30. Tick every single checkbox for optional updates EXCEPT for "bing desktop" hide this abomination and never make contact with it again (lol jus kiddin) 31. Install all the updates. (This will TAKE A LONG TIME make sure your laptop doesn't shutdown/sleep/hibernate on the process and keep an eye on it, some updates need user input especially MSE) 32. After the first batch of windows updates are done, check it again, there will be more left. then install all of them. 33. When you are sure there are no more updates, then you can proceed to install your games and other programs 34. I recommend installing the AlienAutopsy program, it's PC Doctor alienware version, it comes with your alienware laptop out of the box. I don't consider it bloatware as it is useful when I want to check for hardware problems. 35. After you have installed all your games and programs, run a full scan with your antivirus, run a default scan on AlienAutopsy, fix all options on windows and your programs, do everything you have to do. Check for updates on all your programs. 36. Now to make your laptop *SUPER* Clean, Defragment your Hard Drive (for HDD I'm not sure this is recommended for SSD users) 37. Check C:/, C:/Program Files and C:/Program Files (x86)for any unwanted files. 38. Type cleanup on start menu and clean up everything 39. Run CCleaner (Provided in download section) clean reistry, and check every box except wipe free space (I've tested this and it doesn't harm your computer) 40. Create a restore point 41. Run disk cleanup twice (once with no admin mode and one with admin mode) (this deletes other restore points wich takes up a lot of GB's) ENJOY your *SUPER* clean M14X R1! -alienhead0306 PS: This is my first post EVER so constructive criticism would be appreciated1 point
-
Yeah... believe it or not, but Dell just posted a new bios for the M17x R3. ... and (*surprise*), they even give a tiny bit information about the changes they made. Under 'fixes & enhancements' it says: "Alienware M17XR3 A12 BIOS add GPU switch option in F2" Here's the link to the official Dell site: Drivers and Downloads | Dell [united States] Please let us know how it works out! As the Dell server currently seems to have some issues regarding this file, I also attached it to this post. I'm waiting for your reports. If there's enough interest I can unlock and apply the Sata tweak (if necessary). M17x-R3_A12.zip1 point
-
So you've got hold of a 4GB version of a GTX 680m, figured out how to flash the vbios and it runs well. However, there are some things missing such as GPU boost and the ability to actually install drivers easily. Perhaps you are reluctant to run a vbios that ups to voltage to 1.037v. This thread aims to have everyone owning a 4GB GTX 680m get the most out of their GPU including enabling a GPU boost hack. This is not an overkill thread, but more about getting things working well with a good performance, quality and stability improvement over stock. There will be no crazy high voltages so everything should be safe short and long term however I take no responsibility for burnt or bricked cards. Please proceed at your own risk, there will be vbios flashing. First of all, the GTX 680m is similar to the desktop GTX 670 but severely downclocked. By OC'ing, one can get the core speed up to speed and beyond but clocking the memory @3Ghz (6GHz effective) in an attempt to reach its 192GBit/s bandwidth is very risky and likely dangerous. However, if the memory is clocked to 2250 (4.5Ghz effective) then the bandwidth is identical to that of the GTX 660 Ti @144GBit/s. Both desktop GPUs have the same base and boost clock at 915Mhz and 980Mhz respectively. This brings me to the vbios. Kindly created by master hex maestro svl7. The vbios (attached below) clocks in @915/1125(2250)Mhz exactly the same as that which I mentioned above. Those specific clocks are also what makes the GPU boost work well (I'll get to that later). The vbios is engineered from the MSI ES(FD) vbios and has a voltage of 1.025v and settles @1.0v during constant load. Not amazingly(potentially dangerously) high but there is still plenty of headroom for overclocking. Flash this, and verify with GPUz. Of course the memory clock can be anything but I chose 1125 as they are nice and neat as well as offering a mild but significant boost in performance. Next, drivers. The recent nvidia drivers are great but digging deep into the source code, we find that there are image quality hacks that trade image quality for performance. Plus some drivers just plain won't install if the GTX 680m is an aftermarket upgrade on unsupported mobos. These drivers are winners though: http://files.laptopvideo2go.com/Dox/geforce306.02.2-modded.exe Modded by the infamous Dox, all hacks are removed, quality is optimsed and support for all nvidia devices is included and should install without a hitch on any system. Drivers are uber stable but not great benchers as image quality is improved at some cost to performance. but I'd happily trade performance for decent quality and stability and use another driver to bench. And finally, enabling GPU boost. This method is not actually GPU boost but it functions in exactly the same way, call it "fake" GPU boost. What we need to do is to download Nvidia Inspector: NVIDIA Inspector 1.9.6.6 download from Guru3D.com Put that in a safe place and run it, allow overclocking and set the base offset to +65 to achieve 980Mhz, the same as the desktop cards. Now some of you may think that this is plain overclocking however, this is not the case. After applying the clocks (keep Inspector open), run a mild to moderately intensive GPU task such as playing HD video or opening the settings dialogue of Furmark (but not starting any test yet) and you will see that the clocks will still show 914.5Mhz. Start a game or Furmark and that will jump to 980Mhz similar to GPU Boost. Now click on "Create clocks shortcut" and a new shortcut should appear on the desktop. Drag that to your "Startup" folder in the Start menu and Fake GPU Boost should be enabled on every restart without any user input needed. I tested other base clock speeds ranging from 900Mhz up to 1000Mhz and and every boost clock speed from +1 to +100 and 915 -> 980 was the only combination that worked. Most other base clock speeds would always change to 928Mhz and without the 915Mhz baseclock, all other fake boost clock offsets would go to 966Mhz unless I went way beyond 1Ghz which I don't recommend anyway. Either it was coincidence that those clock speeds are identical to the desktop ones or that they are the only clocks that work on the GK104 which is why nvidia set them to the desktop ones in the first place. Please report back if you have any issues. I've only tested this myself but it should apply to all 4GB GTX 680m users. EDIT by svl7: Vbios is outdated, grab the latest one here: http://forum.techinferno.com/general-notebook-discussions/1847-nvidia-kepler-vbios-mods-overclocking-editions-modified-clocks-voltage-tweaks.html1 point
-
I really enjoyed the first Borderlands and it seems the new one is getting 9/10 or higher ratings--so I'm super tempted to buy it. The only problem is the steep price, seems Steam has it for $60 and now the game also has some sort of seasonal pass that you gotta fork out more $$ to get additional DLC content. I really hate how gaming has changed into a world of micro transactions, back in the day DLC's used to be free and now publishers find every excuse they can to charge for minor content changes. Anyway, to get back on track, who has purchased the game and what are your impressions? I'm thinking of getting a copy from Greenman Gaming since they have 10% off the Steam price.1 point
-
I did notice if you start over clocking that over clock edition one...the voltage starts to drop ans the core clocks go up...I'll have to re look at which one i was last testing. - - - Updated - - - I did notice if you start over clocking that over clock edition one...the voltage starts to drop ans the core clocks go up...I'll have to re look at which one i was last testing.1 point
-
Doesn't seem to apply when in sli mode....At least.... Not yet.1 point
-
I don't have time to check my scores but, my highest score is 12943 I think and that is with svl7's 900mhz core clock with OV plus the 135+mhz allowed to OC. My memory for gpu0 is 2700mhz and gpu 1 is 2400mhz. My processor is set at 50 flex 46 46 46 46 with the rest of the same settings as you. I am also running 1600 on the Pri Plane. CPU is dedicated to Physx as well. I am running my system with it sitting on an AC.1 point
-
speaking of old videos, do you guys remember the superfly ?1 point
-
Got some worse news... After my GTX 660 Ti it's not my GTX 480 which has just passed away and it's a murder. The killer is my XBOX 360 psu mod. I decided to recheck my XBOX 360 psu mod on my GTX 480 which I had undervolting and underclock for not killing the xbox psu. (the GPU was working well before I try and was quite stable.) But it killed my GTX 480, which now acts exactly in the same way the GTX 660 ti does. It's recognized but won't work and will randomly switch on/off. Setup 1.X will at first recognize it and then it will disappear and the same thing can appear in now in device manager. I don't understand, I'm pretty sure I've wire the xbox psu correctly, 12V with 12V and GND with GND etc... What a great week... I want to take a hammer and knock that xbox 360 psu and knock it really hard (but my girlfriend said no...) - - - Updated - - - But my graphic cards aren't totally dead, since I could even driver for few second the external disply on the GTX 660 Ti before it crashes, and both card name are still recognized... (except last time, windows mistaked the GTX 660 Ti for the GTX 680 O__o ?) May be there's a way to repair them ? Or at least my GTX 480 which isn't anymore covered. Any idea ? May be it's just a fuse ? And I also feel angry to send back my GTX 660 Ti... Because it was probably not DOA and I likely killed it myself... and I hate lying... but I hope I can have a replacement...1 point
-
Do you guys still remember those Youtube videos with outtakes from the film Downfall, showing Adolf Hitler subbed with completely different subtitles? Well, they are back! - Gangnam Style No link provided1 point
-
My best score thus far is P10740, Graphics 11233, Physical 10788, w/ combined 8044 (NVIDIA GeForce GTX 680M video card benchmark result - Intel Core i7-3920XM Processor Extreme Edition,Alienware M18xR2 score: P10740 3DMarks) My system is an R2 w/ OC 4.4 all coures 3920XM and SLI OV/OC 999Mhz Card0 w/ mem at 2050 & 800Mhz CPU Card1 mem 1800. The SLI is configured with PhysX being processed by the CPU with SLI/Max3D on. Additionally, the system is supported by a verified, cached RAID 5 SSD's w/ WEI 7.9. BIOS is set w/ all C-states off, memory at 2133 1.55V, Extreme edition of 4.4 all 4 coures, FLEX 40, Time window 5 sec, and Long/Short term TDP at 99 each. The bus speed is 105mHz and the overall effect on my 16GB of ram is 1900+MHZ. I disabled themes, its a clean install Win7U fully updated and with minimal servies/startup apps running. I set the 3DMark 11 Basic Edition to high over all CPU's. lastly, my max GPU temp is 82c w/ CPU 95c for a very short duration. Shouldn't I be getting higher benchmarks than this? What are some other tweaks I should look into?1 point
-
Well, there is on caveat of using your system. A NVidia eGPU can use a fragmented 128MB+64MB+32MB pci-e space, whereas a AMD requires a straight 256MB block. That has caused on Elitebook owner to switch from AMD to NVIdia previously to get a 4GB+ working solution. That's in case you were thinking of getting an AMD eGPU for it's better DX9 performance per 2. Which video card do you recommend for best performance on my system?. A NVidia Fermi/Keplar a better option if wanting Optimus' internal LCD mode or x1.2Opt performance later down the track with an iGPU-equipped notebook.1 point
-
Thanks for the reply, appreciate it. I have receive an email from them and its's all sorted. Hopefully I get it working I will post results as soon as I am able to set it up.1 point
-
Wow, great call! This is from a similar wprime run, up to about 72% complete. I guess Dell defaults it that high for overclockers? I haven't re-pasted yet, and probably won't bother now until I really need to. Thanks!
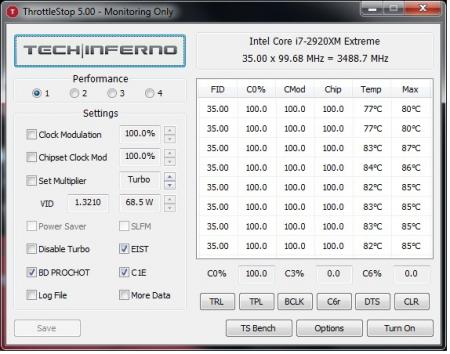 1 point
 -
This should do the trick: Create a batch file with the following commands nvflash -A -4 -5 -6 vbios.rom nvflash -y Of course the vbios.rom must be changed to the name of your vbios file. The name (without extension) mustn't be longer than 8 characters. Save the file as autoexec.bat and put it on your DOS bootable USB drive, along with your vbios file. Boot from the USB drive and wait until the computer reboots.1 point
-
It's up now. Not 100% complete yet, but pretty much. -> Nvidia vbios flashing guide1 point
-
Great, thank you very much for the feedback! So with that vbios you can now change the voltage per afterburner? What system are you using? An M17x R4? I guess the front posts need some cleaning up, and as well some more explanation. The 'newOC' versions are quite a bit modified, I did a lot of tests with my Clevo 680m... it did throttle at stock in my system, didn't even reach full 3d clocks. The newOC edition solves this, and I ported the same mod to the Dell card... I expect it to work the best from all Dell versions, however, the results seem to vary... Glad to hear that it seems to work pretty fine for you! The newOC edition is simply modified a bit more, in order to prevent throttling. I removed the software OCing limits, but the voltage is stock as well as the clocks. The results don't seem to be completely consistent as not all users report the same behavior, not sure about the cause of this. I can't test it myself since I don't have a Dell card / recent AW system. That's why I need feedback. The Clevo card works with the MSI vbios, but you might run into some weird issues, not all Clevo systems seem to run well with the MSI vbios. 180W should be fine I guess, not sure. Depends on how far you push it.1 point
-
That's cool, guess that's really new, at least I haven't heard about this in the M14x R2 before. One of the options on mine is for "Secure Boot" set off since Windows 7 doesn't have a UEFI Secure Boot loader. So there's now a secure boot option available? Win8 is coming... as you said. I recommend not activating it, it might make it harder to flash a modified uefi. I'm not really sure yet about how exactly secure boot will affect firmware updating, but what I can say is that it definitely doesn't give you the total security, the boot process is still vulnerable, I don't really think it's necessary to have it activated at the moment, it just fixes some old vulnerabilities, but there are still many more holes when it comes to powering on a system.1 point
-
If some people are willing to test some things I might be able to patch something together...1 point
-
damn, wonder how i missed this thread. very funny indeed! side note. no clevo anything is running anything at 5 ghz. haha. too funny. side note. brian. that 2600k will run 5+ ghz on phase...i was running mine at 5.6 for the longest time. so that's just to say...you can run safely at 5ghz 24/7.1 point
-
X7200 is a dead system and I don't even think it can utilize 680M SLi. So by default M18x wins (both R1 and R2).1 point
-
Error43 is tricky as it could be hardware problem or pci-e configuration issue. First thing I'd do is try the video card in a desktop system to confirm it's all working well. Then use a generous-specced ATX PSU to power the eGPU (no 5V/12V issues). If that all passes then can try a Video cards->PCI space.!Save dump if using the video card on a system and it works well. Then move the saved file in config to your system and use Video cards->PCI space.Load dump to see if that solves it. Also you have Video cards->!Show state to see if ATiFlash reports any issues with the video card. As mentioned, mPCIe implementations are tricker than expresscard so you may need to play with various permutations to nail it. Can't help with repairing the video cards. What I can suggest however is double-check your PE4L and XBOX360 PSU wiring using a digital multimeter. First thing I'd do is confirm the floppy molex output plug from the xbox360 PSU that goes into the PE4L has the right voltages across it. Ie: 12V, GND and 5V. Then do a continunity test between the the 12V and GND points from the pci-e plug and floppy molex so are using the same reference. If all checks out then one possibility remains, something I've seen before. Turns out I had a PE4L 2.1a whose internal wiring had somehow shorted out causing the eGPU to intermittently appear/disappear not to mention resetting my systemboard bios settings. I had the impression PE4L 2.1b had solved that problem by generous internal glueing down of the cable strands on the EC2C end but then again you are using a PE4L-PM3N 2.1b so may have endured more bending to fit it into the mPCIe slot. Worth investigating, especially if the XBOX360 PSU voltages all check out above.-1 points