Leaderboard


Popular Content
Showing content with the highest reputation on 07/13/12 in all areas
-
Dell updated their support site with a new Command Center version for the more recent Alienware systems. (See here) Download link (direct) Compatibility: Alienware Laptop M11xR3 Alienware Laptop M14x Alienware Laptop M17xR3 Alienware Notebook M14xR2 Alienware Notebook M17xR4 Alienware Notebook M18xR2 Fixes & Enhancements: Installer Added support for Windows 8 X64 Added support for current AWCC 2.7 compatible platforms and M17x-R3, M18x, M14x. AlienFusion FIX BITS DF553175: AWCC effect the P-state and clocks of NV Optimus sku on DC mode AlienFX LFX_GetVersion function added to AlienFX API AlienFX Controller shutdown process was improved4 points
-
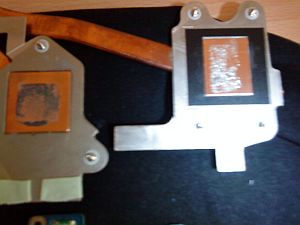
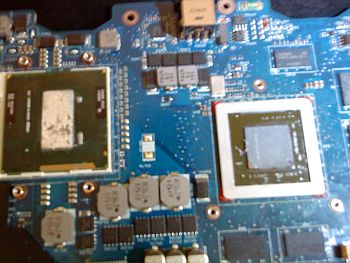
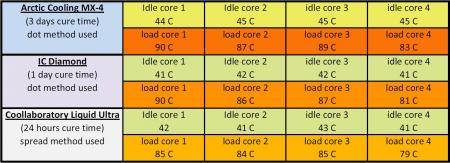
I have tested the following thermal compounds in the M14x R1 since it has the biggest heat problems of all Alienware Laptops and is therefor good as a testing subject. The specs are: i7-2760qm | 6 GB Ram | 750 GB HDD | 1.5GB GT555M | Turbo was on at all tests and the Notebook was lifted at the backside by about 3 cm. No VBIOS mods or Overclocking was used everything on stock speed. No external fan or cooler of any kind. I have used 3dmark vantage for the stress test since this is the most real usage of this Notebook as a gaming Notebook and mirrors how the temperature is in everyday use. To get average results i used alot of benchmark tests for each compound after different cure times and calculated the resulting temps i listed below. For every compound i ran about 5-6 tests after the declared cure time. Interesting was that the performance of the Liquid Ultra doesnt change no matter which cure time i tested it. The other pastes had different results after 1 day or more cure time. Here are some pics of the pastes on the CPU, GPU and heatsinks. This is Liquid Ultra on the CPU and MX-4 on the GPU heatsinks: On this pic you can see how it looks on the CPU and GPU: Well i tried to add some more pics but it doesnt let me upload more at the moment i will try later. However you can clearly see which paste wins and where the differences of them are. MX-4: + best application + easy to remove - worst performance compared IC Diamond: + 2nd best performance + no need to repaste for years - leaves scratches - hard to remove Liquid Ultra: + easy to apply + best performance of all tested + no need to repaste for years - hard to remove from the heatsink (only by sanding it) - electrical conductive My conclusion is that of course the Liquid Ultra is the best compound for the M14x R1 since it has the best performance and has the most advantages when it comes to high temperatures. In idle there is not much difference to other high end pastes but at high work load it clearly outperforms the best pastes by up to 5 degrees.

 2 points
 -
I've decided that it's time to open my beast after i've noticed that one of my 4870's memory climbed above 93 degrees while playing Mass Effect. The idea behind photographing the process is to allow a better perspective than what the service manual gives. What was done? Cleaning the fins on both video cards heatsinks with compressed air Replacing thermal paste on both GPUs and the CPU to Shin Etsu G751 Replacing memory thermal pads on both GPUs from crappy stock ones to those Modding the retention clip as described here. All Credit goes to Ashtefere please rep him for that, he deserves it! Tools used small Phillips screwdriver - it matches all the screws inside your Alienware can of compressed air a small plastic prying tool that Dell once sent me, i used it to pry open the center control cover. Materials used Shin Etsu G751 thermal paste - i bought mine on eBay, but there are a lot of places that sell it. The reason i used it is because according to a lot of reviews this is one of the best performing pastes, only problem is that it's a pain to apply (there are guides for that too ) Thermal pads Step by step (More or less) Ok, here we go. Try to remember the sizes of the screws you are pulling out, and store them somewhere so they don't get lost (i use a vodka shot glass ) Removing the Center control cover i started with placing a towel on my working area to make sure i do not scratch the laptop while i work on it and removed the charger and battery. Unscrew two screws as shown to remove the compartment door. Unscrew the two screws located on both sides of CPU Fan, they are marked as M2.5XL17. Now turn the laptop around and open the screen as far as possible. using the pry tool, or a flat screwdriver, gently pry the control cover up. I found that in my case it's best to start from the right side. Be careful as there's a cable you need to disconnect before you pull it out. EDIT: For those of you who struggle a lot with taking the cover out, make sure you read this mod by Aikimox. Keyboard Unscrew the 5 little screws holding the keyboard and then gently pull it up. lift the keyboard up,disconnect those two cables and remove the it. Video cards. Since both video cards are going to get the same treatment, i'll describe just the master. We are going to pull it out, remove the heatsink, clean it and perform Ashtefere's retention clip mod Keep in mind that it will void your warranty! Remove the bracket. unscrew both screws that hold the video card. Disconnect the CF cable from the card, i used my nails to do it. Note that the location of the CF connector on the second card is under the heatsink and you'll need to remove the heatsink before disconnecting the CF cable there. Now pull the card up from it's outer side to remove it and expose the fan. blow compressed air to clean the heatsink and the fan. Unscrew the 4 screws that hold the heatsink down, following the numeration next to those screws. Now, after unscrewing those screws, the heatsink will probably be still attached to the video card pretty hard. Pry it up gently using the pry tool but make sure to do so where there's no electronic stuff under the tool. This is what you'll see. Next, clean the old thermal paste using alcohol pads, and remove the old thermal pads from the memory. Reapply thermal paste on the video card. I replaced the old thermal pads with with new ones, Ashtefere suggests applying a thick thermal paste on the memory (Shin Etsu would work since it's very thick).. Next, Ash's retention clip mod. I will not repeat him, he explained it beautifully in his guide. This is just to demonstrate how the screw looks like with the washer on it. Follow his guide to reassemble the heatsink on top of the card and return the card to it's place. (Don't forget the crossfire cable). Repeat with the slave card. CPU To access the heatsink of the CPU we will be removing the palmrest and the magnesium cover. With both video cards back in place and screwed in, turn the laptop, and unscrew three screws inside the battery compartment that are marked M2.5XL5 to release the palmrest. With the pry tool pry the palmrest down and then lift it up to remove the little cable that connects the touchpad. Ok, here i forgot to take a number of pictures so I will explain everything on this one. Basically what we're going to do is remove the magnesium cover. before we do that we will need to: disconnect LCD/Wifi/BT cables. They are marked with yellow. Next we will need to open the 10 screws that hold the cover down, those screws are marked with red and with a P letter on the cover itself. Disconnect the Crossfire cable from the master video card so you can pull it out. Finally, after the cover is removed, we'll unscrew those four screws that hold the heatsink down. They are marked with blue Clean the CPU and the heatsink from the old thermal paste with alcohol pads. Next i reapplied Shin Etsu G751 thermal paste on the CPU and replaced the thermal pad on the heatsink with a new one. That's it. Next, reversing the steps i reassembled the whole thing. I had a hard time putting the LCD cable back in place, took me maybe 3 tries before i got it right. Results Those are readings before and after, both after about 30 minutes of playing mass effect 2 so to me this comparison looks valid. Thanks to Ashtefere's mod,replacement of thermal paste and pads to better ones and cleaning the dust I can see about 5-7 degrees temperature drop on the CPU, and i have reason to believe that it'll keep dropping as Shin Etsu has about 3 days settle in time 11-19 degrees GPU temperature drop (!!!) 11-18 degrees GPU DISP/IO temps drop 19-24 degrees GPU /IO temps drop 15-20 degrees Shader temps drop 5 Minutes Furmark run No game warms the GPUs as furmark does, so after running it for 5 minutes and seeing the temperatures stabilize where they did i am very happy overall. EDIT: Additional Resources M17x Service Manual1 point
-
Dell put a new driver for the AMD 7970m on their support site. Version: "A01" 8.973 Fixes & enhacements: Resolves PowerXpress switching issues Download here (direct link). Source EDIT: Seems to be down at the moment...1 point
-
this bios works fine and fast: M14x_R2_925base_1100boost_1350mem but when I tried this one: [M14x R2]_A03 - 650m_@_935-default_1100-boost_1200-mem very weird behaviour. Maybe memory clocks are the problem in your bios?1 point
-
i've frozen quite a few hard drives, one of mine and serveral of some friends, and also one at work. with one exception i got the drives back to work to get the data off them. but, it won't last for long, as (if the problem is a warped disk) it will warp back to failure with rising temperature. so better think of what you are going to save first, in case the drive will show up in windows after some freezing1 point
-
I have Resident Evil 5 are you talking about a Resident Evil 6 or is that 5. Lol idont even know what ive got lol. Are you using 12.7 CAPS they aren't just for Crossfire but also for single card. Whats the in game settings and is CCC just using defaults? You can try vsync with triple buffering... that helps me on Witcher 2 if I used Ubersampling1 point
-
Here sir ! ^^ Not oced only the vbios mod: M14x_R2_925base_1100boost_1350mem.
 1 point
 -
I am with you on that Unreal. Makes it real easy to backup and can be accessed from any system. I love gdrive dropbox and the note cloud evernote. Theres always this. Keep your documents on an external drive thats not regularly connected or used on any system. Perhaps even have a carbon copy of that drive to. After suffering data being unaccesable on a drive i had years ago i decided ill never keep my data and my system as one anymore. All thats on my main system is apps and perhaps bookmarks lol. All else i keep on external which is barely accessed. Im sorry about your lose as I know the feeling. I was unable to replace any of it from back then. Svl7 had an Intel 320 drive go 8mb on him a glitch that made all data and drive size turn to 8mb from the gigabytes it was normally. That was a hard drive failure to deal with no doubt. Must of been gigs poor SVL7 lost also. Save yourself from future failed drives and backup like Unreal said either cloud based sync services or more than one backup drive for your documents. Again sorry you lost those photos. - - - Updated - - - Side note atleast hard drive clicking failure is one thats often fixable by re torquing the torque hd screws with a special troque screw driver and the exact PSI needed for the particular drive....1 point
-
I've never tried this either way, but FYI -1 point