Leaderboard


Popular Content
Showing content with the highest reputation on 10/24/11 in all areas
-
I was trying to overclock the cards to above 800/1000, but I couldn't achieve much with them being undervolted. So I had to return them to stock voltage, here are some runs after o'cing:2 points
-
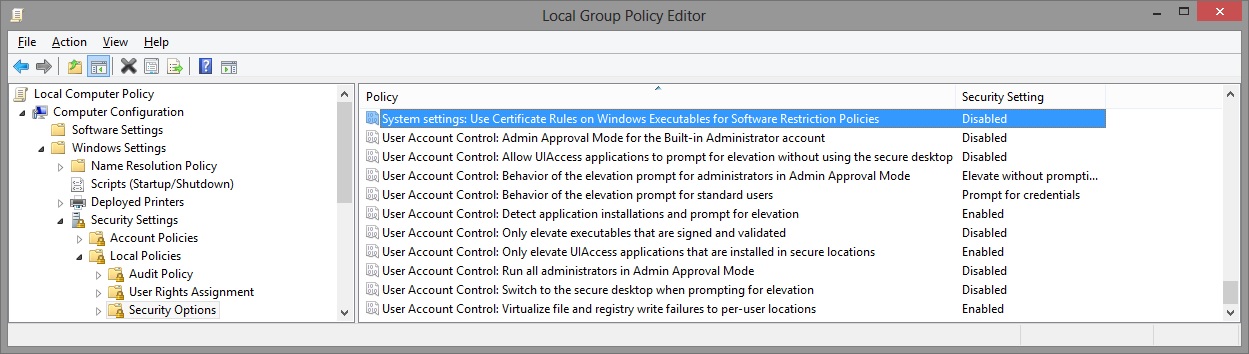
I've recreated the OSD Icons for the R1/R2/R3/R4 and R5 aka 17 as the standard ones are a bit dated. It should also work with the M15x though as my old M15x had the same setup for the OSD app. Regarding the R3 OSD, it seems its the same install for the M18x as well so it should work for you M18x owners too. I've also added the AW 17 OSD to the list. This exe is also compatible with the 14 and 18 as Dell uses the same OSD for all the new machines. There's also a set for you Area-51 m17 R1 owners. I've tried to give it a simular feel to the Invader Icon pack by Alienware. Hope you guys like it Install Instructions for R1 1. You need to end the OSD process in Task Manager since it may be using some of these icon files. Ctrl+Shift+Esc then find the OSD process and end it. 2. Backup your current icons if you want to revert to the originals (You can also uninstall and re-install the OSD application if you want to go back to the original icons) 3. Extract the attached "M17X R1-R2 & M15X.zip" contents to C:\Program Files (x86)\OSD\picture\. Overwrite if prompted. 4. Restart the OSD application. It is located in C:\Program Files (x86)\OSD\Launch.exe 5. Done! Install Instructions for R2 /M15x 1. You need to end the OSD.exe process in Task Manager since it may be using some of these icon files. Ctrl+Shift+Esc then find "OSD.exe" and end the process. 2. Backup your current icons if you want to revert to the originals (You can also uninstall and re-install the OSD application if you want to go back to the original icons) 3. Extract the attached "M17X R1-R2 & M15X.zip" contents to C:\Program Files (x86)\OSD\ICONs\. Overwrite if prompted. 4. Restart the OSD application. It is located in C:\Program Files (x86)\OSD\Launch_OSD.exe 5. Done! Install instructions for R3 / R4 / M18x 1. You need to end the OSD process in Task Manager since it may be using some of these icon files. Ctrl+Shift+Esc then find the AlienwareOn-ScreenDisplay.exe process and end it. 2. Backup the existing AlienwareOn-ScreenDisplay.exe by renaming it to "AlienwareOn-ScreenDisplay.exe.BAK" for example. Its in C:\Program Files (x86)\Alienware On-Screen Display\ 3. Extract the AlienwareOn-ScreenDisplay.exe from the appropriately named file depending on your OS and model to the C:\Program Files (x86)\Alienware On-Screen Display\ folder. 4. Restart the OSD application by double-clicking the file. 5. Done! Install instructions for 14 / 17 / 18 ** 1. You need to end the OSD process in Task Manager since it may be using some of these icon files. Ctrl+Shift+Esc then find the AlienwareOn-ScreenDisplay.exe process and end it. 2. Backup the existing AlienwareOn-ScreenDisplay.exe by renaming it to "AlienwareOn-ScreenDisplay.exe.BAK" for example. Its in C:\Program Files (x86)\Alienware On-Screen Display\ 3. Extract the AlienwareOn-ScreenDisplay.exe from the "AW 14-17-18 (Windows 8).zip" file to the C:\Program Files (x86)\Alienware On-Screen Display\ folder. 4. Restart the OSD application by double-clicking the file. 5. Done! The Area-51 m17-R1 install should be similar to the steps for the other laptop revisions above. They all basically follow the same process anyway, apart from filenames/paths. @robby_hd was kind enough to make a red version of these icons for the M17x R3 / M18x R1 which can be downloaded from his post here. **There seems to be a security issue with Windows 8/8.1 at this point in time since it doesn't allow modified exe's. I will update this post with a solution once it has been found. Also a few Alienware owners are having an issue with the unmodified OSD and Windows 8. Only the default Windows 8 OSD displays and not the Alienware version. Try the solution posted by Dell here and then attempt installing the mod. The below screenprint is a workaround by editing the security policies to allow the unsigned exe to run in Windows 8. If you are not aware of what these settings do and the repercussions of changing them, please do not attempt it. - Open the Group Policy Editor by typing "gpedit.msc" in the search or run text box. - Duplicate the settings below. Area-51 m17-R1.zip M17X R1-R2 & M15X.zip M17X R3-R4 & M18X R1-R2 (Windows 7).zip M17x R4 & M18X R2 (Windows 8).zip AW 14-17-18 (Windows 8).zip M17X R4 & M18X R2 (Windows 8.1).zip

 1 point
 -
http://www.youtube.com/watch?v=-uRc_9CiOew Rev Theory: Justice Heard this band from one of my friends, lovin it.1 point
-
http://www.youtube.com/watch?v=HZGA79RFWMU&feature=related1 point
-
Well, found the datasheet in the end and did some quick benching, got me some hardware points for the Pentium 4 2.8 GHz and Intel 828555 integrated graphics, 3dM03 and 3dM2001, lol. Also some wprime and CPU-Z runs, but I simply can't get it as high as I'd like... does anyone here got some experience with overclocking Pentiums? I guess my RAM is crashing, but since it's a notebook I pretty much don't have any options in the BIOS, e.g. to set the FSB:DRAM ratio to 1:1 for example. Only thing I can think of is changing some stuff in the RAM profile itself with the SPD tool, though I have no idea what exactly needs to be changed... ideas?1 point
-
Nice score!! Am I right when I assume that you only use one PSU? This will be a limiting factor when it comes to overclock these cards in an r2. Very nice run. Did you use some auxiliary cooling?1 point
-
well overheat or limits of the hardware (we truly need an overvolt of .5 volts is all like in Svl7's mod but not feasible for most of us too Frankenstein our cards) I am repasted and I saw about 10-20mhz more on core and my 1210mhz overclock on ram went from mid 90s in furmark to 81 max and mostly about mid 70's. So for me with rbe editor i flashed my cards for gaming 24/7 clocks i have 830/1100 locked on every power profile so it never clocks down which adds stability in games where on occasion the clocks were going between 3 and powersaving clocks in between high stress scenes. Go through the M18x bench thread look at me and Jimbos runs... Jimbo got higher clocks out of his for bench purpose but he had lower temps than all of us being in Australia at night and a AC unit not sure what else you utilized Jimbo.... so for bench clocks for me on 3dmark11 i have about 845/1210 max and 850/1215 on Vantage. Vantage will see you ever so slightly higher and 3dmark11 is so strong you'll have to watch your core speed good. Now your limits seem close to my 24/7 overclock for gaming. I would suggest posting either a pic of gpuz or hwinfo after running one of those runs for us here... if memio/vram modules are in 90's instability will follow... even if its high 80''s the paste instead of pads on vram and voltage regulators etc... i saw drop of 20c average maybe slightly less in high stress... the core only saw about a 10c improvement.. check on the ICD survey results... it helped even on Stamatis's R2 and its 5870's.... whats with your ram Iphantom your modules are mixed in matched according to that screen shot... you have 1800mhz ram with two 4gb modules and two 2gb modules for a total of 12gb right... it may not be a prob but i've always been used to using all the same sized modules... anyways... guess if it runs good it doesn't matter if the dimms are different capacities. Iphantom i want to help find reason for your invalid tesselation result... please post exact driver version you are utilizing now... could have something to do with that... as I or Jimbo have never seen that before... heres what the site says try downloading the patch located below... Unable to verify AMD Catalyst tessellation setting, result invalid This message can appear only with 3DMark 11 results from systems using ATI/AMD video cards. It appears when the benchmark run was done with too old SystemInfo module and there is no way to verify if AMD Catalyst Tessellation Controls were modified for the benchmark run. Most likely the result is comparable with other scores, but there is unfortunately no way to tell. This error should appear only with old benchmark results submitted prior to the introduction of Futuremark SystemInfo 4.2. To correct the problem, update SystemInfo module to the latest available and re-run benchmark. Latest SystemInfo installer can be found here. Processor is not recognized or Graphics card is not recognized System Info Fix click me <!----->1 point
-
24K for GPU even when undervolted? wow1 point
-
Just finished a red OSD Icon Theme for M17xR3 for the newest OSD Application. Simply download, unrar and replace the .exe with the one at your OSD Application installation folder (normally C:/Program files (x86)/Alienware On-Screen Display/). Run it. Should work then. For Download see my next post !!!1 point
-
http://www.youtube.com/watch?v=8qoCq-KsmZU1 point
-
Some of the install discs include all windows versions and activate the right one based on the product key and some just have the version that's labeled... have you tried the OEM disk they sent to see if it allows "ultimate" edition installed?1 point
-
*In response to a PM from DR650SE for overlocking advice… figured everyone can discuss this togetherso I posted it instead. "You can followanything I wrote as my settings by all my bench pics but here's anything thatcomes to mind. I had to get high cpu scores on my r2 when I had it to keep upon the lack of having ever changing factory pasting on the gpus and no dice orac so I thought I was fuxxed so I found my own way without those methods. I mayof had lower gpu scores but had my cpu at 8kcpu on 920xm and on 3dmark11 ispretty good right for the R2? I am the beginner Ilearned from you guys and from back when on Wikia free forums when it beforeT|I was up. I learned how to flash vbios from you back then only. So the theory. Youknow this stuff but having it all work together is the key. I had 5870m not6970m in the r2 so there's emphasis on YOU using every method possible forsaving power and keeping cool. Maybe you and Stam really should work togetherto make your supply dual parallel power supplies and I'll do it on my m18x withyou guys... R2 would have 480watts for play and 660watts for m18x. Okay now thetechniques since I use the normal power supply like you. You guys had amazingdiscussions on it so far. I am also running into power shutdowns like when over115amp and watts are set high on cpu... that's happening without my gpusoverclocked. Some of this you'vesaid yourself DR650SE. Try sticking to vbios overclock not using ULPS off inwindows that allows power saved while idling before the test and there would beless heat already for the second gpu... So don't disable ULPS just make like 20variations of your overclock in organized fashion on a usb stick with RBE thenyou can quickly move your next overlock vbios files in right place and flashand check settings quicker. Before your main run you can still use ULPS off andTrixx to find your range of good clocks then turn ulps back on and flash yourplanned overclock. Turn off all bios options for Bluetooth and PCI card slotsremove all USB stuff, use just a single or dual ssd drive if in raid 0 anddon't have a motor based platter hard drive while benching. Keep the powersupply cool also, see my makeshift cooler on the website. Cool components equalless required watts, MHz, voltage id, amperage etc for the same performance orbetter and heat raises these as heat goes up. So we need all ways possible tolower wattage coming from your power supply compare numbers on my highest cpubenches in the r2 bench thread to see which voltage I used, watts and clockssince they can help. Example 4ghz mayscore less than an undervolted 3.75ghz. feel the config out with wprime if thewprime scores good on that config probably will be good for 3dmark. So undervolt even ifit sacrifices a slight bit of MHz the scores can be higher from lower temps. SoI'm saying use passive cooling ie undervolt to the point of just stable enoughto survive the test. Amps will shut off system faster than watts ... Tdc andtdp but if you use a little higher amps and limit your watts.. The load canquickly be drawn on demand and allowing high wattage peaks but no crash sincethey peak and go back with cpu thermal envelope. Use throttle stop for morethan just over clock have overclock on one profile and on the other set yourlowest multiplier locked like is it 12 on i7 first gen? Its 8 on Sandybridge.And also on that profile check cmod or one of them and drop it anywhere from25%-87.5% so your chips cores are running well under natural idle loads andtemps will drop further leave the cpu cooling awhile so when you launch thebench you restore your overclock but cpu cooler that's directly contacting thepaste and cpu is also extra cool where as its not if you didn't do that justthe entire cpu heatsink would be cool not the area I mentioned. Now if you look at HWinfo summary I discoveredyou see what actually happens during cmod less than 100%... I noticed your cpucores suddenly operate at the percent speed you set the cmod too but also thememory does this and even the baseclock drops the same percent giving 100%system cooling via passive drops in speed in almost all clocks of the systemallowing components to absorb more of your cooling on the system. Cool rightthat is additional passive cooling since its using lack of voltage and MHz tothe cores to keep them extra frosty before the benching starts. Fans should be maxedon gpus and cpu with HWinfo. Those heat sinks need to be extra cool beforehand. I never benched with the covers ever off but the battery out for sure socharging isn't happening. All Alienware lights out, you will need Alienware OSDenabled set to go dark and no LED's lit even status lights. When windows startsand lights go out fully on keyboard etcclose OSD process manually and start hitting stop on every unnecessary servicein windows services window. Next closeanything remaining in task manager that's unnecessary since some will be foundhere left. Make sure your plugged into outlet with enough juice some in housescan just be appropriate for lighting. Set screen brightness all the way down.Stop most startup apps in ccleaner use disable since it is easy to enable againthis way. You can keep system covers off since your trying to squeezeperformance. Use the dice on everything even the heatsinks. Use your dice potand ICD 24 its amazing paste. Repaste your CPUs and gpus including Vram andother heat creating pieces. Pre chill your system by idling before kicking theoverclock in and starting the bench. If need create a hotkey to lower cpu orraise in certain scenes of the benches. I haven't but it will help. Undervoltundervolt undervolt! I'm honored to help, I am the newbie amongstyou guys. I use a basic notebook cooler they do help you should too since Inotice my aluminum frame helps cool components a giant amount in fact thealuminum always felt cold. You should use air conditioning too or cool yourroom extra for it even if using dice all components should be cool. Use thehighest baseclock possible that's stable. A high baseclock is priority.Undervolt ram unless its the lowest voltage you can get stable. My ram for the8kcpu in 3dmark11 was stock Dell ram I ran high baseclock but was able to keep1.5v ram. It was like 146-149 baselock with fsb on r2. (m18x cant use fsb). Theram I had used 1.5v with a huge over clock from its stock 1333mhz. Unlike myHyperX I bought for my M18x at 1600mhz which are 1333mhz chips at 1600mhztimings but require 1.65 volts. I wish they would run at lower volts, for me ifI overlock on my baseclock on my m18x my max ram volts is 1.65 in bios is so ithandles to a certain point and would have benefited from 1.7v for extremeoverclocks... But for your r2 try 1.5volt on ram to help heat too and powertoo. If you have Dell ram handy try that you never know one may handleoverlocks and undervolting better. Use a thick lead from your powersupply towall that's rated at high amps. The M18x lead is thickest I've seen. Setwindows to performance in the computer properties so there's no excessivesystem animations etc. Make sure your drive or drives are defragmented and ifits SSD look into a defrag program that aids in SSD i/o operations withouttraditional defrag. In the past I had used Diskeeper or Perfect Disk fordefragging... there a few companies that use similar invisible defragging thathave no impact on user operations while the system is in use. Also ramdisks forpagefile or the app your using could help too. Another is called Fancy Cachethat I think Unreal posted just do a search for it. There's been a thread aboutthose types of programs haven't tried it but there's guaranteed a benefit sinceram transfer rates are much higher than SSD and regular drives are just a jokecomparatively. The higher your Voltage ID at the given moment the more tdc andtdp it will require. My same settings set with only difference being VID boostrequire me too raise tdp and tdc a bit to maintain the same speed. Cheers!Happy overclocking. If you have any unmentioned techniques I'm all ears too. *This is just some basic rambling and observations… so just some thoughts I am in no way sayingany of this is concrete. Feel free to discuss these and any other methods youhave used. The only required proccesses if not using internet or graphics just leave your companies graphic services running if needed this is after stopping uneeded services just close the remaining uneeded processes http://i1237.photobucket.com/albums/ff474/marcwwaters86/Theonlyrequiredproccessesifnotusinginternetorgraphicsjustleaveyourcompaniesgraphicservicesrunningifneededthisisafterstoppinguneededservicesj.png The only required services when not using graphics or internet for graphics just leave your graphics companies services running http://i1237.photobucket.com/albums/ff474/marcwwaters86/Theonlyrequiredserviceswhennotusinggraphicsorinternetforgraphicsjustleaveyourgraphicscompaniesservicesrunning.png1 point
-
Change of pace1 point