Search the Community
Showing results for tags 'fan'.
Found 20 results
-
 Hey guys, first post, but I thought I’d discuss my heatsink fan retrofit in my old M14x r1. Old fan was loud and not very efficient: the air transfer rate was around 2 cfm (I’m assuming cubic feet per minute). Finally had enough and decided to swap out the crappy r1 fan/coughing pinwheel for a r2 fan (rated at 10.4cfm). I found an old r2 heat sink on eBay (beware though that the heat sink for the r2 will NOT fit the gpu/cpu configuration for the r1. HOWEVER, the fan of the r2 heat sink it is attached to is a carbon copy fit into the r1 MoBo. A few philips head screws and a seal of good electric tape and BAM, you’ve got a significantly cooler and MUCH quieter intake fan in your old R1. My CPU temps from before were around 87-88 max load in FSX, 65 for the GPU; bear in mind this is after a repaste. Now with the new fan, I’m not going over 77 degrees on the CPU, and the gpu stays around 58, all while being MUCH quiter. I’ll post pics of the walkthrough if anyone is interested. Just thought I’d share with all you fellow loonies trying to squeeze every last frame and degree out of our “portable toaster ovens with a screen and keyboard”.
 -
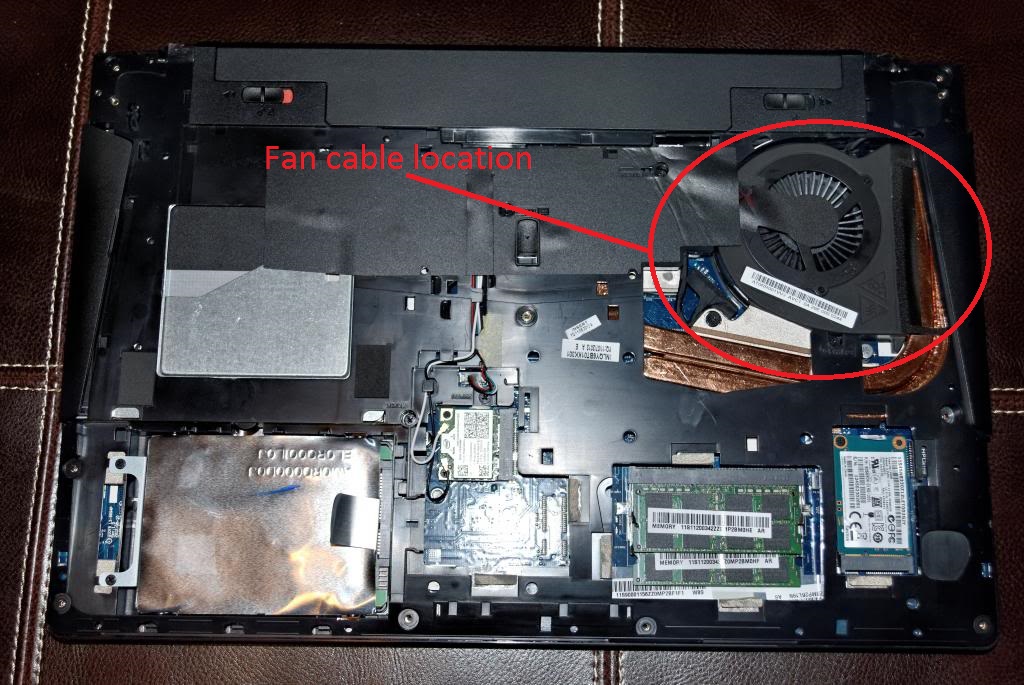
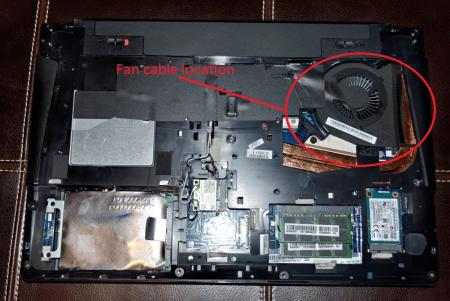
My Y400 ran into some trouble a while back and still isn't fixed but I won't tell what happened to it here as I will post it on a new thread. Simply put, I had to mod the laptop fan so that it would run at 100% speed no matter what. It made the fan run louder but made my temps considerably lower. This is a post to show you how I did the mod. 1. Open up the bottom cover of your Y400 or Y500 2. Locate the cables for the fan. 3. There should be four cables there. One red, one black, one yellow and one brown. 4. Cut the brown wire. The brown wire is for the motherboard to control the fan speed. Once you cut it your laptop fan will run as fast as the dust cleaning process lets it in lenovo's energy management tool. This is the fan's normal speed. It was made to run slower by lenovo to make less noise. I got the image above from this thread: http://forum.techinferno.com/lenovo-ibm/2773-y500-disassembled-pictures.html It shows roughly where the cables should be for the Y400 and Y500.
- 17 replies
-
- 1
-

-
- cooling mod
- fan
- (and 3 more)
-
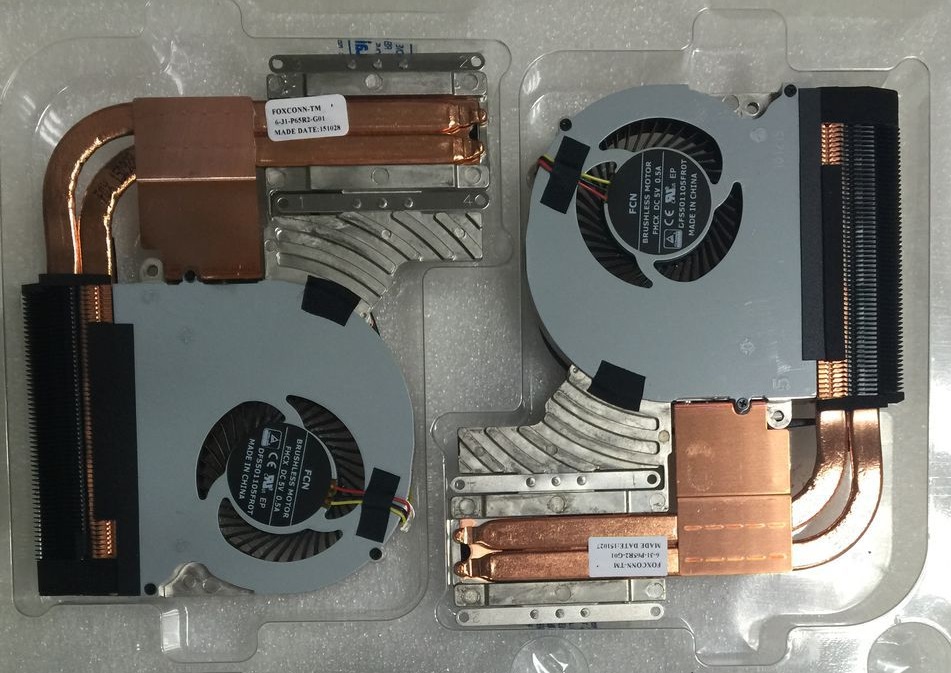
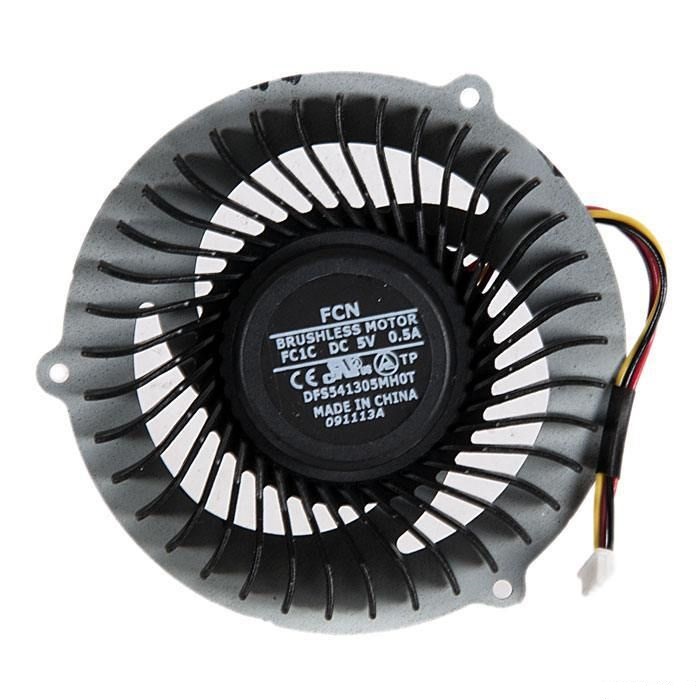
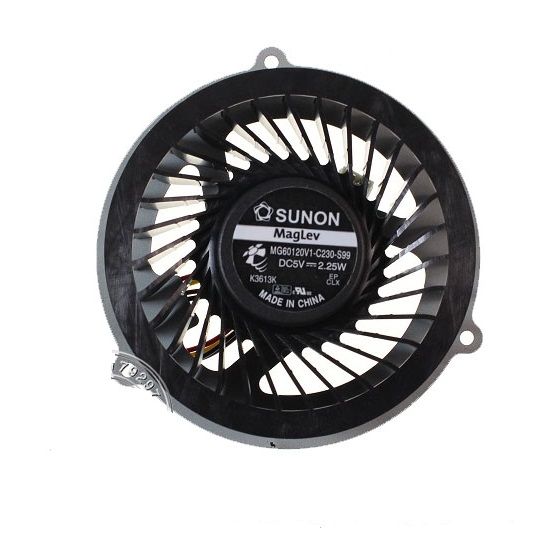
When my first CPU fan on Y500 is broke i replaced it on something compatible (non-original) and planned to replace it later on original. Since that time happened a lot things, but i still using that non-original fan. But i did some research and here is what i founded: I. ORIGINALS 1. Forcecon (marked as FCN on fan) DFS5413005MH0T-FC1C (5V - 0.5A) Spotted in: Y400, Y500. 2. Asia Vital Components (marked as AVC on fan) BNTA0612R5H-P007 (5V - 0.5A) Spotted in: Y410p, Y500, Y510p. 3. Sunon (marked as SUNON MagLev on fan) MG60120V1-C230-S99 (5V - 2.25W (0.45A)) Spotted in: Y410p, Y500. So, which to choose? Any recomendation? Maybe there also unexpected way (completely diffirent fan from another company for another laptop)?

-
Over the last 10 years I've found laptops throttle the processor speed in order to keep fan noise down. I prefer the fan to run noisily, and the processor to run at full speed. I've developed tried and true mods for lappies and have demonstrated their effectiveness. I have two Lenovo W541 laptop workstations with I7-4940MX processors and discrete nVidia graphics. On one I overhauled the cooling. Copper shim between CPU and hsf, AS5 on both sides. Shims between hsf and inductors near CPU and gpu, and shim on the gpu. Used 'thinkpad_acpi' Linux kernel module to set fan to max speed. Ran mprime (prime95 for Linux) AND Unigine Heaven, alternating, to cure the AS5. Then ran mprime. Temps were slightly high. But laptop processors tend to run hot. The I7-4940MX is a 3.1 GHz, 4.0GHz. Turbo processor. The modded machine ran at 3GHz. continuously running mprime, for weeks. The unmodded machine with the same max-fan-speed software tweak and stock thermal-interface material, throttled to 1.7GHz. at the same running temps. Clearly, laptop manufacturers are robbing performance off the top, by inferior cooling hardware and materials. Granted, getting the cooling mod to all fit together correctly with smooth, flat surfaces requires hours of work and materials not normally found sitting around the house. I normally do not mod the CPU die. I abrade copper surfaces down to 1500 grit paper, and then polish with scapings from a bar of buffing compound. Everything is done on 1/2" plate glass to maintain flatness. The final mirror polish is done with the compound granules on a clean, damp cloth. Desktop processors mostly have slightly raised corners, so smoothness is not as much of concern. You're going to get thermal-interface compond completely covering the center of the processor. The ideal is to fill the microscopic gaps between the cpu die and the hsf, but where there is metal on metal, have it be. Metal to metal provides 100s to 1,000s times the heat transfer of thermal paste. But, on a desktop, there are more effective cooling solutions than moving air. Most user are satisfied with their laptops, because the processor doesn't run full speed long enough to make a difference. But I enjoy tweaking, and I do processor-intensive work, like batch editing 100s of large images, video rendering, security testing, password recovery, network testing; that are all severely compromised by poor, stock laptop cooling solutions.
-
Hi, I am having some heat issues with the GTX 680m I installed on my Alienware M17x R2 (yes, its old). Having installed and ran HWiNFO64, it appears that the maximum rpm of the GPU fan is 2560rpm, even when the GPU reached a maximum of 93° Celsius. The rpm seems low, but what is the maximum rpm of the fan, does anyone have any ideas? Thanks
-
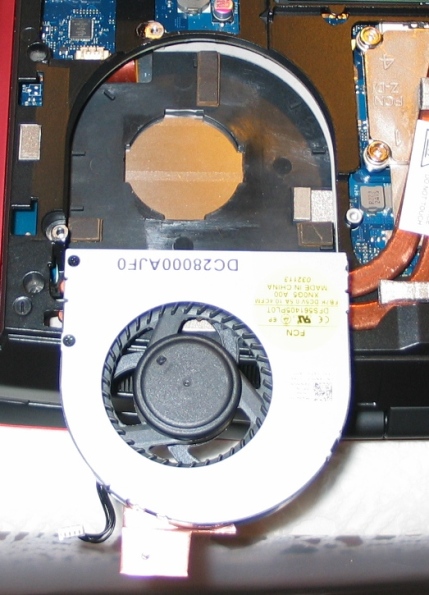
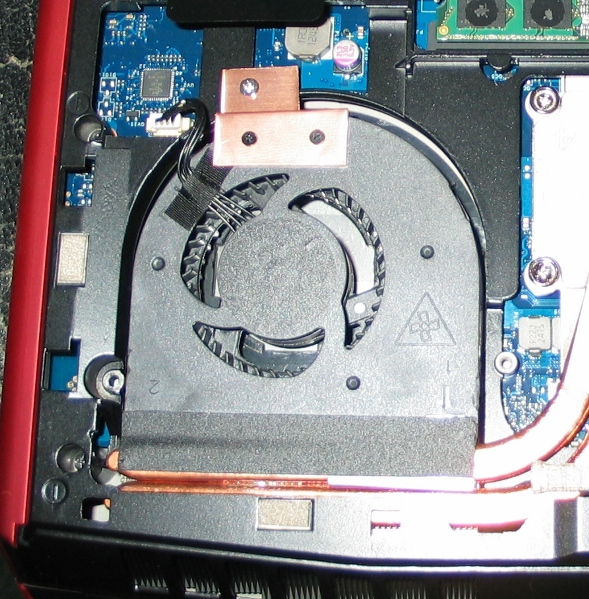
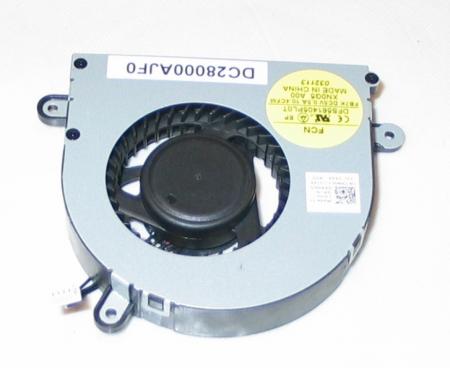
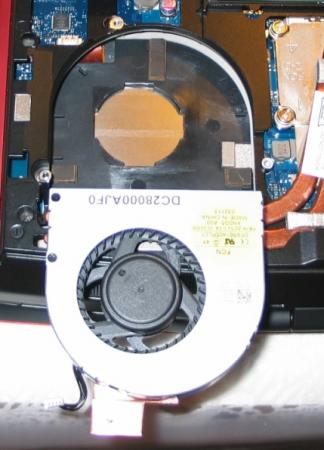
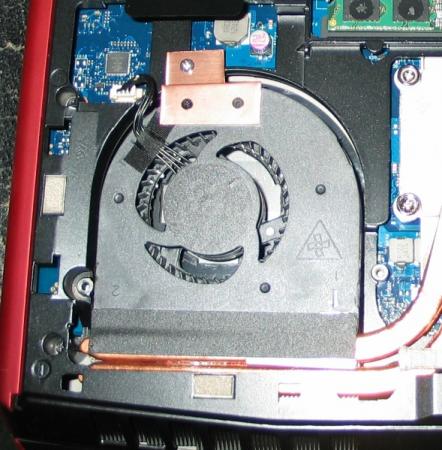
CPU Fan Upgrade Procedure for M17x R3/R4 (2.0CFM->10.4CFM!)<o:p></o:p> My original CPU fan was adequate (not great but adequate) fora 3740qm CPU @ 3.7GHz but when I upgraded to a 3920xm CPU and overclocked to4.1GHz x 4 cores, I needed more cooling - a lot more. Running a 60-second CPU stress test on all four cores in Intel XTU, with a 65watt CPU TDP programmed, and a core voltage of 1.351v, the difference is asfollows: · With original fan, system runs @ 4.1GHz for ~28 seconds before dropping to3.5-3.7GHz because of heat. On longerstress tests, it DOES NOT recover from this reduced speed state becausecooling is not adequate. Core Max: 92-95Celsius. · With this fan mod, system runs @ 4.1GHz for ~55 seconds before dropping to 3.7GHzbecause of heat. On longer stress tests,it DOES recover from this reducedspeed state and spikes of ~4GHz are seen for the remaining duration of thetest. Core Max: 92 Celsius every time. <o:p> </o:p> So here are the stepswith some pictures: 1. Procure an M14x R2 fan. It MUST be an R2 fan!! The fan blade design is clearly different so usemy picture as a reference. There are many eBay sellers, for example, selling the R1 fan as an "M14x series fan," implying that bothrevisions use the same fan - which is not true. The R1's fan has a 2CFM sticker rating while the R2's has 10.4! The markings to search for are: XN0G5 and/or DC28000AJF0. I got mine here: http://www.aliexpress.com/store/product/Cooling-Fan-for-Dell-Alienware-M14x-XN0G5/207462_647373968.html Note: Do not just swap the M14x's fan blade into your existing M17x fanshroud. I tried that first and it doesnot increase airflow. You need the newblade AND the new shroud for this to be effective. 2. Remove your original CPU fan. There are three screws that hold it in. Also disconnect its power jack from themotherboard. While you have access, youmight want to blast that exposed exhaust port with some compressed air to makesure everything is clean. 3. Notice the three mounting brackets that protrudefrom the sides of the fan shroud in the picture from Step 1. You'll need to cut them off so the shroudwill fit. I used a Dremel with agrinding wheel. There's also one smallblack screw in the corner with the yellow sticker. You'll need to remove it and grind down thatprotrusion as well. Save that screw forlater btw. 4. Make spacers/pads to hold the new fan up. The factory pieces will not line up so you'llwant something under the fan for clearance and to allow air intake from theunderside. I used small pieces of arubber material called Dynamat but padded mirror tape would work, as would manylayers of electrical tape placed on top of each other. It doesn't matter what you use - as long asit won't melt - and you'll want it to have a small footprint so it doesn'tblock airflow. I made my pads abouttwice the height of the factory material. Higher pads will allow for greater clearance and more air intake - justbe sure the fan still lines up with the heatsink and the case closes over it. This picture shows the three pads I made, and the fan shroud with its originalmounts ground off. 5. Create a mounting bracket to secure the fanshroud at the point farthest from the exhaust port. You could optionally fabricate mounts to lineup to all three screw threads on the case, but with my sturdy rubber pads andthe tape that will be included on the exhaust side if you buy your fan new, Iwas fine with only one new mount. Note: Leavethat tape covered until the end of Step 7. I used a thin piece of copper but any metal is fine. Bend the metal so it lines up to both the topof the fan shroud and the point above the screw thread on the case. Mark how it sits on the fan shroud and drill twotiny holes (1/16" bit) through the shroud-side of the mount. Now place the mount on the shroud using yourmarkings and VERY CAREFULLY drill further so that you have holes going throughthe plastic as well. Do not push hardand do not hit the fan blade within! Drill a slightly larger hole on the case-side of your mount where itwill line up with the screw thread. Thescrew you saved from Step #3 can be used for one of the shroud-side holes andwill not hit the fan blade within. Ifyou can come up with another similar screw, use it for the second hole. If not, you can take one of the other twofrom the shroud assembly if you want. It's also held together with clips so it won't fall apart. One of the three screws that held in youroriginal fan shroud can be used for the other (case side) of the mount. 6. Thoroughly blow off your new shroud inside andout with compressed air to remove any stray plastic scraps from the machiningprocess. 7. Fit everything up, making sure the fan sitsflush on all the pads you've made. Makesure it lines up with the heatsink and isn't too high or too low into thecase. Adjust pads as necessary. Once you're satisfied, screw in your mount tohold the fan in place. Now lift up thetape on the exhaust side (which should still be covered) and remove thecovering. Carefully fold the sticky partdown onto the copper heatsink pipes to secure that side of the assembly. 8. Plug in the fan's power jack. Again, ignore the connector being a differentcolor. It fits and it works withoutmodification or programming. 9. Close your unit up and enjoy!! So there it is! Let me know how this works out for you guys if you try it - and what you think about the procedure itself. Suggestions/questions are always welcome! * I obviously assume no liability if you break anything doing this. Informational purposes only, etc, etc, * This procedure replaces the M17x's original CPU fan (and fanshroud) with that of the M14x R2, and yields a greatly increased fanoutput. Both fans use the samemotherboard connector (ignore the color difference of the jack) so all that'sneeded here is to procure an M14x R2 fan, modify the mounting system a bit soit fits, and connect it up - and it works like a charm!

-
Every once and a while, my fan will start rattling, and everything works fine, but it is just extremely annoying and I don't know how to make it stop. I tried using the dust cleaning function of the lenovo battery application, and it helped a little but occasionally it will start making the noise, and it is really loud and concerning because I hope it is not indicating any other more pressing issues with the Y500.
-
 Hey guys, I built my eGPU setup with an Akitio thunder 2 and a Zotac gtx 970 a few weeks ago. It worked pretty well, but the fans of the eGPU doesn't change speed, neither under high usage... I heard about zotac firestorm and other drivers that can control the fan´s speed, but I want to keep OS X and don't want to change to windows... So I opened the case checked with a multimeter how high or low the voltage of the fans are, but somehow I touched with both poles of the fans and the whole setup shut down. I rebooted it and the eGPU worked fine, but the fans doesn't move ant all... I disconnected them and powered them separately and they spin! That means that it could only be a software problem. I hope you can help me Severin
 -
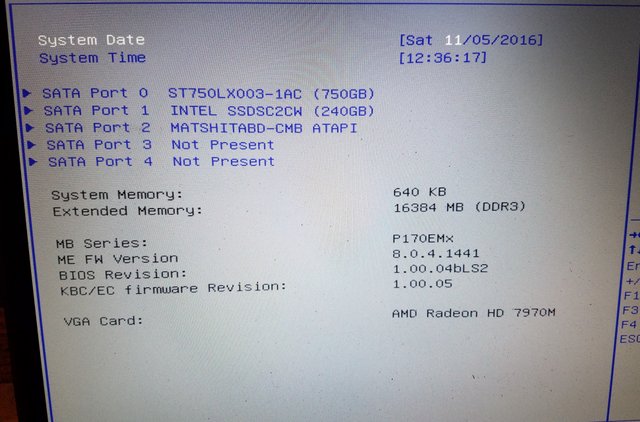
Specs: Sager branded Clevo P170EM 16gb ddr 3 AMD 7970M i7-3820QM BIOS 1.00.04bLS2 I'm working on this laptop for a friend and it will NOT stay on more than a couple minutes before it shuts down. I have tried everything that i can think of and it still shuts down. Im thinking it some kind of thermal or video card problem but I cant quite narrow it down. here are the things i have tied: cleaned/re greased both fans. cleaned all heat sinks fins lapped and reapplied thermal paste reapplied thermal tape to the GPU replaced CMOS battery reset CMOS removed/reinstalled all drivers for iGPU an the 7970 tested all ram in a seperate latop top individually swapped fans to test headers After all of this it still will beep about 20-22 times and shut down it is in no way getting hot the fans still spin but the computer still shuts down. What else can i try ? I can't be the only one who has this problem. I've added a file that show the bios version.
-
Hi. I'm having a Clevo W370ST with i7 CPU and I\ve noticed, that even when CPU throttling, the fan operates only at half-speed. Of course I could always press Fn+1 but I'm a bit lazy so I think about different solution. I already know a little about BIOS Mods, but I haven't found a tool to actually modify the EC. I've tried to learn how it works with RW Everything and Hex Editor but I don't think that's a good approach. Can anyone tell my if there is a tool to modify the fan profile in my EC file?
-
Hi all, first excuse my bad english pls :x I bought a new Computer with a gtx 1080 in, a Manli gtx 1080 Twin Cooler. When I play games and the graphicscard need to work, the 2 fans start to speed up around 3k rpm and then fall of to the normal speed, it last for like 1second, sounds like a tubirne -.-' the temperaturs are below 70°C when this happens When I'am on the desktop or browsing in the internet, everything is fine. I've read in the nvidia forum, it should've been fixed with a driver update, i got the newest one, the driver version 375.65 , the problem is still there. I used the DDU to clean install the newest driver, the problem is also still there but seems to appear a bit less then before. is there maybe a bios which can fix this issue for me or maybe other solutions?
-
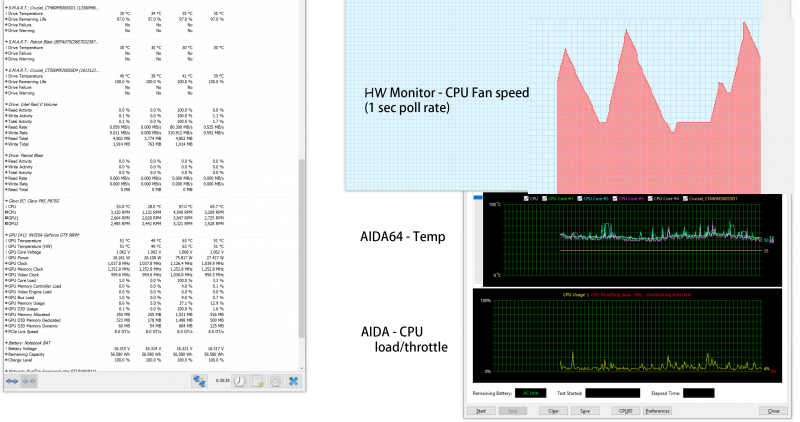
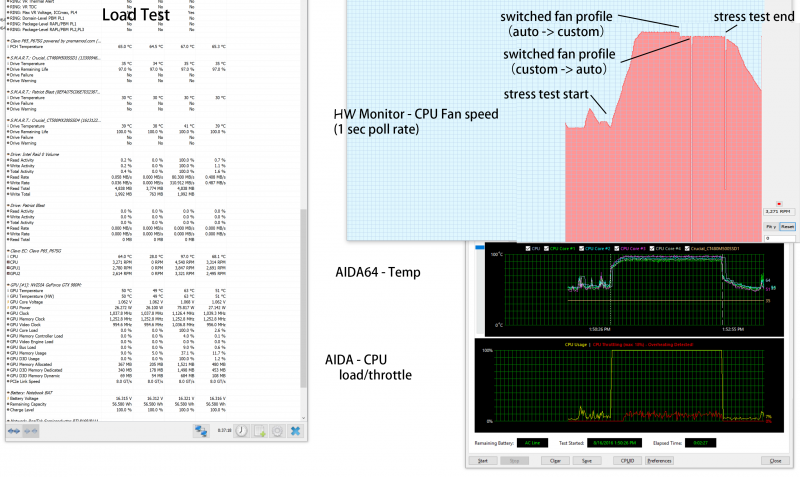
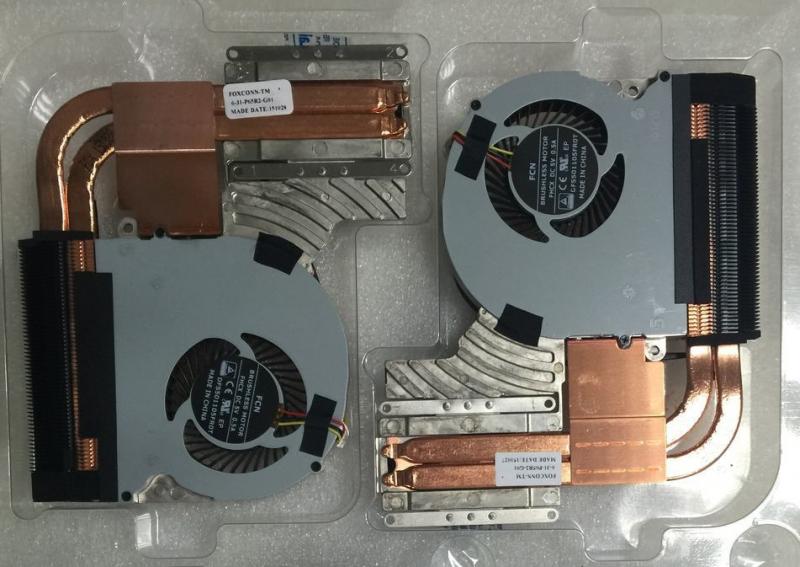
Update 1 (Sept 19, 2016) : I have fixed my CPU fan issue, I have copied the post about it in the main thread, but do read the posts, a lot of gem in there. EDIT: My GPU fans work perfectly, and never had speed dip or slow ramp up. It keeps the gpu under 75C all time, and under 90C with +250 +300 OC. Hi all, I have a P650SG (Eurocom), and I have been having this weird CPU Fan problem for a long time... The CPU Fan would suddenly stop for no apparent reason (i can hear the fan just suddenly went silent), and it will take around 1-2 second to restart and ramp up to top speed really slow... Also it react to the temp change really really slow... the CPU would jump to 97 degree and throttle, then the fan speed will slowly increase.... Here is the Idle and Load test graph: Idle: Load: In the graph you can see the CPU fan ramp up rather slow, and it have a 4000->0rpm dip when I switched fan profile in Clover Control Center, and a 4000->1000rpm dip when I stopped the benchmark...(it shows dip to 1000rpm, but i think it dipped to 0rpm from what the fan sounds like) I have tried different BIOS and EC, 1.03.04 to 1.05.01, non helped. Right now I'm on Premamod v2, it is not improved. This is really bizarre to me... I don't know what is causing this problem, I did an RMA with eurocom but their inspection shows no problem with the cpu fan... Is the cpu fan failing? or is the power delivery failing? PWM failing? I have no clue now... Please someone point me to the right direction... Thanks. UPDATE1: I have fixed this problem. Just an update in case anyone else have the same problem in the future, this CPU fan problem is because my CPU fan is failing, and also the cooling module is not that good. This is actually quite common, Clevo have a new version of CPU cooling module in P651SG. I bought the newest version of CPU cooling module for P651SG on taobao, changed it on with the 5583 thermal paste(this thing is so much better than my Arctic Silver 5 or MX4), and the problem is gone. The new fan even sounds less aggressive at 100% fan speed. Temp has been very good, stay below 85. I also bought the custom cooling pipe that connect CPU heatsink to GPU heatsink, it is said to lower CPU temps more since the GPU fan will help a little. I didn't bother putting it on since temp is very much improved already. I bought the CPU cooling module for about 40 USD, and the heatpipe 10 bucks, way lower than the quoted price of around 50 CAD for only the fan + 30 bucks shipping I did a couple weeks ago with eurocom. BTW some pic after I changed the CPu cooling module, broken case corner, and applied vinyl skin.
-
HI everyone. Do someone got solution for GPU fan in M17x r3 after R9 m290x upgrade ??? i use HWinfo but will be nice if someone help me how solve this problem. I know this its old topic but when i try find somethings about this i got nothing. Thank you
-
Hello ive seen a few people asking about heat and i thought i would chime in and say a few ways to keep down the heat! there are a few ways you go about this with out opening the computer, for those who arent to sure about taking a screwdriver to their laptop it may help you. in saying that, if your fans are dirty then this will not help you at all. I TAKE NO RESPOSIBILITY TO ANY DAMAGE HARDWARE! ANY CHANGES YOU MAKE ARE AT YOUR OWN RISK! INCREASING THE FAN SPEED to control your fans use this http://www.hwinfo.com/download64.html this is a free program that alot of people use on various computers. it work on alienwares well but im yet to test ROG and MSI with it. its pretty simple to use install it and get to this page and click on the sensors button then on the next screen click the small fan icon at the bottom unless you want to manually adjust your fan between each time you play click customer auto and you can edit it from there UNDERCLOCKING download and install NV tools it can manage fan speeds too but its not always 100% in laptops http://www.nvidia.com/object/nvidia-system-tools-6.08-driver.html on the left hand side, under the performance tab, select device settings now just slide it back in small steps until you are comfortable with the temps. remember that if your computer blue screens it DOES NOT mean your computer has been damaged. it is simply a way for the computer to avoid damage. adjust the slider in intervals of about 15mhz to be safe and click apply each time. start on the core clock and finish on the memory. Every now and again it is good to check on your progress to see how far you need to go. (more on this later) MSI after burner is a good one too http://www.guru3d.com/files-details/msi-afterburner-beta-download.html again the fan control is a bit hit and miss with it but it can control your clock speed. ass per the program above keep going untill you hit a STABLE setting you want. TESTING here we will look at the new GPU temps after the tune. MSI Kombustor is a great way to test your heat. http://www.geeks3d.com/20150710/msi-kombustor-v3-5-2-64-bit-v2-6-0-32-bit-download-gpu-stress-test-benchmark/ click on stability and watch the temps. if you see any artefacts stop the test and increase the mhz by 15mhz each fur mark is the one that i use to test the heat of my alienware http://www.ozone3d.net/benchmarks/fur/ aim for about 70-75*C. hope this helps you a bit. PS avoid EVGA's tuning tool on alienware i have heard it can brick your LCD! CLEANING THE FANS Just for the sake of it ill give you a few tips on cleaning your laptops fans out. assuming you already know the basics of using a screwdriver to open a laptop ill cover a few things to help you. REMEMBER, IF YOU REMOVE THE HEATSINK YOU WILL NEED NEW THERMAL PASTE! compressed air is a great way to remove dust and id recommend having a can of it over a compressor. The reason being is that some compressors can fill with a bit of water and can spray it directly into the computer. you can spray the air into the vents and while it wont really "clean" it it may open enough room for air to pass out. i DO NOT recomend this however. after opening up the computer and removing the fan take a paint brush and clean the entire fan, get as much of the dust out as you physically can. you can use toothbrushes too if you dont have anything else. make sure you clean the grill behind the fan too as that is where the dust usually builds up. removing this dust and hair is the most important part of this clean up. now on to thermal paste. remove all the old thermal paste from the heat sink and the CPU with a dry cloth then, use isopropyl alcohol to clean the rest. some people seem to think that more is better but this is completely not true! if you put a large amount of thermal paste on the heatsink you will actuall have hotter temps. this is due to either: A ) the heatsink is not geting enough connectivity to the GPU as the layer of thermal paste is too thick B ) too much of it creates small pockets of air, these air pockets become super hot and that causes more heat on the GPU the correct amount is roughly the size of a pea even that is boarderline too much. Dont spread it around instead place your heat sink over it as even as possible and screw it down in a X pattern for an even spread. really hope this helps you and good luck!
-
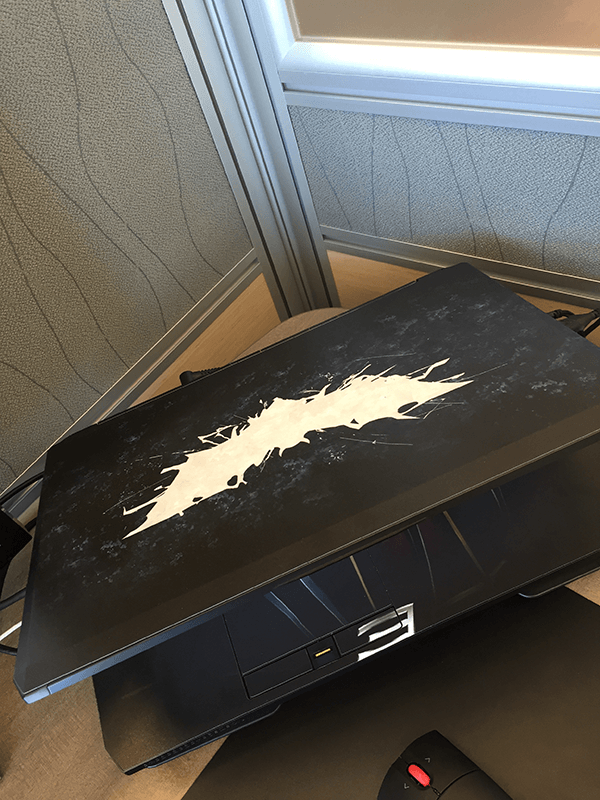
Hi all, as I already stated elsewhere in this forum, I've just bought a Batman 2.0 (P771DM-G) few days ago. What I've discovered is the computer likes to auto-resume from standby if it.. "thinks it's worth to do so".. I mean: it seems that if it requires more heat dissipation, it could wake up automously withing 20"-25". It happens only after some gaming session, that's why I think it might be some forced policy coming from the Clevo Control Center or the BIOS itself. Oh, and I troubleshooted with powercfg -lastwake and -waketimers without any more detail, and the Windows Event Viewer just says the PC got resumed by an "unknown reason". Since I think here in this forum there is the best knowledge about BIOS and low-level policies of those computers, I'd like to get a confirmation about my theory. Is it something that can be avoided with some Clevo CC setting? Or I need to let the computer dissipate some minutes before actually trying to suspend it for the next hours? I haven't the BIOS/VBIOS revision numbers here, but the computer has been assembled just 10 days ago (and I don't see any firmware update in the reseller website: http://santech.eu R39 model). The Clevo Control Center is the latest available in that website: v5.0000.0.22 Thanks for the support, guys! EDIT: wrong Model. It's a P771DM-G.
-
I got a Clevo laptop, W355SS about a year ago. Everything has been going fine, but lately the fan has started to make too much noise. It's probably something structural, as I opened it up, cleaned everything from dust and re-applied thermal paste. Temperatures went down considerably (15-20 degrees in idle mode). This made the problem better when idling because the fan never turns on, but as soon as the fan starts even in its slowest mode, considerable noise is being made, disproportionate to the speed. Do you guys have any tips on how to improve this? It has to be something structural, maybe sth in the axis (dust?), but I don't know how to remove the fanblades. I opened the fan up and I don't know if I am able to remove the fan itself, as it seems to be held on its axis without screws, and it is plastic. Do you have in mind any tutorials for Clevo fans and heatsinks? Any website where I might be able to get a cheap replacement or a better heatsing and/or fan?
-
Hi, how can I control the fan speed of my GPU under OSX? At the moment my GTX 970 is always running on the same fan speed. Is this normal? How can I monitor my temperature under OS X? Under Windows the fan speed changes automatically. Thanks a lot for your help guys!
-
hello everybody i want to use hwinfo for GPUS and CPU fans speed. but there is just fan 1&2 in hwinfo. when i use manual or custom auto the GPU fans work together. i haven't any option for CPU fan speed or one by one GPU fans. what can i do? how can i control the fans separately ? i have three fans in my system physically: GPU1 GPU2 CPU pic from hwinfo:
-
Hi guys, i have a Alienware M14X R2, my problem is after i repaste my alienware when the fan goes +3000 rpm i can feel it on my keyboard on the left side, its a soft vibration if i put mi hand above the fan ( on the keyboard ) and thats annoying, i don't know what going on, because i dissasembly again and i check everything and looks normal and it still happening, what can i do to check if it every is fine ? Thanks!
-
Hi guys, i had this problem since 1 year more or less, someone know how to help me to cease the vibration of the fan when spin faster on my laptop ? i tried 3 fans and always was the same, i checked the 3 screws that holds the fan and are fine. Alienware said to me " you could try to isolate the fans with a piece of rubber. It could be a damaged screw not holding the fans in place " but don't know how is the best way to isolate the fan. When the fan spin slow i don't feel anything under my left side of the keyboard, but when goes at high speeds yeah i can feel it pretty much. Thanks again always for your help.