Search the Community
Showing results for tags 'bios'.
-
Dell put a new BIOS for the Alienware 18 on their website. The change log is rather short: A quick look tells me there's more than this... For those who are interested: The Intel GOP driver has been updated, the built-in hardware tests as well and some changes have been made to the dynamic platform thermal framework, among some other minor adjustments. I guess the most noticeable difference will be the changes to the EC. >> Download link (direct) << So... rather disappointing all in all it seems, but let us know your findings...
- 6 replies
-
- 1
-

-
- a03
- alienware 18
- (and 4 more)
-
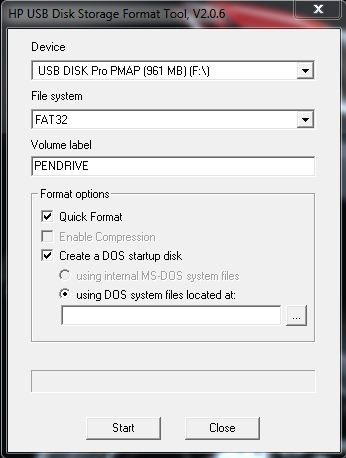
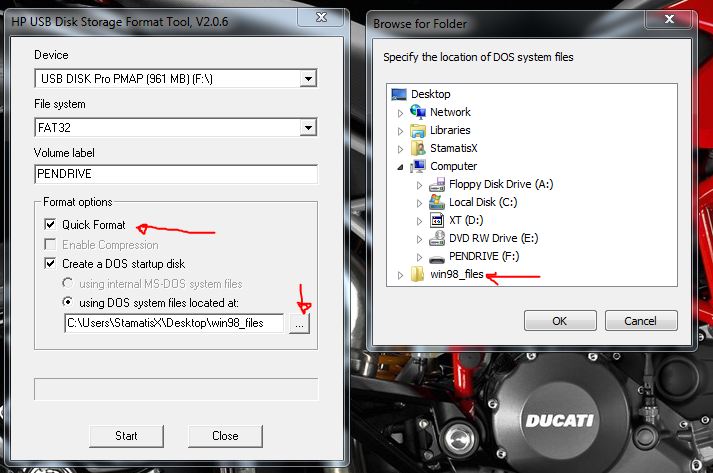
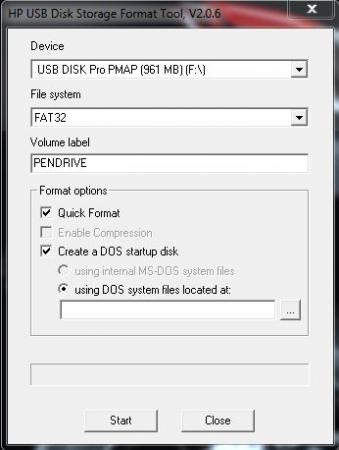
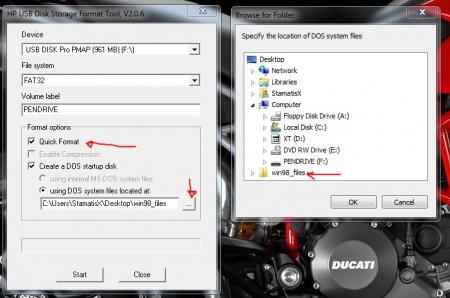
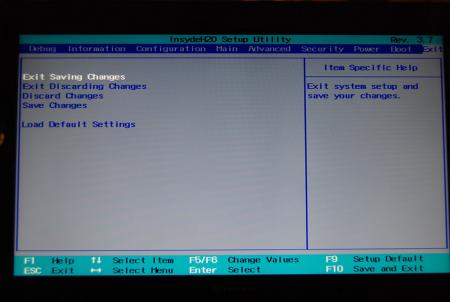
For those who don't like the restrictions Lenovo put on their system, here's a BIOS mod that will get you back at least some of the freedom you should have over your own hardware. Features: WLAN card whitelist removed, any (hardware-wise compatible) card should now work hidden BIOS menus unlocked VBIOS tweaked for more performance and better tuning possibilities Keep in mind that not necessarily all of the BIOS options available with this mod will be fully functional, so use the new available settings with care. If you're unsure about something don't change it and ask here, someone might be able to help. Available for v1.07 / v1.09 / v1.10 and v3.05. v2.04 and v2.07 added (only whitelist removal as for now) If you have a different BIOS (or more specific, a BIOS newer than 3.05) I will need a copy of it in order to make it work for your system. Instructions for flashing the modified BIOS v3.05: You need a USB stick prepared to run DOS, here is a guide you can follow in case you don't know how to do this: Guide by @StamatisX - thanks! >>> Before continuing make sure the AC adapter is connected to your laptop and your battery has at least 20% charge remaining. <<< (0) - NOTE: This step is Only necessary if your system isn't already using BIOS v3.05 Update to the official v3.05 BIOS provided by Lenovo . (1) - Create a backup of your own BIOS (now v3.05) by using Fptw64 tool. Extract the files and run the included .bat file from an admin command prompt. . (2) - Download Lenovo_Y510p-Y410p_[v3.05]_modified.zip and put the files of folder [1] to the root of your prepared USB DOS stick. Let the BiosFixer prepare your BIOS for flashing by drag and dropping your backup file on it. Put the created "v305mod.bin" file to the root of your USB DOS drive as well. . (3) - Now you need to downgrade the firmware back to v2.07 (Y510p-Y410p_v207_[stock].zip) in order to flash the mod. . (4) - Boot from your USB DOS drive, when you see the command prompt type BIOS and hit enter. Wait until the BIOS is flashed (you can safely ignore warnings about non-existing regions). . (5) - Once the BIOS flash completed with no errors, type EC and hit enter. Wait until the EC is flashed. Then reboot. . (6) - Go to the BIOS setup menu, load the default settings, apply and reboot. Done. In case you're using an ultra bay GPU follow the instructions in post #2 and flash the vbios.. NOTE: It's crucial that you flash both, BIOS and EC. Having different EC and BIOS versions can in certain situations lead to issues. IMPORTANT: If you want to go back to stock v3.05 you can do that easily by simply using the official update from Lenovo. That's it, nothing additional required in this case. Old instructions for users with v1.07 / v1.09 / v1.10 or v2.04 / v2.07 who for some reasons don't want to update to v3.05: Video walk-through of bios settings (thanks @allstone): My donation link in case you want to buy me a beer Download link for files referenced in this post:

- 2250 replies
-
- 280
-
-
Hi Everyone, So I am having some issue with my GPUS's at the moment. I have 2 Gigabyte HD7950 Windforces in crossfire and I keep having issues playing some games. (By issues I mean the game wont run etc. or just black screen) I am able to solve the issue by disabling crossfire in catalyst, but I don't really want to just have one card running right? Anyway I looked deeper and noted that one card has the F2 BIOS and the other has the FZ1. My question is could this be the issue, and even if it isn't how do I flash the card so they both have FZ1 or the latest version? Cheers guys,
-
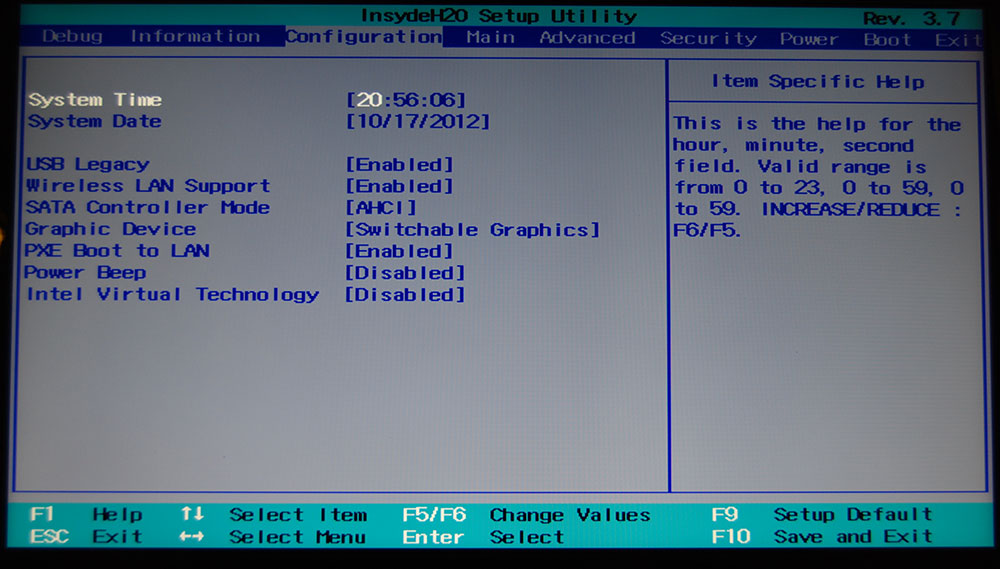
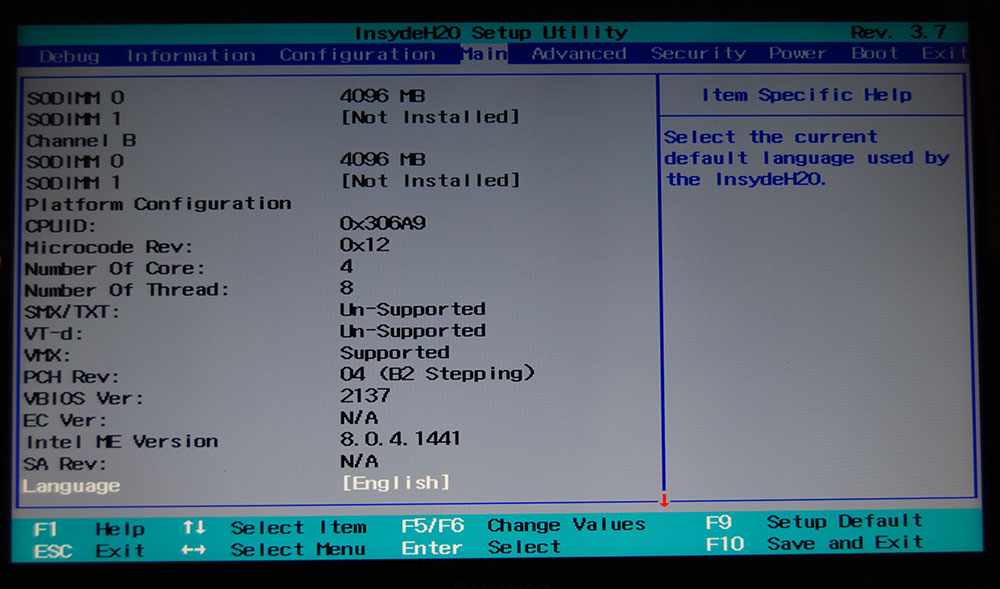
 I want to create VM of different 64 bits Operatting Systems, but Virtual Bot give me an error. I have to Enable Virtualization Technology in BIOS but cant find the option in the BIOS.. I need help, thanks (sory if the english is bad, is not my native language)
 -
Hi guys, I've gotten myself into a sort of funky pickle: I have installed a GTX770m in my MS-16F2 to replace the now antiquated GTX560m. After some heatsink modification on the mill and new thermal strips, the card went in quite easily. Now, my problem is that Nvidia's software, nor GPUz or any other install-able software will recognize the card. Nearly everything recognizes my display adapter as "Standard VGA adapter". However, when running Nvidia autodetect on my machine, it does detect the GTX770m. Additionally, I backed up the existing vBios on the card and the display adapter was recognized correctly, so I know its not just a matter of having a dead card. I already tried flashing my computer's bios with a newer and unlocked version. The flash was successful, but the video card situation hasn't changed. Does anyone have a version of the GTX770m vBios, or even better, and MSI specific copy? Any help in solving this issue would be greatly appreciated. Thanks gents
-
Hi all, could someone help me to unlock my bios to get access to the hidden options? My laptop is Sony Vaio VPCF23A9E. i attach the original rom. Thanks a lot! afuwin.zip
-
 Hi all. I'm considering downgrading (blind-flash method, verified it works on this system before) my M17x R4's system BIOS from A10 Unlocked to A05 Unlocked. Reason being the idle clock for the Intel iGPU - I liked the behavior much better in A05 and earlier. I was able to idle at 350MHz(qm chip)/400MHz(xm chip) instead of the advertied 650MHz, which results in significant idle power savings. The new BIOS does still allow for this, but only if the system is exposed to AC power (yes, adapter is original.) The problem is if I have to restart my system for any reason while on battery power, I get stuck with 650MHz iGPU clock and a 25% greater overall idle power draw until I can plug in. I've documented this behavior further in a previous post, but for this question let's not focus on the reason I want to downgrade - unless you know another way I can force the behavior I want. What I want to ask is this: Other than the CPU microcode update which does not apply to my current ES CPU, the new Windows 8-related features, and the slightly faster POST, are we aware of any other meaningful differences between the two BIOSes? Differences in system performance? I did notice a slight improvement with A10 over A05 on my previous CPU but I attributed that to the microcode update, which no longer applies to my current CPU. I've yet to run A05 on my current ES CPU.
 -
 Well sometime ago I disable the integrated graphics using the unlocked A08 BIOS. However, yesterday for some reason I was going to re-enable it again and made a mistake in selecting the wrong option on the Video Setting setup page. After that my computer has been unable to boot up and I get a blank screen. I tried the BIOS recovery by placing a usb stick on the eSATA port with the file named PAR00X64.fd and I get usb activity, a lot of beeps after that and two reboots, however, i get back to the blank screen again. I tried using all the available video outputs (vga, hdmi, display port) and it was a no go. I could only managed to see the intel raid driver screen via hdmi but after that I get a blank screen. My issue is not hardware related, more of a software issue and if i could manage to revert the BIOS to the default settings everything would get back to normal. My PC is an m17xR3 running the unlocked A08. Any help would be greatly appreciated.
 -
Are your games running great at 50-60 FPS and then FPS randomly drops? - First make sure your GPU/CPU temperature are good. My GPU temp sits at 68 degrees celcius max, and my CPU sits at 89-90 degrees celcius max. - Make sure your CPU/GPU are not throttling. If you look at MSI Afterburner or similar monitoring software your clock speeds should not jump down and up repeatedly. -Both of the above good? Then continue below This is for the Alienware M14X R2 obviously because it's in this forum. I was having problems with FPS drops due to PhysX, I tried everything as far as settings go and overclocking/underclocking. My temperatures were great and so it wasn't throttling. The following really helped: 1) Flash to most updated DELL bios A11 http://ftp.dell.com/FOLDER01271863M/1/M14R2A11WIN.exe (do not use modded A11 BIOS from this forum just yet!) 2) Uninstall NVIDIA drivers completely, MAKE SURE PHYSX IS UNINSTALLED. 2a) IF YOU ARE HAVING PROBLEMS WITH PHYSX UNINSTALLING ONLY: Download the most recent Drivers | GeForce (314.22- 25th Mar2013). Run the EXTRACTOR ONLY, EXIT OUT OF THE INSTALLER. Go to C:\NVIDIA\DisplayDriver\314.22\Win8_WinVista_Win7_64\International\PhysX use the installer to remove PhysX. STEP 3 IS RECOMMENDED NOT REQUIRED**************************** 3) -Download Guru3D - Driver Sweeper (no installer) download . ( I know this isn't necessary because NVIDIA now has Clean install but I do it for stability reasons. -Also download CCleaner - PC Optimization and Cleaning - Free Download . -Install CCleaner. -Reboot into Windows Safe Mode (google it if you don't know how, it's different for Windows 8) - Run DriverSweeper and clean all of the NVIDIA drivers EXCEPT NVIDIA CHIPSET -Run CCleaner and fix all registry error (do this a few times in a row to make sure) -Reboot into normal mode ************************************************************** 4) Run the new NVIDIA drivers installation (314.22), It will extract then open the installation. -Select Custom Install -Make sure everything EXCEPT PhysX is selected. Also Make sure Clean Install is selected. -Let NVIDIA reboot computer -After Computer reboots NVIDIA will finish install and ask to reboot again. Go ahead. 5) Now it is time to install PhysX. -Download the following PhysX installers: NVIDIA DRIVERS 9.12.0613 -Install it -Navigate to this folder: C:\Program Files (x86)\NVIDIA Corporation\PhysX\Engine -Copy all these files to a safe folder such as in a new folder on your Desktop. -Run the same installer you just downloaded (0613 driver) and use it to UNINSTALL PhysX. Reboot if necessary. -Now copy those files I told you to keep safe back into the same directory. The PhysX folder and Engine folder might not be there so remake them manually, spell correctly. Then copy the files into that Engine folder. -Now go to: C:\NVIDIA\DisplayDriver\314.22\Win8_WinVista_Win7_64\International\PhysX -Run the PhysX_9.12.1031_SystemSoftware.exe - This will install PhysX 1031. - Go to: C:\Program Files (x86)\NVIDIA Corporation\PhysX\Engine , the files from the old PhysX (0613) should be there still along with the new PhysX 1031 drivers - NOW YOU HAVE PhysX Legacy Support 6) OPTIONAL STEPS: The above fixed my problems. But these following steps should help you as well: 1) - Flash your VBIOS using slv7's A11 Modded bios. I have attached a zip file of everything you need in one to make life easier. Follow the README ive included in the zip file to flash your BIOS. MAKE SURE YOU ARE ALREADY RUNNING THE DELL A11 BIOS FIRST! 2) Upon flashing your BIOS or not Disable Turbo Boost under performance options on your BIOS Thank You, and I hope this helps people that had my same problem
-
T|I and the author are no longer associated. For support kindly contact the author directly
-
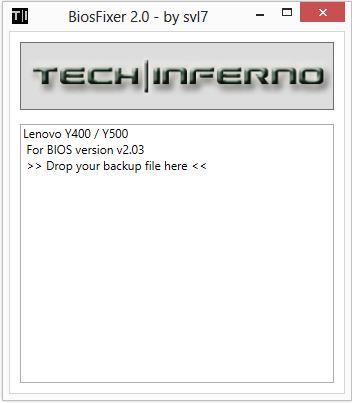
This is continuation of this thread (http://forum.techinferno.com/lenovo-ibm/2690-lenovo-y500-unlocked-bios.html) with all the necessary information in the first post in order to make it easier to find all the stuff. Lenovo Y400 / Y500 - 'unlocked' BIOS / wwan-wlan whitelist removal + modified VBIOS for higher overclocking The Lenovo Y500 comes with a pretty locked down BIOS, and in addition to this with a whitelist which prevents the user from getting 3rd-party wwan/wlan cards to work properly. The modified BIOS versions here will take care of this. Keep in mind that not necessarily all options available in the modified bios will work. Some might not do anything at all, others could possibly leave your system in a state which will prevent it from booting. Use care when changing stuff in the modified bios, don't touch things you're not familiar with. Use all the mods and software posted here on your own risk. Read the instructions carefully. NOTE: This will only flash the bios region. It won't reset the nvars set in the bios. *************** ONLY FLASH A MOD OF THE SAME VERSION AS YOUR CURRENT BIOS VERSION!!! If you're on 2.02 or 2.03 you can safely use the 2.04 update, *************** Attached you'll find modified versions of the Y400 / Y500 BIOS v1.03 and v1.05. Removed as they're outdated. Better updated to v2.02. The bios contains your Windows 8 license, therefore you can't just flash any file, else you'll have issue with your Windows activation. Furthermore the serial numbers, service tags etc. are stored there as well. You don't want to loose them. I wrote a little program that will take care of this issue and personalize the modified bios for you, so that you won't end up with an invalid Windows or no service tags. *************** Preparation to get to BIOS v2.02 (coming from any earlier version): Generally it's a good idea to keep the BIOS up to date. We're luck to have an official BIOS update to v2.02 apparently thanks to a leak on the net. (Lenovo is really bad when it comes to providing firmware updates and fixing issues). The leaked version must be genuine, else it wouldn't flash by using the regular method. If you want to update your system to v2.02 then grab the update here, extract it and flash the bios by executing the included InsydeFlash utility. Once the update is completed you can continue with the instructions below to get a modified version on your system. *************** Instructions for flashing a modified version: As a reminder - the modified BIOS needs to be the same version as you have on your system (2.02 to 2.04 is ok). Prepare an USB stick which can boot DOS. If you don't know how to do this, follow this short guide: Download the flash tool, for flashing you'll need the DOS version, but for creating the backup of your current BIOS the Win64 version will do as well, and it is faster. Get the prr tool as well. Grab the modified BIOS you want to flash, it comes as a tool which will patch the bios for you. Make sure you grab the version that corresponds with your BIOS version. Create a backup of your current BIOS using the flash tool you downloaded (first step) by runing the included backup.bat, or by using the Win or Dos version flash tool with this command: If the .bat doesn't work then open an administrator command prompt in your working directory and run the .bat per command line or type the command written above. In case you get an 'error 104' replace the parts file with the one that can be found in the 'error 104 fix' attachment at the end of the post. And if you still have issues after doing all of the steps above then please leave a reply in the thread and describe your problem. Open the downloaded tool and execute it. Drag and drop your BIOS backup file on it, it will create the mod for you. It will look like this: Put the modified BIOS, the prr.exe tool and the fpt.exe (along with the fparts.txt file) on the root of your prepared DOS bootable USB drive, restart your system and boot from that drive. Execute the prr.exe, if you don't get an error message continue by pressing enter. Then flash the bios by using this command (filename.bin obviously needs to be replaced with the name of the file you want to flash). If you can't remember the name of your file, use the command dir to display all the files on your drive. Flash with this: fpt.exe -f filename.bin -bios NOTE: The name of the BIOS file mustn't exceed eight characters (not counting the extension)! That's a DOS limit, so make sure the name of your file isn't too long. Wait until the process is done. After flashing it will verify the data, in case there's something wrong with the flashed data it will tell you. In that case don't reboot, just flash again. *************** Flashing the ultra bay 650m - only for SLI users with BIOS v2.02: The modified BIOS v2.02 also contains a vbios which will allow you to overclock your 650m past the 135MHz limit. As the ultra bay GPU has it's own vbios module you need to flash it separately. You'll need an USB drive which can boot DOS (just as the one you used for flashing the BIOS). *************** It might look a bit complicated at first, but that's the easiest way I could think of. Let me know if anything is unclear. >> Here's the 'buy me a beer' link in case you like this << Use at your own risk, you are responsible for your system and the changes you make on it. My programs come with absolutely no warranty to the extent permitted by applicable law. Grab file archive here:

- 2578 replies
-
- 243
-
-
 Hello, people My original M17x R2 set is dual gtx285m with SLI Windows 7 64-bit Recently, I bought a gtx675m. I inserted gtx675m into the primary graphics card slot (left). And I left my old gtx285m in the secondary graphics card slot (right). (SLI doesn't work anymore now for sure) I turned on my laptop. Installed the newest driver (310.90) and this unlocked BIOS A10 It didn't recognize the new gtx675m as usual so new gtx675m wouldn't work. My friend told me to modify nvcv.inf in C:\NVIDIA\DisplayDriver\310.90\Win8_WinVista_Win7_64\International\Display.Driver\ Here is a sample. Then I ran the setup again to reinstall the driver. After I reboot my laptop, it recognizes the new gtx675m now and it is functional. I made that secondary graphic card gtx285m to run PhysX. I have checked GPU-Z, nvidia inspector... They all say the new gtx675m and the secondary gtx285m are both functional. I have run Battlefield 3 and turned all graphic settings to very high. It runs perfectly at 60FPS, smoother than my old gtx285m SLI set. The problem is all 3 fans keep spinning like hell right after I press the power bottom. It doesn't care about the temperature...spins 100% even at 30/40°C I tried HWiNO64...it works, all fans now runs normally (will speed up if temperature get higher). BUT it works ONLY IF I get into Windows and run HWiNO64. All fans start spinning 100% if I close HWiNO64. Seems like bios refuses to recognize any graphics card other than gtx285m. I tried a lower graphics card gtx260m. Got the same problem. Is there any solution? Sorry for bad English because English is not my first language.
 -
When i click the BIOS version i want to download it opens insydeflash normally but then it comes up with an error. IHISI: Flash write error in SMI! SMI Return Code: 0x25 i downgraded to a08 for no reason, just a test, now when i click on any bios version it comes up with the error.. i downgraded my bios perfectly earlier and it worked so i dont understand why this wont.. all i want to do is unlock my bios and disable damn hyperthreading so i can play a game. Any ideas ? i am pretty computer savvy but try and explain it simply!
-
Hello, I'm pretty new to overlocking and have some general questions: First of all "How do I overlock" my M14x R2? I have a i5 CPU and a GT650M. For the graphics card it's pretty easy using MSI afterburner or the NVidia Control Panel (with the installed Performance addon) but for the CPU I don't really get the BIOS Settings. I've seen on old Alienwares there was an "OverClock" feature which could be only on or off - with no further settings - but on my (A09 - for windows 8) BIOS to me it only seems that I can change some BUS Hz and memory clocks but not "straight forward" the CPU speed. Before some may say "don't do it then" - I just want to slightly improve the game performance for some games like Dark Souls where I get huge frame drops too 10fps...
-
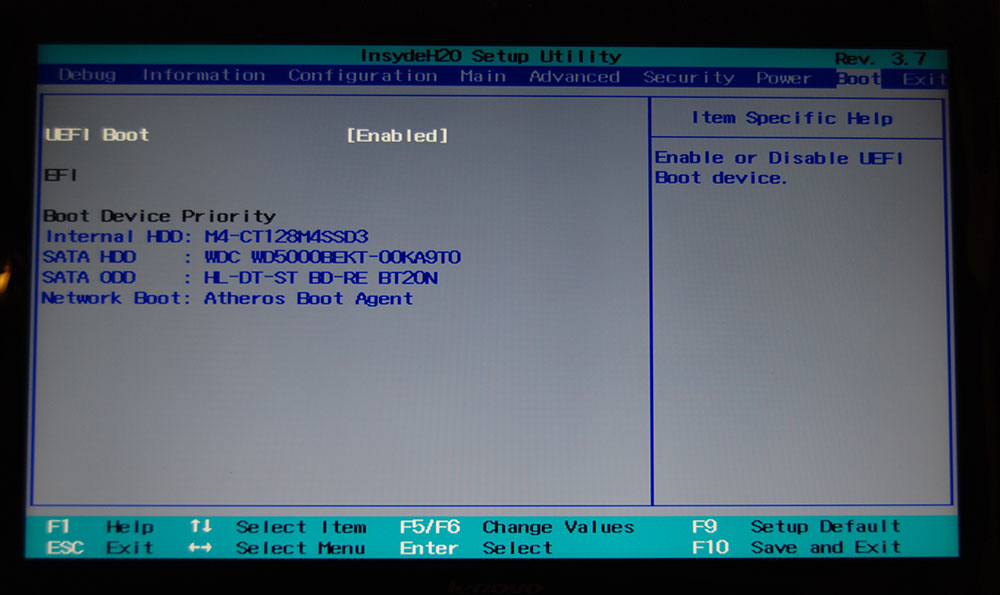
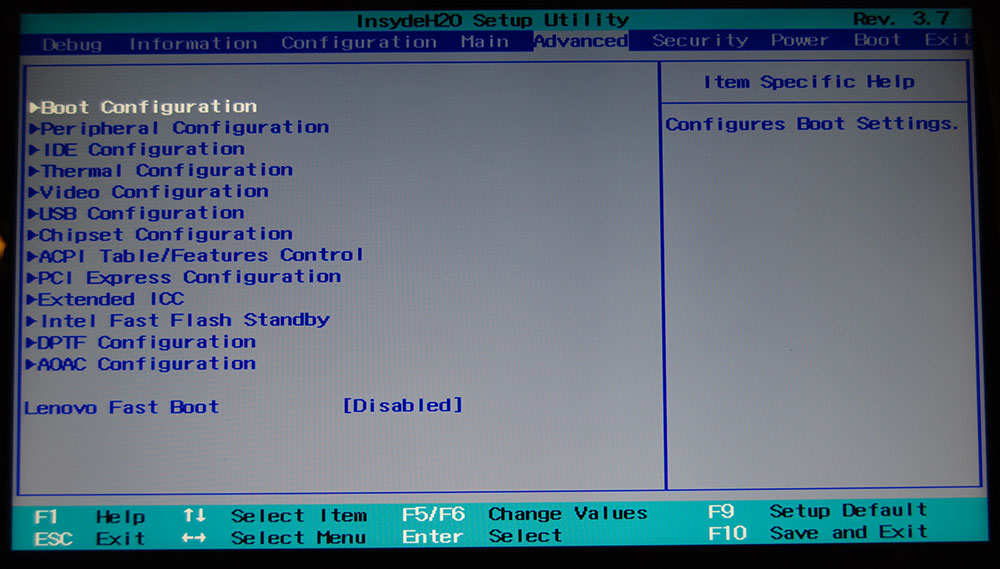
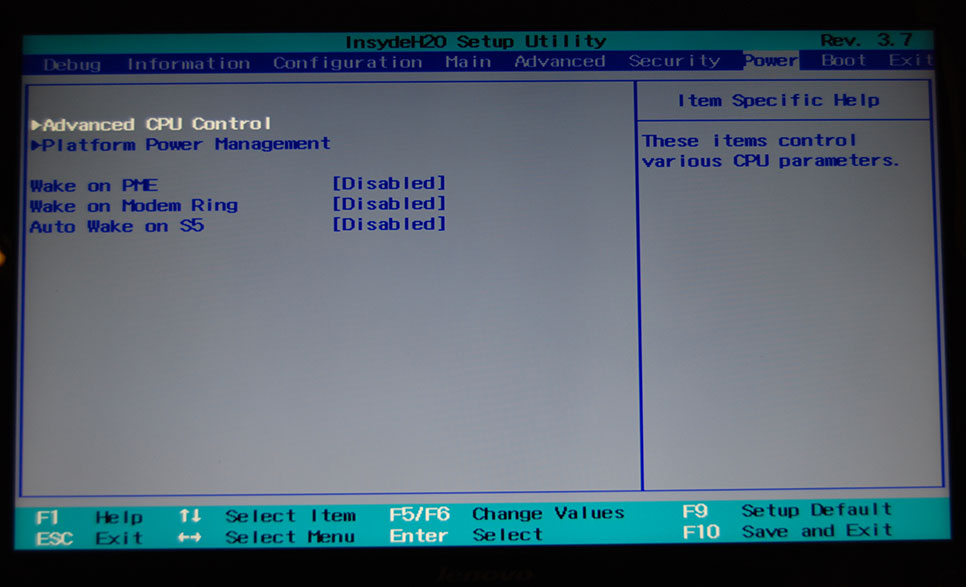
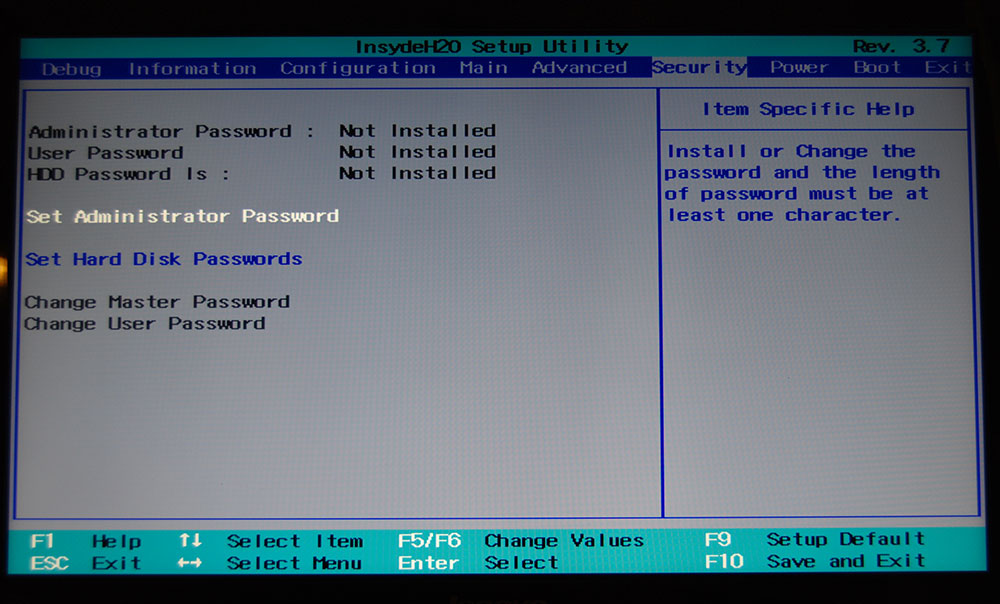
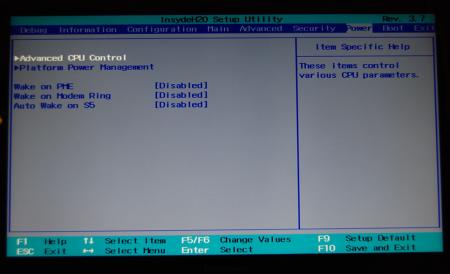
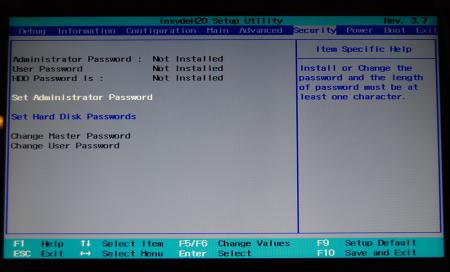
Lenovo Y500 - 'unlocked' BIOS / wwan-wlan whitelist removal The Lenovo Y580 / Y480 comes with a pretty locked down BIOS, and in addition to this with a whitelist which prevents the user from getting 3rd-party wwan/wlan cards to work properly. The modified BIOS versions here will take care of this. Keep in mind that not necessarily all options available in the modified bios will work. Some might not do anything at all, others could possibly leave your system in a state which will prevent it from booting. Use care when changing stuff in the modified bios, don't touch things you're not familiar with. Use all the mods and software posted here on your own risk. NOTE: This will only flash the bios region. It won't reset the nvars set in the bios. While it is technically possible to update from v2.0x to v8.01 by using the method described below, I can't really recommend it since the EC of your system won't get updated. While it might work (possibly even without any issues) I can't recommend it. Therefore if you're on v2.0x and want to update, the better option is to wait until Lenovo provides an official 8.xx firmware update with EC and BIOS. You can then still flash the modified version as described below, once you're on a proper v8.xx firmware. Attached you'll find a modified version of the Y580 / Y480 BIOS v8.01 (5DCN90WW). ----------------------------------------- >> For users with a v2.0x BIOS: << Download links Old version: Current 2.0x version: Lenovo Y580 / Y480 BIOS v2.07 (5DCN40WW) -> unlocked, whitelist removed, Nvidia 660m @ 1GHz default 3d clocks Flash with the included InsydeFlash utility. ----------------------------------------- >> Instructions for v8.0x BIOS users: << The attached BIOS ("Lenovo Y580 - Y480 BIOS v8.01 (5DCN90WW) - Mod") is unlocked, whitelist stuff removed and the 660m is tweaked to 1GHz default 3d core clock. The only way I know of which allows you to flash the modified BIOS for v8.01 users does unfortunately also describe certain information which you don't want to loose (serials, Windows licencse etc.). Don't worry, I got it all sorted out, but due to this the flashing procedure is a bit more complicated than usual. Make sure you follow the instructions carefully. Download the flash tool, for flashing you'll need the DOS version, but for creating the backup of your current BIOS the Win64 version will do as well, and it is faster. Get the prr tool as well. Grab the modified BIOS you want to flash and the Y580-Y480_BiosFix tool. Create a backup of your current BIOS using the flash tool you downloaded (first step) by runing the included backup.bat, or by using the Win or Dos version flash tool with this command: -d BackupBiosY500.bin -bios If you get and 'Error 104', grab 'Error 104' fix and replace the original fparts file with it. . Make sure you have the modified bios which you want to flash, the bios backup you just created and the "Y580-Y480_BiosFix" tool in the same folder. Run the Y580-Y480_BiosFix tool, follow the instructions on the screen. Enter the name of the files correctly, else you'll get an error. It will create a new file for you and will be named after the modified bios file you specified, with 'Fix' appended to it. Here's a screenshot of the tool in use (Y580 version looks the same). In the case shown here it will create a file called "modifiedBiosFix.bin" which you can find in the folder where you run the tool. Use that one for flashing. Put the fixed BIOS, the prr.exe tool and the fpt.exe (along with the fparts.txt file) on the root of your prepared DOS bootable USB drive, restart your system and boot from that drive. Execut the prr.exe, if you don't get an error message continue by pressing enter. Then flash the bios by using this command (filename.bin obviously needs to be replaced with the name of the file you want to flash). If you can't remember the name of your file, use the command dir to display all the files on your drive. Flash with this: fpt.exe -f filename.bin -bios NOTE: The name of the BIOS file mustn't exceed eight characters (not counting the extension)! That's a DOS limit, so make sure the name of your file isn't too long. Wait until the process is done. After flashing it will verify the data, in case there's something wrong with the flashed data it will tell you. In that case don't reboot, just flash again. It might look a bit complicated at first, but that's the easiest way I could think of. Let me know if anything is unclear. The attached v8.0x modified versions include: - unlocked menus - whitelist removed (wwan / wlan) - Nvidia 660m 'GHz edition' - 1000MHz default 3d clocks >> Here's the 'buy me a beer' link in case you like this. Modding makes me thirsty << Use at your own risk, you are responsible for your system and the changes you make on it. My programs come with absolutely no warranty to the extend permitted by applicable law. Thanks @X0pas1 for testing, and for some pics - see below: I'd appreciate it if someone could also post some pictures of the more interesting sub-menus, e.g. advanced CPU control, video settings and similar. UPDATE 1/17/16 DOWNLOAD LINK FOR FILES REFERENCED IN THIS POST:
- 1619 replies
-
- 132
-
-
BIOS A08 popped up on Dells driver site, grab it here: Drivers and Downloads | Dell [united States] No change log included... damn it, seriously. Any noticeable changes? Let us know. If you can't download from Dell, grab the attachement. EDIT: Note that you might not be able to easily downgrade to a version which predates A08. EDIT 2: A09 is not on the Dell site, but file is nowhere to be found... weird. You might want to hold off with updating until they release A09. M14x_R2 - BIOS A08.zip
- 14 replies
-
- 1
-
-
- a08
- alienware bios
- (and 6 more)
-
The dell site says nothing, does anyone know what changes are in the A04 BIOS? I'm about to flash it momentarily. Kaldon:ambivalence: OK, I've flashed it with no problems, was there a USB Debug option in the BIOS before? I don't recall it but I never specifically looked for it. The VBIOS version is now 80.07.28.00.26 my old version was 80.07.16.00.04 My fingers are crossed that they removed the 65C thermal limit... Will be testing that next. Im also going to see if my USB 3.0 problem is fixed with external drive constantly remounting. Kal
-
Hi guys, I was wondering if you could help me overvolt/undervolt the np6165/w150erq's embedded vbios. The stock sager bios dump is here, courtesy of prema from notebookreview forums: W150ER_06_stock.rar The thing i've noticed is that the 650m's max normal voltage under stock conditions is 1.037v but for some reason it goes to 1.012v when under use. It goes back to 1.037 when the gpu is not under use. I'd like to fix that for a start pls. I've also modded my laptop by adding heat pipes and stuff. More to come soon.
-
I didn't realize this so far, but BIOS A03 for the M18x R2 is up on the Dell support site. According to the date there it got released the same day as the M17x R4 BIOS A05. So this might fix the GPU software overclocking issue as A05 did on the R4... would be interesting to hear! No change log included on the website... really a bad practice Dell started here, back in the early M17x R2 and M15x days they included a highly detailed change log as .txt file, they really should bring this back. [MENTION=4186]Alienware-Frank_L[/MENTION] , [MENTION=4614]Alienware-Luis_Pardo[/MENTION] or any other AW representative here... do you have any insights on the change log? Download links: Dos version Win version
- 3 replies
-
- 1
-
-
- alienware m18x
- alienware m18x r2
- (and 6 more)
-
Dell just published a new BIOS version for the R4, A05 Download link (direct) No change log on the Dell site, no idea what's up with Dell, pretty annoying if you ask me, releasing something like this with no change log. Maybe [MENTION=4186]Alienware-Frank_L[/MENTION] can provide some more information? EDIT: Seems this BIOS brings 680m overclocking & boosting... pretty cool!
-
This is a modified version of the M17x R3 BIOS A10, it brings back the SATA behavior of A08 and earlier, while keeping the features of BIOS A10. A lot of users don't seem very happy with the changes Dell made to the SATA performance of BIOS A09 and up, thus I created this BIOS. Just keep in mind one thing: Dell probably didn't change the corresponding settings in the BIOS for no reason, so it's possible that certain drives may have issue with this BIOS, I don't know. According to a lot R3 users, A08 brings a clearly better SATA performance on a wide variety of drives. It's up to you to decide what you need and what you want to use. Now you have the choice. Download link for BIOS A10 with the 'SATA fix', and unlocked hidden menus: M17x R3 BIOS A10 - unlocked & 'SATA fix' Read the included READ ME for further information and instructions. Load the default settings in the BIOS setup after flashing. User at your own risk.
-
Dell released BIOS revision A09 for the Alienware M17x R3. Under "fixes and enhancements" it says So it seems they have done something similar to the BIOS as with the most recent M14x BIOS, this might result in lower SSD speeds. It has been said that Dell changed the BIOS so that it really applies to the SATA 3 specifications, with the result that some SSDs don't completely adhere to these specs might now run at SATA II speeds. Firmware updates of the SSD vendors might fix this. SSD manufacturers will probably say that the controller on the motherboard is the issue and not the SSD itself... I have no idea what is actually true, fact is that the SATA 3 didn't get removed, it still works with some drives. Anyway, I recommend everyone to use this BIOS since the SATA "enhancement" or whatever you want to call this is certainly not the single change in there. Dell always fixes a lot of other small bugs and improves the BIOS, expect this to be true for this revision as well. Download link: M17x R3 BIOS A09
- 11 replies
-
- 2
-
-
- a09
- alienware m17x r3
- (and 5 more)
-
 Hi, i just got my dads old M15x and started to play bf3 when it lagged like hell. I looked it up with both intel and EA and they said i should disable hyperthreading in the Bios. The problem is that my BIOS doesn't have that option so i would really appreciate if someone could give me a link to an unlocked bios or something? M15x i7 820qm GTX 260m
 -
[revised by svl7, 01/22/12] Here are some unlocked versions of the M18x BIOS, this means all the hidden BIOS menus are now available. This allows you to further tweak and overclock your machine, but some settings are very advanced and not meant to be touched by the average user, so use it with care and common sense. Unfortunately quite some of the links which were previously posted here are now invalid due to what happened with megaupload. I will try to recollect all the files and get fresh links, so I can provide the complete collection. Here's what's available for now: [unlocked] M18x BIOS A03 [unlocked] M18x BIOS A04 both modified and provided by Ahmed from BIOS-Mods, a big thanks to his amazing work! Consider buying him a drink for all the effort! [unlocked] M18x BIOS A05 modified by @svl7 After flashing, go to the BIOS menu and load the default settings to prevent possible issues. As always with such mods, you are responsible for what you do to your system, use at your own risk. M18x - A05 unlocked.zip
- 205 replies
-
- 23
-
-
Eric G. (Posterous) has again provided us with an exclusive, A03 bios, to be available on Dell Support soon. Just announced - Alienware M18X (Updated) - Dell News and more Direct Link: ftp://ftp.dell.com/bios/M18xR1A03.EXE <!-- / message --><!-- sig --> __________________