Leaderboard


Popular Content
Showing content with the highest reputation on 03/09/18 in all areas
-
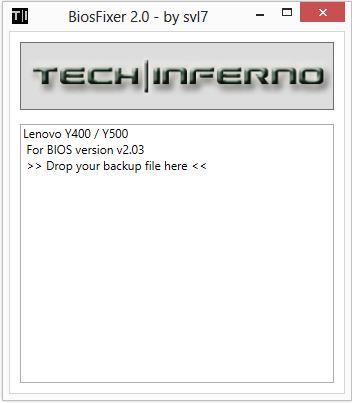
This is continuation of this thread (http://forum.techinferno.com/lenovo-ibm/2690-lenovo-y500-unlocked-bios.html) with all the necessary information in the first post in order to make it easier to find all the stuff. Lenovo Y400 / Y500 - 'unlocked' BIOS / wwan-wlan whitelist removal + modified VBIOS for higher overclocking The Lenovo Y500 comes with a pretty locked down BIOS, and in addition to this with a whitelist which prevents the user from getting 3rd-party wwan/wlan cards to work properly. The modified BIOS versions here will take care of this. Keep in mind that not necessarily all options available in the modified bios will work. Some might not do anything at all, others could possibly leave your system in a state which will prevent it from booting. Use care when changing stuff in the modified bios, don't touch things you're not familiar with. Use all the mods and software posted here on your own risk. Read the instructions carefully. NOTE: This will only flash the bios region. It won't reset the nvars set in the bios. *************** ONLY FLASH A MOD OF THE SAME VERSION AS YOUR CURRENT BIOS VERSION!!! If you're on 2.02 or 2.03 you can safely use the 2.04 update, *************** Attached you'll find modified versions of the Y400 / Y500 BIOS v1.03 and v1.05. Removed as they're outdated. Better updated to v2.02. The bios contains your Windows 8 license, therefore you can't just flash any file, else you'll have issue with your Windows activation. Furthermore the serial numbers, service tags etc. are stored there as well. You don't want to loose them. I wrote a little program that will take care of this issue and personalize the modified bios for you, so that you won't end up with an invalid Windows or no service tags. *************** Preparation to get to BIOS v2.02 (coming from any earlier version): Generally it's a good idea to keep the BIOS up to date. We're luck to have an official BIOS update to v2.02 apparently thanks to a leak on the net. (Lenovo is really bad when it comes to providing firmware updates and fixing issues). The leaked version must be genuine, else it wouldn't flash by using the regular method. If you want to update your system to v2.02 then grab the update here, extract it and flash the bios by executing the included InsydeFlash utility. Once the update is completed you can continue with the instructions below to get a modified version on your system. *************** Instructions for flashing a modified version: As a reminder - the modified BIOS needs to be the same version as you have on your system (2.02 to 2.04 is ok). Prepare an USB stick which can boot DOS. If you don't know how to do this, follow this short guide: Download the flash tool, for flashing you'll need the DOS version, but for creating the backup of your current BIOS the Win64 version will do as well, and it is faster. Get the prr tool as well. Grab the modified BIOS you want to flash, it comes as a tool which will patch the bios for you. Make sure you grab the version that corresponds with your BIOS version. Create a backup of your current BIOS using the flash tool you downloaded (first step) by runing the included backup.bat, or by using the Win or Dos version flash tool with this command: If the .bat doesn't work then open an administrator command prompt in your working directory and run the .bat per command line or type the command written above. In case you get an 'error 104' replace the parts file with the one that can be found in the 'error 104 fix' attachment at the end of the post. And if you still have issues after doing all of the steps above then please leave a reply in the thread and describe your problem. Open the downloaded tool and execute it. Drag and drop your BIOS backup file on it, it will create the mod for you. It will look like this: Put the modified BIOS, the prr.exe tool and the fpt.exe (along with the fparts.txt file) on the root of your prepared DOS bootable USB drive, restart your system and boot from that drive. Execute the prr.exe, if you don't get an error message continue by pressing enter. Then flash the bios by using this command (filename.bin obviously needs to be replaced with the name of the file you want to flash). If you can't remember the name of your file, use the command dir to display all the files on your drive. Flash with this: fpt.exe -f filename.bin -bios NOTE: The name of the BIOS file mustn't exceed eight characters (not counting the extension)! That's a DOS limit, so make sure the name of your file isn't too long. Wait until the process is done. After flashing it will verify the data, in case there's something wrong with the flashed data it will tell you. In that case don't reboot, just flash again. *************** Flashing the ultra bay 650m - only for SLI users with BIOS v2.02: The modified BIOS v2.02 also contains a vbios which will allow you to overclock your 650m past the 135MHz limit. As the ultra bay GPU has it's own vbios module you need to flash it separately. You'll need an USB drive which can boot DOS (just as the one you used for flashing the BIOS). *************** It might look a bit complicated at first, but that's the easiest way I could think of. Let me know if anything is unclear. >> Here's the 'buy me a beer' link in case you like this << Use at your own risk, you are responsible for your system and the changes you make on it. My programs come with absolutely no warranty to the extent permitted by applicable law. Grab file archive here:
 1 point
 -
Solved. just had to update nv_dispi under [NVIDIA_Devices.NTamd64.6.1] as it deals with windows 7 Plus the [strings] section as per TheTqM's posted pdfs. Thank you!!1 point
-
The attached files tell you what you need to do to mod the two files for PEG/ Dedicated, get into the practice as there is nobody consistently doing .inf mods here anymore. I have modded 391.01 following those instructions successfully however I hold no responsibility if it doesn't work on your machine as I've not checked for compatibility beyond my own, but let us know if it goes fine. The instructions were created from older modded files using the method @Ezio21 suggested. So thank you @Ezio21. Please note you still need to follow the whole string of instructions for installing modded drivers as previously outlined by @J95. But in short: 0) Make sure you have a copy of your last working driver ready to reinstall if anything goes wrong. 1) Download driver "XXX.XX-notebook-win10-64bit-international-whql" and unzip using your preferred compression software. 2) Make a copy of the nv_dispi.inf and nvdmi.inf from Display.Driver into a folder for modding them. Make a backup of the originals too. 3) Follow attached instructions to modify those files. 4) Replace the two files within Display.Driver 5) Delete all folders other than: 6) Restart (Shift + Restart on Win10) in safe mode. 7) Use DDU to uninstall old driver in full 8) Restart (Shift + Restart on Win10) and Disable Driver Signature Enforcement. 9) Install from setup.exe 10) Hope that you did everything right. Once again the attached instructions worked for me. Hopefully they work for you. NVDISPI INSTRUCTIONS.pdf NVDMI INSTRUCTIONS.pdf1 point
-
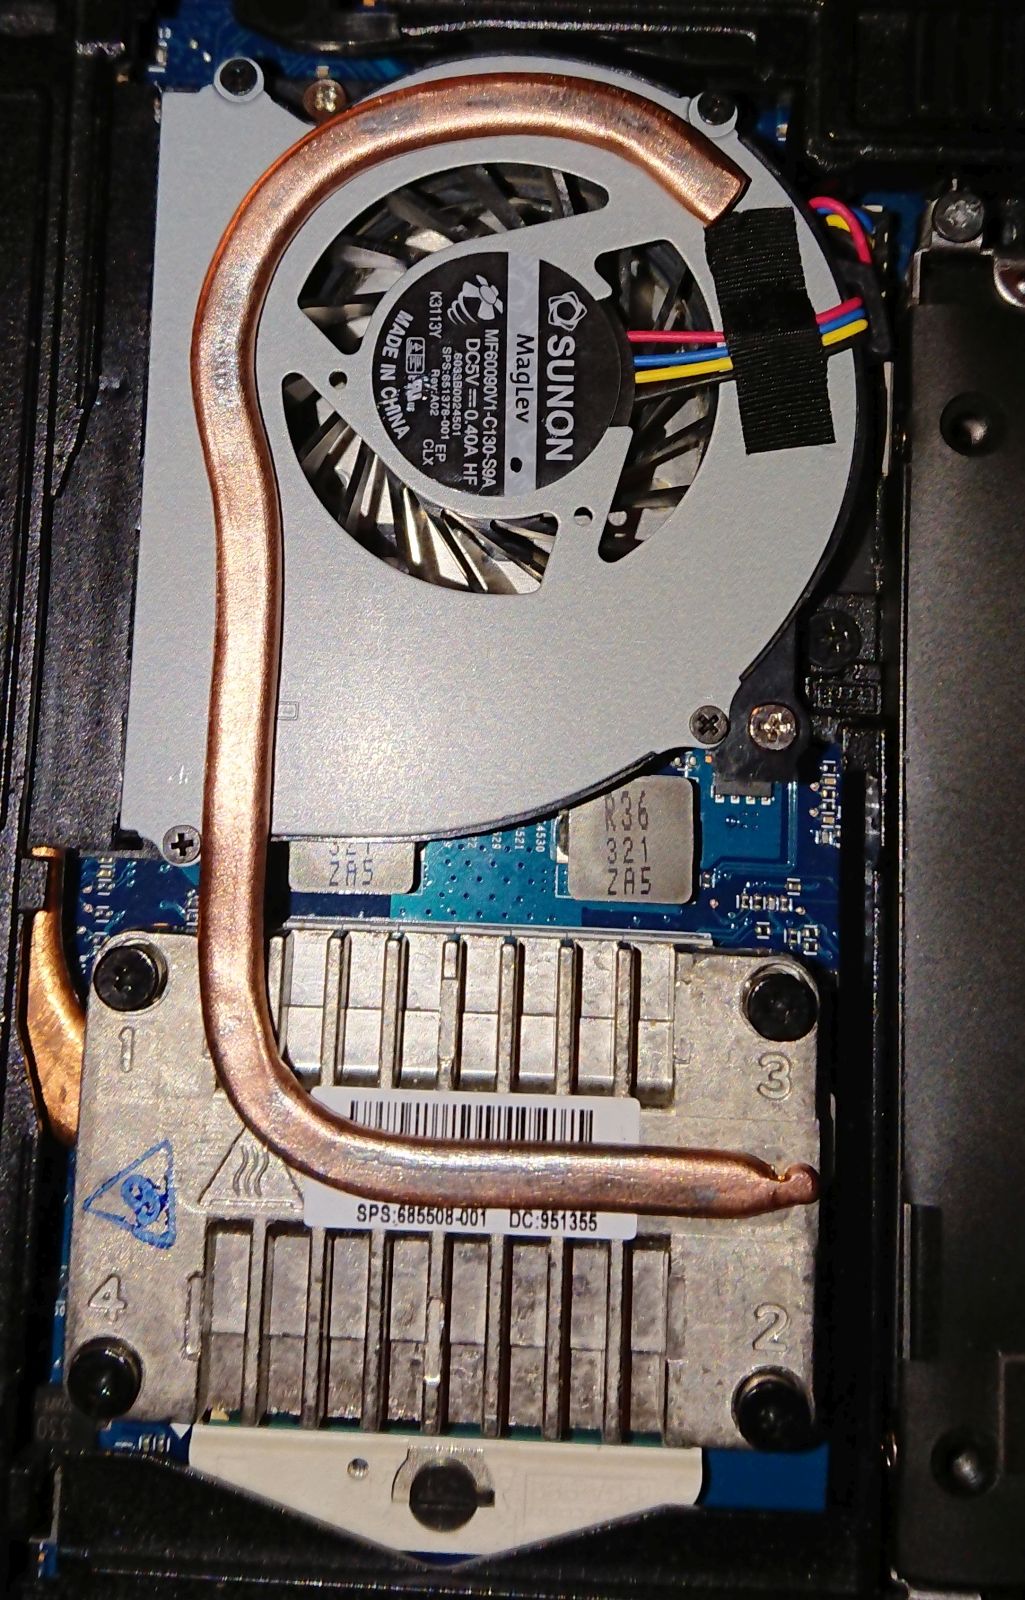
bought a 2570p last week, just needed a tiny brother for my 8460p n 8570p... now time for mods... first: cooling... with my 3740 the temps go up to 93-95°c. just a "bit" too much... so i ripped off a cooler from my studio xps 13 n pulled the smaller from 2 heatpipes down, its just 2.5mm thick n had the right length... next step will build a copper plate with the same size like the alu plate on da fan, soldering n lets go... first step:
 1 point
 -
After a lot of frustration, I am finally making headway on the issue. After A WHOLE LOT OF TRIAL AND ERROR... I seem to be getting full performance from the GTX 1060. However Optimus is not working. I have a GT70 2PC for reference. the section ID I am using is 160. will continue trying more IDs and see if I can get optimus working or better performance. Below I will leave the string I am using in my modified nvmii.inf %NVIDIA_DEV.1C60.11FF.1462% = Section160, PCI\VEN_10DE&DEV_1C60&SUBSYS_11FF14621 point
-
This has been already suggested in this thread before, as far as I remember. It should totally work. By that mean the reboot sequence won't be initiated. But apart from these dedicated checks at ultrabay address, BIOS has something that I assume to be generic initializer sequences for PCIe devices (there are structures like "Is it Nvidia? If true, do this. Is it AMD? If true, do that. Is it Intel? If true do other stuff"). Those will execute incorrectly too, with possible adverse effects. Let alone the obvious troubles with driver installation you'll encounter with altered vendor ID and a hassle of flashing BIOS of every card you're ever going to use. In my final version of the mod (coming soon, by the way!) I'm preserving compatibility with original ultrabay GPU by replacing checks for Vendor ID with checks for Device ID. So now instead of checking for 0x10DE at Vendor ID address, we're shifting by two bytes and checking for either 0x0FE4 or 0x0FCD, device IDs of GT750m and GT755m respectively. This unfortunately means there're going to be two separate versions of the mod for owners of different iGPUs. Other than that this should work perfectly (as long as AMD doesn't release some GPU with same device ID, but AMD users don't need to flash the mod anyway).1 point
-
I modified another driver, if anyone wants it Im sharing. 390.77 - Added compatibility for M18xR1 - GTX 880M. I used section for M18xR2 so there shouldn't be any issues. @NODice You require newer vBIOS as I remember. nvdmi.7z1 point
-
Sorry I didn't see your reply. Im not online here often. Download new stock drivers and unpack it. Download old stock drivers and unpack it Download modified INF file for your clevo for old drivers from this thread Use something like WinMerge to see differences between these old stock INF files and modified INF for your laptop You will now see which parts are required for your card to be supported Make same changes in new stock drivers INF file and install it.1 point
-
PCI\VEN_10DE&DEV_1C60&SUBSYS_11FF1462 GT70 4gen1 point