Leaderboard


Popular Content
Showing content with the highest reputation on 08/02/16 in all areas
-
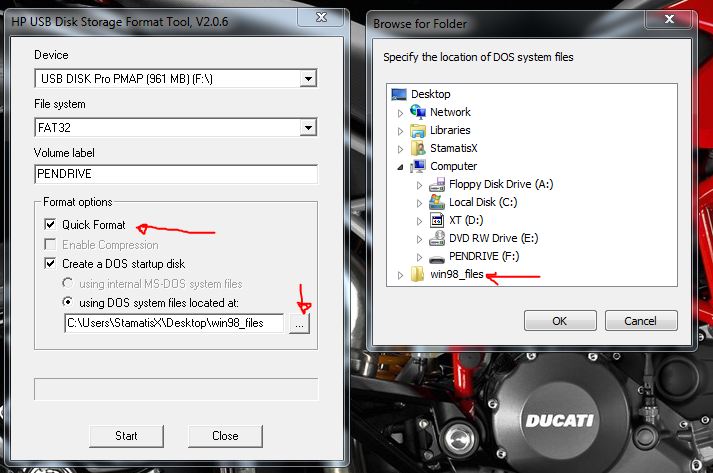
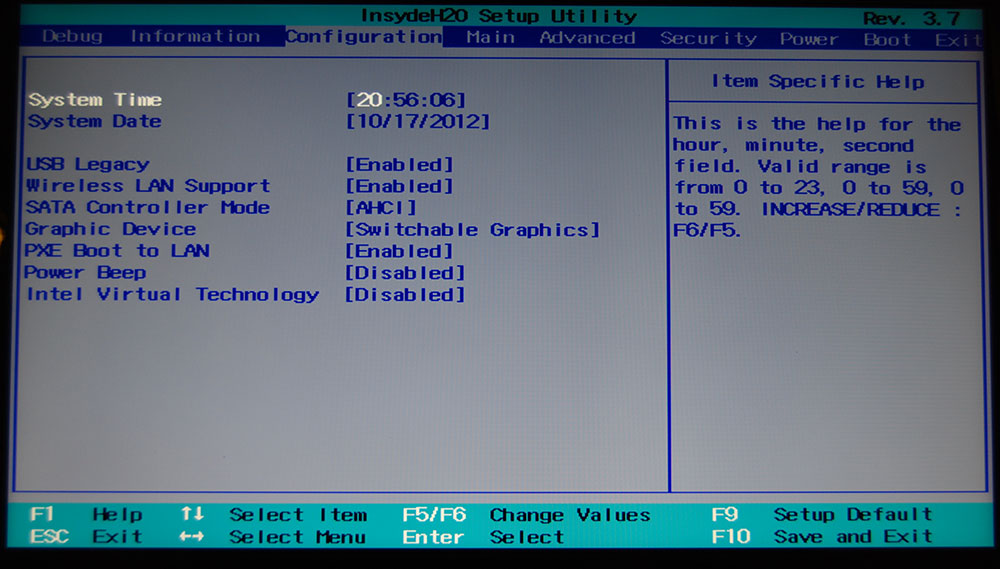
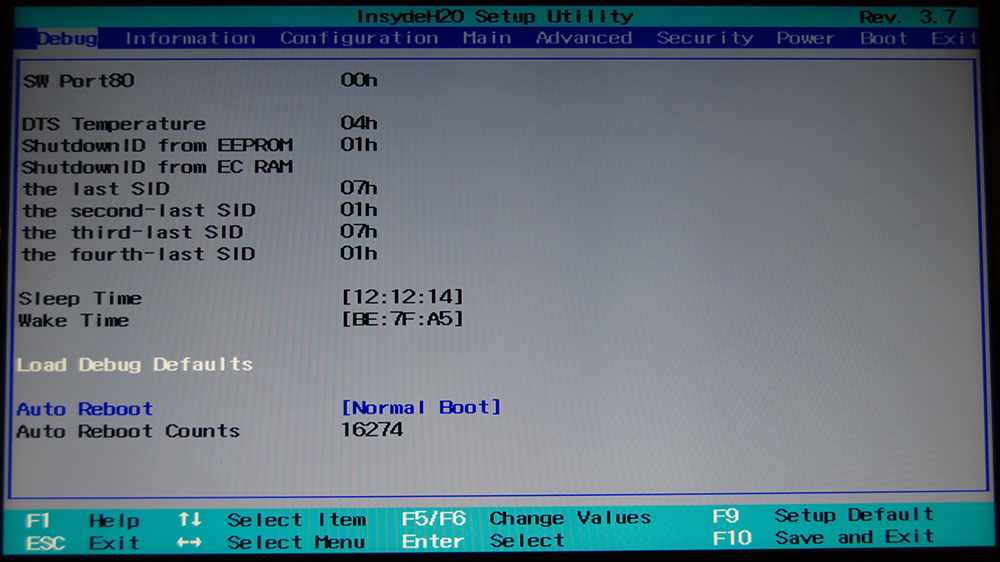
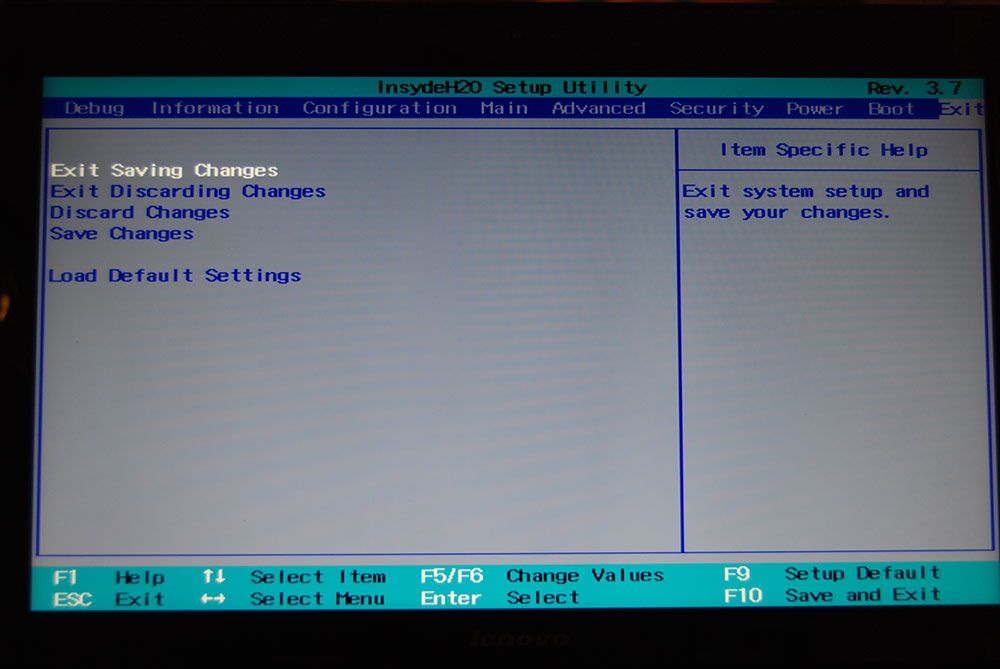
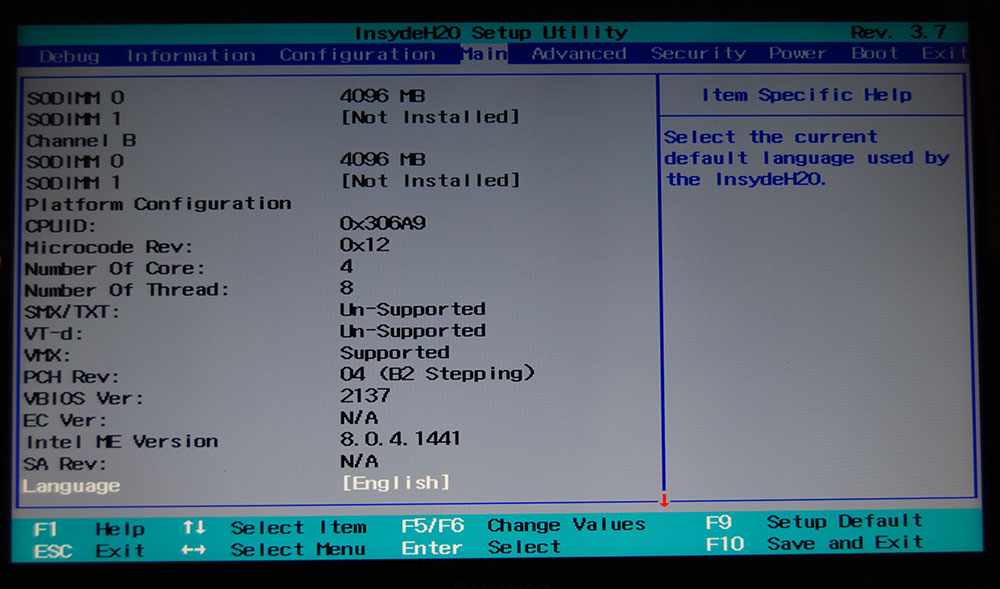
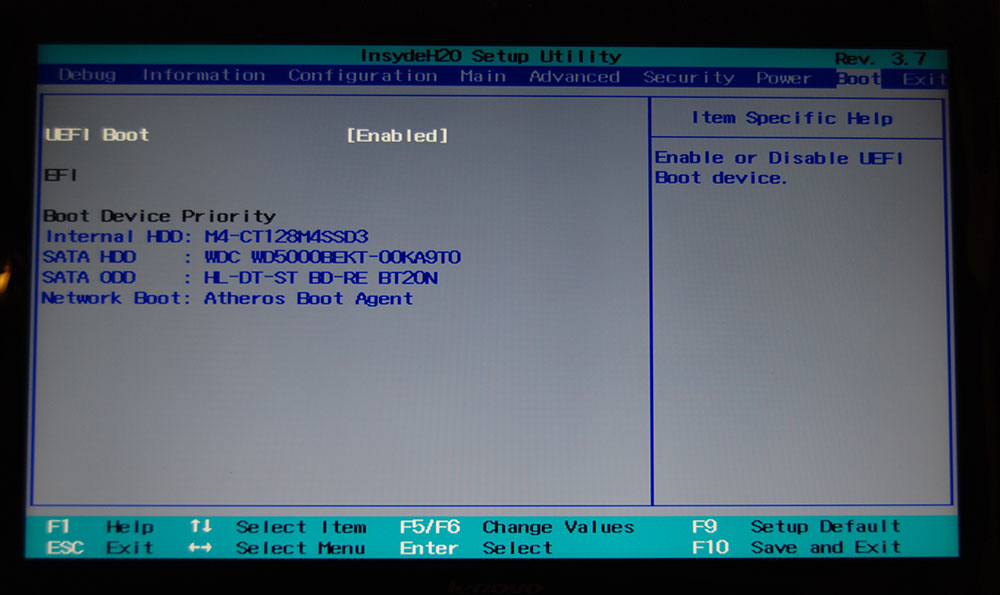
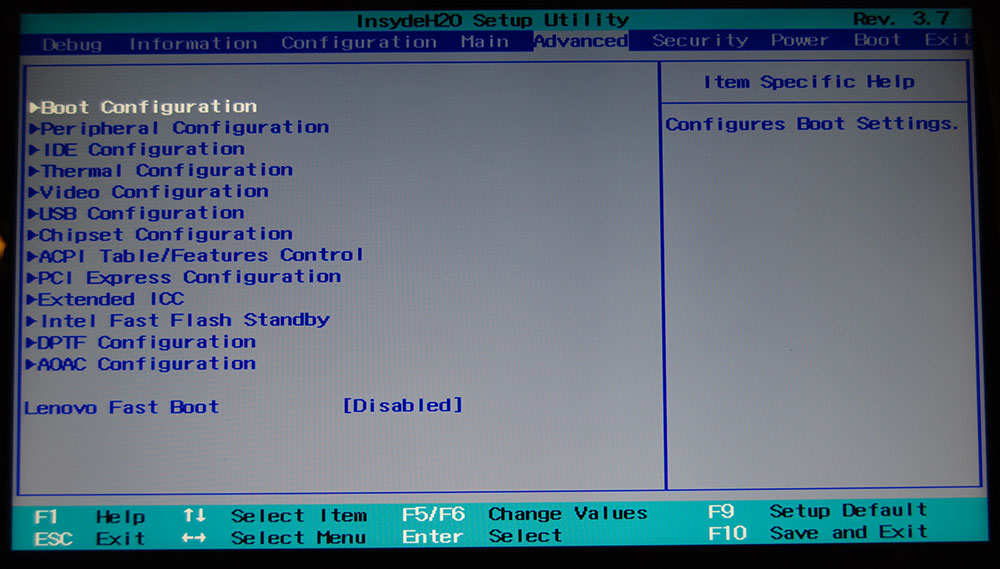
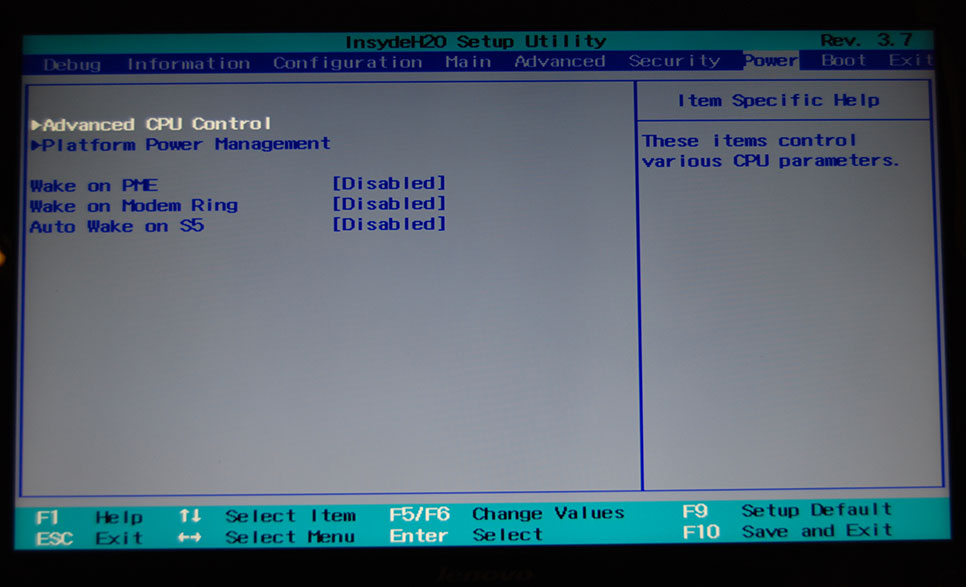
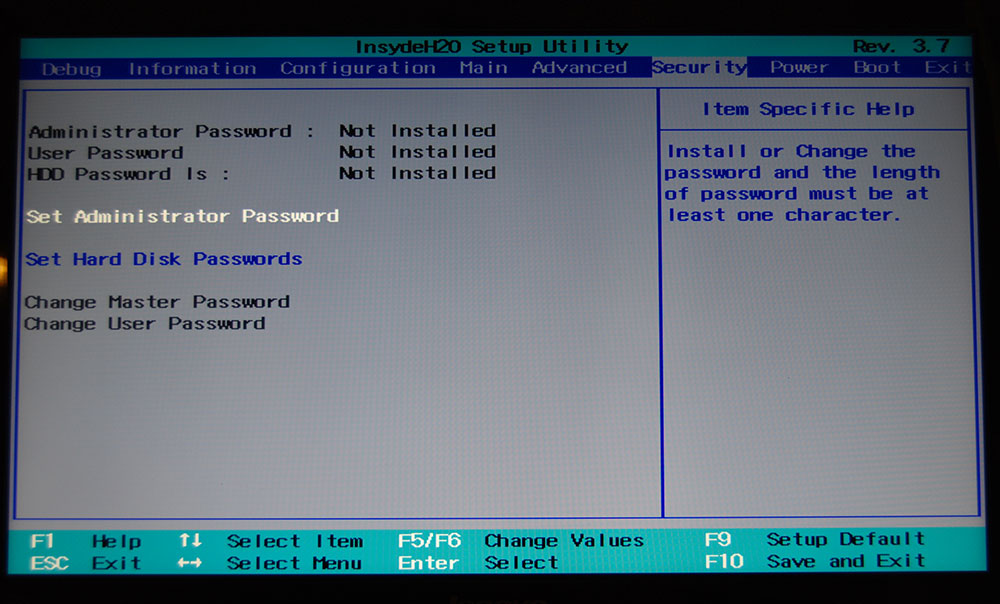
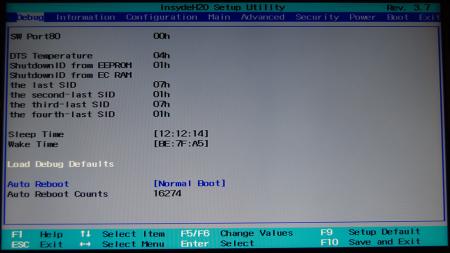
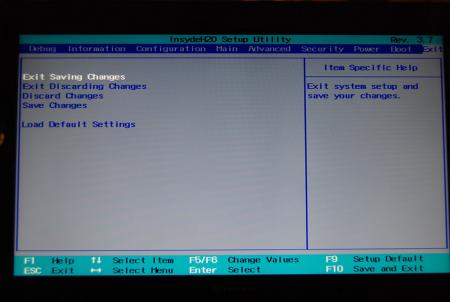
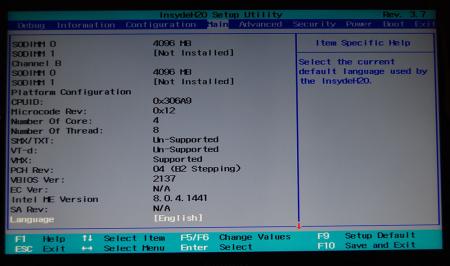
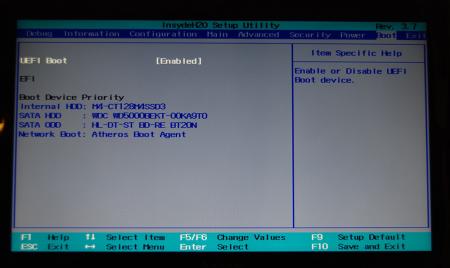
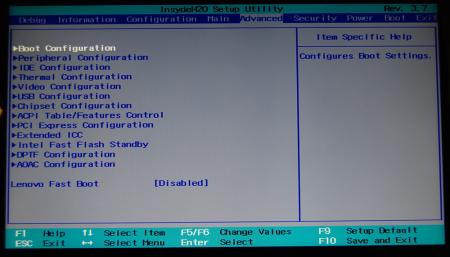
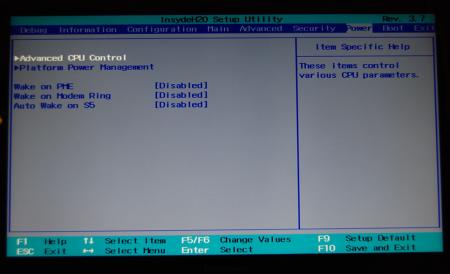
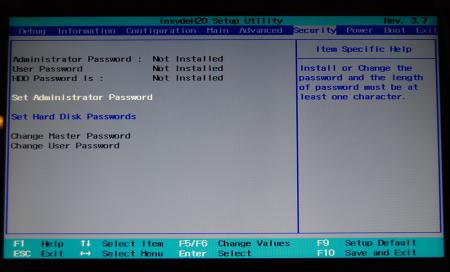
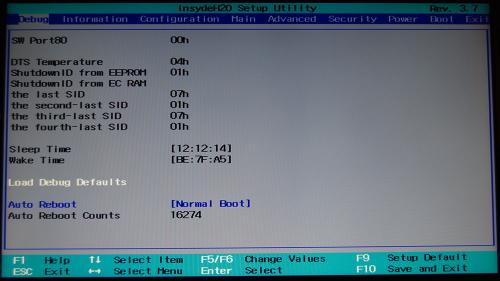
Lenovo Y500 - 'unlocked' BIOS / wwan-wlan whitelist removal The Lenovo Y580 / Y480 comes with a pretty locked down BIOS, and in addition to this with a whitelist which prevents the user from getting 3rd-party wwan/wlan cards to work properly. The modified BIOS versions here will take care of this. Keep in mind that not necessarily all options available in the modified bios will work. Some might not do anything at all, others could possibly leave your system in a state which will prevent it from booting. Use care when changing stuff in the modified bios, don't touch things you're not familiar with. Use all the mods and software posted here on your own risk. NOTE: This will only flash the bios region. It won't reset the nvars set in the bios. While it is technically possible to update from v2.0x to v8.01 by using the method described below, I can't really recommend it since the EC of your system won't get updated. While it might work (possibly even without any issues) I can't recommend it. Therefore if you're on v2.0x and want to update, the better option is to wait until Lenovo provides an official 8.xx firmware update with EC and BIOS. You can then still flash the modified version as described below, once you're on a proper v8.xx firmware. Attached you'll find a modified version of the Y580 / Y480 BIOS v8.01 (5DCN90WW). ----------------------------------------- >> For users with a v2.0x BIOS: << Download links Old version: Current 2.0x version: Lenovo Y580 / Y480 BIOS v2.07 (5DCN40WW) -> unlocked, whitelist removed, Nvidia 660m @ 1GHz default 3d clocks Flash with the included InsydeFlash utility. ----------------------------------------- >> Instructions for v8.0x BIOS users: << The attached BIOS ("Lenovo Y580 - Y480 BIOS v8.01 (5DCN90WW) - Mod") is unlocked, whitelist stuff removed and the 660m is tweaked to 1GHz default 3d core clock. The only way I know of which allows you to flash the modified BIOS for v8.01 users does unfortunately also describe certain information which you don't want to loose (serials, Windows licencse etc.). Don't worry, I got it all sorted out, but due to this the flashing procedure is a bit more complicated than usual. Make sure you follow the instructions carefully. Download the flash tool, for flashing you'll need the DOS version, but for creating the backup of your current BIOS the Win64 version will do as well, and it is faster. Get the prr tool as well. Grab the modified BIOS you want to flash and the Y580-Y480_BiosFix tool. Create a backup of your current BIOS using the flash tool you downloaded (first step) by runing the included backup.bat, or by using the Win or Dos version flash tool with this command: -d BackupBiosY500.bin -bios If you get and 'Error 104', grab 'Error 104' fix and replace the original fparts file with it. . Make sure you have the modified bios which you want to flash, the bios backup you just created and the "Y580-Y480_BiosFix" tool in the same folder. Run the Y580-Y480_BiosFix tool, follow the instructions on the screen. Enter the name of the files correctly, else you'll get an error. It will create a new file for you and will be named after the modified bios file you specified, with 'Fix' appended to it. Here's a screenshot of the tool in use (Y580 version looks the same). In the case shown here it will create a file called "modifiedBiosFix.bin" which you can find in the folder where you run the tool. Use that one for flashing. Put the fixed BIOS, the prr.exe tool and the fpt.exe (along with the fparts.txt file) on the root of your prepared DOS bootable USB drive, restart your system and boot from that drive. Execut the prr.exe, if you don't get an error message continue by pressing enter. Then flash the bios by using this command (filename.bin obviously needs to be replaced with the name of the file you want to flash). If you can't remember the name of your file, use the command dir to display all the files on your drive. Flash with this: fpt.exe -f filename.bin -bios NOTE: The name of the BIOS file mustn't exceed eight characters (not counting the extension)! That's a DOS limit, so make sure the name of your file isn't too long. Wait until the process is done. After flashing it will verify the data, in case there's something wrong with the flashed data it will tell you. In that case don't reboot, just flash again. It might look a bit complicated at first, but that's the easiest way I could think of. Let me know if anything is unclear. The attached v8.0x modified versions include: - unlocked menus - whitelist removed (wwan / wlan) - Nvidia 660m 'GHz edition' - 1000MHz default 3d clocks >> Here's the 'buy me a beer' link in case you like this. Modding makes me thirsty << Use at your own risk, you are responsible for your system and the changes you make on it. My programs come with absolutely no warranty to the extend permitted by applicable law. Thanks @X0pas1 for testing, and for some pics - see below: I'd appreciate it if someone could also post some pictures of the more interesting sub-menus, e.g. advanced CPU control, video settings and similar. UPDATE 1/17/16 DOWNLOAD LINK FOR FILES REFERENCED IN THIS POST:
 1 point
 -
Version 1.0.0
1110 downloads
Files contained in this archive: [Y580][Y480]-'unlocked_BIOS'_660mGHzEdition_WhitelistMod.zip 'Error 104' - fix.zip Lenovo Y580 - Y480 BIOS v8.00 (5DCN90WW) - Mod.zip Lenovo Y580 - Y480 BIOS v8.01 (5DCN90WW) - Mod.zip Lenovo_Y480_Y580_-_BIOS_V.206_[unlocked].zip Lenovo_Y480_Y580_-_BIOS_V.206_[unlocked][no whitelist].zip Y580-Y480_BiosFix.zip fpt-dos.zip fptw64.zip prr2.zip For information on how to use the files in this archive, see here: My donation link in case you want to buy me a beer1 point -
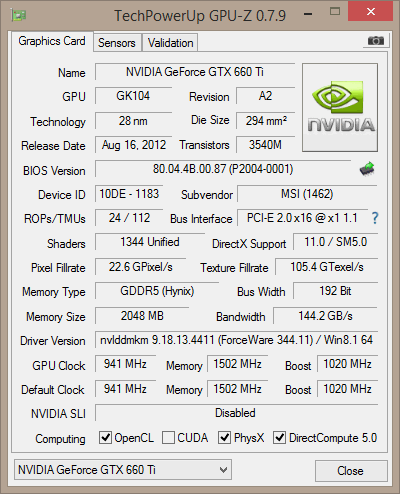
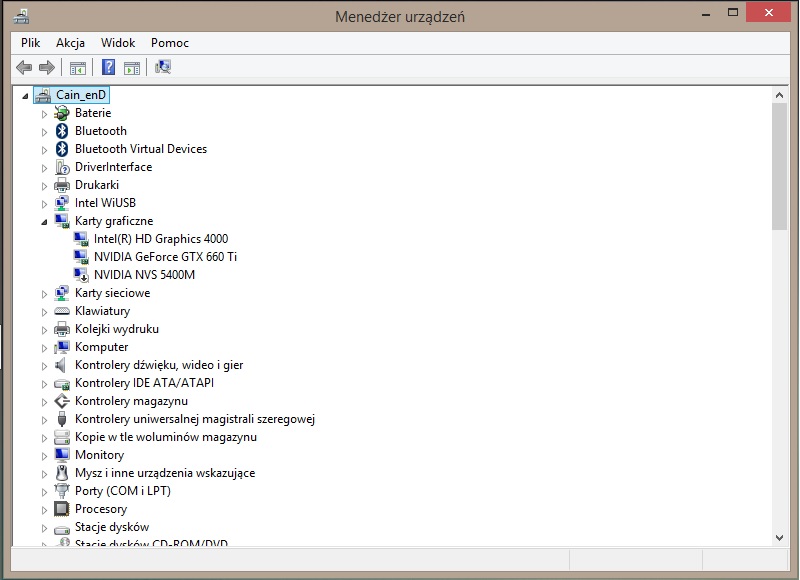
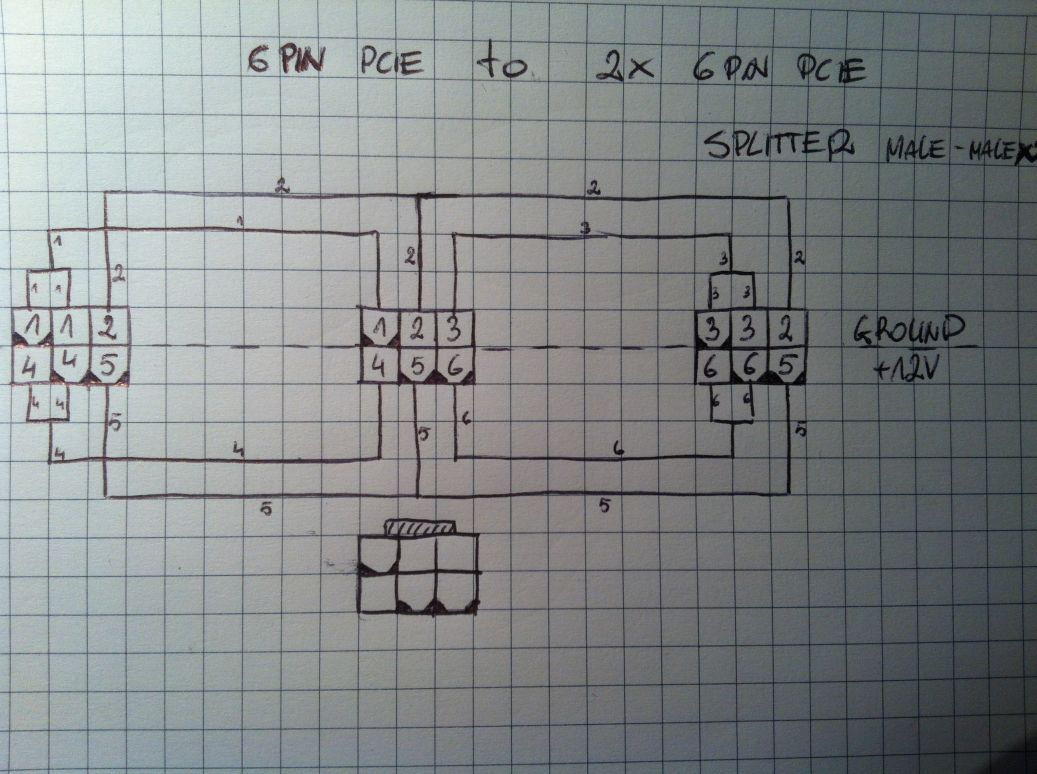
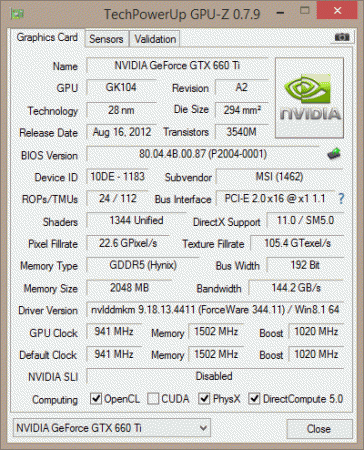
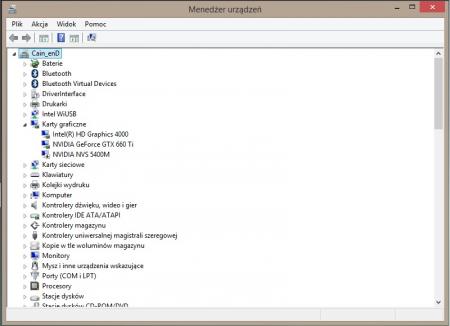
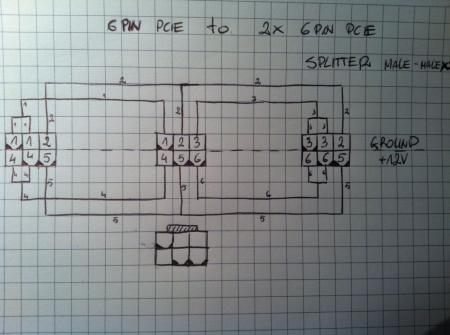
Hello everyone:D First of all I want to Thank to all egpu community for great job done over this few years. Without You none of this could happen. So I think it's first T430 implementation. Let's start from basics: Setup: Lenovo T430 i5 3320m 2.6Ghz 8gb ram HyperX pnp Plextor M5pro 128 GB Windows 8.1 x64 UFI BIOS GPT System partition. 2.65 BIOS version IGPU: intel HD4000 DGPU: nVidia NVS 5400m EGPU: MSI N660Ti (MS-V284) GTX660ti 2gb OC Adapter: EXPRESS CARD version of EXPGDC V6.0 + DA-2 220W power supply + own created 6PIN to 2x 6PIN Splitter Male-Male I've tried WIN7 setup no luck error 12 TOLUD and too complicated DSDT override...i just pass it. What i found that some one get his card to work under win8.1 with UFI BIOS GPT system partition. I've tried to give it a shoot... and ... SUCCEED:D Steps: 0 make sure that in BIOS under Settings->Display you got: 1 Internal lenovo LCD / 2 Optimus / 3 OS Optimus detection 1 Whipe every Nvidia Driver with DDU and turn off pc. 2 connect you card trought expresscard port and turn you pc on. It will turn off after few sec and reboot after another few don't worry. 3 open devmng and you should see 3 GPU's: IGPU DGPU and EGPU. Last 2 will be as Default VGA adapter. 4 install forceware Drivers (i used 344.11-desktop-win8-win7-winvista-64bit-english-whql) 5 restart after that you probably get BSOD. Don't worry. 6 turn off pc and disconnect EGPU 7 turn it on and again it will turn off after few sec and reboot after another few. 8 Now in devmng You should have propertly installed HD 4000 and NVS 5400M 9 Check if you have access to NVIDIA control panel. If yes turn off NVS 5400M (right click and turn off this device) in devmng. 10 Turn off pc. Connect EGPU to expresscard port and turn on pc. 11 Now you should have GTX 660TI hd 4000 and disabled NVS5400m in devmng. Check If you have access to NVIDIA control panel. If yes ConGRATZ you got you EGPU running 1.2OPT Things to remember: GTX 660 Ti is 192 BIT card I've tried Quadro K600 128BIT card it worked too but only on external monitor. I haven't tried GTX 670/760 with are 256 BIT card. They probably should work too. Someone From POLAND Warsaw plz contact me if you want to check compatibility. Some Photos:
 1 point
 -
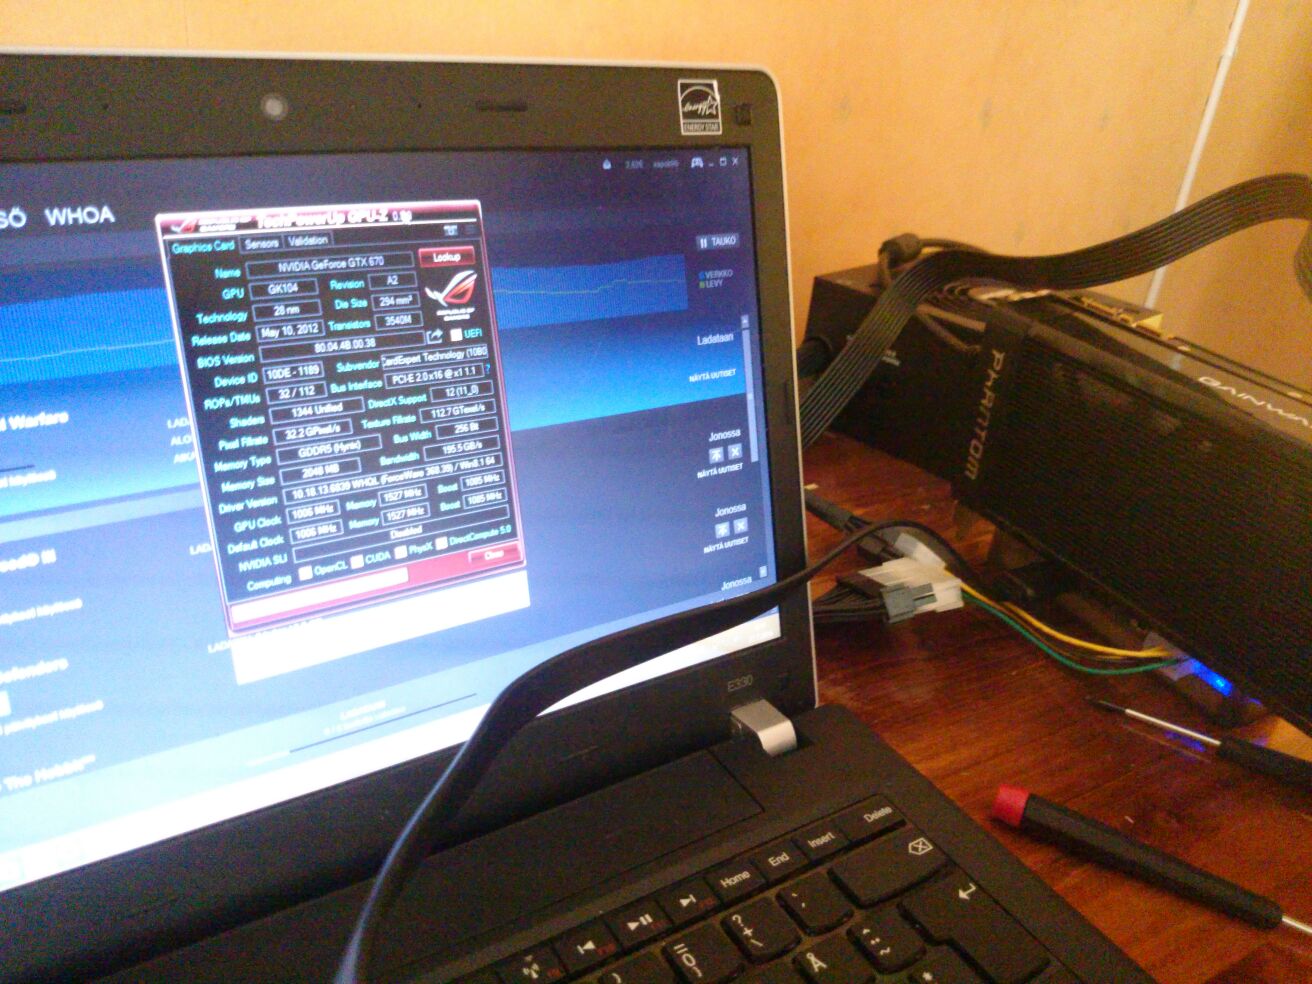
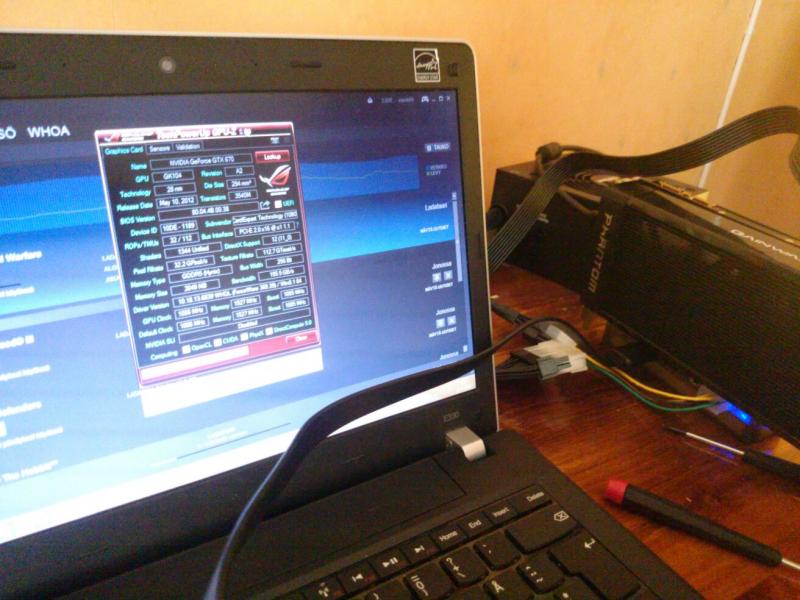
Hello everyone! I finally got my eGPU setup working after many endless hours, and decided to write and implementation guide for users struggling with similar setups. Notebook Details 13" Lenovo Thinkpad Edge E330 i3-3120M 2.5Ghz HD4000 iGPU 8 GB RAM Windows 8.1 eGPU Gear EXP GDC Beast v8.0 eGPU adapter with mPCIe cable lead 450W Corsair CX450M PSU Gainward GTX 670 Phantom edition 2GB GDDR5 225W TDP Performance Results will include later Now for the build itself... Implementation Guide As Lenovo Thinkpad Edge's TOLUD is 3,5GB leading to Windows error 12, and Lenovo is well known for using whitelisting, the build might seem like a lost cause. However when there is a will, there will eventually be a way. 1.Error 12 !!! DO A BACKUP FIRST !!! To overcome the error 12 I followed the guide on this thread: Windows 8.1 and 10 users please note that you have to run the following command as and Admin user in command prompt bcdedit -set TESTSIGNING ON 2.Whitelisting Now we only have to overcome the whitelisting. The only way to overcome it elegantly is with a bios mod. However you are only able to install bios mod if you have bios version 1.09 or older as Lenovo Thinkpad Edge E330's bioses 1.12-> have EEPROM write protection thus installing a bios mod requires certain flashing device and an skilled user. As bios modding is a dangerous thing to do, and can lead into a seriously overpriced paperweight (your laptop!!), I myself didn't feel the urge to do it. I settled for hotswapping: Boot the laptop with whitelisted WIFI card attached > Boot into setup 1.30 menu > hit F5 > carefully remove the WIFI card and attach the eGPU and voila! Setup 1.30 should now detect your eGpu 3.Booting to windows After succesfully completing a DSDT override, and overcoming the whitelisting, now what is left to do is to boot into Setup 1.30 (using above hotswapping method or not if you have a bios mod) and run a pci compaction 36-bit on eGPU and then chainload to windows and start gaming (YEAHH!!!! THAT'S RIGHT BITHCES) #OPTIONAL# (4.Almost forgot) As Lenovo Thinkpad Edge E330 has an half-miniPCIe slot I removed a tiny piece of plastic to make the EXP GDC mPCIe adapter fit better #OPTIONAL# I myself got a huge gaming boost out of this and enjoyed doing it, however your mileage may vary... Thanks to: @Tech Inferno Fan for setup 1.30 and eGPU threads @angerthosenear for DSDT override guide
 1 point
 -
Well.... A friend of mine had 980 SLI in his desktop, went to repaste the graphics(they are stock cooler ones from Asus) and one of them simply died, I have already re-flashed the VBIOS but the only difference was in the serial number(only one byte was different, I think its the serial number), I might talk to him about donating the gpu, BUT I cant confirm that the gpu is still alive, I think it was a static shock when he took it apart, the card kinda boots, the fan spins, but no image, and only appears on the PCIe information in bios sometimes, maybe its a dead gpu..1 point
-
Use the expresscard slot with a BPlus PE4C 3.0 for the most fuss free x1 2.0 (4Gbps) eGPU solution.1 point
-
Hi guys, I am new around here. I just recently bought an PE4C V3 connected via expresscard slot to dell m6800 with quadro k5100m discreet gpu and geforce gtx 1070. I still trying to get my hardware detected but so far no luck. I cannot see it on device manager. Tired various things like changing switches on PE4C, uninstalling all drivers. disabling optimus via bios. etc.... I am totally newb so do I need the egpu setup 1.3 to see my card on win 10 device manager? Here is my setup. *Edit. There are 4 leds on PE4C. First one is dimming red but it is very faint, second and 3rd one are bright green and 4th one also bright red.
 1 point
 -
I wonder when these processors might come out. I am looking to upgrade from my old laptop and a new build with these Kaby Lake processors would be great.1 point
-
I just helped a friend of mine build a new PC and initially he bought the RX 480 but after the news about the 1060 I told him to return the 480. I felt that the lower temperatures and better performance were worth the $10 over the blower style 480. Even after all this time there are still no aftermarket 480 cards yet. Whats up with that?1 point
-
Glad to see people brought this to court and ended up winning. Just because they make great products doesn't mean they can flat out lie to us about specifications. My friend has a GTX 970 and he will probably be glad about this news.1 point
-
Looks sexy, wonder how much it will cost1 point
-
Too bad that 30 bucks return is only for US citizens.1 point
-
I'm really excited for the native TB3 support in Kaby Lake. What kind of timeline have manufacturers followed after getting new processors in the past?1 point
-
Hi all, First of all I would like to take a moment and write my history with this experience. Last year I had a Dell Precision M4500 (i7-720QM and nVidia Quadro FX880M) which it had to be my eGPU machine. But using FL Studio alot, the cpu didn't kept the pace so I had to make a change. My research got to my Thinkpad T430 because Ivy Bridge platform can get you up to 90% of peak performance of your eGPU solution. When I had my Dell M4500, I have ordered the EXP GDC V8 Expresscard solution at a pretty fair and decent price (Christmas sales) from Banggood. Shipping to Romania was quite long, almost 2 months. In the meantime bought from a local guy, a Dell DA-2 220W power adapter which I heard it is plug'n'play. After arrival, I found out that I don't have the PCI-E power adapter for the graphic card, in my case a Gigabyte Radeon 6850 OC 1GB. That's the only card I have so, I was aware that I might need a display monitor. After another months of searching, found out on Banggood the holy PCI-E adapter specialy for EXP GDC solution. To be assured , bought 2 cables (just in case ) because the shipping was 1 month and 2 weeks (long, I know!). Well, last night I was dying to fire it up, so I put my Panasonic TV ( don't have a display monitor, lame, I know...) and put all cables and adapters together, the expresscard in T430 and fire it. My specs : i7-3610QM, 16GB HyperX Impact CL9, 1600x900, Intel HD4000 iGPU, Windows 7 64bit. After Windows loaded, my Radeon 6850 was found in Device Manager but I got the famous "Code 12" error. The device cannot start because it does not have enough resources. After 5 minutes of google-ing I found my solution! Solution : Shutdown your T430, put the expresscard in the laptop and the most important thing, DISCONNECT the display monitor from the graphic card. Start you laptop and let Windows load. The magic will happen, your graphic card starts with no errors. After that, install the drivers from AMD website. I have installed the Crimson drivers. Connect the monitor to the graphic card and voila! , you have a fully working eGPU solution on your Thinkpad T430. Still didn't found a solution for the following issue. In device manager, I had the Radeon 6850 and Intel HD 4000. When I started my Steam or Origin games, the main GPU was Intel HD 4000. My quick solution was to disable from device manager, the Intel HD 4000 iGPU. Maybe someone found a solution to install AMD Enduro (Switchable graphics) like Nvidia Optimus? I will post later this day, some pics with my tests. So far I have tested Furmark and i got 35 FPS. Battlefield 3 on ultra setting at 1280x720 (the maximum resolution of my TV) runs flawess. GTA V needs more tweaking. My i7-3610QM cpu got maximum temp of 80 degrees C in games. Edit1 : Here are some pictures of my setup including the docking station (is the 170W version with USB 3.) http://imgur.com/a/DpV6t So, this is all about till now. Thanks for reading!1 point