Leaderboard


Popular Content
Showing content with the highest reputation on 06/17/15 in all areas
-
No responses after two days? Guess I'll have to reinstall Windows then. I'll first try the Win10 Preview again and if this doesn't work, I'll downgrade to Win8.1. After that I will give feedback whether it worked or not for future reference. See you later, Kone2 points
-
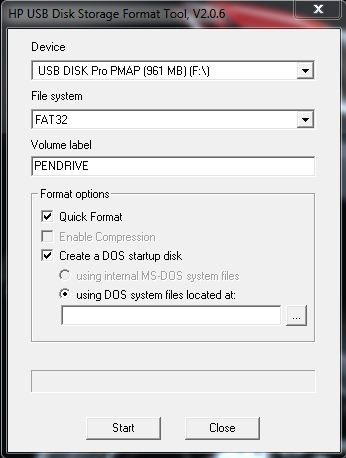
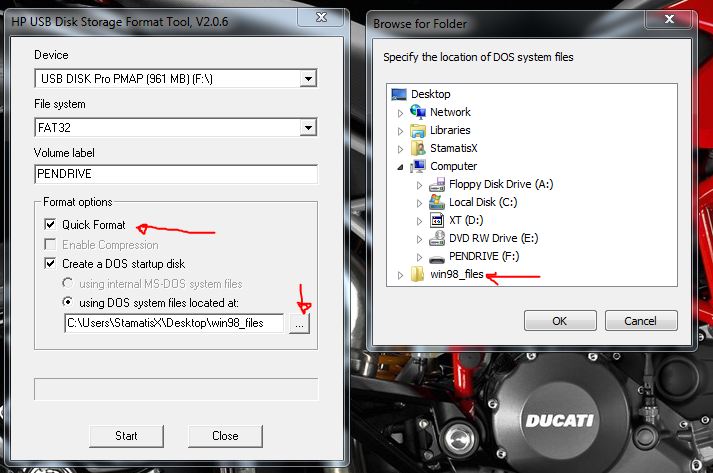
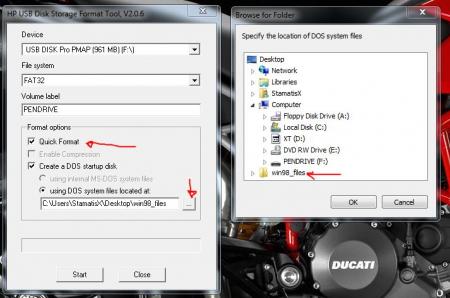
For those who don't like the restrictions Lenovo put on their system, here's a BIOS mod that will get you back at least some of the freedom you should have over your own hardware. Features: WLAN card whitelist removed, any (hardware-wise compatible) card should now work hidden BIOS menus unlocked VBIOS tweaked for more performance and better tuning possibilities Keep in mind that not necessarily all of the BIOS options available with this mod will be fully functional, so use the new available settings with care. If you're unsure about something don't change it and ask here, someone might be able to help. Available for v1.07 / v1.09 / v1.10 and v3.05. v2.04 and v2.07 added (only whitelist removal as for now) If you have a different BIOS (or more specific, a BIOS newer than 3.05) I will need a copy of it in order to make it work for your system. Instructions for flashing the modified BIOS v3.05: You need a USB stick prepared to run DOS, here is a guide you can follow in case you don't know how to do this: Guide by @StamatisX - thanks! >>> Before continuing make sure the AC adapter is connected to your laptop and your battery has at least 20% charge remaining. <<< (0) - NOTE: This step is Only necessary if your system isn't already using BIOS v3.05 Update to the official v3.05 BIOS provided by Lenovo . (1) - Create a backup of your own BIOS (now v3.05) by using Fptw64 tool. Extract the files and run the included .bat file from an admin command prompt. . (2) - Download Lenovo_Y510p-Y410p_[v3.05]_modified.zip and put the files of folder [1] to the root of your prepared USB DOS stick. Let the BiosFixer prepare your BIOS for flashing by drag and dropping your backup file on it. Put the created "v305mod.bin" file to the root of your USB DOS drive as well. . (3) - Now you need to downgrade the firmware back to v2.07 (Y510p-Y410p_v207_[stock].zip) in order to flash the mod. . (4) - Boot from your USB DOS drive, when you see the command prompt type BIOS and hit enter. Wait until the BIOS is flashed (you can safely ignore warnings about non-existing regions). . (5) - Once the BIOS flash completed with no errors, type EC and hit enter. Wait until the EC is flashed. Then reboot. . (6) - Go to the BIOS setup menu, load the default settings, apply and reboot. Done. In case you're using an ultra bay GPU follow the instructions in post #2 and flash the vbios.. NOTE: It's crucial that you flash both, BIOS and EC. Having different EC and BIOS versions can in certain situations lead to issues. IMPORTANT: If you want to go back to stock v3.05 you can do that easily by simply using the official update from Lenovo. That's it, nothing additional required in this case. Old instructions for users with v1.07 / v1.09 / v1.10 or v2.04 / v2.07 who for some reasons don't want to update to v3.05: Video walk-through of bios settings (thanks @allstone): My donation link in case you want to buy me a beer Download link for files referenced in this post:
 1 point
 -
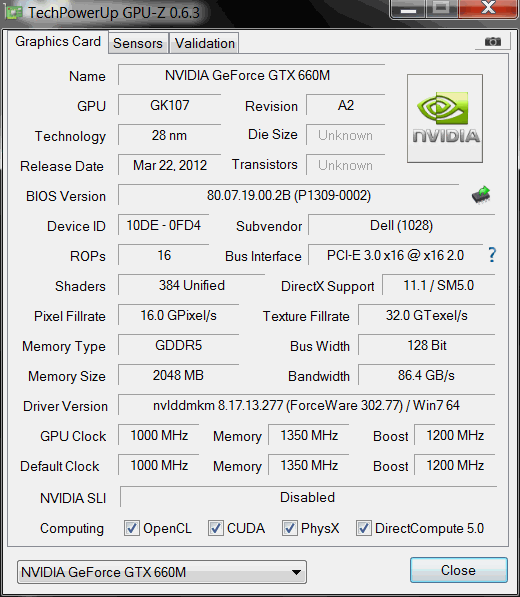
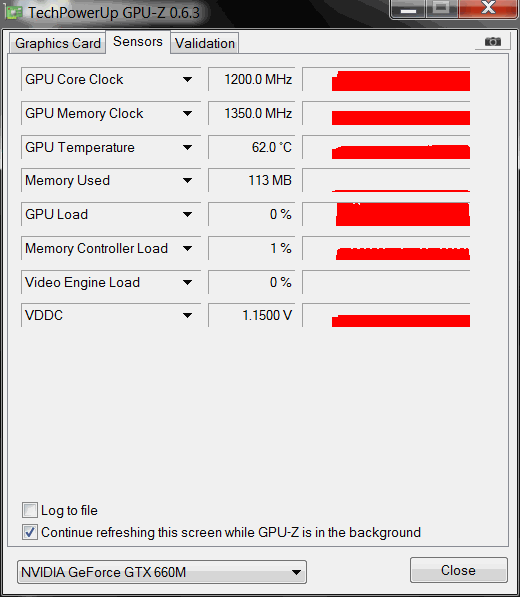
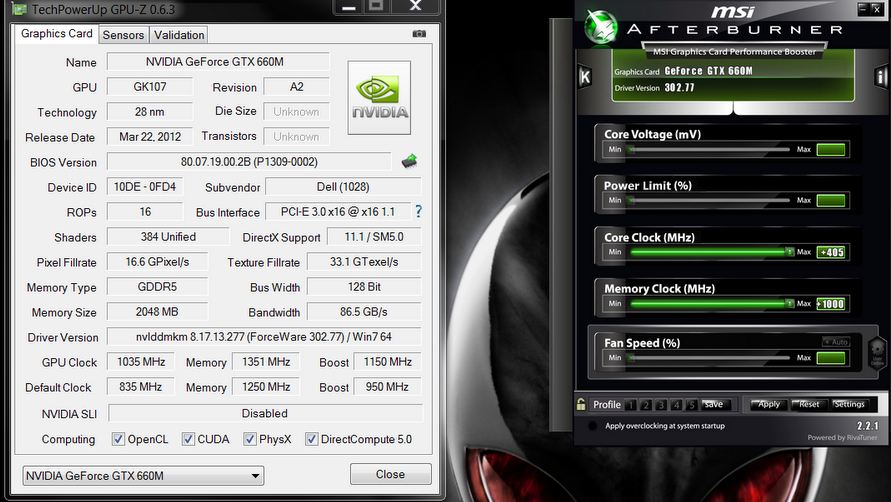
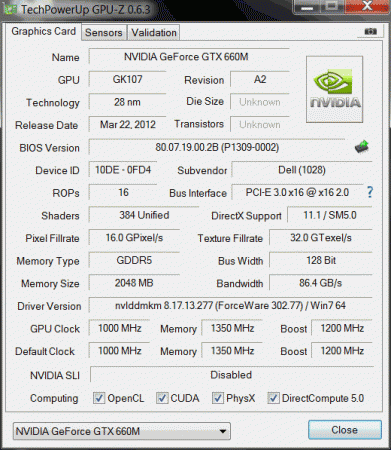
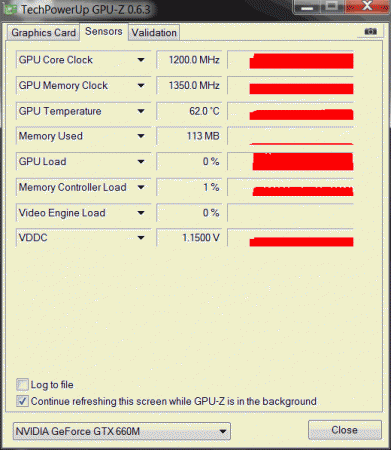
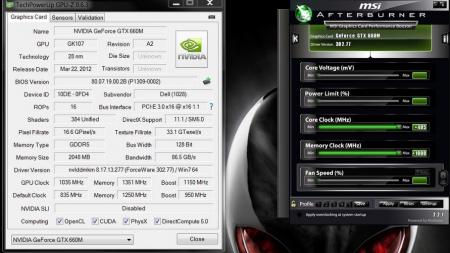
UPDATE: ALL DOWNLOADS LISTED IN THIS POST FOUND HERE. Nvidia 'Kepler' GPUs - modified VBIOS files >>> NOTE: More versions (including voltage mods) exclusive for T|I users can be found in the second post. <<< The 'Kepler' GPUs from Nvidia perform really well, even at increased clocks speeds they stay quite cool - a perfect behavior when it comes to overclocking and improving the performance. Unfortunately the mobile GPUs suffer from an artificial +135MHz core overclocking limit, so you can't go higher by using tools like Nvidia Inspector and similar. The modified VBIOS files listed here have this limit unlocked, some have increased stock clocks or tweaked voltages. Just refer to the description. All files have been modified by myself, if you like them feel free to buy me a drink, donation link can be found below GTX 660m: 660m_OC_edition__VBIOS_[DELL].zip- comes with unlocked software overclocking limits 660m_GHz-Edition_overvolted_VBIOS_[DELL].zip - default 3d clock 1000MHz, base boost 1200MHz,, memory (3d) 1350MHz, increased 3d voltage undervolted editions possible, depends on interest, tba Some screenshots: GTX 680m: Clevo_680m_-_80.04.33.00.10_'OCedition'_revised_01.zip Dell_680m_-_80.04.33.00.32_'OCedition'_revised_00.zip Increased software overclocking limits & optimized for no throttling. Read the included 'Read me' file before flashing. Instructions: I recommend flashing under DOS using nvflash . Donation link in case you want to buy me a beer Thanks and cheers! More to come. Testers: Thanks @eliteone (Dell 660m), @littleone562 (Dell 680m) For all mods: Use at your own risk.
 1 point
 -
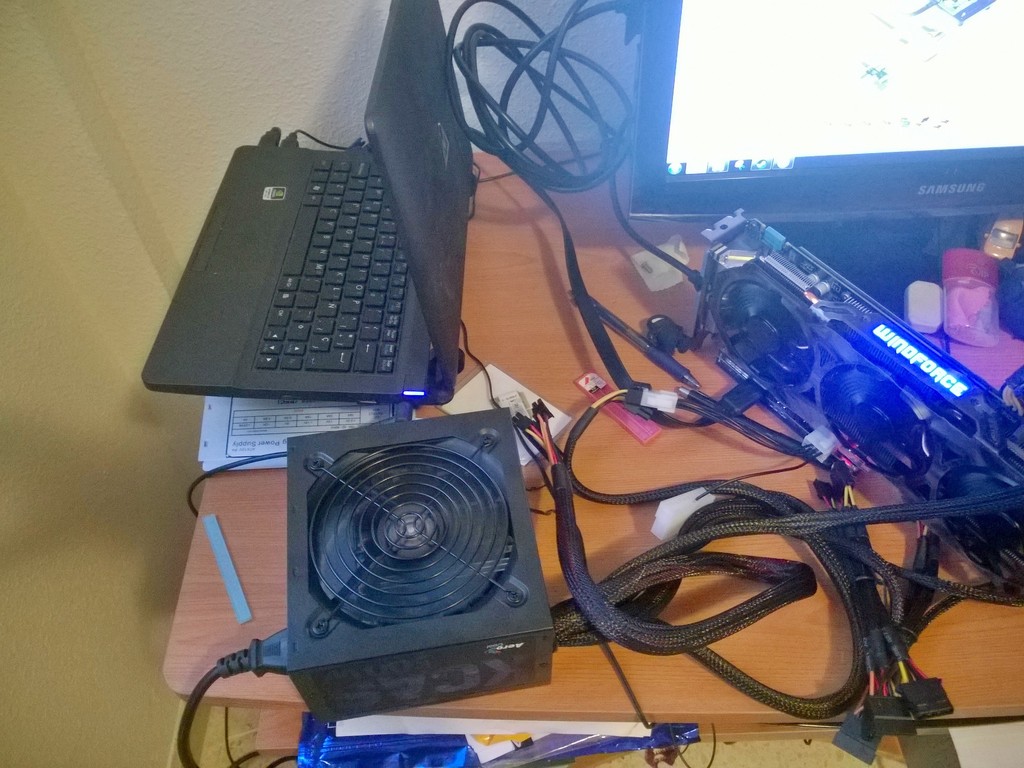
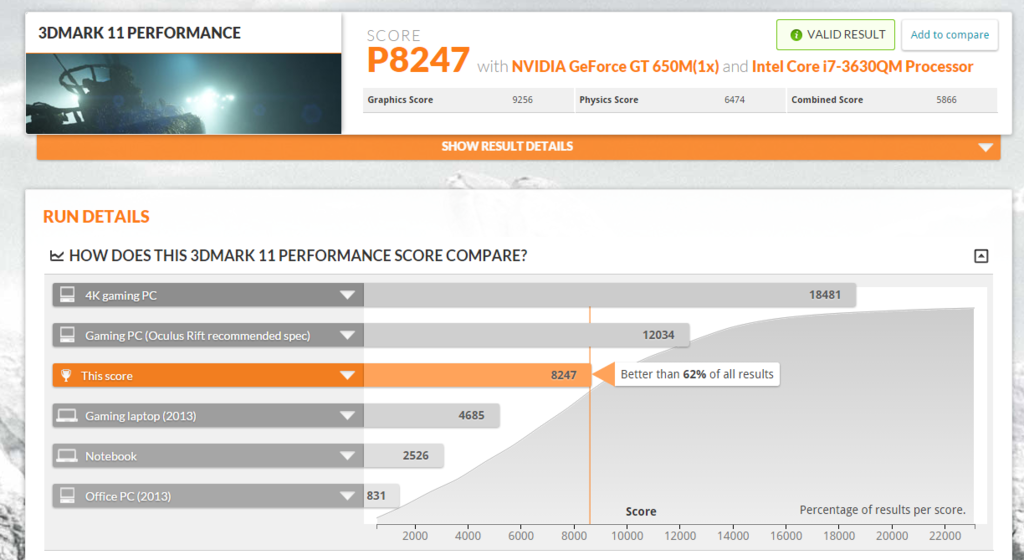
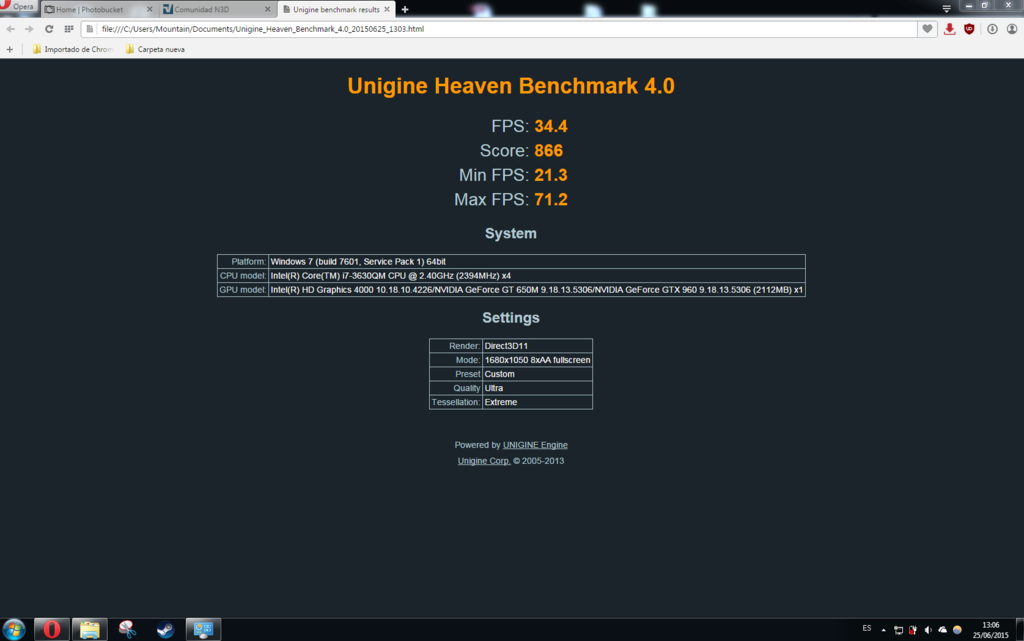
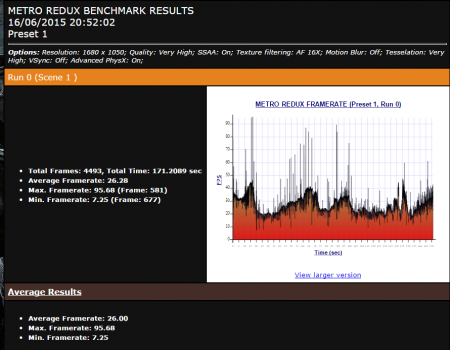
Notebook: Mountain F11/Clevo W110ER CPU: i7 3630QM (2.4GHz) RAM: 8GB 1600MHz OS: Windows 7 Pro 64bit Monitor: Samsung Syncmaster T200HD eGPU Parts GPU: Gigabyte 960 G1 2GB Adapter: EXP GDC BEAST mPCIE PSU: Aerocool KCAS 500W Bronze How To 1-Uninstall Drivers and restart 2-Disable GT650M and shutdown 3-Conect eGPU and turn on EXP BEAST 4-Turn on pc and install GPU drivers 5-Restart 6-READY TO USE Photos Benchmarks 3dMark11 Source: NVIDIA GeForce GT 650M video card benchmark result - Intel Core i7-3630QM Processor,CLEVO CO. W110E Unigine Heaven 4.0 UNIgine Heaven 4.0 Tessellation Extreme + CPU UNPARK CORES Metro Last Light Tomb Raider 2013 Bench (phone photo) www.youtube.com/watch?v=KmMp5sR7B_g


 1 point
 -
FYI, those of you who fly Alaska (and other airlines): I happen to know someone at Astronics who developed the seat power systems being installed on Alaska's fleet now. Each seat has a 110V outlet that puts out a max of about 230W in addition to USB power. Pro tip is this: Power is distributed on a first come first serve basis per seat row. If you want to run your overhacked desktop replacement gaming laptop and suck up all the juice, make sure you are the first to plug into your outlet in your seat row. Don't buckle your belt, don't text, immediately plug in your laptop before you sit down. The first person to plug in per seat row gets as much of the power as you can draw. Any leftovers get sent to the 2nd person to plug in, then the 3rd person to plug in. If the system registers a draw on your outlet first in the seat row, you win. A dedicated 230W probably still isn't enough for some of the biggest power hog systems out there, but you can work with it!1 point
-
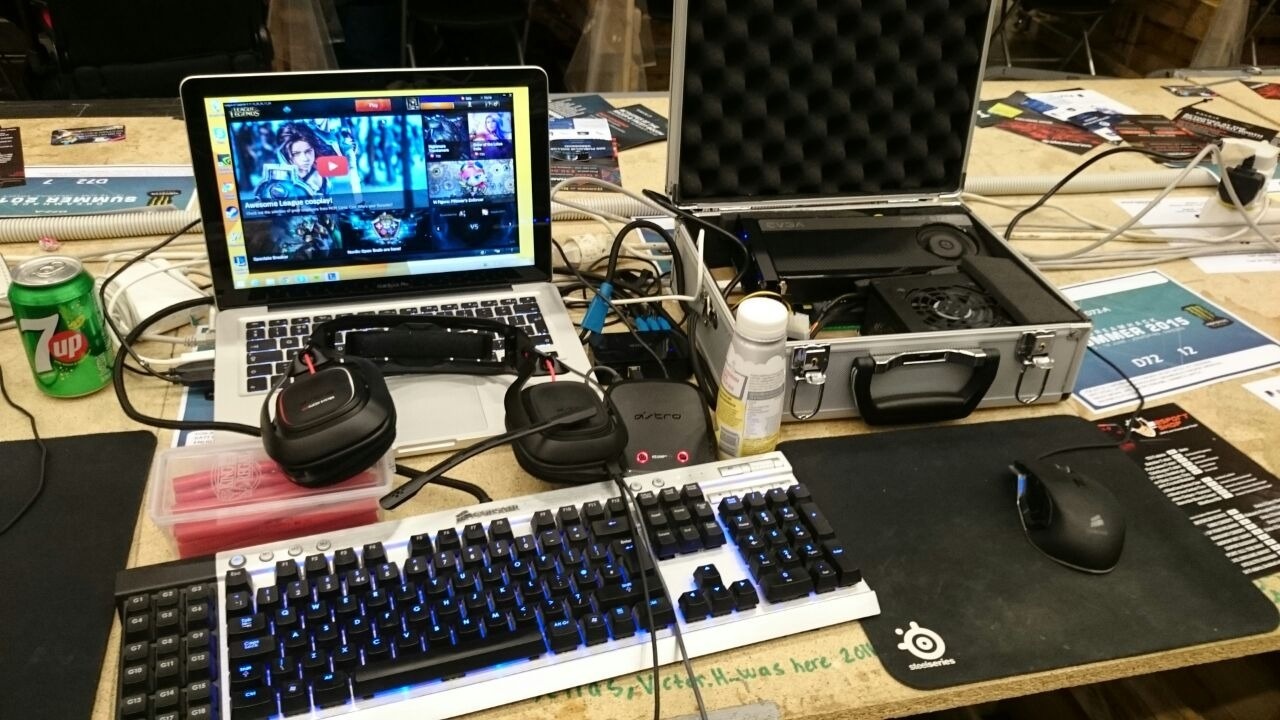
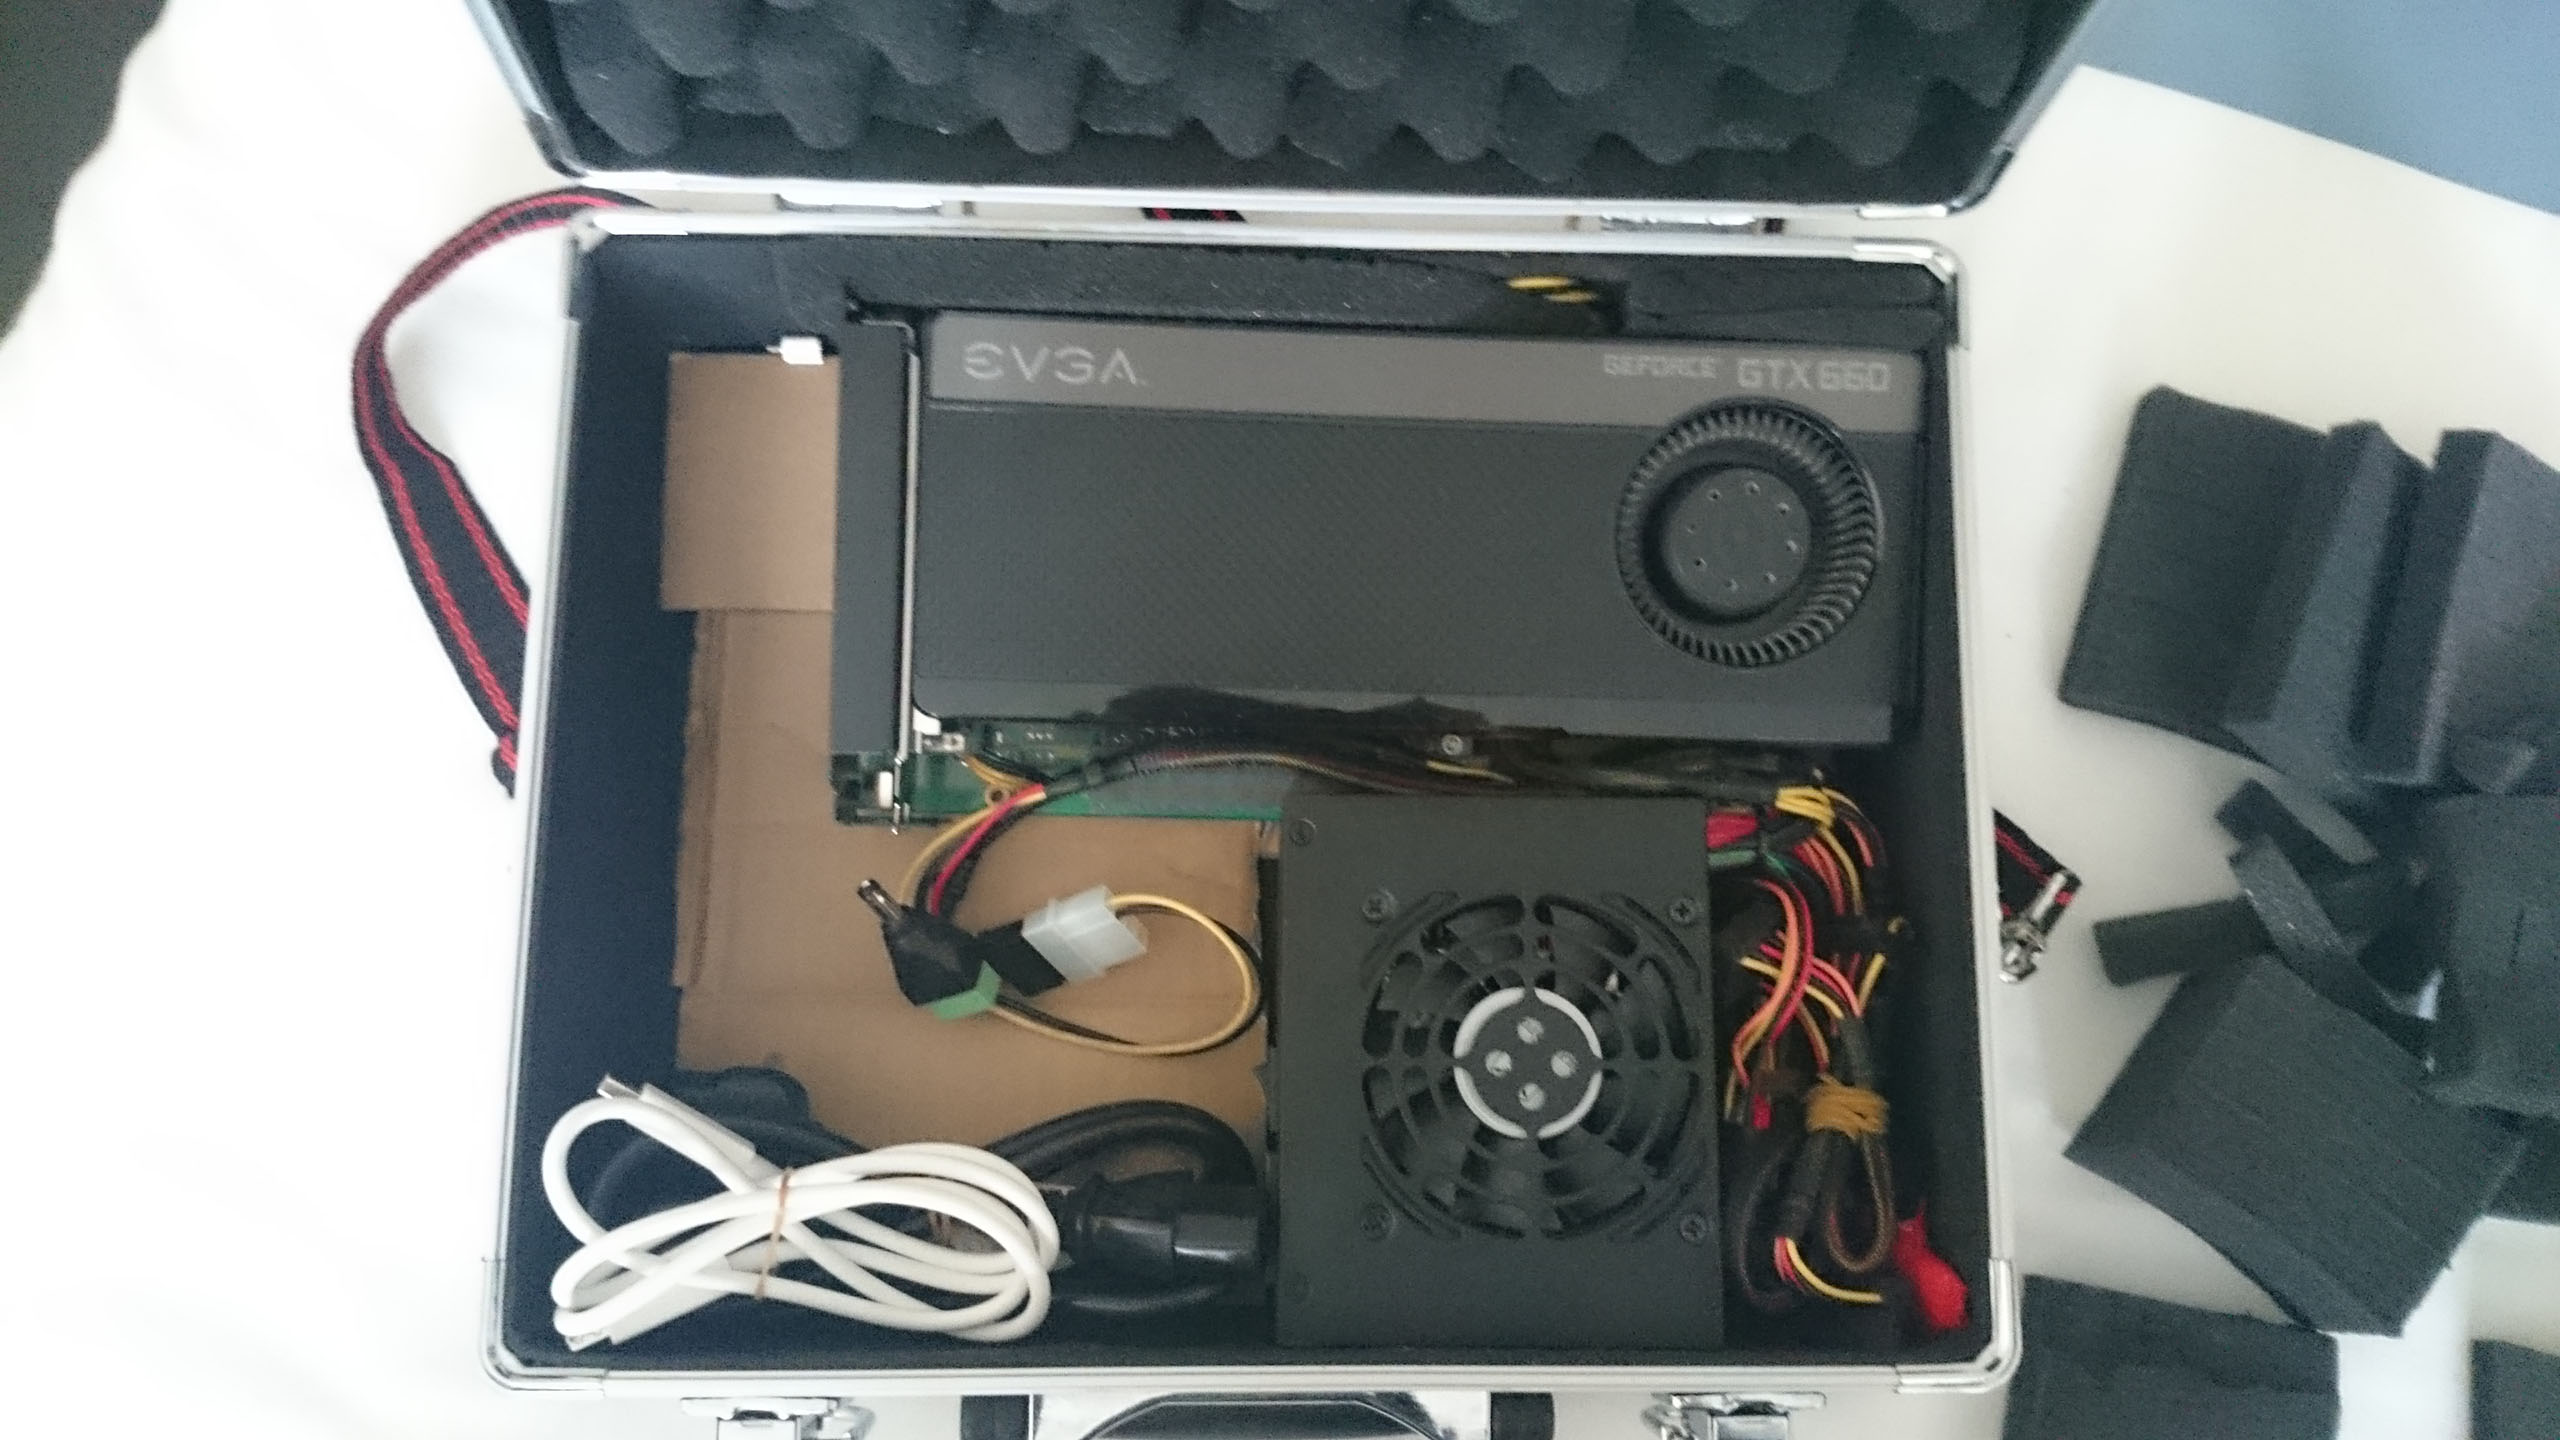
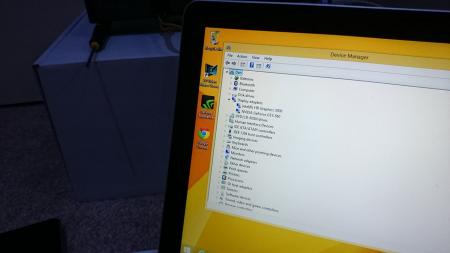
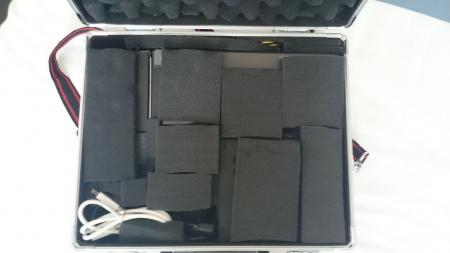
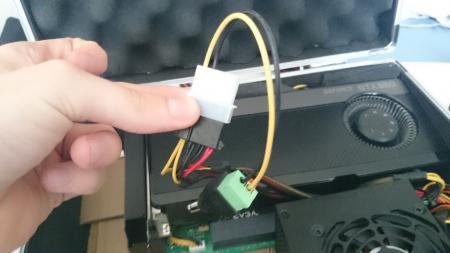
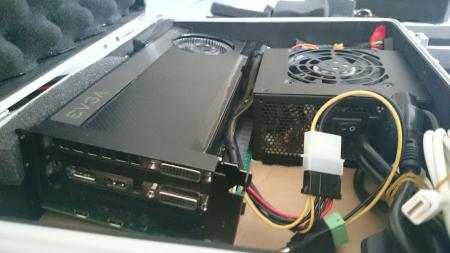
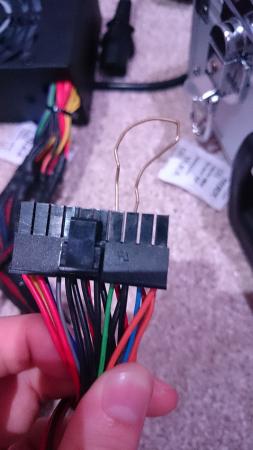
Hi all, this post is a placeholder where I will detail the system & set-up I built and took with me to Dreamhack Summer 2015 in Sweden. A picture of it set-up: WIP: Hardware Purchase AKiTiO enclosure, GPU (I re-used a desktop one), PSU, male/female molex cable & solderless DC power connector. Find a metal paperclip Open up AKiTiO enclosure and remove PCIE board using a small screwdriver. Use the paper clip trick in the 20/24 PIN PSU motherboard connector to enable PSU to turn on. NOTE: The below image is for my PSU, this is the usual configuration, but I would strongly recommend you refer to the manual that comes with the PSU to ensure you are grounding the correct PINOUT. Custom "Enclosure" For my trip to Sweden (I live in the UK so flew with this), I purchased an aluminium carry case to roughly match the dimensions I needed. The case came with pre-perforated foam inside and made it incredible easy to 'create' suitable sizes of foam to secure all the components for the flight. This particular GPU fits snugly inside the case with just enough space for the thunderbolt cable. (dimensions of all components to be added) PSU - 125mm x 10mm x H 65mm (excluding cables, modular power supply, or the 220W Dell power adapter mod would work best to replace mine) GPU - 255mm x 125mm x H ~35mm (70mm instead of 35mm when attached to the PCIE board) Case - External - 330mm x 290mm x H 135mm - Intermal - 310mm x 250mm x 85mm The GPU was "mounted" on some angled cardboard as everything didn't quite fit, I would guess an angle also helps with the air-flow around the GPU. The case went neatly in a carry-on bag for my flight (55cm x 40cm x 20cm) with room for my MBP in the front (pictures to be attached) For anybody interested, leaving the UK they did search the case, so if you plan to fly with this build in some extra time! Software -Windows 8.1 Installation Install Windows 8.1 using EFI by following this guide. I opted to wipe all files and have yet to re-install OSX in a separate partition ----------------------- PAY ATTENTION TO THIS PART. I wasted at least 5 hours as the bootcamp Apple provide for this age of Macbook is not EFI-enabled and I didn't follow other guides properly! Shut down laptop. Plug eGPU into Macbook & turn on the PSU Turn on Macbook & boot into Windows. Check device manager to see two items under 'Display Adapters'. Download latest nVidia drivers for your GPU from nVidia's driver page here Restart Macbook & boot into Windows. Check Device Manager and you should see the name of your GPU under display adapters: If all goes well and you installed native EFI, Optimus should work every time you boot. You will also likely find your sound drivers for the internal speakers no longer work. If you are unsure if Optimus is working, follow this guide which will should an icon in the taskbar, when hovered it will say what is using the dedicated graphics card. To ensure all apps would use the eGPU, I changed the global setting in the nVidia configuration program to run with the dedicated card.


 1 point
 -
Using this since I use my eGPU, didn't want to toggle my ATX on/off that often either so I bought one of these. Doesn't matter if this one will be defect, can be replaced easily. Using my toe btw...won't crawl under my desk every time Still it's a good mod. It's nice if you've got the stuff and knowledge to do such things. I don't even have got the tools to mod my Akitio to be closed

 1 point
 -
So i called eurocom service and they did not know what it will be ok to cover that chip... tryed a newer driver and not working... massive throttling. First step i think is to buy new thermal pads and liquid metal paste and then test my temps. Now in iddle them is 48 degrees and in full load goes up 2 93 sometimes.... i'm not going to play anything until I get the new thermal pad and paste. Sent from my SM-G900F using Tapatalk1 point
-
Yes you were. Sorry for my confusion brother. Sent from my SPH-L720 using Tapatalk1 point
-
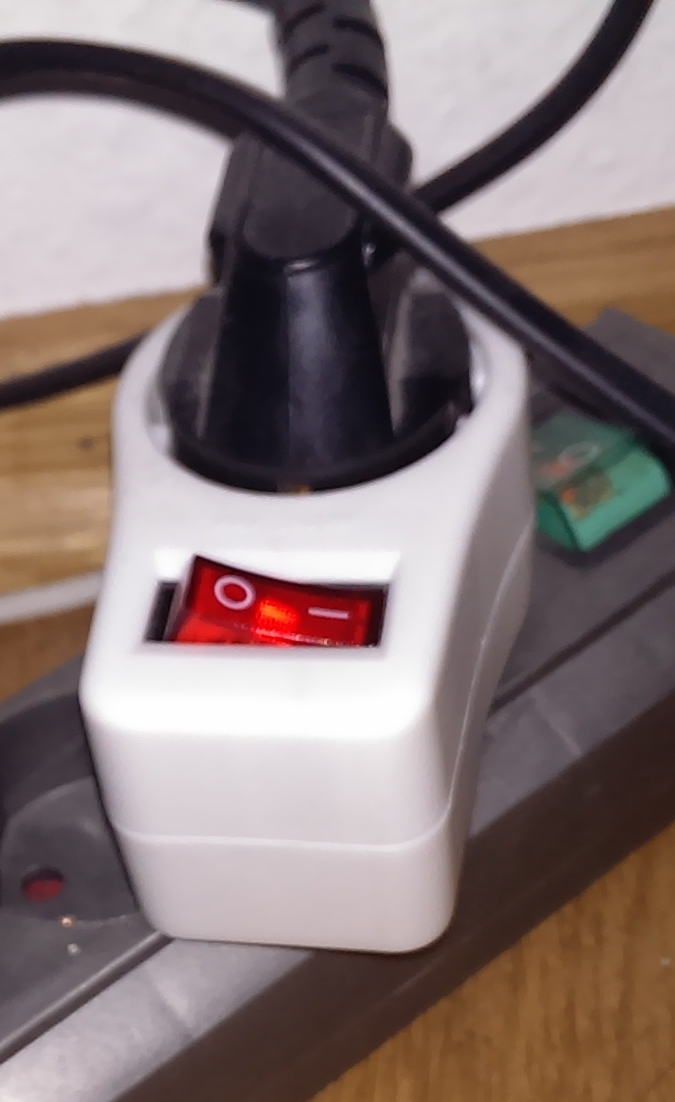
Hi Friends, I don't wanna start a new discussion about this PSU. But what is a power SWITCHing unit without a switch, i thought? Without further ado, i took a switch and installed it. And here's how it looks: While it is very tight in the housing, but with a little tweaking, you can accommodate the switch. The switch cuts both lines of the mains voltage, so it's ensured that even with incorrect house installation, the power supply is de-energized.1 point
-
Hey Arulin, Many question so I will try to answer as much as I can. would a 780m GTX pulled from a Clevo not post at all on a Alienware x17m R3? That is possible, if you have the wrong BIOS running, the wrong drivers,... Many things can add to this. Is there any reason why a Clevo 780m GTX be any different then a Alienware 780m GTX except for the bios? Nope, Clevo uses univeral cards or generic as well they should work fine in Alienware. Would CPU heatsink grease cause any issues on the memory chips instead of using heat pads? I do not understand this question well can you elaborate. Yes thermal grease should not be used as a thermal link on the memory chips, if you see some there clean them with a very fine soft brush and dab of alcohol on a cotton and without pressure wipe the chips off. When five and six beep codes happen from a freshly installed MXM card is that a sign that the card is bad? That beep code is usually a sign of bad RAM stick or Dimm slot, try uninstalling some ram and retest again. Best option here is to leave one stick in and do a CMOS reset then try again. If a mxm card is working, no matter what bios is on it will it still POST? Unless the card is shorted the laptop should post, the reason why it is not posting i think is from ram or something else, try unplugging the card and revert everything to original, does it post then. If yes boot couple times and do clean restarts, shut down uplug, cmos and install the card boot into safe mode and delete all drivers and start from scratch. If you can not boot at all then I think the answer is "BAD GPU" Is there any reason why a pulled 780m GTX from a Clevo would not work in an Alienware x17m R3? No, it should work fine if the card works fine, inspect it physically any missing chips or damaged, look on google for a reference on how the chips should look like. Send it back and get your money back if you have the option for a refund if not then try to express buyers protection on ebay. Goodluck.1 point
-
I need GPU IDs HWID, switching to dedicated mode seems to change HWID like M17x. Only 4x4GB 2133 MHz or 2x8GB 1866 MHz http://forum.techinferno.com/alienware-m17x-aw-17/3220-2133mhz-ram-post-issue-m17x-r4-amd-7970m-gpu.html - - - Updated - - - GeForce 353.17 Beta Windows 10 Win10 'F8' Boot options 'Safe Mode' & 'Disable driver Signing' cmd (Admin) bcdedit /set {default} bootmenupolicy legacy -> reboot -> F8 -> select 'Disable Driver Signature Enforcement' -> Install drivers. Extract driver using 7-Zip Display.Driver folder -> copy/overwrite the proper .inf file Extracted driver package -> run setup.exe INF MOD v353.17 nvgb.inf_PEG_Dedicated: PEG/Dedicated All Models (including Optimus/M17xR4) excluding AW 2015 - GTX 980M , 970M , 965M , 880M , 870M , 860M , 780M , 770M , 765M , 680M , 675MX , 670MX nvgb.inf_v353.17_Otpimus_AW_17: Optimus Alienware 17 / 05AA (only) GTX 980M - 970M - 965M Windows 10 GeForce 353.17 Beta nvgb.inf_v353.17_PEG_Dedicated_Win10.zip nvgb.inf_v353.17_Otpimus_AW_17_Win10.zip1 point