Leaderboard


Popular Content
Showing content with the highest reputation on 01/28/15 in all areas
-
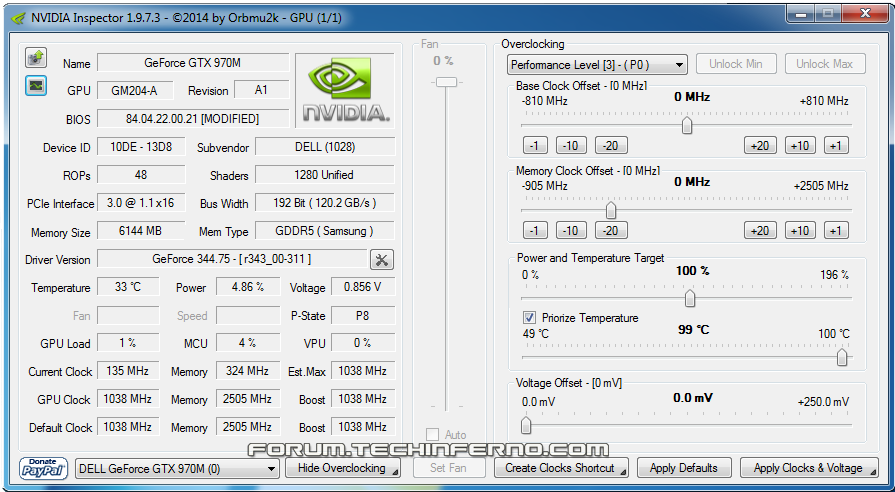
NVIDIA 'Maxwell' VBIOS mods Here you find modified VBIOS versions for the mobile parts of the Nvidia 'Maxwell' series. The VBIOS versions in this post are tweaked for performance and versatility. You'll get almost complete control over the performance parameters of your GPU. List of available VBIOS mods: Nvidia GTX 970m - 'OC edition' rev0 - >> 6 GB Version << - modified by @johnksss & svl7 -> see attachments Nvidia GTX 980m - 'OC edition' rev0 - >> 8 GB Version << - modified by @johnksss & svl7 -> see attachments Screenshot demonstrating the capabilities of the 970m versions: >> Read the instructions carefully before flashing! << If anything is unclear after reading or if you have additional remarks, please post in the thread. Flashing: - Go to the device manager -> 'Display Adapters' -> chooser your GPU, right click on it and choose disable - Flash the VBIOS with mnvflash, a modified version of nvflash (see attachments). Here are detailed instructions for nvflash in case you aren't familiar with it. - After the flashing is done: Enable the GPU once again in the device manager. - Reboot Do NOT use driver 347.09, it's broken and useless and won't allow you to overclock, even with the stock firmware. Don't distribute the files hosted here outside of Tech|Inferno. Don't modify the files you download here. mnvflash_windows_5.196.zip Nvidia GTX 980m - 'OC edition' rev0.zip Nvidia GTX 970m - 'OC edition' rev0.zip
 1 point
 -
As the title says, A12 unlocked and with tweak SATA settings. Alienware_M17x_R3_BIOS_A12_[unlocked]_&_'SATA_fix'.zip Have fun!1 point
-
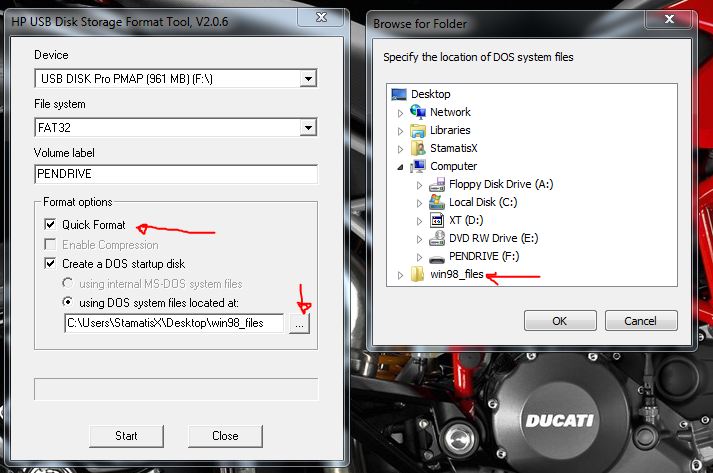
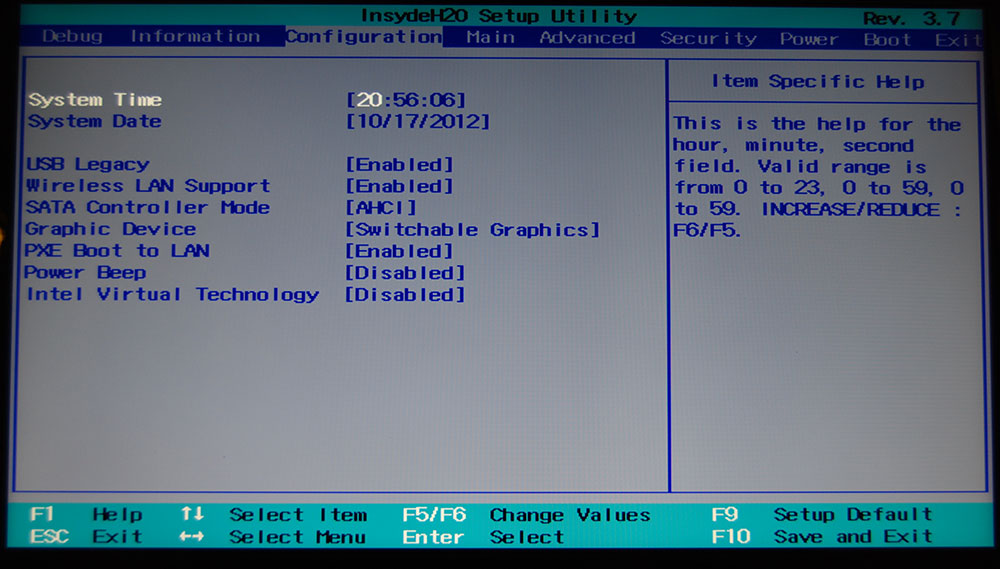
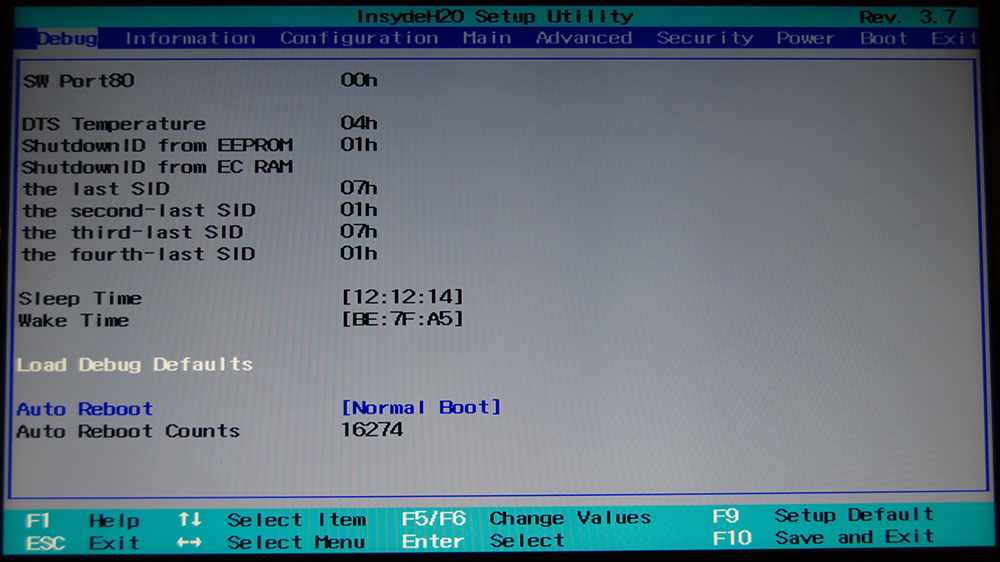
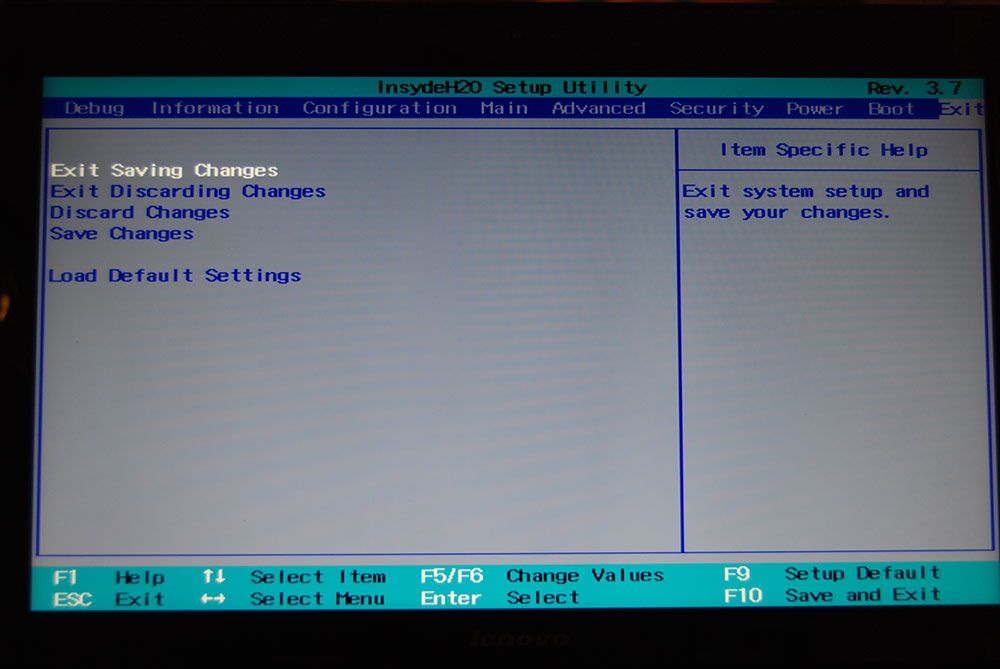
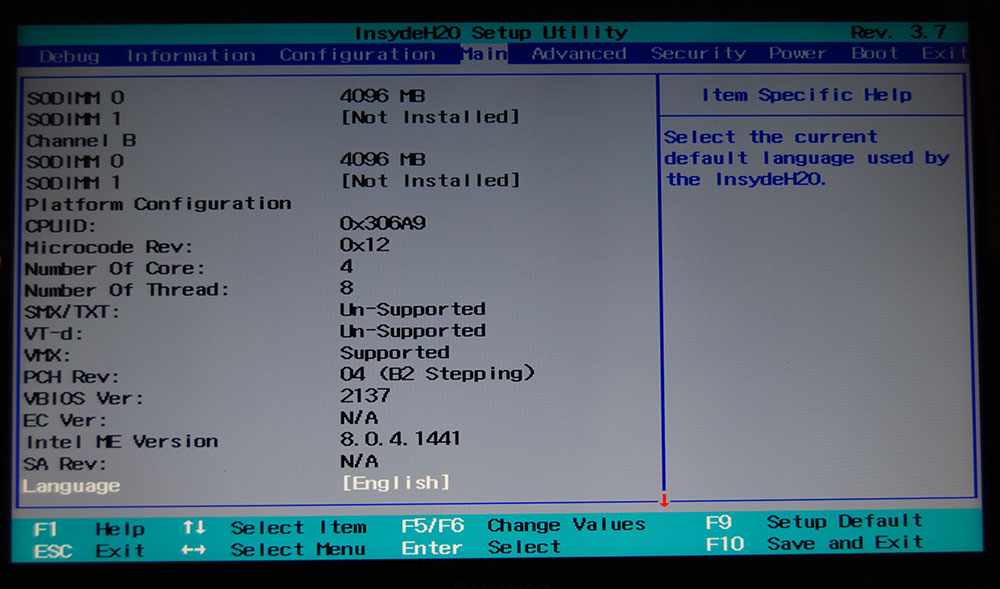
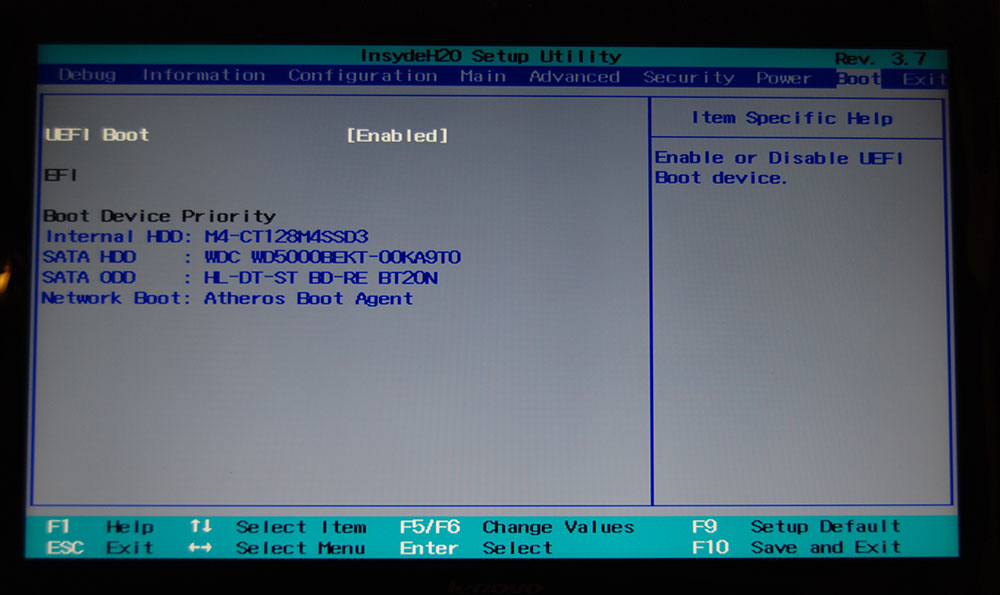
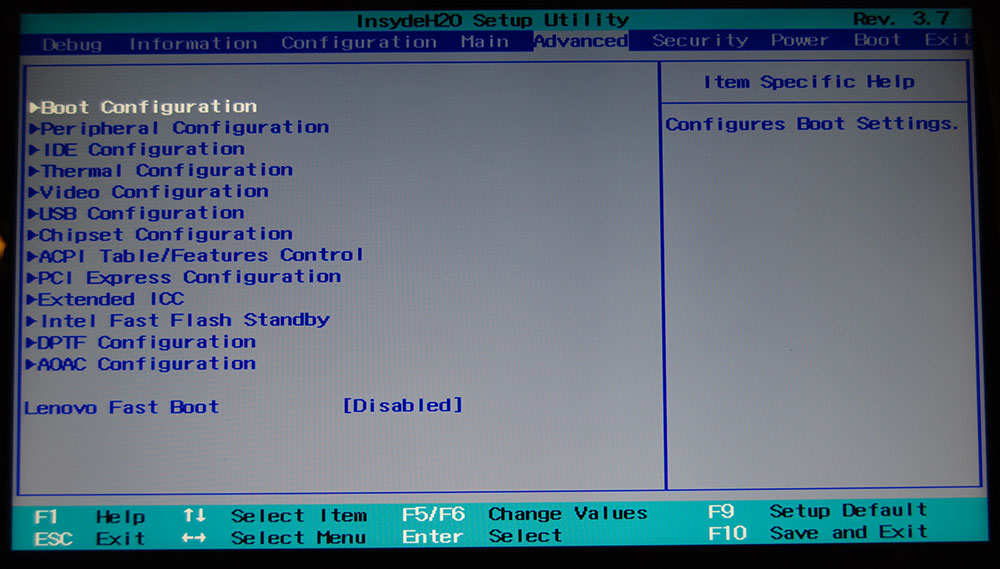
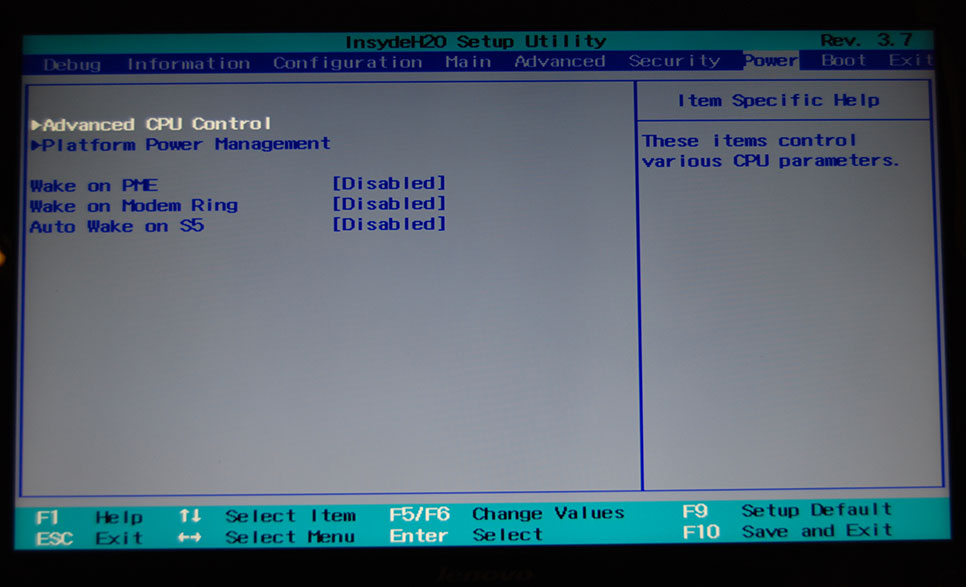
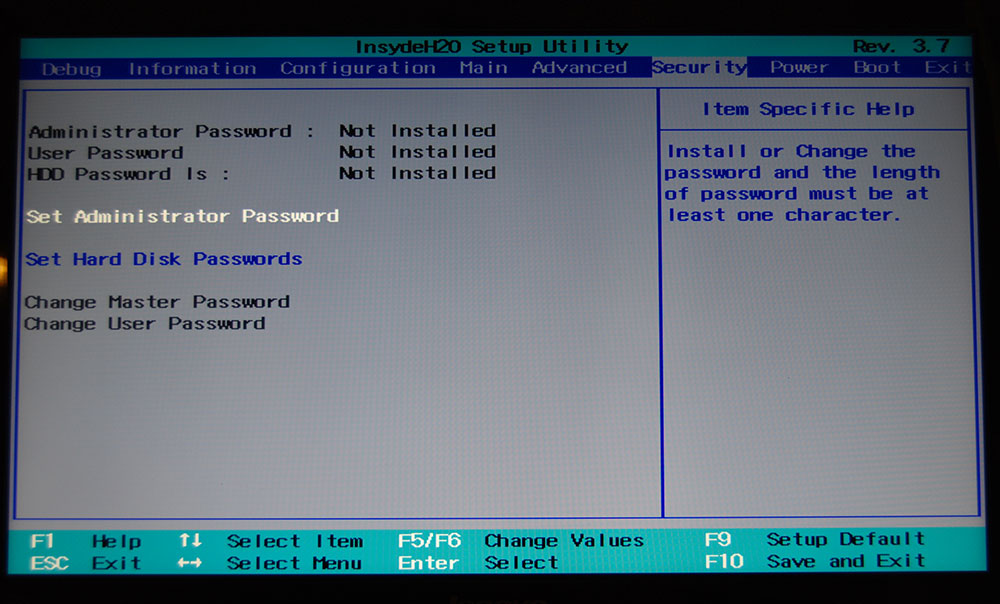
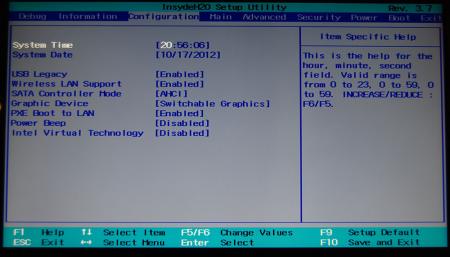
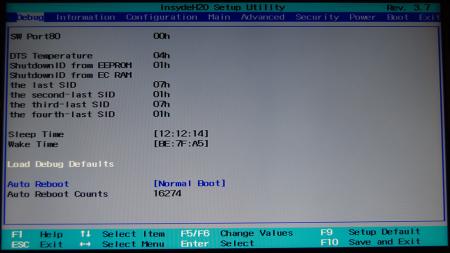
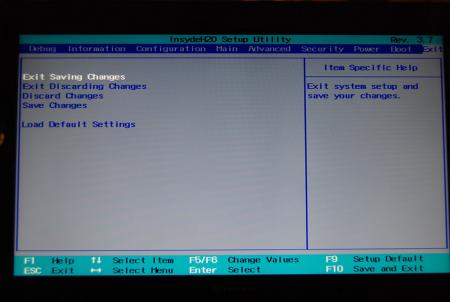
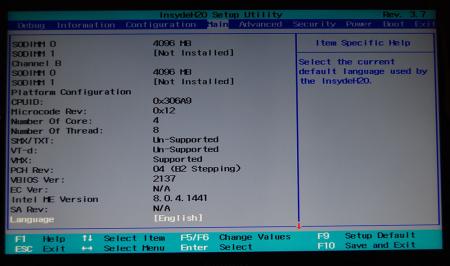
Lenovo Y500 - 'unlocked' BIOS / wwan-wlan whitelist removal The Lenovo Y580 / Y480 comes with a pretty locked down BIOS, and in addition to this with a whitelist which prevents the user from getting 3rd-party wwan/wlan cards to work properly. The modified BIOS versions here will take care of this. Keep in mind that not necessarily all options available in the modified bios will work. Some might not do anything at all, others could possibly leave your system in a state which will prevent it from booting. Use care when changing stuff in the modified bios, don't touch things you're not familiar with. Use all the mods and software posted here on your own risk. NOTE: This will only flash the bios region. It won't reset the nvars set in the bios. While it is technically possible to update from v2.0x to v8.01 by using the method described below, I can't really recommend it since the EC of your system won't get updated. While it might work (possibly even without any issues) I can't recommend it. Therefore if you're on v2.0x and want to update, the better option is to wait until Lenovo provides an official 8.xx firmware update with EC and BIOS. You can then still flash the modified version as described below, once you're on a proper v8.xx firmware. Attached you'll find a modified version of the Y580 / Y480 BIOS v8.01 (5DCN90WW). ----------------------------------------- >> For users with a v2.0x BIOS: << Download links Old version: Current 2.0x version: Lenovo Y580 / Y480 BIOS v2.07 (5DCN40WW) -> unlocked, whitelist removed, Nvidia 660m @ 1GHz default 3d clocks Flash with the included InsydeFlash utility. ----------------------------------------- >> Instructions for v8.0x BIOS users: << The attached BIOS ("Lenovo Y580 - Y480 BIOS v8.01 (5DCN90WW) - Mod") is unlocked, whitelist stuff removed and the 660m is tweaked to 1GHz default 3d core clock. The only way I know of which allows you to flash the modified BIOS for v8.01 users does unfortunately also describe certain information which you don't want to loose (serials, Windows licencse etc.). Don't worry, I got it all sorted out, but due to this the flashing procedure is a bit more complicated than usual. Make sure you follow the instructions carefully. Download the flash tool, for flashing you'll need the DOS version, but for creating the backup of your current BIOS the Win64 version will do as well, and it is faster. Get the prr tool as well. Grab the modified BIOS you want to flash and the Y580-Y480_BiosFix tool. Create a backup of your current BIOS using the flash tool you downloaded (first step) by runing the included backup.bat, or by using the Win or Dos version flash tool with this command: -d BackupBiosY500.bin -bios If you get and 'Error 104', grab 'Error 104' fix and replace the original fparts file with it. . Make sure you have the modified bios which you want to flash, the bios backup you just created and the "Y580-Y480_BiosFix" tool in the same folder. Run the Y580-Y480_BiosFix tool, follow the instructions on the screen. Enter the name of the files correctly, else you'll get an error. It will create a new file for you and will be named after the modified bios file you specified, with 'Fix' appended to it. Here's a screenshot of the tool in use (Y580 version looks the same). In the case shown here it will create a file called "modifiedBiosFix.bin" which you can find in the folder where you run the tool. Use that one for flashing. Put the fixed BIOS, the prr.exe tool and the fpt.exe (along with the fparts.txt file) on the root of your prepared DOS bootable USB drive, restart your system and boot from that drive. Execut the prr.exe, if you don't get an error message continue by pressing enter. Then flash the bios by using this command (filename.bin obviously needs to be replaced with the name of the file you want to flash). If you can't remember the name of your file, use the command dir to display all the files on your drive. Flash with this: fpt.exe -f filename.bin -bios NOTE: The name of the BIOS file mustn't exceed eight characters (not counting the extension)! That's a DOS limit, so make sure the name of your file isn't too long. Wait until the process is done. After flashing it will verify the data, in case there's something wrong with the flashed data it will tell you. In that case don't reboot, just flash again. It might look a bit complicated at first, but that's the easiest way I could think of. Let me know if anything is unclear. The attached v8.0x modified versions include: - unlocked menus - whitelist removed (wwan / wlan) - Nvidia 660m 'GHz edition' - 1000MHz default 3d clocks >> Here's the 'buy me a beer' link in case you like this. Modding makes me thirsty << Use at your own risk, you are responsible for your system and the changes you make on it. My programs come with absolutely no warranty to the extend permitted by applicable law. Thanks @X0pas1 for testing, and for some pics - see below: I'd appreciate it if someone could also post some pictures of the more interesting sub-menus, e.g. advanced CPU control, video settings and similar. UPDATE 1/17/16 DOWNLOAD LINK FOR FILES REFERENCED IN THIS POST:
 1 point
 -
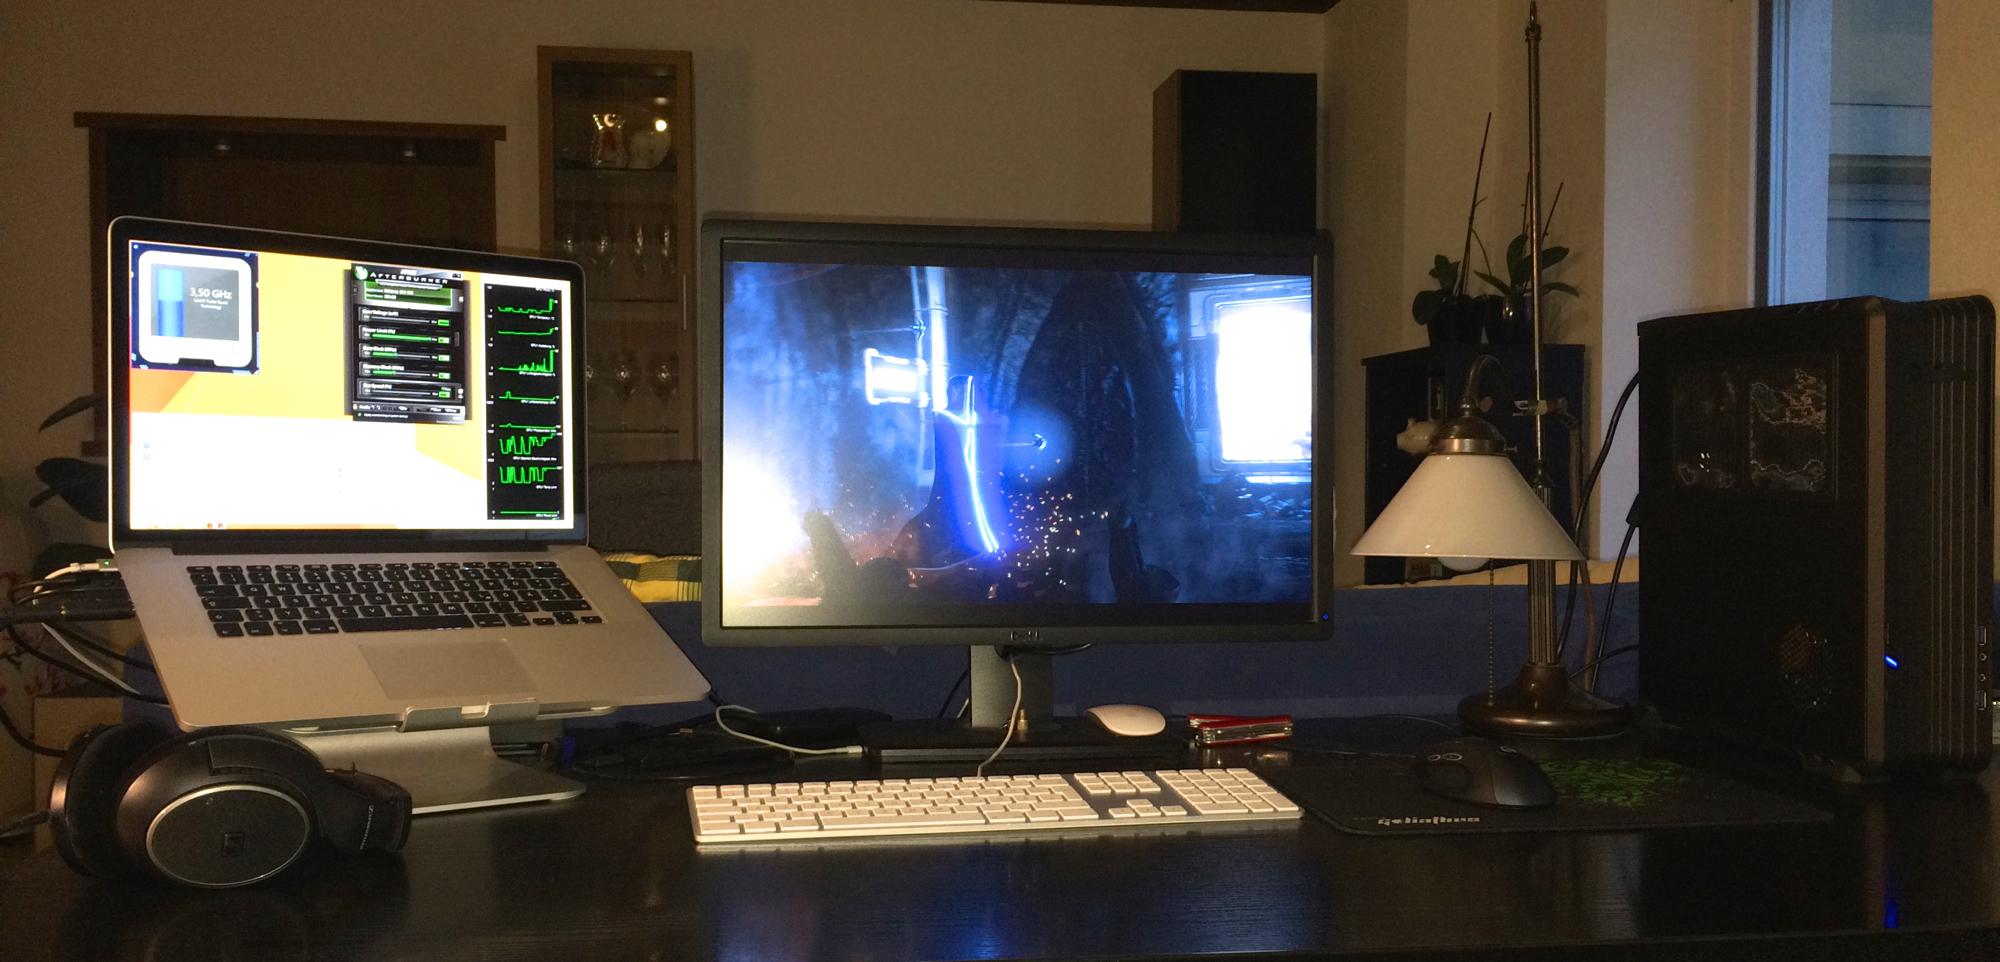
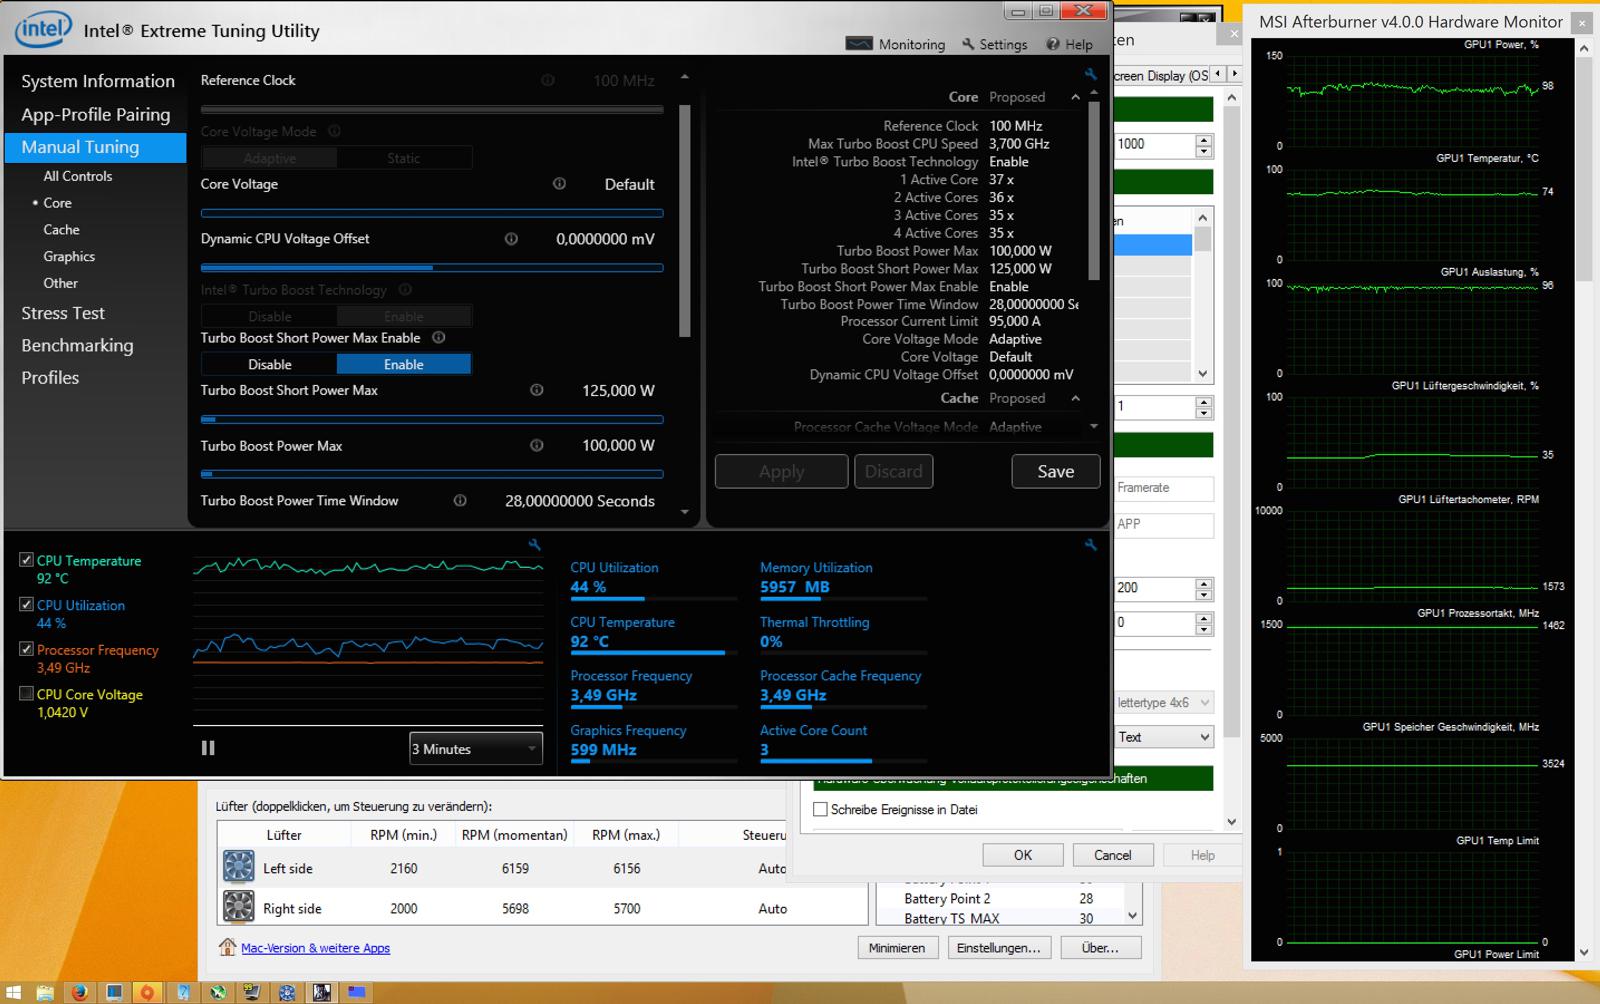
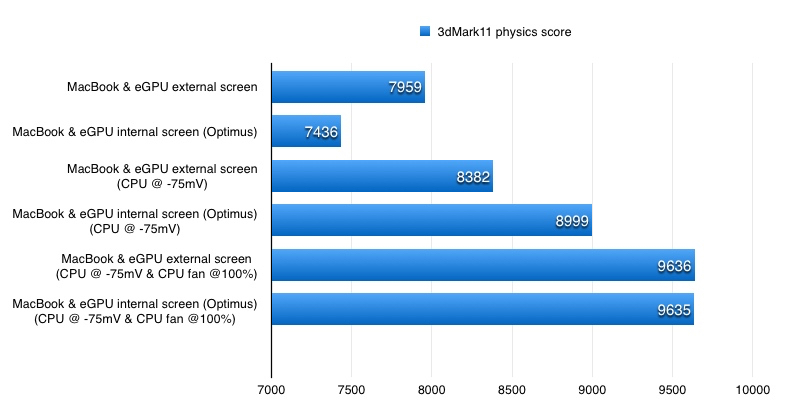
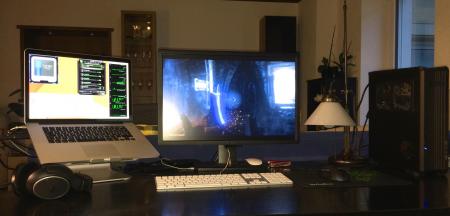
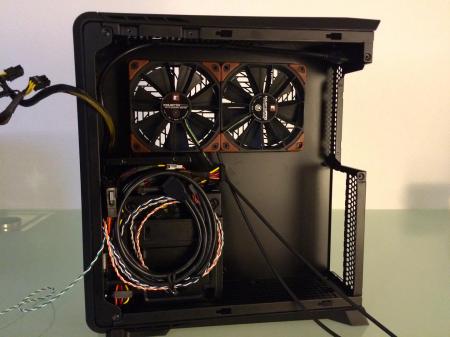
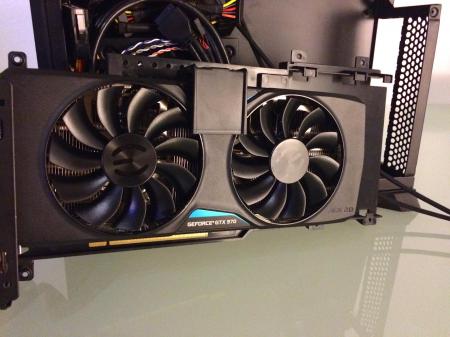
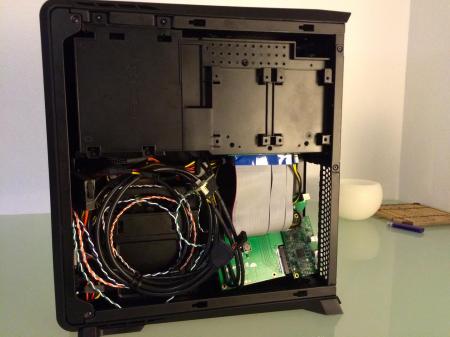
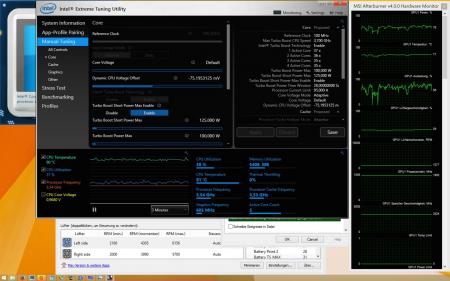
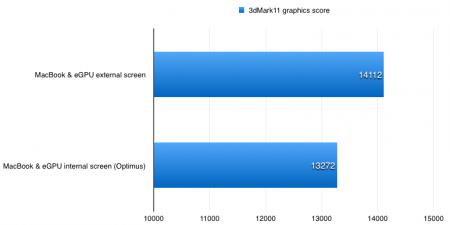
This guide is based on Evo*s guide. Made my optimus setup much more flawless. Other builds I made 3 builds until now: 2013 13" Macbook Pro + GTX970@16Gbps-TB2 (AKiTiO Thunder2) + Win8.1/OSX10.10 [Dschijn] 2014 15" Macbook Pro Iris + GTX970@16Gbps-TB2 (AKiTiO Thunder2) + Win8.1 [Dschijn] 2014 15" Macbook Pro Iris + GTX970@16Gbps-TB2 (AKiTiO Thunder2) + Win8.1 [Dschijn#2] PICTURES CONFIGURATION (Hardware) Apple MacBook Pro 15" Retina / i7-4870HQ 2.5Ghz / 512GB / 16GB (mid 2014), with Iris Pro graphics only AKiTiO Thunder2 PCIe Box Chieftec SFX-500GD-C Bitspower 24 PIN ATX PSU adapter to start the PSU EVGA GTX 970 FTW (Update 5th Feb. 2015: Switched to the new EVGA GTX 970 FTW+) PCIe 16x riser with powered molex - Please be aware that powered risers are not recommended to use. We strongly advice you to use a barrel plug instead: http://forum.techinferno.com/enclosures-adapters/8317-%5Bguide%5D-making-molex-barrel-adapter.html Apple 2m Thunderbolt Cable Silverstone RVZ01 Raven Why did I choose this case? I wasn't so pleased with the Cooler Master Elite 130. The footprint is too big and the GPU is struggeling to get fresh air (especially with a non Nvidia layout cooler). The Raven RVZ01 has the same footprint as the Sonnet III-D and is just a bit taller. It is still cheaper and offers better cooling options. I used a SFX-L PSU, which is the bigger brother of the regular SFX PSUs. It is using a 120mm fan to provide better cooling with less noise. Two slim 120mm fans (set to 7V) are pushing fresh air directly onto the GTX 970 (currently using 3 Noctua NF-F12 industrial PWM fans @ 7V. Will try to control them with the PWM signal of the GPU later). The more elegant case is the Silverstone ML07 Milo. It has the same footprint and functions but a more classic appearance. SOFTWARE INSTALLING Install Windows 8.1 64 bit from a USB stick by using ISO file. This is a standard Boot Camp installation. After installing Windows, download and install all Windows updates. Update Boot Camp drivers (Boot Camp Support Software 5.1.5640) and shut down Do the hardware preparing part 1-8 Install latest Nvidia driver Shut down MacBook Pro and continue from the hardware preparing step 8 Apply following steps to get Optimus internal LCD mode working: http://forum.techinferno.com/implementation-guides/8558-%5Bguide%5D-macbook-enabling-optimus-internal-lcd-mode.html#post110757 . Without this Optimus would only sometimes work. HARDWARE PREPARING Open AKiTiO's box by a normal screwdriver, take out the PCIe board, attach the riser and the GPU to its x16 slot Attach PSU's PCIe power cable to the GPU and do the "paperclip trick" or apply the adapter Attach the Molex power plug to the riser Attach DVI/HDMI cable to the eGPU Place something under the eGPU so that it will be steady Do not attach AKiTiO's 60W power plug to the DC jack of the PCIe board Connect TB cable Turn on MacBook Pro first Hold your "Alt" Key Power up AKiTiO/eGPU by switching on the PSU If your first boot with the eGPU fails, boot without the eGPU into Windows and power up the eGPU (and plug it into the MB) when you are in Windows. SOFTWARE Tools MSI Afterburner (overclocking and monitoring GPU): http://event.msi.com/vga/afterburner/download.htm Intel XTU (undervolting and monitoring CPU): https://downloadcenter.intel.com/Detail_Desc.aspx?DwnldID=24075〈=eng Macs Fan Control: http://www.crystalidea.com/macs-fan-control BENCHMARKS 3dMark Firestrike Please note, the computer benchmarks have been done with my first card (MSI GTX 970 4G gaming). With my 15" MBPr I used a EVGA GTX 970 FTW (power limit 110%, Core Clock +100MHz, Memory Clock +50MHz) eGPU Firestrike results with external screen NVIDIA GeForce GTX 970 video card benchmark result - Intel Core i7,Apple Inc. Mac-3CBD00234E554E41 eGPU Firestrike results with internal screen (Optimus, without external screen) NVIDIA GeForce GTX 970 video card benchmark result - Intel Core i7,Apple Inc. Mac-3CBD00234E554E41 3dMark 11 (All test done with: EVGA GTX 970 FTW, 110% power target, +70MHz GPU, +20MHz memory clock speed): 0mV external NVIDIA GeForce GTX 970 video card benchmark result - Intel Core i7-4870HQ Processor,Apple Inc. Mac-3CBD00234E554E41 0mV internal NVIDIA GeForce GTX 970 video card benchmark result - Intel Core i7-4870HQ Processor,Apple Inc. Mac-3CBD00234E554E41 -75mV external: NVIDIA GeForce GTX 970 video card benchmark result - Intel Core i7-4870HQ Processor,Apple Inc. Mac-3CBD00234E554E41 -75mV internal: NVIDIA GeForce GTX 970 video card benchmark result - Intel Core i7-4870HQ Processor,Apple Inc. Mac-3CBD00234E554E41 -75mV external (CPU fans @ 100%): NVIDIA GeForce GTX 970 video card benchmark result - Intel Core i7-4870HQ Processor,Apple Inc. Mac-3CBD00234E554E41 -75mV internal (CPU fans @ 100%): NVIDIA GeForce GTX 970 video card benchmark result - Intel Core i7-4870HQ Processor,Apple Inc. Mac-3CBD00234E554E41 POWER CONSUMPTION For power consumtion results, please take a look in my first guide: [GUIDE] 2013 13" Macbook Pro + GTX970@16Gbps-TB2 (AKiTiO Thunder2) + Win8.1/OSX10.10 VIDEOS Diablo III in 4k resolution (downsampling to 1980x1200) - FPS counter in the bottom right corner: Battlefield 4 - FPS counter in the upper right corner: Far Cry 4 - FPS counter in the upper left corner: The Witcher 3: GTA V: CPU TWEAKING By stressing the mobile CPU, it will reduce it's speed to adjust Intels CPU limitations. The CPU lowers it speed if: - a critical temperature is reached (sth between 95-100°C) - the max TDP (Thermal Design Power) is reached By lowering the CPUs voltage the CPU can more easily boost into higher frequencies / not too low throttle frequencies / hold it's boost frequency. With Intels XTU tool you can lower the "Dynamic CPU Voltage Offset" slider under "Manual Tuning - Core" to the left. Values around -100mV should be possible. After applying, test the stability of this new settings with Prime95 Small FFTs. With -100mV offset and without the offset) and fans set to 100% I get a higher 3dmark firestrike physics score (9751) because the thermal throtteling doesn't kick in and the CPU can constantly boost. I tested the settings in Geekbench (32bit) and Cinebench. Imo Cinebench is better, because the benchmark takes more time and the throtteling has a bigger impact as the quick Geekbench (or 3d Mark) where the thermal capacity of the cooler has a much bigger influence. Geekbench scores: 0mV 3187 - 11302 -50mV 3194 - 11916 -100mV 3180 - 12199 Cinebench scores: 0mV 1st 570cb -50mV 1st 584cb -100mV 1st 591cb 2nd 620cb 3rd 616 0mV fans 100% 1st 583 2nd 587 -100mV fans 100% 1st 642 2nd 638 3rd 643 As you can see, the lower voltage increases the results because the CPU can boost into higher states under full load and throttles less (hard). By setting the fans to 100% the slow increase of the fanspeed in the benchmark (stock) is excluded! In Battlefield 4 the CPU load is quite demanding and the CPU fan is working at full speed to prevent the CPU from throttling. With a very stable CPU voltage reduction of -75mV the fan speed is in a much lower area and much less annoying!


 1 point
 -
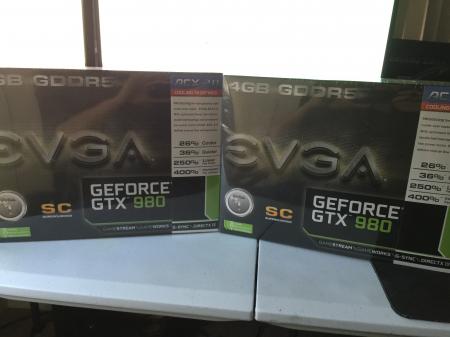
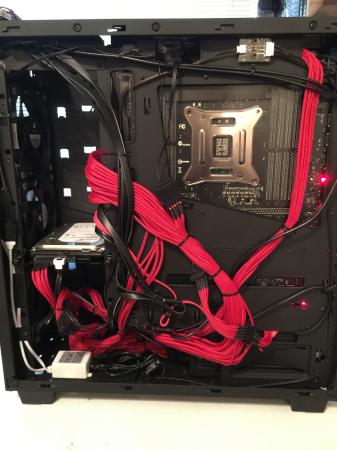
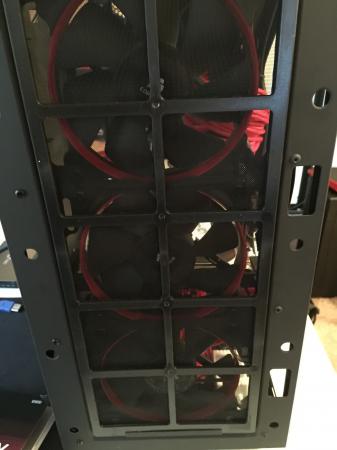
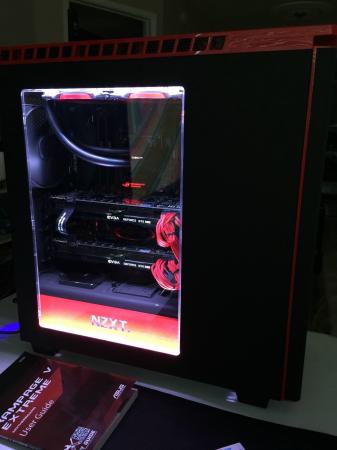
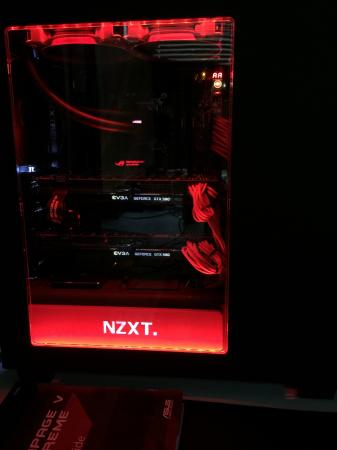
Hey dudes, So I'm thinking of building a new X99 system today (going to head to Fry's to grab the parts) but before I do, I wanted to run the build by everyone here and get some feedback. I'm looking at Corsair ram, specifically: CORSAIR Vengeance LPX 16GB (4 x 4GB) 288-Pin DDR4 SDRAM DDR4 2666 (PC4-21300) Desktop Memory Model CMK16GX4M4A2666C15 - Newegg.comand noticed there's one that costs $20 more but is Cas 16 (CORSAIR Vengeance LPX 16GB (4 x 4GB) 288-Pin DDR4 SDRAM DDR4 2666 (PC4-21300) Desktop Memory Model CMK16GX4M4A2666C16 - Newegg.com). Is there any reason why the slower timings would cost $20 more? Shouldn't it be the other way around? Unfortunately Fry's doesn't carry the Cas 15 so I'd have to get the Cas 16 stuff or shop at NewEgg (which I don't want to do since I hate their customer service). Here's what I have in mind for my build: Motherboard: Asus X99-A (I was considering MSI X99S Krait but the PCI-E layout sucks for SLI). If anyone can recommend something better I'm open to it. Ram: See above. GPU: Already have 2 x 980 SC SLI PSU: Already have AX1200i Case: Got Corsair C70 but not happy with it. Really wish I could get my hands on the 800D but nobody is selling it anymore. CPU: Intel 5820K - don't see any pt in 5930k or 5960x since I don't need the extra lanes. The extra 2 cores would be nice but not for $1000 a pop. Cooler: H100i (it's the older one, will it still work on this board?) Currently this is what I have: Mobo: Asus Maximius V Formula CPU: [email protected] GHz GPU: see above Ram: Vengeance 2133 MHz XMP Case: See above Thanks. EDIT: BUILD IS COMPLETE! Pretty happy with the results, here's the end specs: Motherboard: ASUS Rampage V Extreme CPU: Intel i7 5820 K CPU Cooler: Corsair H100i with MX4 Ram: 16 GB (4 x 4) Corsair Vengeance LPX 2666 MHz GPU: 2 x EVGA GeForce GTX 980 SC Case: NZXT. H440 Black & Red PSU: Corsair AX 1200i SSD: Samsung 840 500 GB + 1 TB backup drive Fans: 3 x Corsair SP 120 for the front, 2 x AF 120 on the H100i and the regular NZXT 120mm in the back. Lighting: RGB LED strips + controller from Fry's electronics Total build time: About 2 days.


 1 point
 -
Yes! I have seen one german user using a GTX 960 in a AKiTiO without a riser! He got a small (ITX version) of Gigabytes GTX 960 with one 6-Pin PCIe power connector and got it up and running. Imho that is close to the possible and some of the higher clocked GTX 960 might need a powered riser!1 point
-
Thanks man, updated both...1 point
-
@J95 Well i just installed driver with updated inf it worked fine, system restart twice no problem. But both 980ms throttles as 344.75 driver.1 point
-
@J95 did you just edit your post? cosz i've tried previously posted inf. Well system restart fine no black screen. So i enable SLI and ran 3dmark11. Unfortunately cards did throttle and got blackscreen, then gettin blackscreen on every restart.1 point
-
@J95 Yes, as i got 18 no optimus.1 point
-
@J95 haha New Alienware is joke. Yes i've tried, it installed fine. But on restart im keep gettin black screen, i did restart 4 times but still blackscreen. Hence revert back to 347.25.1 point
-
Clearly the driver/software team was not ready for Maxwell to start with...many users are reporting issues with desktop 980/970 including performance, desktop specific fixes & compatibility...aka battery boost or more drastic ones (speculation). Essentially desktop & mobile drivers are the same and mobile is the least of their concerns, as always...removing OCing options with no explanation whatsoever... Could you try v345.09 w/ unlocked vbios...just one card, I can't test anything until the freaking card finally arrives >5th customs. 180W PSU...they need to throttle... Did you try installing v345.09? @TBoneSan @godfafa @mikecacho @faritas901 point
-
haha for me it does not throttle while playin games, im happy with it Anyway Dell has just released 980m driver. Unfortunately Dell 980m driver throttles card a lots, even while playing games. I dont think there is solution for this. may be future version fix it. lol you already ordered P570WM1 point
-
Tested BF4 even with Ultra Settings and it's smooth. But to me it's more important to gain 60+ FPS in busy situations so I lower the quality I am considering buying Farcry 4 soon, so will add a video of that as well.1 point
-
the MSI GTX870M is 100% compatible. but you need another heatsink for this Card. This : New MSI MEDION Heat Sink nVidia GTX780 GTX770 E31-0406580-Y31 | eBay or this New MSI MEDION Heat Sink nVidia GTX670MX GTX675MX GTX680M E31-0406162-Y31 | eBay without CPU Bridge1 point
-
- Download GeForce 340.43 Beta - Win8 -> disable driver signing http://forum.techinferno.com/nvidia/6307-%5Balienware%5D-aftermarket-upgrades-driver-support-modded-inf.html#post86445 - Extract w/ 7-Zip/Winrar - Display.Driver folder -> copy/overwrite nvdmi.inf_v340.43_M18xR2_GTX_880M_SLI - Nvidia 340.43...International folder\ run setup.exe You need 5 quality posts or T|I Elite Membership for immediate download rights.1 point
-
i can confirm this, i installed a gtx770m that was pulled from another msi notebook and it installed right away at boot. no vbios flash or modified drivers required-1 points