Leaderboard


Popular Content
Showing content with the highest reputation on 02/06/13 in all areas
-
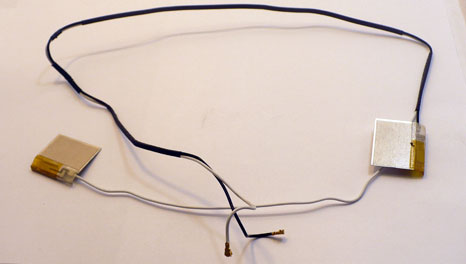
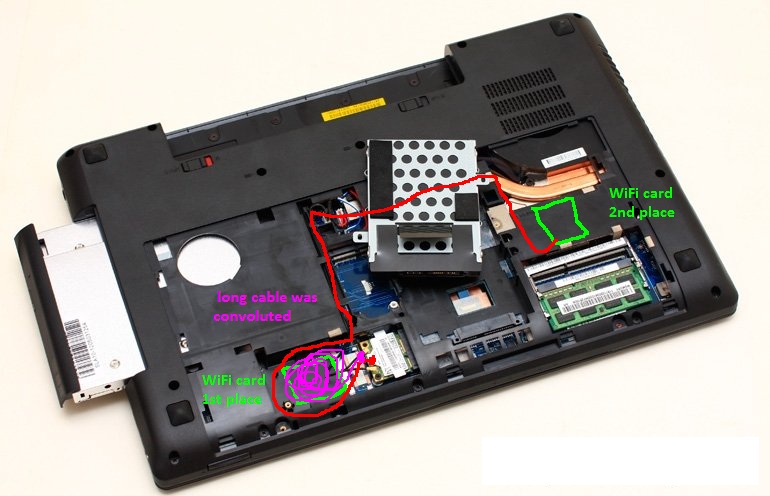
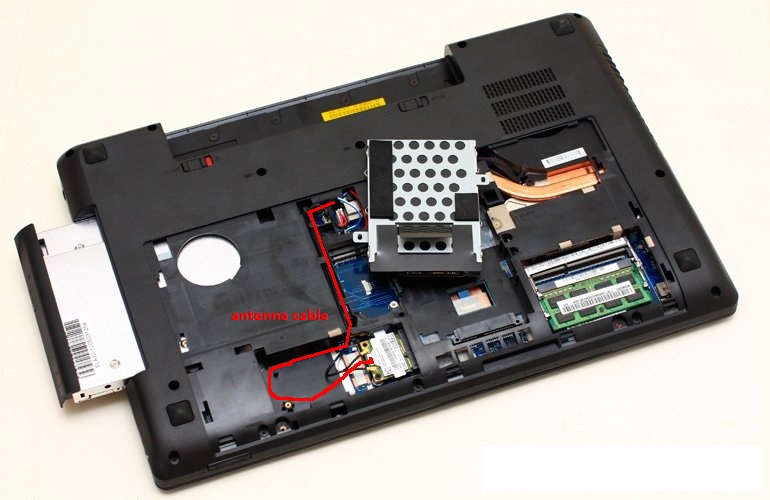
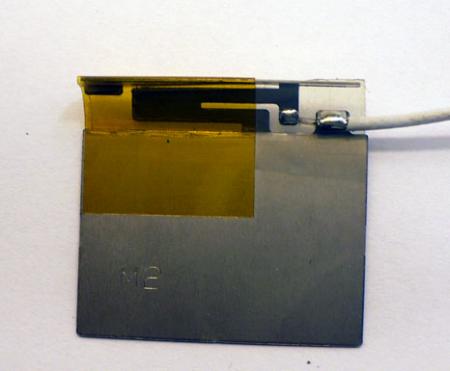
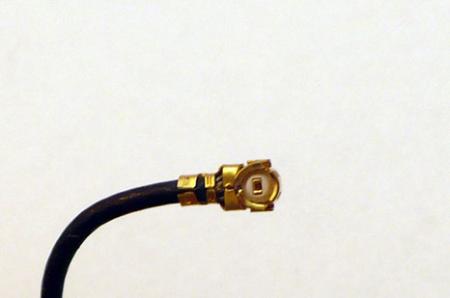
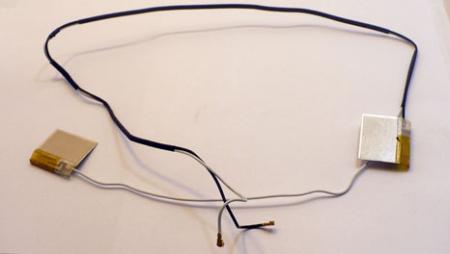
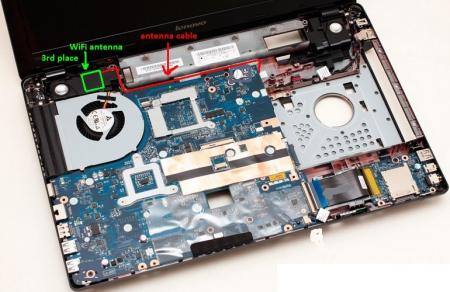
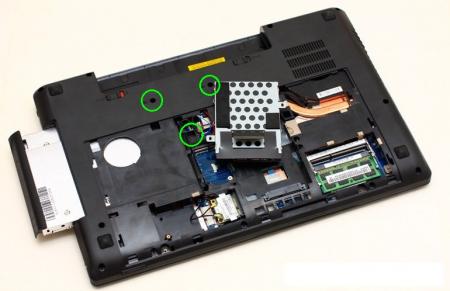
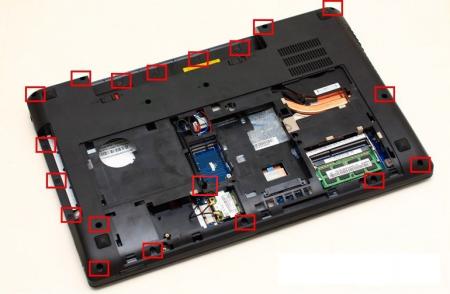
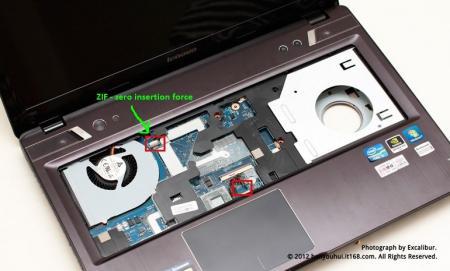
Hello everybody, Today i will show You how to mount 3rd antenna to Lenovo y580. The new antenna came from LENOVO G550. I took shorter one (black one). Oryginally it was placed on display panel next to the camera. Look like that: I was trying three different places. 1st place was a TV card slot. The long cable was convoluted and placed over the antenna. 2nd place was black plastic below heatpipe, and over RAM. But i can not close the back cover so i resigned of that place. 3rd place was a left speaker. To take off the keyboard you have to unscrew 3 screws. Then you have to undermine the three hooks. I used a driver's license because it is lean and hard, respectively. Take a look at "Lenovo Y480/580 Hardware Maintenance Manual" on this post (end of 1st post): LINK page 46. You need to remove the three screws instead of two do not read page 45. Then you have to remove keyboard bezel. Use the same manual as above but page 48 to 50. Then, stick the double-sided tape antenna. Take a look at images. I have done some speed tests. My router: ASUS RT-N66u My PC 1: SSD 128GB, Gigabit LAN My PC 2: Lenovo Y580 SSD 128GB, WiFi 5GHz, WiFi card 3rd location Intel 6200: Max Download from PC1 to PC2 = 100Mbit/s Intel 6200: Max Download from PC2 to PC1 = 100Mbit/s Intel 6300: Max Download from PC1 to PC2 = 135Mbit/s Intel 6300: Max Download from PC2 to PC1 = 135Mbit/s I have done some performence tests. 1st place - very large disturbance, unstable connection, avg speed 80Mbit/s 2nd place - very large disturbance, unstable connection, avg speed 90Mbit/s 3rd place - no disturbance, stable connection, avg speed 135Mbit/s


 3 points
 -
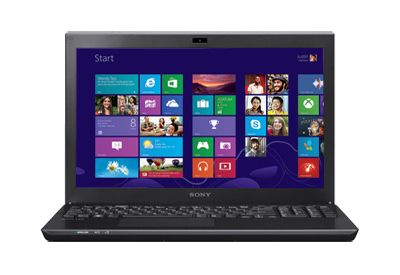
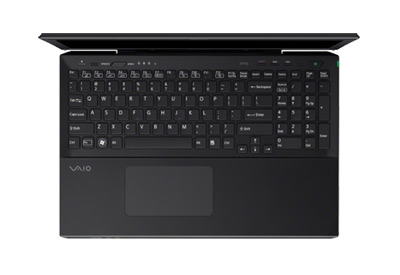
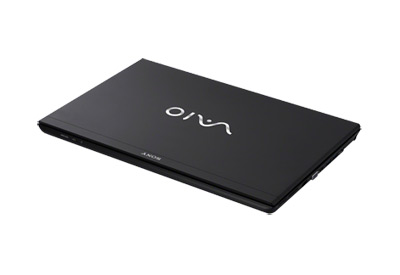
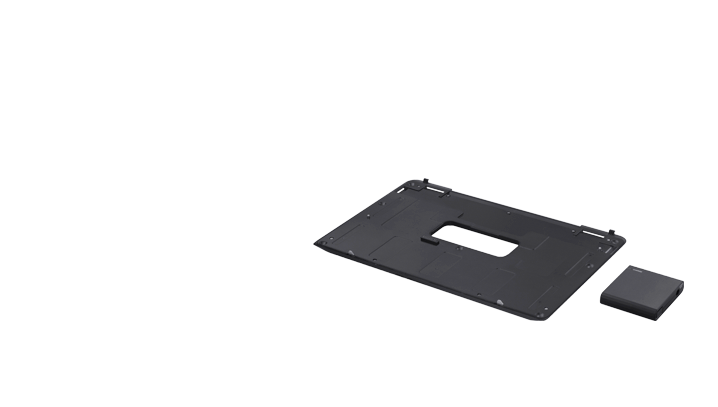
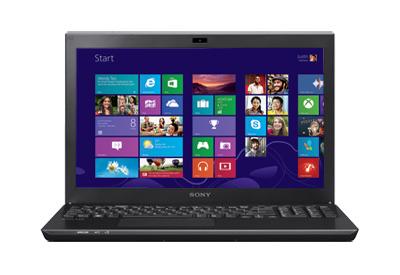
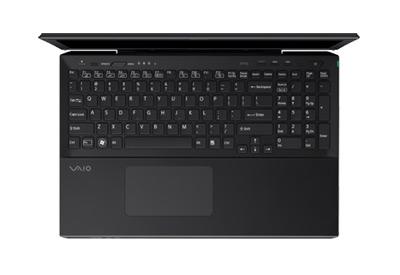
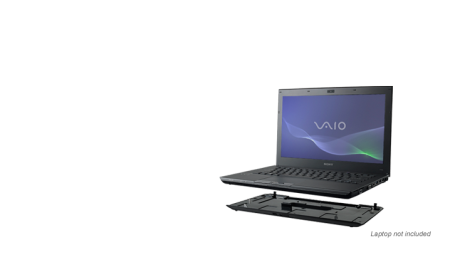
[ATTACH=CONFIG]5976[/ATTACH] [ATTACH=CONFIG]5977[/ATTACH][ATTACH=CONFIG]5978[/ATTACH][ATTACH=CONFIG]5979[/ATTACH] Model SVS151290X Specifications[H][/HR]3rd gen Intel® Core™ i7-3632QM quad-core processor (2.20GHz / 3.20GHz with Turbo Boost) Windows 8 64-bit 15.5" LED backlit Full HD IPS display (1920 x 1080) NVIDIA® GeForce® GT 640M LE (2GB) hybrid graphics with Intel® Wireless Display technology 750GB (7200rpm) hard drive 8GB (4GB fixed onboard + 4GB removable) DDR3-1333MHz CD/DVD player / burner Internal lithium polymer battery (4400mAh) [ATTACH=CONFIG]5981[/ATTACH][ATTACH=CONFIG]5982[/ATTACH] Optional Battery Sheet[H][/HR]Battery - Number of Cells : 6 (2p3s) Battery Capacity : 4400 mAh Battery Type : Lithium-ion Estimated Battery Life : Battery life will vary based on model configuration. Please see notebook spec sheet for specific battery life. Output Voltage : 11.1 V Support Links [H][/HR] Manuals, Specs & Warranty


 2 points
 -
First post revised, added modified v8.01 bios (unlocked, whitelist mod, 660m @ 1GHz core 3d ). Took me a while, but 'Error 28' when trying to flash is solved. Don't know what to do about 'Error 104' at the moment. I'm waiting for feedback, especially regarding the GPU mod. All important things are described in the first post, I will here repeat the most important points: Currently we can only flash the modified v8.01 BIOS, not the whole firmware image. Therefore I advise you to only flash the modified v8.01 when you're already on factory v8.01. While updating from 2.0x to the v8.01 might work, I can't guarantee success. The new bios comes with a different EC version, using the new bios with the old EC could lead to issues. If someone is going to test this, please keep us informed!! In case Lenovo puts a new bios version on their support site, let me know. For 2.0x users I currently recommend only using the 2.0x mods. Once an official 8.0x update is available you can update to it and then flash the modified bios provided in the first post.2 points
-
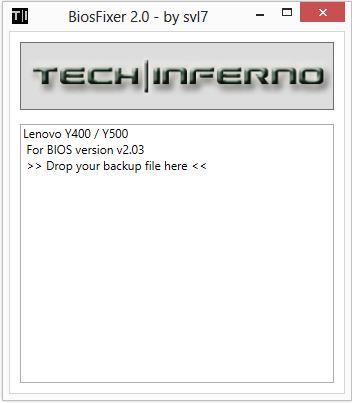
This is continuation of this thread (http://forum.techinferno.com/lenovo-ibm/2690-lenovo-y500-unlocked-bios.html) with all the necessary information in the first post in order to make it easier to find all the stuff. Lenovo Y400 / Y500 - 'unlocked' BIOS / wwan-wlan whitelist removal + modified VBIOS for higher overclocking The Lenovo Y500 comes with a pretty locked down BIOS, and in addition to this with a whitelist which prevents the user from getting 3rd-party wwan/wlan cards to work properly. The modified BIOS versions here will take care of this. Keep in mind that not necessarily all options available in the modified bios will work. Some might not do anything at all, others could possibly leave your system in a state which will prevent it from booting. Use care when changing stuff in the modified bios, don't touch things you're not familiar with. Use all the mods and software posted here on your own risk. Read the instructions carefully. NOTE: This will only flash the bios region. It won't reset the nvars set in the bios. *************** ONLY FLASH A MOD OF THE SAME VERSION AS YOUR CURRENT BIOS VERSION!!! If you're on 2.02 or 2.03 you can safely use the 2.04 update, *************** Attached you'll find modified versions of the Y400 / Y500 BIOS v1.03 and v1.05. Removed as they're outdated. Better updated to v2.02. The bios contains your Windows 8 license, therefore you can't just flash any file, else you'll have issue with your Windows activation. Furthermore the serial numbers, service tags etc. are stored there as well. You don't want to loose them. I wrote a little program that will take care of this issue and personalize the modified bios for you, so that you won't end up with an invalid Windows or no service tags. *************** Preparation to get to BIOS v2.02 (coming from any earlier version): Generally it's a good idea to keep the BIOS up to date. We're luck to have an official BIOS update to v2.02 apparently thanks to a leak on the net. (Lenovo is really bad when it comes to providing firmware updates and fixing issues). The leaked version must be genuine, else it wouldn't flash by using the regular method. If you want to update your system to v2.02 then grab the update here, extract it and flash the bios by executing the included InsydeFlash utility. Once the update is completed you can continue with the instructions below to get a modified version on your system. *************** Instructions for flashing a modified version: As a reminder - the modified BIOS needs to be the same version as you have on your system (2.02 to 2.04 is ok). Prepare an USB stick which can boot DOS. If you don't know how to do this, follow this short guide: Download the flash tool, for flashing you'll need the DOS version, but for creating the backup of your current BIOS the Win64 version will do as well, and it is faster. Get the prr tool as well. Grab the modified BIOS you want to flash, it comes as a tool which will patch the bios for you. Make sure you grab the version that corresponds with your BIOS version. Create a backup of your current BIOS using the flash tool you downloaded (first step) by runing the included backup.bat, or by using the Win or Dos version flash tool with this command: If the .bat doesn't work then open an administrator command prompt in your working directory and run the .bat per command line or type the command written above. In case you get an 'error 104' replace the parts file with the one that can be found in the 'error 104 fix' attachment at the end of the post. And if you still have issues after doing all of the steps above then please leave a reply in the thread and describe your problem. Open the downloaded tool and execute it. Drag and drop your BIOS backup file on it, it will create the mod for you. It will look like this: Put the modified BIOS, the prr.exe tool and the fpt.exe (along with the fparts.txt file) on the root of your prepared DOS bootable USB drive, restart your system and boot from that drive. Execute the prr.exe, if you don't get an error message continue by pressing enter. Then flash the bios by using this command (filename.bin obviously needs to be replaced with the name of the file you want to flash). If you can't remember the name of your file, use the command dir to display all the files on your drive. Flash with this: fpt.exe -f filename.bin -bios NOTE: The name of the BIOS file mustn't exceed eight characters (not counting the extension)! That's a DOS limit, so make sure the name of your file isn't too long. Wait until the process is done. After flashing it will verify the data, in case there's something wrong with the flashed data it will tell you. In that case don't reboot, just flash again. *************** Flashing the ultra bay 650m - only for SLI users with BIOS v2.02: The modified BIOS v2.02 also contains a vbios which will allow you to overclock your 650m past the 135MHz limit. As the ultra bay GPU has it's own vbios module you need to flash it separately. You'll need an USB drive which can boot DOS (just as the one you used for flashing the BIOS). *************** It might look a bit complicated at first, but that's the easiest way I could think of. Let me know if anything is unclear. >> Here's the 'buy me a beer' link in case you like this << Use at your own risk, you are responsible for your system and the changes you make on it. My programs come with absolutely no warranty to the extent permitted by applicable law. Grab file archive here:
 1 point
 -
I doubt it's due to the command I fixed something and uploaded it again, as stated in my previous post. Performance is great! Temps are rather hot for this card... seems to be related to the Clevo systems. If you want lower temps you can try to mod the heatsink a bit in order to increase the pressure on the die.1 point
-
With a 580 overclocked sc2 and d3 run great maxed out. The story mode campaign parts of sc2 ran in the 40s at worst, with the actual gameplay 80+ except for intense late game combat. D3 will stutter in some places on rhakis crossing, but the rest of the game is smooth. rhakis crossing stuttering can be eliminated with an fps cap. Very intense fighting with multiple players and 50+ monsters on screen can drop fps to 30s, but that is rare. Not sure about borderlands 2.1 point
-
I use my eGPU mainly for CUDA development and I don't really play many games, certainly none of the ones you mentioned, however I am partial to the occasional game of Red Orchestra 2, which I can run with a GTX 560ti on 1.2opt with all the video settings on ultra at 1920x1080 resolution and get completely smooth gameplay. It's so good that I don't even bother to plug the monitor into the card itself, I just keep the monitor plugged into my laptop and use it as a conventional external display.1 point
-
Ok, will take a look at it. For the ftp use -d filename.bin -bios1 point
-
@buluunee: MSI 675mx 4GB version added. For this I need a dump of your bios, e.g. with the afuwinflash, or even better with this tool, and a GPU-Z screenshot. Also preferably of a recent bios.1 point
-
I've attached a bios backup from 8.01, svl7 BIOS 5DCN90WW EC 5DEC90WW Thanks! 801BIOS.zip1 point
-
I had several of these over a few months this summer while Dell tried to actually find one that would work properly. Any Bios newer than A04 throttles the GPU in favour of the CPU and A04 runs the GPU at full boost and throttles the CPU to 1.2Ghz (at least the quad core unit I had). I also had problems with the screens, lots of dead pixels and overall poor screen quality, the Wi-Fi performance ranged from bad to totally unusable (Apparently different units are worse than others). Additionally I had issues with build quality, all but one had at least one part of the system that was not assembled correctly, including one where the touchpad was unusable because it was installed too far to the left so it stuck down after every click. That's the troubles I had with this thing, I'm sure there are some people who didn't have as many issues but I eventually just gave up and they gave me a full refund (after two months). As for heat, I saw some ridiculous temperatures. The cooling system is just not powerful enough for the components in the system. It's all cooled by one tiny fan and it vents directly into the back of the screen cover. I've seen it get to 95C on the CPU and 85 on the GPU at the same time. Who knows why I bought another Dell after this, there just wasn't anything else that interested me. Haven't had any issues with the Alienware, except that it shipped out missing a screw that I've since installed myself. I wouldn't have noticed if I hadn't disassembled it to repaste it.1 point
-
If it is stable, then no....1 point
-
!!!!ATTENTION!!!!!!!!!!!!! For those people who want to unlock their BIOS for the Lenovo Y 500 I'm going to list what I've tried what's works and what didn't work for me 1.Intel HD4000 graphics - Not working -think it's a frame buffer issue 2. Intel WIDI - Not working - No Intel Graphics Support 3. Memory - Overclocking Memory worked via advanced Menu 4. CPU - Overclocking worked via the multiplier - In advanced Menu Please Replace stock thermal paste if you going to attempt (ex IC Diamond) 5. Raid - Not working - In advanced Menu I can switch to Raid Mode but in the config Menu there was still only AHCI and IDE mode only tryed to restart in raid mode Bios would revert Back to AHCI Mode 6.Power Management - Working - you can set C-State via Unlocked Power Menu !!!!!!!!!!!!!!ATTENTION!!!!!!!!!!!!!!!!! Windows 8 (64bit) Standard (preinstalled on all Y 500) And all so a BIG THANKS TO SVL7 for helping me out P.S I have Bios ver. 1.3 with the elan Touch Pad I have to return my laptop touch Pad issues I believe Bios ver. 1.5 users have the Synaptics touch pad which as far as I know has no issues (note) Returning to stock Bios Version 1.3 windows 8 is activated Hope this answer everyone's Questions1 point