Leaderboard


Popular Content
Showing content with the highest reputation on 02/05/13 in all areas
-
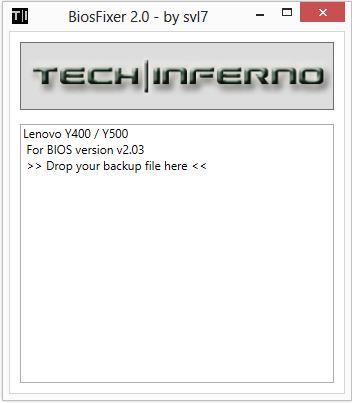
This is continuation of this thread (http://forum.techinferno.com/lenovo-ibm/2690-lenovo-y500-unlocked-bios.html) with all the necessary information in the first post in order to make it easier to find all the stuff. Lenovo Y400 / Y500 - 'unlocked' BIOS / wwan-wlan whitelist removal + modified VBIOS for higher overclocking The Lenovo Y500 comes with a pretty locked down BIOS, and in addition to this with a whitelist which prevents the user from getting 3rd-party wwan/wlan cards to work properly. The modified BIOS versions here will take care of this. Keep in mind that not necessarily all options available in the modified bios will work. Some might not do anything at all, others could possibly leave your system in a state which will prevent it from booting. Use care when changing stuff in the modified bios, don't touch things you're not familiar with. Use all the mods and software posted here on your own risk. Read the instructions carefully. NOTE: This will only flash the bios region. It won't reset the nvars set in the bios. *************** ONLY FLASH A MOD OF THE SAME VERSION AS YOUR CURRENT BIOS VERSION!!! If you're on 2.02 or 2.03 you can safely use the 2.04 update, *************** Attached you'll find modified versions of the Y400 / Y500 BIOS v1.03 and v1.05. Removed as they're outdated. Better updated to v2.02. The bios contains your Windows 8 license, therefore you can't just flash any file, else you'll have issue with your Windows activation. Furthermore the serial numbers, service tags etc. are stored there as well. You don't want to loose them. I wrote a little program that will take care of this issue and personalize the modified bios for you, so that you won't end up with an invalid Windows or no service tags. *************** Preparation to get to BIOS v2.02 (coming from any earlier version): Generally it's a good idea to keep the BIOS up to date. We're luck to have an official BIOS update to v2.02 apparently thanks to a leak on the net. (Lenovo is really bad when it comes to providing firmware updates and fixing issues). The leaked version must be genuine, else it wouldn't flash by using the regular method. If you want to update your system to v2.02 then grab the update here, extract it and flash the bios by executing the included InsydeFlash utility. Once the update is completed you can continue with the instructions below to get a modified version on your system. *************** Instructions for flashing a modified version: As a reminder - the modified BIOS needs to be the same version as you have on your system (2.02 to 2.04 is ok). Prepare an USB stick which can boot DOS. If you don't know how to do this, follow this short guide: Download the flash tool, for flashing you'll need the DOS version, but for creating the backup of your current BIOS the Win64 version will do as well, and it is faster. Get the prr tool as well. Grab the modified BIOS you want to flash, it comes as a tool which will patch the bios for you. Make sure you grab the version that corresponds with your BIOS version. Create a backup of your current BIOS using the flash tool you downloaded (first step) by runing the included backup.bat, or by using the Win or Dos version flash tool with this command: If the .bat doesn't work then open an administrator command prompt in your working directory and run the .bat per command line or type the command written above. In case you get an 'error 104' replace the parts file with the one that can be found in the 'error 104 fix' attachment at the end of the post. And if you still have issues after doing all of the steps above then please leave a reply in the thread and describe your problem. Open the downloaded tool and execute it. Drag and drop your BIOS backup file on it, it will create the mod for you. It will look like this: Put the modified BIOS, the prr.exe tool and the fpt.exe (along with the fparts.txt file) on the root of your prepared DOS bootable USB drive, restart your system and boot from that drive. Execute the prr.exe, if you don't get an error message continue by pressing enter. Then flash the bios by using this command (filename.bin obviously needs to be replaced with the name of the file you want to flash). If you can't remember the name of your file, use the command dir to display all the files on your drive. Flash with this: fpt.exe -f filename.bin -bios NOTE: The name of the BIOS file mustn't exceed eight characters (not counting the extension)! That's a DOS limit, so make sure the name of your file isn't too long. Wait until the process is done. After flashing it will verify the data, in case there's something wrong with the flashed data it will tell you. In that case don't reboot, just flash again. *************** Flashing the ultra bay 650m - only for SLI users with BIOS v2.02: The modified BIOS v2.02 also contains a vbios which will allow you to overclock your 650m past the 135MHz limit. As the ultra bay GPU has it's own vbios module you need to flash it separately. You'll need an USB drive which can boot DOS (just as the one you used for flashing the BIOS). *************** It might look a bit complicated at first, but that's the easiest way I could think of. Let me know if anything is unclear. >> Here's the 'buy me a beer' link in case you like this << Use at your own risk, you are responsible for your system and the changes you make on it. My programs come with absolutely no warranty to the extent permitted by applicable law. Grab file archive here:
 4 points
 -
I'm not taking about the screw, only about the windows stuff. The screw is a different story. Aynway, I think it's just common-sense to first take a proper look at a system before starting to make changes to it.2 points
-
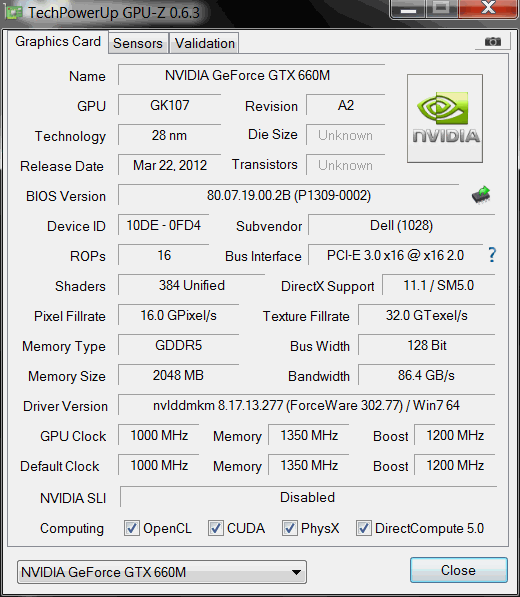
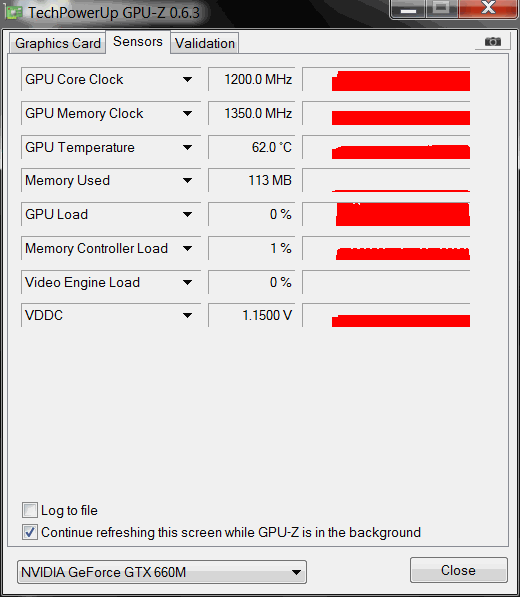
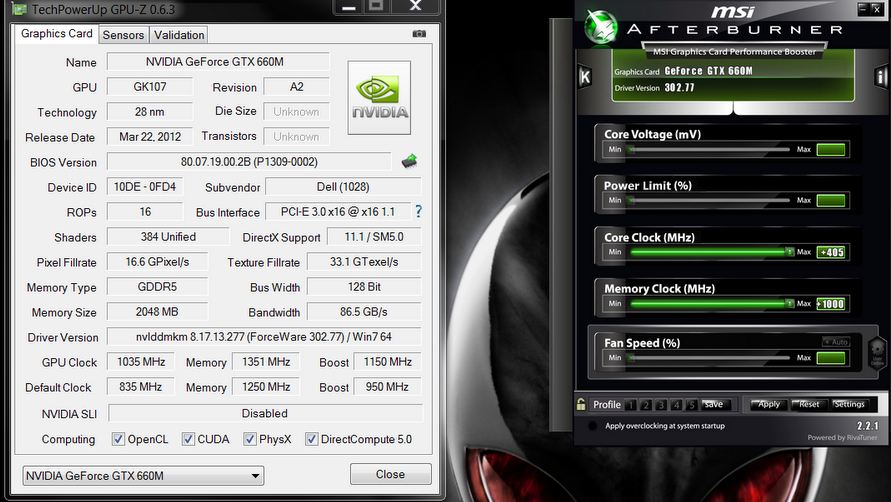
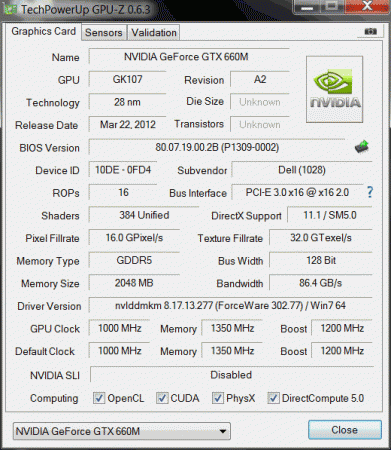
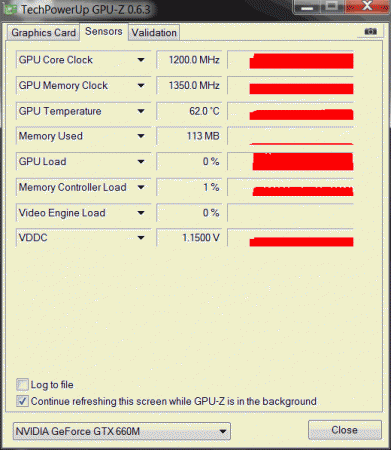
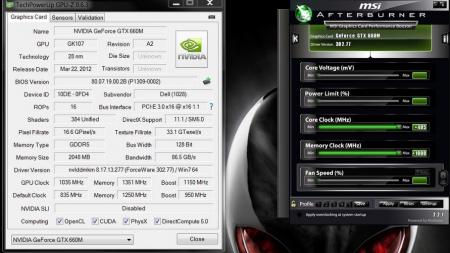
UPDATE: ALL DOWNLOADS LISTED IN THIS POST FOUND HERE. Nvidia 'Kepler' GPUs - modified VBIOS files >>> NOTE: More versions (including voltage mods) exclusive for T|I users can be found in the second post. <<< The 'Kepler' GPUs from Nvidia perform really well, even at increased clocks speeds they stay quite cool - a perfect behavior when it comes to overclocking and improving the performance. Unfortunately the mobile GPUs suffer from an artificial +135MHz core overclocking limit, so you can't go higher by using tools like Nvidia Inspector and similar. The modified VBIOS files listed here have this limit unlocked, some have increased stock clocks or tweaked voltages. Just refer to the description. All files have been modified by myself, if you like them feel free to buy me a drink, donation link can be found below GTX 660m: 660m_OC_edition__VBIOS_[DELL].zip- comes with unlocked software overclocking limits 660m_GHz-Edition_overvolted_VBIOS_[DELL].zip - default 3d clock 1000MHz, base boost 1200MHz,, memory (3d) 1350MHz, increased 3d voltage undervolted editions possible, depends on interest, tba Some screenshots: GTX 680m: Clevo_680m_-_80.04.33.00.10_'OCedition'_revised_01.zip Dell_680m_-_80.04.33.00.32_'OCedition'_revised_00.zip Increased software overclocking limits & optimized for no throttling. Read the included 'Read me' file before flashing. Instructions: I recommend flashing under DOS using nvflash . Donation link in case you want to buy me a beer Thanks and cheers! More to come. Testers: Thanks @eliteone (Dell 660m), @littleone562 (Dell 680m) For all mods: Use at your own risk.
 1 point
 -
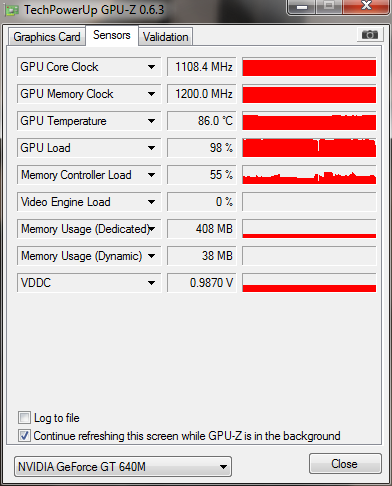
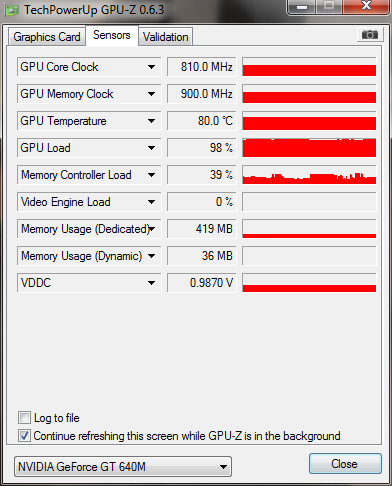
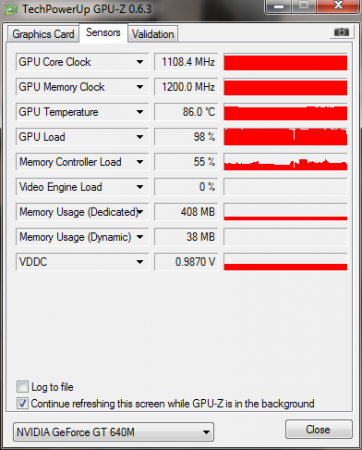
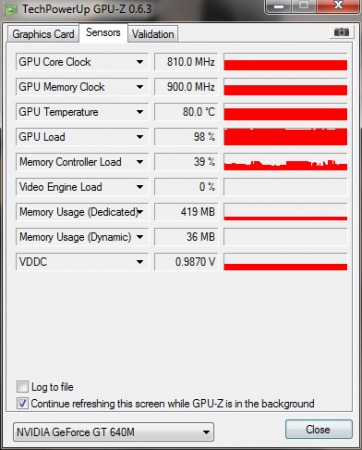
Acer Aspire V3 series BIOS mods - better Nvidia GT 640m performance The Nvidia GT640m ("Kepler") which can be found in the Acer Aspire V3 series has an incredible overclocking potential. Unfortunately this is very limited due to VBIOS restrictions. This modified BIOS version will help you to unlock the full power of your GPU. The increased default clocks (3d) gives you additional performance without having to use any additional tools. If you want to go even further - the 135MHZ software overclocking limit is removed, so you can push your GPU to the limits. Mods based on Acer Aspire V3-5xx series BIOS 1.07: This BIOS is compatible with the V3-531, V3-571, V3-571G and all other models which I may have forgotten and use the same BIOS - Overclocking edition: 810 MHz core (3d) and boost - undervolting edition: depending on interest, tba Here some pics, at 810MHz and further overclocked per software... yeah, this works very well Instructions are included, refer to the READ ME file. Please provide feedback and leave a comment. If you like my work feel free to buy me a beer *************************************************************** F.A.Q.: Why do I need to flash the BIOS in order to get higher clocks? Isn't the VBIOS responsible for the GPU settings? Answer: How can I revert to the original BIOS? Answer: What exactly got changed compared to the original BIOS? Answer: *************************************************************** Remember, you are responsible for the changes you make on your system, flash at your own risk.b
 1 point
 -
FYI Dell has a 20-25% off outlet sale going on all home laptops so I snapped up the following for my gf with the 640M + blu ray. There's also a $50 off coupon floating around that stacks with it so you can save even a little more. I realized this after I had already purchased it so it's a bit too late XPS 15 Known Issues Newest bios causes GPU throttling in favor of CPU speed. Old bios does the opposite. Wireless signal is weak with these systems. Hoping @svl7 and @Prema will be able to help with some bios modding to get rid of the throttling. Service Manual ftp://ftp.dell.com/Manuals/all-products/esuprt_laptop/esuprt_xps_laptop/xps-15-l521x_Owner%27s%20Manual_en-us.pdf Videos http://youtu.be/eaorXn27D_U1 point
-
More like this: nvflash -r nvflash -4 -5 -6 -A dell1.rom1 point
-
You might need to disable the write protection, at least that was necessary when I first flashed my 260m.1 point
-
@ svl7, I followed your guide and everything went smooth. I also installed a dual band WLAN card which works just fine. Thanx for your work!1 point
-
If it is stable, then no....1 point
-
First run with the new 3DMark release: NVIDIA GeForce GTX 680M video card benchmark result - Intel Core i7-2920XM Processor,Alienware M18xR11 point
-
First post revised and updated. Took me a while, but I found a new way of flashing the BIOS without having to blind flash back to A03 with the USB recovery method. It's pretty easy and very safe, just follow the instructions carefully. If you have questions, post them here.1 point
-
Out of curiosity - can you access the Chipset and Advanced tabs normally? ****************************************************************************** As always, the disclaimer: G53JW.zip1 point
-
List of all nvflash (DOS) commands (as of version 5.117): NVIDIA Firmware Update Utility (Version 5.117) -- Primary Commands -- Update firmware: nvflash [options] <filename> Save firmware to file: nvflash [options] --save <filename> Compare adapter firmware: nvflash [options] --compare <filename> Verify adapter firmware: nvflash [options] --verify <filename> Update TV data: nvflash [options] --tv <filename> Display version: nvflash [options] --version [<filename>] Display firmware bytes: nvflash [options] --display [bytes] Check for supported EEPROM: nvflash [options] --check Write protect EEPROM: nvflash [options] --protecton Remove write protect: nvflash [options] --protectoff Change soft straps: nvflash [options] --straps=<straps> Set IEEE 1394 GUID: nvflash [options] --guid=<guid> Set IEEE 1394 GUID source: nvflash [options] --guidsource=<location> List adapters: nvflash [options] --list List PCI firmware blocks: nvflash [options] --pciblocks List applied patches: nvflash [options] --listpatches Press 'Enter' to continue, or 'Q' to quit. -- Commands and Options -- help ? Display this screen. save b <filename> Read EEPROM and save to <filename>. compare k <filename> Read EEPROM and compare with <filename>. verify h <filename> Verify <filename> matches EEPROM if flashed. tv x <filename> Transfer TV data from file to EEPROM. version v <filename> Display file version and ~CRC32 (if no filename, acts on display adapter). listpatches Display list of runtime ROM pack patches applied at boot (primary only). display d [bytes] Display 256 the first bytes of the EEPROM (default is 256 bytes) check c Check for supported EEPROM. protecton w Write protect EEPROM (only on some EEPROM's). protectoff r Remove EEPROM write protect (only on some EEPROM's). straps m <straps> Change soft straps. format is: AND Mask 0, OR Mask 0, AND Mask 1, OR Mask 1 Press 'Enter' to continue, or 'Q' to quit. guid q <guid> Set the IEEE 1394 GUID in the firmware image (GUID is in the form of 16 hex digits). guidsource 1 <location> Set the source of the IEEE 1394 GUID. main - main EEPROM image dedicated - separate serial EEPROM part list a List all NVIDIA display adapters found in the system. pciblocks List all the PCI ROM Images stored in the EEPROM. upgradeonly Only allow upgrading of firmware based on version. overridetype 5 Allow firmware and adapter PCI device ID mismatch. overridesub 6 Allow firmware and adapter PCI subsystem ID mismatch. reboot y Reboot the PC after other tasks completed. keepstraps g Keep the soft straps already present in the EEPROM after flashing the new image. romstrap j Override the ROM strap setting to allow flashing an image when grounding the STRAP_SUB_VENDOR pin. This allows flashing a corrupted or erased EEPROM. Note: Make sure there is a physical EEPROM present when using this option index i <index> Force a specific device index. filterdevid f <value>[,<mask>] Filter device list by device ID and optional mask. fwindex F <fw index> Index of which firmware image to use from a firmware bundle. auto A When possible, run without user intervention. directpci n Bypass the PCI BIOS. Press 'Enter' to continue, or 'Q' to quit. silence s Silence all audio beeps. beep ! Beep to signal updating progress. nolight l Do not light keyboard LEDs. override o <level> Override safety check level: default unknown EEPROM | NV adapter aborts application. level=1 unknown EEPROM acceptable for read operations. level=2 unknown NV adapter acceptable for read operations. level=3 Combined effect of 1,2 (cannot write to unknown EEPROM or adapter). log L <log file> Create a log file. Use a single dash ("-") to use the single letter version of a command. Use a double dash ("--") to use the longer descriptive version of a command. Use equals ("=") to specify parameters, with separating commas (","). -- Sample Usage -- nvflash --index=1 nv30nz.rom Press 'Enter' to continue, or 'Q' to quit. -- Supported EEPROM's -- AMD AM29LV001B 128Kx8 2.7vV, 1B page, 16k blk, ID=(01,006D) AMD AM29LV010 128Kx8 2.7vV, 1B page, 16k blk, ID=(01,006E) AMD AM29LV001T 128Kx8 2.7vV, 1B page, 16k blk, ID=(01,00ED) Atmel AT49F512 64Kx8 5.0,3.0,2.7V, 1B page, 0k blk, ID=(1F,0003) Atmel AT49F001T 128Kx8 5.0V, 1B page, 0k blk, ID=(1F,0004) Atmel AT49F001 128Kx8 5.0V, 1B page, 0k blk, ID=(1F,0005) Atmel AT49BV/LV010 128Kx8 2.7-3.6V, 1B page, 0k blk, ID=(1F,0017) Atmel AT29LV/BV010A 128Kx8 3.0V, 128B page, 0k blk, ID=(1F,0035) Atmel AT29LV512 64Kx8 3.0V, 128B page, 0k blk, ID=(1F,003D) Atmel AT25F1024 1024Kx1S 2.7-3.6V, 256B page, 32k blk, ID=(1F,0040) Atmel AT29C512 64Kx8 5.0V, 128B page, 0k blk, ID=(1F,005D) Atmel AT25F1024 1024Kx1S 2.7-3.6V, 256B page, 32k blk, ID=(1F,0060) Atmel AT25F2048 2048Kx1S 2.7-3.6V, 256B page, 64k blk, ID=(1F,0063) Atmel AT25F512 512Kx1S 2.7-3.6V, 128B page, 32k blk, ID=(1F,0065) Atmel AT49F010 128Kx8 5.0V, 1B page, 0k blk, ID=(1F,0087) Atmel AT29C010A 128Kx8 5.0V, 128B page, 0k blk, ID=(1F,00D5) Atmel AT25DF021 2048Kx1S 2.3-3.6V, 256B page, 4k blk, ID=(1F,4300) Atmel AT25DF041 4096Kx1S 2.3-3.6V, 256B page, 4k blk, ID=(1F,4401) Atmel AT25FS010 1024Kx1S 2.7-3.6V, 256B page, 4k blk, ID=(1F,6601) ST M25P05 512Kx1S 2.7-3.6V, 128B page, 32k blk, ID=(20,0005) ST M25P10 1024Kx1S 2.7-3.6V, 128B page, 32k blk, ID=(20,0010) ST M29W512B 64Kx8 2.7-3.6V, 1B page, 0k blk, ID=(20,0027) Press 'Enter' to continue, or 'Q' to quit. Num M25P10-A 1024Kx1S 2.3-3.6V, 256B page, 32k blk, ID=(20,2011) AMIC A25L512 512Kx1S 2.7-3.6V, 256B page, 4k blk, ID=(37,3010) AMIC A25L010 1024Kx1S 2.7-3.6V, 256B page, 4k blk, ID=(37,3011) AMIC A25L020 2048Kx1S 2.7-3.6V, 256B page, 4k blk, ID=(37,3012) XLNX XCF128XFTG64C 8192Kx16 9.5,8.5,2.0,1.7V, 8B page, 128k blk, ID=(49,016B) Tenx ICE25P05 512Kx1S 2.7-3.6V, 128B page, 32k blk, ID=(5E,0001) PMC Pm25LD512 512Kx1S 2.7-3.6V, 256B page, 4k blk, ID=(7F,9D20) PMC Pm25LD010 1024Kx1S 2.7-3.6V, 256B page, 4k blk, ID=(7F,9D21) PMC Pm25LD020 2024Kx1S 2.7-3.6V, 256B page, 4k blk, ID=(7F,9D22) PMC Pm39LV512 64Kx8 3.0-3.6V, 1B page, 4k blk, ID=(9D,001B) PMC Pm39LV010 128Kx8 3.0-3.6V, 1B page, 4k blk, ID=(9D,001C) PMC Pm25LV512 512Kx1S 2.7-3.6V, 256B page, 4k blk, ID=(9D,007B) PMC Pm25LV010 1024Kx1S 2.7-3.6V, 256B page, 4k blk, ID=(9D,007C) SST SST29EE010 128Kx8 5.0V, 128B page, 0k blk, ID=(BF,0007) SST SST29LE/VE010 128Kx8 2.9,2.7V, 128B page, 0k blk, ID=(BF,0008) SST SST29LE/VE512 64Kx8 2.9,2.7V, 128B page, 0k blk, ID=(BF,003D) SST SST45VF010 1024Kx1S 3.0-3.6V, 1B page, 4k blk, ID=(BF,0042) SST SST25LF020 2048Kx1S 3.0-3.6V, 256B page, 4k blk, ID=(BF,0043) SST SST25LF040 4096Kx1S 3.0-3.6V, 256B page, 4k blk, ID=(BF,0044) SST SST25VF512 512Kx1S 2.7-3.6V, 256B page, 4k blk, ID=(BF,0048) SST SST25VF010 1024Kx1S 2.7-3.6V, 256B page, 4k blk, ID=(BF,0049) SST SST29EE512 64Kx8 5.0V, 128B page, 0k blk, ID=(BF,005D) SST SST39SF010 128Kx8 5.0V, 1B page, 4k blk, ID=(BF,00B5) SST SST39VF512 64Kx8 2.7-3.6V, 1B page, 4k blk, ID=(BF,00D4) Press 'Enter' to continue, or 'Q' to quit. SST SST39VF010 128Kx8 2.7-3.6V, 1B page, 4k blk, ID=(BF,00D5) MX MX29F001T 128Kx8 5.0V, 1B page, 0k blk, ID=(C2,0018) MX MX29F001B 128Kx8 5.0V, 1B page, 0k blk, ID=(C2,0019) MX MX25L512 512Kx1S 2.7-3.6V, 256B page, 4k blk, ID=(C2,2010) MX MX25L1005 1024Kx1S 2.7-3.6V, 256B page, 4k blk, ID=(C2,2011) MX MX25L2005 2048Kx1S 2.7-3.6V, 256B page, 4k blk, ID=(C2,2012) MX MX25L4005A 4096Kx1S 2.7-3.6V, 256B page, 4k blk, ID=(C2,2013) GD GD25Q512 512Kx1S 2.7-3.6V, 256B page, 32k blk, ID=(C8,4010) GD GD25Q10 1024Kx1S 2.7-3.6V, 256B page, 64k blk, ID=(C8,4011) GD GD25Q20 2048Kx1S 2.7-3.6V, 256B page, 64k blk, ID=(C8,4012) GD GD25Q40 4096Kx1S 2.7-3.6V, 256B page, 64k blk, ID=(C8,4013) WBond W39L010 128Kx8 3.3V, 1B page, 4k blk, ID=(DA,0031) WBond W39L512 64Kx8 3.3V, 1B page, 4k blk, ID=(DA,0038) WBond W29C011A 128Kx8 5.0V, 128B page, 0k blk, ID=(DA,00C1) WBond W29EE512 64Kx8 5.0V, 128B page, 0k blk, ID=(DA,00C8) WBond W25X10A 1024Kx1S 2.7-3.6V, 256B page, 4k blk, ID=(EF,3011) WBond W25X20A 2048Kx1S 2.7-3.6V, 256B page, 4k blk, ID=(EF,3012) WBond W25X40A 4096Kx1S 2.7-3.6V, 256B page, 4k blk, ID=(EF,3013) WBond W25X80A 8192Kx1S 2.7-3.6V, 256B page, 4k blk, ID=(EF,3014)1 point