Leaderboard


Popular Content
Showing content with the highest reputation on 01/04/13 in all areas
-
Here's some information, it's about the M18x R1, but the bios and available settings are very similar. (Massive wall of text warning) http://forum.techinferno.com/alienware-m18x/1491-2920xm-overclocking-guide-detailed-results.html Also this: http://forum.techinferno.com/alienware-m18x/1054-alienware-m18x-stock-bios-xm-guide.html And check the benchmark thread, there should be some info as well.2 points
-
Here is the detail of the correspondence. I know it's a legitimate set of emails because it was originally a reply to the paypal record they had of my purchase. I am not likely to return my board because it's working fine for my purposes and is used for a mission critical machine in my business. This is sad if they are stopping production. First email: "Recall notification. Dear ****, Thanks for your interest in our TH05. Since this item is engineering sample which hasn’t got final approval yet, and there are still some compatible issues existed between MacBook and them. If you agree with this recall activity, we are pleased to refund all price to you as soon as we could. Please contact with us for further return procedure. Sincerely yours, ******." Second email after I complained about how I can't return it because I use it for work purposes: "We are very sorry for this situation.> As we are not able to provide TH05 any more, so we think it is muchsafer > for you to use other products in case that TH05 is broken. > We think "Magma ExpressBox 3T" or "Sonnet Echo™Express and Echo Express Pro" > can work well. > https://thunderbolttechnology.net/products?tid=8&field_company_nid=All> In the future, we would like to provide similar product, however, weare not > able to provide at present. > > For return and refund information, we will send another e-mail toyou > for detailed information. > > Again, we are very sorry for it and thank you for yourunderstanding. > > > Best Regards, " Next email after I asked for the technical reasons for the recall: " TH05 will be no longer available in the future. So, there is no replacement when TH05 in your system is broken. Also, it is not recommended to use engineering sample for your product. That is why we propose to use other certified Thunderbolt products. Thank you for your understanding. Best Regards, "2 points
-
@grechie I have tried the dell vbios at storage voltage and the one with v1.05. With storage voltage, I can OC until 1006/2250, 3d11 GPU score P8100, with v1.05 version. I can OC until 1045/2250 and GPU score P8400. As I am using 17R3 CPU i7 2760QM is not so good so the I got less CPU score and Combined Score. The general score is between P7600 - P7800 can't pass P8000. I will do more test with v1.05 to see the limits of my card. Anyway, there is no throttling at all. All versions work stably.2 points
-
Has successfully flash to the unlocked A10 BIOS. Following the procedure as described: 1. Blind flash back to A05 BIOS 2. Re-Boot and enter BIOS to make necessary changes 3. Re-Boot and load Win7 4. Flash un-locked A10 5. Re-Boot and enter BIOS to make necessary changes (including unlocked options) 6. Re-boot and load Win7 7. Enjoy2 points
-
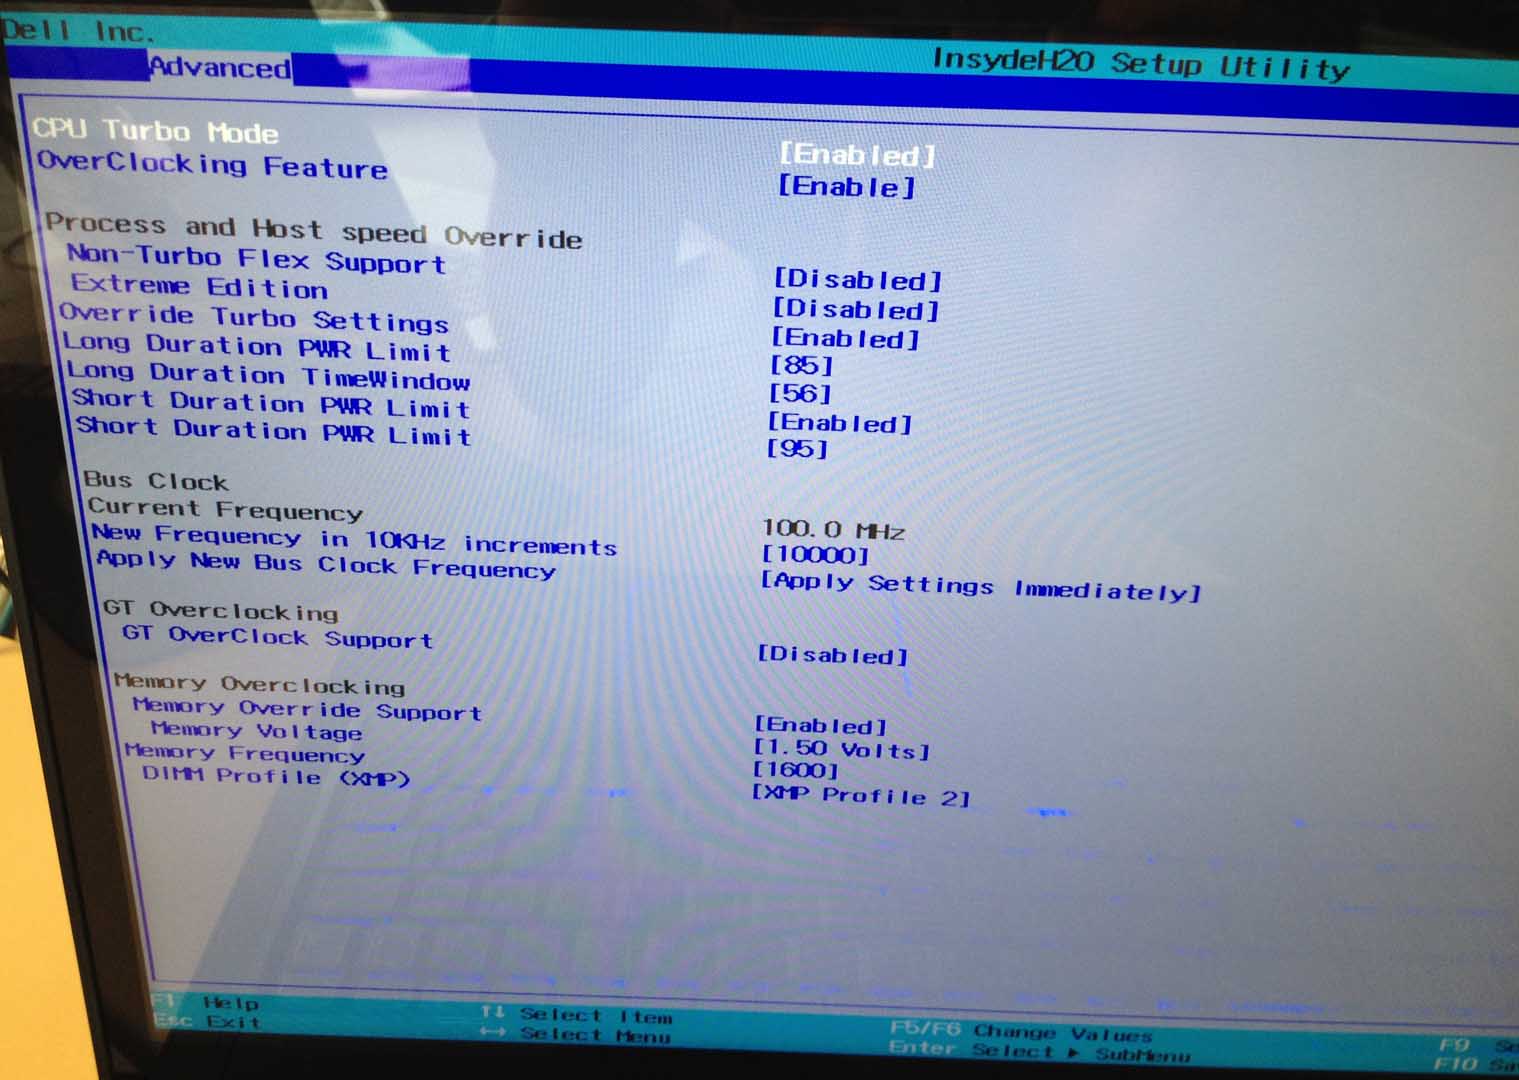
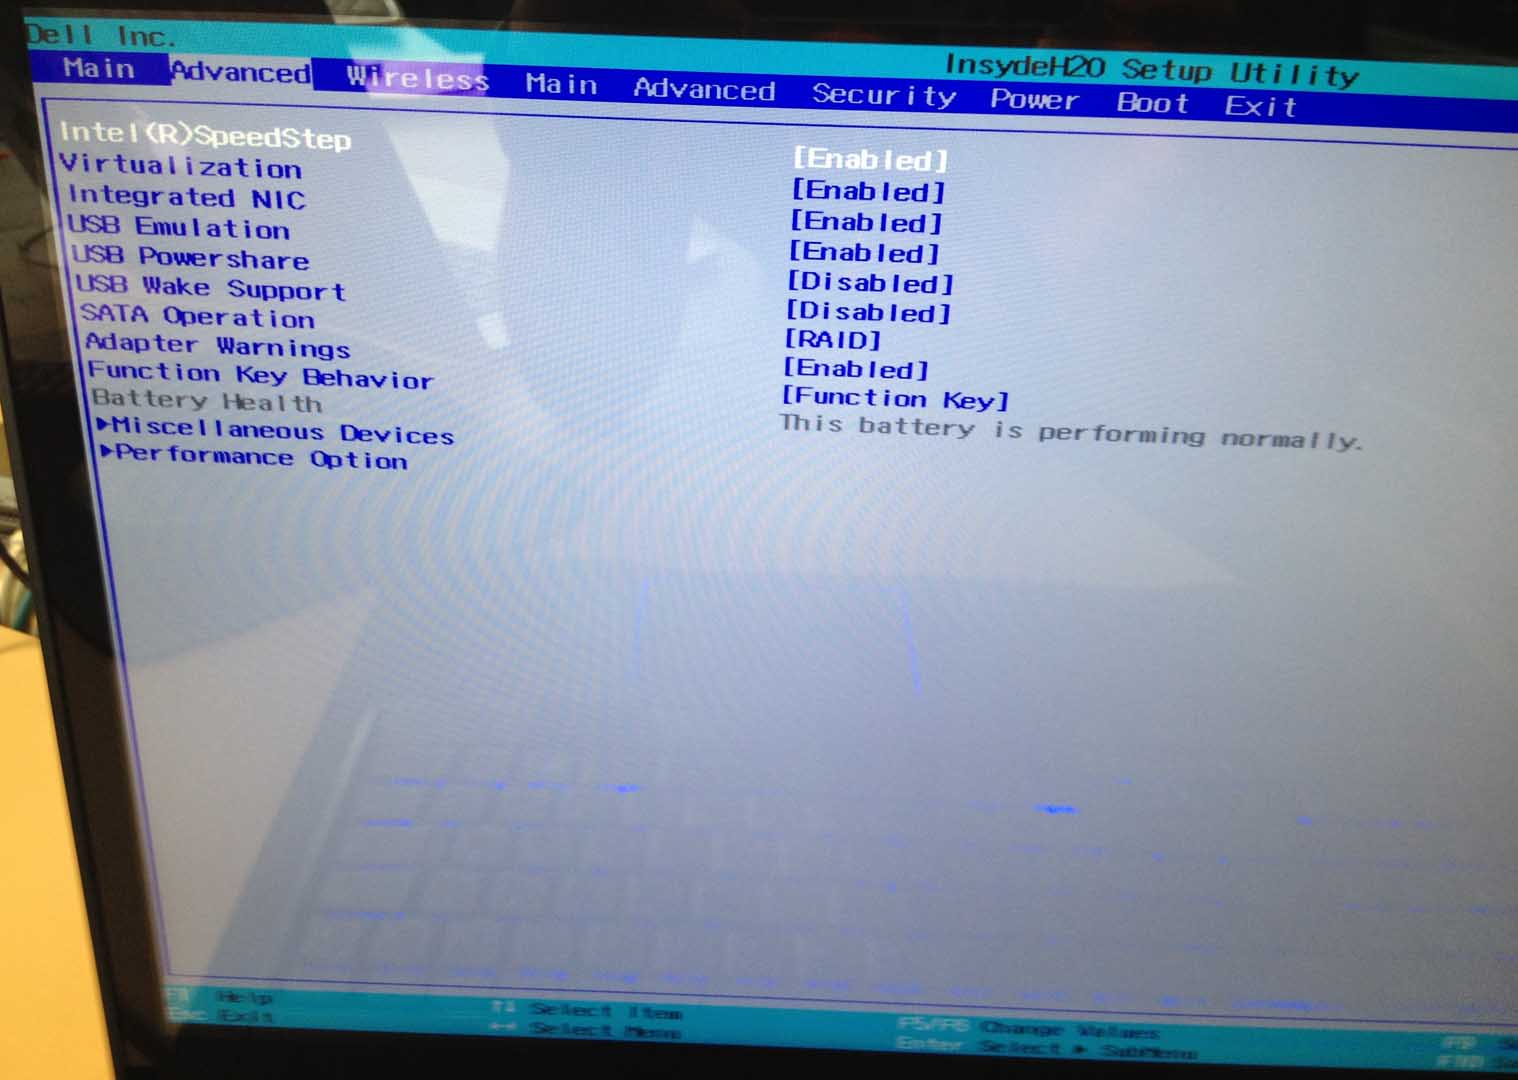
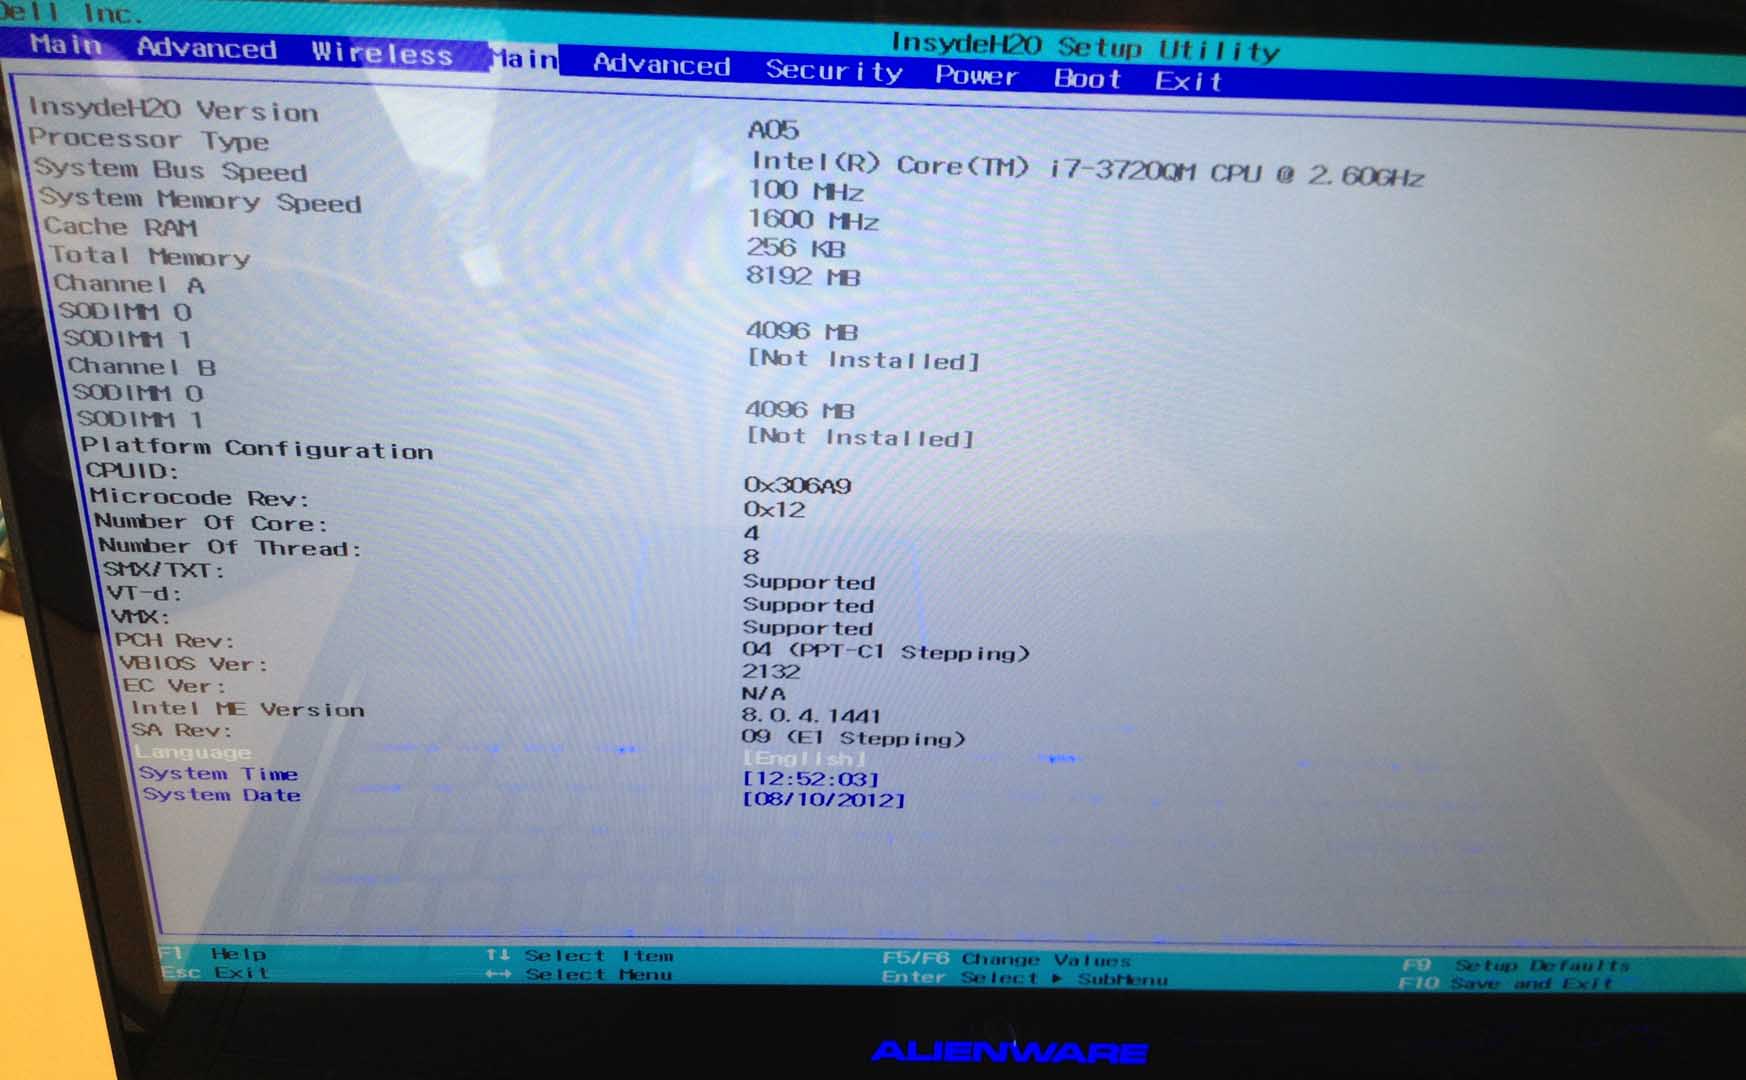
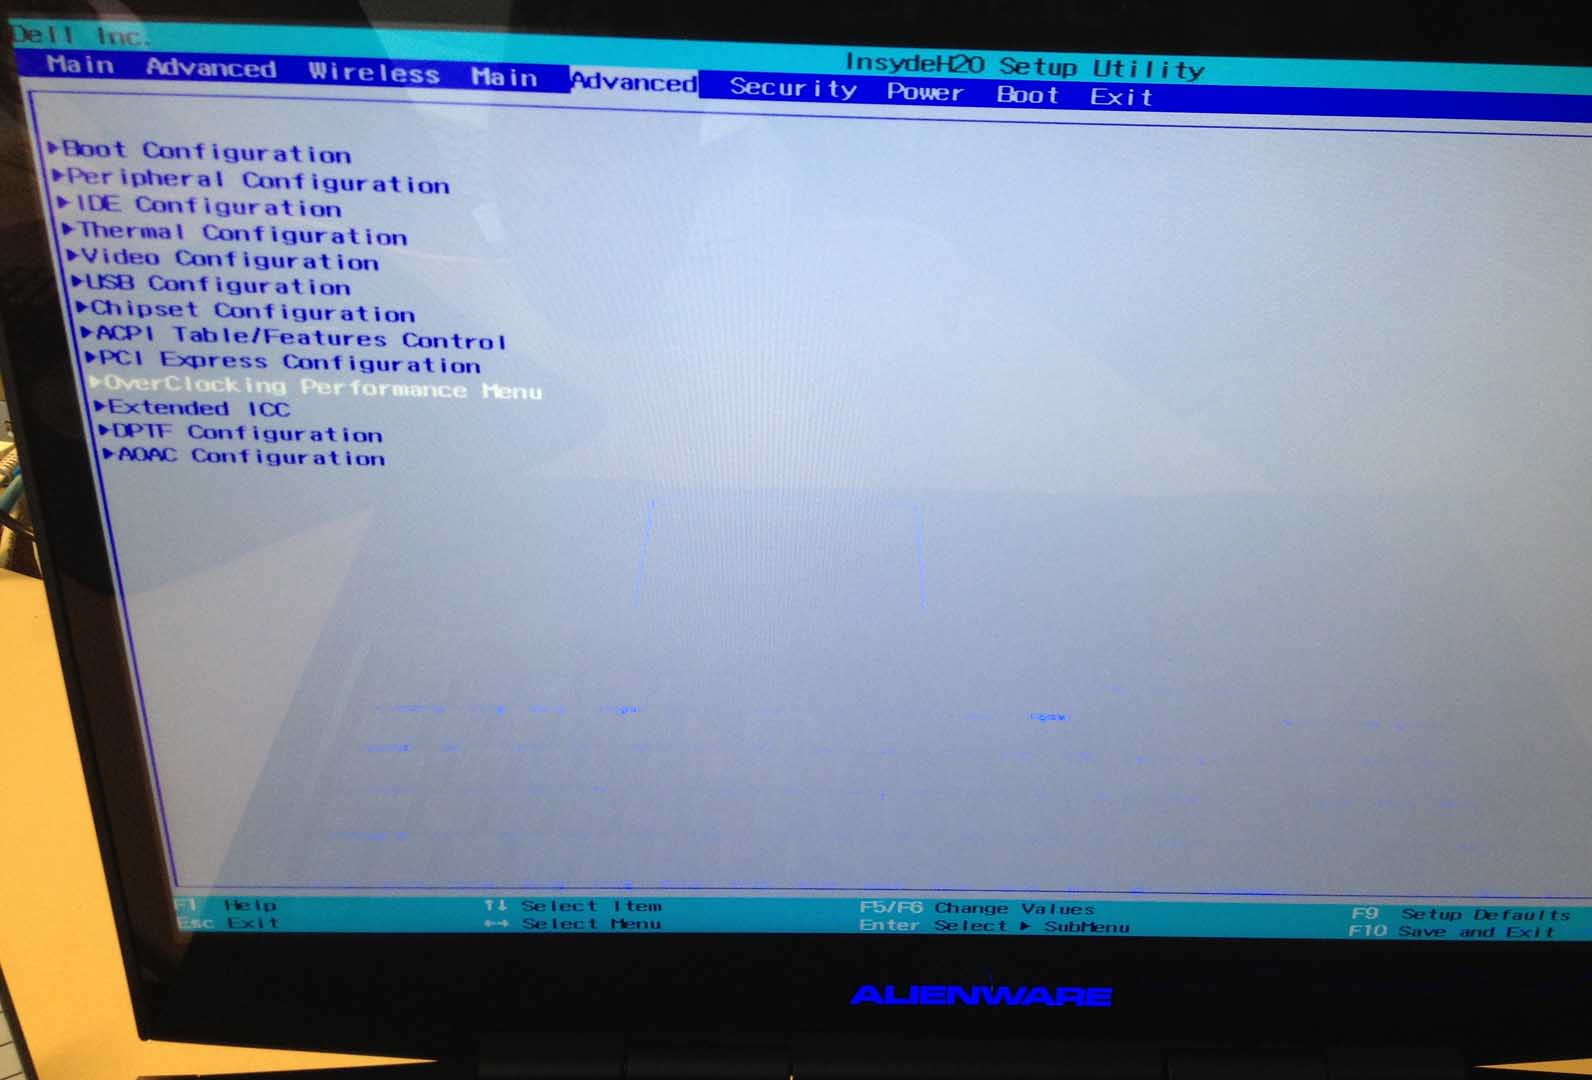
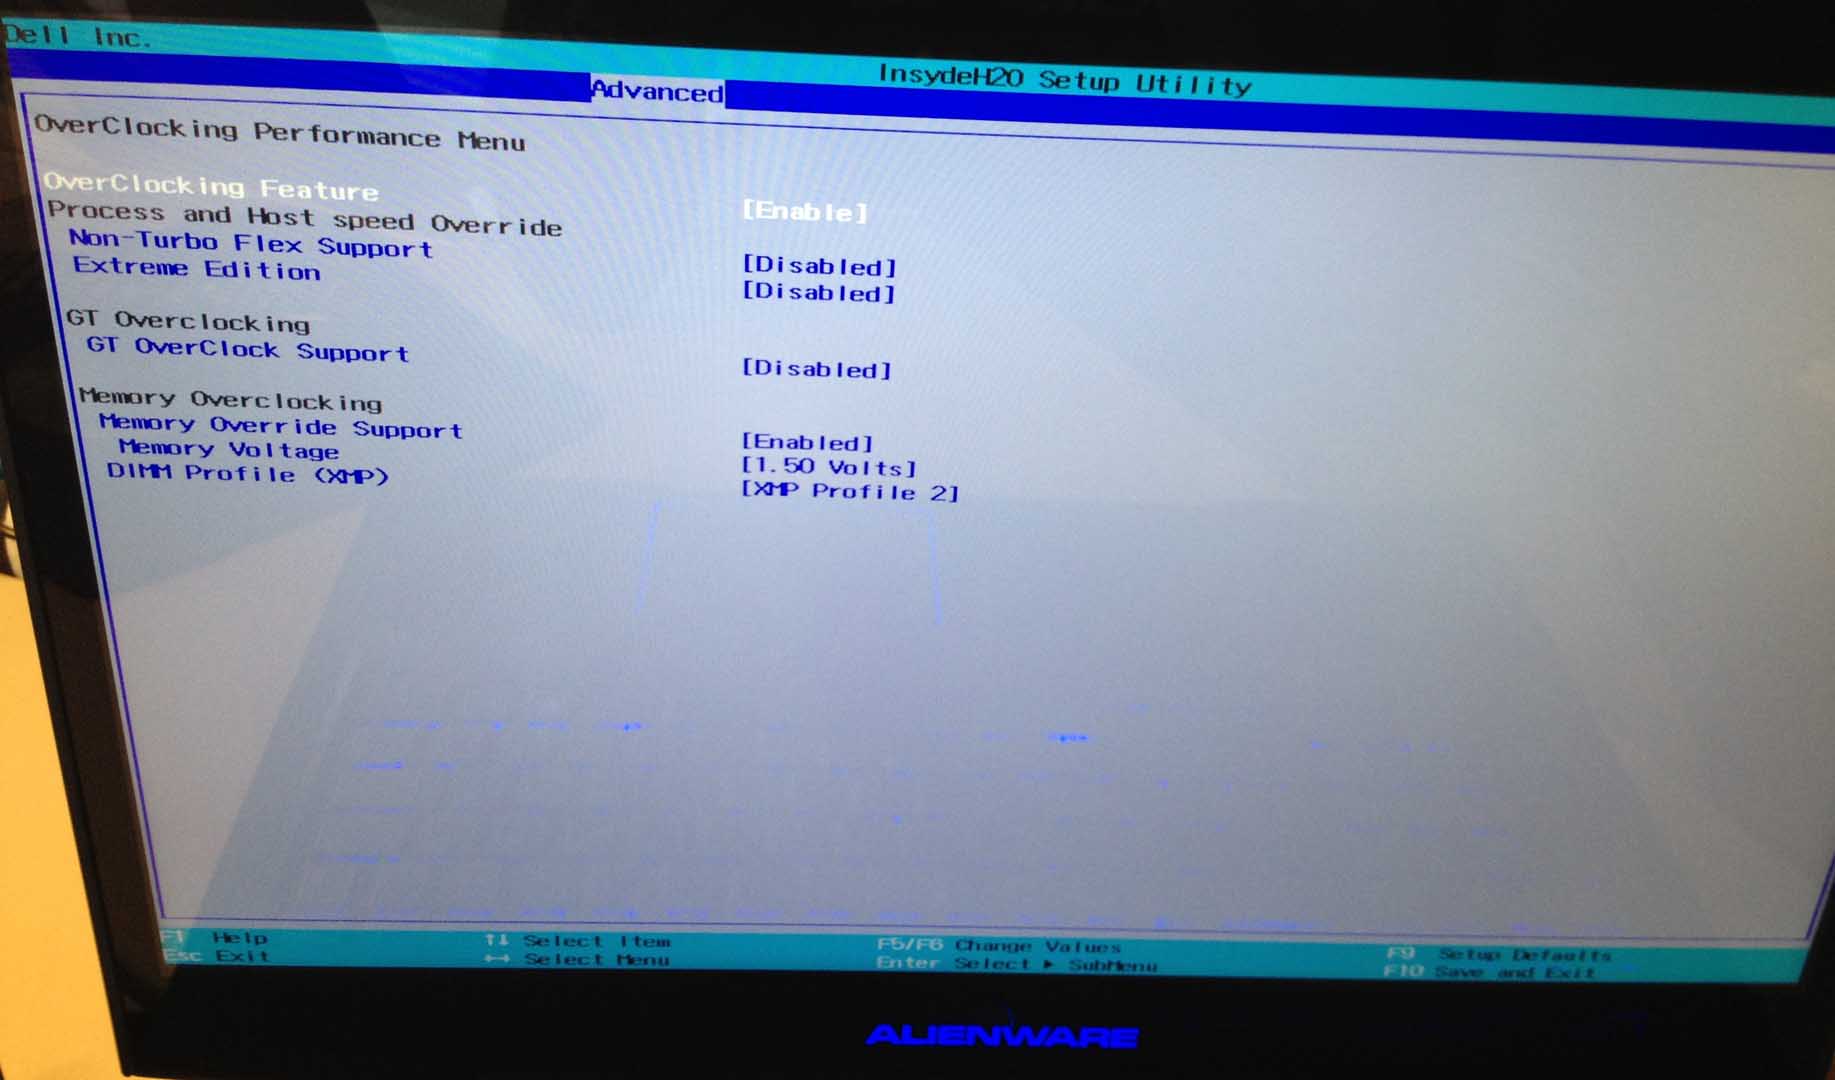
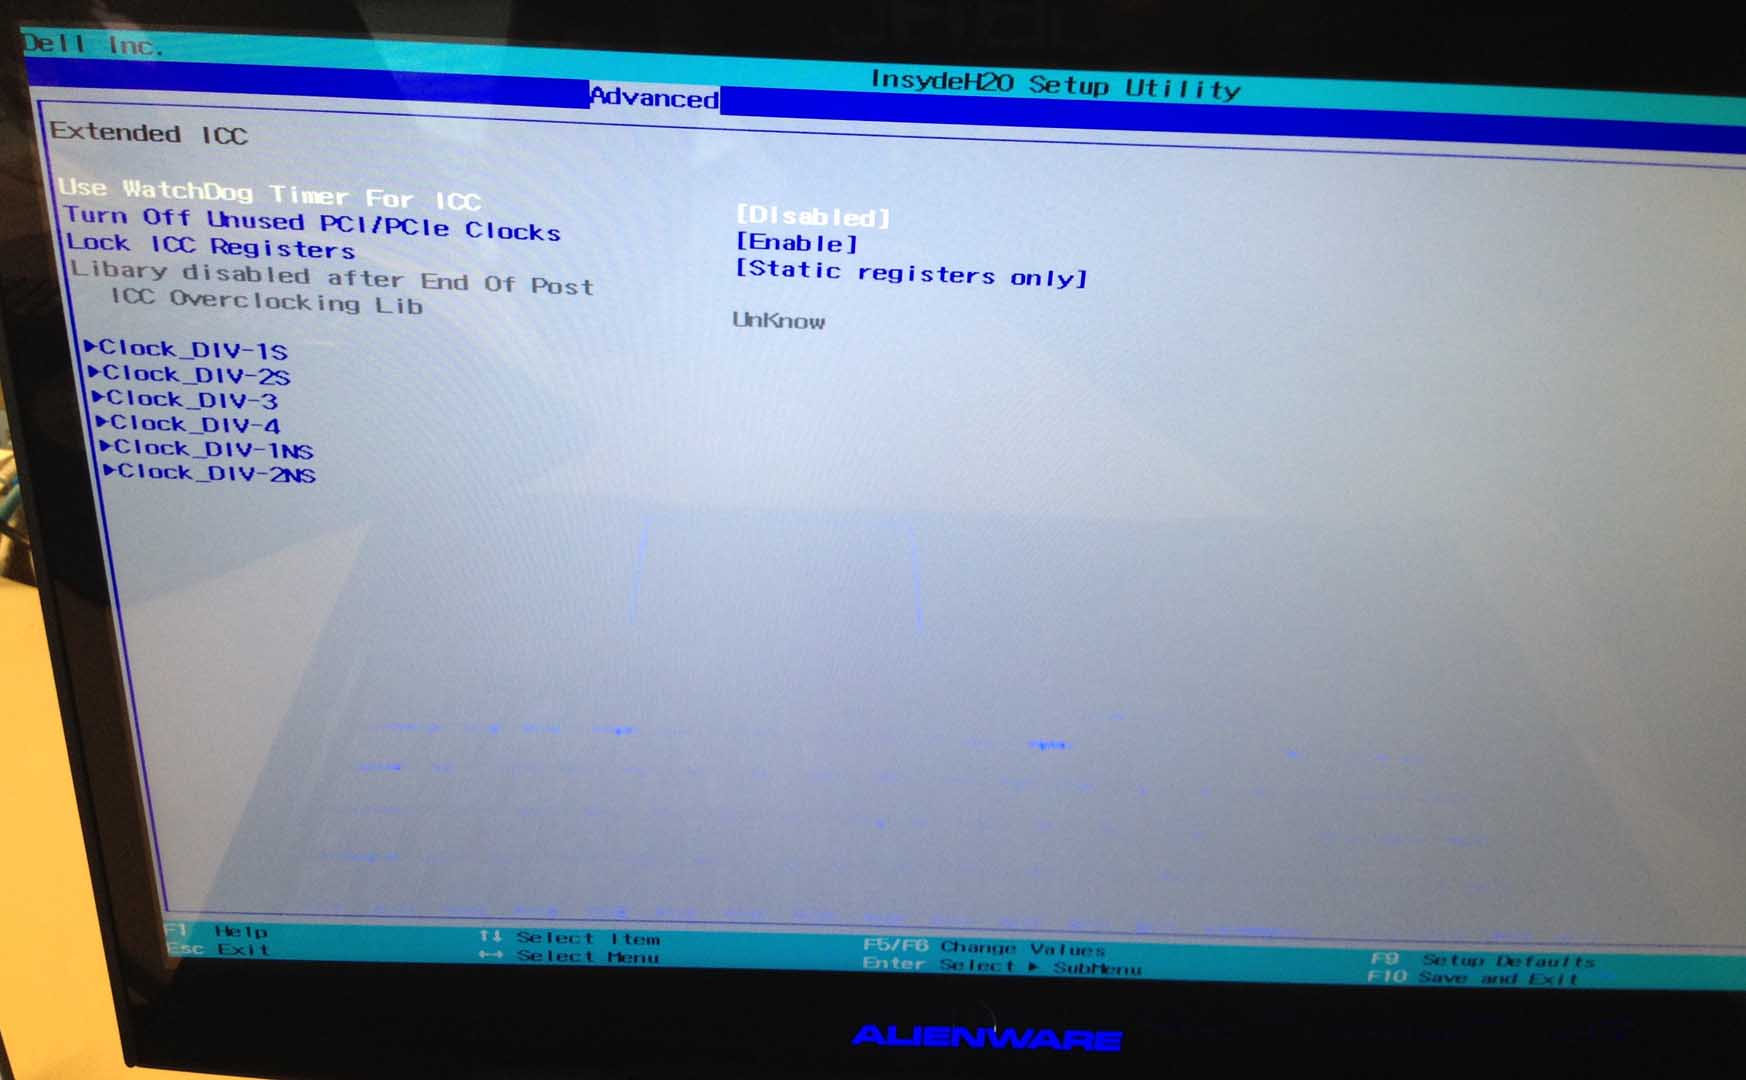
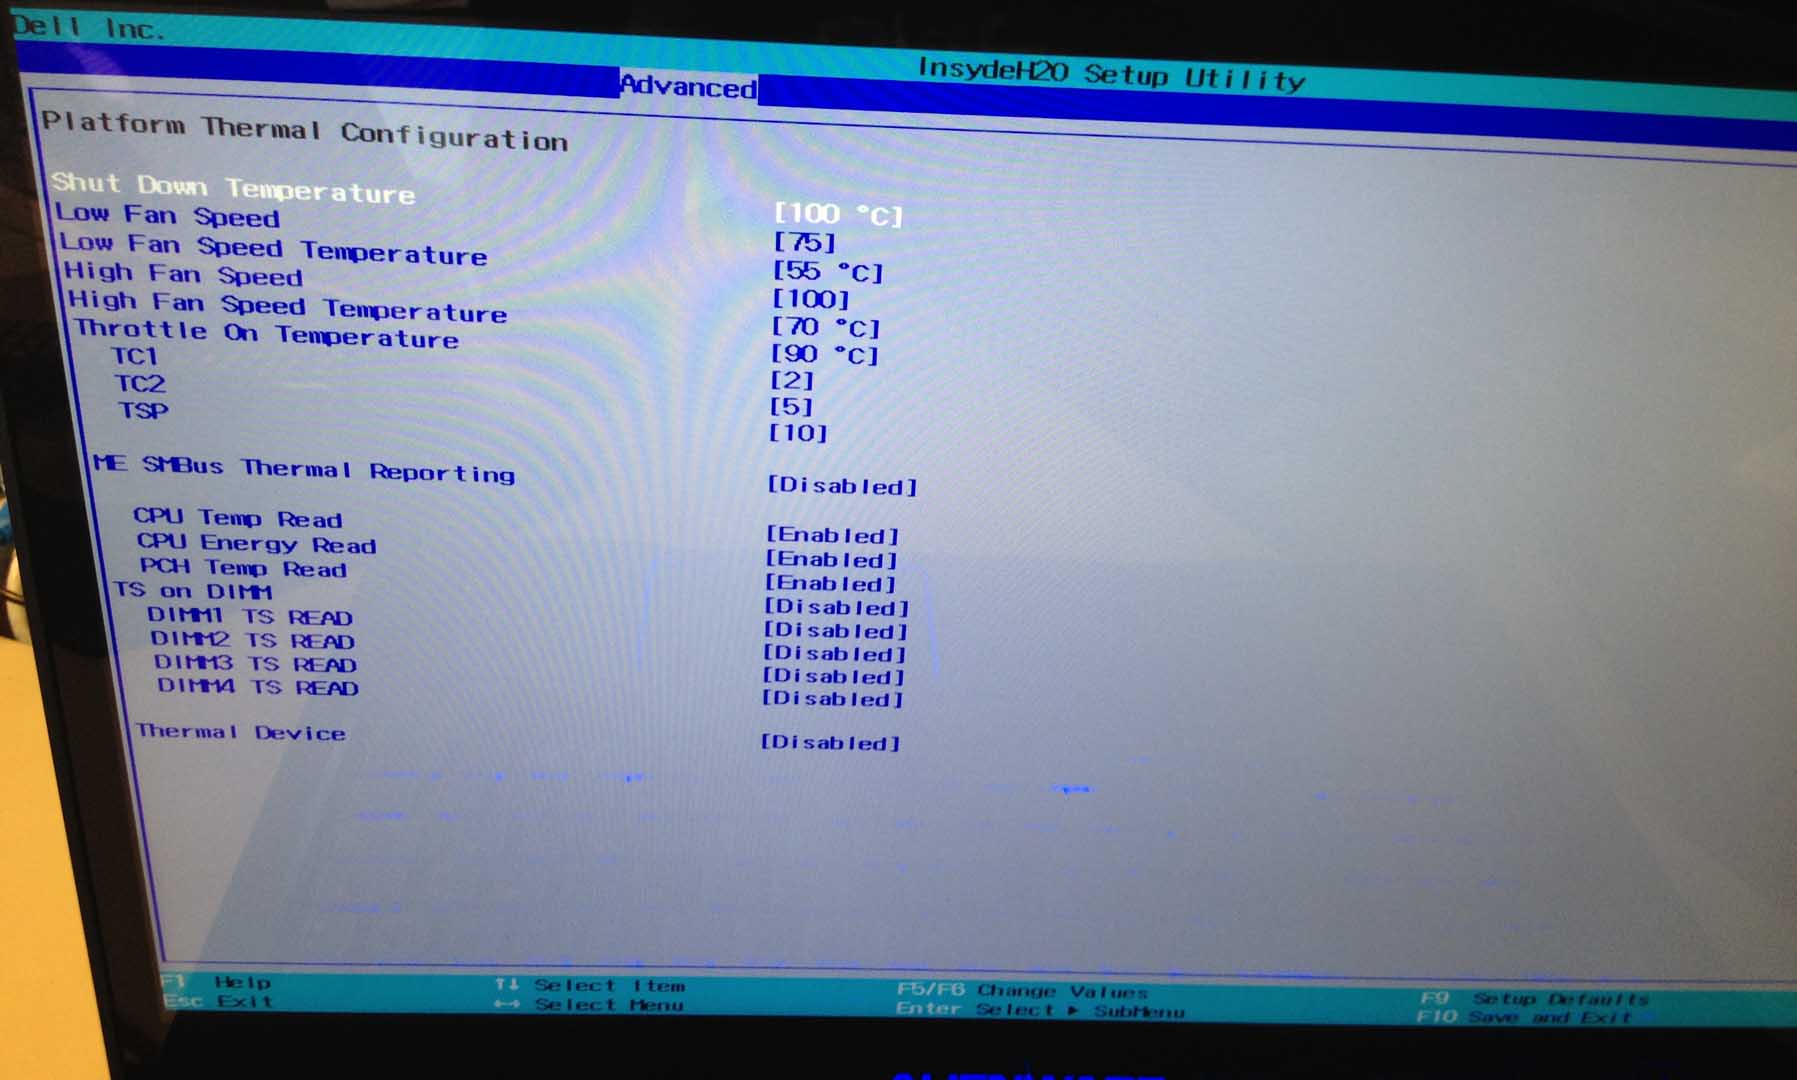
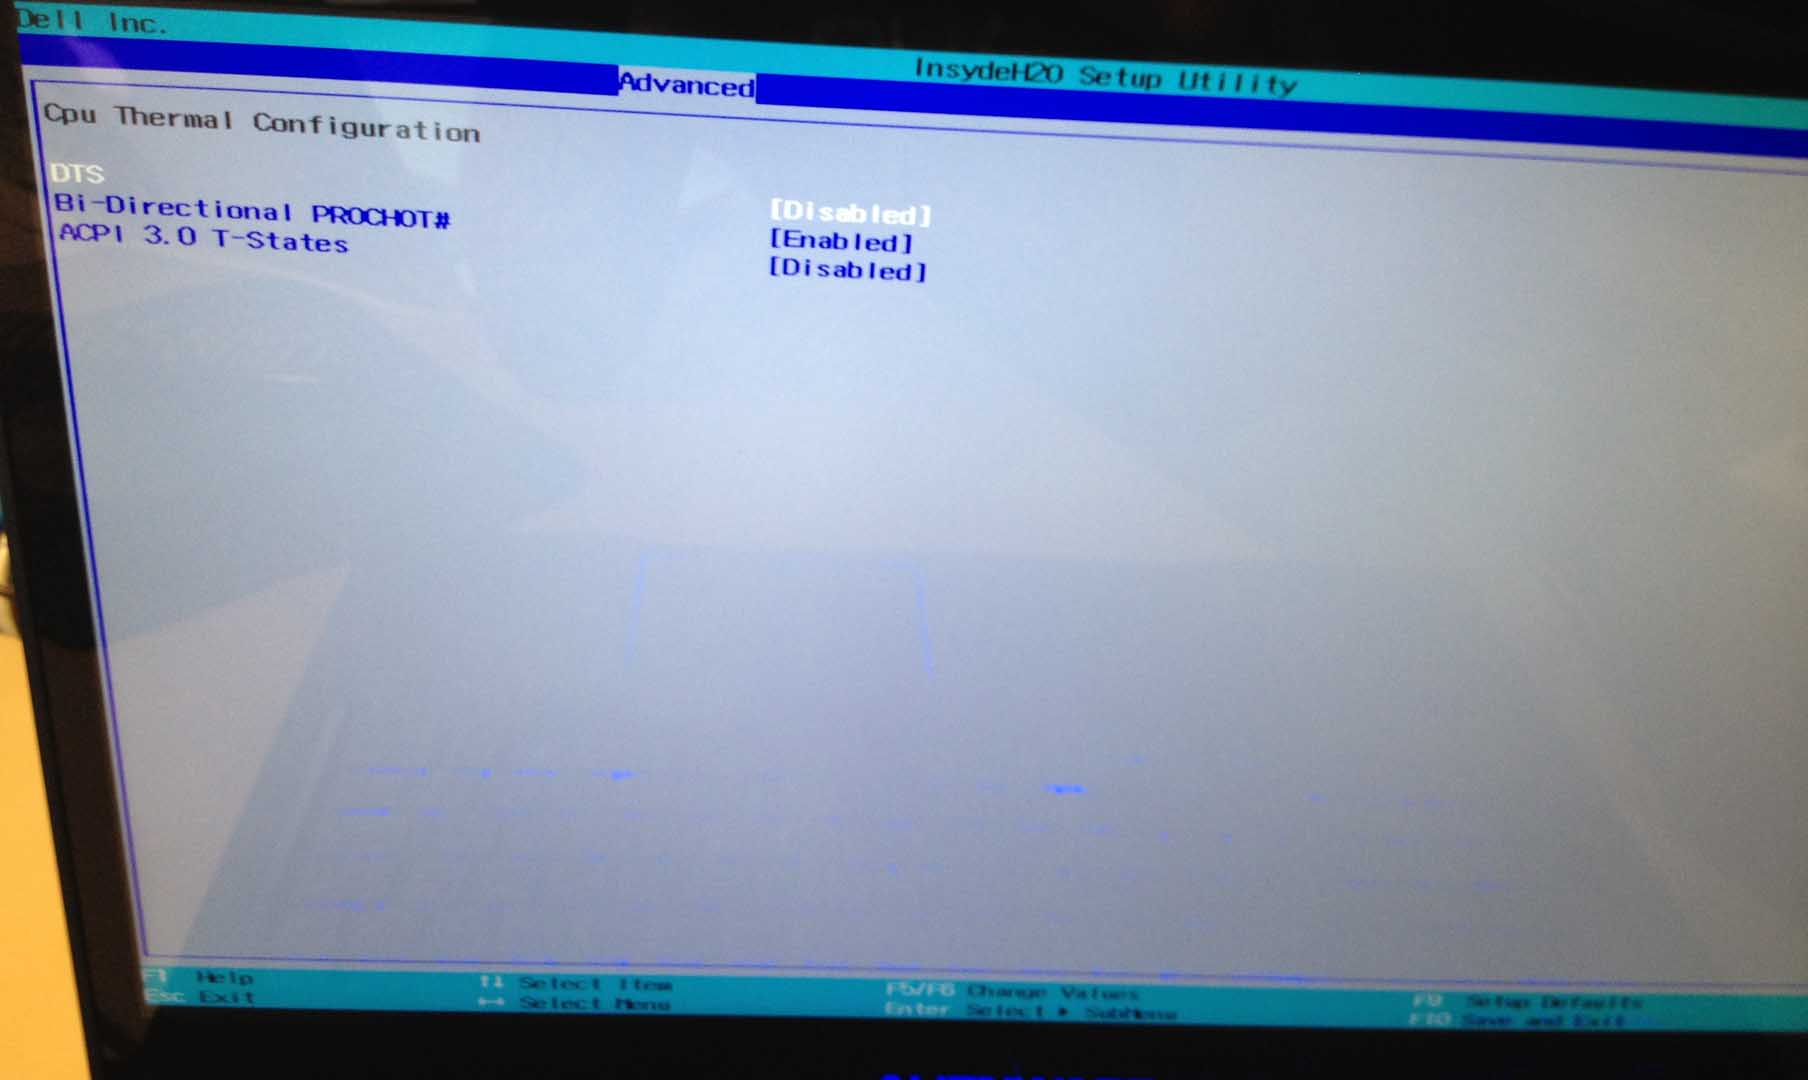
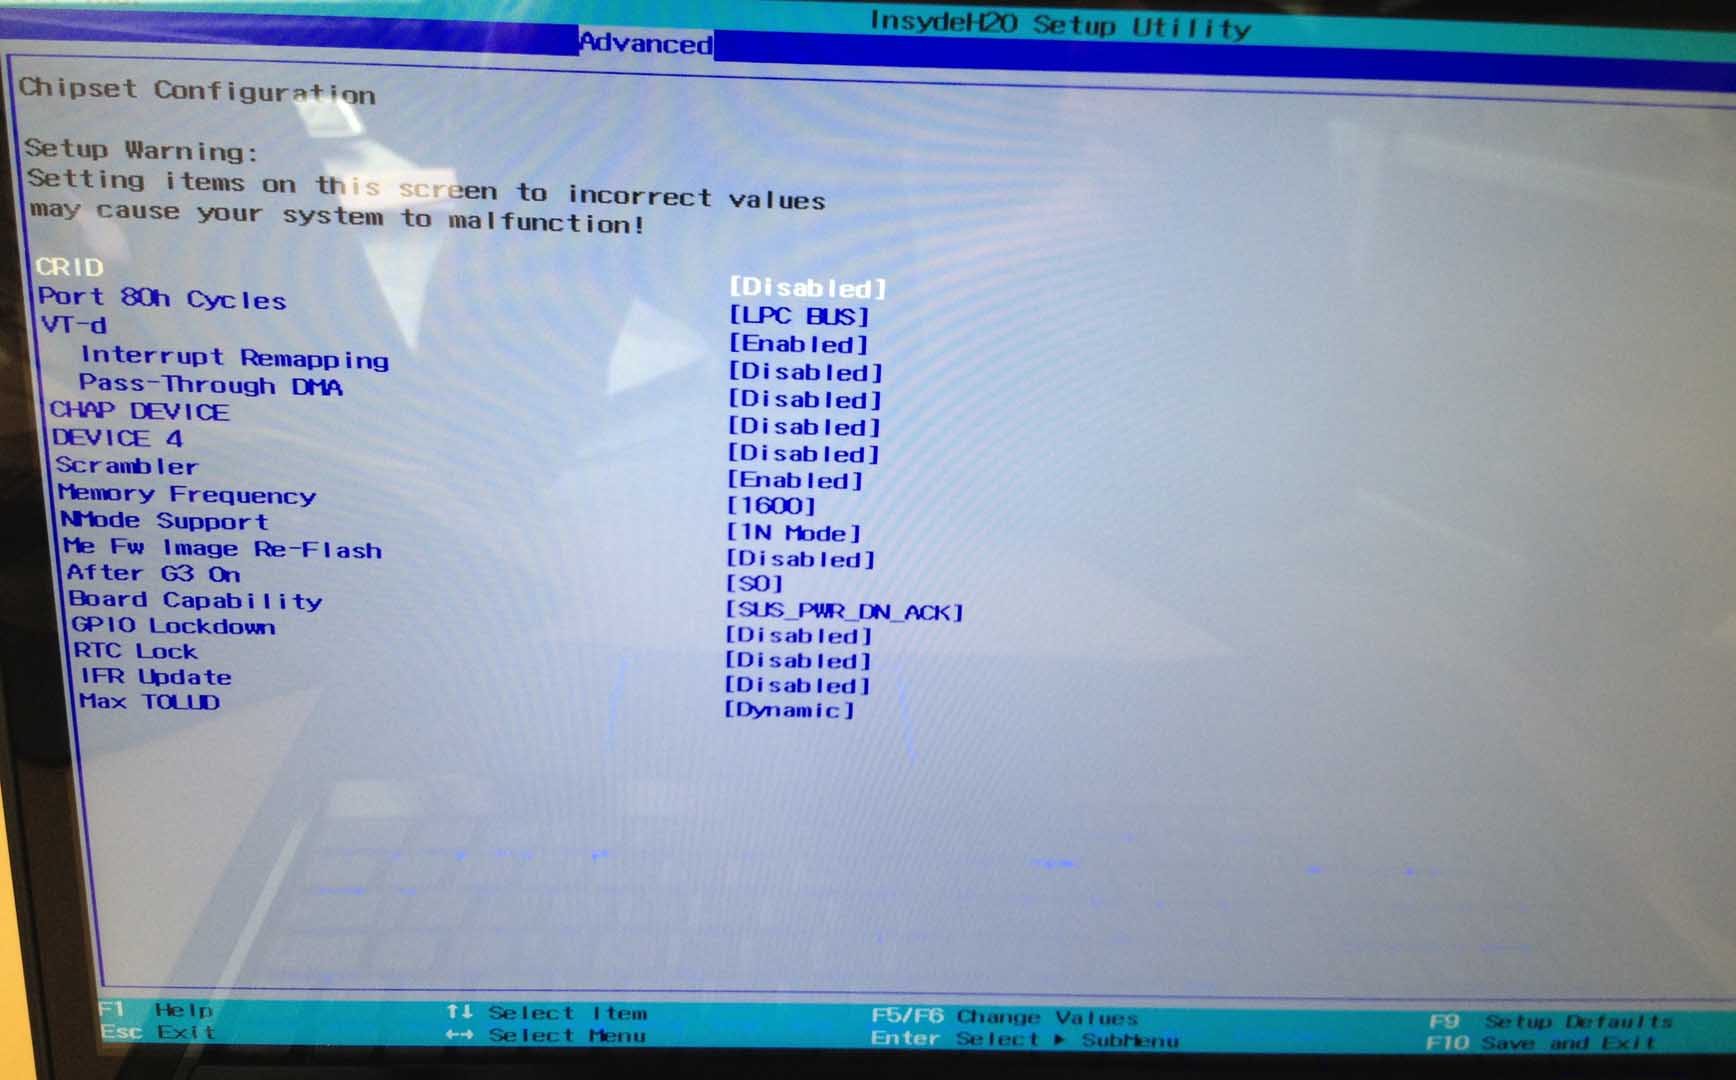
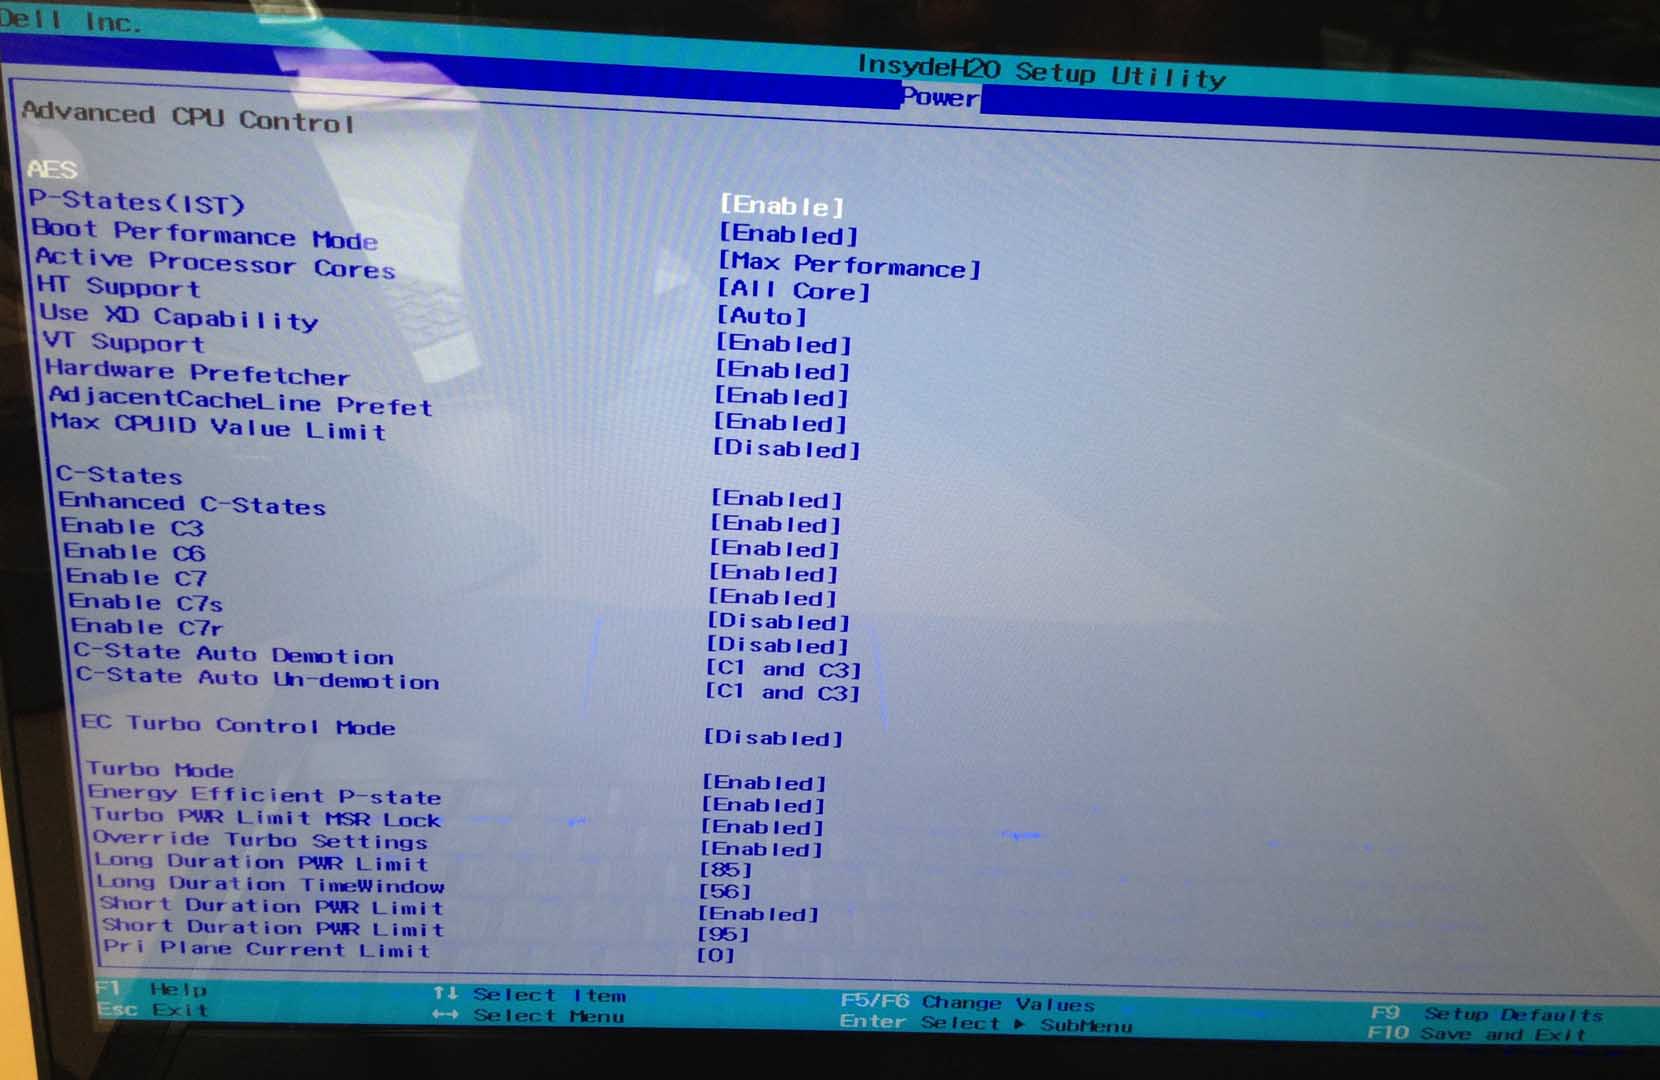
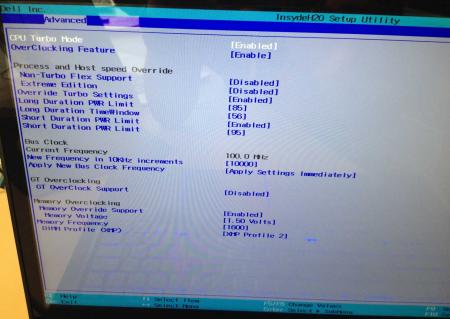
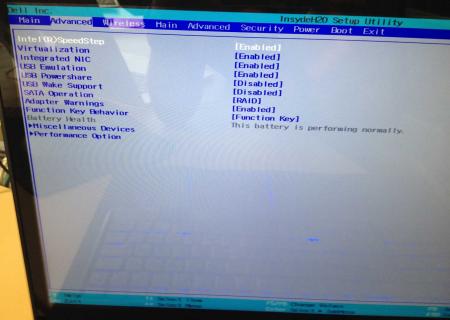
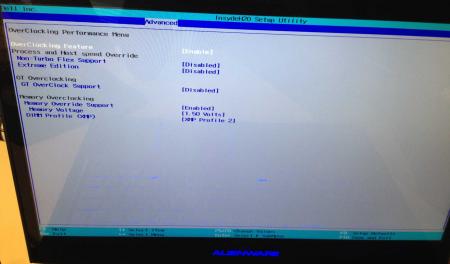
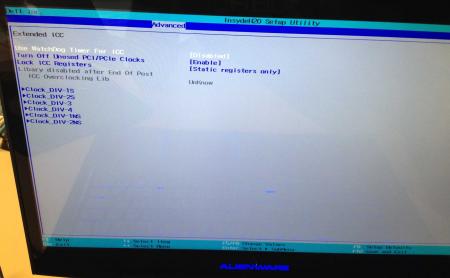
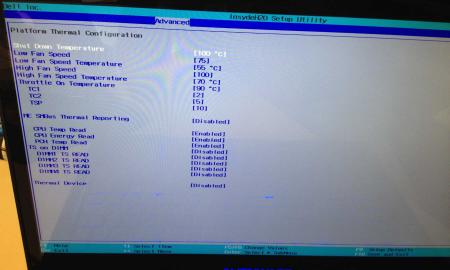
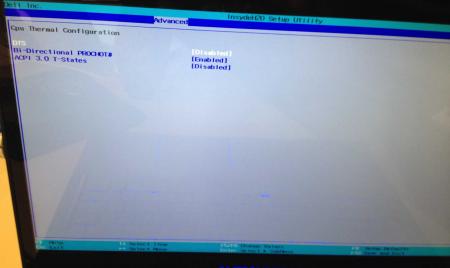
Dell has hidden a lot of options in the BIOS of the Alienware M17x R4, the modified BIOS versions here will show you all the hidden menus and allow you to further tweak your system and optimize its performance. Don't change anything you're not familiar with. There might be functions available which don't work on your system, so use this BIOS with care. It should only be used by advanced users. In case you mess up and your system refuses to boot after applying the changes you make, remove the AC adapter, battery and coin cell battery in order to clear the non-volatile ram of the BIOS. This should fix most issues. *********************** Instructions: If you're on A05 or an earlier version, you can flash the modified bios by simply using the InsydeFlash utility provided with the official bios update on the Dell support site. However, once you're on a version newer than A05, things get a bit more complicated. There are two options then: - Method 1: Revert to stock A05 or earlier by using the Insyde USB bios recovery method, and then flash the modified bios by using the official tools (InsydeFlash). - Method 2 (recommended): Flash the modified Bios from DOS by using the FPT tool: . Grab the DOS version of fpt for flashing, and my 'prr tool' to circumvent write protection.. Download a '[FPT]' labeled version of the unlocked BIOS. Put the DOS version of the flash tool on the root of the prepared USB stick (fpt.exe and fparts.txt), along with the prr.exe and the file you want to flash (plus the included flash.bat). . Restart the system and boot from your USB stick. Run prr.exe, then flash the bios by executing the flash.bat file. Wait until the tool completes the flash. If the verification is okay, reboot, else flash again.. Go to the bios, load the default settings and reboot. Done NOTE: The flashing from DOS as described above will only update the BIOS, not the rest of the firmware. Therefore I strongly advise you to first flash the stock version of the bios you want by using the official update provided by Dell, and once that's done you can go ahead and flash the modified version of your bios by following the instructions above. Download links to the unlocked M17x R4 BIOS versions: M17x R4 - BIOS A05 [unlocked] M17x R4 - BIOS A08 [unlocked] - see attachment M17x R4 - BIOS A09 [unlocked] - see attachment M17x R4 - BIOS A10 [unlocked] - see attachment [FPT] M17x R4 - BIOS A10 [unlocked] - see attachment [FPT] M17x R4 - BIOS A11 [unlocked] - see attachment Donation link, in case you want to buy me a beer Here some pictures of the menus (thanks a lot for the pics @deadbydawn!) I want to thank @widezu69 for testing !! It's hard to find users who are willing to risk their system in order to test a mod, I greatly appreciate this! Thank you!! ********* Flash and use at your own risk. I don't take any responsibility for any possible damages on your system. The software which I provide here ('prr tool') comes with absolutely no warranty to the extent permitted by applicable law. ___ M17x_R4_-_BIOS_A08_[unlocked].zip M17x_R4_-_BIOS_A09_[unlocked].zip M17x_R4_BIOS_A10_-_[unlocked].zip [FPT]-M17x_R4_BIOS_A11_-_[unlocked]V2.zip [FPT] M17x R4 - BIOS A10 [unlocked].zip M17x_R4_-_BIOS_A05_[unlocked].zip


 1 point
 -
. So... Dell/Alienware managed to confuse a lot of users with their latest BIOS updates from last week. Version A08 of the M14x R2 as well as the M17x R4 and also A07 of the M18x R2 made a quick appearance on the Dell support site, only to vanish again shortly after - apparently to be replaced with A09 respectively A08. To make the confusion perfect, Dellienware once more decided not to publish any change log, not even a tiny bit of useful information. (I already bothered some Dell reps with this, but no success so far... they're always telling that my emails will be forwarded to the proper people...). Anyway, even though severe, I don't want to discuss the change log problem at this place. So what's up with those new BIOS? It's hard to miss that some numbers are missing between the last bios update and the current releases. Anyone who's slightly familiar with software updates and naming will realize that this is already and indication that quite some changes have been made - obvious, right? Huge parts of the firmware got revised and new modules were added as well. To keep it short, the bios (or UEFI to be more precise) is now officially Windows 8 ready. You may have already read that Microsoft requires the OEMs to have certain functions in the UEFI available (namely Secure Boot) in order get the systems 'Windows 8 certified'. Just to quickly clarify something, you don't need a 'Windows 8 certified' machine in order to run Windows 8, neither do you require Secure Boot, but the OEMs are pretty keen on this certificate as customers seem to prefer systems with certain stickers on them. What's this Secure Boot stuff? And how does this affect me? Secure boot is a protocol, a part of the UEFI, designed to ensure that a system gets booted in a so-called trusted state. This means a state that is known to be secure, that the firmware code has not been tampered with and is a direct copy which comes from a trusted source (e.g. the manufacturer of the used UEFI variation). Secure boot handles this with a system of different functions and interfaces as well as a key system. It makes sure that all external images have to pass a predefined authentication before they get executed. It is designed to prevent attacks which target the firmware to OS handoff. What secure boot won't do is protecting the firmware from direct attacks, e.g. manipulated bios updates and similar ... and this is where we come to secure firmware updating. Some of you may have noticed or read that coming from an 'old' bios version it is no longer possible aynmore to (easily) downgrade to an earlier version once you have flashed A08/A07 or later. This is because Dellienware decided to implement a way to verify firmware updates, in the case of the Insyde UEFI it is 'secure flash'. The UEFI image, the drivers which are required at boot etc. are all digitally signed. Now if you want to update your BIOS, this is what happens (simplified): - Flash utility checks the firmware image for integrity. - If ok, the image gets sent to the system - System reboots, starts the pre-uefi environment and starts the authentication process on the file which is to be flashed - If this check passes, and only then, the software environment for the flash gets launched, firmware gets updated. I have to admit that secure boot without implementing a method for secure firmware updating makes pretty much no sense at all, so it's obvious that this would come sooner or later, especially with Microsofts requirement for the Win8 certification. The consequence of this is that the user gets locked out of his own system. A (hobbyist like me) is no longer able to tweak the firmware of his system in order to use hardware the way he wants. Same goes for benchers, power users, hardware enthusiasts etc. who like to flash a modified bios in order to get access to disabled settings or activate certain CPU extensions which the system manufacturer locked out. The digital signing which gets used in UEFI is really sophisticated, so don't even ask about creating own signatures or revers engineering it. This is the end of bios modding (and especially easy flashing) as we know it. While I have hope that it will be able to find some workarounds for the current AW systems, I have reasons to believe that it will be much more difficult to achieve this with a system which comes with the secure boot function implemented by stock. One thing is for sure, if you intend to use a modified firmware, secure boot needs to be disabled ...but it is obvious that the issue with the secure firmware update (in our case 'secure flash') persists, even with secure boot turned off (for the reasons mentioned above). I don't want to read all this / To much technical details, what are the conclusions of all this for me? Do you use / want to use a modified bios on a current AW system (M14xR2, M17x R4, M18xR2)? If no - doesn't really matter for you, just go ahead and update to the latest bios which Dell provides for your system. If yes... - If you're still on an 'old' BIOS (pre-A08/A07 when looking at the official releases) then you can for example stay there and flash forth and back between a modified and stock bios, as long as the stuff you flashes predates A08 respectively A07 (again, I'm only talking about public, official releases). If you want to update to the latest version, keep in mind that you won't be able to easily downgrade anymore once you're on one of those new bios. You won't be able to easily flash a modified version either, unless you directly flash a modified when coming from an 'old' bios. In this case the mod will flash fine, but the consequences are the same, you won't be able to downgrade anymore easily, neither will you be able to just flash a newer modified bios. And if you already flashed a unmodified new bios and want to get a modified one... shit happens. Contact me in the corresponding thread of your model and we might be able figure out something. Let me know if you have any questions, some explanations might not be sufficient if you're not a bit familiar with all this stuff.1 point
-
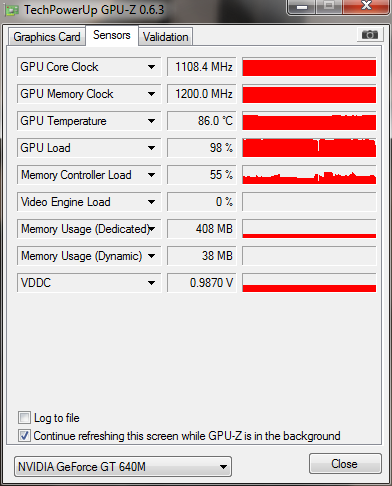
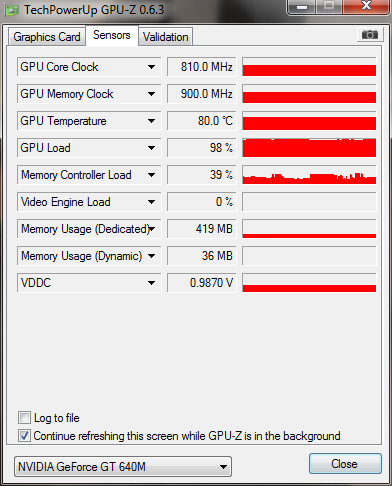
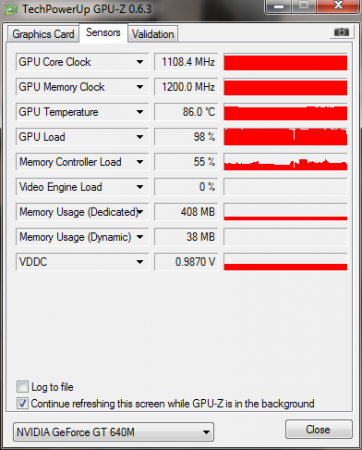
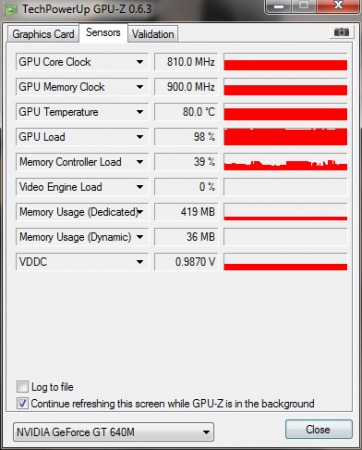
Acer Aspire V3 series BIOS mods - better Nvidia GT 640m performance The Nvidia GT640m ("Kepler") which can be found in the Acer Aspire V3 series has an incredible overclocking potential. Unfortunately this is very limited due to VBIOS restrictions. This modified BIOS version will help you to unlock the full power of your GPU. The increased default clocks (3d) gives you additional performance without having to use any additional tools. If you want to go even further - the 135MHZ software overclocking limit is removed, so you can push your GPU to the limits. Mods based on Acer Aspire V3-5xx series BIOS 1.07: This BIOS is compatible with the V3-531, V3-571, V3-571G and all other models which I may have forgotten and use the same BIOS - Overclocking edition: 810 MHz core (3d) and boost - undervolting edition: depending on interest, tba Here some pics, at 810MHz and further overclocked per software... yeah, this works very well Instructions are included, refer to the READ ME file. Please provide feedback and leave a comment. If you like my work feel free to buy me a beer *************************************************************** F.A.Q.: Why do I need to flash the BIOS in order to get higher clocks? Isn't the VBIOS responsible for the GPU settings? Answer: How can I revert to the original BIOS? Answer: What exactly got changed compared to the original BIOS? Answer: *************************************************************** Remember, you are responsible for the changes you make on your system, flash at your own risk.b
 1 point
 -
First off, i'd like to thank Nando for all his work helping bring eGPUs to the masses. On to the post: The short of it: Where I once had a DVD drive that I barely used, I now have 3 low power USB ports and a convenient eGPU port. I’ve designed a caddy of my own in order to manage the new components. Full photo set: https://www.facebook.com/media/set/?set=a.193840844073776.17933.193579380766589&type=1 The long of it: This began as a simple 2nd HDD/DVD caddy swap. The more I thought about it however the more the fact that the HDD was physically smaller than the DVD drive, which ultimately meant unused space started to bother me. Incidentally I was also working on getting an eGPU set up but didn’t like the idea of having to take off the 2nd battery and bottom plate off each time I wanted to use the eGPU. The eGPU hardware connects via the mini PCIe slot where the Wi-Fi card is. So I decided to try to permanently embed the eGPU connection alongside a 2nd HDD where the DVD drive used to be. This threw a new wrinkle into the equation, since a permanent eGPU connection would mean disconnecting my wlan permanently. My solution was to go with a USB dongle for my wireless connection. New problem, where to find the USB connection….and where to hide the dongle. The last thing I wanted was to have it sticking out the side of the computer all the time. So the dongle also had to go into the caddy space. As to the USB connection, well there’s a wwan slot I never use right next to the caddy. While most wwan cards are physically a mini PCIe format and connection, they really work via USB. I found a card which breaks out the USB connection to flying leads (mentioned in the parts list below) and planned on using that to get my USB connection for the Wi-Fi dongle. New problem, most wwan mPCIe ports carry USB signal but not power. The port on the SB works like this. So where do I get 5v from? I could run the port power in parallel from one of the USB ports on the right side of the computer, but those make for some long leads and are difficult to run back to the caddy area. The only easily available source of power on the left hand side is the SATA connection itself. And that was my "aha" moment. I tend to use my laptop as a laptop when on the road but when at home it’s really working as a desktop. I’ve got a few USB peripherals and a screen I connect it to, plus the aforementioned eGPU. Ultimately I decided that I wanted more USB ports and a convenient eGPU port on the left side of the machine more than I wanted a 2nd hard drive. So I replaced the hard drive in the mod with a USB hub, with enough power to run the wlan dongle, an Asus Xonar USB soundcard, thumbdrives, peripheral dongles (Logitech universal, and Microsoft keyboard, etc.) It won’t power a HDD in a caddy however. I was also having some trouble fitting the hard drive in the original mod, but that’s because I was afraid of taking a dremel to the bottom case of the laptop (I’ve since worked through my fear, though I like the mod as is.) Things that still need doing: I still need to shave off a 1mm from everything, and I ended up warping the top case with one of my earlier attempts. I’ve revised the design of my caddy so that I can fasten the 3 screws along the face of the DVD drive which I had to forego with the old design. I also have to model this and get it 3d printed so it’s one integral unit. Also, it looks like the new version of the eGPU hardware (PE4L-PM060A) might have the mPCIe card and the adapter directly soldered to the mini hdmi cord, so I’ll have to revise the mod slightly. Even without revising the design, I have to go in there and clean up some cables now that I’ve had it in for a few weeks and know that it works. Things to watch out for: I somehow shorted the speakers on this computer, no idea how I did it but I’ve made my peace with it. Also I killed a couple of usb wifi dongles due to bad solder joints and shorts. (Will update with parts list soon…) Photos: Initial Testing: First stab at a mockup: Progress: End Result: Pic of the three usb ports with the eGpu port. Its the hole at the end, closest to the screen.1 point
-
Its not yet available for download but its dated as of todays date so it should come live soon... wonder whats new Drivers & Downloads | Dell Ireland1 point
-
there is a known problem with WD USB 3.0 drives and our laptops read USB 3.0 hard drives keep ejecting - Alienware Forum - Alienware Club - Dell Community and Alienware m17x-R4 USB 3.0 Problems With WD Externa... - Western Digital Community for more information1 point
-
I found a T61 schematic that tells us what's what: port1=WWAN port2=wifi port3=bay device? port4=expresscard port5=dock port6=lan The bay device appears to be some sort of legacy 32-pin connector. Maybe something to do with the ultrabay? Don't see any mention of a third mPCIe slot on the schematic. Wonder what it is?1 point
-
You can check the the bcd entry for DIY eGPU Setup 1.x per the instructions. Appears you are using NTFS partitions, which grub.exe works on OK. grub.exe should exist on your Win7 boot volume's \ and \eGPU directory to allow boot into the disk image as well as the image's \config directory to allow chainloading out of. Only reason I can think of booting the disk image failing on a NTFS partition is if it's compressed or using bitlocker, something grub.exe can't deal with. Lastly, if you find no go booting the disk image then I'd suggest do a USB installation per the Setup 1.1x instructions.1 point
-
Hi, welcome to T|I! First of all... don't use furmark. Just don't. It's good for one thing only - killing cards. That being said, your temps seem still a bit high when looking at your vantage temps, you should be at about 85°C. What I recommend is repasting and making sure that your heatsink is really making proper contact with the whole die. Maybe modify the heatpipes a bit if they're making contact with some of the components on the board, or using a copper shim. Also in case you use a Dell 6900m series backplate, you need to modify it a bit in order to get enough pressure on the die. About the stealth mode... no idea.1 point
-
http://forum.techinferno.com/alienware-m17x/1964-%5Bm17x-r4%5D-unlocked-bios-versions.html1 point
-
In case setup-disk-image hasn't done it, copy grub.exe from c:\eGPU to c:\ I note implementations that come with benchmarks. There have been sprinklings of discussion about Lenovo S430 and T430s having successful DIY eGPU implementations but details have been scarce. Perhaps you can fill in the blanks for others to duplicate your findings? AFAIK, TOLUD issues have been resolved with the latest Lenovo bios which incorporates a dynamic TOLUD. Upon detecting a eGPU on bootup the bios will decrease TOLUD to accomodate it.1 point
-
I recently watched The Cabin In The Woods. Defiantly one of the best movies for 2012 IMO. They put quite the spin on the typical zombie movie, and keep you guessing what will happen next the entire time. I did not foresee the ending at ALL - this is now one of my fav movies of all time. Highly recommended watch.1 point