Leaderboard


Popular Content
Showing content with the highest reputation on 08/21/12 in all areas
-
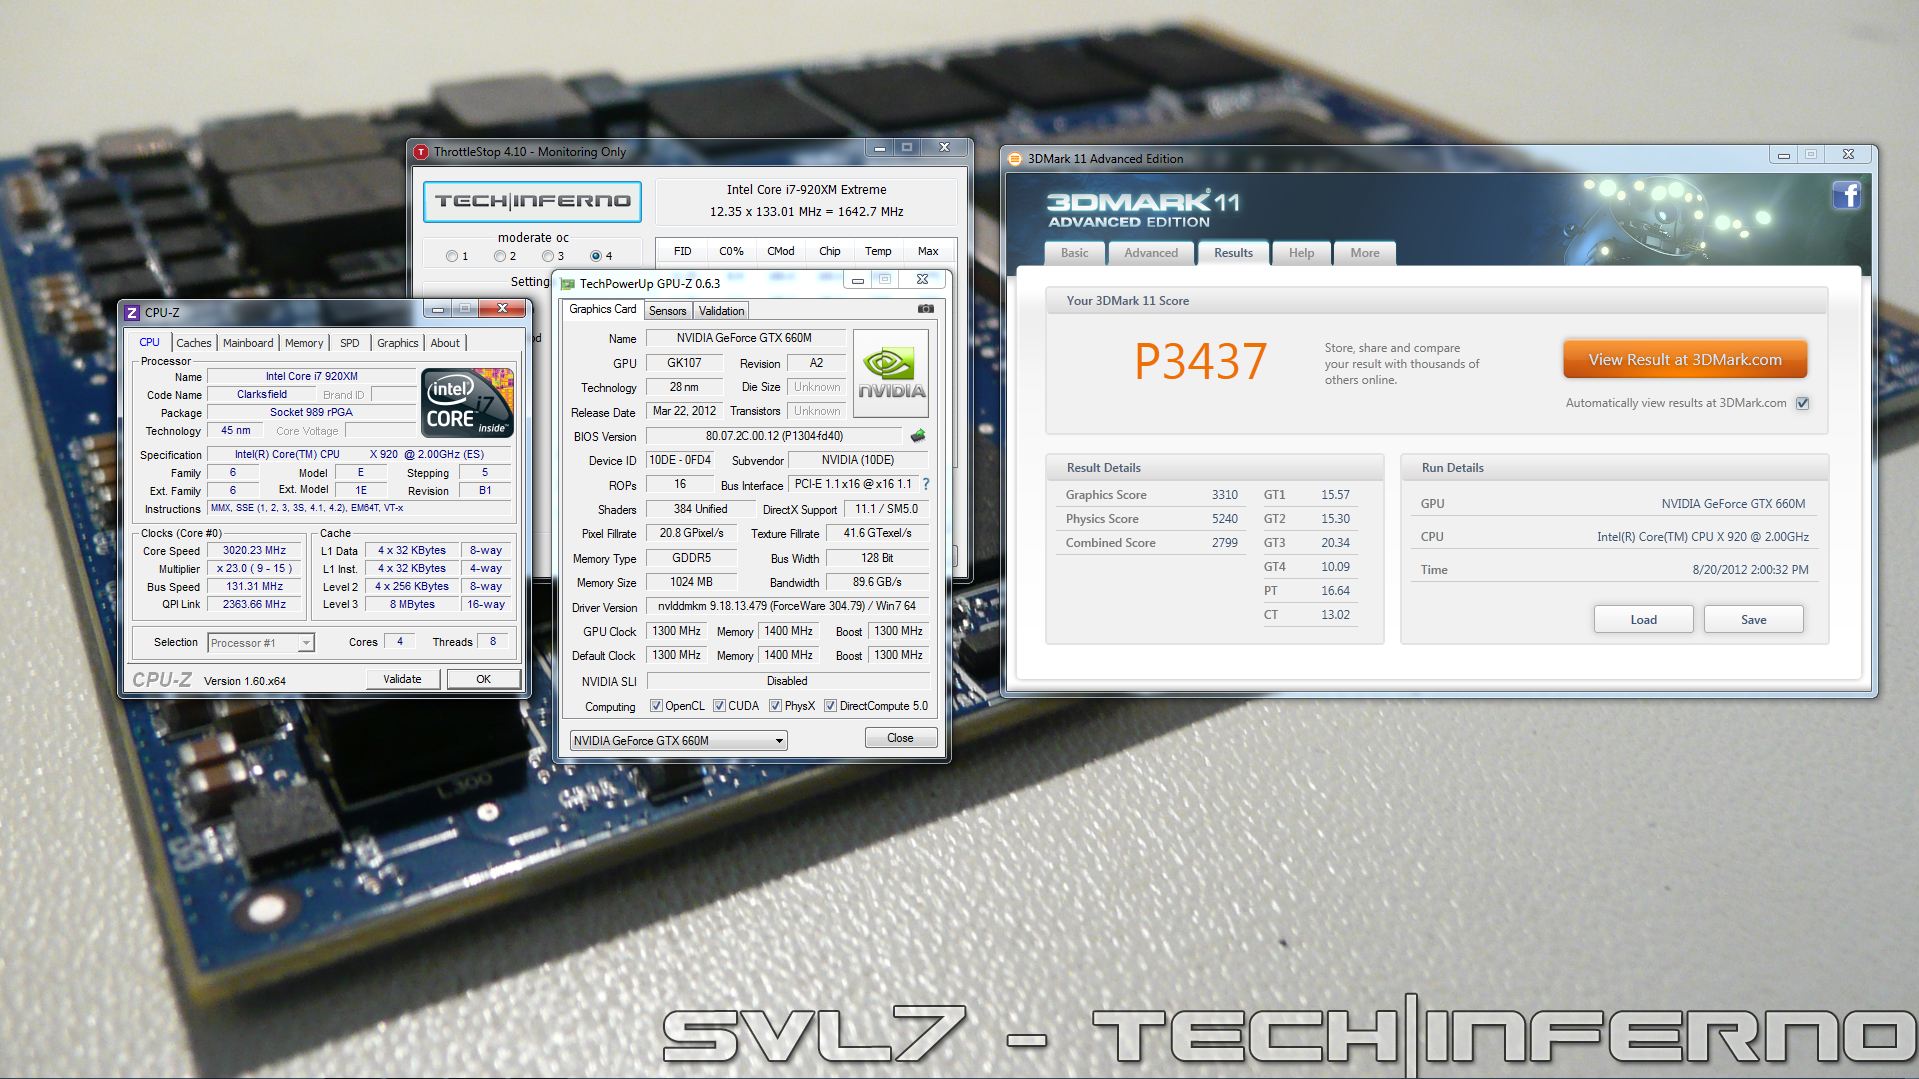
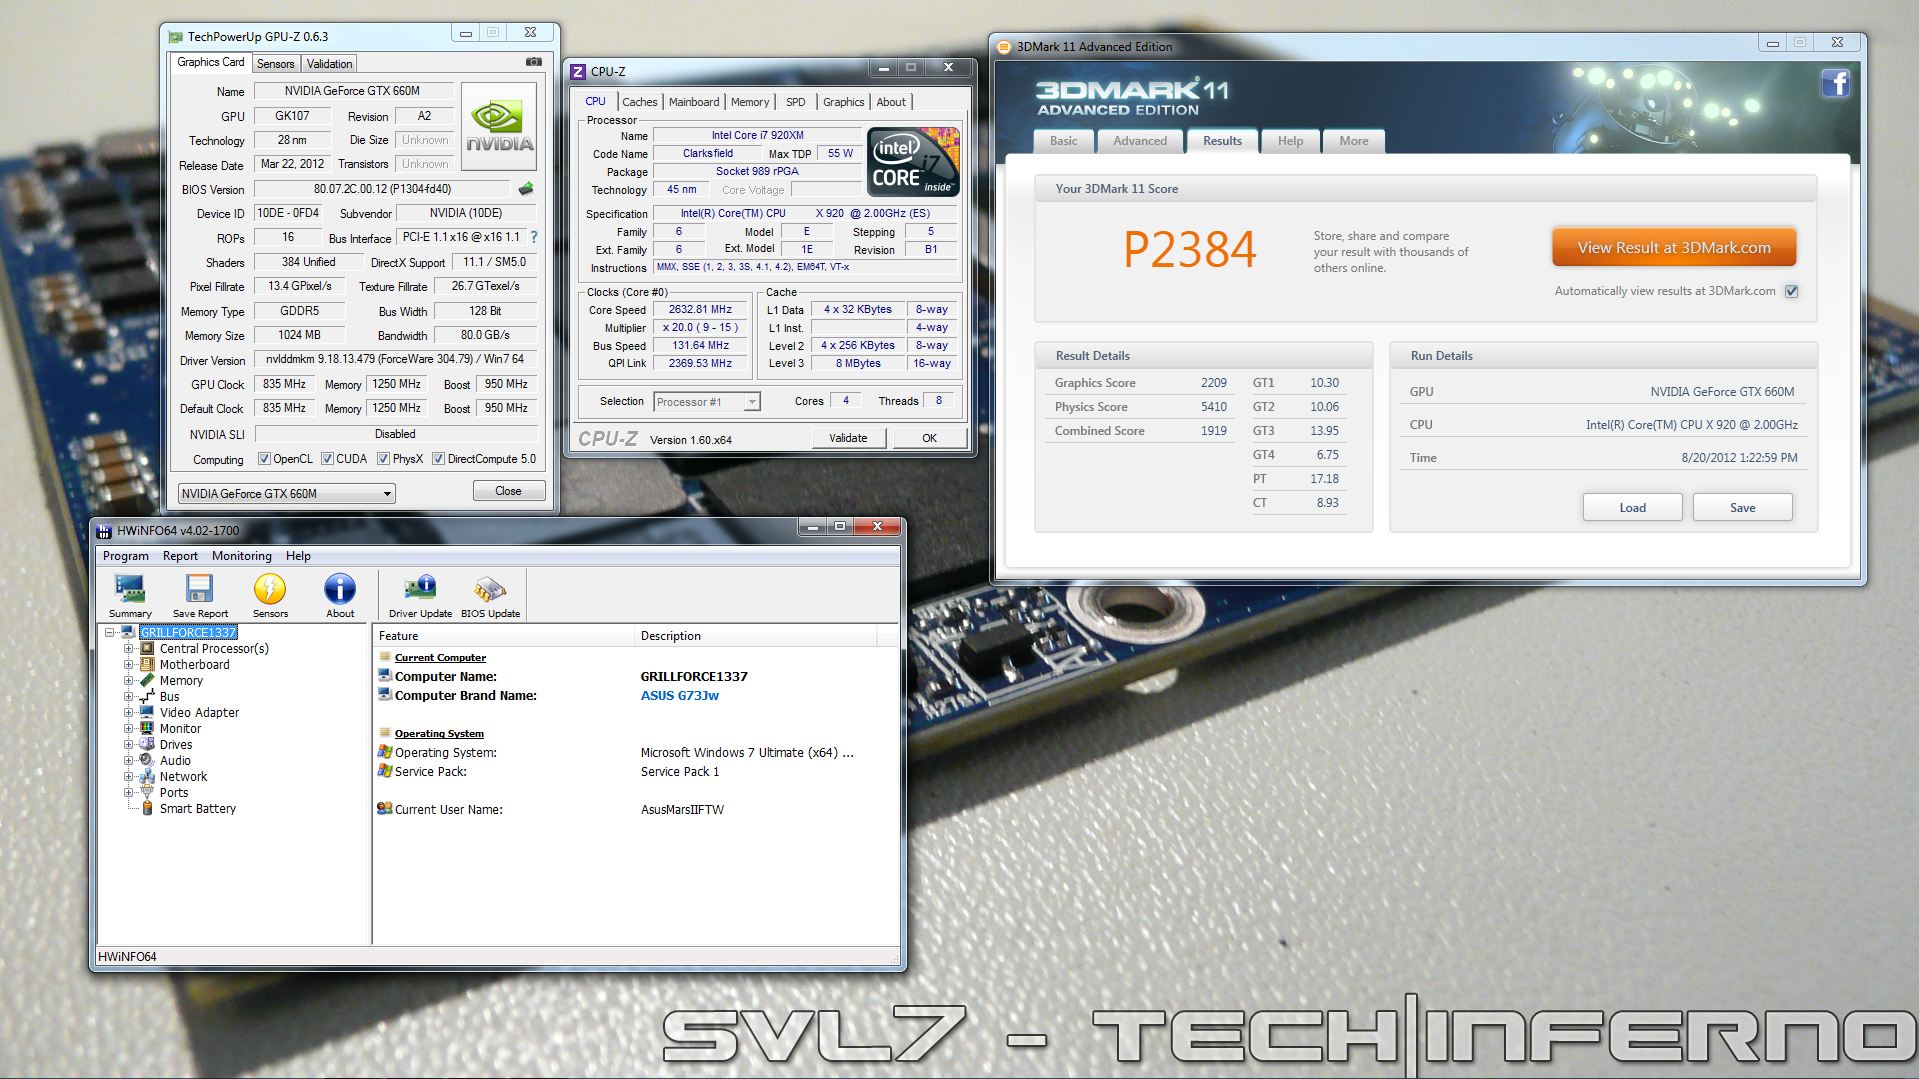
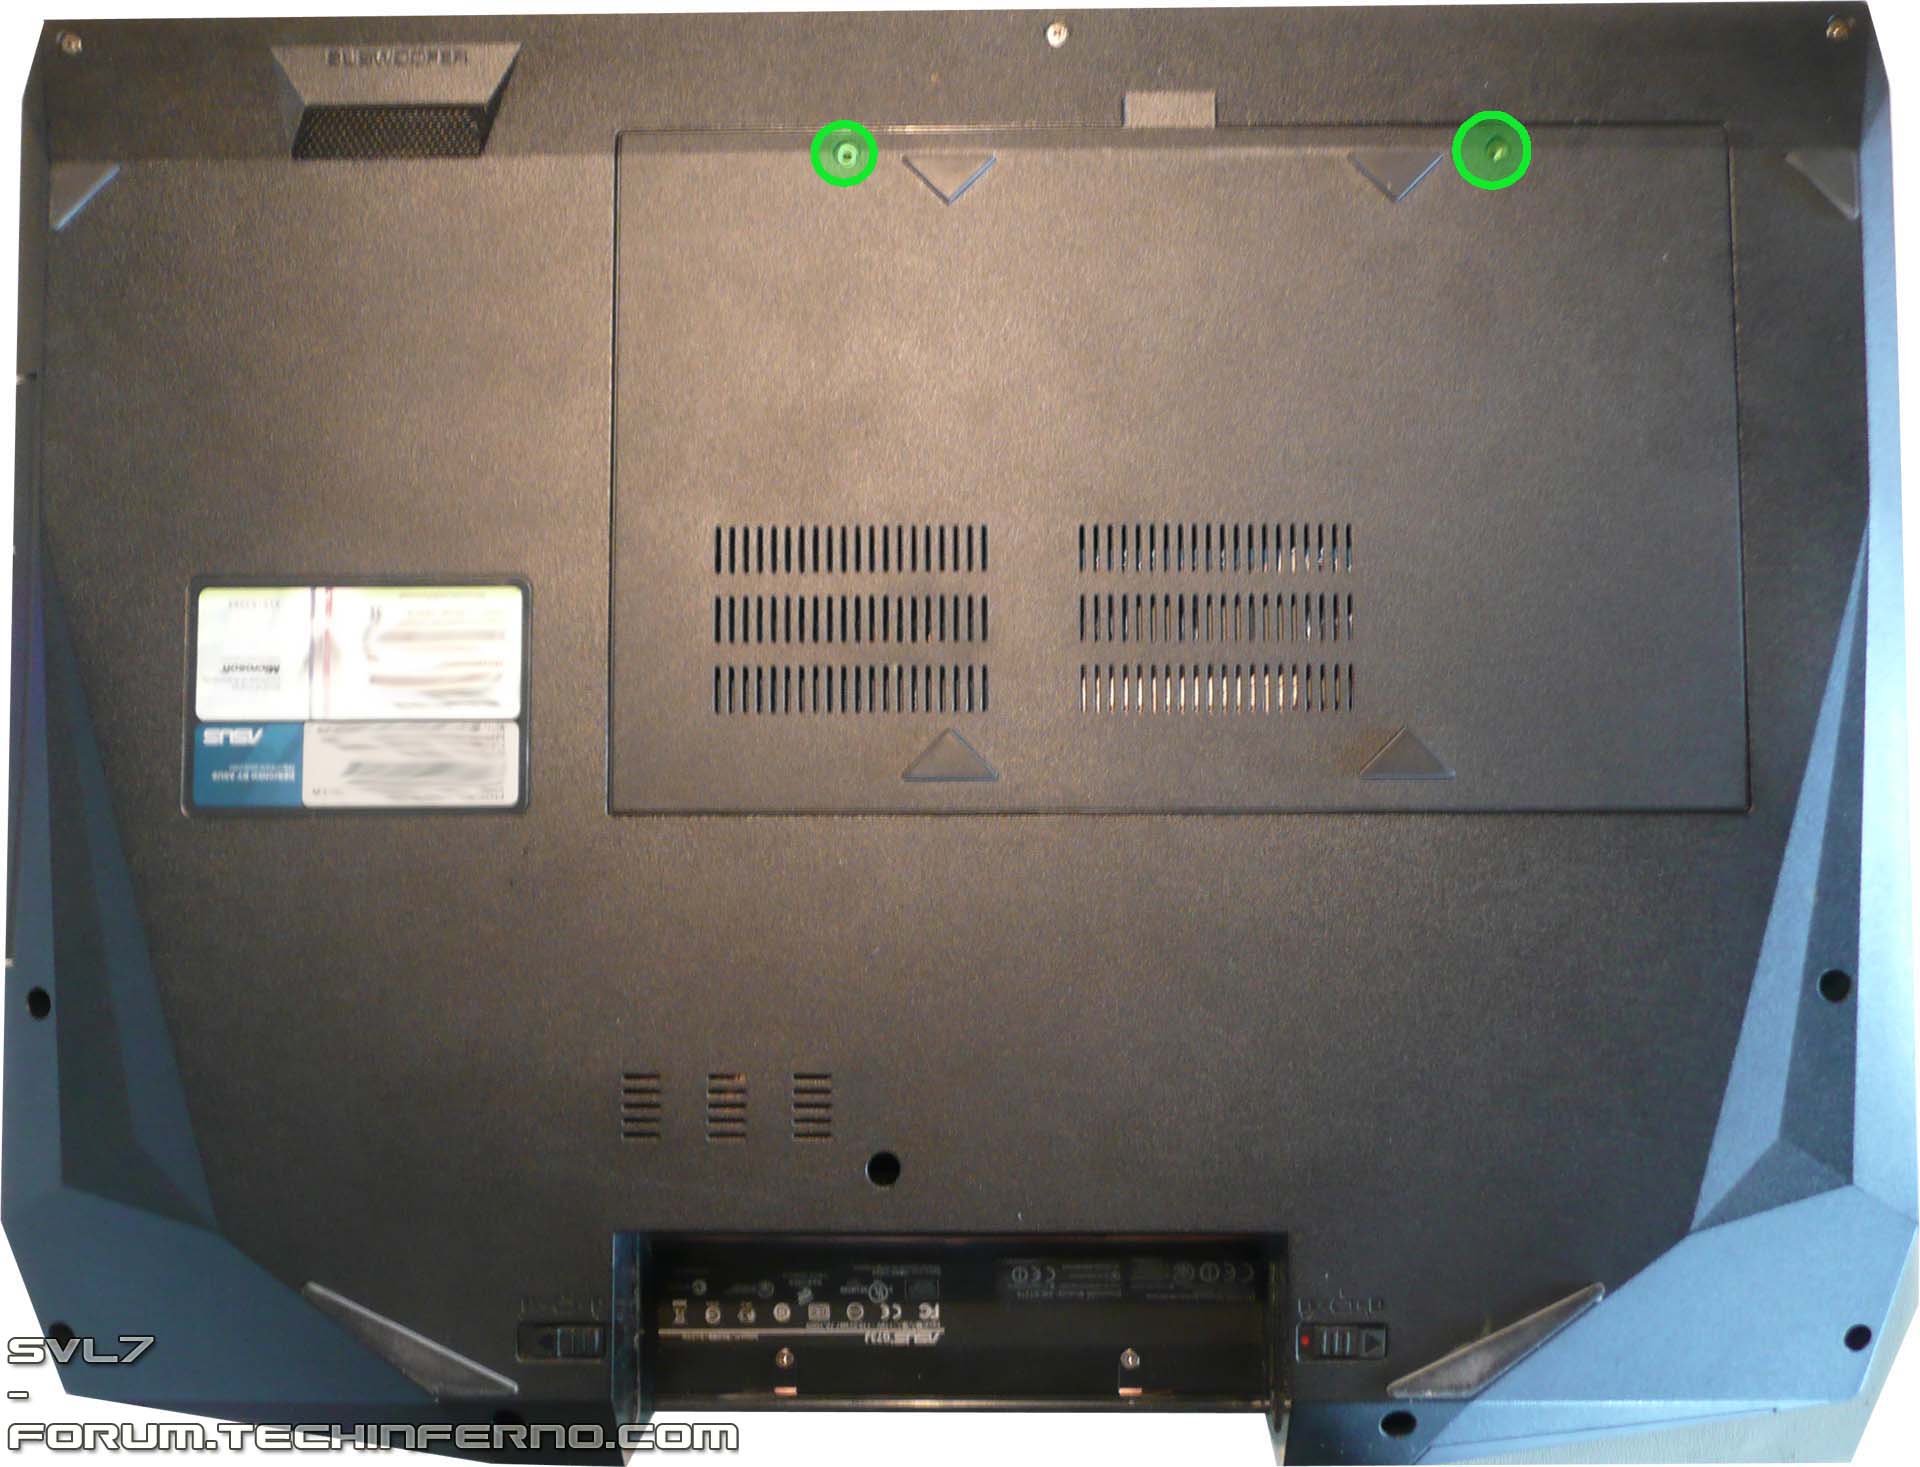
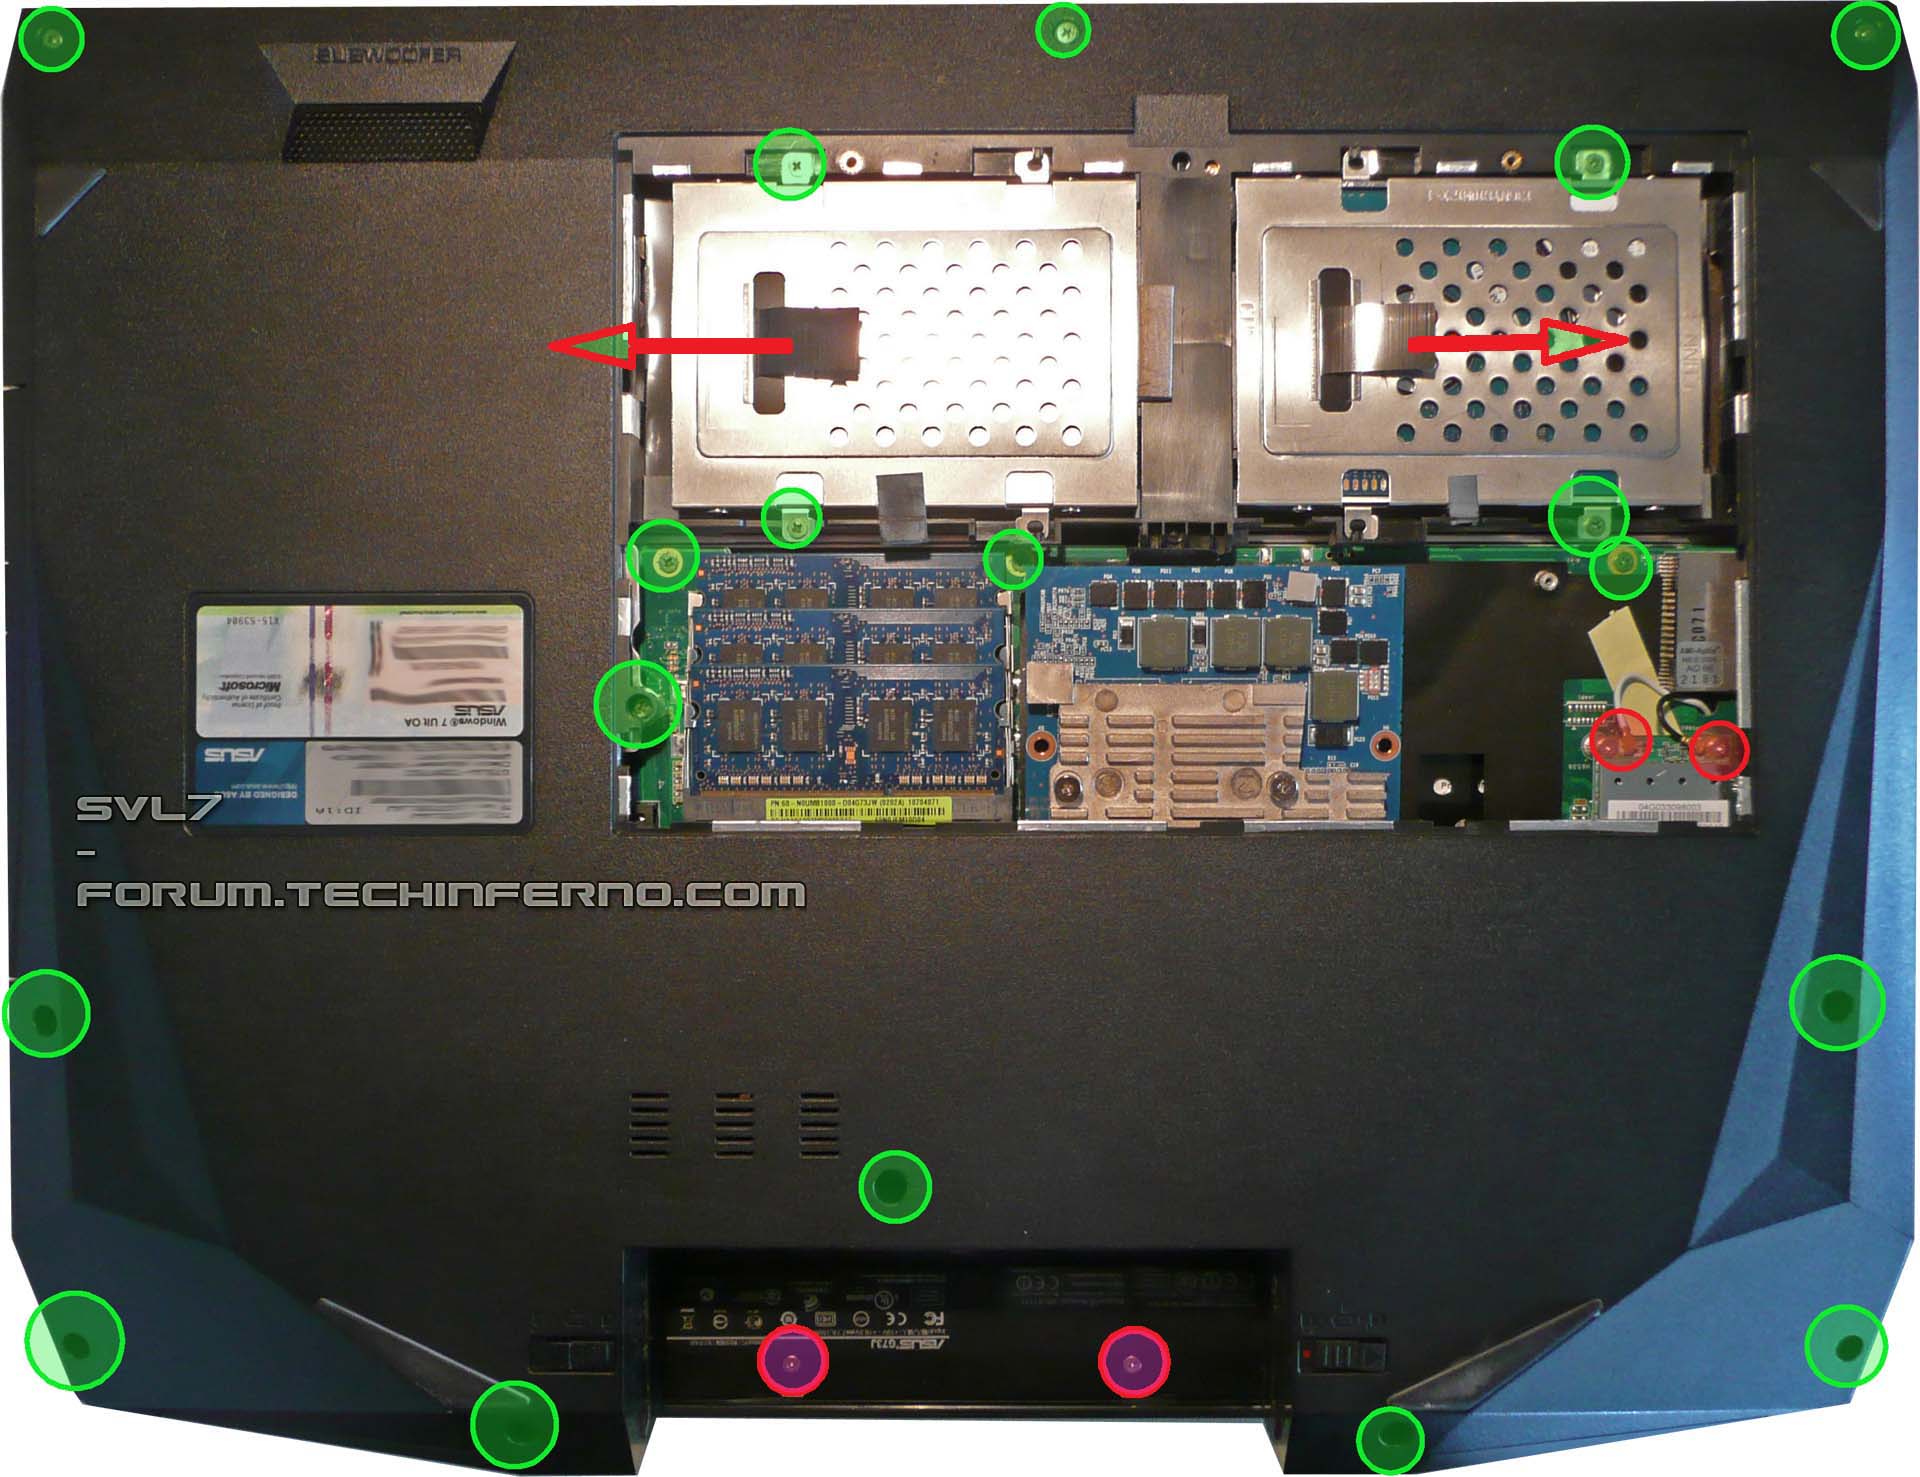
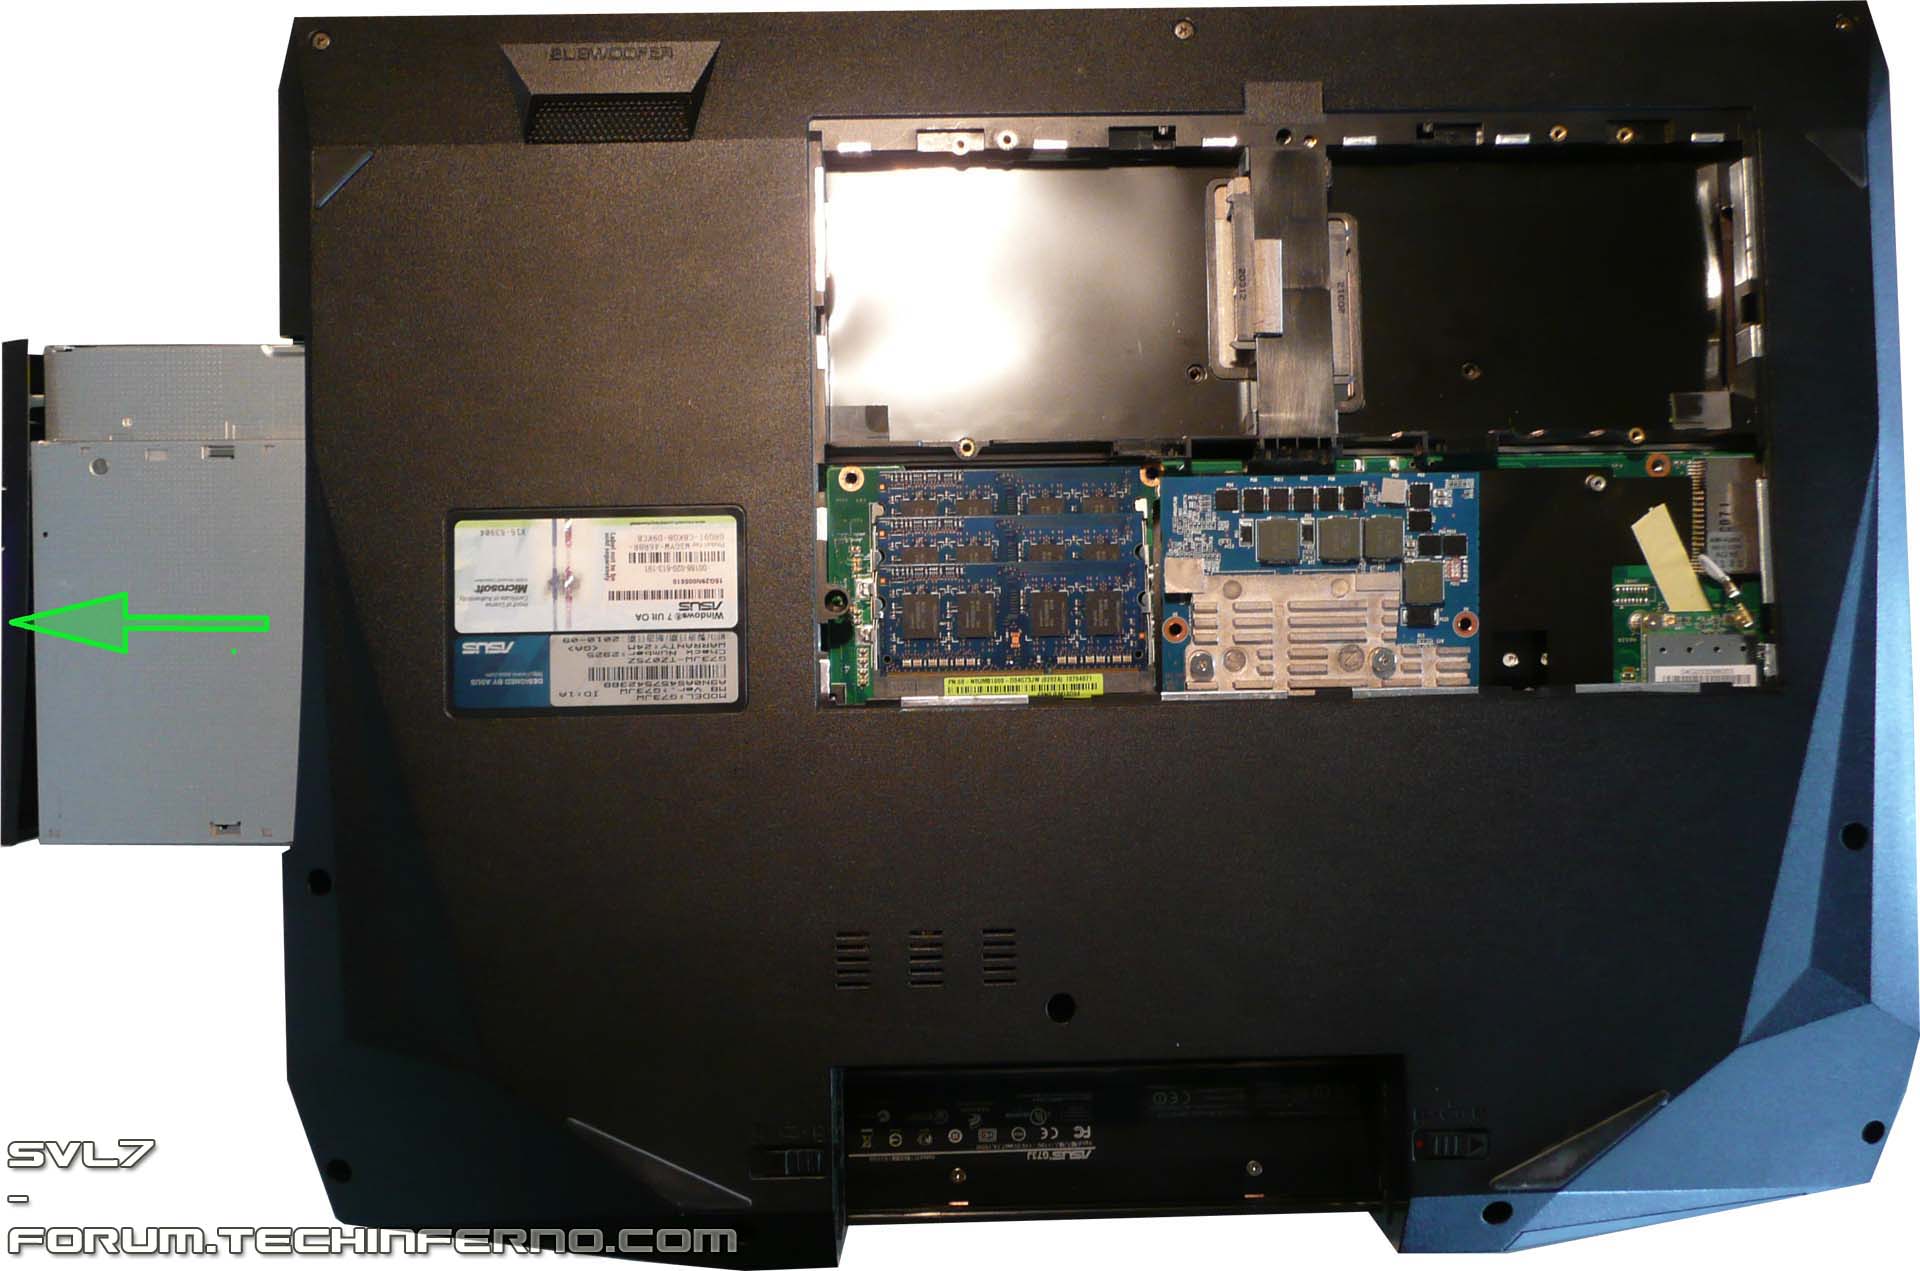
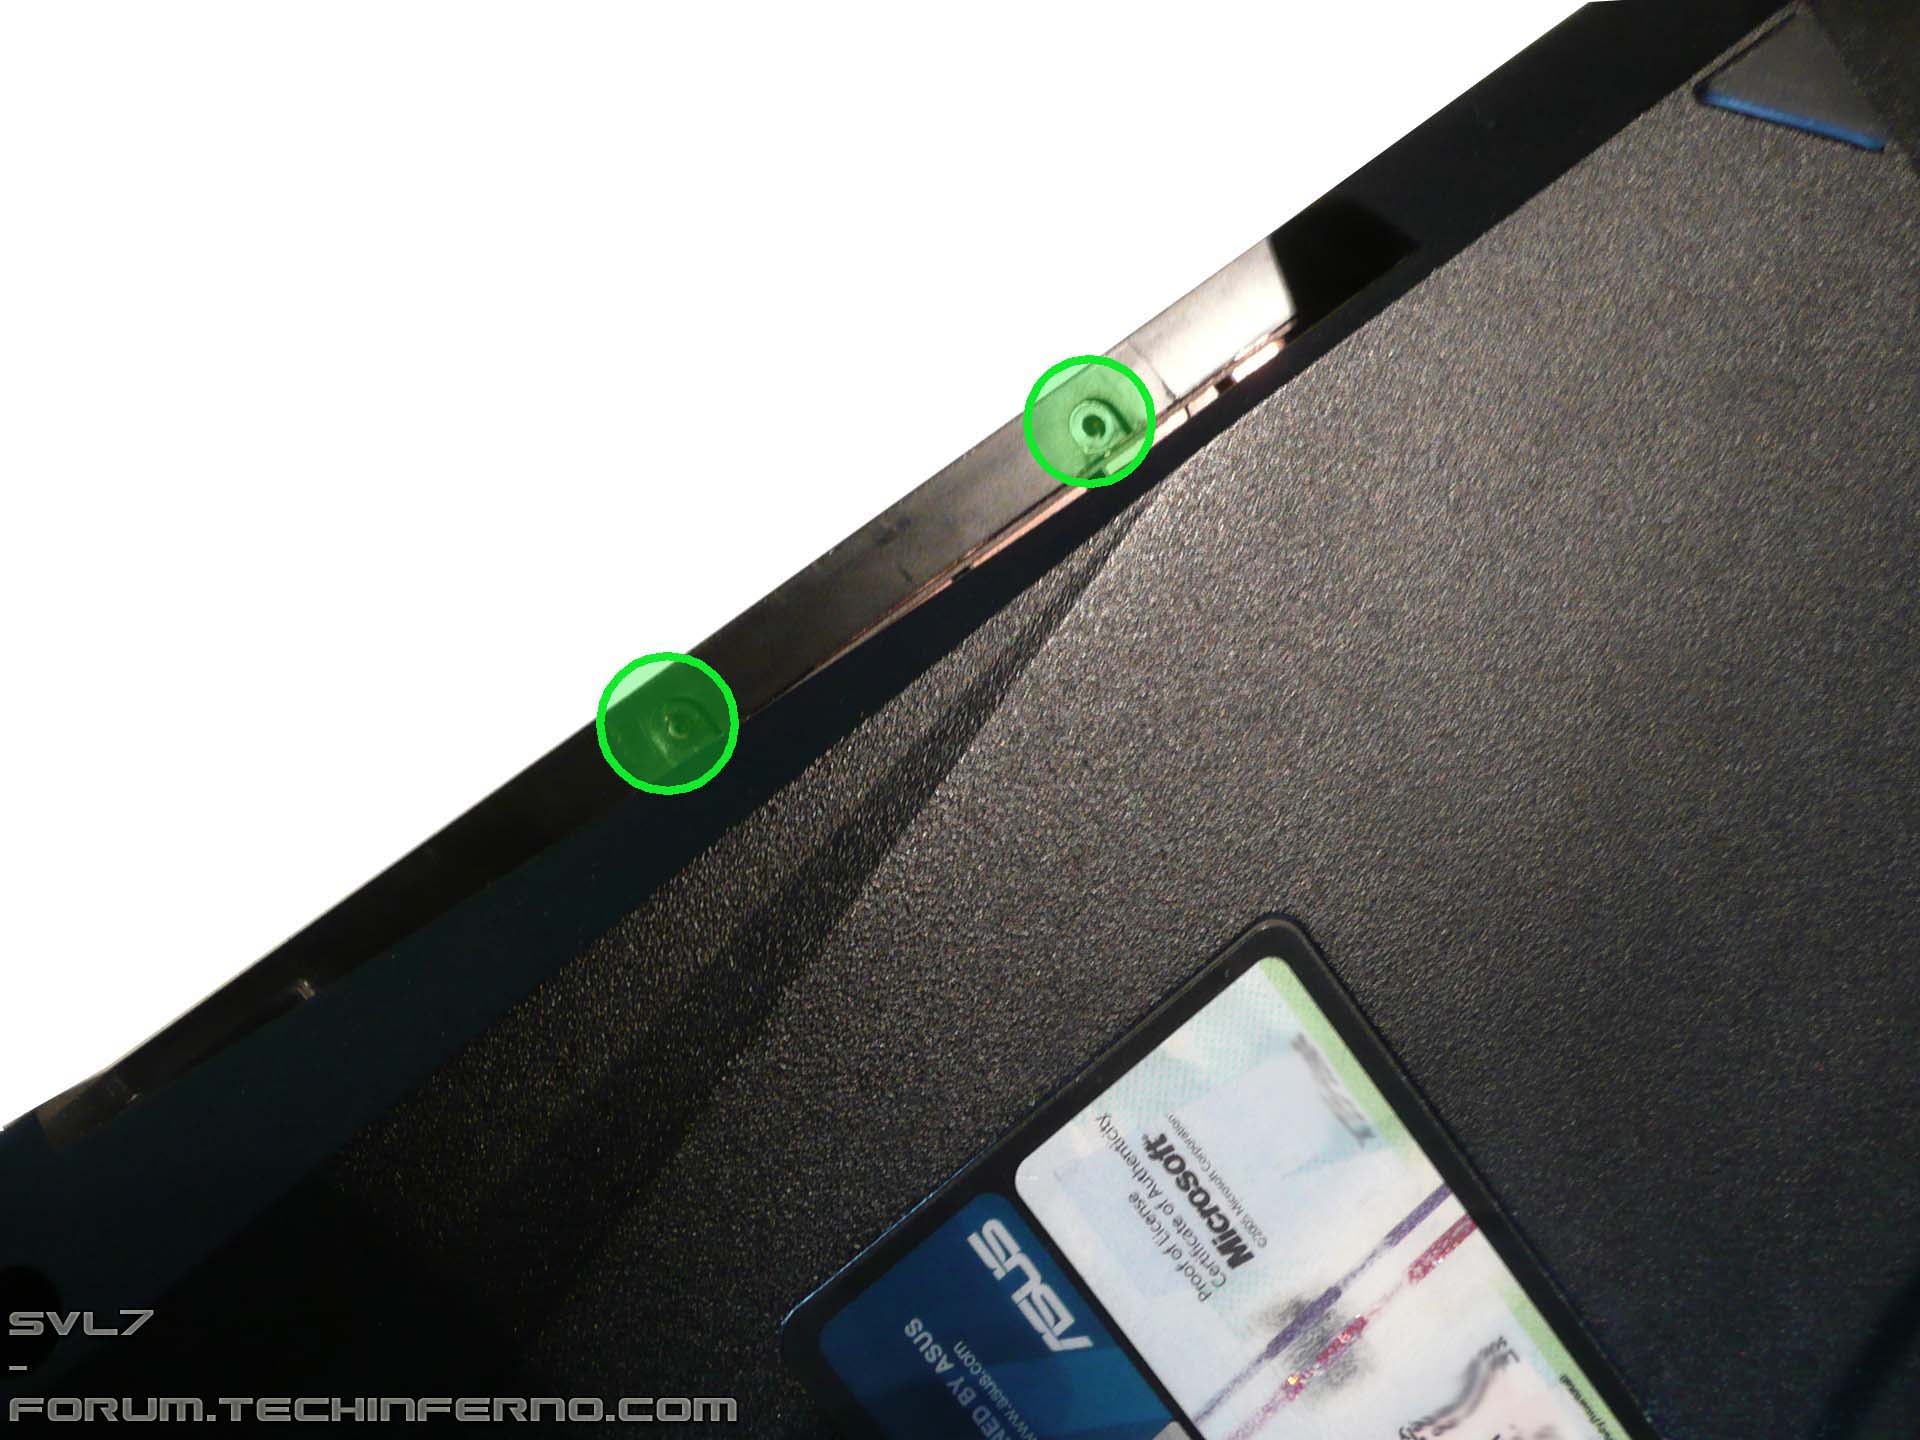
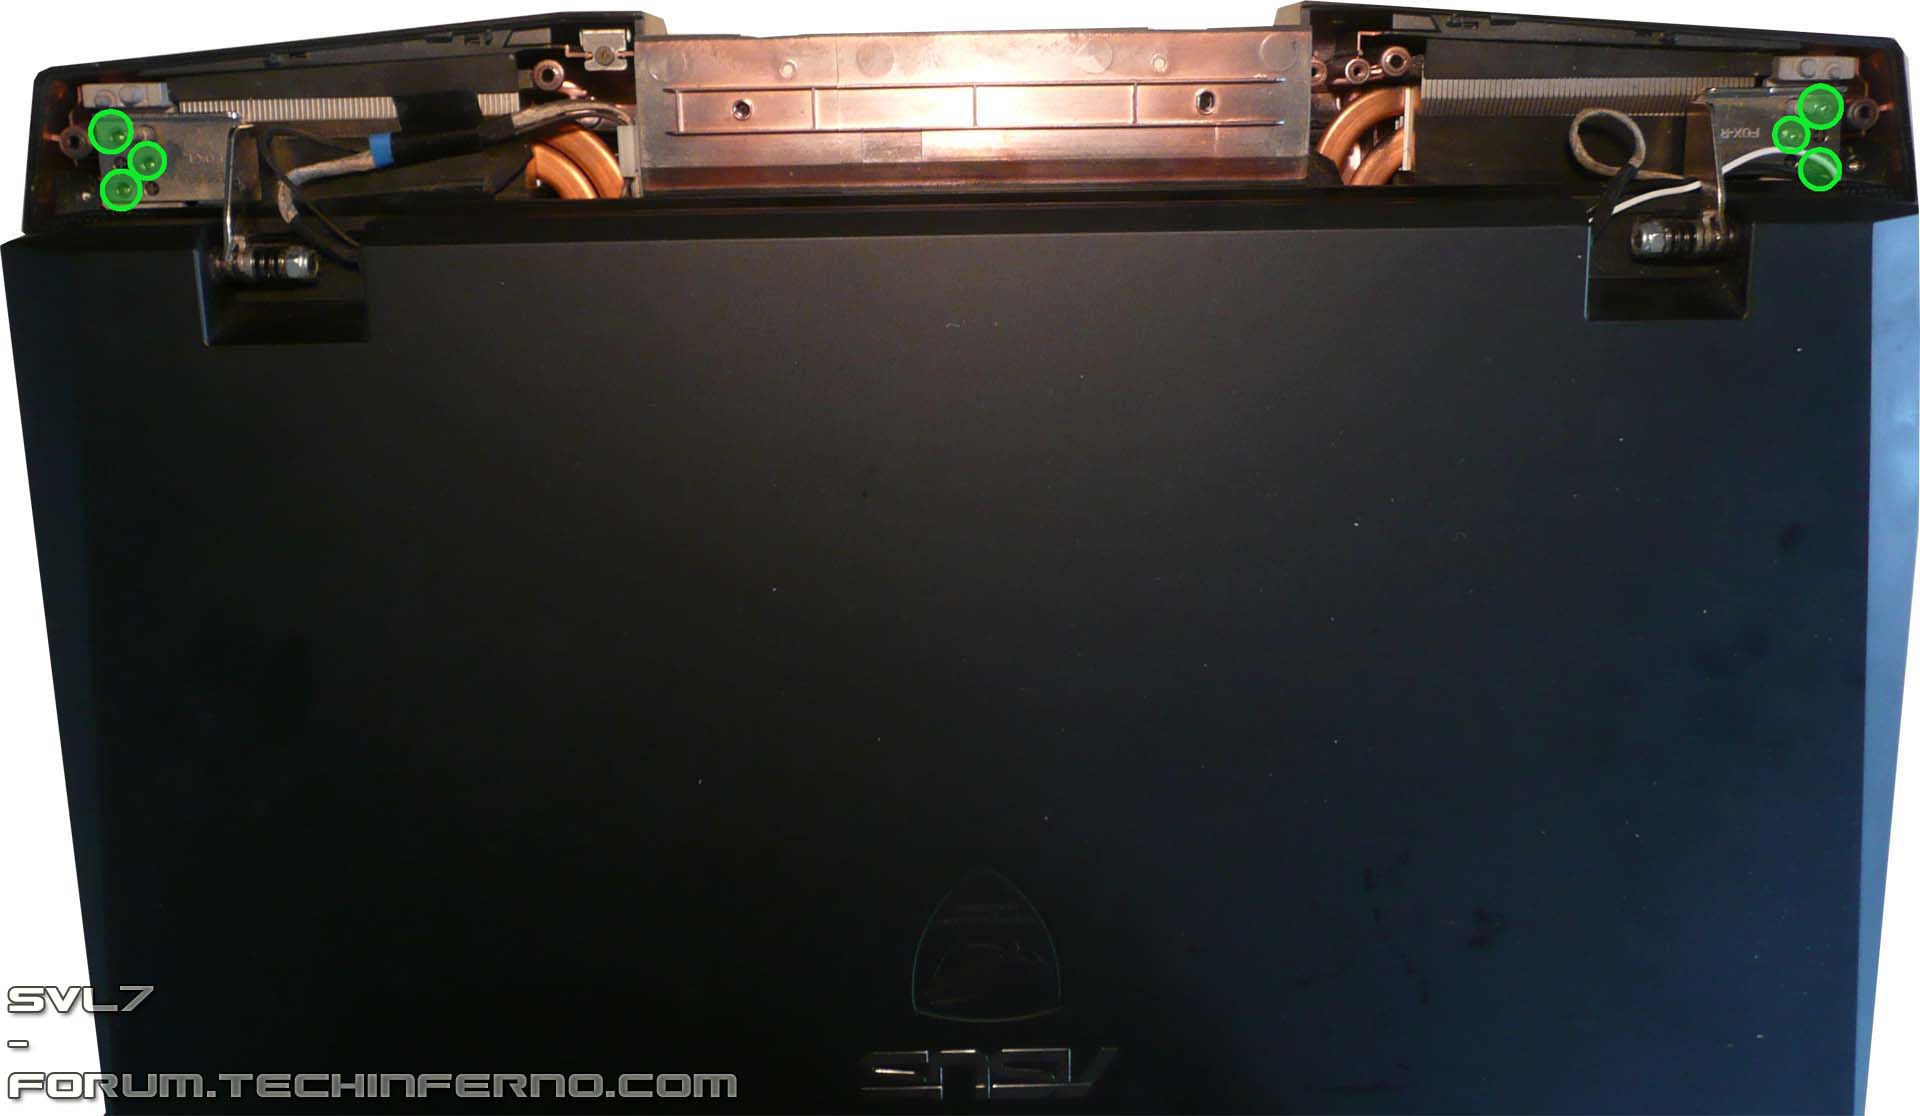
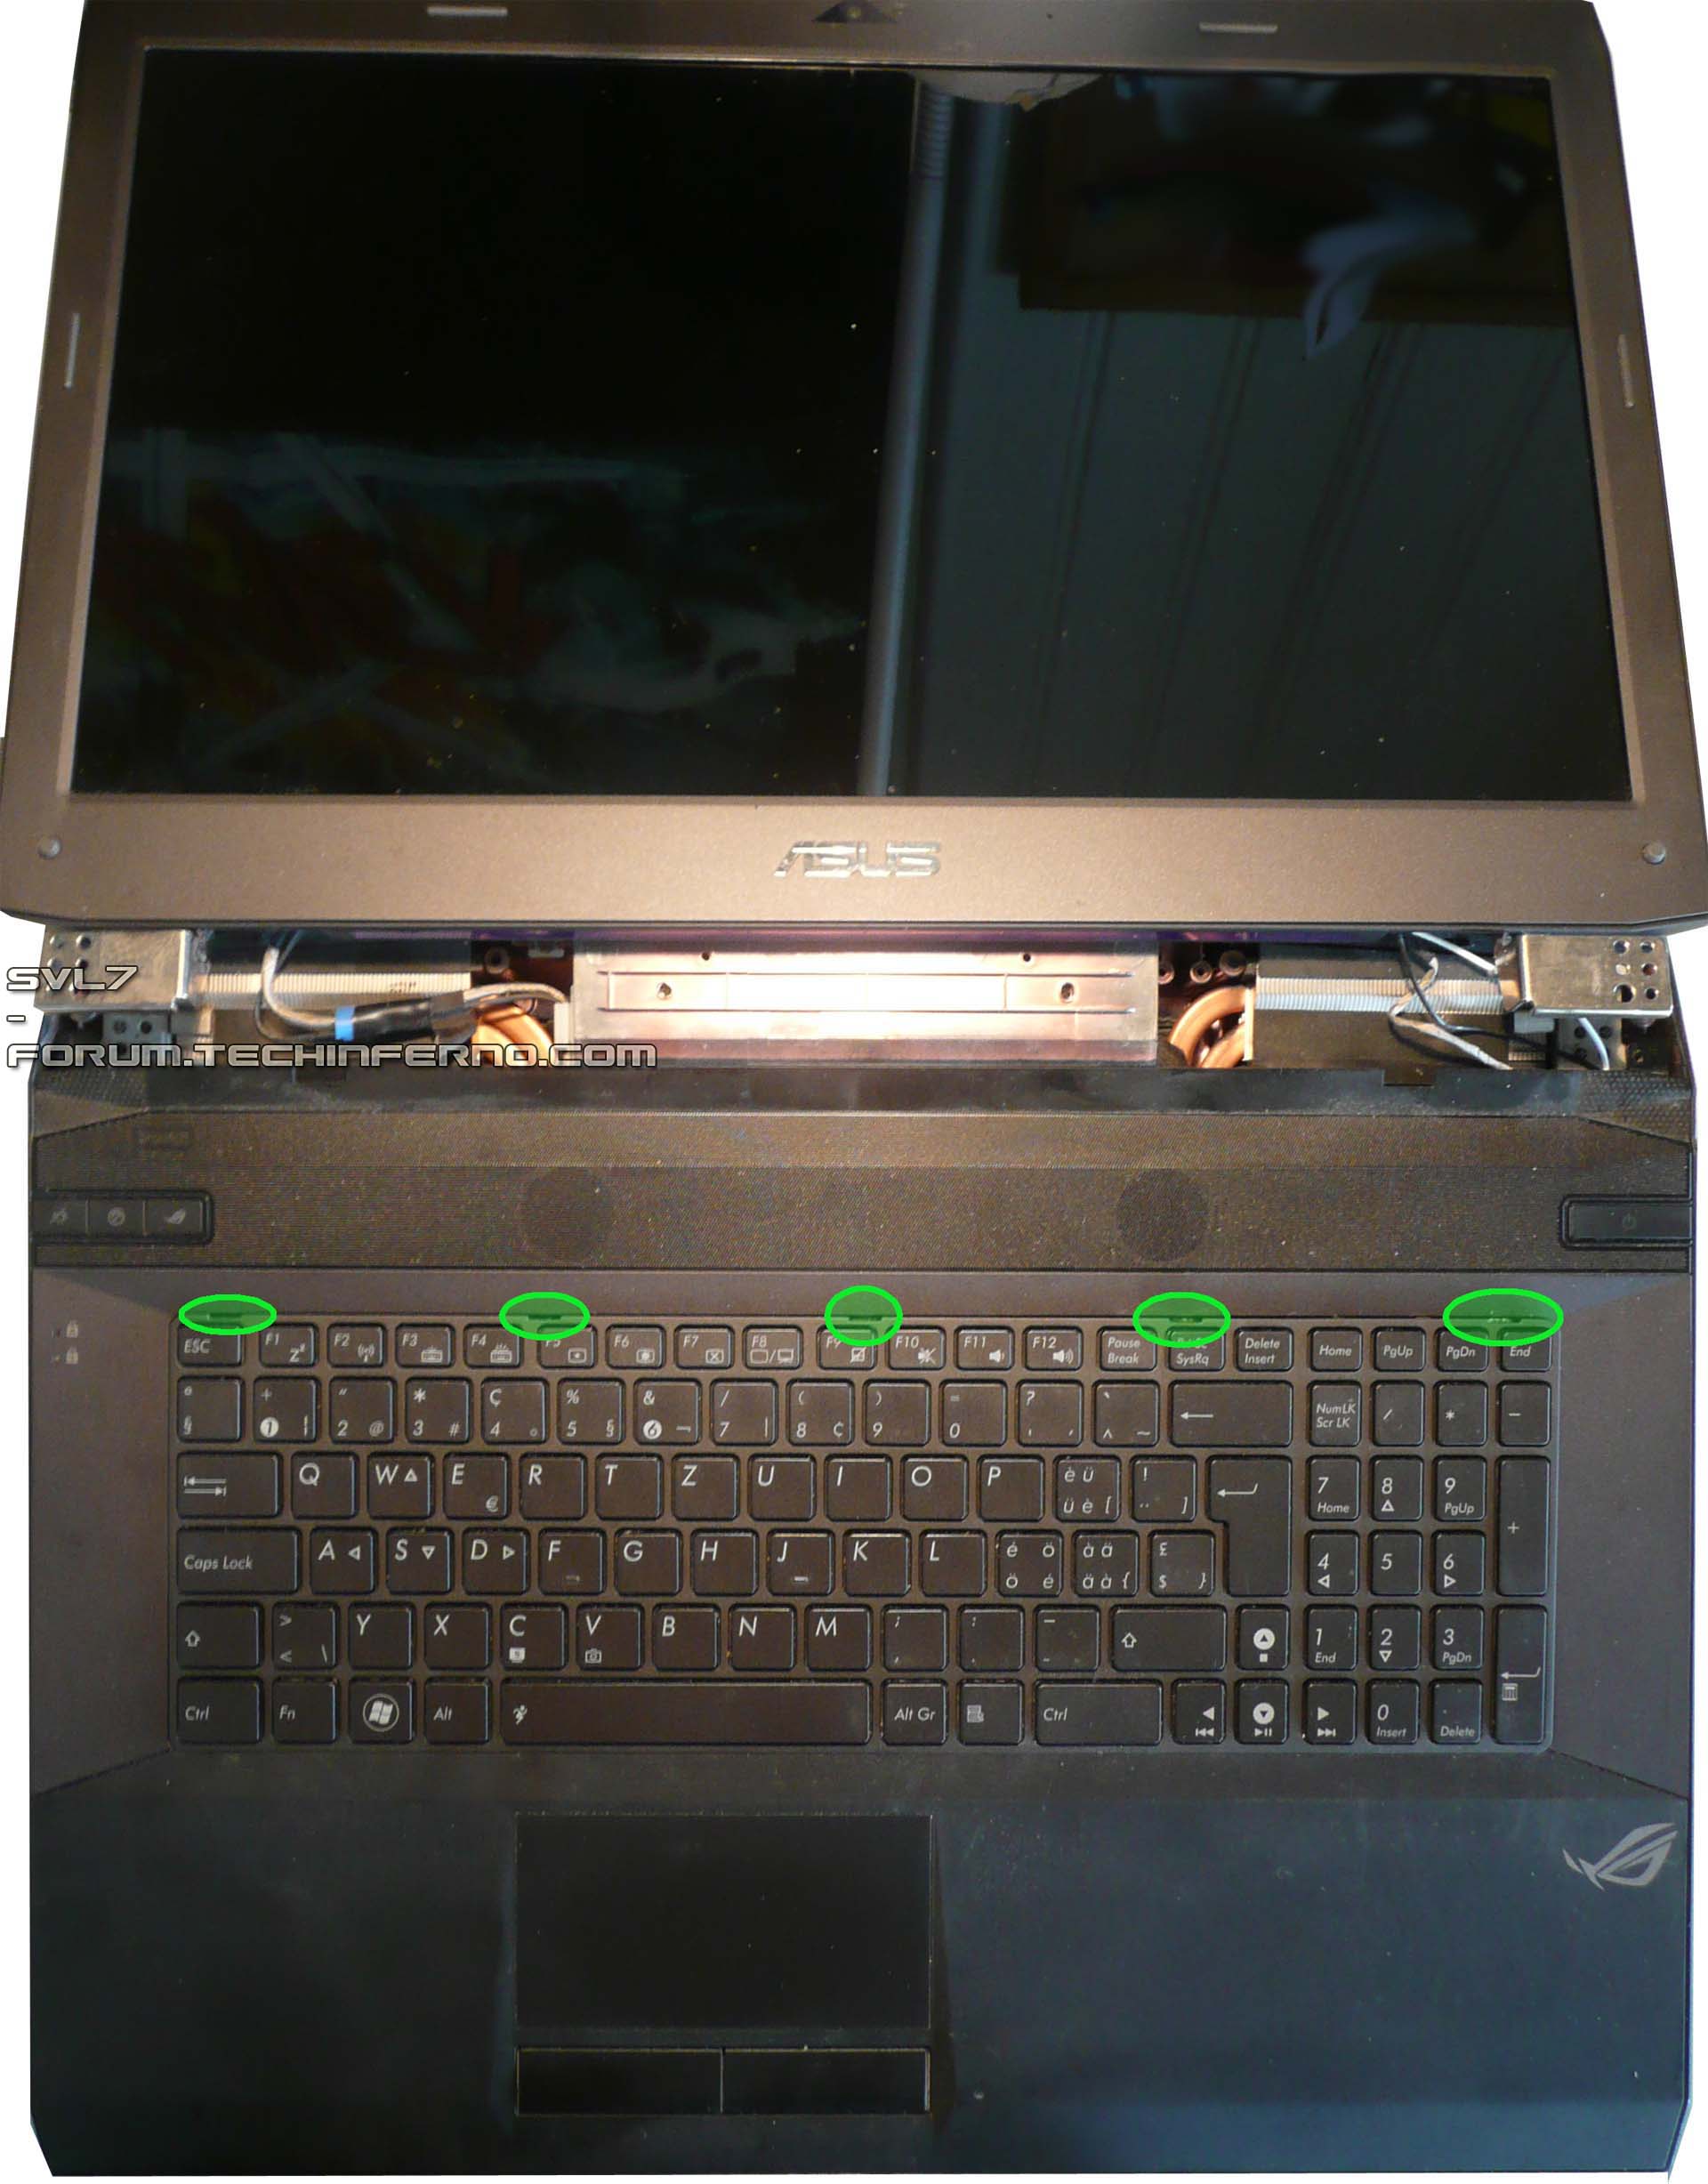
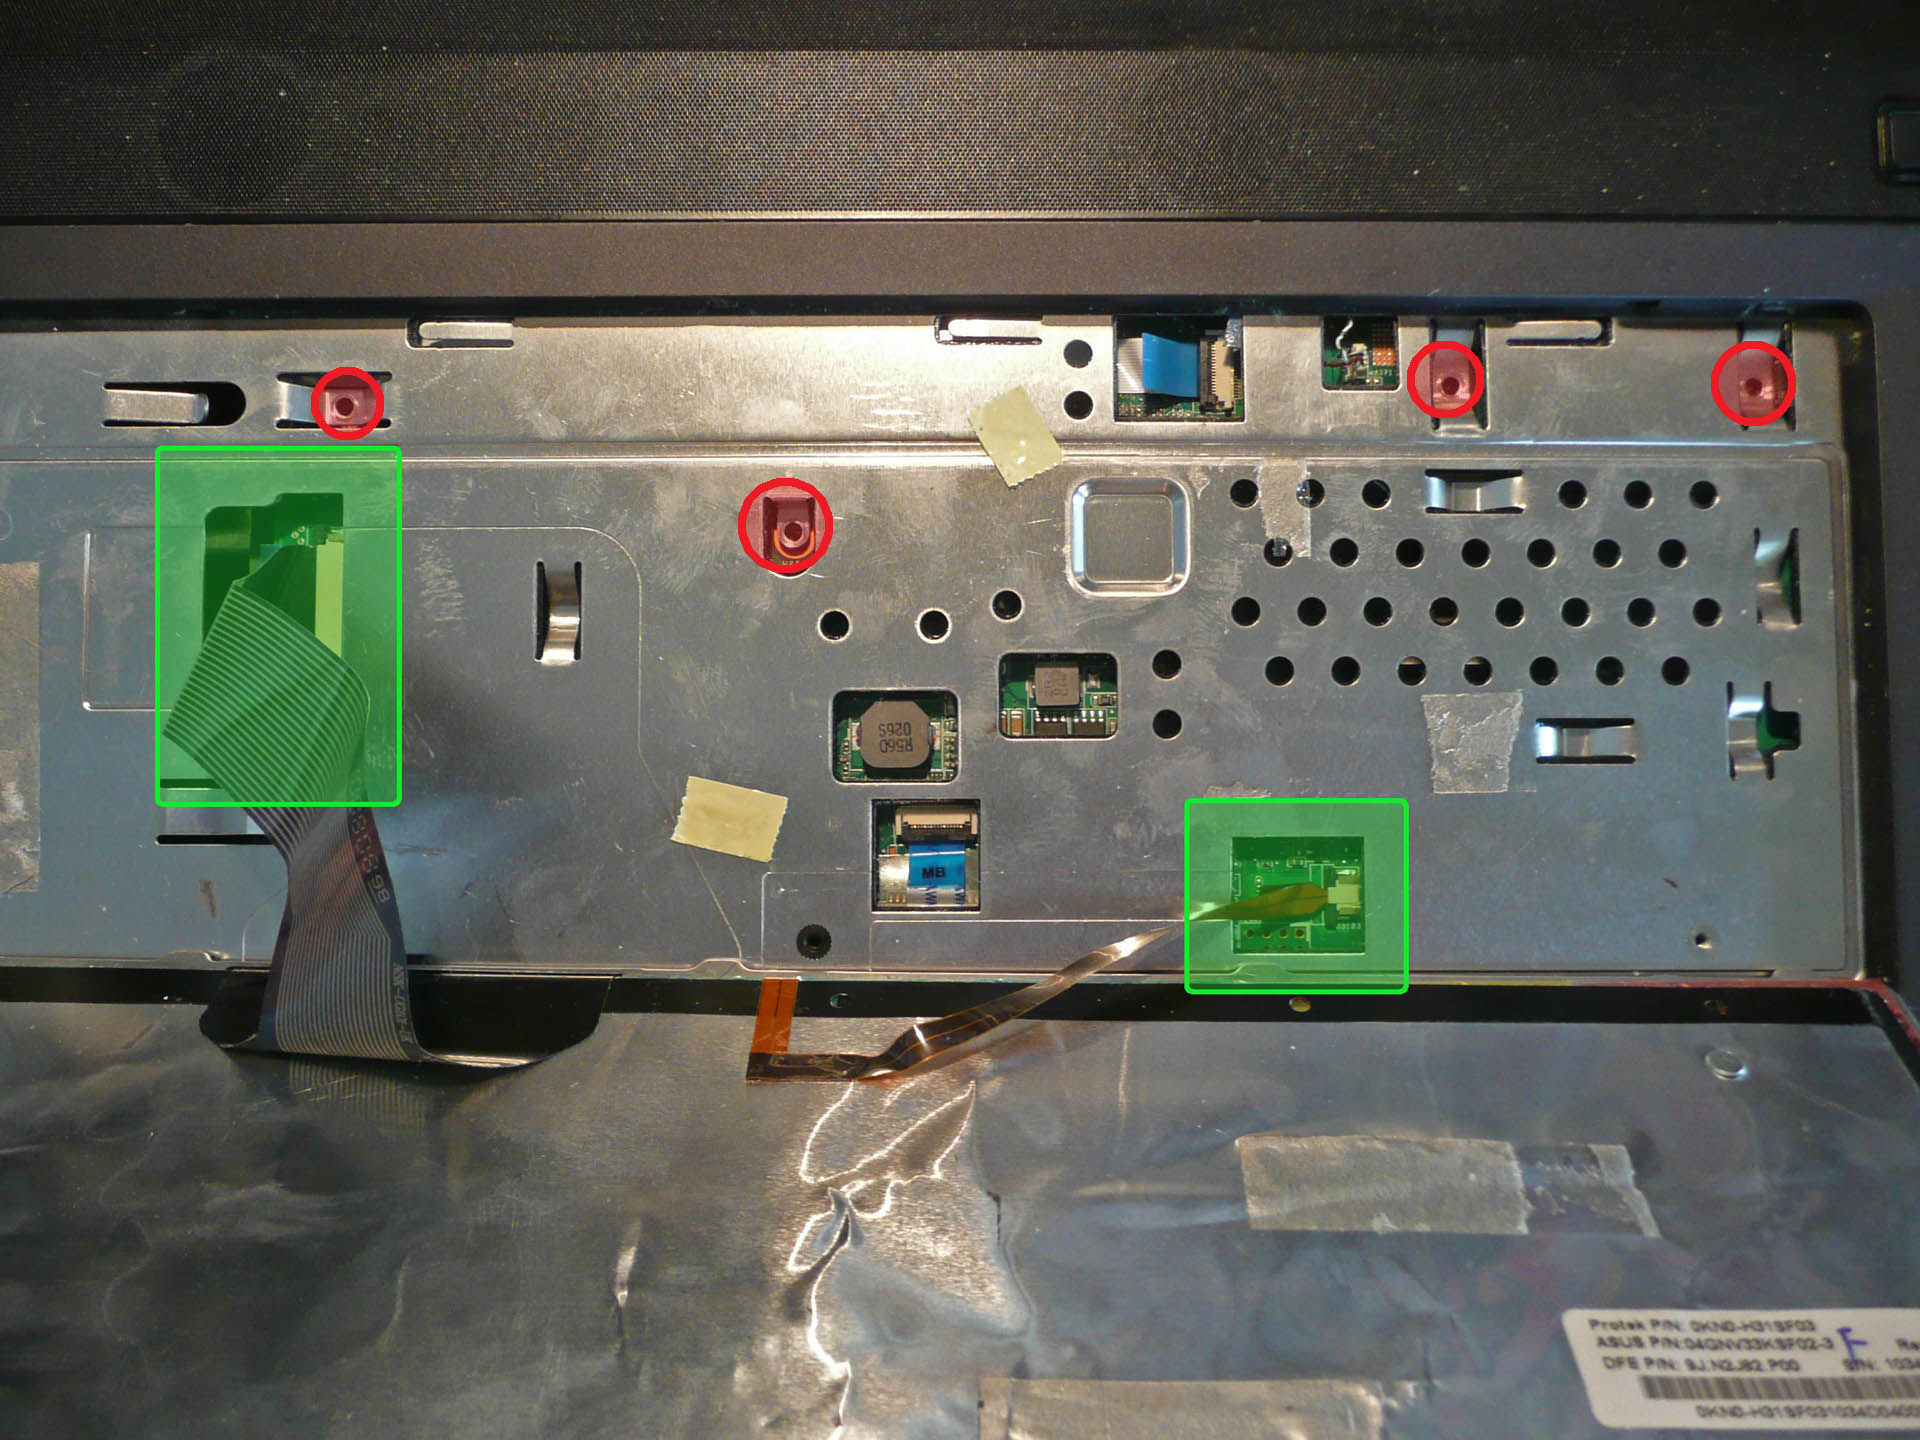
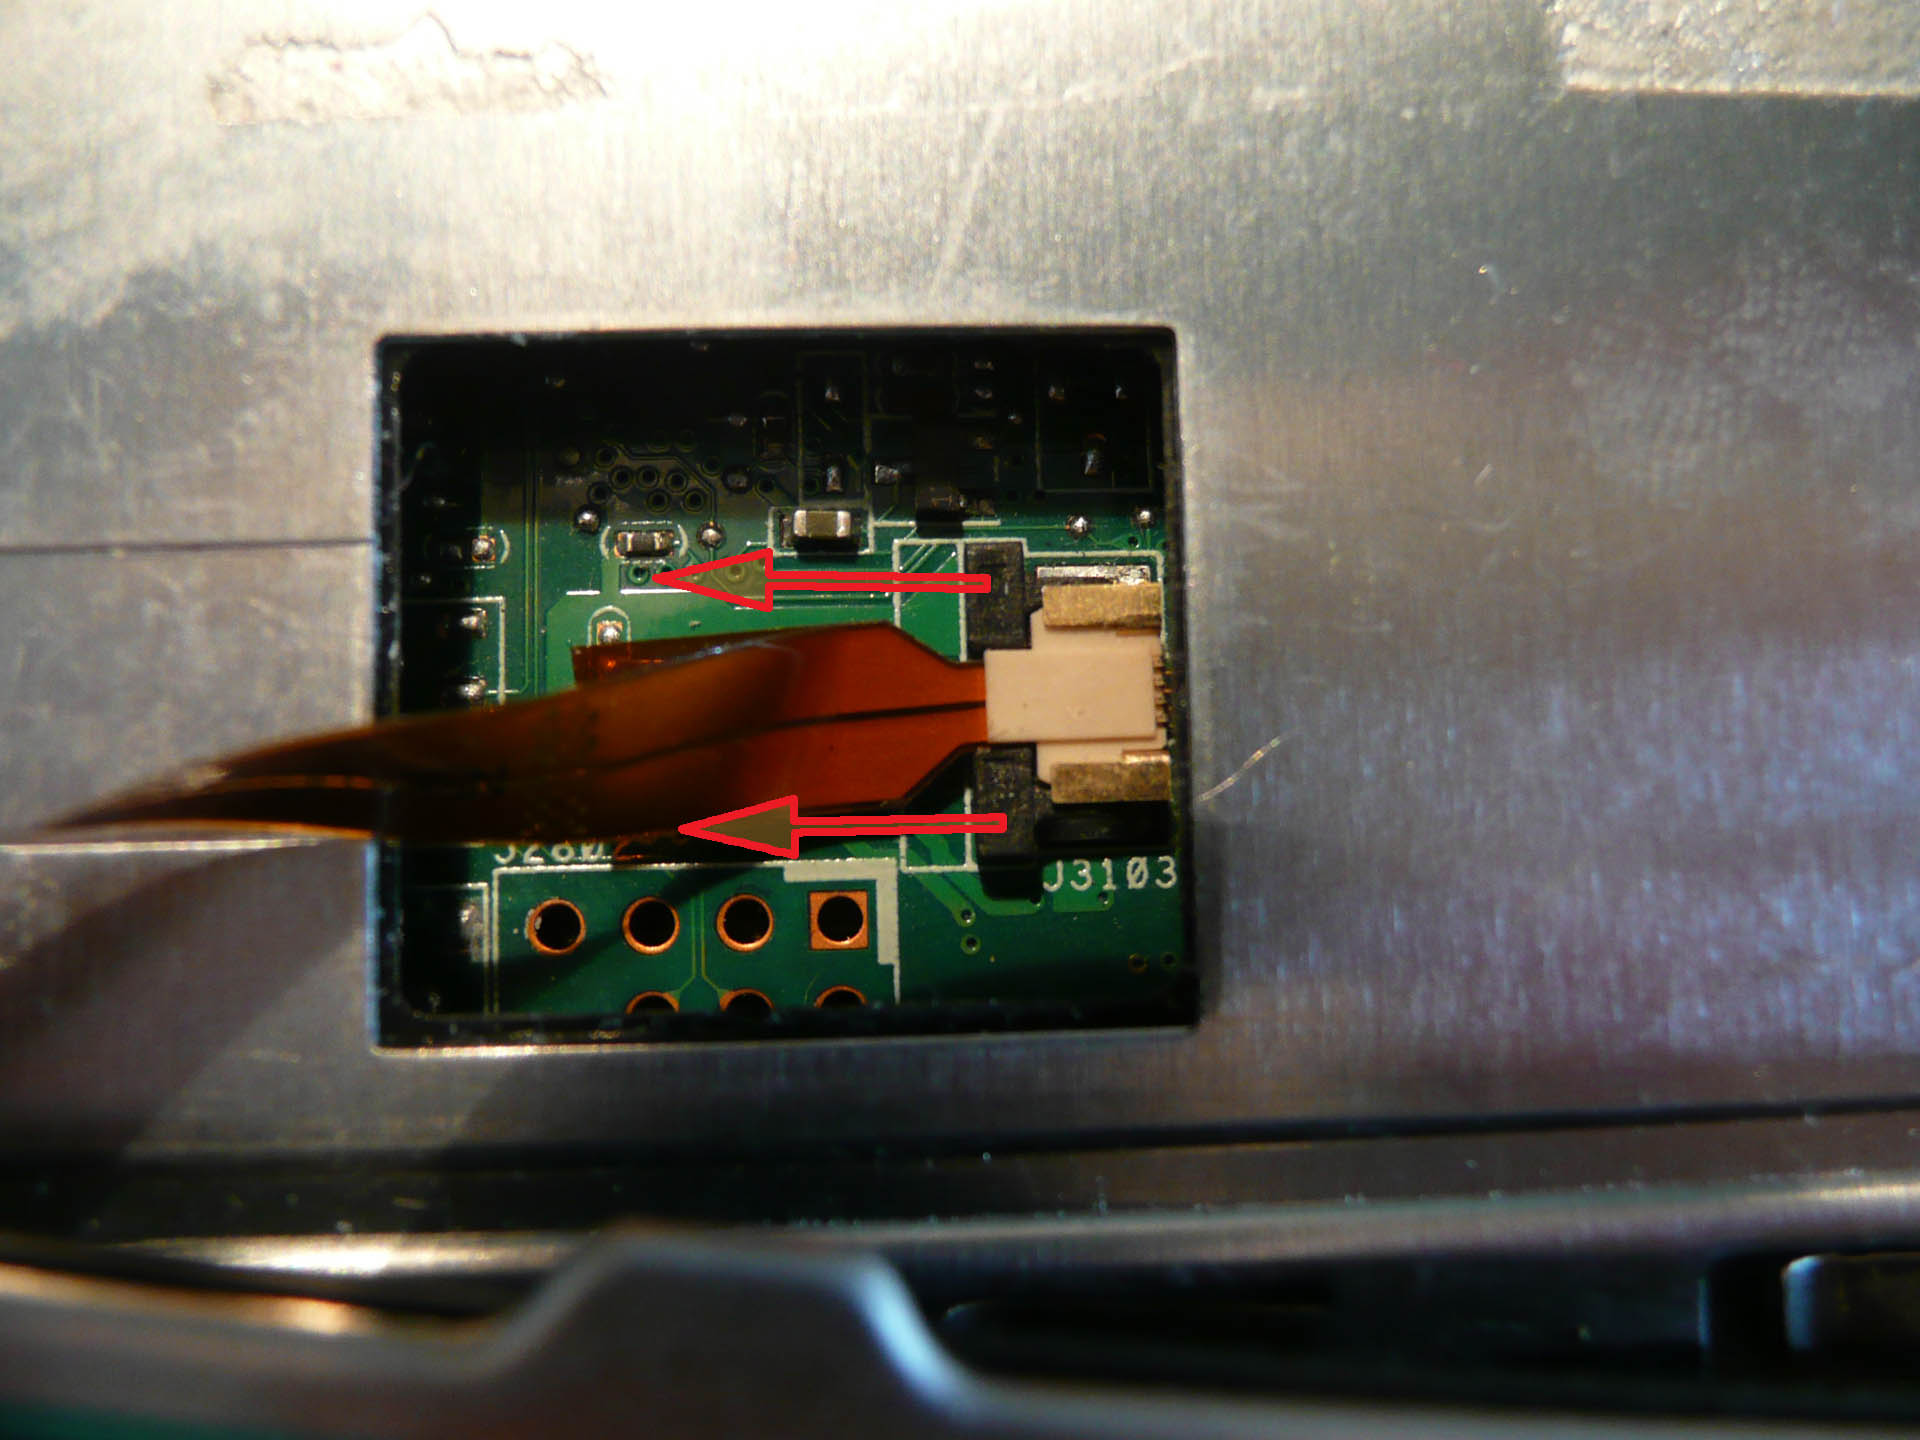
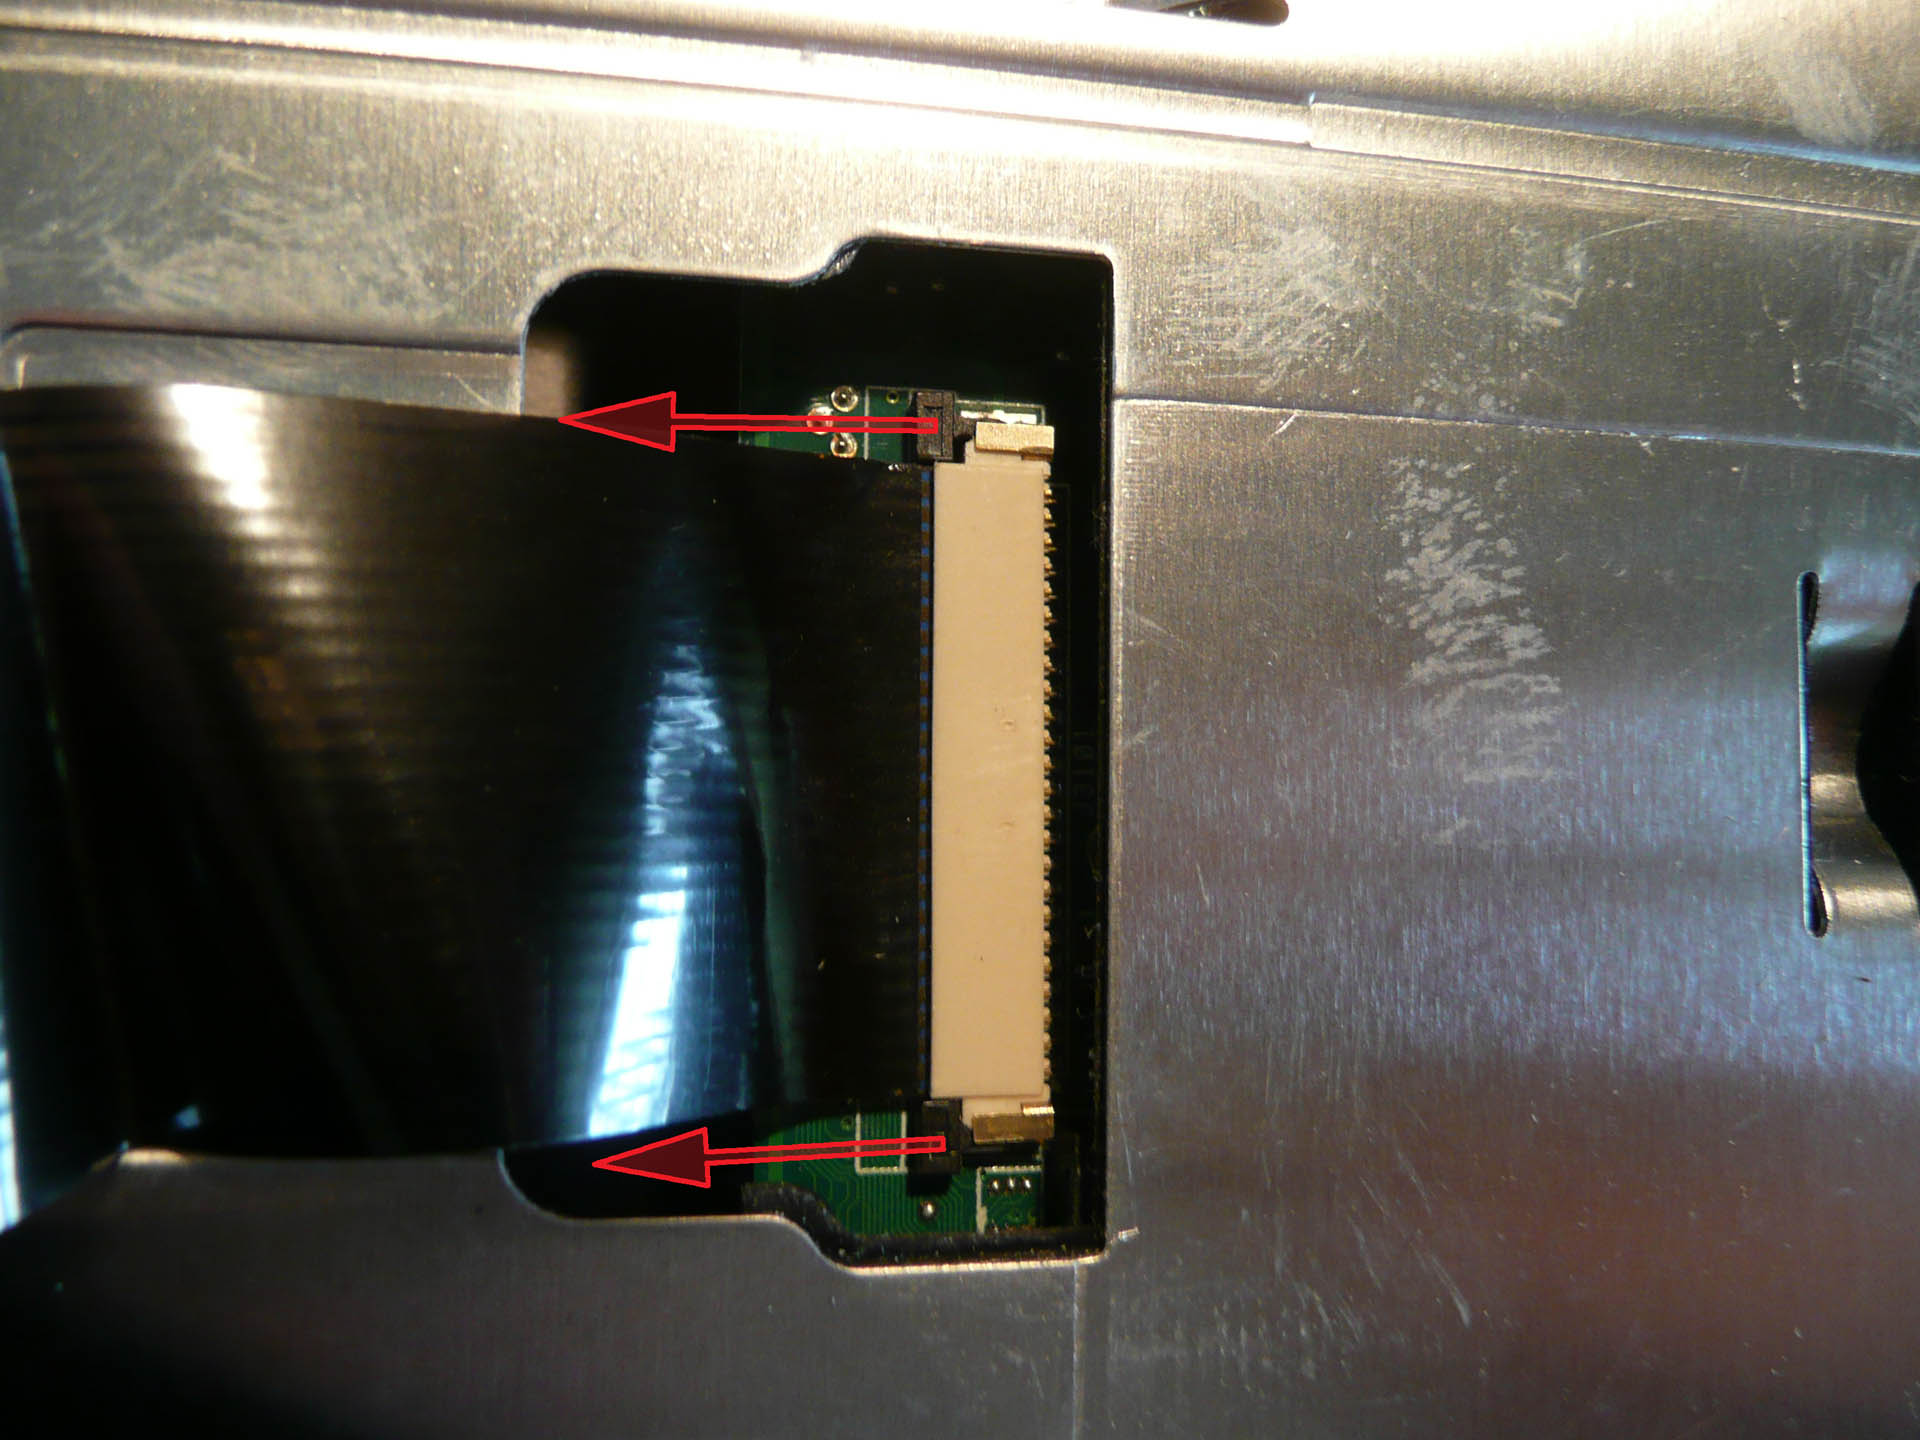
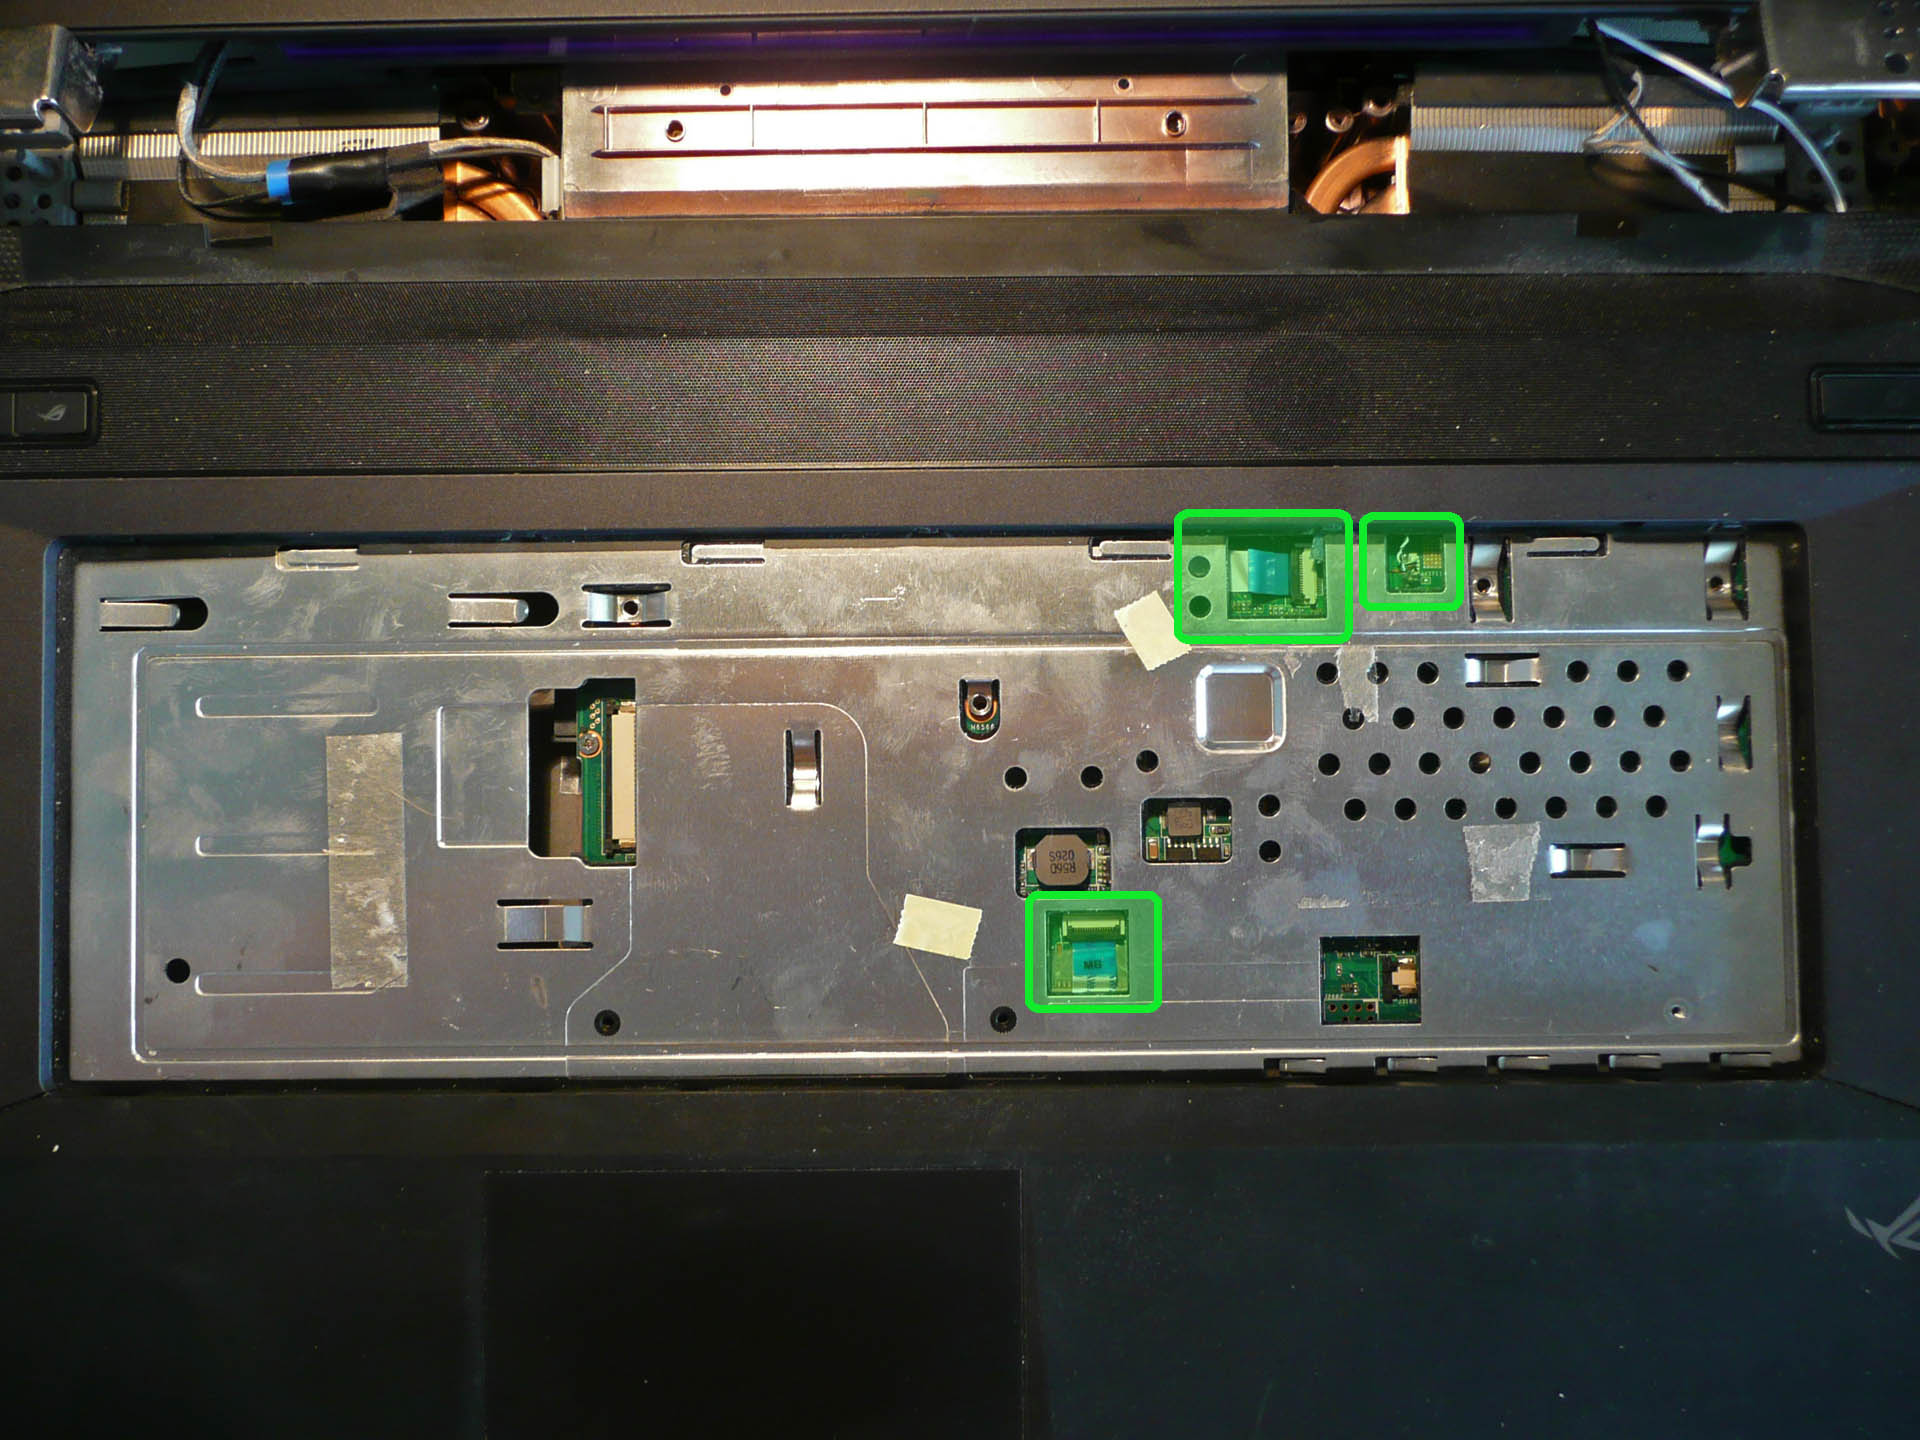
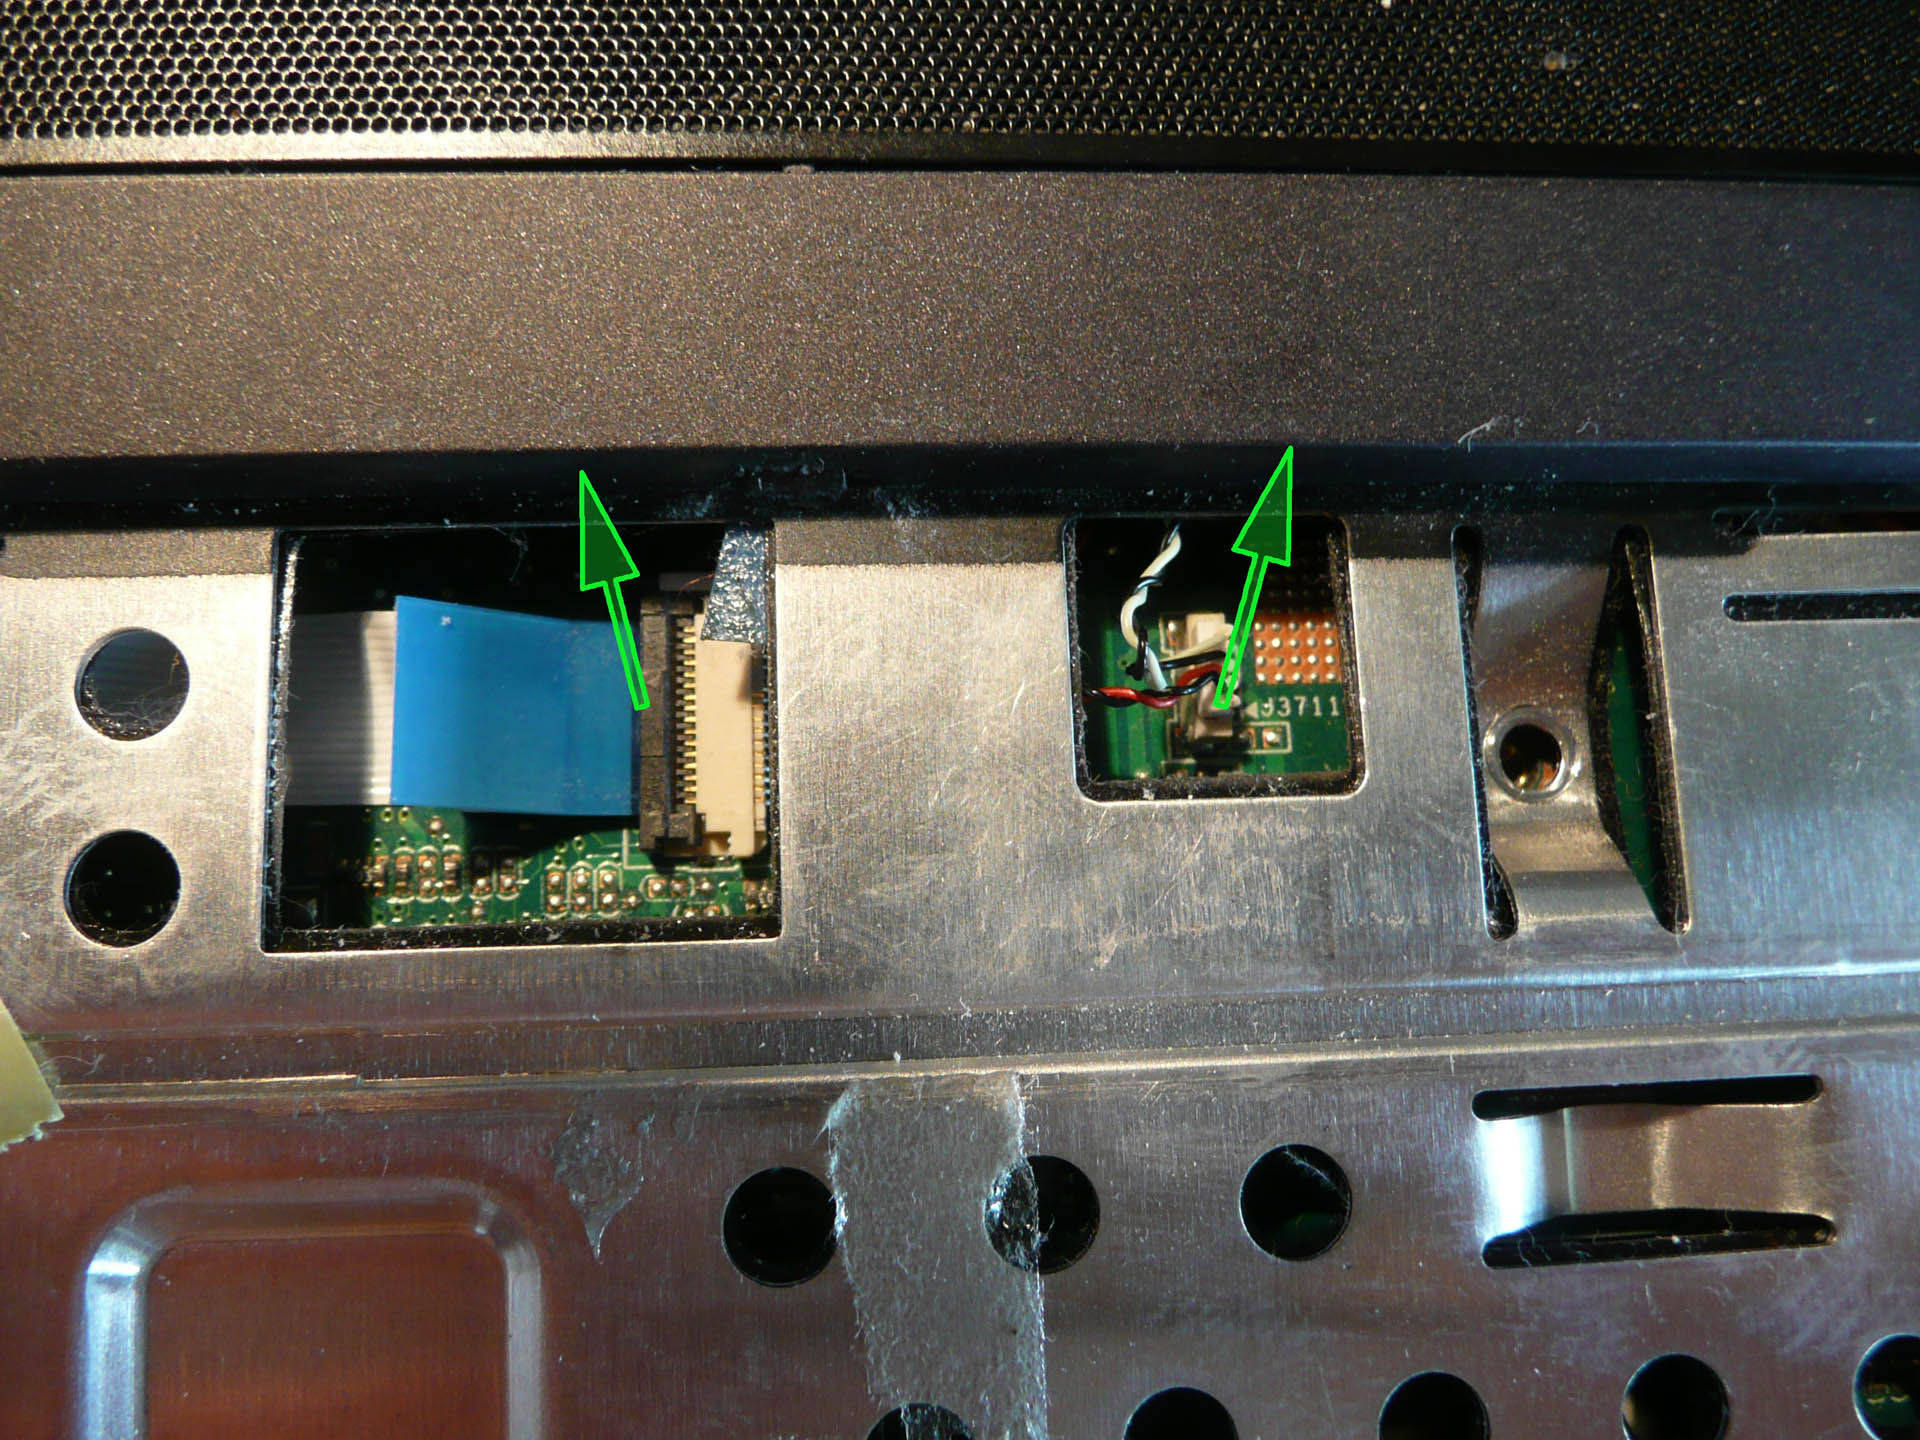
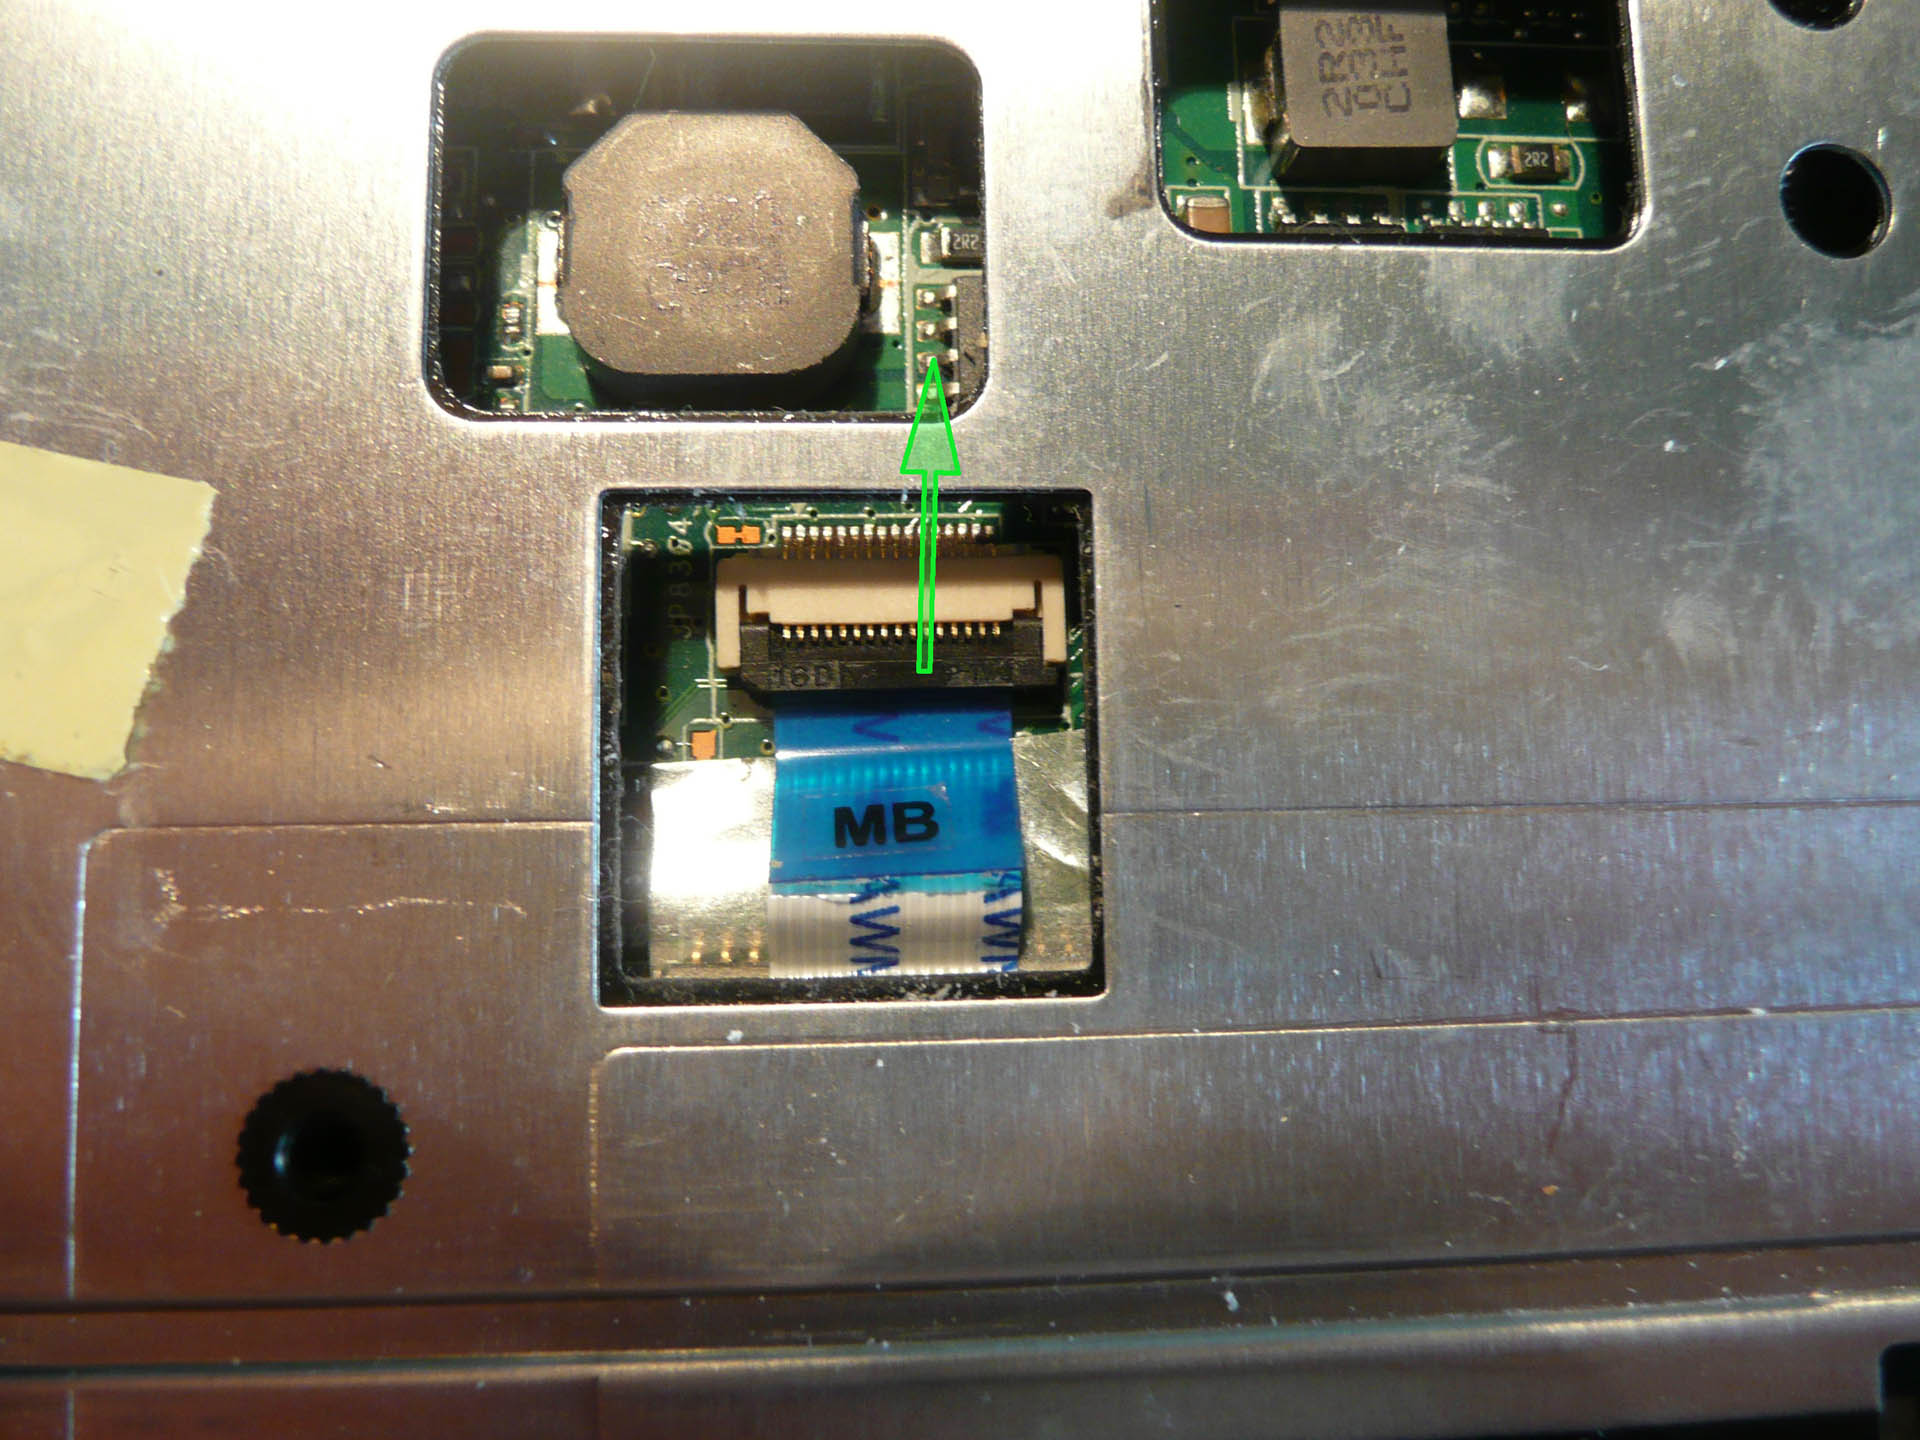
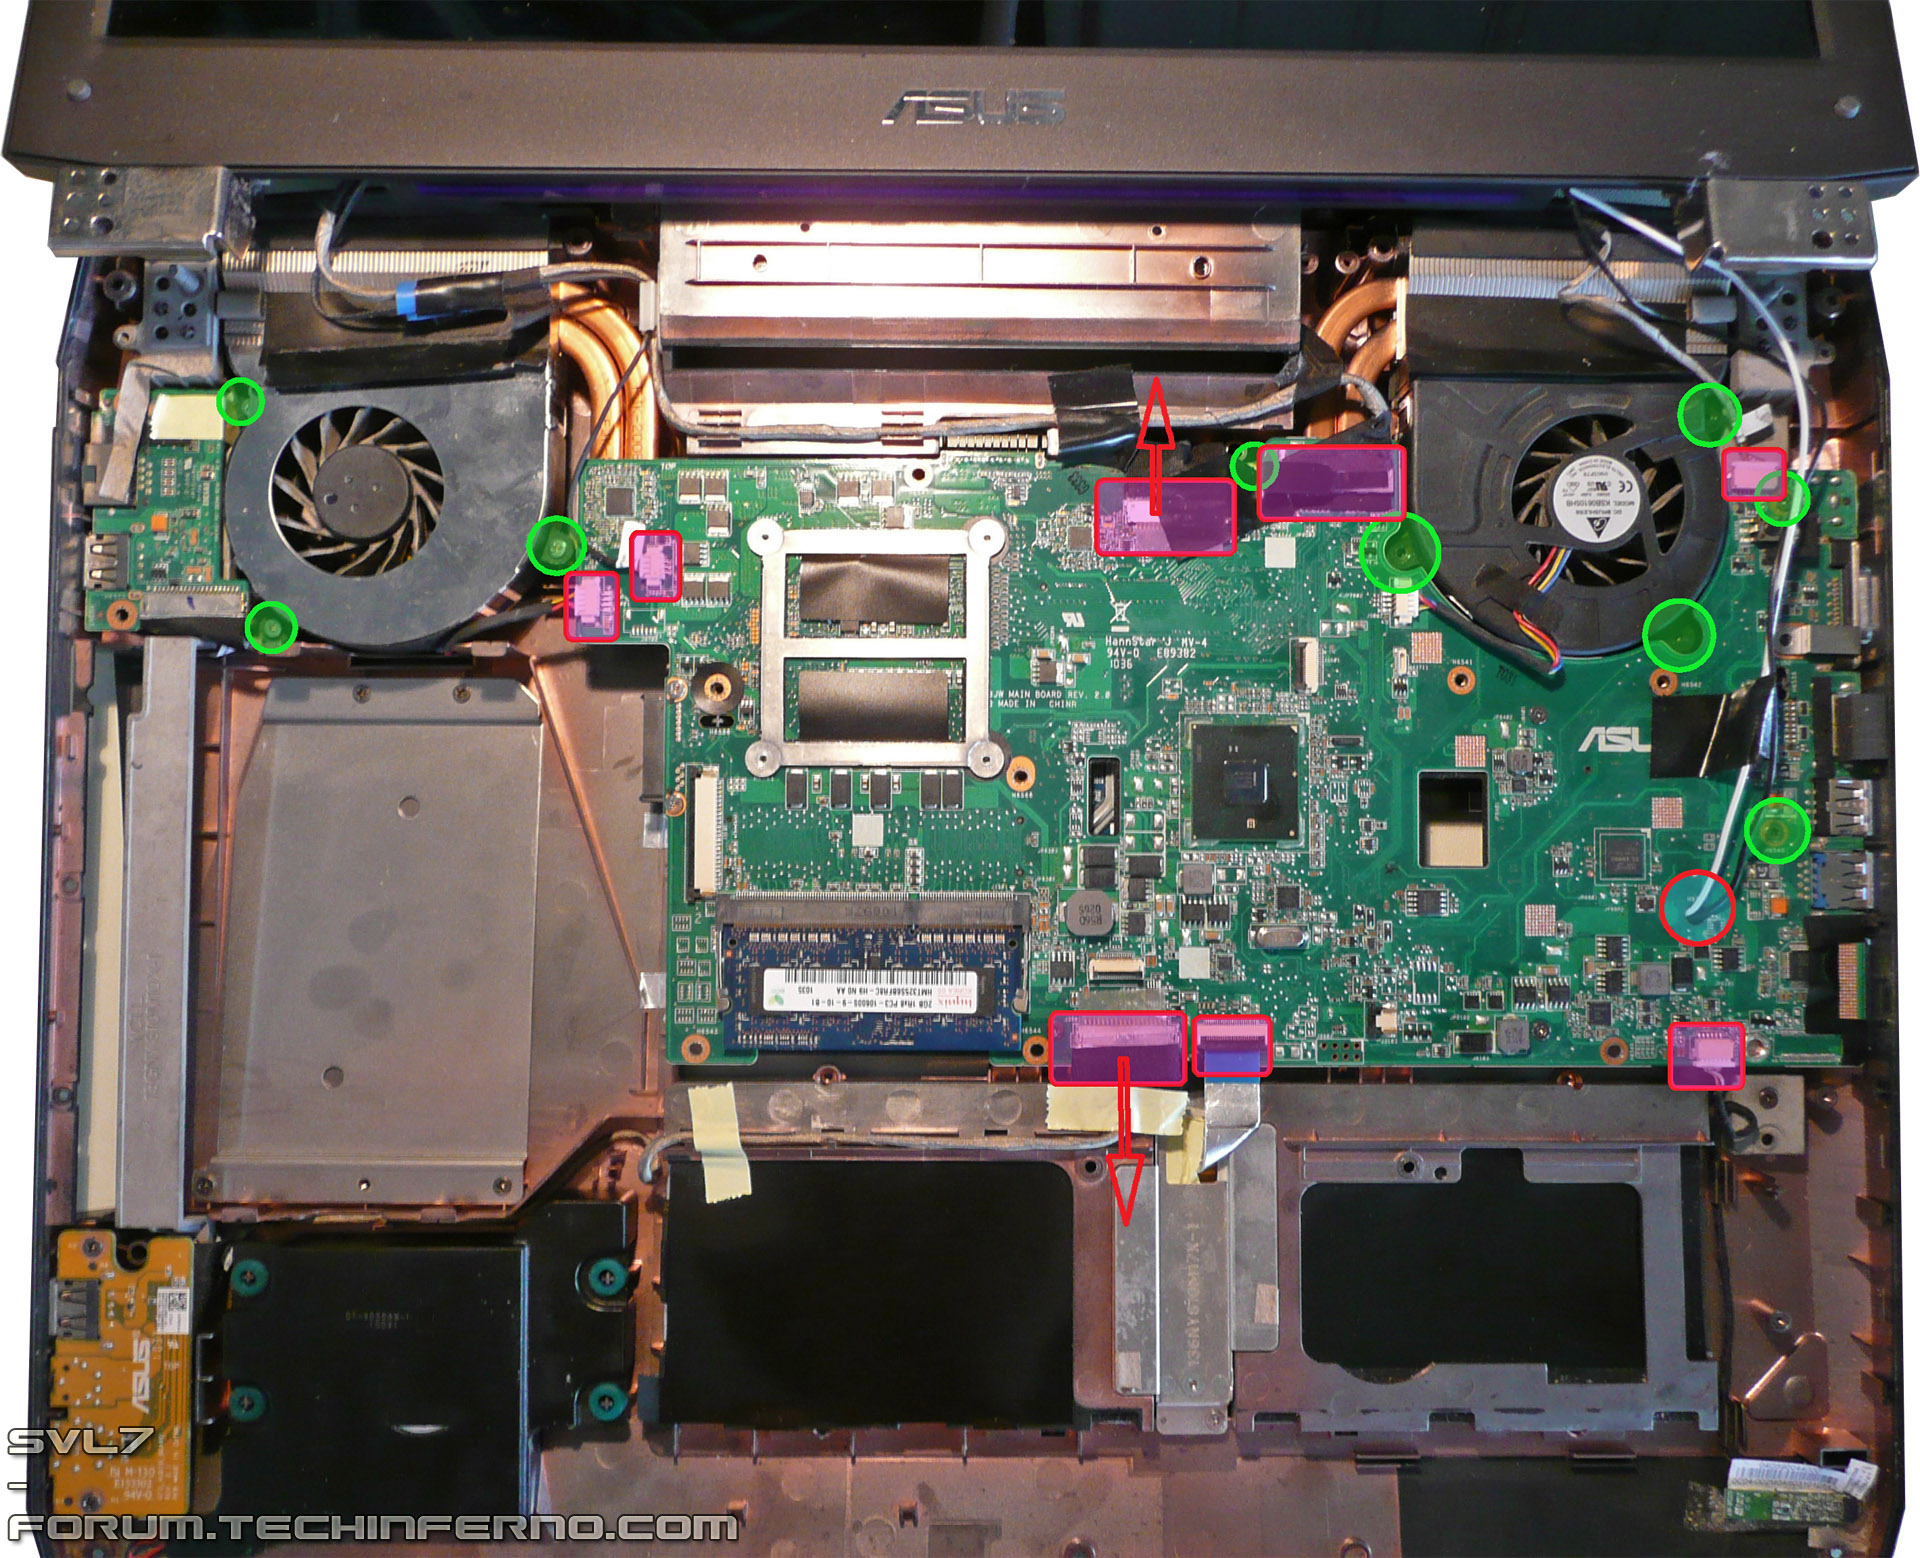
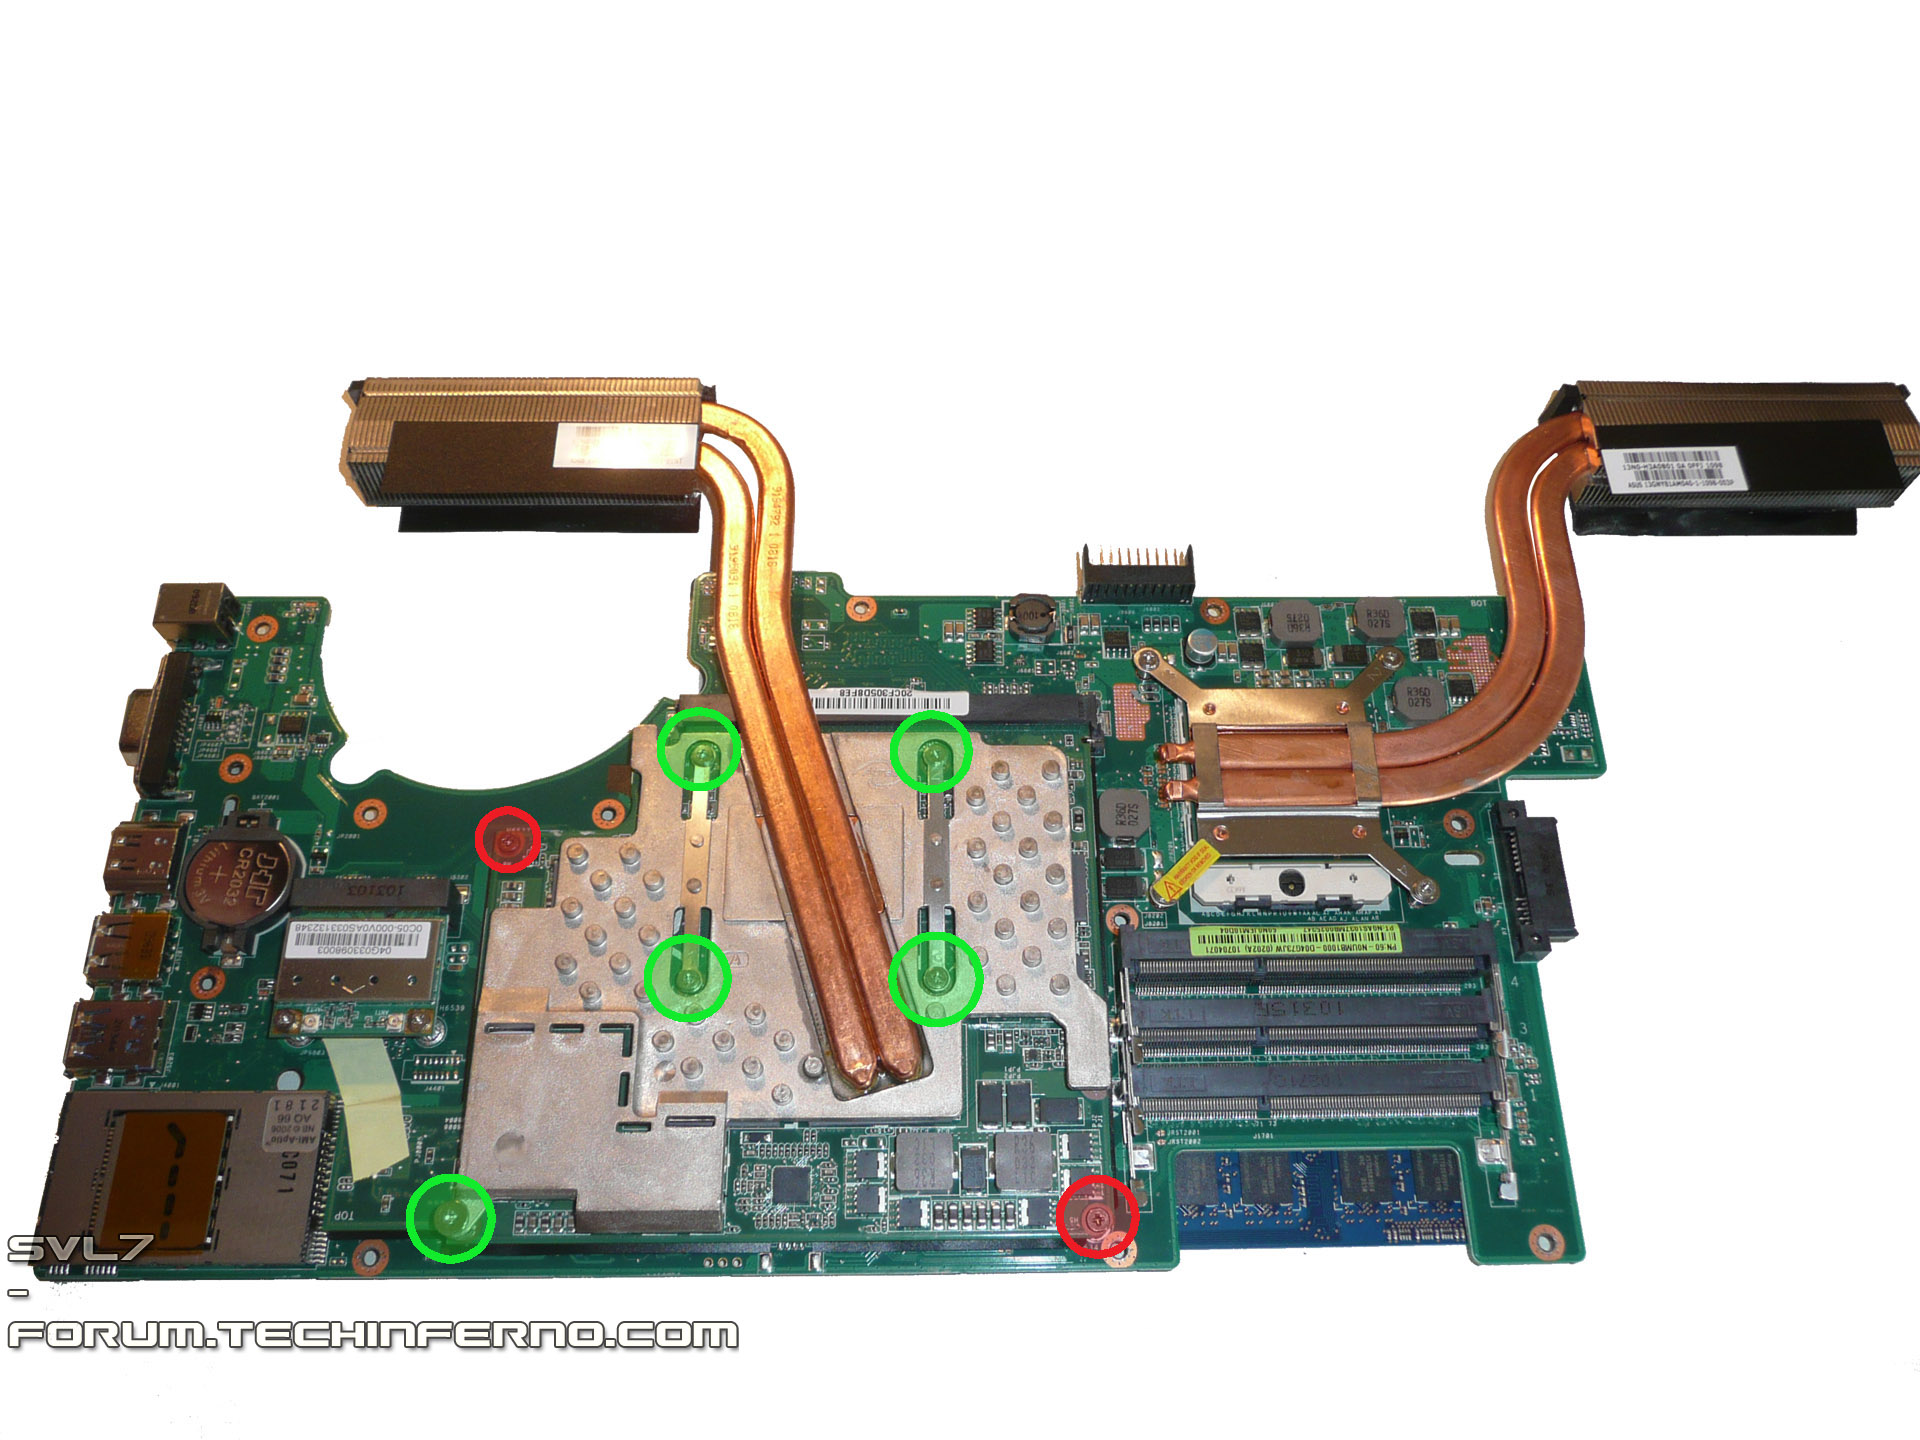
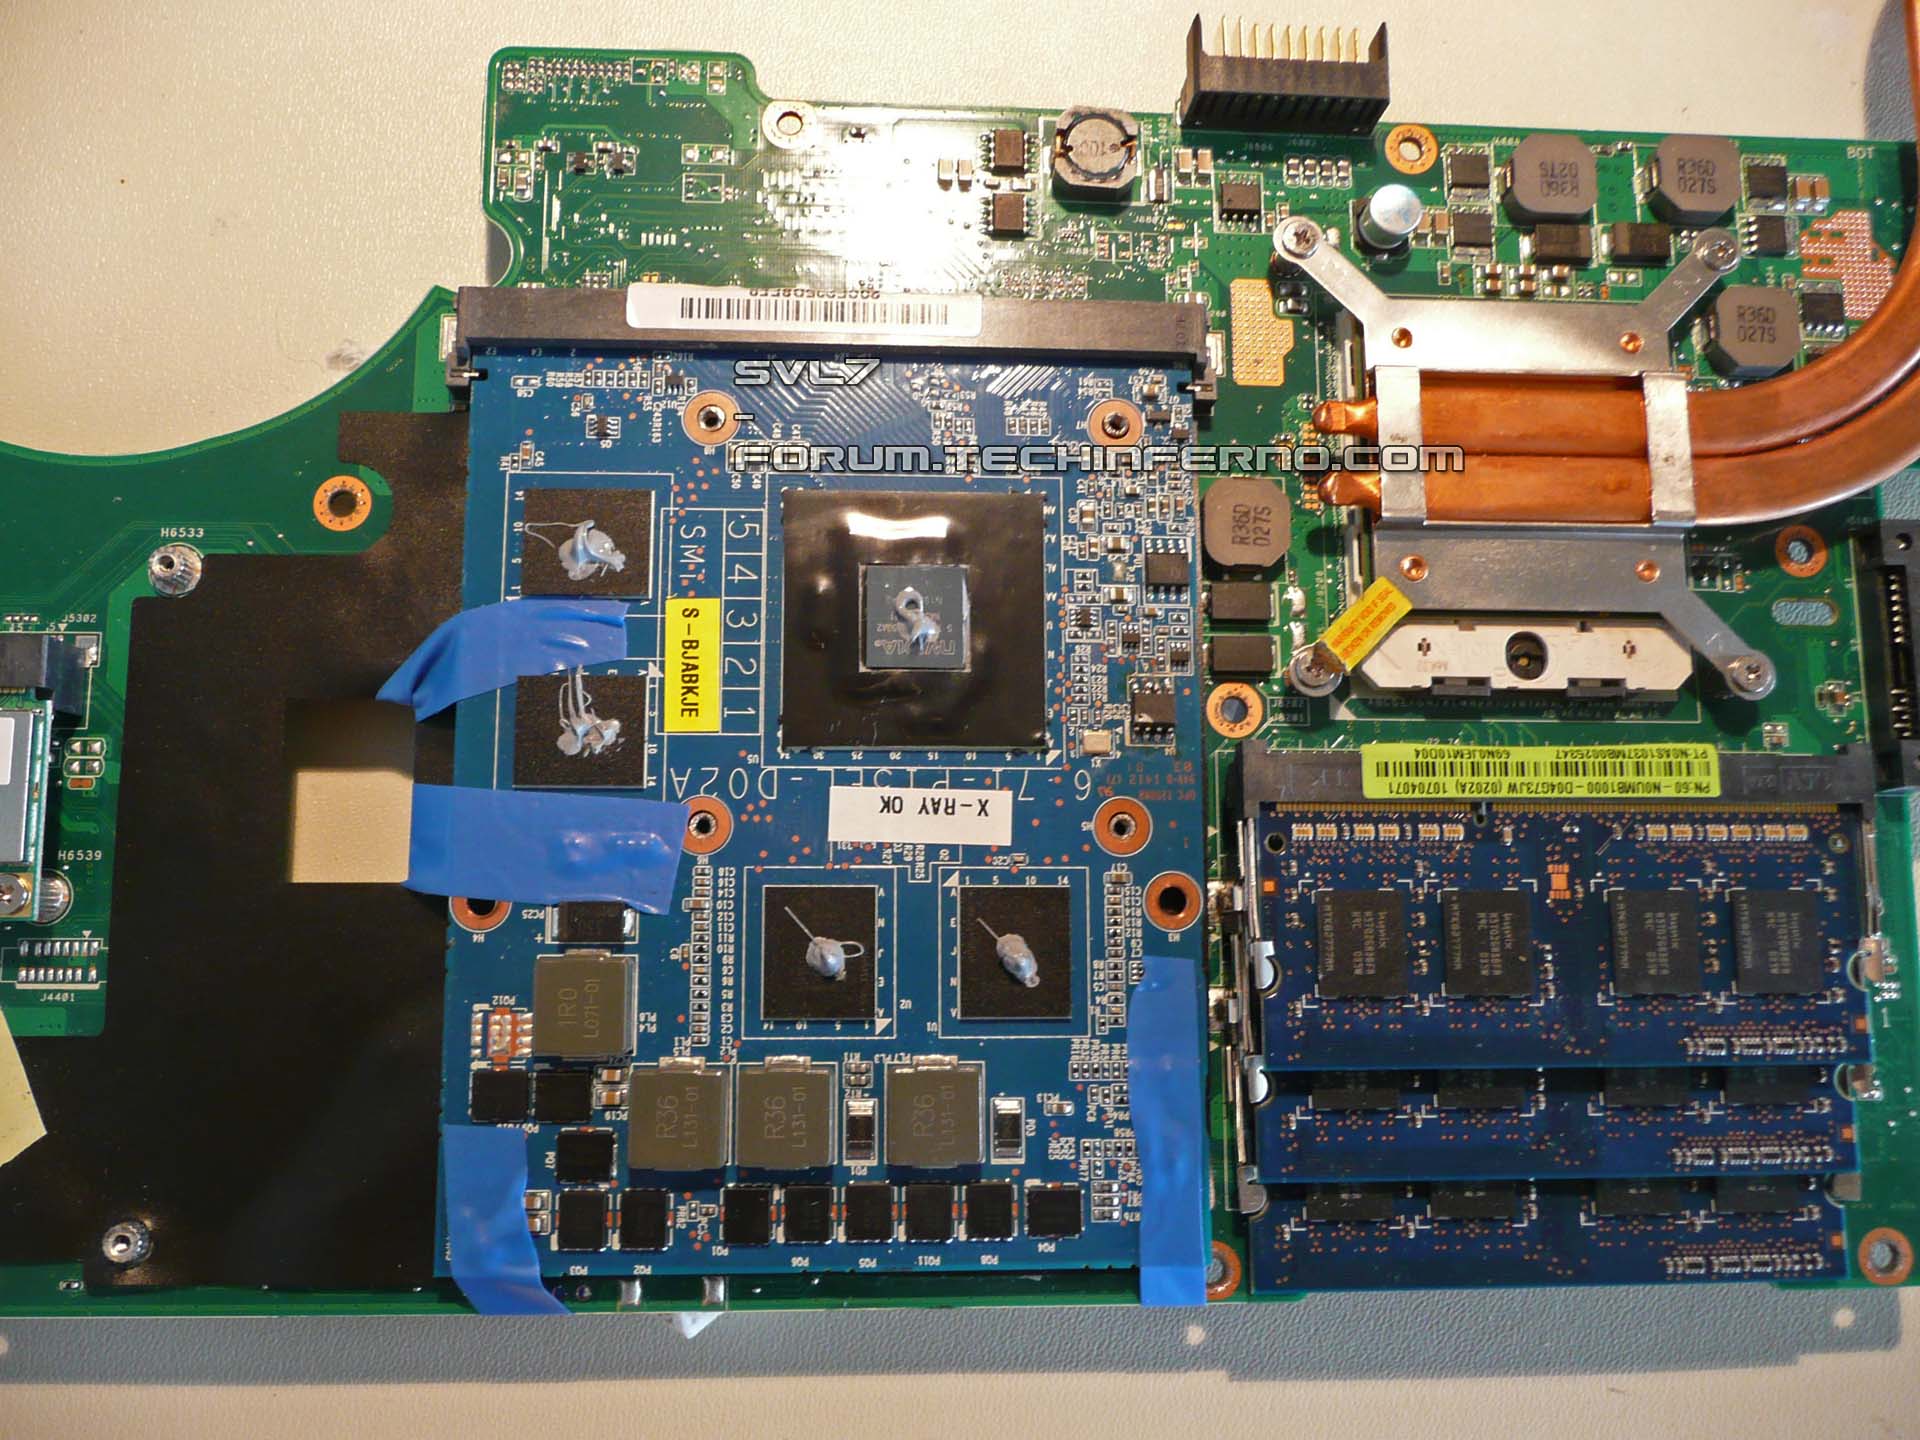
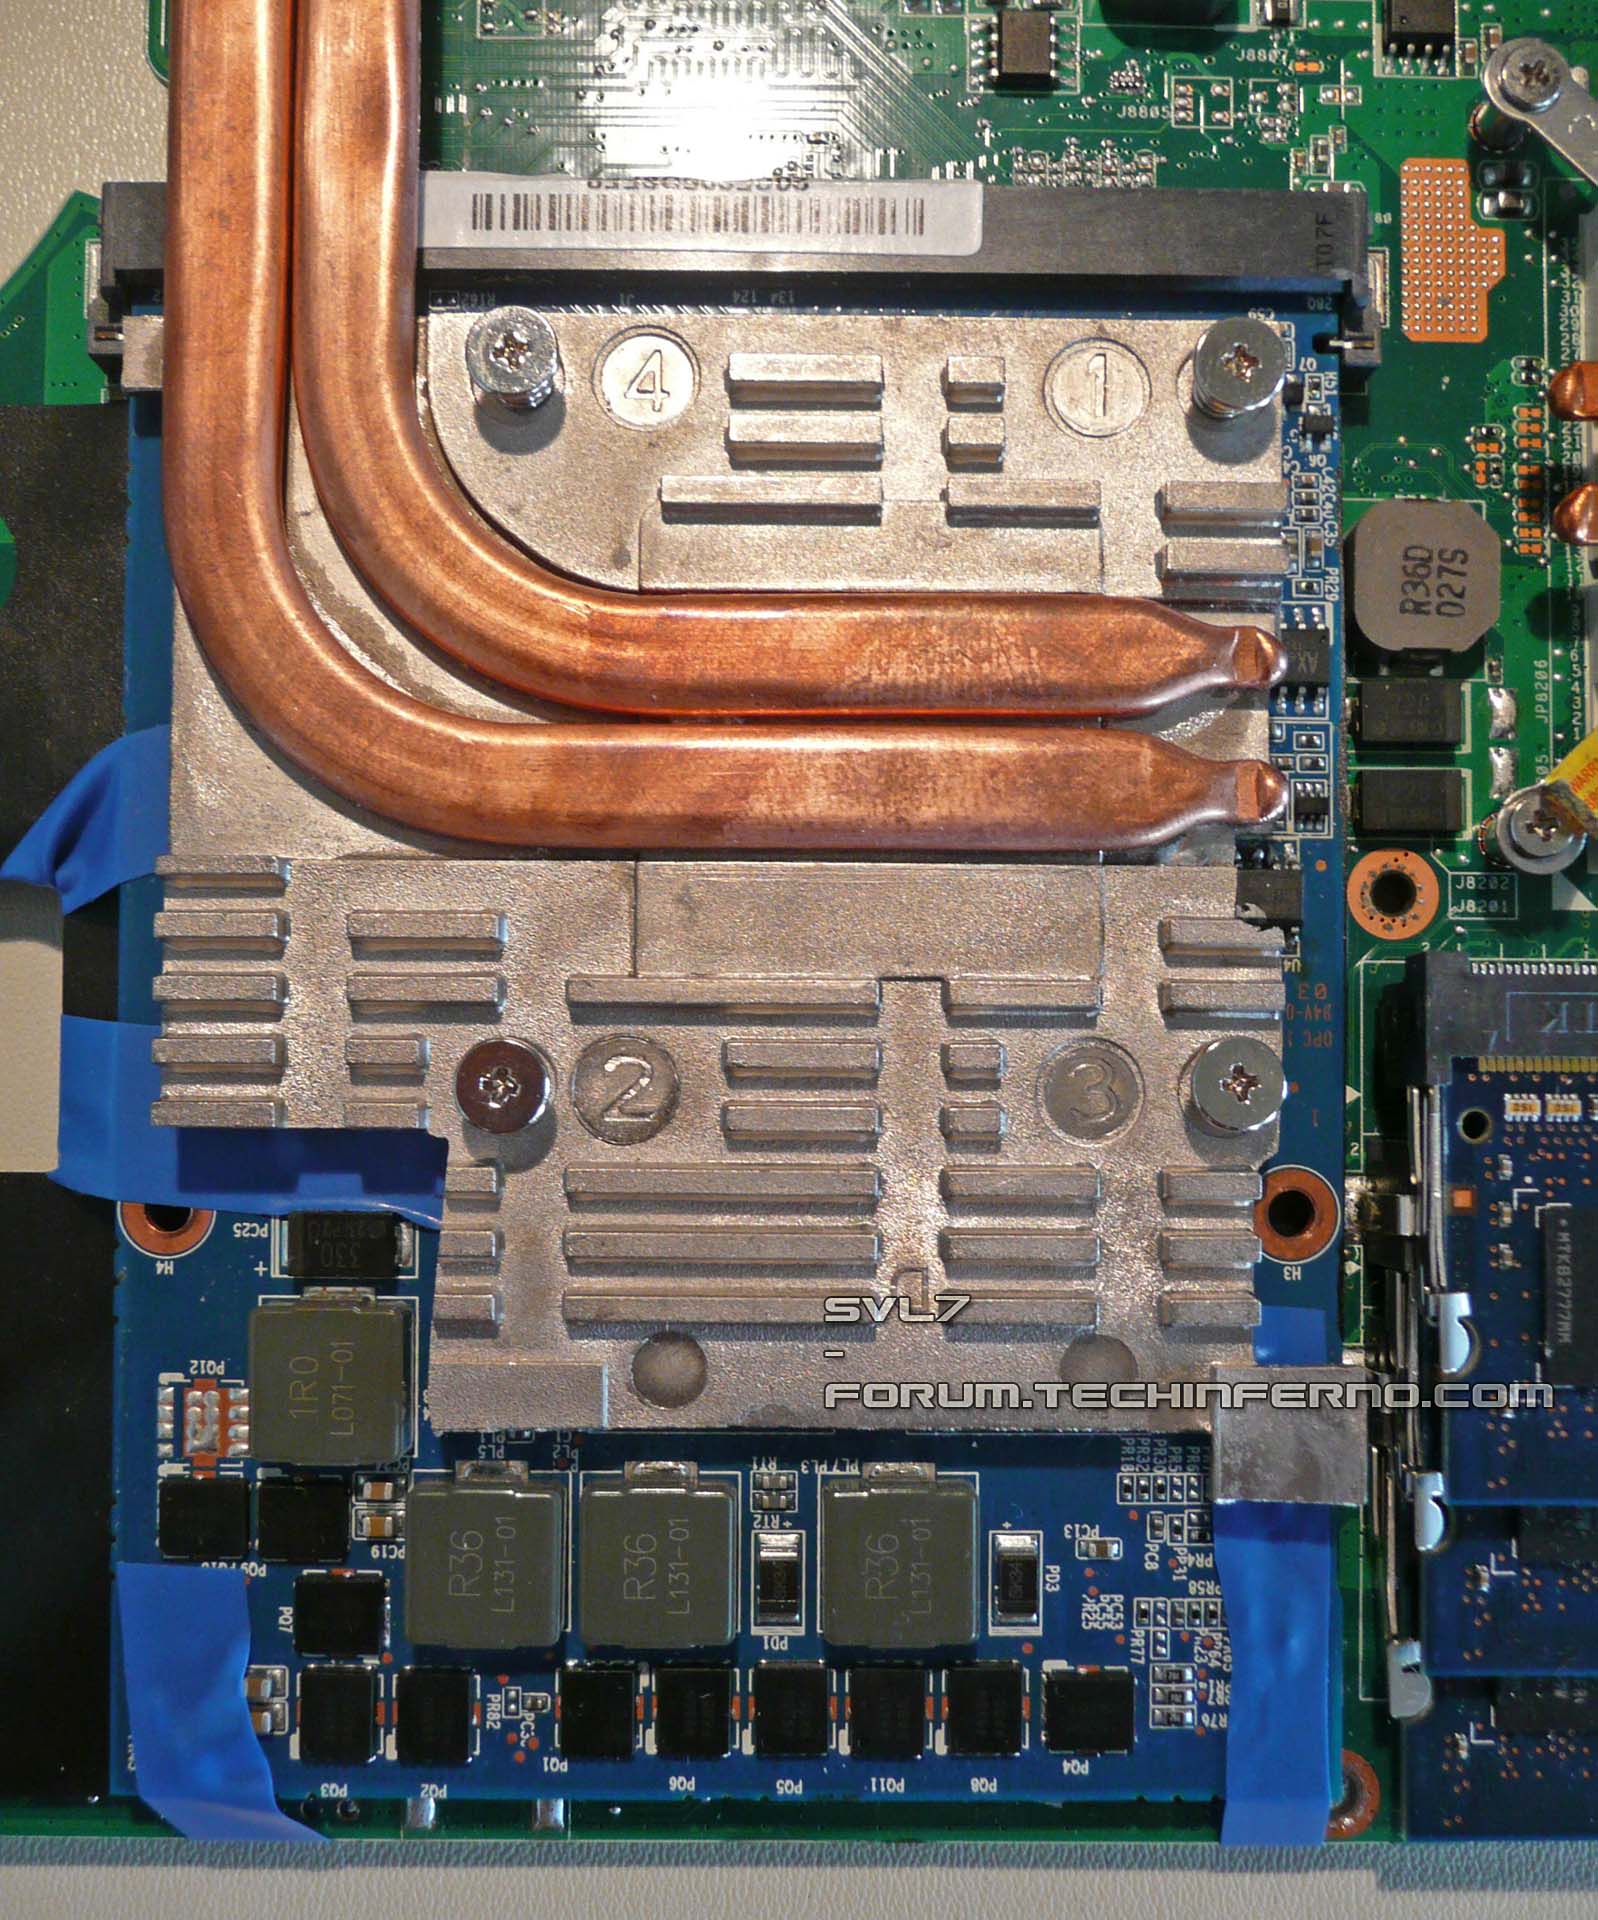
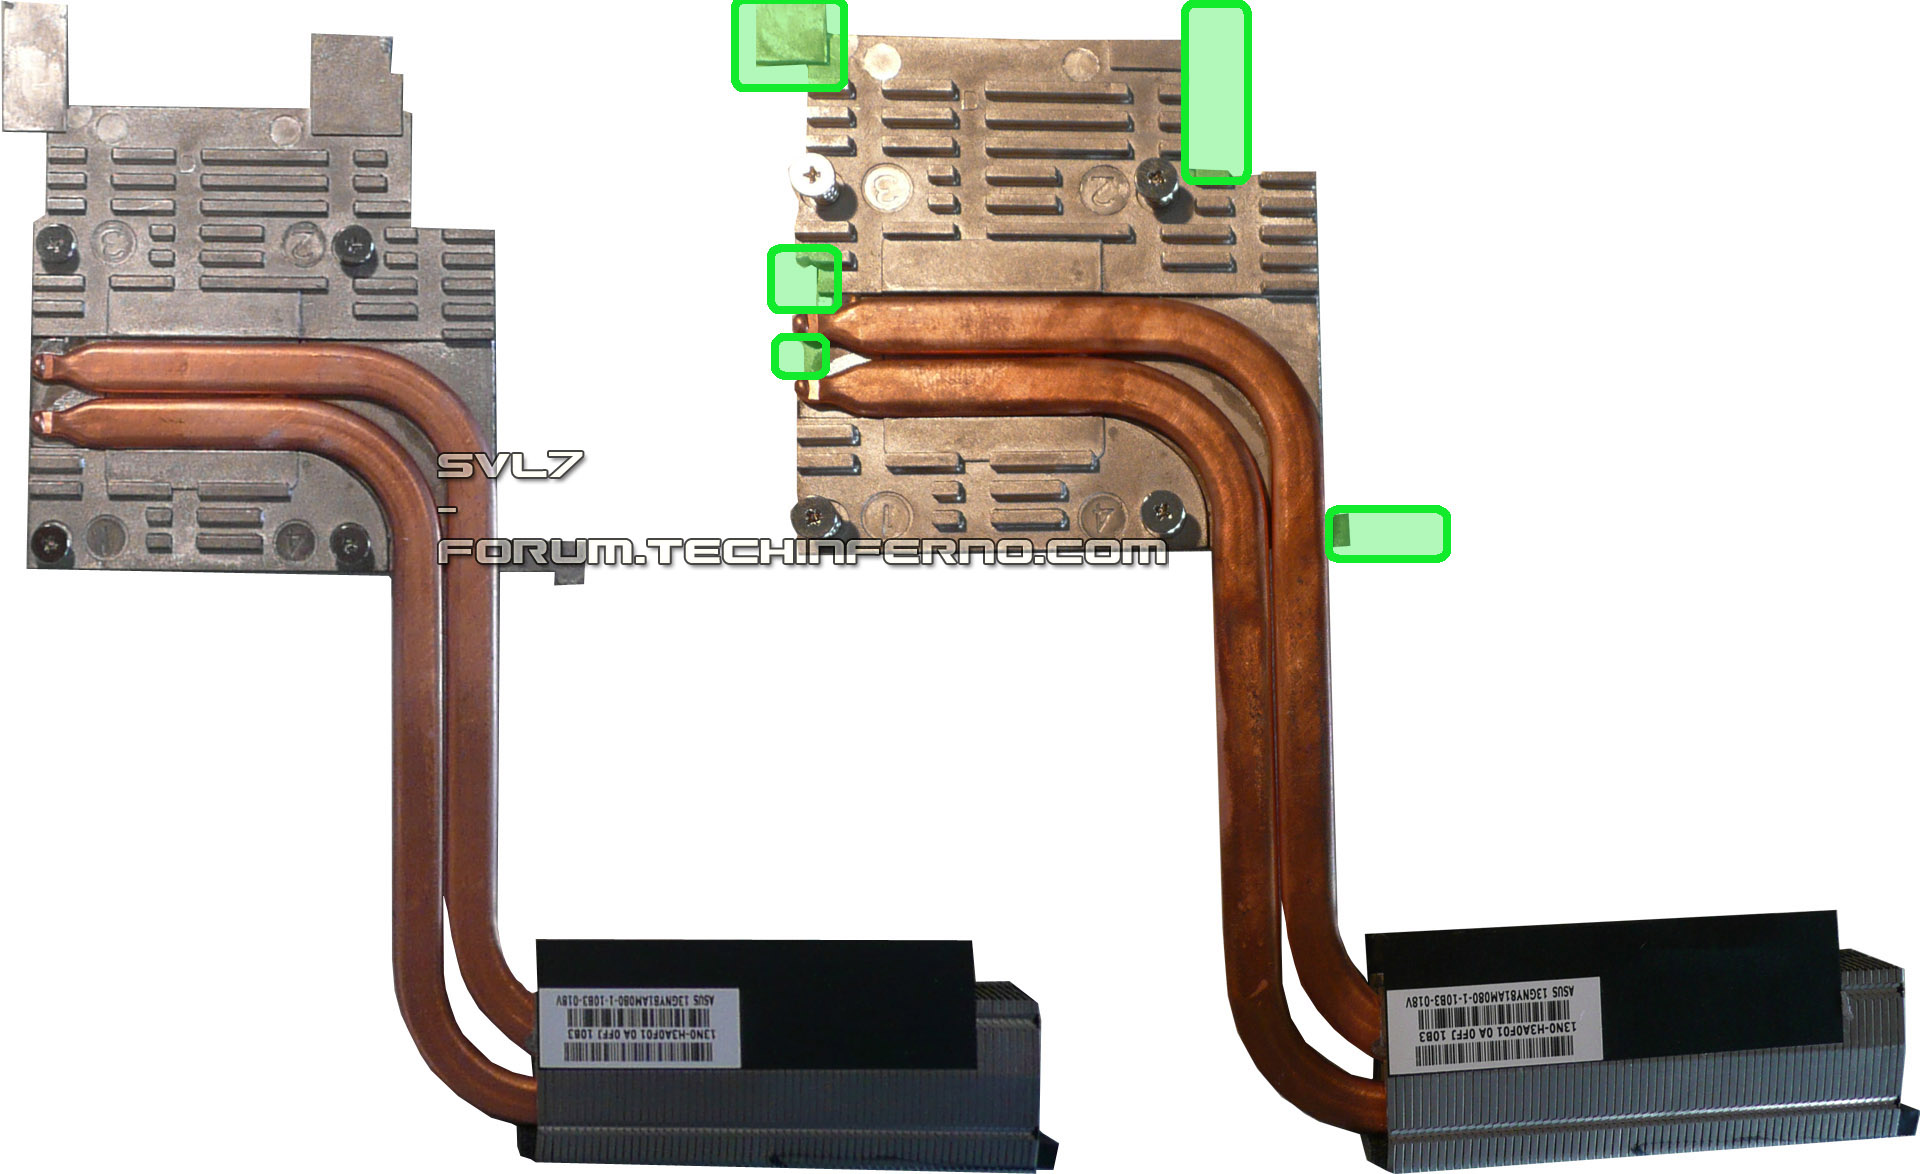
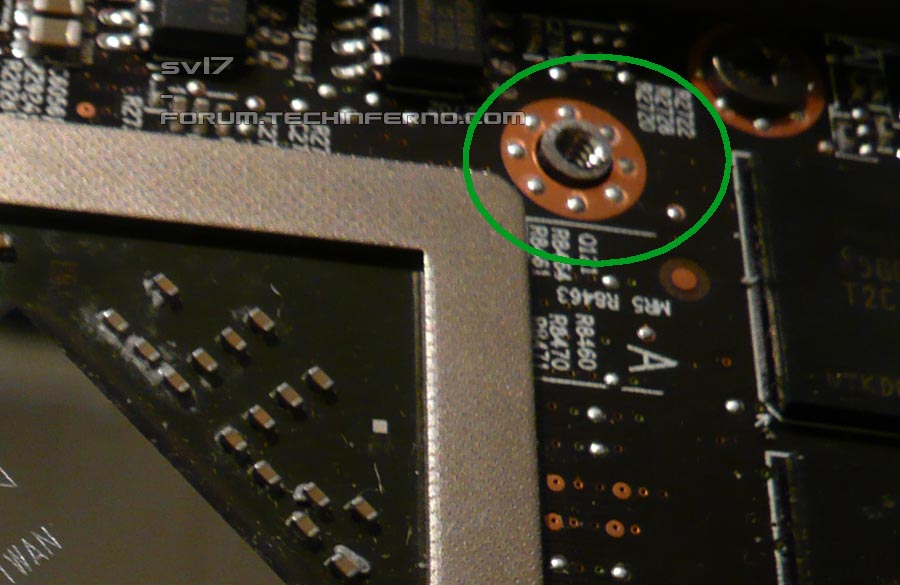
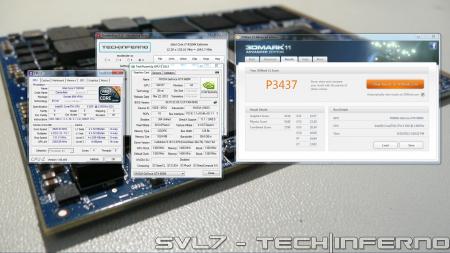
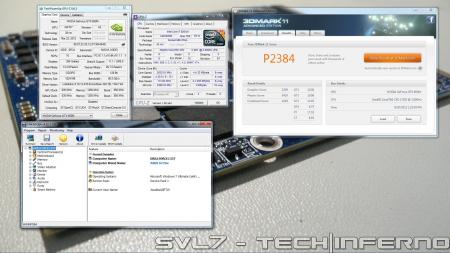
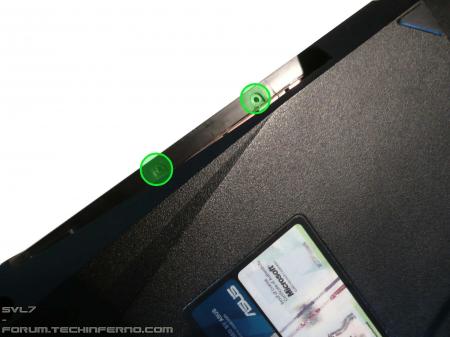
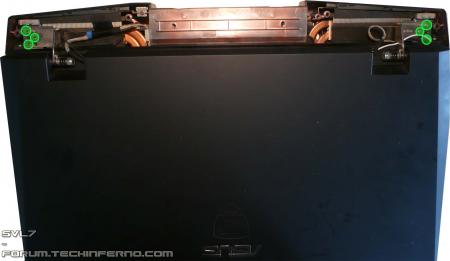
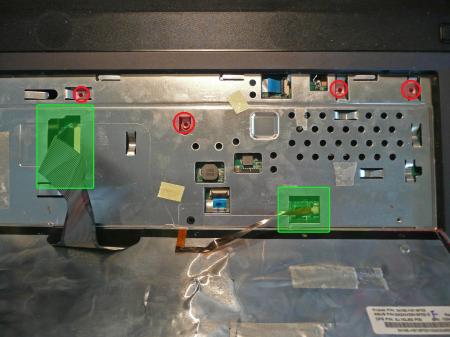
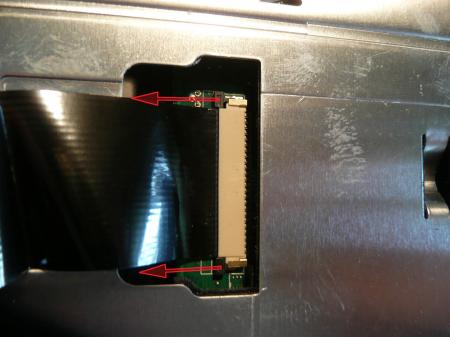
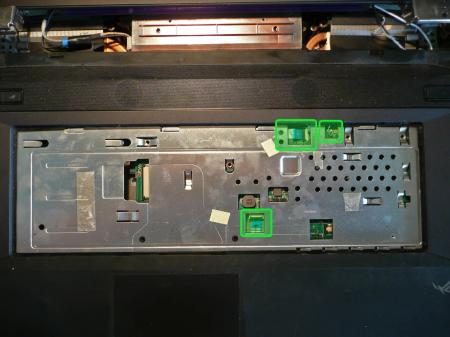
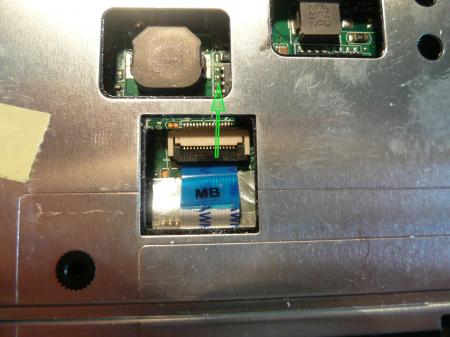
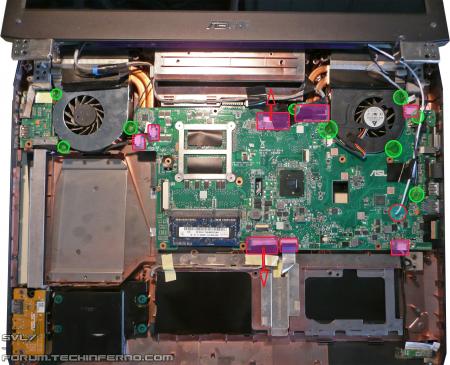
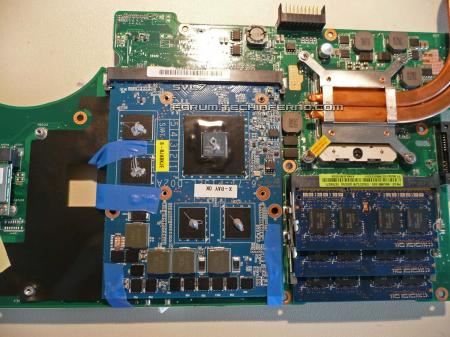
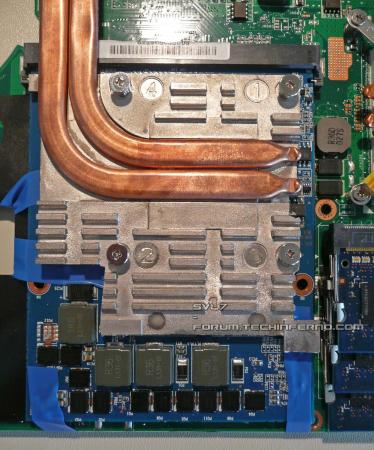
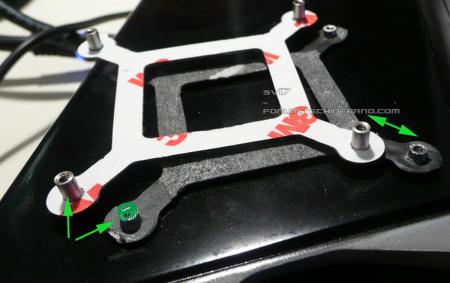
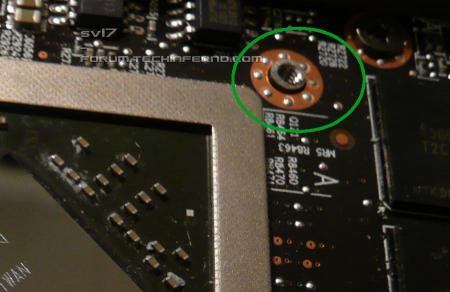
Yes, it works. The popular Asus G73JW can be upgraded with a Kepler card The G73JW isn't what I'd call "easy to disassemble", but it's doable. If you haven't disassembled this system before, follow the instructions very carefully. It's crucial not to rush anything, a lot of cables and plugs are really fragile. The upgrade is rather difficult, especially when you compare it with an Alienware / Clevo system, but it's really worth it. I want to thank MXM-upgrade for providing the test card, and @Conker for providing his G73JW for another experiment (we already disassembled this system several times... ). Check the end of the post to see some benchmarks. *** *** *** What you need for this upgrade: Nvidia GTX 660m, preferrably pre-flashed with the proper VBIOS. I assume MXM-upgrade.com will provide you the card ready for the upgrade, so you don't need to worry about the VBIOS and the involved procedures. In case you get your card somewhere else it's very likely you'll need to blind flash the card in order to get a picture on the screen. That's a relatively inconvenient procedure, especially since you can't be 100% sure whether it's your fault or possibly a defective card in case the blind flash doesn't work....I only tested the card from MXM-upgrade, other 660m may work as well, but I can't tell for sure. . . Asus G73JH GPU heatsink - The 460m which Asus put in the JW is a complete abomination when you compare it to an MXM card... it uses the same physical pin layout, but that's it. You won't be able to mount the JW heatsink on a proper MXM module, but it works with a (slightly modified) JH heatsink. You can grab one at asusparts.eu, ebay, other online notebook parts shops, etc., whatever you prefer. . . Screws which fit the backplate of the card you buy, or a Dell GPU backplate from a 6900m / 7900m series card (as those backplates have the proper thread size for the screws of the JH heatsink) . Screwdriver (make sure it really fits the screws) . Metal file or tool with similar effect to do some small modifications on the JH GPU heatsink . Thermal paste & some stuff to clean off the old paste (e.g. rubbing alcohol) . Some tape to keep the 660m in place . and I highly recommend: ESD-mat and wristband!! While it will also work without this equipment (you have to be really unlucky to damage your system by ESD), nevertheless, l won't recommend anyone to do so. Keep in mind that you're going to completely disassemble your system. Modifying the heatsink: No need for a lot of talk, it's pretty straight forward, look at the picture and you'll know what you need to do. When you're done with the modifications make sure it fits. Preparing the backplate: You need to slightly grind down the 'poles' of the backplate in order to get enough pressure on the die. Take a look at the pics and you'll see what I'm talking about. Without this mod the 'poles' are too high and won't allow you to properly mount the heatsink. Disassembling the system (step by step): - Uninstall your current Nvidia drivers. - In case your card doesn't already come with the required vbios: Set the first boot priority to USB (!!!) Else it will be rather difficult to blindly flash the card. - Shutdown your system, remove the battery and the AC adapter. - Press and hold down the power button for about 15 seconds. - Remove the quick-access panel of your G73: - Remove all the regular sized screws on the back (green), the two drives (red arrows), two small screws in the battery compartment (red) and unplug the WLan antennas (encircled red). Make sure you don't miss a screw. - Remove the optical disc drive. - Remove two small screws which previously have been hidden by the optical disc drive: - Now the display assembly, six screws. Then carefully lift the display and place it as shown in the next pic. - Once you have the display like this, remove the keyboard. You need a small flat tool for the five clips. Then lift it carefully. It gets hold in place with double sided tape, so you need to apply some force. Always use care, there are cables attached to it. - Four more screws. Then remove the cables which are connecting the motherboard with the keyboard. Carefully pull on the black part of the connector (see arrows) to unlock the cable, then you can remove it. - More cables: - Three screws on the mobo, 2x3 screws for the fans and a lot of cables to unplug. Also pull out the WLan antennas through the hole. Again, be careful with the cables. Once everything is detached, remove the fans and then the mainboard. - And finally... the heatsink(s). Remove the screws which are encircled with green first. Lift the heatsink and then you can unplug the card after removing the 'red' screws. - Put in the 660m and keep in in place with some tape. Unfortunately you can't use the screws as the holes on the motherboard aren't conform with the MXM standard. Put a small amount of thermal paste on the die of the GPU and as well on the VRAM modules. Using thermal pads for the memory isn't a good idea in this case since it would increase the distance between the die and the heatsink. Then mount the modified heatsink and reassemble the system. Make sure the heatsink really fits well and doesn't touch any component it shouldn't. After reassembling your G73, start it up. When your card already comes with the proper vbios it should boot just fine, else you messed up something during the dis- and reassembly. In that case check all the cables etc. If your card didn't come with the required vbios, then you need to blind flash your card now. That's why I stated earlier to set the first boot priority to USB in case the 660m doesn't already come with the proper vbios on it. The required vbios is attached to this post. Once your system is running and booted the OS it's time to install the GPU drivers. Download the desired drivers from Nvidia and unpack it, then put the modified .inf file (see post attachment) in the 'Display.Driver' folder, delete the old one with the same name in there. Then start the installation. That's it! Have fun with your upgraded machine!! And some benchmarks... 3dMark11 run at stock and overclocked... Gotta love the 660m, it's so much fun to overclock it, just look at the core clock Just ask if you have any question! As already mentioned, this upgrade procedure isn't easy for a beginner, but it's totally possible as long as you take your time, no need to hurry. 660m_G73JW.zip modified inf 660m G73JW.zip


 3 points
 -
dam i gotta go buy some papers, haven't rolled a joint in ages. i did try to make some funky looking joint like that back in the days, they are a pain in the ass to roll, plus real stoners are too lazy for this kind of stuff.1 point
-
Hello New Bench M18X R2 Teste Cinébench 11.5 Wprime 32&1024 WR Vantage 3Dmark 11 AMD Radeon HD 7970M video card benchmark result - Genuine Intel® CPU @ 2.60GHz,Alienware M18xR2 score: P12527 3DMarks1 point
-
Hi, Clevo P170EM 680m ID vendor 1558 pretty good with Msi +200 ov vBios. 932/1225 thank you so much for your great work, i've donate something to the board to reward the hard work. Thanks very much again1 point
-
Hahahahaha, nice!! If b00bs didn't stop smoking he probably would try it immediately Come on @iloveb00bs, I'm sure you still got some mad skillz when it comes to building joints, time for a show-off!1 point
-
This is sick as hell!! Would love to know how this was made!!!
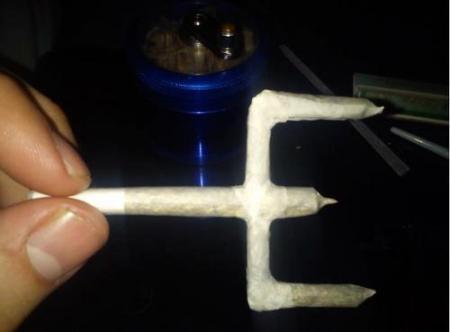 1 point
 -
Hi, and welcome to T|I! The R1 works with the 5870m... but I never heard about anyone trying a 6970m in it. I assume you're already on the latest BIOS, right? Is your card an OEM version or ES? In-circuit programming of the 6970m works, did this several times. If you somehow manage to get a datasheet of the 6900m series, let me know, would be really interested in seeing this. Regarding the M17x R1 schematics... got something which might interest you . Though I think you can't download it at the moment... Alienware M17x R1 schematics.pdf1 point
-
That will change stuff for many : Introducing the Paragon System - Diablo III1 point
-
I will want to try a03 w/ updated orom as well. To make sure I am ready for anything, blind flash goes this way: batter out, power cord out, a usb stick with "M18R2.HDR" (renamed *.fd) into the e-sata port, [END] pressed and held, power cord in, [END] released, *beeps*, done?1 point
-
Thanks [MENTION=119]Mr. Fox[/MENTION] - It was 116F yesterday and today it was around 114F so the A/C has to run 24/7 (not looking forward to my electric bill). I think the copper is higher quality with the triple pipe sink as well and the minor design difference seems to aid in dissipating heat better.1 point
-
More stuff exclusive for T|I users, voltage mods: All the vbios listed here are attached at the end of the post. ******************************** Nvidia 800m series: Nvidia GTX 880m (8GB version only): 'OC edition' -> unlocked overclocking limits, voltage adjustable, power target adjustable, optimized performance at higher clocks Can be used for all current 880m (Clevo, MSI and Dell). Nvidia GTX 870m: 'OC edition' -> see above Nvidia GTX 860m (GK104 variant): 'OC edition' -> see above. Refer to the file name to know which version is suited for your system. NOTE: Only for the Kepler version of the 860m. Silly Nvidia started giving different GPUs the same name. ******************************** Nvidia 700m series: Nvidia GTX 780m: 'OC edition' -> unlocked overclocking limits, voltage adjustable, power target adjustable, optimized performance at higher clocks Can be used for all current 780m (Clevo, MSI and Dell). Nvidia GTX 770m: 'OC edition' -> see above Nvidia GTX 765m: 'OC edition' -> see above. Refer to the file name to know which version is suited for your system. ********************************* Nvidia 600m series: MSI GTX 680m (4GB version): 'OC edition' revised -> higher limits for software overclocking, stock default clocks ----------------------- Dell GTX 680m (2GB version) vbios: 'OCedition' revised -> higher limits for software overclocking, stock default clocks same with increased 3d voltage ('OV') -> refer to the file name ----------------------- Clevo GTX 680m (4GB version) vbios: 'OCedition' revised -> higher limits for software overclocking, stock default clocks. For P1xxHM based systems I recommend only using version 80.04.29.00.01 !! Some users reported issue with other vbios versions (stock or modified, doesn't matter). EM users make sure you're on the latest BIOS / EC same with increased 3d voltage ('OV') -> refer to the file name (Same warning as above applies to P1xxHM users). ----------------------- K3000m: (Nvidia) K3000m - 80.04.3A.00.07 'OCedition' -> higher software overclocking limit Should work on all K3000m, unless you got a board ID mismatch. (HP) K3000m - 80.04.33.00.2E - 'OC edition' - > same as above, but probably the better choice if you use a HP machine ----------------------- K5000m: (Dell) K5000m - 80.04.33.00.35 - 'OCedition' -> higher software overclocking limit, stock 3d clocks 758MHz It's Dell but should work on all K5000m, unless you get a board ID mismatch. ----------------------- GTX 670mx: MSI 670mx (1.5GB) - 80.04.5B.00.A5_'OCedition'_rev00 -> higher software overclocking limits, tweaked performance at high clocks. Same board as the Clevo card. Clevo 670mx (3GB) - 80.04.58.00.03_'OC edition'_rev02 -> same as above, plus voltage is adjustable per software. ---------------------- MSI GTX 675mx: MSI 675mx (2GB) - 80.04.58.00.14_'OCedition'_rev00 -> higher software overclocking limits, tweaked performance at high clocks. MSI 675mx (4GB) - 80.04.58.00.0E_'OCedition'_rev00 -> same as above, vbios for 4GB card (!) ----------------------- Clevo GTX 675mx: Clevo 675mx (4GB) - 80.04.58.00.05_'OCedition'_rev00 -> higher software overclocking limits, tweaked performance at high clocks. ----------------------- ASUS G75VW BIOS: - 660m at 1000MHz core / 1400MHz memory - additional BIOS menus http://forum.techinferno.com/asus-gaming-notebook-forum/2538-%5Bg75vw%5D-modified-bios-vbios-higher-overclocking.html ------- Donation link in case you want to buy me a beer Thanks and cheers! *** FILE DOWNLOAD LOCATION:1 point