Leaderboard


Popular Content
Showing content with the highest reputation on 05/16/12 in all areas
-
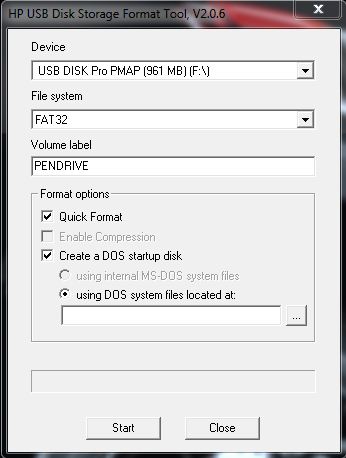
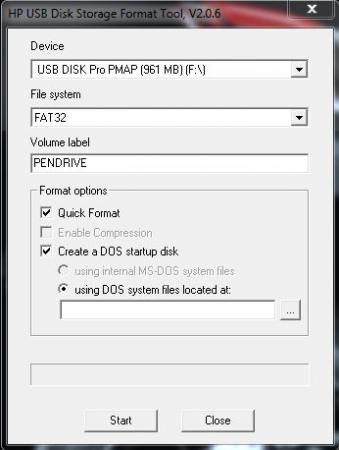
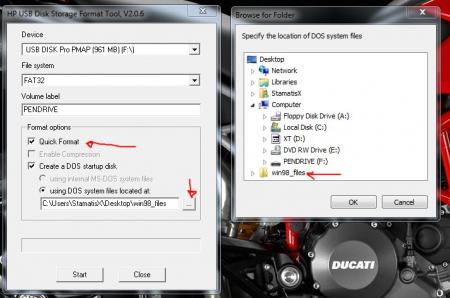
- work in progress - Instructions for flashing the VBIOS of an AMD / ATI video card: You'll need: A VBIOS file you want to flash The latest version of ATIflash, a DOS utility to flash the VBIOS A USB drive, formatted to boot DOS, in order to use ATIflash How to create a bootable USB flash drive: Flashing procedure: Once you've prepared your USB drive, put ATIflash to the root of the drive, same with the VBIOS file you want to flash. NOTE:DOS has a limit of 8 characters per file name (not counting the extension). So make sure to rename your files appropriately before putting them on the USB drive. Reboot your system, go to the boot manager and choose to boot from the USB drive. As soon as you see the command line you're ready to go, write dir and hit enter to display all the files on the USB drive. Display all adapters, ATIflash will enumerate them. Remember the numbers of the devices you want to flash. atiflash -i Save a copy of your original VBIOS to the USB drive, "i" is the number of the adapter you checked before, if you only have one GPU it's going to be "0". "Filename" is going to be the name of the file, don't forget to add an extension (.rom). Keep in mind that there's a limit of 8 characters for a file name in DOS. atiflash -s i filename.rom Verify the integrity of the VBIOS you want to flash by calculating its checksum. Of course you need to know the correct checksum in advance. If the checksums don't match -> don't flash. atiflash -cf vbiosfile For example if the file you want to flash is called "modVbios.rom" the command for displaying the checksum would be "atiflash -cf modVbios.rom". Flash your VBIOS to the desired adapter "i". atiflash -p i vbiosfile E.g. "atiflash -p 0 modVbios.rom" flashes the file modVbios.rom to adapter 0. DON'T do anything with the system during the flash procedure. Restart the system when asked to do so and remove your USB drive. Pro tip: Using ATIflash: This will display a list of all valid atiflash commands, the associated parameters and explanations about how to use them: atiflash -h
 1 point
 -
New Clevo machine out just in time to clinch the performance crown from the M11x: Gallery: Clevo W110ER / Sager NP6110 press pictures | The Verge Looks good but looks more like a 12 inch form factor. Still, i7 3612QM and GT 650m should provide decent performance. Similar configs in other laptops have managed around 9k Vantage which is no slouch1 point
-
This is a modified version of BIOS A10, with all the hidden menus made available. The archive with the BIOS and the necessary files to flash it are attached to the post. After flashing, go to the BIOS menu and load the default settings, save, exit and reboot. As always with such modifications, you alone are responsible for your system and what you do with it. If you flash it, please report back and let me know whether everything is ok. (I'm sure it is, but I don't have an M17x R3 myself to test it ) The menus look exactly the same as all the previous "unlocked" R3 BIOS versions. Tested and confirmed to work, thanks @Staff Sargent !! *********************************************** Please consider a donation if you like this modified BIOS. *********************************************** UPDATE: Had to correct some things, this works fine. Keep in mind that A10 is no longer officially available on Dells support site, I don't know the reason for this, they might have to fix some things. Update 2: BIOS is available again on Dell's site, nothing changed between the version which was on there earlier and now... lol. M17x R3 - [unlocked] BIOS A10.zip1 point
-
if there is enough paste where thermal pads were supposed to be it should be fine. we do that on mobile vram sometimes since it performs 2X better1 point
-
Well for the best of the best you want the ASROCK X79 extreme11 mobo. Not out yet but we've seen some news and showcases of it. Originally it came with 16-phase VRM but the retail models look to have 24-phase. Great for overclocking. But the most important thing is that it supports up to 4 way multi GPU setups @PCIe 3.0 x16 on all cards simultaneously thanks to not one, but TWO PLX PEX 8747 bridges. That is multicard without bottleneck. As for other components, the 3930k hits the spot for performance to price ratio and can be OC'd just as well as the 3960X at half the price. As for GPUs, for its price, the nvidia GTX 670s look awesome. And the reference PCB is tiny! Great for watercooling in the future. Price to performance is great too. The OC edition cards actually perform better than the reference GTX 680. As for RAM, I usually scale speed with latency so 1600-CL7, 1866-CL9, 2133-CL11 etc. Obviously channels have to be suited for the CPU. PSU, of course the Corsair AX1200 is great, but for 4 cards, you may have to go with 1500+ or even 2x PSUs.1 point
-
I'll keep a separate bitcoin wallet for the lab, I'll tell my boss that I was making money for the lab to do more experiments during the idle times of the server :3.1 point
-
If there isn't a lot of paste squeezed out over the other components you should be fine. I've had a bit squeeze over in my lappy my friend with no I'll effect. But if there is gobs of it that spilled over you may want to clean it up some as it could trap more heat than it helps alleviate. Especially if it's sitting over other components but not touching the heatsink to transfer the heat. It's upto you my friend. You already know excess can be more hinderence. To much just adds more material between components and heatsink. Pads you ordered might as well use them since you bought them.1 point
-
IMO planning for 4 x GPUs is silly, unless you're planning 3 x 30" with 7680x1600 or some other uber power hungry config. Also, the lanes may be there but even a 3960X will bottleneck 4 GPUs, and the scaling drops off fairly dramatically after dual config (4xGPUs is nowhere near double 2xGPUs). PCI-E lane speed is thus... Each generation gets twice as fast... so X16 1.0 = X8 2.0 = X4 3.0 2.0 X16 is plenty of bandwidth for any modern GPU, therefore so is 3.0 X8. To properly do a quad GPU setup you're looking at $5k minimum, IMO it's a total waste of money unless you NEED it. Far better to do a $2.5K build now, and another 2.5K build in ~ 2 years. To summarise: Plan for a beastly dual GPU build, don't pay more than $250 for a board unless you have spare money and don't get hung up TOO much on lane bandwidth. That's basically the philosophy behind my build which pulls nearly 15k 3dm11P. If I was building it now that would be closer to 20K+, I think this is enough!1 point
-
Got one and I am very happy with it P2430 on 3d Mark 11 on Battery (not connected to PSU I like the simple design and the power is amazing. Unfortunatly no Display Port, which makes it useless on an Dell U2711 (no way to get 2560x1440 @60hz :S)1 point