Search the Community
Showing results for tags 'y500'.
-
 Did a quick search and didn't notice anyone here using a solid state drive... So, I was wondering if anyone is. If so, share your experiencesǃ I'm using a Crucial M4 SSD which is 512 GB. The first thing I noticed was a great boot time. I can boot from off to my desktop in 35 seconds and all the background apps are loaded within the 40-45 second mark. Now, I'm sure there are faster...but this is the best experience I've had from anything I've ever owned personally before. I haven't tried shaking my computer to the point of disrupting the hard drive...nor do I plan to do it intentionally. However, I was running a transfer the other day and had to walk to the office with my computer running, lest I have to redo two previous hours of work and then wait again. No problems whatsoever. General speeds in running applications have been either faster compared to my last computer, although, I have no specific benchmarking comparisons there. But here are a couple things that I ran on the current Y400 with CrystalDiskMark and SiSoftware Sandra 2013 SP3. CrystalDiskMark (based on 5 tests) Read (MB/s) Sequentialː 518.1 Random 512KBː 438.6 Random 4KBː& 21.81 Random 4KB (QD 32)ː 198.8 Write (MB/s) Sequentialː 261.6 Random 512KBː 263.6 Random 4KBː 71.78 Random 4KB (QD 32)ː 212.3 SiSoftware Sandra 2013 SP3 File System Bandwidth Analysing... Aggregated Score : 430.823MB/s Result ID : Crucial M4-CT512M4SSD2 (512.1GB, SATA600, 2.5", SSD) Capacity : 512.11GB Finished Successfully : Yes File System I/O Analysing... Aggregated Score : 12330.4IOPS Result ID : Crucial M4-CT512M4SSD2 (512.1GB, SATA600, 2.5", SSD) Speed : 6000Mbps Capacity : 512110MB Finished Successfully : Yes Overall Score Aggregated Score : 7.07kPT Results Interpretation : Higher Scores mean Better Performance. Decimal Numeral System (base 10) : 1GPT = 1000MPT, 1MPT = 1000kPT, 1kPT = 1000PT, etc. Result ID : Lenovo 20192 IDEAPAD (Lenovo INVALID) (Intel Core i7-3630QM CPU @ 2.40GHz; Intel Core Mobile DRAM Controller; 2x 4GB Ramaxel RMT3160ED58E; Crucial M4-CT512M4SSD2; NVIDIA GeForce GT 650M) Finished Successfully : Yes
 -
So I've been considering getting a upgrade for my Laptop's wireless card. I would like to have 2.4 ghz 5 ghz and bluetooth. The one that I have been considering is the Killer Wireless-N 1202. So any recommendations? [h=2][/h]
-
Okay, so I'm thinking about upgrading my cpu in my laptop in a year or so. I have a Y500 with a i5-3230M, and I want to put in an i7-3612QM because it's a quad core. I've looked and it's the same voltage as my current cpu, and the same socket. However, I want to know whether the cpu in the Y500 is socketed or soldered in, can I take it out safely and put a new cpu in? Also, if I do put in a new cpu, what do I have to do to accommodate it? Do I have to get a new bios? Also, can my motherboard support a cpu that draws 45W instead of 35W? There are Y500's with cpus that draw 45W, so will it work the same in my laptop? Thanks
-
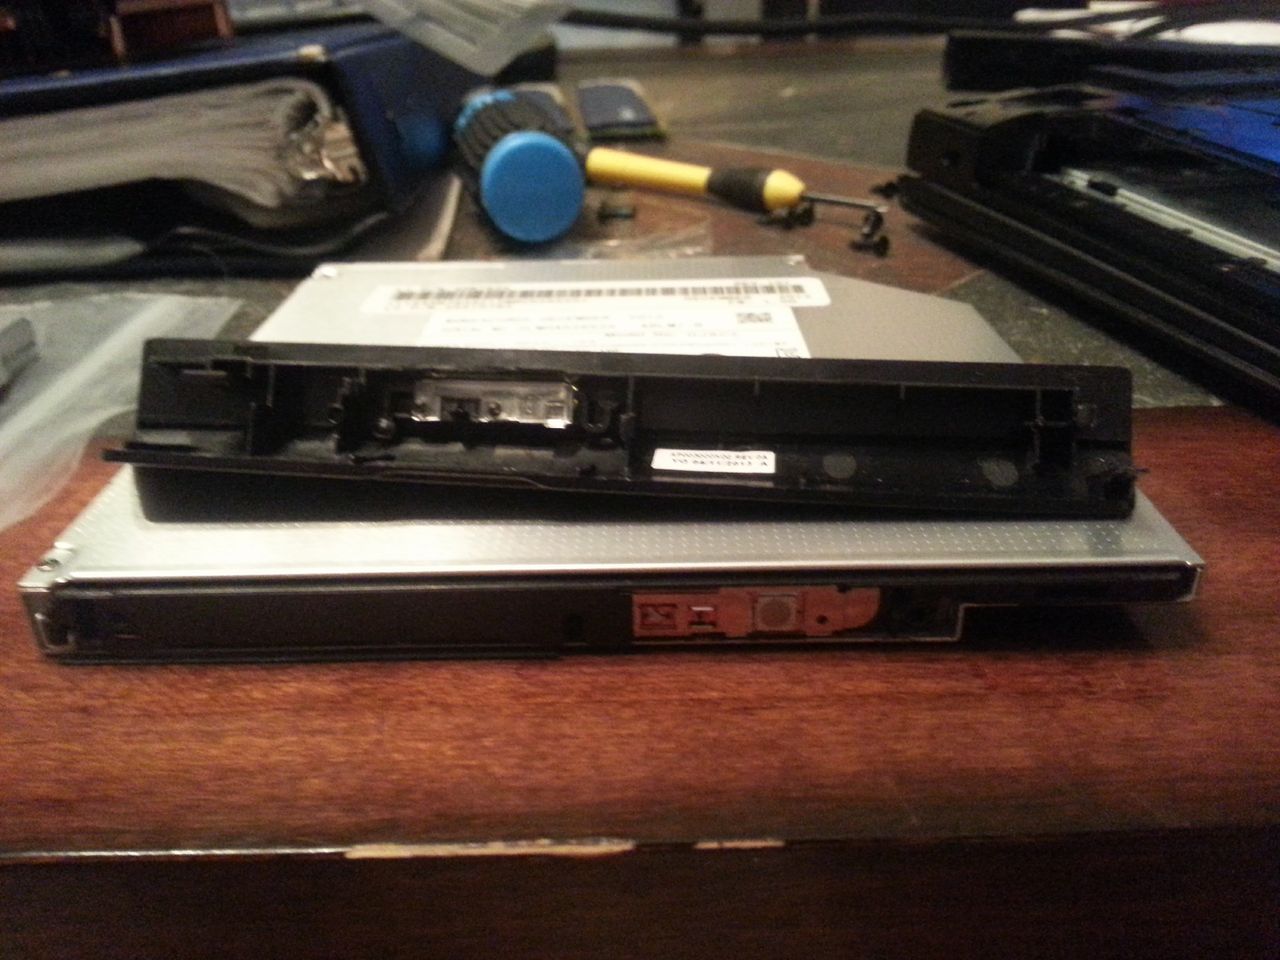
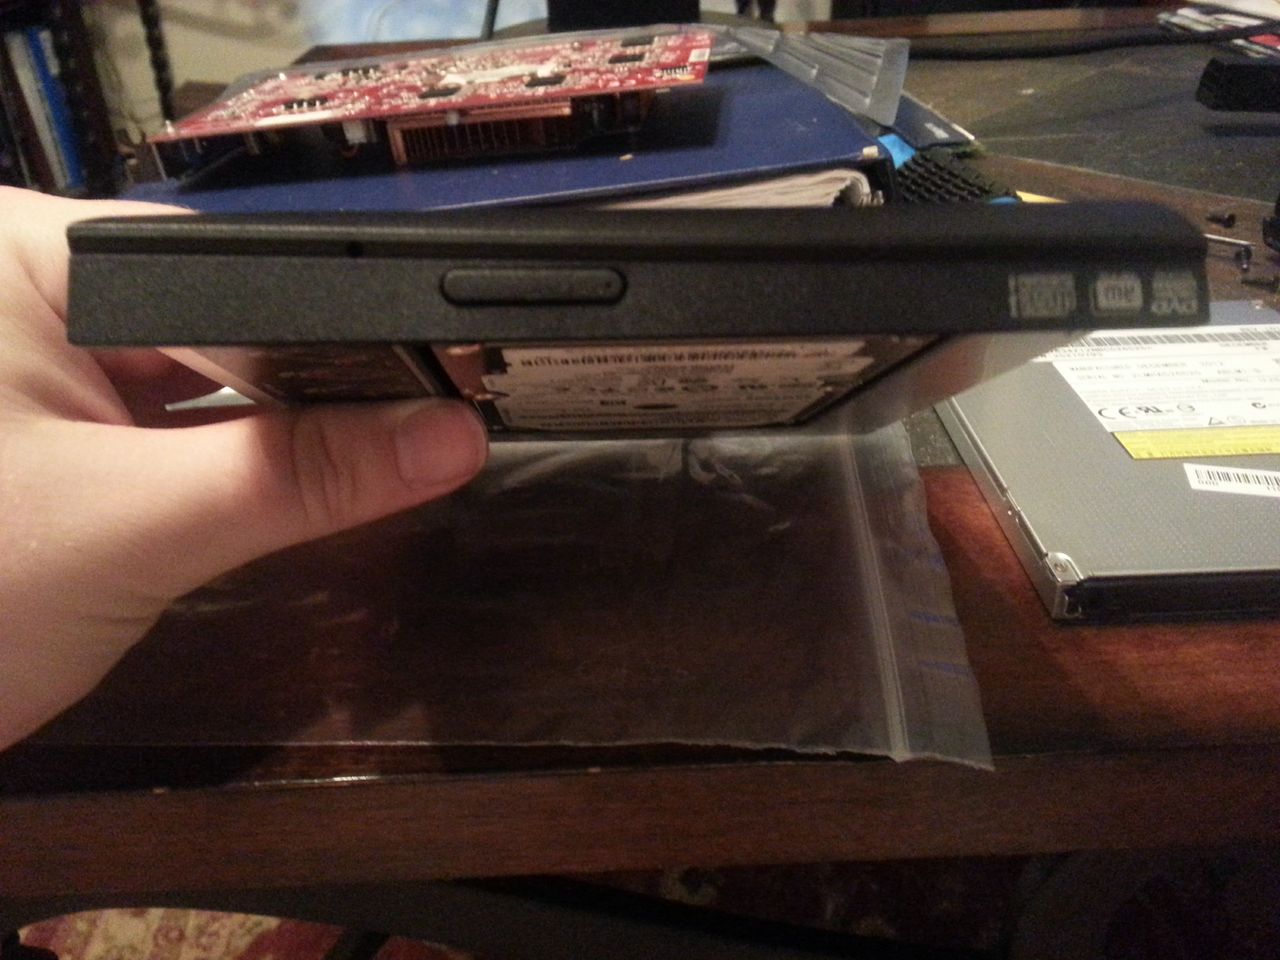
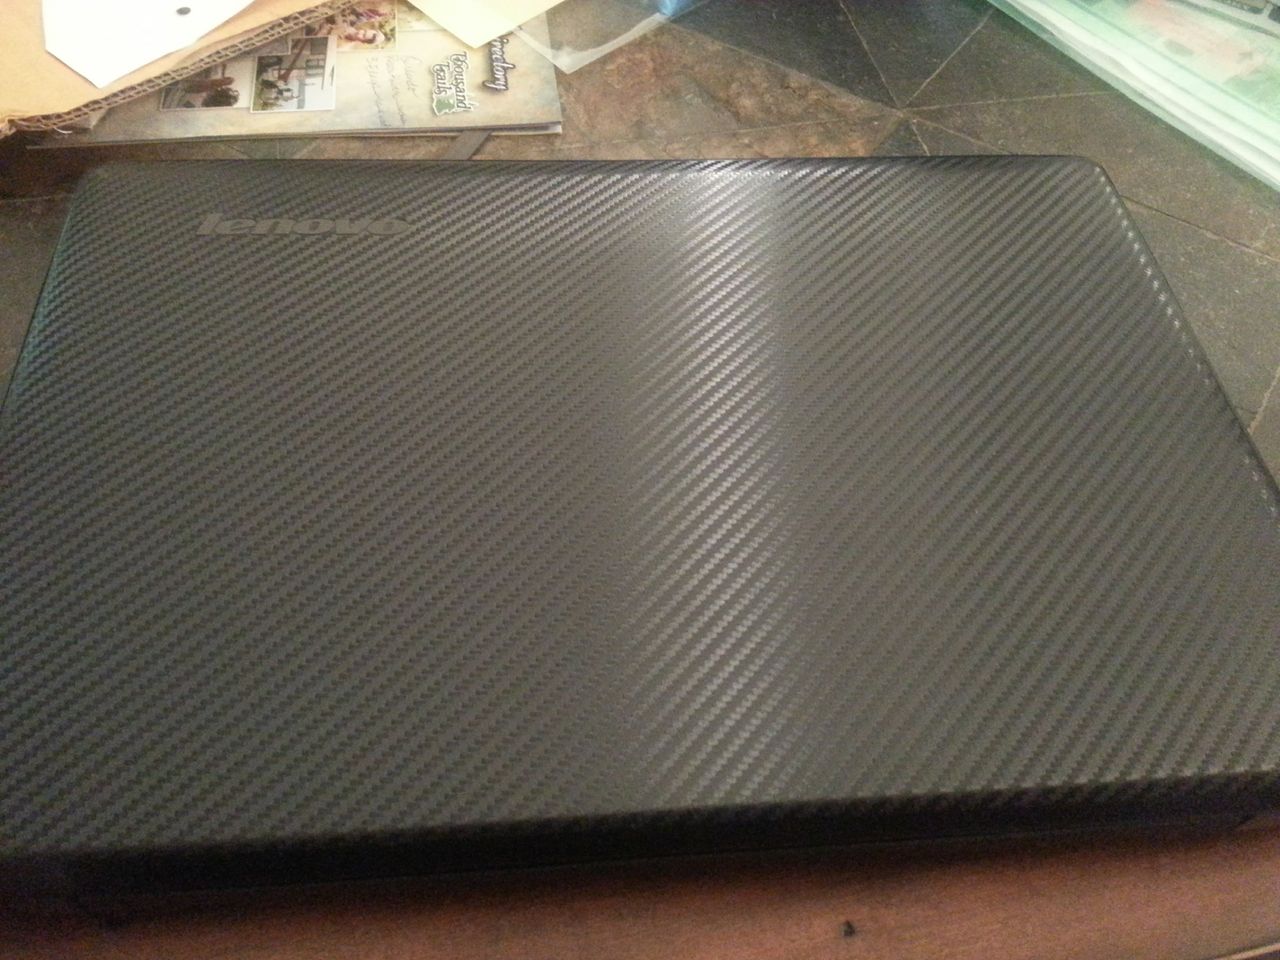
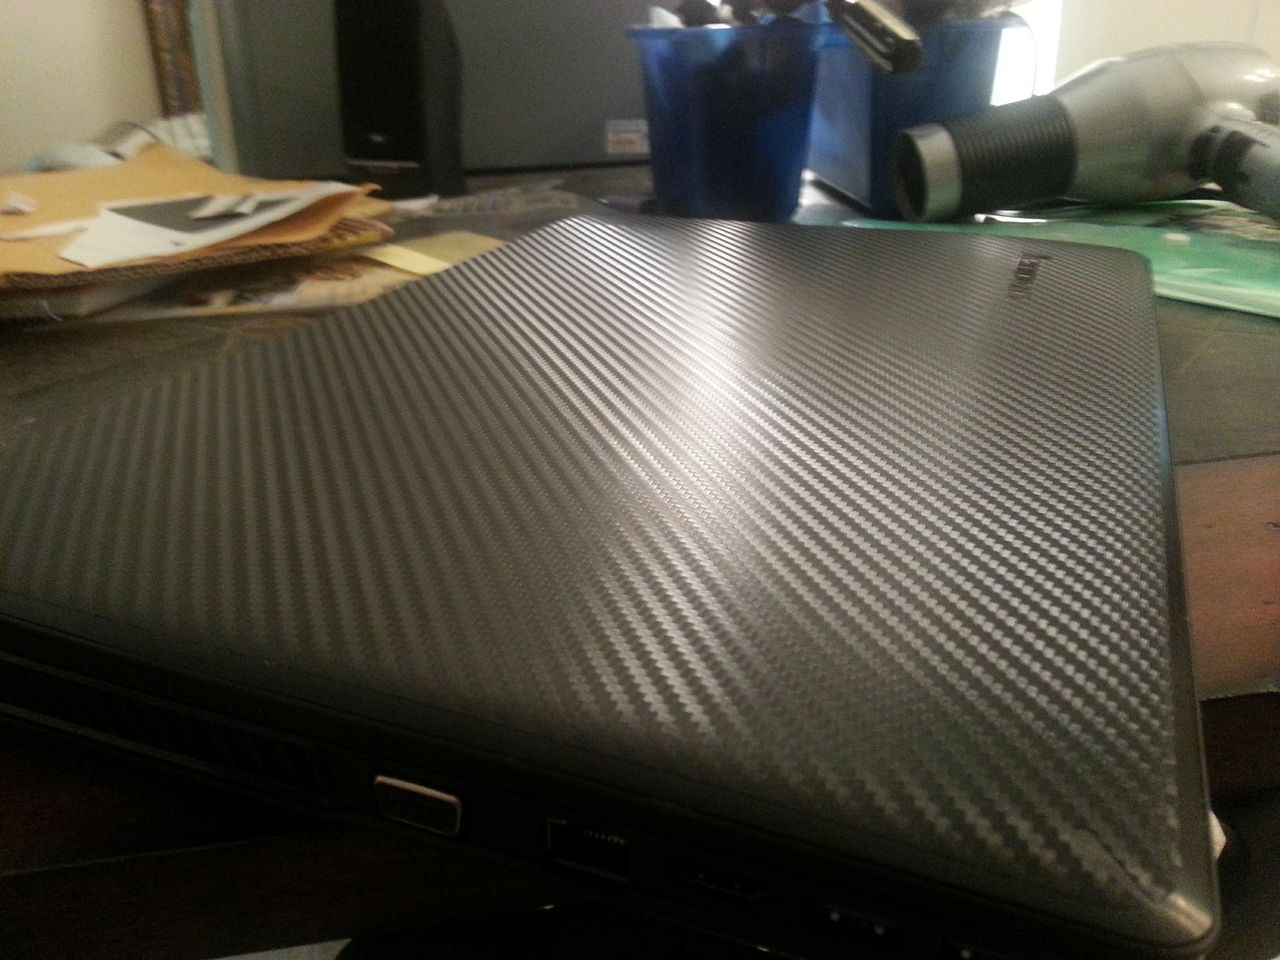
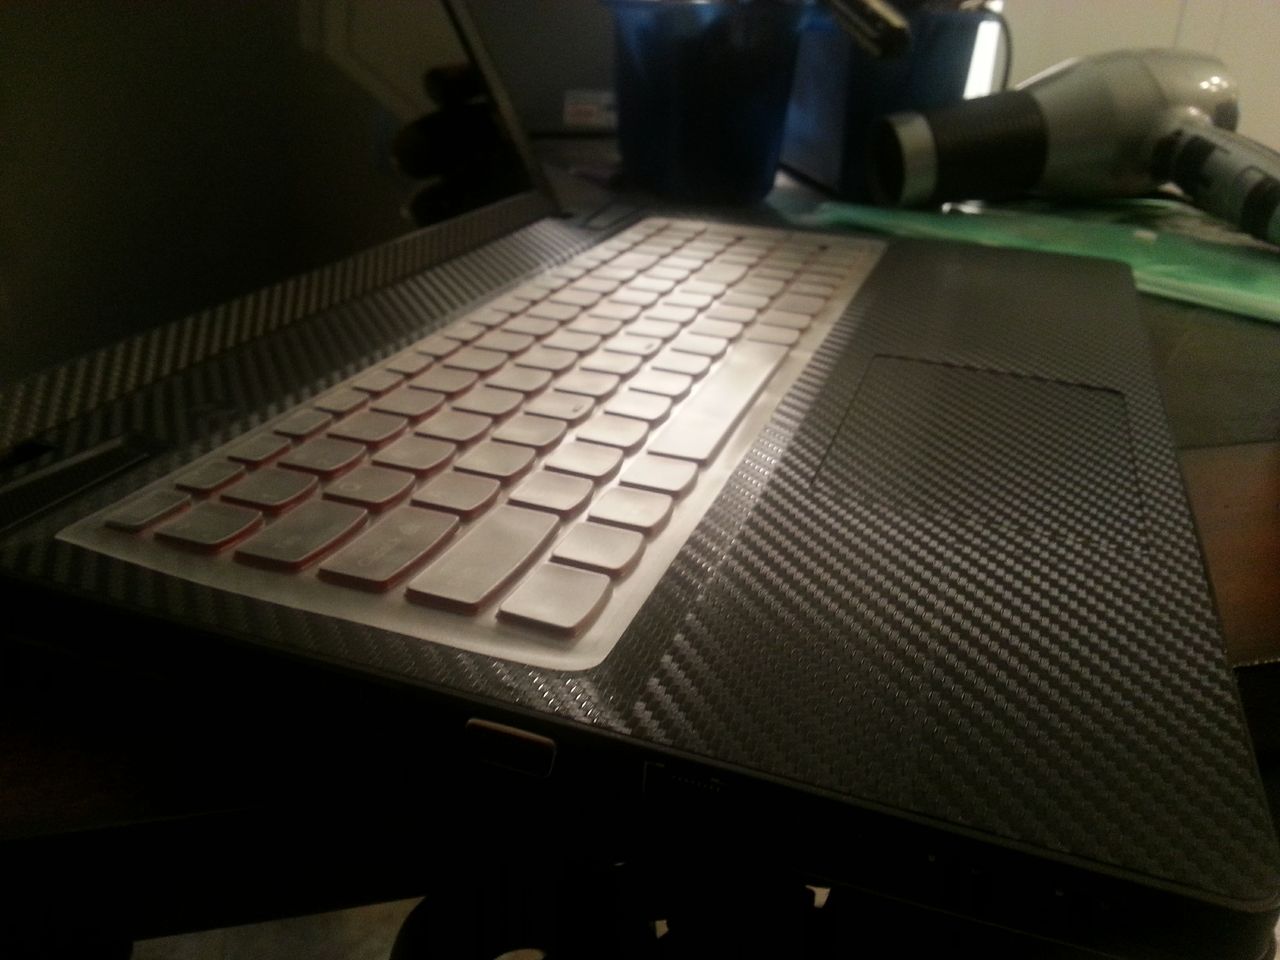
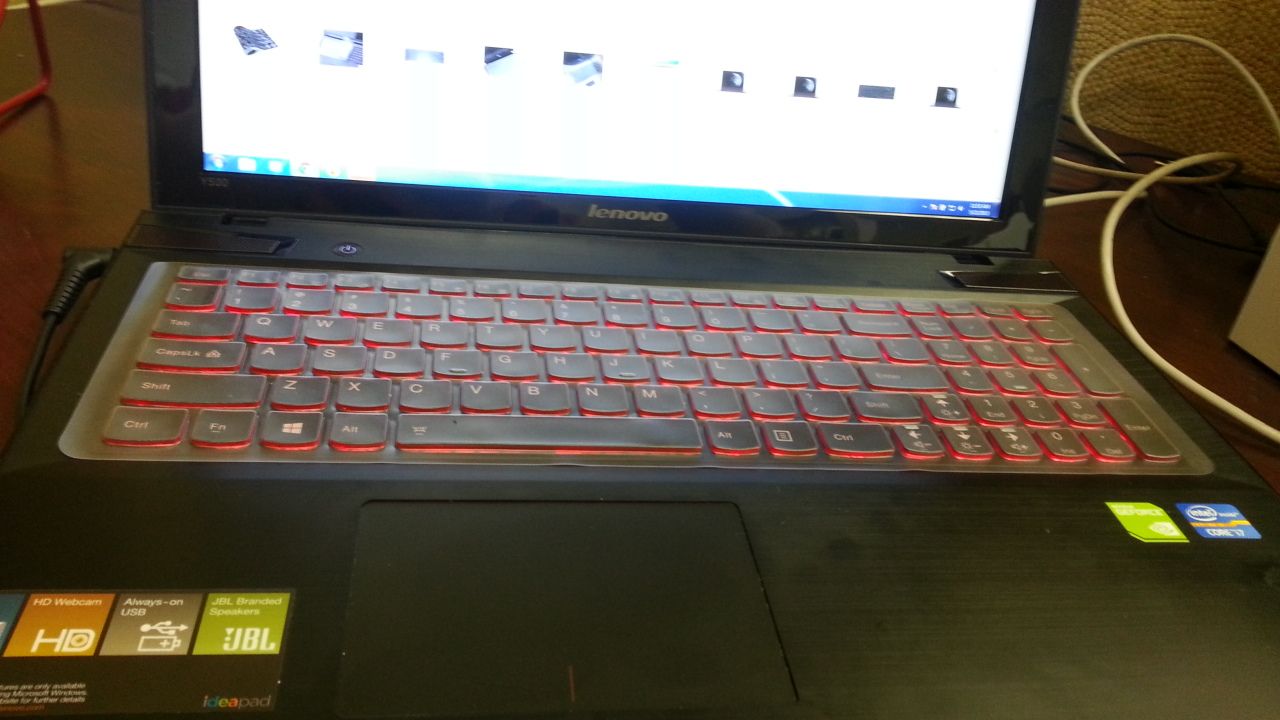
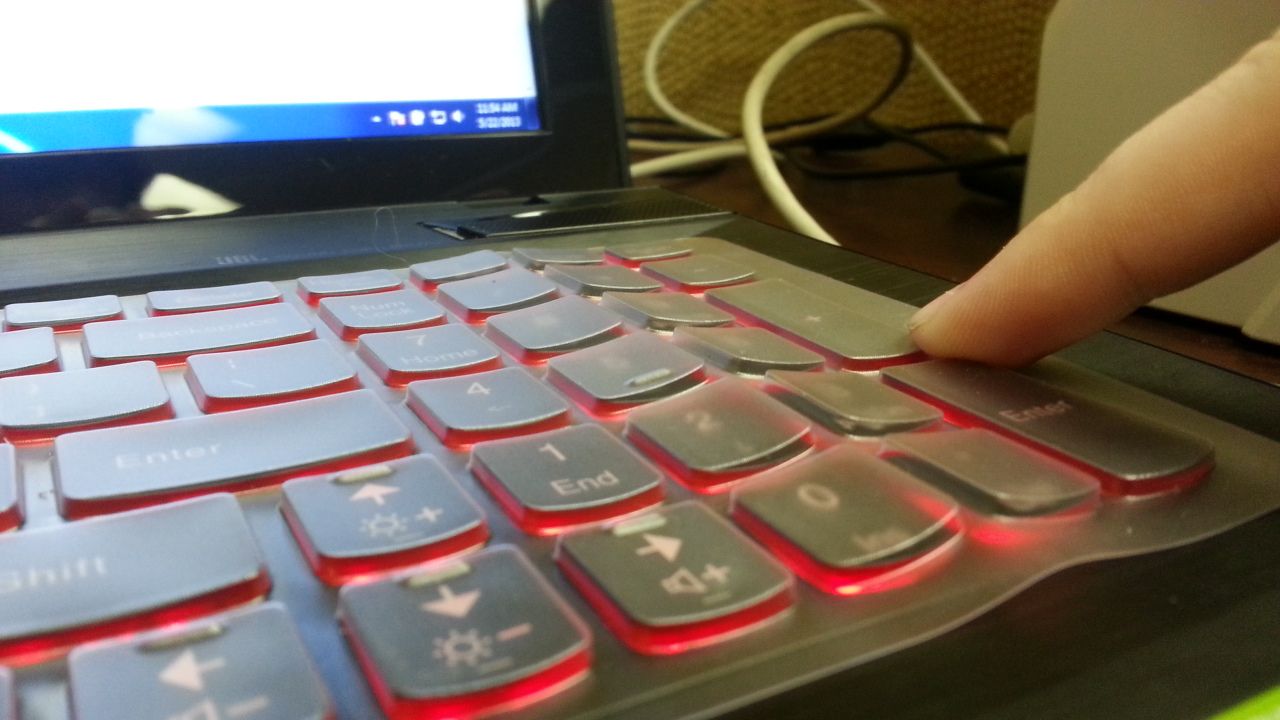
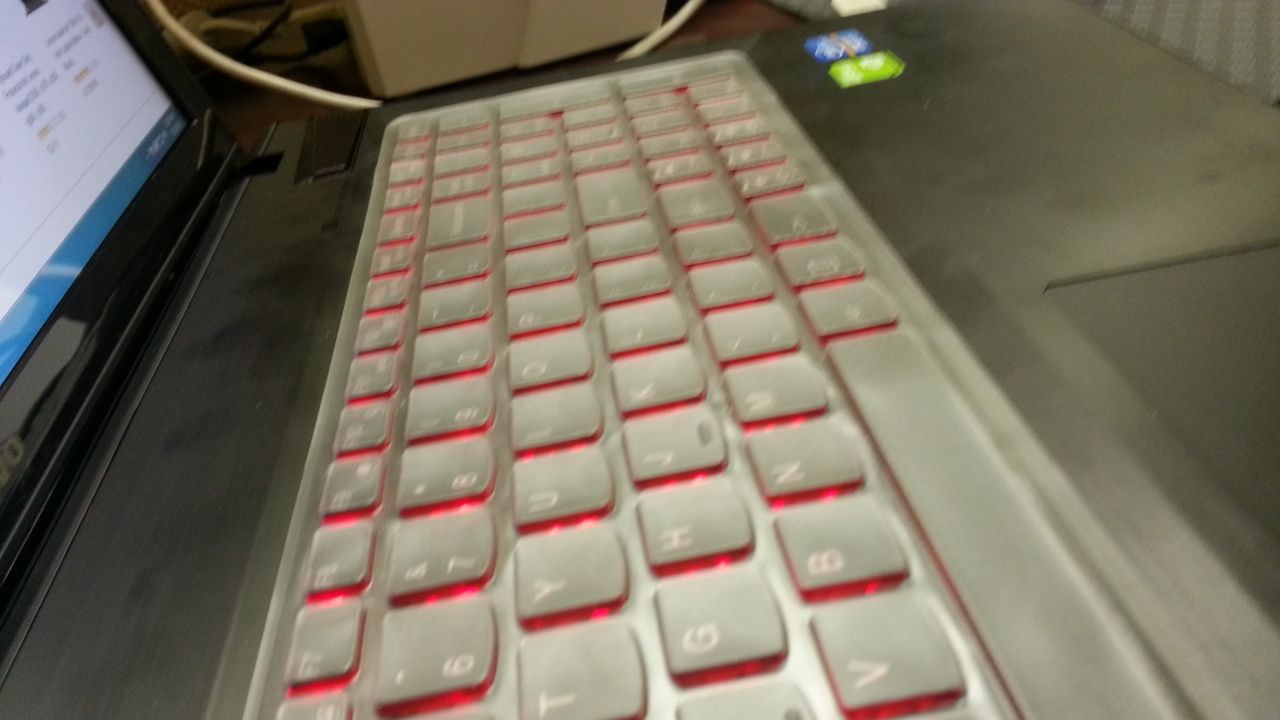
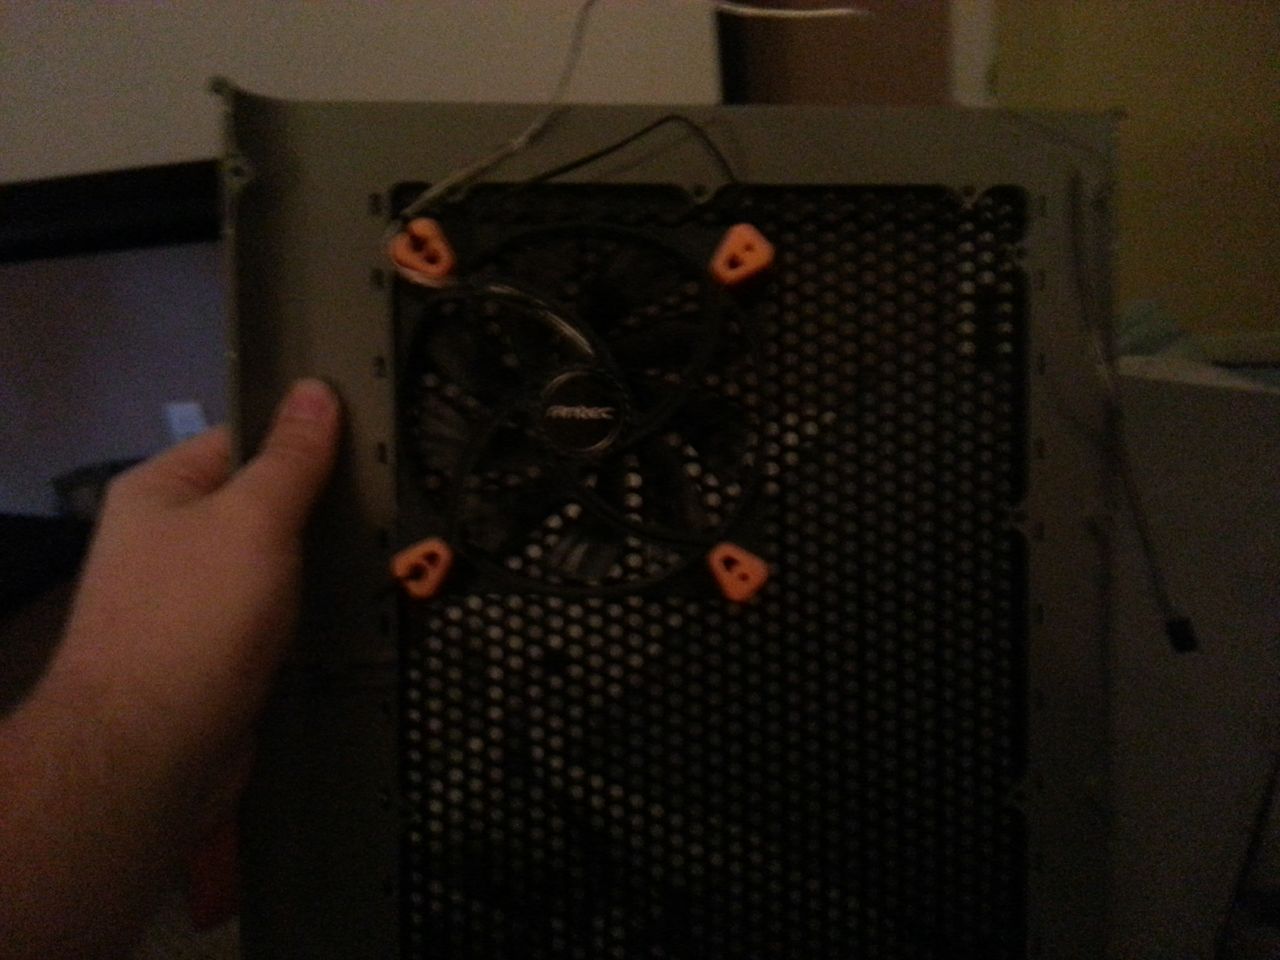
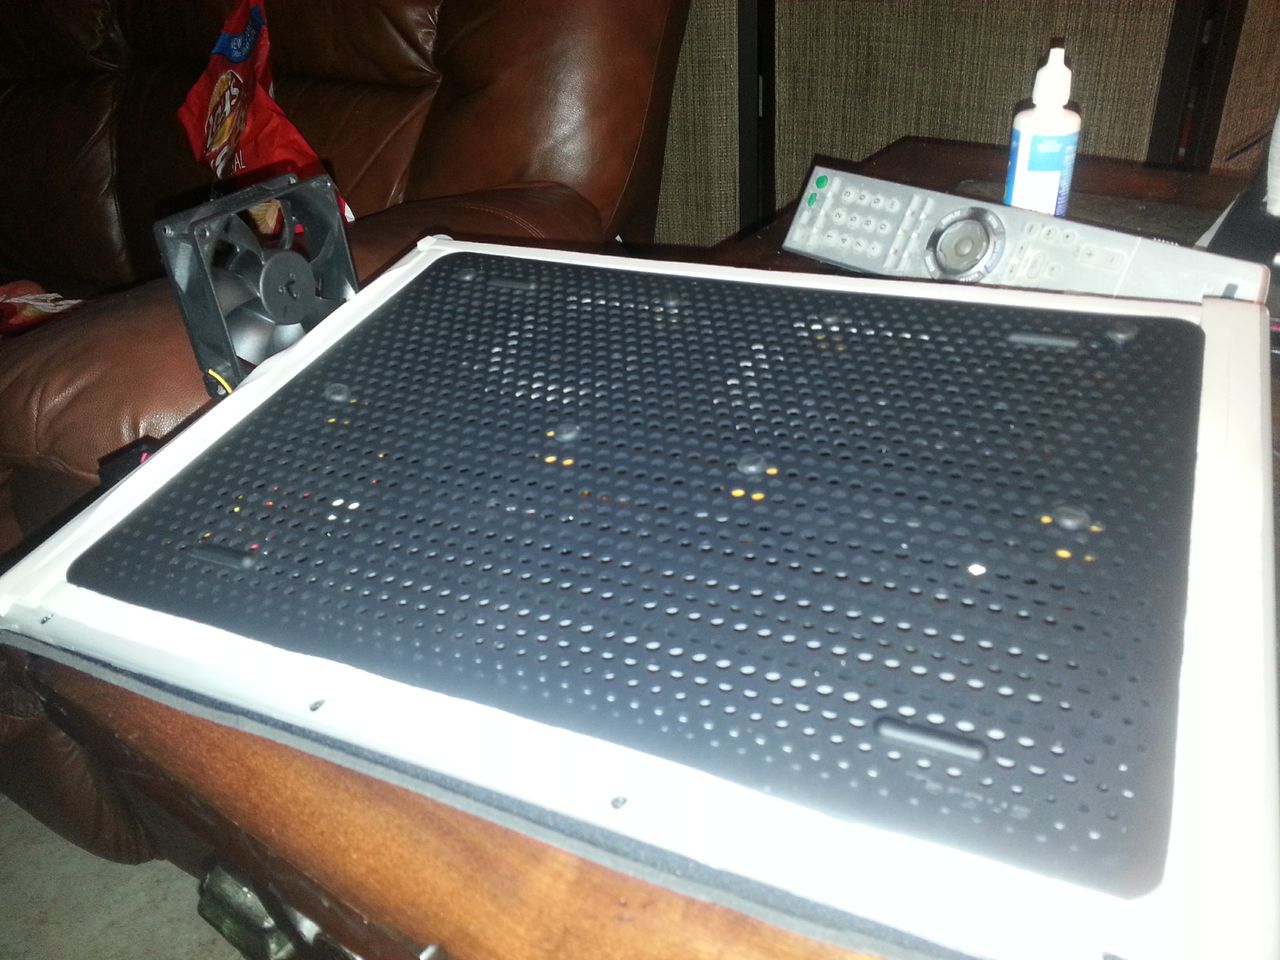
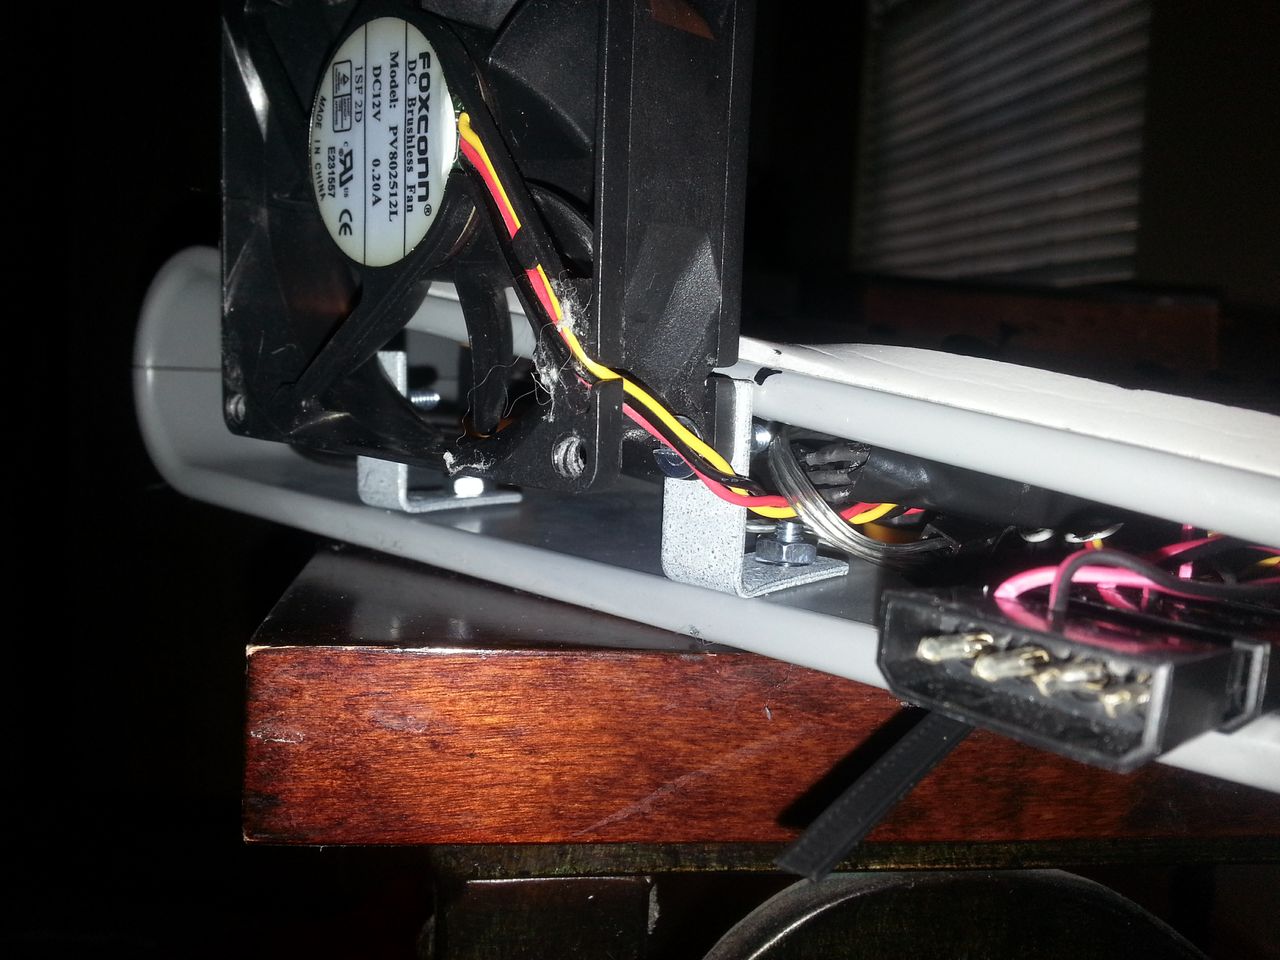
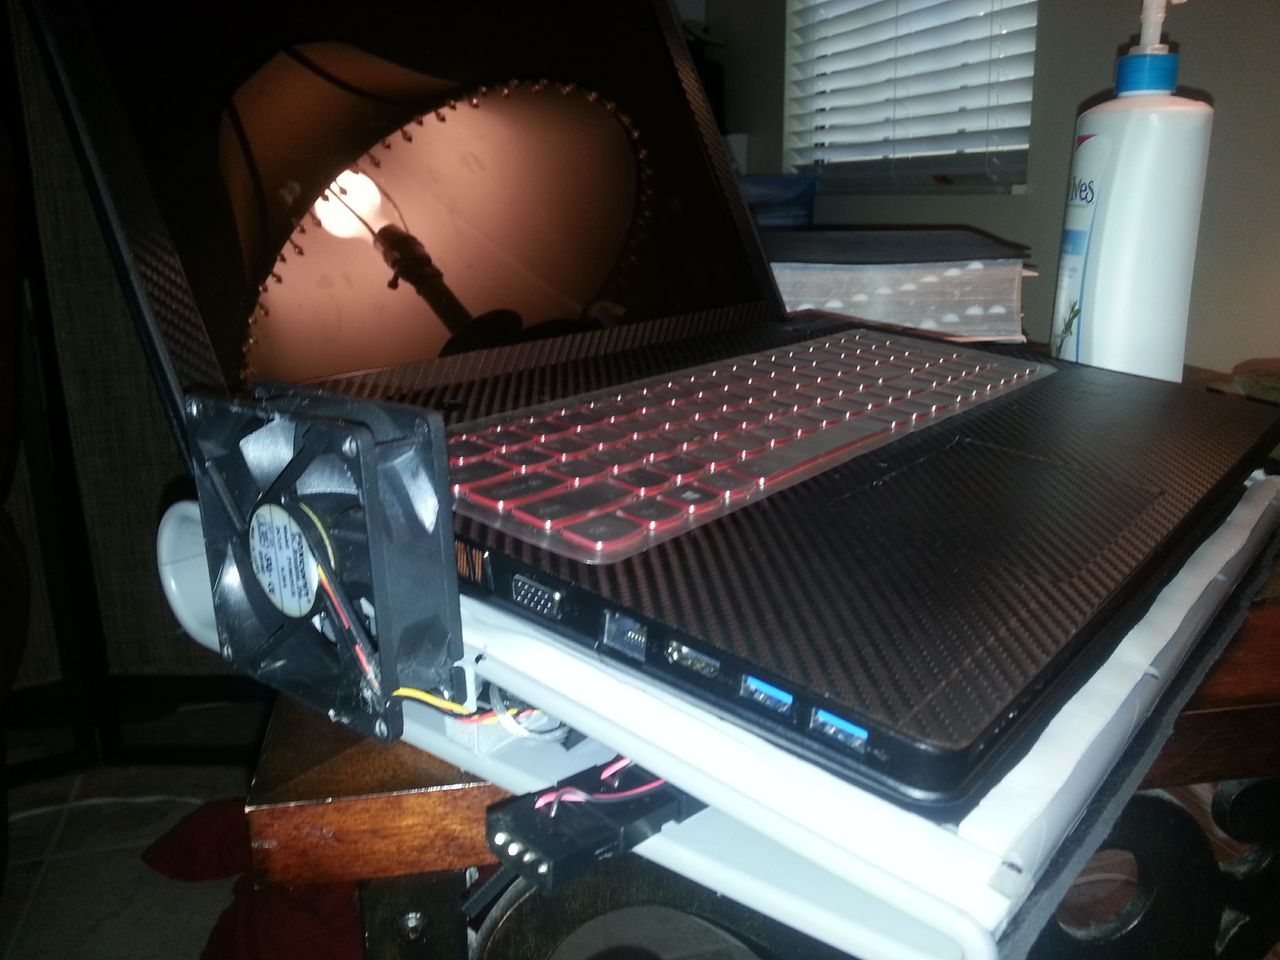
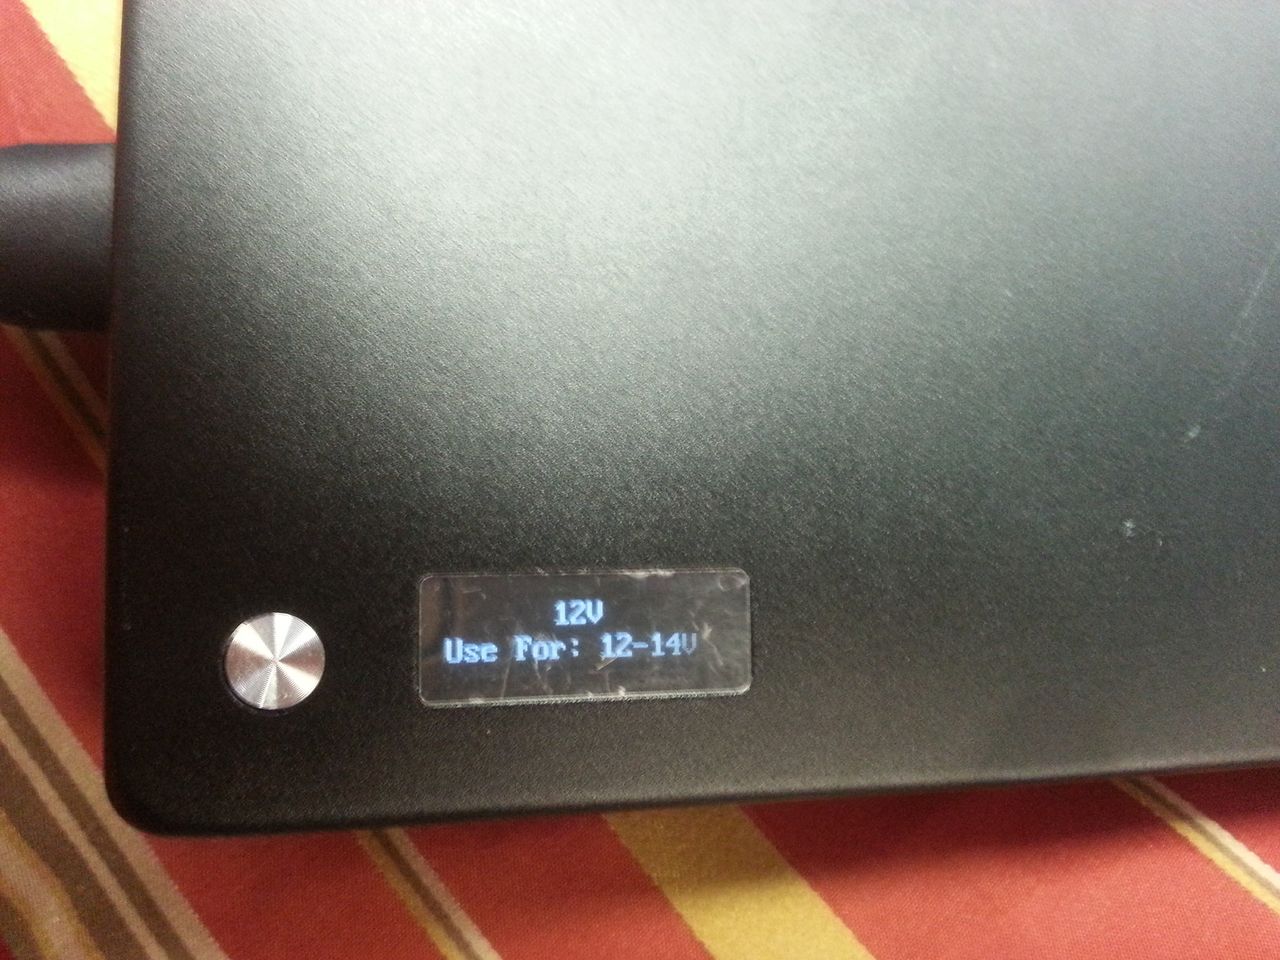
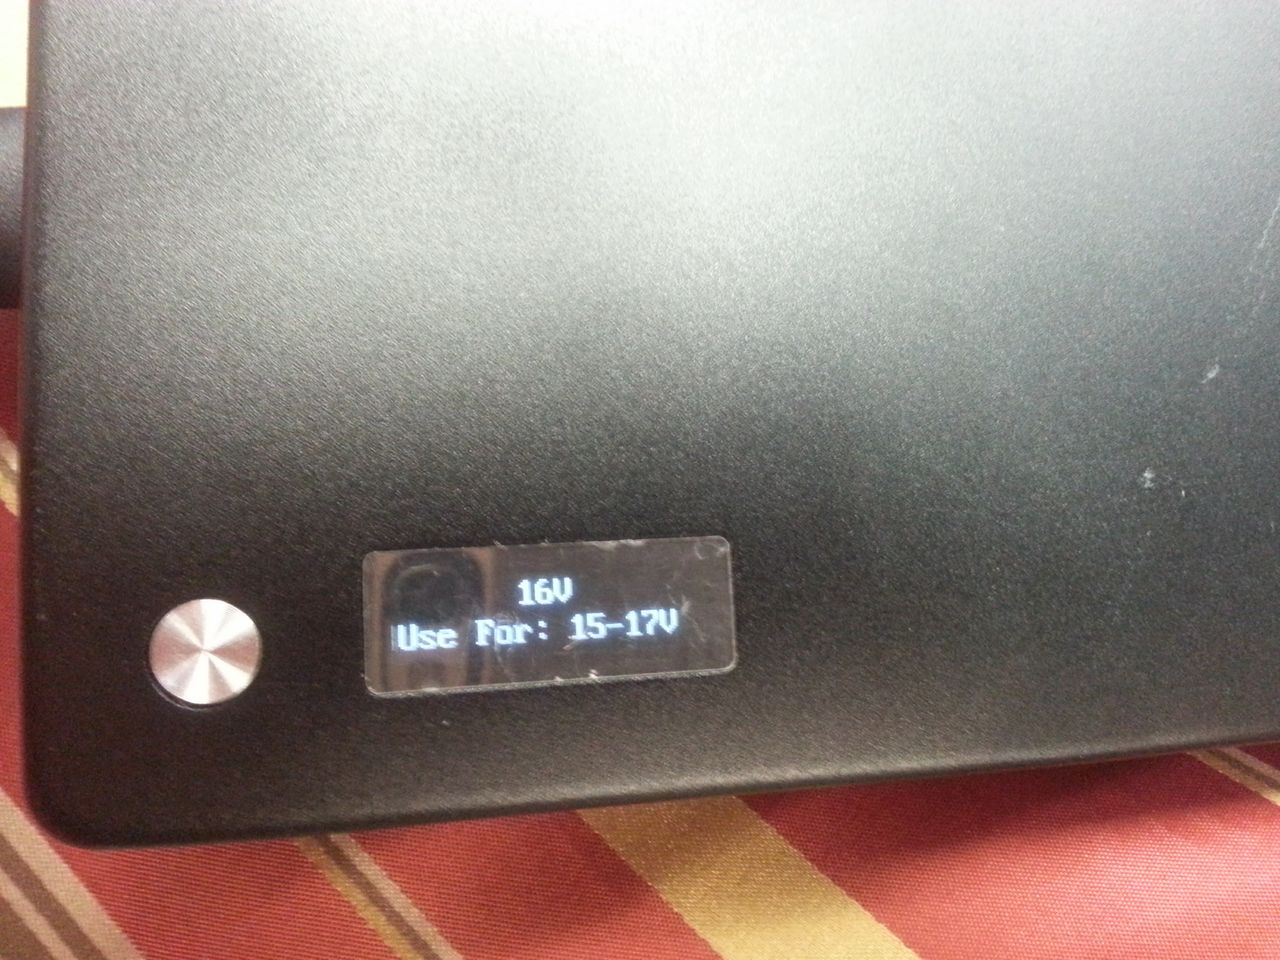
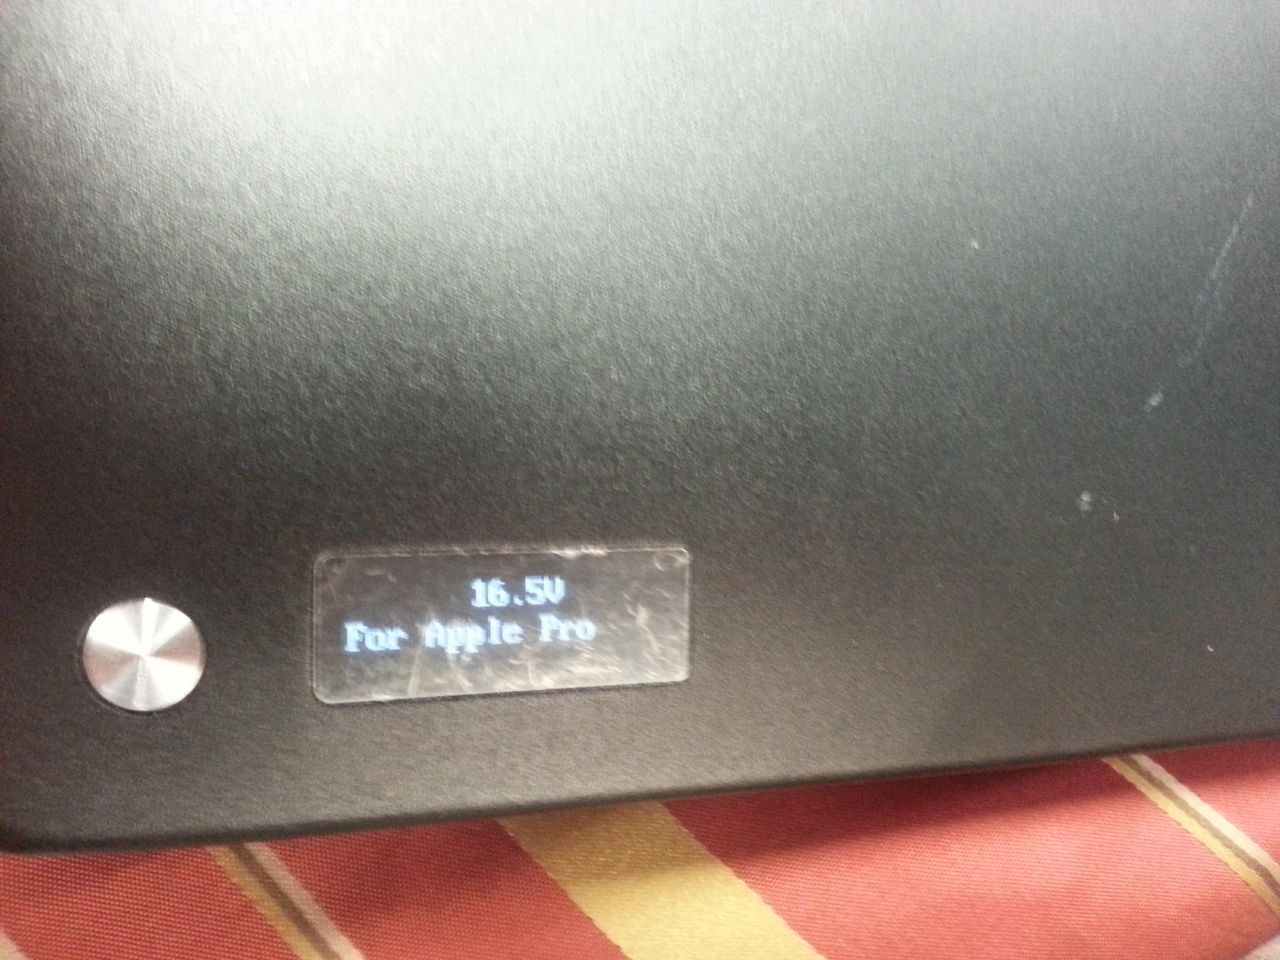
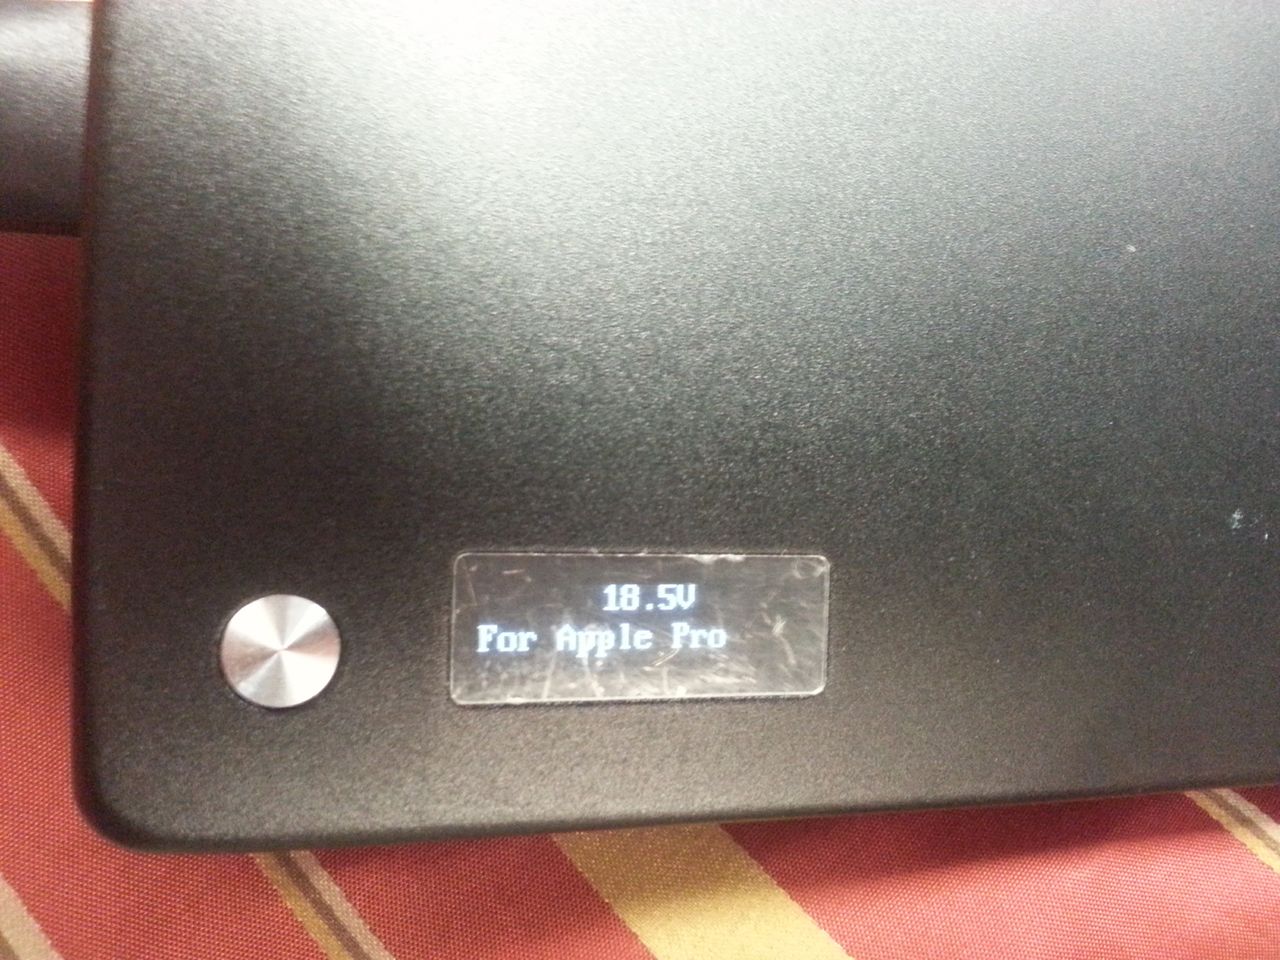
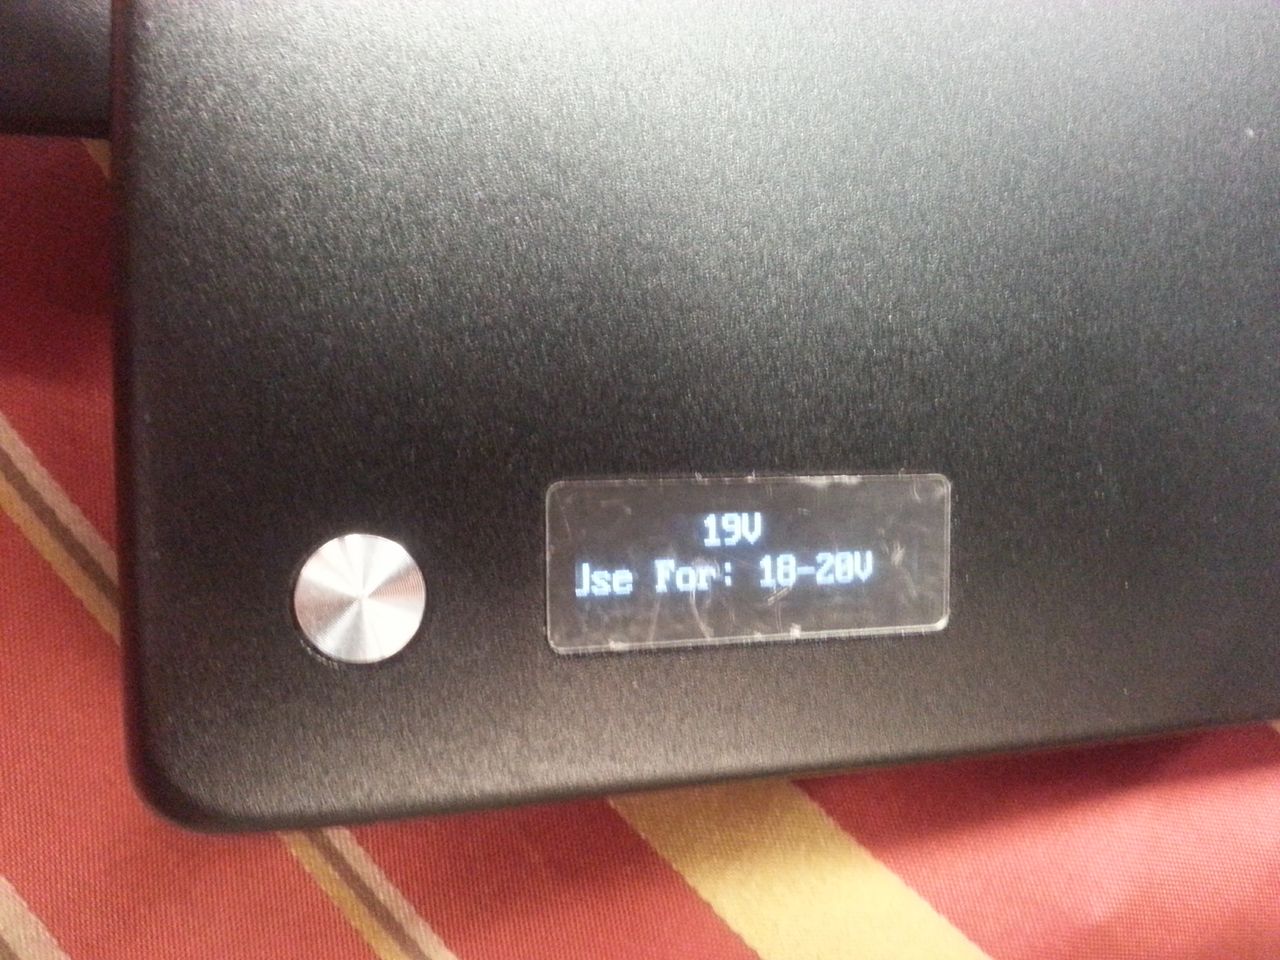
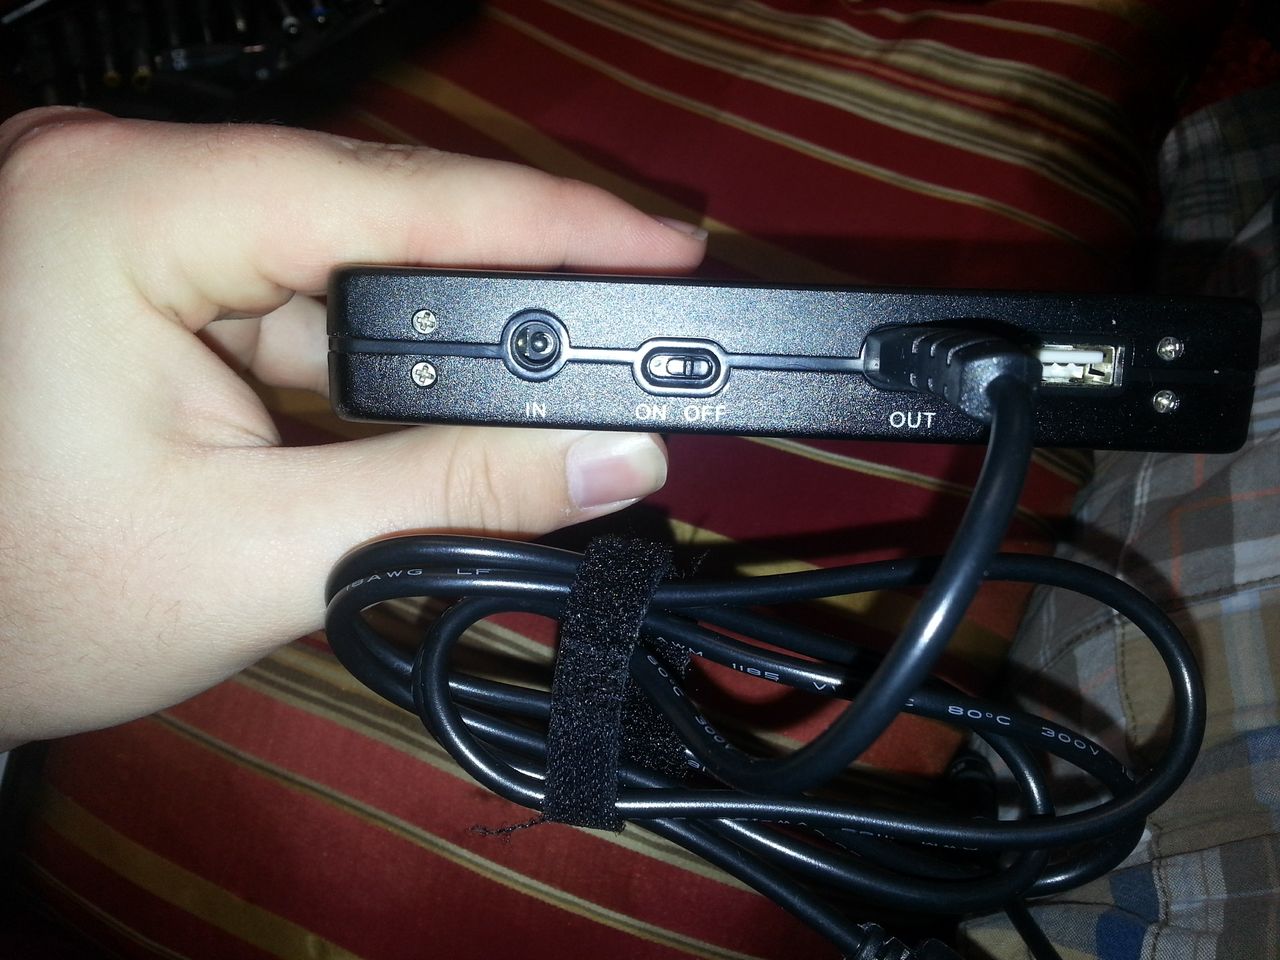
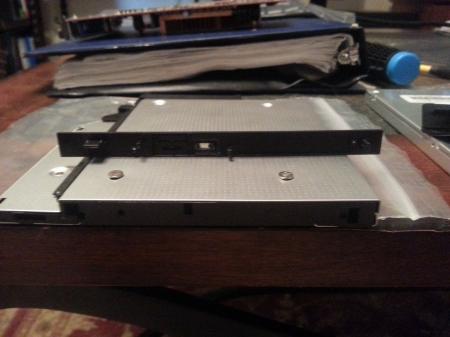
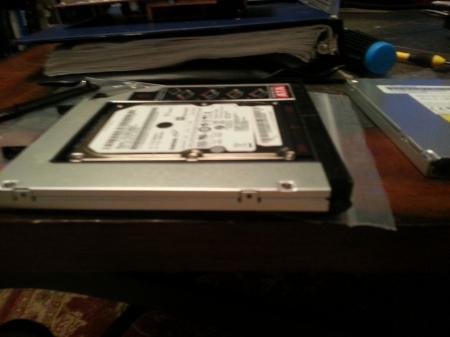
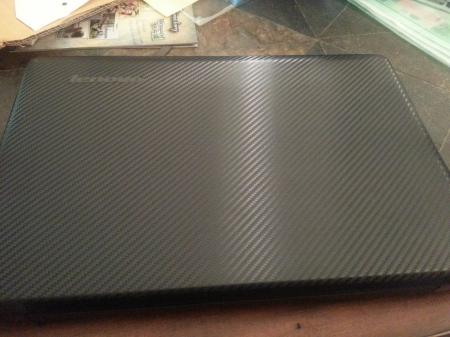
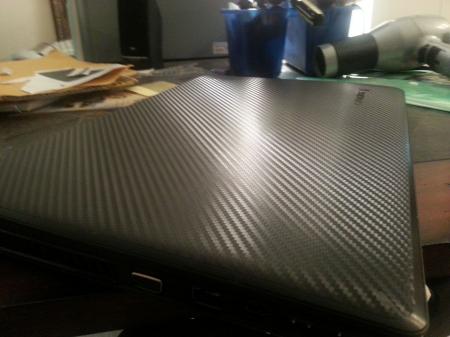
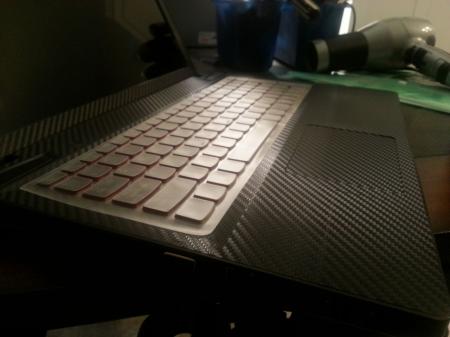
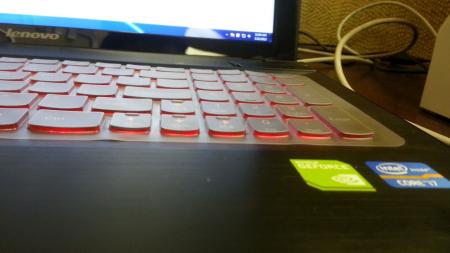
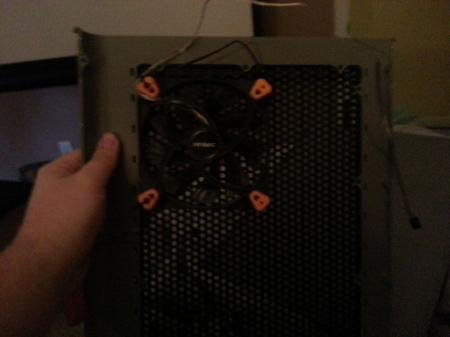
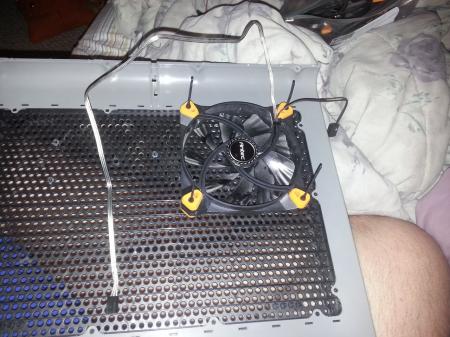
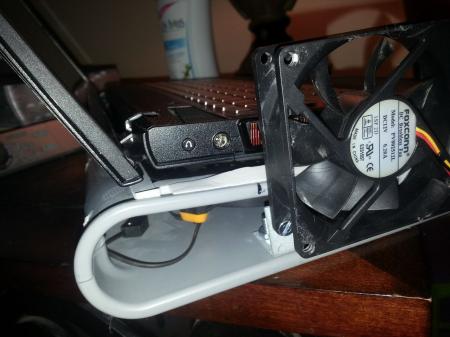
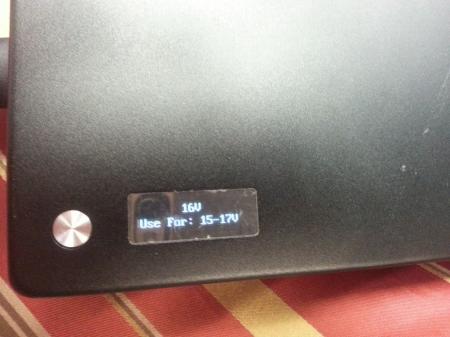
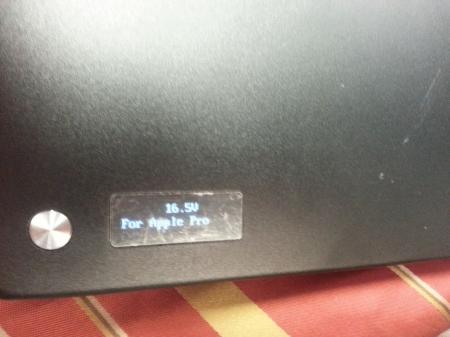
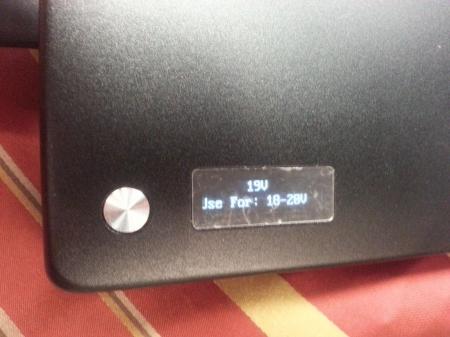
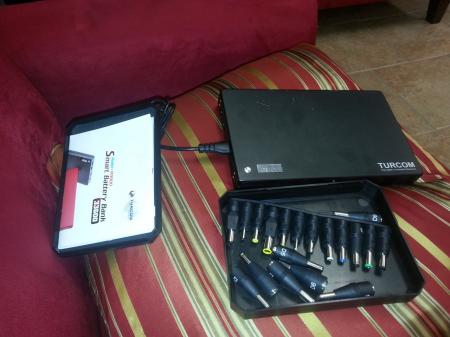
I decided to create this post to enable others to find the accessories they may or may not need. Feel free to contribute any reviews and I will edit the main post to either link too or include them.NOTE: I quoted multiple people that have contributed to this forum, if you do not want your quote in this post please contact me and I will remove it. 1. FRU/Ultrabay/WLAN a. DVD/Blueray b. HDD/Caddy Universal 9.5mm SATA Hard Drive Caddy for hP lenovo I purchased this HDD Caddy off Amazon.com here The caddy itself does come with a faceplate, but it does not cover the entire area that the rounded DVD burner faceplate does, luckily the DVD faceplate can actually snap into the front of this caddy and you now have an undercover HDD *in case you are wondering, the button does nothing* Here are some pictures of my installing my own. I should also mention, like mentioned in this post by bedlam13 you will need to unscrew the plastic front plate from the dvd drive and attach it to the caddy to insert the drive into the ultrabay The difficulty level of installing this caddy was maybe a 2/10. All you need to know how to do is use the right switches located on the underside of the laptop to remove the ultrabay(check your manual for this information). c. GPU Y400 - GT 750m Ultrabay Lenovo shop linkY500 - GT 750m Ultrabay Lenovo shop linkThe general consensus about the GT 650m vs. GT 750m is that they are essentially the same except the 750m is clocked higher and has access to an extra .03 voltage Currently their is better driver support as well as bios mods available for the GT 650m single and SLI, for more information visit svl1's thread as well as jester_socom's thread Link to latest Beta driver 320.18 for 650m/750m Here I can confirm they work on the 750m d. WLAN cards Lenovo IdeaPad Y500 WiFi Stock VS Centrino 6235 Advanced-N - by jester_socom Lenovo ideaPad Y500 WiFi Stick vs Bigfoot Killer Wireless-N 1201 - by William Shadowruby e. Other 2. Cosmetic/functional protection a. Vinyls/Decals Original KH Special Laptop Carbon Cover Skin For Lenovo Y500 Series Link to this product (ebay, took about 10-15 business days to arrive)First I want to mention how impressed I am with this vinyl, It looks amazing. It also provides some scratch protection and the biggest plus is NO MORE FINGERPRINTS!Before you jump on board I have to mention that this vinyl was not very easy to apply. It takes a steady hand and a lot of patience. There are not much in the way of instructions included. Here are some tips for installing it from my own personal experience: Do not remove the entire vinyl, peel back a reference point you can use(for example the "Lenovo" logo) Once you line up the lenovo logo it is much easier to slowly peel the rest of the sticker as it lays down. Use a credit card or something similar as you lay the vinyl down to avoid bubbles Don't work in a dusty area Wash your hands first Try to avoid stretching the material, it is fairly strong and resistant but not indestructible **If you have a friend with a steady hand and some hint of OCD, ask them to do this for youI did purchase this vinyl, but I am going to post a few quotes of those who have also purchased it. Note, I am in no way affiliated with the person selling this on ebay...I live in Florida, enough said. Here are my personal pictures.Also one of my favorite parts of this vinyl is it comes with a cover for the touchpad. If you are like me you like some texture on your touchpad, this takes the edge off the already terrible touch-pad that came with the Y500 b. Keyboard Covers Coolskin clear TPU Link to this product (Amazon- from china 10-15 business days)This was my first keyboard cover, for a laptop, that I have ever purchased. It arrived with a crease in it , I would have liked if they could have shipped it with some sort of hard flat cardboard to keep the shipping from bending it. Although I was able to remove the crease, which I will explain later. This clear TPU(Thermoplastic polyurethane) is made to keep crumbs and small spills from seeping into the depths of your keyboard laptop. It seems to work well, it does make the keys a bit..mushy which takes a bit of getting used too. Because this cover is clear it does not block the LED back lit keys, which is nice. I want to note that this keyboard cover does not fit perfectly, if you turn your laptop over it will most likely fall off. For the price it is not bad, also considering the lack of products for the Y400/Y500.Here are some pictures I tookYou can see the crease in the 4th picture I was referring too earlier. My method for removing the crease itself was to use a hairdryer and apply plenty of heat while letting it lay on the keyboard. Given time it may have taken care of itself. I do not suggest you do anything like put the keyboard cover in a microwave or oven, so if you do it is your problem. Before using a hairdryer I looked up the melting point of TPU just to be safe c. LED Modifications 3. Cooling a. Laptop cooling pads Uberperson's DIY Targus cooling pad So I had a broken Targus cooling pad sitting around my house that looks similar to this one. To put it simply, unless you are a light laptop user and use this pad more for something to put your laptop on, this cooler is pretty bad. The fans included with it are weak. Long story short the USB cord thingy broke and I decided to modify it. The plastic grating looked perfect for installing some Antec silent fans i had sitting around from my last build. Because these fans used rubber screw/plugs the holes worked perfectly to attach the fan to the underside of it.So I cut some of the top material off and unscrewed the pad, where I removed the old fans and attached these in their place. Because these fans are powered via molex and 3-pin I used this AC to molex adapter to power these fans. I didn't really care that I needed an outlet to power these fans because my laptop usually only overheats when I am gaming a lot. Once I had everything up and running I decided that I did no really have enough cooling power for what I wanted. I wanted to find a way to put a small fan near the GPU to exhaust the heat coming out, so i took a trip to lowes and picked up some metal 90 degree angle brackets and put a small fan that lined up next to my exhaust . it does not exactly look pretty, but I am more of a functional person so here are the final pictures!The side fan mainly helps exhaust the hot air from the GPU/CPU, but it also helps move some of the hot air being moved below the laptop. b. Cooling modificationsc. Average Y500 Termperature This information is purely anecdotal and may vary from person to person. Because the Y400/Y500 use a combined heatsink & Fan for the CPU and GPU temperatures can really get up there. Here are my personal stats for running Y500 single GT 750m and I7-3630QM on high performance battery mode, everything else stock.*The following temperatures are recorded using Real Temp GT 3.70 and are approximate I also understand that some of these programs over stress components beyond the scope or use of a normal user or even a gamer. This is purely for science **Room Temp - 25 - 26 CelsiusLight Office use: CPU 49-55 C GPU 41-42 CRunning Prime95 alone 10-min Blend: Average between 88-90 C. Peaks on each core 88/91/96/94 C. GPU reached 56-57 C without stressing any graphics*at this point I ran the dust extractor until I reached Light/idle temperatures and waited 15 minutesRunning Furmark Geeks3D 1.10.6 alone 10-min 1080p Burn-in: CPU average between 85-88 C. Peaks on each core 95/88/89/88. GPU reached 90-91 C*more dusting xD....I know what you are thinking lets do prime95 and Furmark!No.I ended up performing the heavens benchmark in a different location*New room temp 22.2 C or 72 F - temps for heaven are measured through the built-in temp programRunning Heavens 4.0 Basic edition 1920x1080 DX 11, Med shaders, no Tess, Anistropy 4, Anti-aliasing x4, Windowed screen 30 min- Averaged around 75 CPU and 68-70 GPU 4. Power-related a. 170w power adapters b. Spare batteries/Portable power I decided to create this section just because I know a lot of people dislike the limited power usage of the Y400/Y500. Also because I happen to have an external 33600mAh battery . Now as you can see this thing is not cheap, when I purchased it is was around $125. Anyway this thing comes with a whole assortment of laptop tips, similar to those that come with a universal charger. It also has the ability to change the voltage output meaning it can charge almost everything. To put into perspective how much energy this battery can store, the default battery that comes with the Y500 is somewhere between 6000 and 7000 mAh. This battery is 33,600 mAh, now this does not necessarily mean that it will last 5x longer because of some electrical stuff that I know little about. Another cool part about this battery is that it has a usb port as well. Here are some pictures!Note: that awesome little black box did not come with it, I stole that from my mouse. As you can see it was probably originally intended for Mac users(Yuck ) 4. Laptop Bags & Cases5. Laptop/Screen cleaning products


-
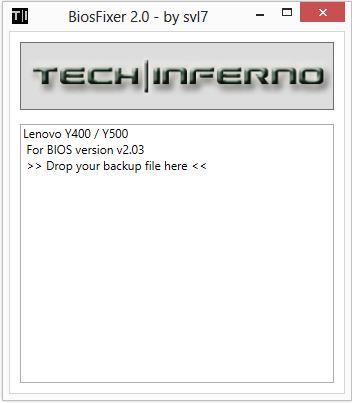
This is continuation of this thread (http://forum.techinferno.com/lenovo-ibm/2690-lenovo-y500-unlocked-bios.html) with all the necessary information in the first post in order to make it easier to find all the stuff. Lenovo Y400 / Y500 - 'unlocked' BIOS / wwan-wlan whitelist removal + modified VBIOS for higher overclocking The Lenovo Y500 comes with a pretty locked down BIOS, and in addition to this with a whitelist which prevents the user from getting 3rd-party wwan/wlan cards to work properly. The modified BIOS versions here will take care of this. Keep in mind that not necessarily all options available in the modified bios will work. Some might not do anything at all, others could possibly leave your system in a state which will prevent it from booting. Use care when changing stuff in the modified bios, don't touch things you're not familiar with. Use all the mods and software posted here on your own risk. Read the instructions carefully. NOTE: This will only flash the bios region. It won't reset the nvars set in the bios. *************** ONLY FLASH A MOD OF THE SAME VERSION AS YOUR CURRENT BIOS VERSION!!! If you're on 2.02 or 2.03 you can safely use the 2.04 update, *************** Attached you'll find modified versions of the Y400 / Y500 BIOS v1.03 and v1.05. Removed as they're outdated. Better updated to v2.02. The bios contains your Windows 8 license, therefore you can't just flash any file, else you'll have issue with your Windows activation. Furthermore the serial numbers, service tags etc. are stored there as well. You don't want to loose them. I wrote a little program that will take care of this issue and personalize the modified bios for you, so that you won't end up with an invalid Windows or no service tags. *************** Preparation to get to BIOS v2.02 (coming from any earlier version): Generally it's a good idea to keep the BIOS up to date. We're luck to have an official BIOS update to v2.02 apparently thanks to a leak on the net. (Lenovo is really bad when it comes to providing firmware updates and fixing issues). The leaked version must be genuine, else it wouldn't flash by using the regular method. If you want to update your system to v2.02 then grab the update here, extract it and flash the bios by executing the included InsydeFlash utility. Once the update is completed you can continue with the instructions below to get a modified version on your system. *************** Instructions for flashing a modified version: As a reminder - the modified BIOS needs to be the same version as you have on your system (2.02 to 2.04 is ok). Prepare an USB stick which can boot DOS. If you don't know how to do this, follow this short guide: Download the flash tool, for flashing you'll need the DOS version, but for creating the backup of your current BIOS the Win64 version will do as well, and it is faster. Get the prr tool as well. Grab the modified BIOS you want to flash, it comes as a tool which will patch the bios for you. Make sure you grab the version that corresponds with your BIOS version. Create a backup of your current BIOS using the flash tool you downloaded (first step) by runing the included backup.bat, or by using the Win or Dos version flash tool with this command: If the .bat doesn't work then open an administrator command prompt in your working directory and run the .bat per command line or type the command written above. In case you get an 'error 104' replace the parts file with the one that can be found in the 'error 104 fix' attachment at the end of the post. And if you still have issues after doing all of the steps above then please leave a reply in the thread and describe your problem. Open the downloaded tool and execute it. Drag and drop your BIOS backup file on it, it will create the mod for you. It will look like this: Put the modified BIOS, the prr.exe tool and the fpt.exe (along with the fparts.txt file) on the root of your prepared DOS bootable USB drive, restart your system and boot from that drive. Execute the prr.exe, if you don't get an error message continue by pressing enter. Then flash the bios by using this command (filename.bin obviously needs to be replaced with the name of the file you want to flash). If you can't remember the name of your file, use the command dir to display all the files on your drive. Flash with this: fpt.exe -f filename.bin -bios NOTE: The name of the BIOS file mustn't exceed eight characters (not counting the extension)! That's a DOS limit, so make sure the name of your file isn't too long. Wait until the process is done. After flashing it will verify the data, in case there's something wrong with the flashed data it will tell you. In that case don't reboot, just flash again. *************** Flashing the ultra bay 650m - only for SLI users with BIOS v2.02: The modified BIOS v2.02 also contains a vbios which will allow you to overclock your 650m past the 135MHz limit. As the ultra bay GPU has it's own vbios module you need to flash it separately. You'll need an USB drive which can boot DOS (just as the one you used for flashing the BIOS). *************** It might look a bit complicated at first, but that's the easiest way I could think of. Let me know if anything is unclear. >> Here's the 'buy me a beer' link in case you like this << Use at your own risk, you are responsible for your system and the changes you make on it. My programs come with absolutely no warranty to the extent permitted by applicable law. Grab file archive here:

- 2578 replies
-
- 243
-

-
I followed the youtube video Lenovo Y400 Y500 Full Disassembly - YouTube. However, the video was probably created with a prototype y500 because some of the layout of the laptop did not match mine. Most noticeably is that there are *three* screws holding the keyboard down not *two*, I almost ripped the keyboard trying to pull it off with one screw still in there. Also, a few of the ribbons are located in different places which I think is an improvement over the y500 in the video. Finally, the hardest part of the entire process was to remove the back cover because it is held on by plastic tabs facing in different directions so the best way is to wiggle it left and right while lifting and not lift directly up. That is just regular white thermal paste on the heatsinks. The OEM thermal paste resembled AS5 in color and thickness and I recommend that it be left alone if the temperatures are good. I have since replaced the cheap stuff I put on there with AS5 and still have not seen the temperatures I saw when it was stock (still 3-5C higher). Here is what I did to stop the twitchy touchpad (issue is well documented in the Lenovo support forum) and the random extra characters the keyboard would add while typing (less known issue).
- 191 replies
-
- 17
-