Search the Community
Showing results for tags 'egpu'.
-
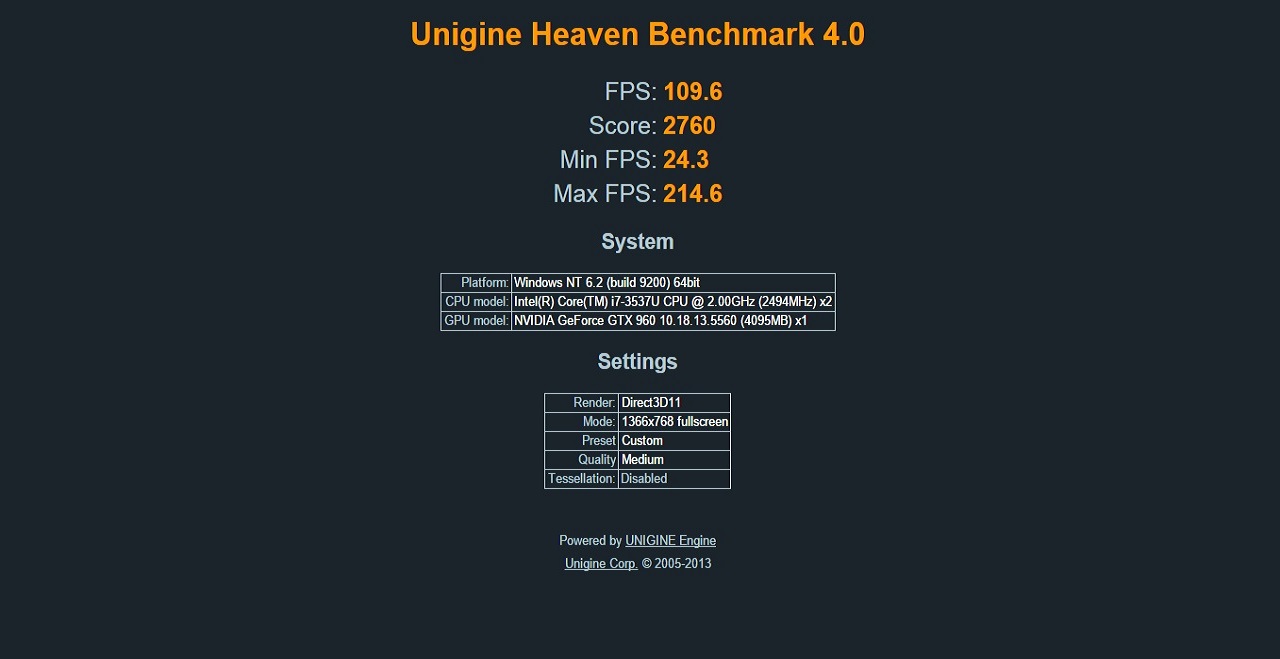
 Hello! New implementation guide on one of the Asus Vivobook notebook series. Notebook Specs: Asus Vivobook S500CA-DS51T CPU: i7 3537u (2.4GHz) RAM: 8GB DDR3 1600Mhz OS: Windows 8.1 64 bit iGPU: Intel HD 4000 Graphics Monitor: LED 1366x768 Touchscreen eGPU Parts Used: GPU: Asus Strix GTX 960 4GB DirectCU II Adapter: Bplus PE4C-PM100C V2.1 PSU: Dell AC-D220P Adapter Adapter: VGA to DVI-I Passive Adapter External Monitor: Dell IN1910N VGA Monitor Installation: 1. Shut down laptop 2. Open bottom and properly attach mPCIe cable 3. Close bottom lid and attach 4. Attach other side to PE4C 5. Attach GPU to the PE4C 6. Plug in VGA and power to external monitor 7. Attach VGA through adapter and then to GPU 8. Attach PSU brick to the PE4C and wall socket 9. Connect 8 pin to two 8 pin cable from PE4C to GPU 10. Set SW2 PERST# Delay to 2 11. Boot up like below 12. Download appropriate drivers 13. Reboot again 14. You should be done! General Use: 1. Ensure all cables are connected appropriately 2. Set PERST# delay to 2 3. Switch on eGPU and external Monitor power 4. Switch on notebook 5. Log in to user 6. Reboot monitor and eGPU power (Hotplug) 7. Check device manager to see if it recognized the card 8. All done! Link is a gen 2 x1 link, and provides a proper playing experience up until 2048x1536 on VGA and HDMI. DSDT Override isn't necessary unless you want to use both monitors at once, although Optimus x1.2 doesn't work. If anyone knows how, please notify! Only completed Unigine Heaven Benchmark 4.0 so far, result below: If you have any questions, please ask! Thanks for reading!
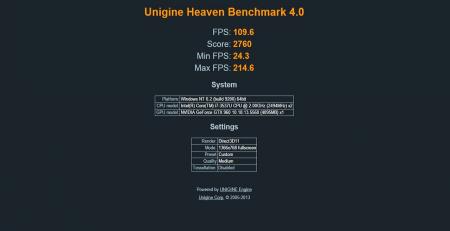
-
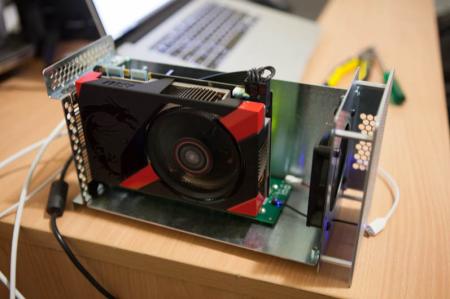
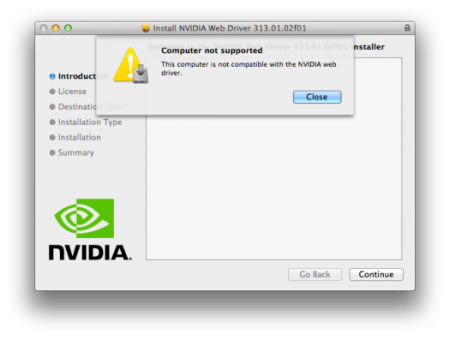
 Setup: Macbook Air2015 with Thunderbolt 2 Connection on OS X 10.10.4 Akitio Thunder2 Nvidia 750 Tisc (One Fan) DellDA-2 Cable: Akitio Egpu 8 Pin to 2 x PCI E 6 Pin Super Low Profile No Latch 1 x Barrel | eBay The Akitio is powered by only the barrel plug The Monitoris plugged into the GPU. The set-up is working, and the card is recognized, but my FPS in games is about the same as my HD6000 I used the Script provided by Goalque: Mac OS X discussion The card uses about 75 watts, but a few people have reported the stock PSU is powerful enough to get the card started, but not if it gets under load. I'm not sure if plugging in the DellDA-2 is any different than the PSU included with the Akitio since I'm just plugging in the barrel plug. Do I need a powered riser? Also, when I look at the Nvidia web driver, it says the 750 Ti isn't supported even though its recognized. Is this just a problem with drivers? I don't know what to do!
 -
 THIS IS A PROVISIONAL GUIDE THAT IS INCOMPLETE, CHANGES ARE BEING MADE CONSTANTLY, USE AT YOUR OWN RISK After about 3-4 days of researching, I'm confident enough to start a provisional guide for 2015 Edition Macbook Pro Retinas both 13" and 15" that have dedicated AMD GPUs instead of nVidia GPU's. A few people have stated that it is impossible to use an eGPU with the new 2015 Macbook's but I believe this is simply not true. After chatting with 2 different Apple engineers at a Genius Bar, I was told that no changes were made to the new 2015 line of Macbook's that would effect the application of a eGPU build, and that it's highly possible to do so. With this in mind I decided to continue with my project and was able to do some extensive research on what parts I would need and what I would need to do with the software. The hardware remains the same, meaning there's nothing extra you should buy, that you would not have bought if you were building an eGPU for any other Macbook. The software, from what I can see is where it gets tricky but I'll get to that later. First off I purchased these: Power Supply - Used to power parts. GPU/Graphics Card - The thing that's going to play Star Wars Battlefront on High Settings at 60 FPS (hopefully) Akitio Case - Used to make GPU thunderbolt Compatible. (You're connecting your thunderbolt cable to this, as GPU's don't have thunderbolt ports). Barrel Plug - Used to attach Dell DA-2 Power supply to Akitio Case and GPU. Super HD Drawing of how the Connections look like Imgur You set up the Hardware like you would any eGPU build. 1. Connect Graphics Card to Akitio Case. 2. Connect barrel plugs 8-pin PCIe end to the Dell DA-2's 8-pin plug. 3. Connect one of the 6 pin PCIe plugs coming from the Barrel into the Graphics Card 4. Connect the Barrel to the Akitio case in order to power the case. 5. You have now powered the GPU and the Akitio case. 6. Your hardware is ready. Now onto the provisional software guide: The software is currently being worked on until my eGPU parts come in to test if it actually works (thus this being a provisional guide) (Requirements: Windows 8.1) At first I thought that the software would be just like any other Apple e-GPU project. Meaning, connect eGPU, install drivers etc. However, the new 2015 line of MBPr's that have dedicated GPU's (dGPU), use AMD rather than nVidia. What this means is that you can no longer use nVidia's Optimus technology in order to connect the eGPU to the new Macbooks with dedicated GPU's. What Optimus does is if it detects that there are 2 nVidia cards connected to the device (the one in the Macbook and the eGPU), it switches to the one with the most power, which would be the eGPU, automatically disabling the default dGPU for you. This allows someone with a 2014 Macbook that has a dedicated GPU, to use the internal LCD screen (the Macbook screen). This is not the case with the new MBPr's with AMD dGPU's. So now, we have to figure out a way to disable the default AMD dGPU and enable the Intel iGPU, which should allow you too use the eGPU for the internal monitor. The problem is that device manager doesn't show the Intel iGPU by default, as that's the way Bootcamp is optimized. It is explained in more detail in the thread below. If you have one of the new 2015 MBPr's with a dGPU and you were to go into device manager on Windows, you would only see the AMD dGPU. You wouldn't see the Intel iGPU. In order to solve this issue I looked at THIS thread. This thread basically solved the whole problem, thanks to users @ah- for providing the file that makes it so device manager shows Intel's iGPU (Intel Iris Pro 5200). The instructions for device manager to show your iGPU are as follows: (Huge thanks to @juniordiscart , wouldn't be able to do this without him) 1. Install reFIND via Windows. 2. Reboot your computer, you should now see a new boot screen. You will see this every time you boot up from now on. Boot back into Windows. 3. Download THIS file and place it on your desktop. 4. Open up Command Prompt, run as administrator. 5. (Thanks to @juniordiscart for the clear and concise instruction) Enter the following commands: mountvol S: /S This will mount the EFI partition in Windows and assign it the drive letter S. You won't be able to see it appear in "My Computer" however, it remains hidden. S: cd EFI dir Check the output after these commands. If you see a directory for refind, then you have refind installed and you can proceed with the next set of commands. Otherwise, make sure you follow the installation instructions for rEFInd for Windows onthis link: The rEFInd Boot Manager: Installing rEFInd xcopy /E C:\Users\YOURUSERNAME\Desktop\apple_set_os.efi S:\EFI\custom\ This last one copies the efi file to the custom folder of the EFI partition. Make sure you get all of the "\" right and that your path to your apple_set_os.efi file is correct. It should ask you to create any custom directory if you don't have one already. 6. Now that you've done the hard part, when you reboot you should be brought to the reFIND boot screen and there should be a new option called something like "apple_set_os.efi". Open this up. 7. It should flash the screen quickly and bring you back to the reFIND boot screen. (If it opens up and stays on the screen for more then a minute, shut off your computer and try again) 8. Boot to Windows. 9. Check device manager. Your Intel iGPU should now show up. Congrats you've done the hard part! Now install your Intel Drivers ( https://downloadcenter.intel.com/ ) BUT WAIT------ While installing your Intel drivers your screen will flash black and most likely freeze up. Let it sit like that for a couple of minutes or so and shut down your computer by holding the power button till it turns off. Turn it back on, and REPEAT STEPS 6-7 above. Every time you shut down your computer you have to first start up the "apple_set" efi file, then start Windows. Or else your iGPU won't show. Now you have the latest Intel drivers. Disable your dGPU in Device Manager (right click it, disable), your Macbook should auto switch to the Intel iGPU. Personally, all of the above worked great for me. I was able to disable the dGPU and use my iGPU. The speed at which the 2880 resolution screen ran was evidence enough that it worked. Now, we wait Since my parts haven't come in yet I'm not able to see if connecting the eGPU will allow me to use the Mac's internal display, but they should be here soon so I'll update as soon as I get them. (To be continued.....) Edit: If anyone can explain to me what error 12 is and how it occurs please do . Thanks!
 -
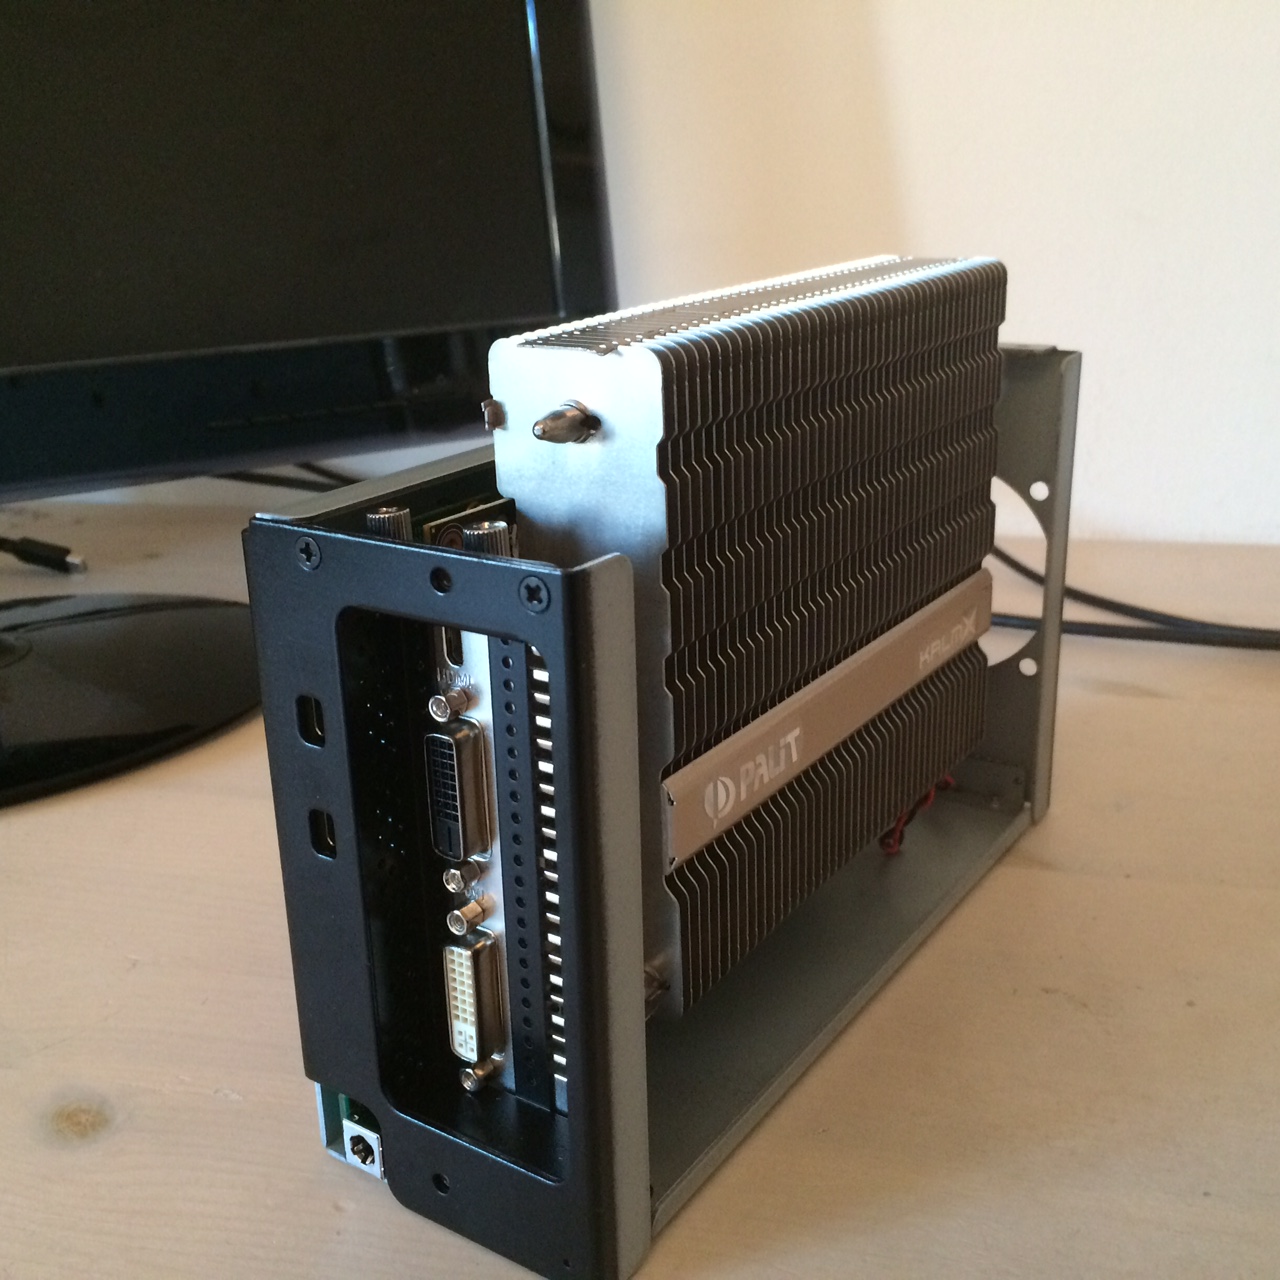
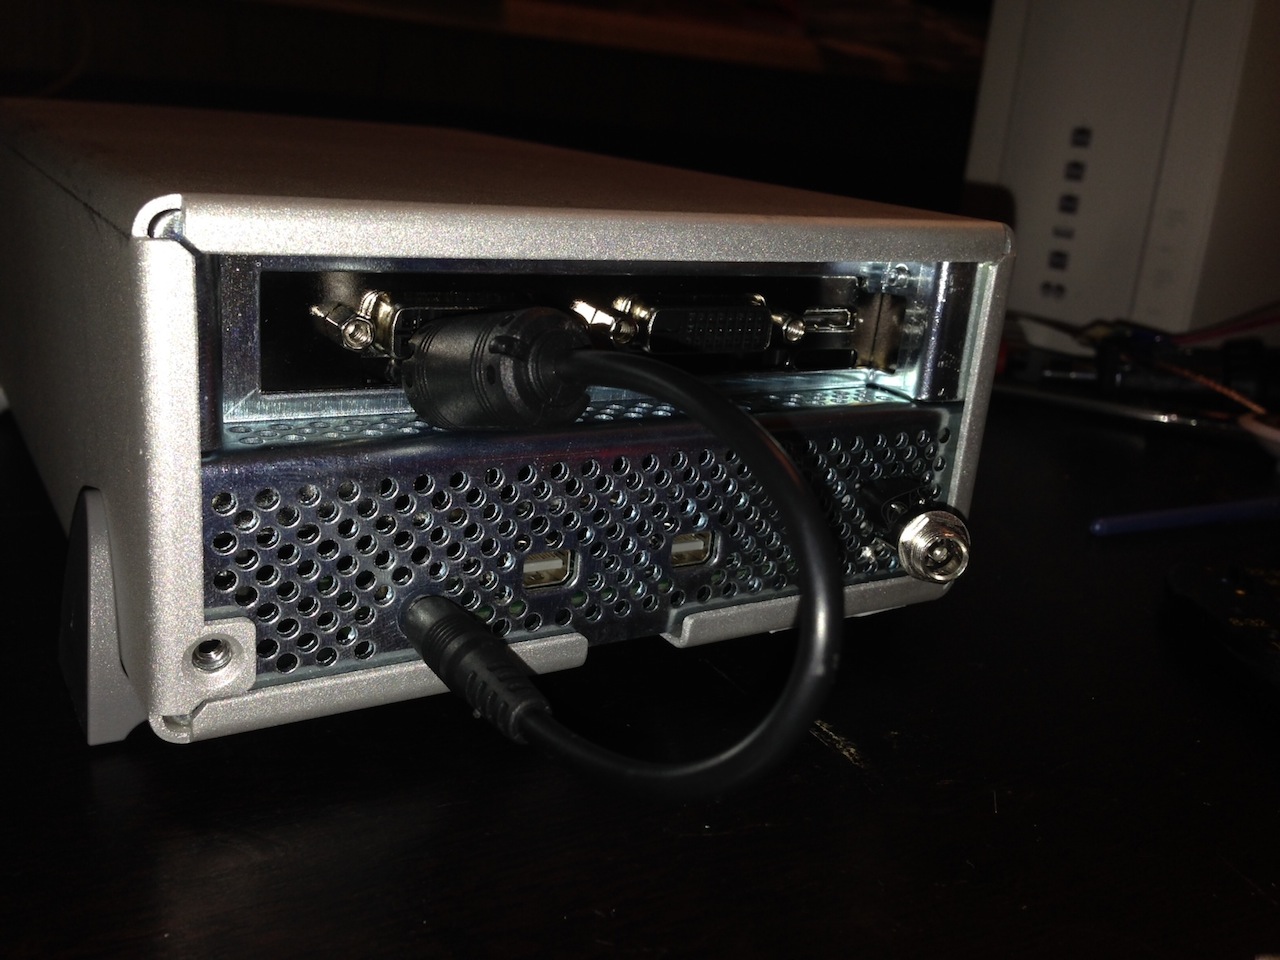
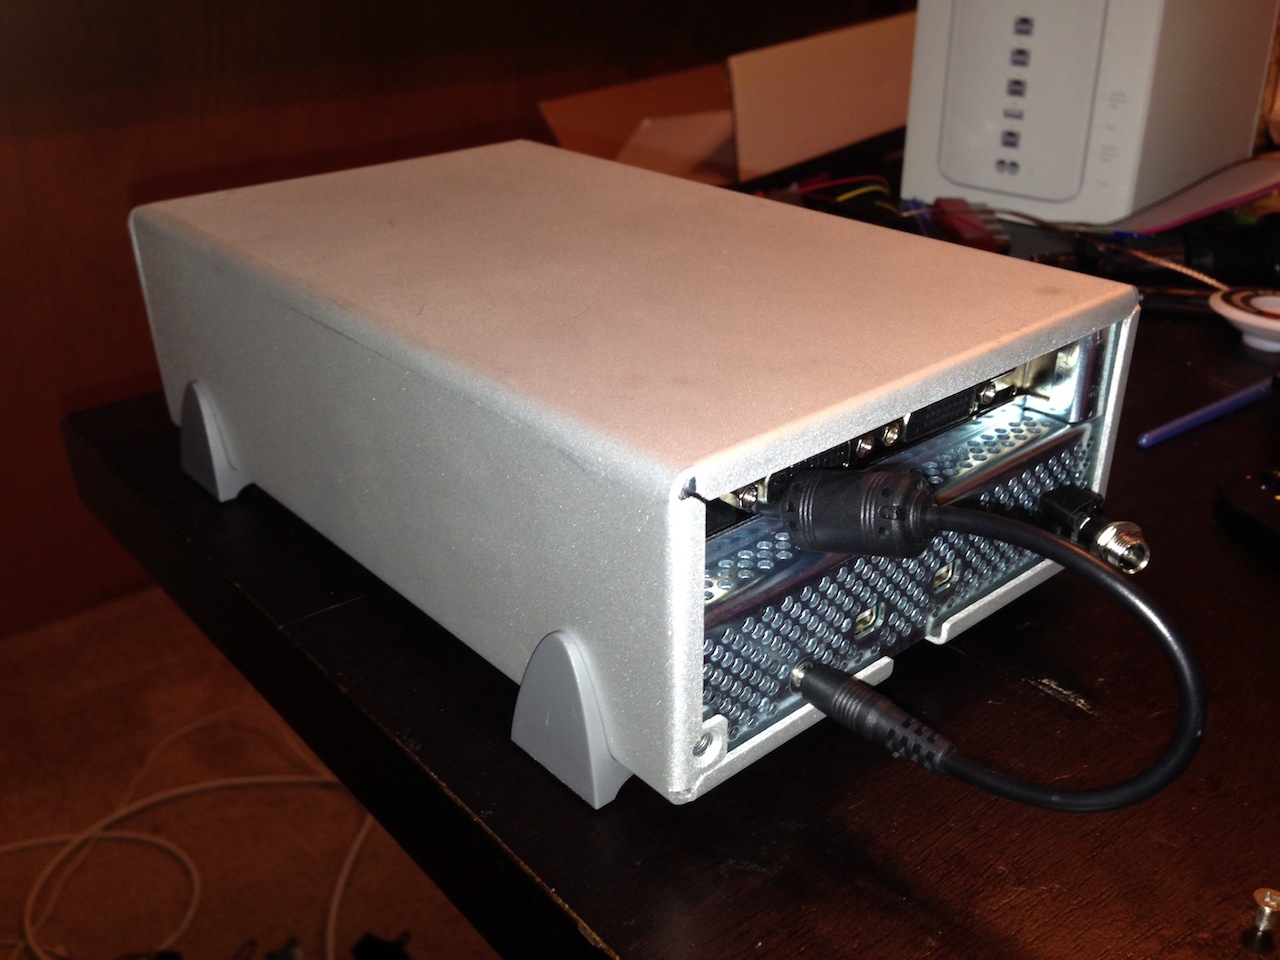
 Hi people! I just wanted to share my gGPU setup with you and talk about the benefits and problems. I bought the Akitio along with a passive Palit GTX 750 TI because I didn't want my gGPU to make any noise nor to need any extra power supply. The Maxwell GTX 750 ti does all that since it only draws 60W and like this, I just needed to apply the guide (here) to pass up to 75 W through the PCIe port so that I could make the most compact setup possible (with a passive GPU). I even got to make it work under OS X and Windows stable, although on Windows I didn't activate optimus with the internal screen of my 13" rMBPr Late 2013. The setup works very stable in idle and whenever I really push it hard, I just put a little 6cm NB-Fan in Front of the GPU which it cools down to less than 60 degrees on 100 % load without any noise. My only problem now is, that there shouldn't be any noise, but yesterday the Akitio and its PSU startet to make a buzzing noise at full load which I am not sure if it is coming from the coils of the PSU or the Enclosure itself. Anyway my main problem is now that I then found that the Akitio makes a subtle but perceivable very high frequent noise as soon as the PSU is plugged (Akitio not activated) Now my question is, could someone who ownes a Akitio check, if you can hear this noise on any Akitio or if it is just mine that has a problem. Thank you very much in advance! Regards, salut
-
 Hi guys, I am new to this forum, so forgive me if I posted this thread in the wrong place. I am a PhD Student in New Zealand. I want to build an eGPU setup to enable my Laptop to have stereo 3D via the external card. I will be testing it with quite a few cards GTX470, GTX570, GTX770(my current desktop driver) and a Quadro K5000 (which I need for my research). I wish to get the eGPU setup for my Stereo 3D research. I am planning on buying the AKiTiO Thunder2 PCIe box and use my laptop's thunderbolt port to connect the eGPU. I will primarily be using the setup for research but also sometimes for gaming. What else other than a PSU and AKiTiO Thunder2 do I need to setup my eGPU? I live in New Zealand, can I ask AKiTiO to ship one here and still avail the 189$ discounted price our group gets? If I am successful I will definitely make a tutorial for the ASUS g501JW eGPU setup. Thanks a lot.
 -
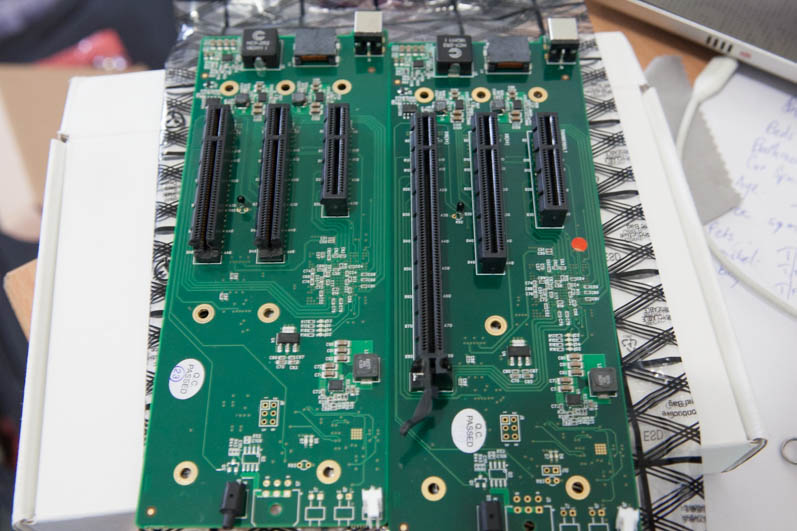
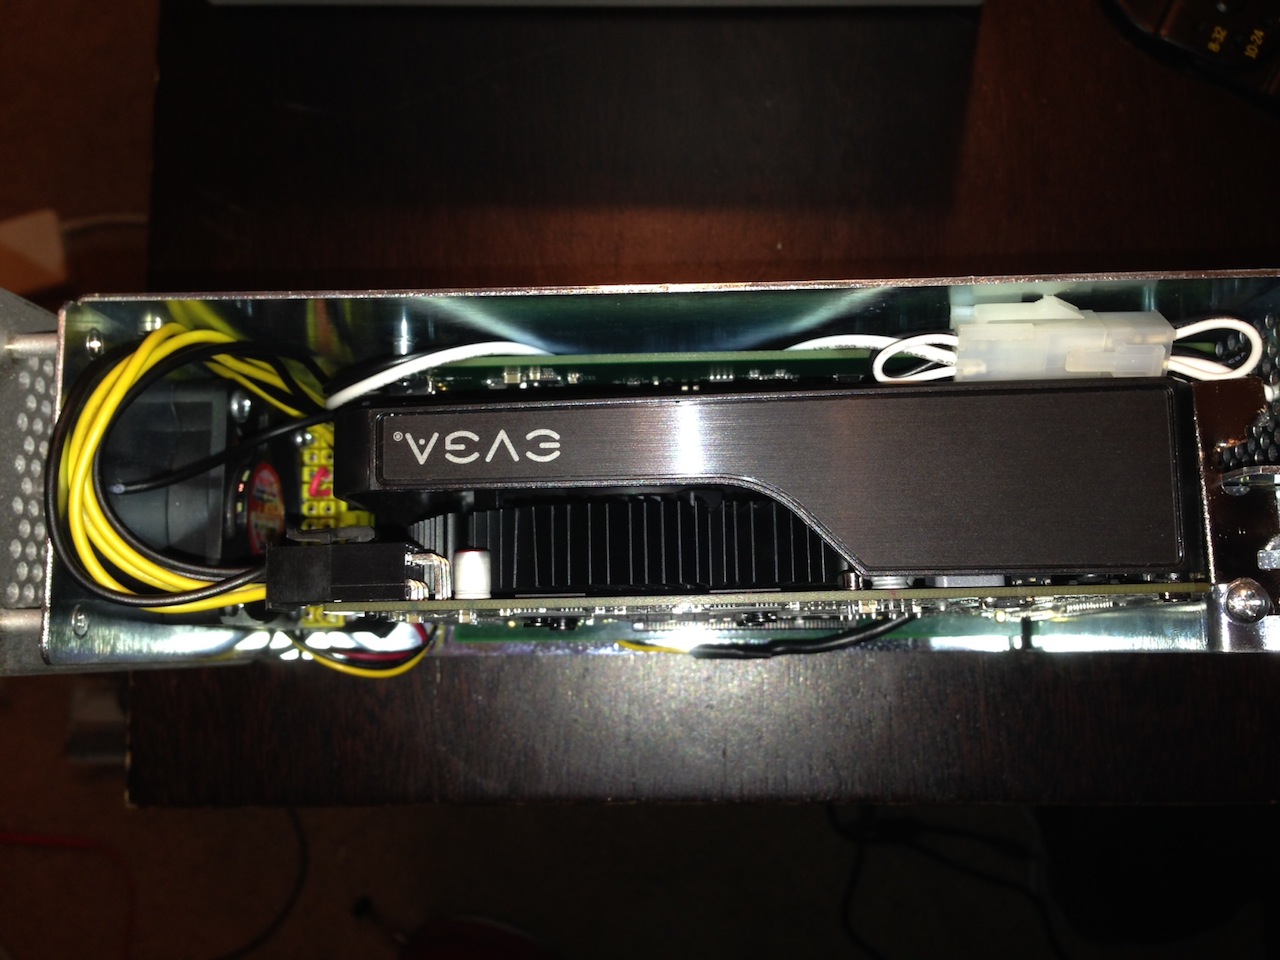
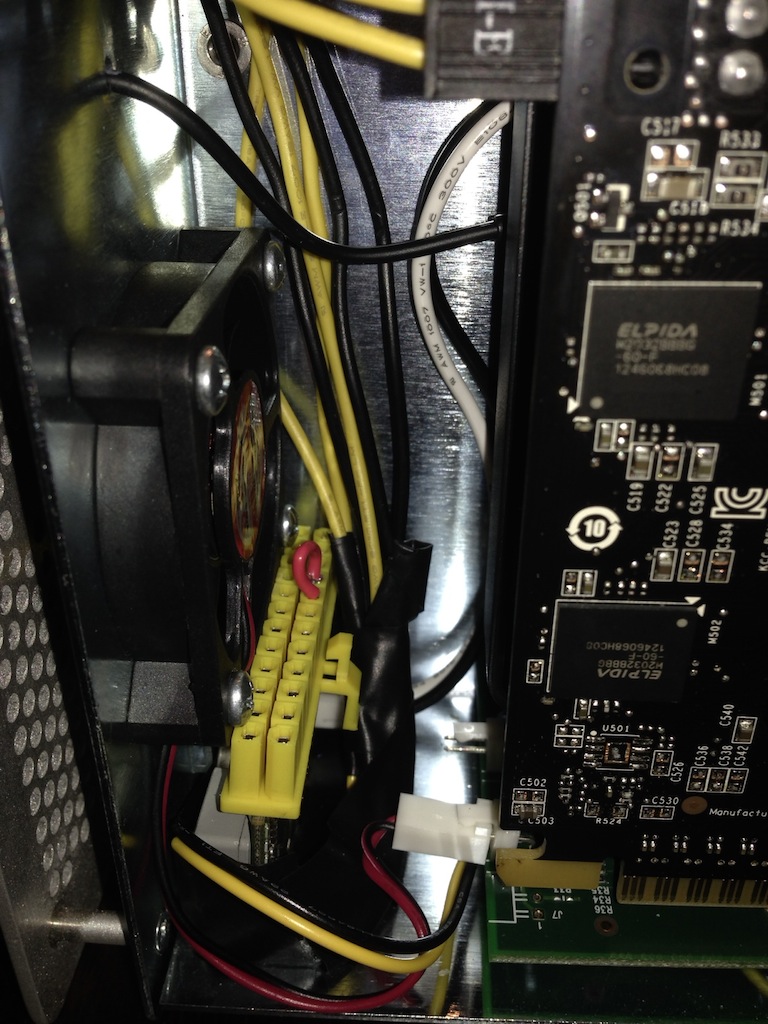
 Hi guys, Following on from @squinks' work: http://forum.techinferno.com/implementation-guides/6689-%5Bguide%5D-2013-15-macbook-pro-gt750m-gtx780ti%4016gbps-tb2-sonnet-ee-iii-d-win8-1-a.html#post91182 I have finally got my Sonnet Echo Express SE II working with the MSI Nvidia GTX760 and my late-2013 Macbook Pro 15" which I custom ordered to have only the Intel Iris 5200 GPU. It is also a quad-core with 16GB ram and 512GB SSD. I am powering the card using a Corsair RM650 because that is what was easily available, fully modular (so I only need the PCIe power cable) and has a power switch easily accessible. I am running Windows 8.1 which I have installed UEFI using this guide. Originally when I received the Sonnet I found out that the PCI slots were only 8x length and so you could not insert the graphics card which is 16x length. Because I am a bit of an idiot and couldn't find a google answer easily enough I tried to hack off the end of the slot with a utility knife. Unfortunately it seems that when I did that I put too much pressure on the PCB and broke it. I received the new board yesterday and you can see in the photo below that it looks like in the later revision (right) they changed the left slot from an 8x to a 16x so you don't have to hack up the slot like I (failed) to do. It is a shame that they didn't extend both of the slots as there would be more airflow if the middle slot was 16x too as the edge of the enclosure would be further apart. Also, the power cables only just fit and are under some pressure when the case is on, I haven't been able to find many 90 degree 'low-profile' PCIe power cables but that would solve this problem. In terms of operation it is a bit of a pain. If the Sonnet and the graphics card are powered when you turn on the machine then Apple's BIOS disables the Intel GPU. This will work perfectly with an external screen but if you have used one of these MacBooks you will know how incredibly good the MacBook's screen is. To get Optimus (or to install drivers) my turnon sequence is: 1. Turn on machine with only the Sonnet plugged in (PSU off). It annoyingly doesn't have a power switch but will turn on when the Thunderbolt cable is plugged in and MacBook is powered on. Hold down the alt/option key so you can select Windows. 2. As soon as the Apple startup chime is heard turn on the PSU (and therefore the graphics card). 3. Quickly start up Windows. I suspect something is happening with the Sonnet's power settings that if you delay then the GPU is not detected. Weird. 4. You should be able to tell the GPU has started as Windows does some strange stuttering on startup only (e.g. typing in password is strangely laggy) but this is completely gone after logging in. I haven't got that many benchmarks but you can see it is running correctly over Thunderbolt 2.0: CUDA-Z Performance Information ----------------------- Memory Copy Host Pinned to Device: 1262.49 MiB/s Host Pageable to Device: 1128.11 MiB/s Device to Host Pinned: 1352.1 MiB/s Device to Host Pageable: 1206.5 MiB/s Device to Device: 64.3746 GiB/s If you do the maths then Host to Device (1262)+Device to Host (1352) then we are getting pretty good speeds: 2614 (Megabyte / s) = 20.421875 Gigabit / s Also, you can see this is much higher than the Thunderbolt 1 Thundertek CUDA-Z score (for Device to Host only) of 790MiB/s vs 1352.1 MiB/s (171%). Now if only we had some other manufacturers interested they could quickly address these BIOS/EFI level issues and we could have true plug-and-play eGPUS!
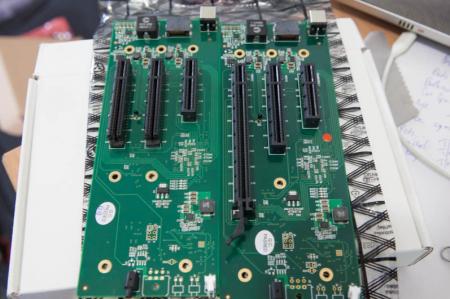
- 26 replies
-
- 6
-

-
- apple egpu
- diy egpu
- (and 7 more)
-
Has anyone tried using a bulk ordering site like MassDrop for getting the adapters at an insanely reduced price? If not, then I've taken the liberty of setting up a poll for our eGPU adapters (needs a sign-up). Please vote for the adapters so that the MassDrop team can contact the suppliers ASAP and arrange for a discounted bulk order price. Voting does not mean you will join the bulk ordering group. We just need the 200 votes to get the item to the BUY page, where other eGPU enthusiast can benefit from a discounted price. If this pay-it-forward strategy works out for us, then we can most definitely take advantage of this every time a new, worthier adapter arrives. It's not everyday we can get lucky with price drops (Akitio). Any thoughts on this?
-
 I'm not sure if I am posting this in the wrong forum or maybe this is a combination of two forum topics (eGPUs and displays) but here it goes: Basically I wanted a external monitor to run on my 15'' mid 2014 macbook pro (no integrated graphics, only iris pro 5200) because I am in the works of making an eGPU for it. I decided to go with the Benq XL2411Z because it seemed like a well rounded monitor and it had a 144hz refresh rate. Now that I've started using it, I have been unsuccessful in achieving anything higher than 60hz. I've been told that if you are running OSX that it is impossible because that is a limit set by apple; however, I have seen people say that they are able to get the 144hz on Windows. So far I have had no such success. I had a HDMI cable connected, then read that in some cases HDMI will not be able to achieve 144hz. So I tried a DVI cable via the mini display-port to DVI adapter, but that did not solve the problem either. A lot of people on other forums have mentioned that they are able to fix this by simply opening their Nvidia control center; however, because I don't have dedicated graphics, all I have is the 'intel integrated control center' which isn't very helpful. The graphics card I am planning on attaching is the evga gtx 960 so I will have to download the drivers for that later (once I get all my parts) but I was wondering if I am missing something here? tl;dr: 1) Do I need a DVI cable to get 144hz or can I achieve 144hz through HDMI? 2) Is it possible to get 144hz without having nivida control center? Thanks!
 -
 Hello fellow Lenovo owners, I've started at tech thread over at the Lenovo forums, to ask them for a bios update to solve the TOLUD problem. Atm. i'm running the latest bios (2.59), and unfortunately my PCI bus memory adress says: DFA00000 - > TOLUD 3,5 GB = no room for eGPU with 4GB+ RAM. I've tried to override DSDT aswell (Windows 7, 64 bit), but it all turns out to BSOD's at boot. I've stumbled across another thread on lenovo forums, which gained the right attention for the Lenovo staff to update the bios's on the X230 and T230 models: http://forums.lenovo.com/t5/X-Series-ThinkPad-Laptops/X230-expresscard-adressing-eGPU/td-p/792909 Therefore I hope it will be possible, for the T430/T530/W530 owners to receive the same solution. But for that I need the Lenovo staffs attention, ad therefore, your help. head over to my thread at: T430 expresscard adressing (eGPU) - Lenovo Community and leave a comment, if you would like to see a solution in the future. Hopefully in the end, it will be something the bios tech guys pay attention to, in the future bios designs. Thanks in advance - Aatind (Denmark)
 -
[RIGHT]Troubleshooting FAQ[/RIGHT] 24 June 2012: Added checklist for troubleshooting when eGPU is not detected (Main FAQ). 30 Mar. 2012: Fixed two-pass script in Non-Optimus FAQ. 27 Mar. 2012: Added new DSDT override solution (extending the root bridge into 36-bit) to overcome high TOLUD (>3.25GB) & 4GB+ of RAM installed. 3 Feb. 2012: Change "Quick Links" with icons. 28 Jan. 2012: Updated the "Quick Links" & changed to new logo. 23 Oct. 2011: Made small correction in Error 12 section. 24 Sept. 2011: Revised the two-pass script in "Non-Optimus Setup: x2/x4" (FAQ#1). 17 Sept. 2011: Added one more FAQ for Error 12. 3 Sept. 2011: Rearrange titles/questions/topics into their own section. 15 August 2011: Troubleshooting FAQ is now in dedicated thread! :) 13 July 2011: Troubleshooting FAQ moved to new page which will ideally document reoccurring issues. Contributions/edits are most welcome. eGPU=external desktop GPU, iGPU=integrated GPU, dGPU=dedicated GPU Announcements:- >>>Driver version in this troubleshooting page is outdated. Always use latest version. Consider the driver version in this page is the minimum/lowest version you can use. Main:- >>>How to ask help efficiently? >>>Why is my eGPU is not detected? Common:- I have problems when running eGPU Setup 1.30 My system just boots to a black screen / my system hangs or BSODs while booting up to Win7 My eGPU worked, then stopped working all of a sudden My eGPU hangs, particularly when doing a lot of graphics processing I can't play any game or run any benchmark for more than a minute or two before a complete system lock up - "black screen" of death [ATI] Device Manager lists my eGPU without any errors but has have no resources against it nor is any external LCD detected I have a PE4L + DC adapter. The eGPU isn't detected/fan spins up fast. My eGPU recognises the external monitor but when I make it the primary it doesn't "turn on" and I'm simply reverted back to my internal LCD Upon powering my eGPU, the fan on the eGPU just spins faster and the card isn't detected. I have problems running an NVidia eGPU with a internal Nvidia dGPU. My mHDMI cable does not fit in my half-height PM3N. Why does my USB/network/sound not working when enable my eGPU in Win7? Error 12:- My eGPU is detected and drivers loaded but has an error 12: cannot allocate resources against it in Device Manager Even after successful compaction I still get a error 12: cannot allocate resources in Device Manager Error 42:- I get an error 42: cannot start device in Win7 Error 43:- I get an error 43 against my eGPU in Win7. Optimus Setup: x1.1Opt/x1.2Opt:- Lenovo Thinkpad/Dell Latitude: I boot with the expresscard in my system. The internal LCD doesn't appear/work. Neither do I see x1.Opt performance (NVidia) Installing Nvidia drivers with AMD/Intel switchable graphics gives an error I can't get internal LCD mode to work. Non-Optimus Setup: x2/x4 Link:- Set x2 link but mPCIe Port2/Port4 re-enabled after reboot? Main >>> How to ask help efficiently? To allow others to help you, always include details information on your eGPU setup. Please use this template when posting. This is how to generate Diags file & include them in your post. ^top Why is my eGPU is not detected? Try any of these:- If running a mPCIe eGPU refer to [url]http://forum.techinferno.com/diy-e-gpu-projects/11393-mpcie-egpu-troubleshooting-steps.html#post149873[/url] Power ON notebook with eGPU already connected & already turn ON. Connect eGPU to notebook but not turn ON yet. Turn ON notebook & before windows loading press F8 to halt windows loading. Turn ON eGPU & continue boot into windows. Connect eGPU to notebook but not turn ON yet. Turn ON notebook. When you see "Starting Windows" screen & you see the four dots emerged to form windows logo, turn ON eGPU. PCIe power connector Make sure you plugged all PCIe power connector on the GPU with 6/8-pin PCIe power connector(s) from PSU. If GPU have two PCIe power connectors & you think connected only one 6/8-pin PCIe power connector is enough, you're totally wrong. Floppy power connector (PE4L/PE4H) Connect floppy power connector from PSU to floppy power header on PE4L/PE4H Jumper (PE4L) Check out jumper settings in the manual which available from here:- PE4L v1.5: [url=http://www.hwtools.net/Adapter/PE4L.html]PE4L ( PCIe passive adapter ver1.5 )[/url] PE4L v2.1: [url=http://www.hwtools.net/Adapter/PE4L%20V2.1.html]PE4L V2.1 ( PCIe Adapter )[/url] ^top Common >>> I have problems when running eGPU Setup 1.30. See eGPU Setup 1.30 troubleshooting. ^top My system just boots to a black screen / my system hangs or BSODs while booting up to Win7 If running a mPCIe eGPU refer to [url]http://forum.techinferno.com/diy-e-gpu-projects/11393-mpcie-egpu-troubleshooting-steps.html#post149873[/url] Poweroff your eGPU. Boot Win7. Standby (not hibernate) your system, poweron your eGPU, resume your system. ^top My eGPU worked, then stopped working all of a sudden First thing is check your mini HDMI cable. 2 users requiring a replacement US$6-shipped cable to restore functionality. NOTE: This solution only for PE4L v1.5 & PE4H v2.4. ^top My eGPU hangs, particularly when doing a lot of graphics processing If you are running a Gen2-capable system (2nd gen i-core or newer) but not using a Gen2 capable eGPU adapter (PE4L 2.1b or PE4C 3.0), then you'll need to downgrade your link to Gen1 to gain reliable operation using Setup 1.30 Check your PSU is delivering the required power OR swap with another more powerful PSU and test again. We've found cheap double-rail PSUs might not deliver enough power. Eg: a Shaw 680W PSU has a 12V/16A and 12V/15A rail. The latter rail was insufficient to power a GTX470 requiring 225W of power. Also refer to Panzer's fuse bypass on PE4H ^top I can't play any game or run any benchmark for more than a minute or two before a complete system lock up - "black screen" of death. Pretty much the same issue as for Q4. Likely the PE4H's fuse is kicking in upon detecting a very high load and shuts down the power to your eGPU. This will occur with any of the heavy duty gpus like a GTX465+ or GTX560+. The solution is to set the PE4H 2.4 fuse bypass jumper (near the floppy molex connector). Older PE4H can do Panzer's fuse bypass to accomplish the same thing. ^top [ATI] Device Manager lists my eGPU without any errors but has have no resources against it nor is any external LCD detected This is a problem seen with onboard HD3450+HD6850 setups. The solution being a unified driver for both cards as provided by the DNA modded ATI drivers. ^top I have a PE4L + DC adapter. The eGPU isn't detected/fan spins up fast. Set JP4 on the PE4L as described so it draws 3.3V from the expresscard or mPCIe slot. Can connect a USB cable b/w your notebook and the PE4L to provide additional 5V->3.3V (regulated) if you find it's still flakey. ^top My eGPU recognises the external monitor but when I make it the primary it doesn't "turn on" and I'm simply reverted back to my internal LCD If you see a brief flash on the external LCD then it could either be a faulty HDMI cable connected to the LCD or the PSU is insufficient to drive the eGPU to actually display something. I did encounter a intermittently faulty HDMI cause this problem. Also, Optimus drivers newer than 258.96 will cause this if using a DVI-to-VGA adapter. ^top Upon powering my eGPU, the fan on the eGPU just spins faster and the card isn't detected. This indicates the eGPU is either not on the PCI bus or isn't getting 3.3V. Try unplugging, replugging the mini HDMI cable (expresscard solution) or hotplugging the PM3N (mPCIe solution). If the card is still not detected then connect the setup to another system's expresscard slot. It may be either a faulty expresscard slot or mini HDMI cable. Worth testing the eGPU in a desktop system as well. ^top I have problems running an Nvidia eGPU with an internal NVidia dGPU (supplied by nlooije/Khenglish) The trick is to get both an NVIDIA dGPU and eGPU working work under the same driver. This method assumes that the eGPU is detected in the device manager. If any errors such as code 12 or 43 are present check the corresponding items in the Troubleshooting section. If using the PM3N and it is not detected then maybe the mPCIe port is whitelisted, use the Setup 1.30 to unwhitelist. Download the latest drivers from the NVidia website or from this post by Tech Inferno Fan. Once the eGPU is detected, windows will automatically search for drivers through windows update. Cancel the search, and let windows install the standard vga drivers. In the device manager, right-click uninstall the dGPU and eGPU NVidia drivers. Use CCleaner to search for any residual Nvidia driversoftware and delete further. Install the latest Nvidia drivers. If everything went correctly then the installation software should ask permission to install the drivers twice, once for every card. Reboot and cross fingers. ^top My mHDMI cable does not fit in my half-height PM3N mPCIe socket Newer systems have been reported to have half-height mPCIe socket which may be limited in space for inserting a mHDMI cable due to the rigid connector. DIY solution: It is possible to strip the rigid connector to give the cable more flexibility and make more efficient use of the space. Use a sharp knife to cut along the ridge of the connector; be careful near the cable itself as the wires there are not protected. Inside the connector the wires are protected by a thick layer of solid glue. non-DIY solution: no commercial products have been found to solve this problem. (supplied by beatTheRestrictions) ^top Why does my USB/network/sound not working when enable my eGPU in Win7? Likely a PCI contention issue. Recommend setting up Setup 1.30, configured with a pci.bat (resulting from PCI compaction on your primary GPU + eGPU) prior to chainloading Win7. ^top Error 12 >>> My eGPU is detected and drivers loaded but has an error 12: cannot allocate resources against it in Device Manager Please check TOLUD on your notebook. For a reference on how to do this, please go to Pre-Purchase FAQ #2 (>> 2. How can I check if my notebook is compatible with an eGPU?). Many notebook vendors' bios were never designed to accomodate a desktop eGPU so do not setup PCI configuration space correctly to accomodate it resulting in the symptoms below. This will affect the DIY, Villagetronic ViDock and MSI Graphics Upgrade Solution (GUS) external graphics solutions. Symptom RequirementSIZE> Details with solution1SIZE> Device Manager error 12: cannot allocate resources Fix error Problem explanation: Windows XP/Server 2003 do not reconfigure the bridge windows based on the requirements of a device behind the bridge. This leads to a classic problem where a PCI device cannot be started due to lack of resources on the bridge, even though enough device resources are available to the system. For reasons such as this, a platform configuration that configures PCI devices at boot time works best. Some systems with more than 2.5GB RAM have no bios allocated free 256MB PCI window to host the desktop eGPU. Need to configure this correctly using one of the methods below:Solution#1 : (Update 3-14-2012) A DSDT override extending the root bridge into 36-bit can allow ALL systems with a 64-bit CPU and chipset (anything after 2007) to be eGPU compatible when used with Windows 7 and the latest iGPU/dGPU/eGPU drivers with up to 48GB of RAM installed. Solution#2 : Use Win8.x (WDM 1.2) that allows the primary video device to be disabled, freeing up resources for the eGPU to use. Solution#3 : Use Win7 to do a PCI relocation as described. Solution#4 : Use eGPU Setup 1.30 PCI Compaction. Solution#5 : [XP or Win7_with_XP_drivers] - disable onboard graphics using eGPU Setup 1.30 Solution#6 : install only 2.5GB/3GB of RAM, freeing 256MB of PCI Resource space. Solution#7 : Use Magma ExpressBox Full Driver described here. Greater than 2.5/3GB RAM installedExamples Neither the DV2000 or the 2510P had an appropriate PCI bridge memory window defined by the bios. The DV2000 too didn't have a free 256MB window when equipped with 3GB of RAM, the 2510P didn't have it's bridge correctly configured. In both cases eGPU Setup 1.30 was used to configure the PCI space correctly. ^top Even after successful compaction I still get a error 12: cannot allocate resources in Device Manager (Source: Tech Inferno Fan) The first thing to try is 32bitA compaction and see if that resolves it. If not, then what has been discovered happening is the I/O port allocated by compact gets moved by Win7. The I/O port allocated is shown as the last two echo lines in pci.bat such as : @echo -s 2:0.0 BASE_ADDRESS_5=2001 >> setpci.arg @echo -s 0:1c.1 1c.b=20 1d.b=20 >> setpci.arg The 0:1c.1 refers to pci-e port2 and the 2:0.0 refers to the PCI ID my GTX460 has. The 20 and 2001 means assign the port and GTX460 to use I/O port 0x2000-20FF. On this particular system, Win7 moves the pci-e express port2's I/O space to 0xD000-DFFF port instead which is odd so the GTX460 flags an error 12 since it can't get 0x2000-20ff. So the workaround is to change the 20 to be D0 and let Win7 have it's way. This can be done by adding two additional lines between "call pci" and "call chainload" to override compact's allocation. This setting will override any further re-runs of compaction as well. It should look like this in STARTUP.BAT file:- call pci setpci -s 2:0.0 BASE_ADDRESS_5=d001 setpci -s 0:1c.1 1c.b=d0 1d.b=d0 call chainload mbr ^top Error 42 >>> I get an error 42: cannot start device in Win7 Standby (not hibernate) your system, poweroff your eGPU, poweron, resume your system. ^top Error 43 >>> I get an error 43 against my eGPU in Win7. UPDATE: Use NVidia Verde 270.61 driver as described. First thing to replace is the mini HDMI cable. Could also be a faulty eGPU. Or if using a NVidia eGPU try: Ensure your PE4L 1.5+ or PE4H 2.4+ has the PCI Reset Delay slider set to 0s rather than 7 or 15. If it's the latter then upon doing a resume-from-standby the card will be delayed leading to an 'unconfigured' state, hence the error 43. Use Setup 1.30 to load a PCI dump AND use the 258.96 Optimus drivers (becak) Downgrade to 258.96 Optimus drivers (apollo-fox) (Update 26 July 2011) There is the Video cards->Initialize and Video cards->Save/Load dump features to eradicate error43. Ensure you are running the latest 275.33 Verde drivers + modded nvam.inf and the PCI reset delay slider on the PE4L 1.5/PE4H 2.4 is set to the 0 seconds position (not 7 or 15 seconds). Then proceed as follows: Boot eGPU Setup 1.30 with 2GB installed, run Setup 1.30, select to Video Cards->Save. If you are hotplugging after bios boot then need to select Video Cards->Save(Win) and follow instructions generated from within Windows. Install 4GB of RAM. Boot Windows. Create a devcon with 4GB of system RAM installed: eGPUeGPU-setup-mount v:devconmkdevcon Boot eGPU Setup 1.30, - select Video cards->Load to load the PCI space dump created when it was working with no error 43. - perform 32-bit PCI compaction on the iGPU+eGPU. - select startup.bat->edit, remove the 'call vidinit' since it might interfere with your load dump. - select Apply config.Run startup.bat - select Chainload mbr If still get an error 43, then repeat steps in (3) above but use 32-bitA PCI compaction method instead. ^top Optimus Setup: x1.1Opt/x1.2Opt >>> Lenovo Thinkpad/Dell Latitude: I boot with the expresscard in my system. The internal LCD doesn't appear/work. Neither do I see x1.Opt performance (NVidia) These system's bios will use the eGPU as the primary video if it detects it on bios startup. That means the iGPU will be disengaged. Problem then is the internal LCD won't work and neither will x1.Opt since they are both reliant on a iGPU to be the primary video card. Solution is to boot past the bios with the eGPU switched off, then either: hotplug the EC2C by hitting F8 to stall the Windows boot proces power on eGPU, resume in Windows boot Setup 1.30 and hotplug if need PCI compaction ^top Installing Nvidia drivers with AMD/Intel switchable graphics gives an error (supplied by appolo-fox) Installing Nvidia drivers with AMD/Intel switchable graphics may give you an error asking you to install Intel drivers first. Solution is to uninstall the switchable driver from your manufacturer (Lenovo in this case); system should revert to pure Intel driver via WinUpdate (if not, you will need to reboot and disable AMD discrete GPU with Setup 1.30 and let WinUpdate install or download newest Intel driver from their website. The Nvidia installer should be content with the pure Intel driver and install correctly. After Nvidia installation, reinstall your switchable graphics driver. [URL=http://imageshack.us/photo/my-images/811/amdintel.jpg/][/URL] -> Intel driver provided by ATI (AMD). Nvidia installer exits with error. ^top I can't get internal LCD mode to work. This appears to be the case if you attach your eGPU after Win7 boots. So either hotplug your eGPU at the Win7 bootloader menu (hit F8 to pause bootup). Another option is to install and configure Setup 1.30 to detect your eGPU and configure your PCI configuration space prior to chainloading to Win7. AppInit_DLLs needs to be set for internal LCD mode to work For games to launch on the internal LCD on systems with an intel iGPU, the AppInit_DLLs needs to route via a DLL. NVidia sets this to nvinit.dll. During my tinkerings I have seen this registry setting missing so internal LCD mode didn't work. [H] "AppInit_DLLs"="C:WindowsSysWOW64 vinit.dll" ^top Non-Optimus Setup: x2/x4 >>> Set x2 link but mPCIe Port2 or Port4 enabled after reboot? On x2 setup (mPCIe Port1&Port2 or Port3&Port4), mPCIe Port2/Port4 must be disabled. If they left enabled, it can cause eGPU instability (e.g. 3dMark06 crashed while running benchmark). There are two methods for dealing this issue. First Method: modded PM3N (Source: Tech Inferno Fan) Second Method: two-pass script in STARTUP.BAT (Source: Tech Inferno Fan) ^top
-
A new OS X 10.9.5 update has just been released. If you are going to update to the latest version, you will loose compatibility with the old OS X NVIDIA web driver. Do the following to re-enable your driver with the new update and new NVDIA web driver.1. Update to 10.9.5 2. Download and install NVIDIA Cuda 6.5.18 here http://us.download.nvidia.com/Mac/Qu...4.01.03f01.pkg You will not be able to install the web driver because it will not recognize your hardware; [EDIT] this step can be skipped if you downloaded a modded package.[ATTACH=CONFIG]12589[/ATTACH] Follow the steps here on how to skip the hardware verification
-
Hi everyone, I have gone through a lot of pages of this forum (related to eGPU and overclocking) and they really are very useful but not able to find anything good for my laptop. My laptop is Alienware M14Xr1 with following configurations : Intel core i7 2860QM Nvidia GT555m (3GB) 8GB primary memory 1600Mhz 750GB secondary memory 7200RPM (698.4 GB usable) 900p screen I want to use a eGPU setup in my system. Could anyone please tell me whether it is possible or not to use - In my system there are following ports available - 2xUSB3.0, 1xUSB2.0, 1xHDMI1.4, 1xMiniDisplayPort, 1xVGA, 1xEthernet1000mbps, (I think none of these will be helpful in eGPU setup ) But i have heard that if you remove your wireless card then you can plug in your eGPU there. Is it true, Please anyone share your experience with me related to this setup.
-
 Hello, T|I Forum I looked around on this forum for titles hitting anything similar to this situation, but didn't find anything similar myself. I am also sorry for this long post, I wanted to be sure to give as much info on the problem as possible to help answer this problem. Using Nando4's Awesome "DIY eGPU experiences [version 2.0]" guide, I was able to get my setup working very easily with my T420 on Windows 7 Pro. Pleased with how well things were running I decided to buy a used T430 when one passed by my work for refurbishment.<!-- google_ad_section_end --> At first things were still going well with the setup, I currently have these specs here: Computer: Lenovo T430 /w Intel HD Graphics 4000 (only) 512 GB SSD (Main Drive) less then 6 months old 500 GB HDD (Backup Drive) less then a year old 8 GB of RAM less then 6 months old Windows 8.1 eGPU: NVidia GeForce GTX 660 (Would also like to upgrade to the GTX 780 if this issue can be fixed) PE4H (PCIe passive adapter ver2.4) Mini to Mini EC2C The Issues: After many days (2) of testing and reading through different googled searched forums trying to pin point this issue (not an easy one IMA as the main solution was to "disable each driver one at a time to see it the problem stops" Which ended in a Win 8 Refresh.) I ended up narrowing it down to the eGPU, as without it the computer runs fine and smooth, can play music and videos without it skipping every few seconds, and even games on low settings (the best this laptop can do without an eGPU :/ ) ran smoothly without jittering all over the place. However when I attach the eGPU, anytime I open a new window, start watching videos, or play any games, the DPC reading would spike off the charts every few seconds then back to normal. This may seem small, but during this spike, all audio would cut out as well as display a noticeable jitter on anything being displayed real time. The tool I'm using to read the DPC levels is "DPC Latency Checker V1.3.0" and I was using "LatencyMon" but that would just flood me with more info than I know what to do with. Other (useful?) Notes: The system always seemed to do the jittering thing with the T420 as well, but I always pushed that as being just because the GPU was a bit outdated, and the small lag never bothered me as much as it does now on the T430. The T430 might of had an update to the BIOS too. I now have new options and features I didn't notice before yesterday, something I had to visit yesterday after my SSD refuse to boot and had to reinstall Windows 8.1 when the repair disk would say the SSD was locked, (maybe due to a BIOS setting I changed when telling it to optimize it for Windows 8). As of Now, I have a bear bone Win 8.1 including its updates as well, as well as the latest updates (that I know of) for the chipsets and GPUs. Also, before the BIOS change, I was never able to run the eGPU on the Express card setting "Automatic" which would allow for Gen 2 devices to connect. Now I can! or so it seems. I now also have no issue turning on the PC with the eGPU already connected and on the "Automatic" setting, where before It would just cause the PC to never boot into windows. Things I Would Also Like To Know: This coming PowerBall Numbers? How to set up my PE4H ver 2.4 to run 2.0 with my 2.0 GPU to my 2.0 Express Card Slot. What are the other Channels for? Why does sticking the mini HDMI cable into PCI x2 instead of PCI x1 not provide power "= to" Gen 2 speeds? What is the delay switch for? Why does this board have no instructions when sent to people... This I wounded from day one after receiving the device. Oh and last (for now) A good thick cable to connect the mini to mini for best data rate... (Does it work like normal HDMI where that can be an issue?)
 -
I have a Y400, a 3D printer and a plan. I want to get a desktop GPU roughly compatible with the 650m -- GTX 650? -- and wire it up to my GPU-less Ultrabay. Having looked at the teardown pictures, it looks like something sort of kinda similar to a normal PCI port. Is this at all possible?
-
Hello! I have a HP Pavilion g6 laptop with amd a8-3520m APU. I planning to buy a pe4h adapter with radeon hd 7750, but i dont know how the APU will respond for the egpu. Please help me!
-
 Hi, I just succesfully finished a low profile eGPU setup, I decided to share the experience I had. My goal was to make it as portable as possible but still powerful enough to drive the internal 12.5 inch 1366x768 display of my lenovo x220. The parts I used: PE4L 2.1b + EC2C with EC-060A (l x w) 64 x 47 mm Zalman GTX650 low profile max 64W (l x w x h) 150 x 55 x 35 mm Laptop AC adapter 12v 10a 120w TEKO P/3 small plastic case (l x w x h) 160 x 90 x 60 mm M2 nuts and bols Lenovo X220 with 1.37 bios (Series 6, HD3000) USB to USB cable The GTX650 low profile card is very nice for an internal eGPU setup, its very small and draws only 64W max. This means it can draw its power from the pci-e lane, which provides 75W max. No extra connectors on the videocard. Its still powerfull enough to run games at high/ultra on 1366x768. Ofcourse an atx psu is not an option for portability, so a 12V 10A 120W ac laptop adapter is used (2.5 - 5.5mm plug). The initial installation went pretty smooth, the card got detected and the nvidia drivers installed withouth problems. There was no need to change the tolud size or an dstd override. Settings used pe4l: SW1: 1, SW2: 2-3 Settings used bios: PCI express speed -> automatic, PCI express powermanagement -> off. Unfortunatly I couldn't run a benchmark or game for longer then 3 minutes without a bsod or crash. After some research it turned out the card didnt get a clean 3.3v from the pci-e lane. The fix was to run an usb - usb cable from the laptop to the pe4l for 3.3v power. No more crashes and very stable performance :-) Too bad an extra cable is needed though, portability took a small hit there. A few pics of the case and the setup: Some dremel action for the dvi and hdmi port: More dremel action to run the cable and pci-express card through: Drilled m2 holes to mount the pe4l: pe4l mounted on m2 bolts: Up and running: Need to finish the cover plate and paint the enclosure matte black: And a small video I made: Let me know what you think!
 -
Hey guys, I'm cross posting from macrumors because I think everyone here has better experience with setting PCI registers and implementing EFI for Windows 8 in a mac setting. So I've installed windows 8 through EFI, no bootcamp (emulated bios setup). Current setup: Macbook Air mid 2012, Windows 8 EFI. Problems right now: 1) No Audio. I've tried everything -- downloaded newest intel drivers and tried to force the HD Audio Controller driver to update using the intel DisplayAudio folder driver as mentioned here by gophermobile http://forums.macrumors.com/showthre...1427082&page=2 Does not work. Windows rejects the driver saying: "The folder you specified doesn't contain a compatible software driver for your device. If the folder contains a driver, make sure it is designed to work with Windows for x64-based systems." (Yes the driver is for 64 bit, straight from Intel's website). Note that I had to use the Have Disk option in device manager, because simply doing "update driver" leads windows to reject the update saying its already gotten the newest drivers. Tried this same Have Disk method to manually install Cirrus Drivers extracted from the Bootcamp drivers, and still the same error. 2) Intel Graphics HD4000 drivers not working. Using basic windows graphics driver which means that graphics is severely impeded. Anyone got a working solution for this? There has been mentions of setting PCI registers and all this nonsense but not sure if that is working. I'm pretty sure these are the 2 MAIN problems. Has ANYONE been able to resolve these? Let's solve these now, especially with the new Bootcamp 5 drivers out. I'm wondering if this can all be solved using the PCI register. This is something I am highly unfamiliar with, but is it possible to set the PCI registers so the drivers identify the HD4000 intel graphics and the Cirrus Audio properly?
-
 Hi, this thread will be my "Blog" of the experiences and troubles with my S430 and the eGPU Setup. I am currently collecting the pictures and make videos of how I build my case. Updates will come regularly. Update from 12.06.2013: Hey, I got my PE4L 2.1b mod to work. Sadly I rarely have issues with the connection. I think that a downgrade to Gen1 link speed could fix the issue. Bplus now has a cable for the PE4H 2.4 that will allow me to run Gen2 and lucky as I am I was able to get my hands on a Cheap PE4H 2.4 from ebay. I also purchased the new cable from BPlus already. The plans about my case have also changed, I wanted to make a metal one and already had the plans layed out. But with the announcemend of payable Thunderbolt adapters in (hopefully) early 2014 I decided to just make a "cheap" case for these 6 Months that I'll use it. When the cases that come with the Thunderbolt adapter do not fit my needs I'll use the materials and layouts I gathered/made to make a metal case for the Thunderbolt eGPU solution. I will also make some minor changes to the XBOX 360 PSU. So until my new hardware arrives in approx. two weeks there will be no updates. Sorry. Until then Lets start with my System specs: Lenovo S430 3364-57G Core I7 3520M 2 x 2,9Ghz HT 2x 4GB Hyundai DDR3 1600Mhz Plextor 128GB M5S Travelstar Z7K500 500GB Intel HD4000 Zotac GTX 560 Multiview Windows 7 64bit Professional eGPU Setup Specs: PE4L 2.1b with PM3N XBOX 360 Power Brick 203 Watt ( 12V @ 16,5A = 198W , 5Vsb @ 1A = 5W ) DELOCK HUB USB 2.0 4 Port ext. ZSlimZ Molex wire from an old PC PSU Diagnostic Tools: Imgur album: Lenovo S430 eGPU with GTX560 - Imgur 1.2opt ≈368MiB/s H -> D ( ≈ 385MB/s ≈ 77% of 2.0 x1 ) ≈403MiB/s D -> H ( ≈ 422MB/s ≈ 84,5% of 2.0 x1 ) Benchmarks: 3DMark06 -- 20584 ≈ 80% of 25800 3DMark -- Ice Storm: 86378 ≈76% of 113619 ---- Graphics: 125785 ≈ 82,5% of 152566 ---- Physics: 41201 -- Cloudgate: 9652 ≈ 55% of 17605 ---- Graphics: 20463 ≈ 93% of 21922 ---- Physics: 3388 -- Fire Strike: 2398 ≈ 87,5% of 2738 ---- Graphics: 2638 ≈ 91% of 2886 ---- Physics: 4834 ---- Combined: 984 -- 3DMark11 3706 ≈ 91% of 4060 ---- Graphics: 3645 ---- Physics: 4222 ---- Combined: 3507 Software DSDT Override: Windows 8 DSDT Override: I tried, I read several guides on the topic, because I didn't want to setup a new OS, but I haven't found the solution, I experimented a bit myself, but to no avail. Windows 7 DSDT Override: File: DSDT Override + S430.zip The file contains a guide in german aswell. Die Datei enthält auch eine Deutsche Anleitung. DSDT Override for Lenovo S430 (3364-57G) and other Notebooks ===================================================== There is a short guide for the S430 and a long one for other Notebooks. USE AT OWN RISK. NO WARRANTY! If you have a S430 (3364-57G) and Windows 7 installed: Step 1: Open CMD in Admin Mode. Windowskey -> type "cmd" -> right click on it -> start as admin. Step 2: Navigate to this directory. Step 3: Type "asl /loadtable DSDT-S430.aml" into the commandline. Step 4: Reboot. Check Device Manager -> view -> resource by connection. If you have a "Large Memory" entry now, you're done. ===================================================== ===================================================== If you have no Lenovo S430 you have to go the full way. Step 1: Open your Device Manager and click on view -> ressources by connection. Step 2: Search for the last "PCI bus" entry. It should have a lot of subentries, including "Motherboard resources". Step 3: Write down or memorise the last digits of the second value inside the brackets. e.g. Entry: [00000000BFA00000 - 00000000FEAFFFFF] PCI bus Value to memorise would be "FEAFFFFF". Step 4: Open CMD in Admin Mode. Windowskey -> type "cmd" -> right click on it -> start as admin. Step 5: Navigate to this directory. Step 6: Type "iasl -g" into the command line. You should have some new files in your directory now. One of them should end with ".dsl". Step 7: Open the .dsl file with the editor. Step 8: Press STRG + F and search for the memorised value. Step 10: You will see a bunch of "DWordMemory" Methods, go to the end of that list, put your cursor behind the last "TypeStatic)" ( yes after the bracket ) press Enter and now copy the following at the place: QWordMemory (ResourceProducer, PosDecode, MinFixed, MaxFixed, Cacheable, ReadWrite, 0x0000000000000000, // Granularity 0x0000000C20000000, // Range Minimum, set it to 48.5GB 0x0000000E0FFFFFFF, // Range Maximum, set it to 56.25GB 0x0000000000000000, // Translation Offset 0x00000001F0000000, // Length calculated by Range Max - Range Min. ,, , AddressRangeMemory, TypeStatic) It should look like this: Now indent if you like for better readability. ( Notice the Method you inserted is a 64bit QWordMemory not DWordMemory ) Step 11: Go to the top of the textfile, you should see two lines that start with "AHCI" delete both and save the file. Step 12: Switch to the command line again. Type "iasl <name of="" the="" file="" you="" got=""><dsl file="" name="">.dsl". Step 13: Check the output, if there are 0 Errors you are fine if not check some DSDT sites like: DIY eGPU experiences - Page 1003 tonymacx86 Don't forget to thank them for their efforts. Step 14: If you got 0 Errors you'll get a "DSDT.aml" file. Type "asl /loadtable DSDT.aml" into the command line. Step 15: Reboot. Check Device Manager -> view -> resource by connection. If you have a "Large Memory" entry now, you're done. Hardware & Case XBOX360 PowerBrick: Q: Won't 198W be too much for a Molex wire to handle? Aren't you afraid of cable fire? A: Yes you are right, 198Watt would be too much for a single Molex wire, but I have a GTX560 that just consumes 150Watt. Molex oficially handles up to 11A per lane, what would make 132W on the 12V lane. I know I am slightly above that and tested the wire heat while my GPU was on maximum Load during a 3DMark benchmark. it got warm, but far from Hot. I would guess that the single 12V cable had about 26°-30°C and I decided that this is okay for me. Edit: I tested the temperature with a device now, the cables surface got 24,3°C warm. So please keep 11A per lane in mind and be careful! Cable fire is very dangerous. Test thoroughly beforehand! Q: Why do 5Vsb and PSU Enable go into the red lane? A: When you plug in the XBOX PSU it will be on standby and only provide 5V on the 5Vsb lane ( Vsb = Volt Standby ), to wake the PSU up there must be a 1,5V to 5V current on the PSU Enable lane. Only then you'll have power on the 12V lane to power your GPU. Q: Why did you seperate the GND lanes? A: I noticed that the 3 lanes get a bit too thick for my shrinking hose, so I split it up. The thinner wires handle up to 8A per lane and my GPU needs 12,5A so I am safe with my GTX560 in this case. The male Molex connector is connected with the female one on the XBOX PSU. The female connectors are for the PCI-E power adapters and the female floppy for the PE4L. I just cut them off from an old ATX PSU. Discontinued attempts PE4L Socket and Plug: I tried to connect the PE4L via a HDMI cable to get more mobility. Sadly it didn't work. I soldered everything right, but it seems that the impedance of 4 soldered bridges and one HDMI connection is too much. Here are some pictures: Photo Album - Imgur Ferrit Cores for the PCI-EMM060B Cable: Short: It didn't work no Gen2 Speeds: to be continued...</dsl></name>
-
hello, was wondering if someone who can donate a EGPU, which is not in use and is able to send to Brazil. if possible post with video card. every day I get on the forum to see how the EGPU works and I do not have conditions to buy parts from a EGPU, and a video card, so if someone that has a EGPU and you are not using, you can send me?
-
 This will hopefully be a somewhat useful guide to getting your eGPU working. I will try my best to extend the guide to system configurations outside of my own (that I cannot test). This is only for Windows based systems. I will cover Windows 7 and Windows 8/8.1. I have my system (Fujitsu T901) running with an eGPU with Windows 7, Windows 8, and currently Windows 8.1. I will try to be as general as possible, but bear in mind that it is based on getting my system running with an eGPU. So if you have a Fujitsu T901, this will help you get your eGPU setup. Before you continue, make sure you read, re-read, read read read till you get sick of it - the official page: http://forum.techinferno.com/diy-e-gpu-projects/2109-diy-egpu-experiences-%5Bversion-2-0%5D.html This guide is more to show the steps for a single application. Mine just so happens to require all of the troubleshooting steps to get working correctly. Pain to setup, but good for a guide. ---------- For the T901 you will need to have Setup 1.x and will require the following steps (covered in this guide): If you do not want the dGPU active: 32bit compaction with Setup 1.x. If you do want the dGPU active: 36bit compaction of the eGPU with Setup 1.x and a DSDT override is required (whether it is loaded into the registry if you are using Windows 7 or loaded into memory during boot if you are using Windows 8/8.1). This is my system (Fujitsu T901): i7-2620M 16GB RAM NVS 4200M GTX 660 Ti From this: I have a 6-series chipset. 6-series and later (guessing probably all that come later) support PCIe 2.0 ports for use for an eGPU. Essentially - the ExpressCard or mPCIe ports can run at Gen2 speeds. My iGPU in this case would be Intel HD 3000. My dGPU is the Nvidia NVS 4200M. My eGPU is a Nvidia GTX 660 Ti. The RAM amount (since it is over 3.25GB) means that I might run into memory allocation issues (which I do). There are some exceptions to this. ---------- Seeing my laptop has ExpressCard, I got the PE4L-EC060A adapter for use with my eGPU. If you don't have express card, but have a mPCIe slot free (or can be made free by removing your WiFi card), you can get teh PE4L-PM060A. With some testing (MikjoA, naturbo2000, and myself) we determined that getting the 100cm cable doens't hurt performance, longer cables might however. See here: http://forum.techinferno.com/diy-e-gpu-projects/2109-diy-egpu-experiences-%5Bversion-2-0%5D-38.html#post67617 You will need a separate power supply (PSU) to power the eGPU. I use a modular (to cut cable clutter) 550W PSU. Certainly a bit overkill since it is only powering my eGPU. Some people have used the XBOX 360 power supply as well. If you haven't decided on what card you want for your eGPU, you get to read the main post that you are now probably muttering in your sleep. Tech Inferno Fan explains here: http://forum.techinferno.com/diy-e-gpu-projects/2109-diy-egpu-experiences-%5Bversion-2-0%5D.html#whichcard You may need Setup 1.x here (usually a pretty good idea to get this - needed in most situations): http://forum.techinferno.com/diy-e-gpu-projects/2123-diy-egpu-setup-1-x.html I have two videos of me using Setup 1.x here to hopefully help walk through the process: http://forum.techinferno.com/diy-e-gpu-projects/2123-diy-egpu-setup-1-x.html#post78919 ---------- Hardware wise, this it is a fairly simple procedure - especially for ExpressCard applications, mPCIe applications will require an extra few steps not covered here but you can see MikjoA's procedure here: http://forum.techinferno.com/diy-e-gpu-projects/2158-diy-egpu-guide-sony-vaio-vpc-z2-svz13.html Plug power from your external PSU into your eGPU and adapter (floppy connector). And that's about it really. Plug in your PSU and plug your adapter into your computer. Harder part is making your own enclosure. I use a stripped mini-ITX case. Once you have it all plugged in and whatnot. Turn on your laptop and see if it works! Once you get to your desktop, go to device manager. If you don't see any flags on your video card you should be good to go (lucky you ). But..... if you are like me, you will have a whole series of errors. In a nutshell: Error 12 - Memory allocation issue. You might get by with using Setup 1.x to perform PCI compaction to get it working. I perform a DSDT override to get mine working correctly (which I'll cover later). Error 43 - Yay you don't have error 12 (my reaction). Means you need to install the video card driver. ...but if you are like me, it won't go easy. I'll cover this later. ---------- If you see nothing in device manager, check your connections. If that all checks out, make sure your ExpressCard / mPCIe port is active in BIOS. If it is, you either have something going wrong, or an extreme case of error 12. How to (probably) fix error 12: How to (probably) fix error 43: ---------- DSDT override info: Readup here first please: http://forum.techinferno.com/diy-e-gpu-projects/2109-diy-egpu-experiences-%5Bversion-2-0%5D.html#dsdtoverride Link to my guide showing how I performed my DSDT override and how it allowed iGPU+dGPU+eGPU: http://forum.techinferno.com/diy-e-gpu-projects/3539-guide-dsdt-override-simultaneous-igpu-dgpu-egpu.html If you are running Windows 8 or 8.1 you will want to take a look here too: http://forum.techinferno.com/diy-e-gpu-projects/2109-diy-egpu-experiences-%5Bversion-2-0%5D-6.html#post31421 ---------- Upgrading video drivers. --- This pretty much ends this guide. Since you have it all up and running, you are pretty much set. Hope this helped you! ---------- My setup: The pictures were all too big for the forum to handle so just see this imgur album instead: eGPU setup - Imgur 1. eGPU case 2. side pic 3. top view showing awful dremel skills and custom IO shield 4. internal pic. PSU mounted with steel pipe hanger. GPU on modified rubber stoppers and held in place with more steel pipe hanger 5. case is just a smidge too small, so the PCIe power cables poke out a little bit, not much though 6. custom PSU power plug thing 7. shows adapter and ATX switch board, plus my GPU with a little dirty fan... 8. showing it all hooked up, I can reach my finger inside and flip the switch directly on the PSU to turn the eGPU on/off 9. full setup, no laptop 10. full setup, up and running!
 -
In a pinch for time, so can't write very much. PE4L is better, due to lower price. Both PE4L 2.1 and PE4H 3.2 have 1.2 Opt support. 1. Both will work, PE4L and PE4H are basically like the PCI slot on a desktop motherboard - you plug GPU into this, and connect other components to the PE4L/PE4H 2. Yes, as stated above, boith PE4L and PE4H will work. PE4L 2.1 or PE4H 3.2, PE4L is recommended due to lower price 3. Yes hope someone else can re-address your questions and explain better. Just wanted to give you quick answers to you have a general idea.
-
 Hey guys, I've been lurking these forums for months, and finally decided to get all my parts together after finding a great deal on a Sonnet Echo Express enclosure. My setup is as follows: 13" Retina Macbook Pro Windows 8.1 UEFI booting Sonnet Echo Express Thunderbolt Enclosure EVGA 650 ti w/2GB VRAM So, everything worked great as a proof of concept with a normal ATX power supply so I ordered a 150watt Pico PSU with a 144watt external power brick, as this is the only solution to keeping everything in the original enclosure. I've provided pictures of my setup as well. Now comes the problem. I rewired the power from the sonnet board back into the enclosure to share power with my GPU, so they both power at the same time. This I've found causes Windows to disable onboard Intel graphics and only allows video output through the GPU headers DVI, HDMI. I CAN get it to boot properly If I open the enclosure, and disconnect the 6-pin power connector, and plug it in as soon as I see the loading circle on the Windows 8.1 splash-screen. Full GPU acceleration after that with no issues, and I can run most games on full settings with the resolution set at 1920x1200. So this brings me to my question, has anyone been able to successfully automate a delay to powering the GPU on startup? I've read about the software available for purchase, but it says in the FAQ that it's only recommended for MBR/BIOS booting, which I'm not using. Other threads show that they've gotten it to work, but I'm wondering if it's because they're manually plugging or switching during the boot process. I could add a switch to my box for the 6-pin GPU power, but that would require a 6-pole single throw switch (which i've not found online yet) or three rocker switches that I'd have to throw at the same time on startup each time I wanna boot to this thing! Any suggestions are more than welcome at this point.
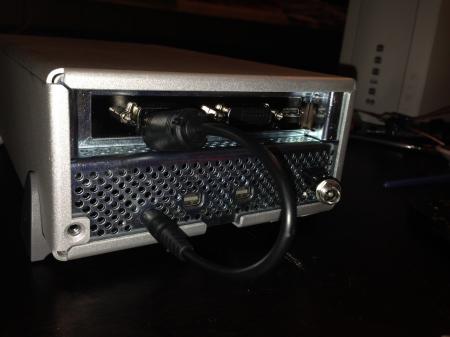

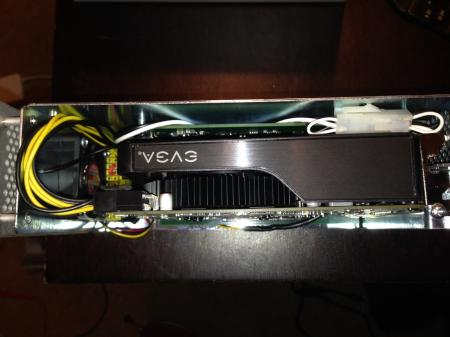
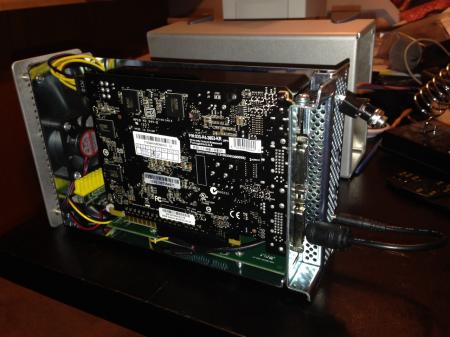
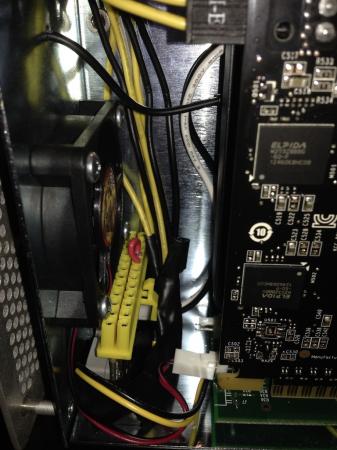
-
 Nando asked me to make a thread after I got my eGPU working so here it is. I'll be updating it later with pictures and more info, including more benchmarks. Components 15" Lenovo W530 (Nvidia Quadro K1000m, Intel HD 4000, i7 3740qm 2.7Ghz) PE4L-EC060A 2.1b Expresscard-to-PCIe adapter Sapphire HD 7950 video card @x1 2.0 (Gen2) expresscard bandwidth Corsair CX600 as a PSU cheap Rosewill Mini ATX case as an enclosure Win8/64-bit/Win7/64-bit (Dual boot, works with both) Installation Win8: The software part was a pain but I figured it out so you don't have to. After getting all the hardware working, I went into device manager and disabled the Quadro GPU. I then rebooted, and plugged in the 7950 while the laptop was off. I made sure that Windows didn't automatically install drivers for it. Then I downloaded the latest WHQL drivers for my card, rebooted, opened device manager and disabled the Intel HD4000 graphics. To switch back to either iGPU or dGPU, turn off laptop, unplug 7950, reboot and open device manager. Enable either dGPU or iGPU.You may have to go into BIOS and choose which GPU to use. (I need the Quadro for Solidworks when I'm not using my 7950, so that part is important.) Anyway, that's it. Win7: Same as above, except both GPUs need to be enabled at startup to work properly. An interesting note, on Win7 I can have my Nvidia dGPU running my laptop screen and my AMD eGPU running my external screen at the same time. On Win8 it's one or the other. Benchmarks My card is overclocked to 1150/1600, but I've only run a few benchmarks. Metro LL scores me at 37.4 fps average. For comparison, I saw that similarly overclocked 7950's scored about 40 fps average in a desktop, so performance loss is not as much as I thought it would be. These benches had two purposes, one for the info, and two, to show me that my overclock is 100% stable. Overall I must say, I'm very pleased with performance. I saw some of my scores around those of 680 eGPUs. Summary for comparison against existing implementations being: DX9: 3dmark06=22138 DX10: 3dmkvantage.gpu=28265 DX11: 3dmk11.gpu=8753 DirectX9 DirectX10 DirectX11 Metro:LL benchmark Unigine Heaven 4.0 Here is a screenshot of somebody else's 7950 at the exact same clocks that ran the same benchmark (Heaven 4.0 DX11 maxxed). My score was lower, it was exactly 82.6% of the performance as the desktop counterpart. This goes to show that bandwidth benchmark is about what was expected (~80%, I'm sure more tests would show a bit more variance). GPUZ screenshot showing my overclock, max temps, etc. I actually overloaded my PSU on that run, it's a CX600 with only 46A on the 12v rail but when gaming it doesn't exceed 45A Pictures This is my setup A closer look inside PE4L 2.1b
 -
 First off, i'd like to thank Nando for all his work helping bring eGPUs to the masses. On to the post: The short of it: Where I once had a DVD drive that I barely used, I now have 3 low power USB ports and a convenient eGPU port. I’ve designed a caddy of my own in order to manage the new components. Full photo set: https://www.facebook.com/media/set/?set=a.193840844073776.17933.193579380766589&type=1 The long of it: This began as a simple 2nd HDD/DVD caddy swap. The more I thought about it however the more the fact that the HDD was physically smaller than the DVD drive, which ultimately meant unused space started to bother me. Incidentally I was also working on getting an eGPU set up but didn’t like the idea of having to take off the 2nd battery and bottom plate off each time I wanted to use the eGPU. The eGPU hardware connects via the mini PCIe slot where the Wi-Fi card is. So I decided to try to permanently embed the eGPU connection alongside a 2nd HDD where the DVD drive used to be. This threw a new wrinkle into the equation, since a permanent eGPU connection would mean disconnecting my wlan permanently. My solution was to go with a USB dongle for my wireless connection. New problem, where to find the USB connection….and where to hide the dongle. The last thing I wanted was to have it sticking out the side of the computer all the time. So the dongle also had to go into the caddy space. As to the USB connection, well there’s a wwan slot I never use right next to the caddy. While most wwan cards are physically a mini PCIe format and connection, they really work via USB. I found a card which breaks out the USB connection to flying leads (mentioned in the parts list below) and planned on using that to get my USB connection for the Wi-Fi dongle. New problem, most wwan mPCIe ports carry USB signal but not power. The port on the SB works like this. So where do I get 5v from? I could run the port power in parallel from one of the USB ports on the right side of the computer, but those make for some long leads and are difficult to run back to the caddy area. The only easily available source of power on the left hand side is the SATA connection itself. And that was my "aha" moment. I tend to use my laptop as a laptop when on the road but when at home it’s really working as a desktop. I’ve got a few USB peripherals and a screen I connect it to, plus the aforementioned eGPU. Ultimately I decided that I wanted more USB ports and a convenient eGPU port on the left side of the machine more than I wanted a 2nd hard drive. So I replaced the hard drive in the mod with a USB hub, with enough power to run the wlan dongle, an Asus Xonar USB soundcard, thumbdrives, peripheral dongles (Logitech universal, and Microsoft keyboard, etc.) It won’t power a HDD in a caddy however. I was also having some trouble fitting the hard drive in the original mod, but that’s because I was afraid of taking a dremel to the bottom case of the laptop (I’ve since worked through my fear, though I like the mod as is.) Things that still need doing: I still need to shave off a 1mm from everything, and I ended up warping the top case with one of my earlier attempts. I’ve revised the design of my caddy so that I can fasten the 3 screws along the face of the DVD drive which I had to forego with the old design. I also have to model this and get it 3d printed so it’s one integral unit. Also, it looks like the new version of the eGPU hardware (PE4L-PM060A) might have the mPCIe card and the adapter directly soldered to the mini hdmi cord, so I’ll have to revise the mod slightly. Even without revising the design, I have to go in there and clean up some cables now that I’ve had it in for a few weeks and know that it works. Things to watch out for: I somehow shorted the speakers on this computer, no idea how I did it but I’ve made my peace with it. Also I killed a couple of usb wifi dongles due to bad solder joints and shorts. (Will update with parts list soon…) Photos: Initial Testing: First stab at a mockup: Progress: End Result: Pic of the three usb ports with the eGpu port. Its the hole at the end, closest to the screen.