Jump to content

Tech Inferno Fan

Registered User
  • Posts

    5
  • Joined

  • Last visited

  • Days Won

    90

Posts posted by Tech Inferno Fan

  1. 8 hours ago, Morv said:

    @Tech Inferno Fan I purchased Setup 1.2(what is was called back then) in 2013. Am I entitled to receive the current version because of that or do I need to buy it again? I'll possibly get a Thinkpad W541 in the next days which I want to trade for my Macbook Pro if I get the eGPU to run. I know I need your program to disable the dGPU(K2100M) due to this thread and I might use the version I have(1.2-test11) but I don't know if there were changes that might have an impact on the success of this build. If you tell me that I'll be fine with the version I have then that's ok as well.


    Thank you!


    @Morv, Setup 1.20 will be able to disable your dGPU OK. If you have any issues with it then pls PM me.

  2. On 23/09/2016 at 7:18 PM, Dschijn said:

    as expected...


    Yes. Intel would have had a lot of emails from product partners AKiTiO,  Sonnet, ASUS, MSI, etc asking why these students with slick marketting are being allowed to reap eGPU/eGFX profits. Something they themselves were denied.  Moreso when you consider Wolfe cooked up a product: an ABS plastic outer shell that matches the Apple design ethos, probably InXTron/AKiTiO internals, some software installer with percentage bar and an Apple-esque marketting video + kickstarter campaign.


    To their credit they acknowledged gathering ideas from the DIY eGPU community. The most obvious one was the use of a 220W Dell DA-2 AC adapter. @goalque needing to change his automated-eGPU.sh OSX script license to prevent it's plunder by Wolfe or BizonTech.


    Villagetronic also counted their Thunderbolt eGPU chickens way back in 2011 before being shutdown by Intel: http://www.macrumors.com/2011/08/01/external-thunderbolt-pci-expansion-chassis-and-hub-in-development/


    I've explained how pluggable CUDA/OpenCL processing via eGPU would cannabalize Intel's core CPU market: https://www.techinferno.com/index.php?/forums/topic/6399-why-are-intel-not-allowing-thunderbolt-egpus-ideas-inside/  .  Intel's careful Thunderbolt product placement protecting their CPU market.


    In short, Intel has the last say on how it's Thunderbolt technology is to be used. Something the Wolfe team now know.

    • Thumbs Up 3
  3. On 24/08/2016 at 4:38 AM, nickatitfactor said:

    Hello, I am having an issue with connecting 2 or more GPUs to the mac pro 6,1 with 10.11.6.  Essentially I have a MAC PRO 2013 — thunderbolt Akito — Amfetec PCI Host card — Amfeltec PCI backplane — (2) 980ti.   When I plug in the first 980ti, works fine.  Second 980ti, doesnt boot.  I used the script from this site and it worked fine for a single card.  Any thoughts?  Been going nuts.


    Use 2 AKiTiO boxes rather than the Amfeltec PCI backplane. This then places a video card below different TB bridges. Can use multi-GPU video cards like a Titan Z as shown by @nesonehttps://www.techinferno.com/index.php?/forums/topic/6741-2013-13-macbook-pro-2-x-titan_z16gbps-tb2-akitio-thunder2-osx1010-nesone/#comment-103971

  4. 2 hours ago, Petrakis said:

    No success yet


    Your startup.bat looks good.


    Does the eGPU work with an external LCD?  If so, then it's a driver issue which will require:


    1. Removal of all NVidia drivers

    2. Installation of a recent NVidia driver  along with mods to enable Optimus:   https://www.techinferno.com/index.php?/forums/topic/10305-guide-how-to-get-nvidia-optimus-work-in-win10/


    If you are still seeing a BSOD when attempting to initialize the eGPU in windows then you may have a power issue,  video card overclocked beyond ASIC capability, faulty video card or faulty eGPU adapter.

  5. 16 minutes ago, Petrakis said:

    I can´t seem to get optimus working, either games say no compatible gpu found or I get BSOD

    Win 7 64 bits
    4+2 GB ram

    intel HD 3000 + geforce gt 520M


    egpu: GTX 770

    EGPU adapter: EXP GDC BEAST v8 mpci version


    I disable the dGPU and enable compression for igpu and egpu


    The gpu is detected in device manager, nvidia experience, etc. Even without DIY egpu


    For Optimus to work, ensure the dGPU is disabled via Setup 1.30, your iGPU is detected and is the primary bootup GPU.

    For the BSOD issue, switch your eGPU hosting port to Gen1 PCIe speed via Setup 1.30 PCIe Ports->Gen1 menu. That's because the EXP GDC Beast has been found to have flakey Gen2 reliability.

  6. From https://www.theitsage.com/thunderbolt-egpu-beefing-skinny-macs/


    Quote

    Beefing up Skinny Macs with Thunderbolt eGPU

    eGPU Build with Radeon RX 470 in AKiTiO Thunder2

    Fresh off the heels of the iPhone 7 launch, many Apple users can’t help but feel neglected that similar updates haven’t been made to the Mac lineup. With Apple building its products thinner and thinner, something has to give. The most notable compromise of skinny Macs is the lack of graphical computing power. As of fall 2016 every Mac is in dire need of a refresh. While there are rumors updated Macs are coming, more powerful GPU options are likely limited.

    External graphic card enclosures (eGPU) via Thunderbolt ports may be the only solution going forward. Thunderbolt is a standard input/output in every new Mac computer except the MacBook 12″ retina. This port has very high bandwidth that supports high-resolution displays and high-performance data devices. An eGPU for a Mac is what a sidecar is to a motorcycle; it adds capacity and utility only when needed while also remaining mobile.

    No manufacturer is currently selling a complete eGPU solution for Mac. If you want an eGPU, you have to build it yourself.

    eGPU Components: AKiTiO Thunder2, Dell DA-2, and Radeon RX-470

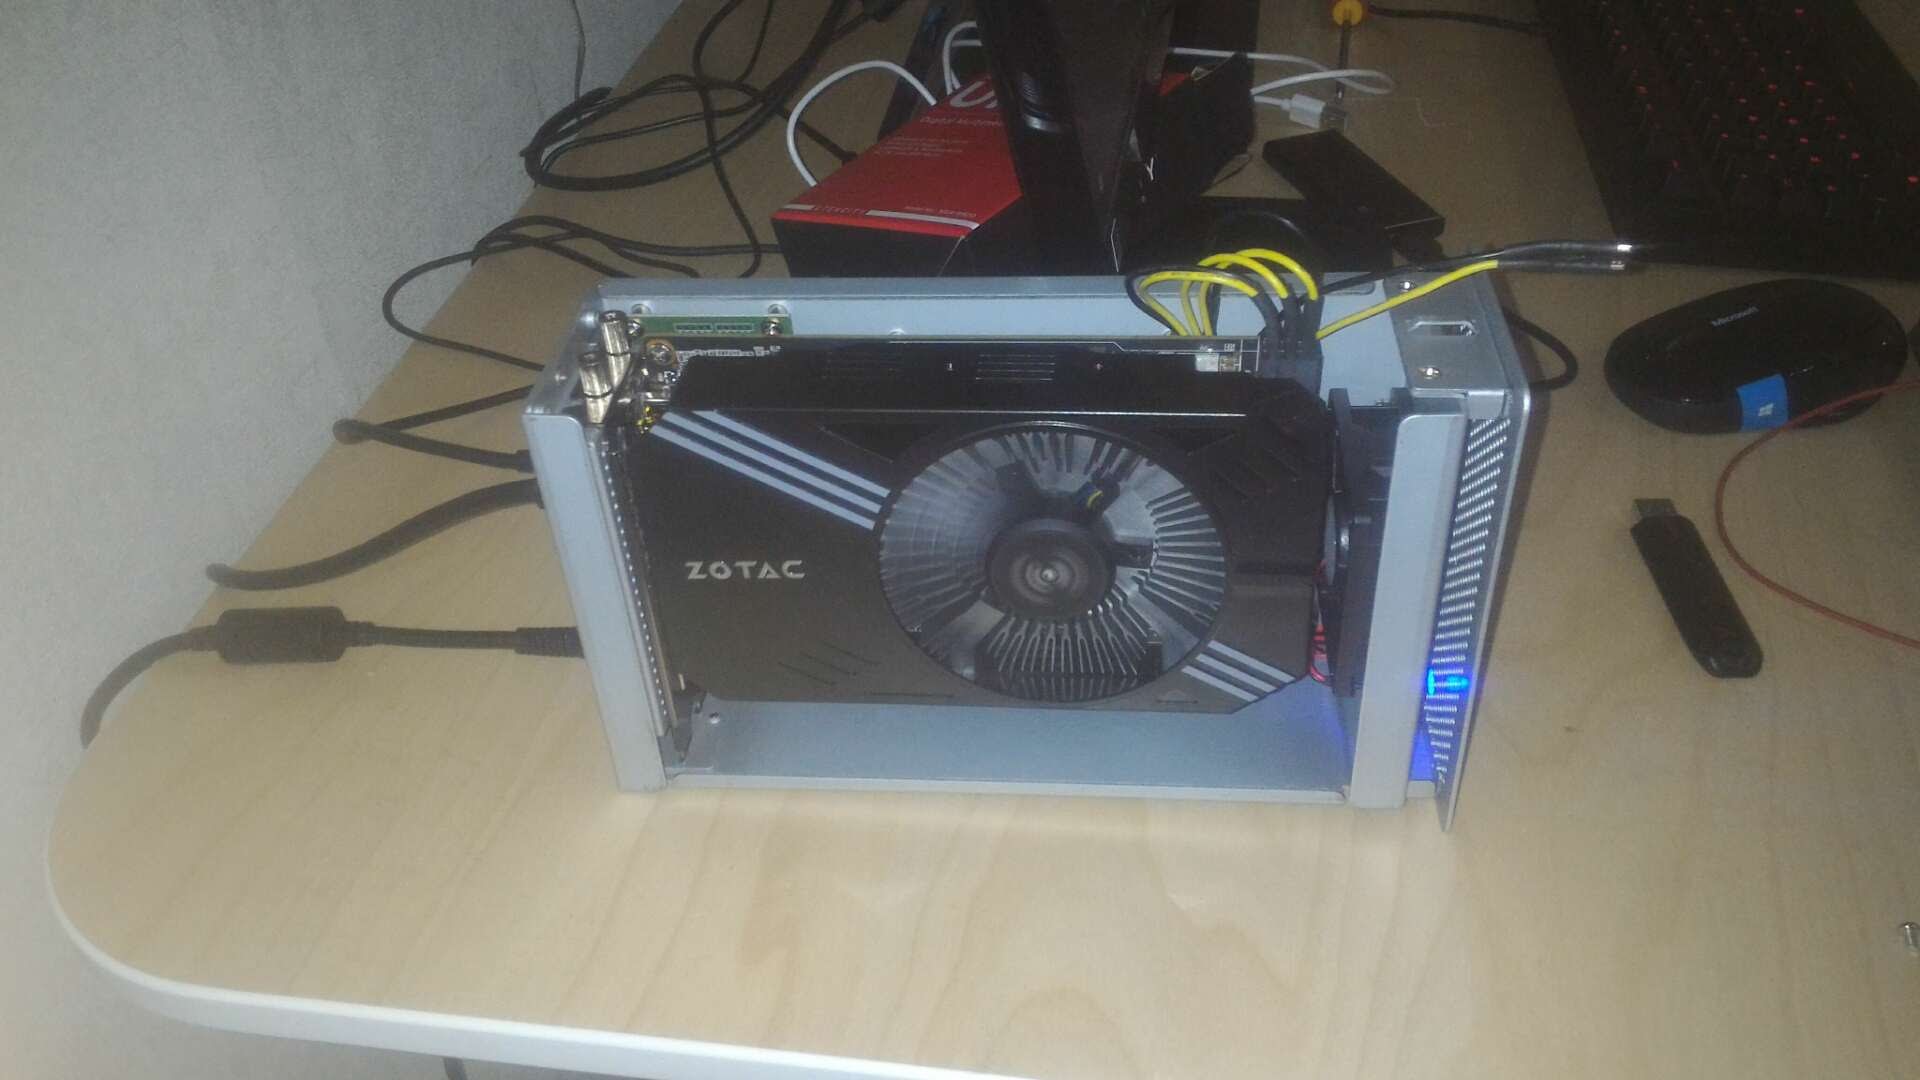
    eGPU Components: AKiTiO Thunder2, Dell DA-2, AMD Radeon RX 470

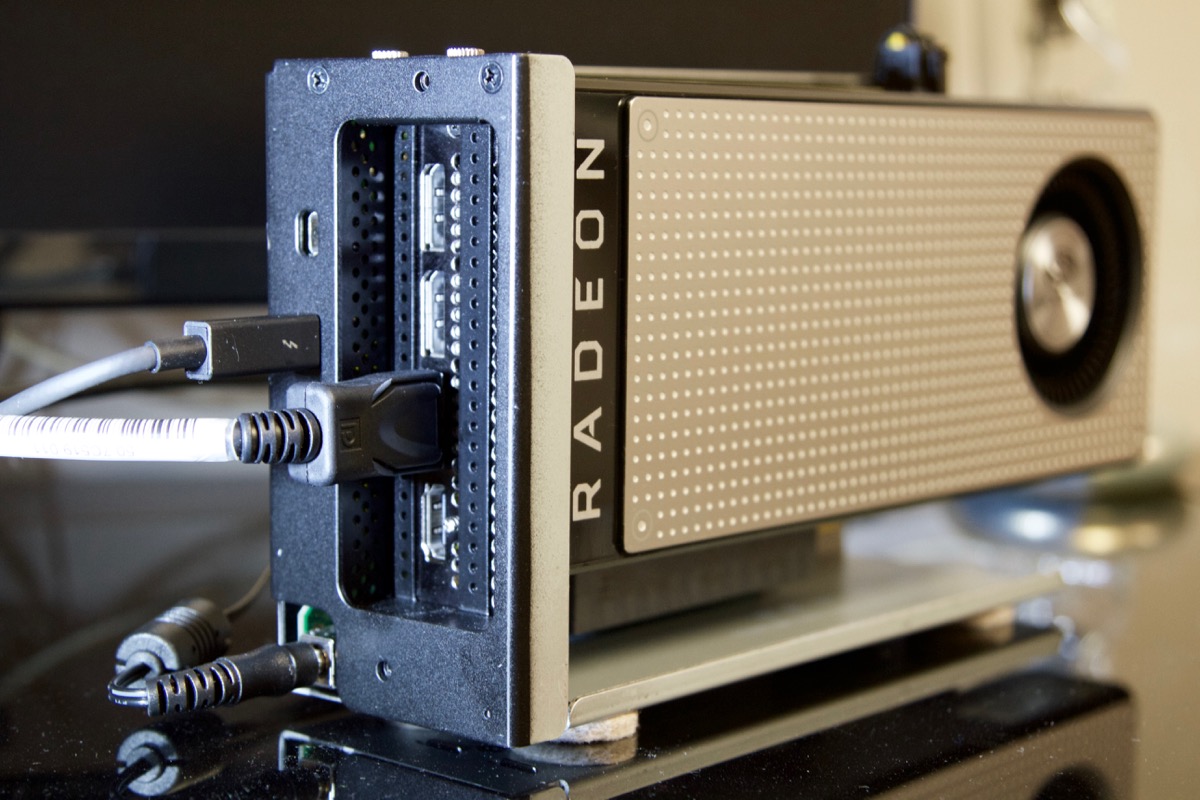
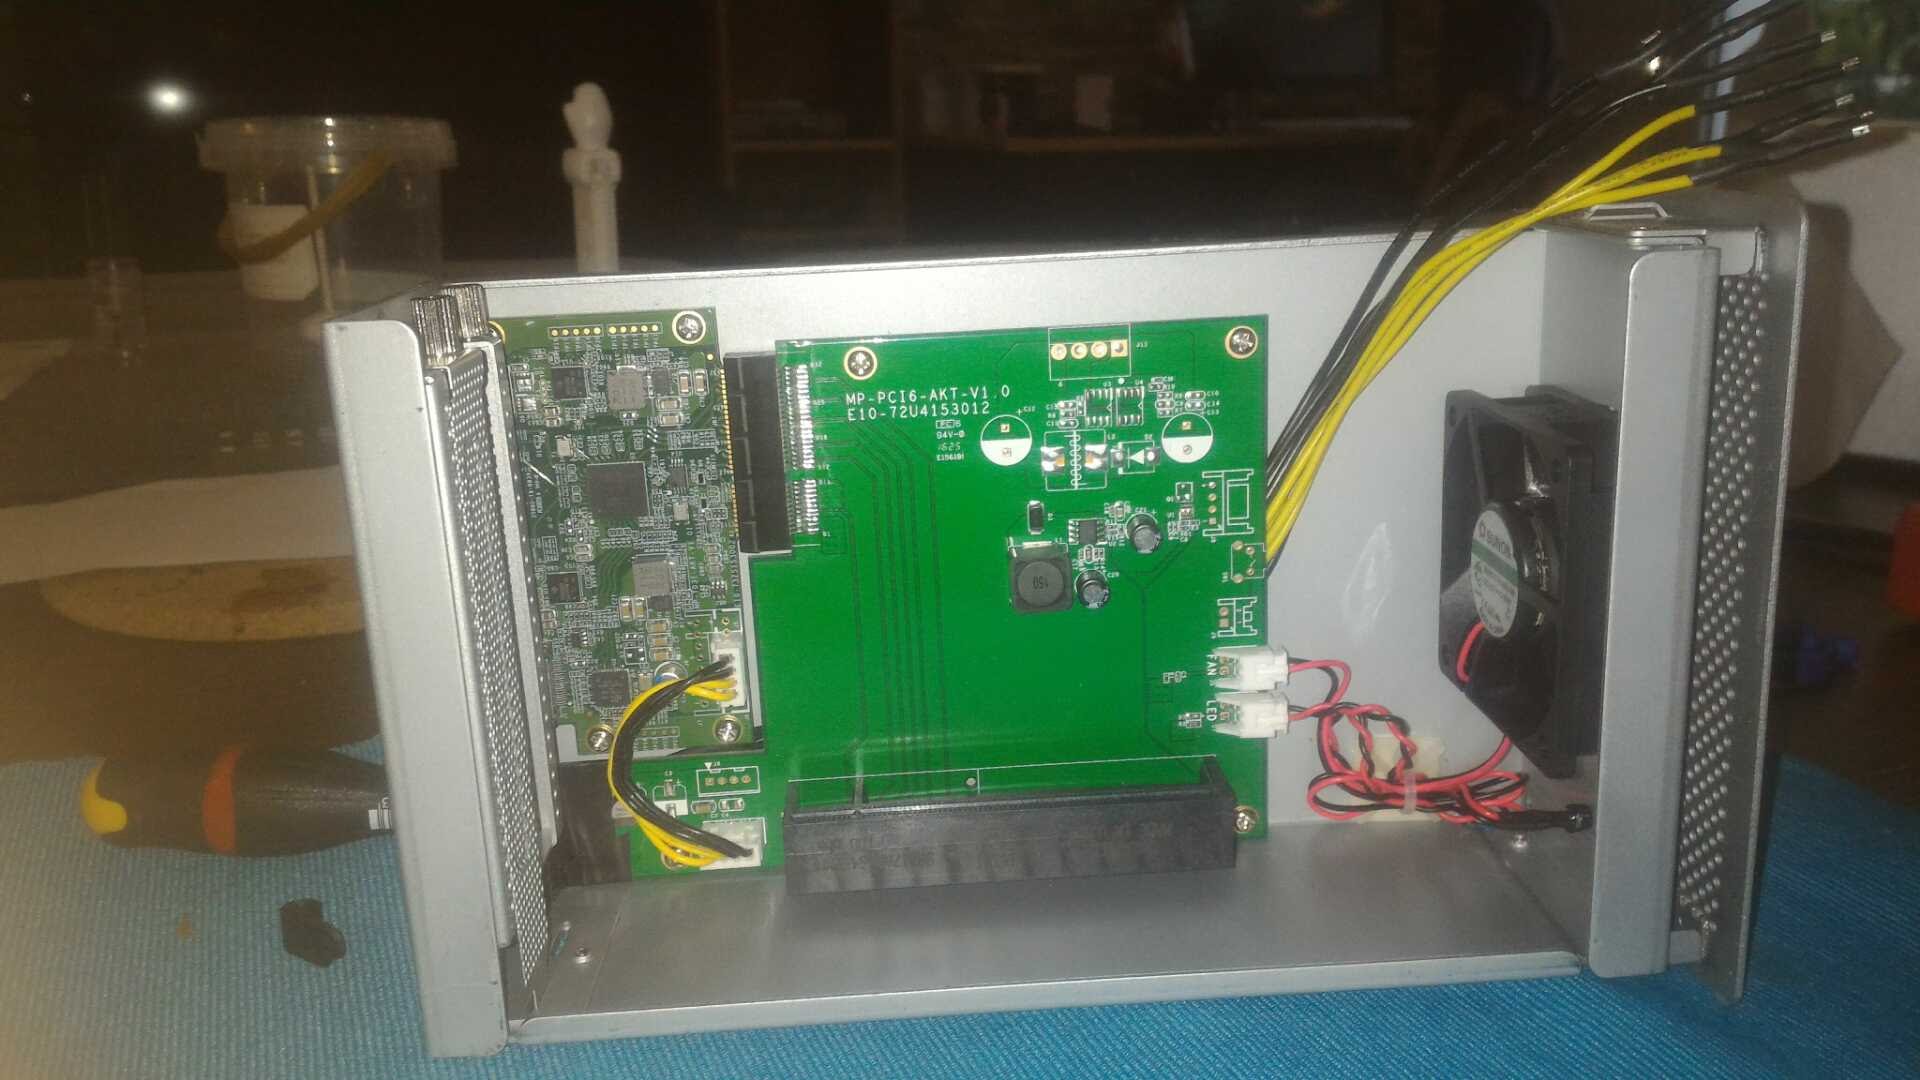
    One of the most popular solutions for building an eGPU is to start with an AKiTiO Thunder2 enclosure. This enclosure has dual Thunderbolt 2 ports and a full-length PCIe slot. AKiTiO officially only supports low-power PCIe components due to its 60W power supply. This limits power delivery to the PCIe slot at 30W which is a no-go for most GPUs requiring 75W.

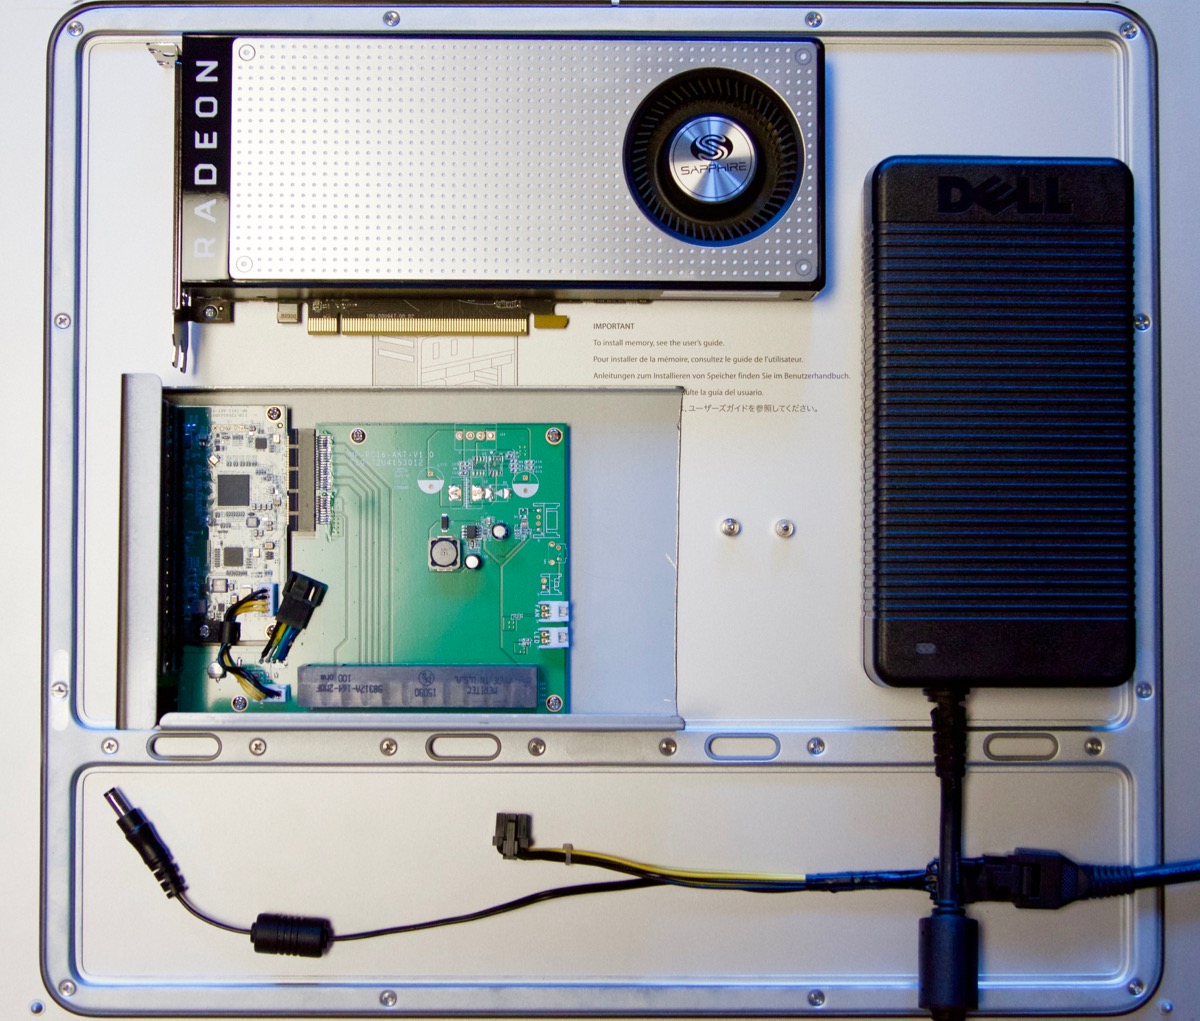
    To get around this hurdle, a prerequisite for an eGPU build is a 200W+ power supply. Some have used Desktop ATX power supplies with 500W+. Many are turning to a Dell DA-2 power brick which has an output of 220W. I replaced the AKiTiO power supply with the Dell DA-2. This power supply is popular due to its relatively low cost and portability.

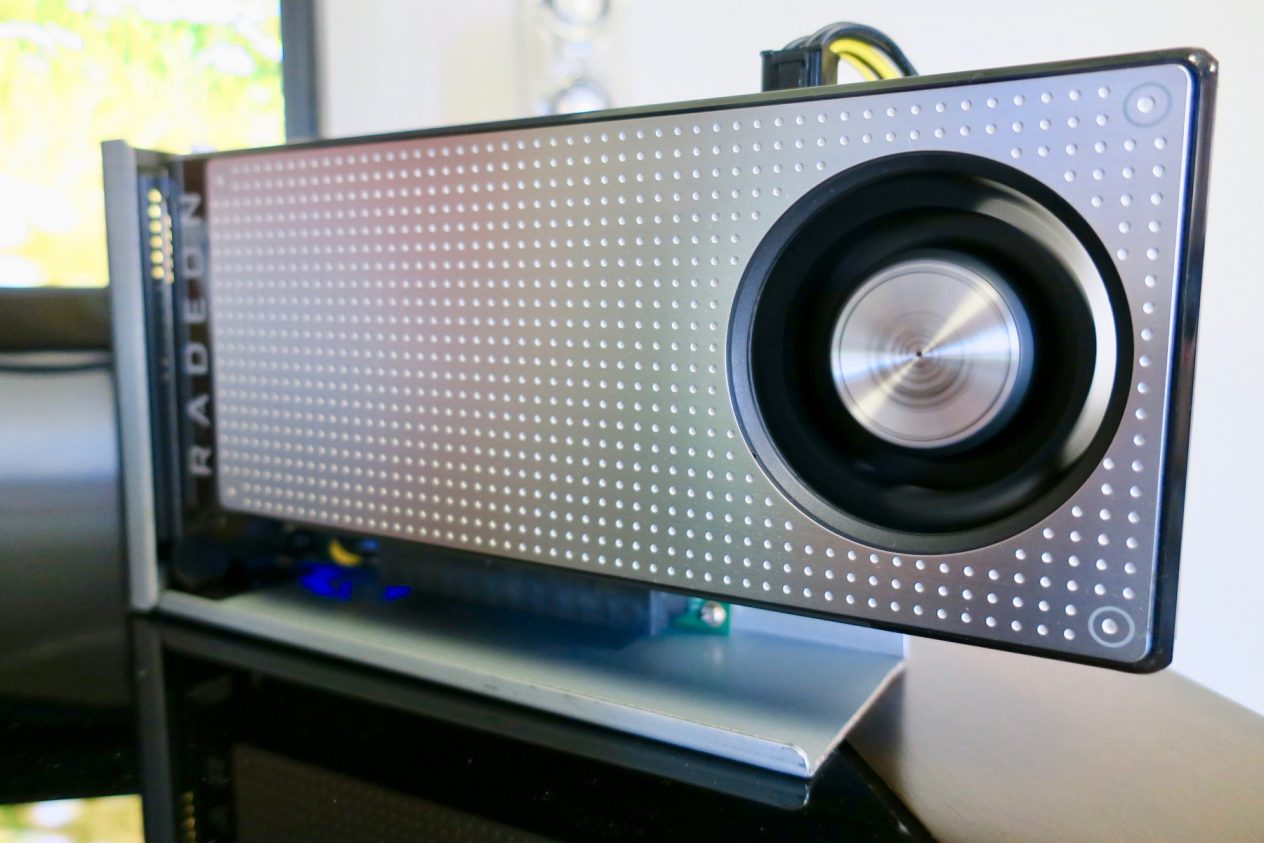
    Last but not least you need a powerful graphic card. I’m using an AMD Radeon RX 470 graphic card which is part of AMD’s newest Polaris lineup. I chose this GPU because of its 150W TDP power requirement. There’s no official driver support in Mac OS X. However, macOS Sierra 10.12 has drivers which can be modified to make use of the RX 470.

    Thunderbolt eGPU for Mac

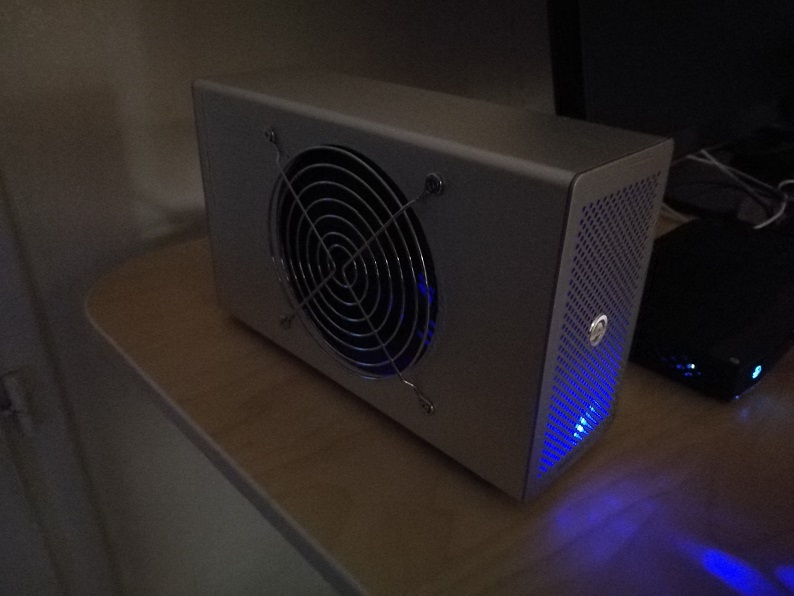
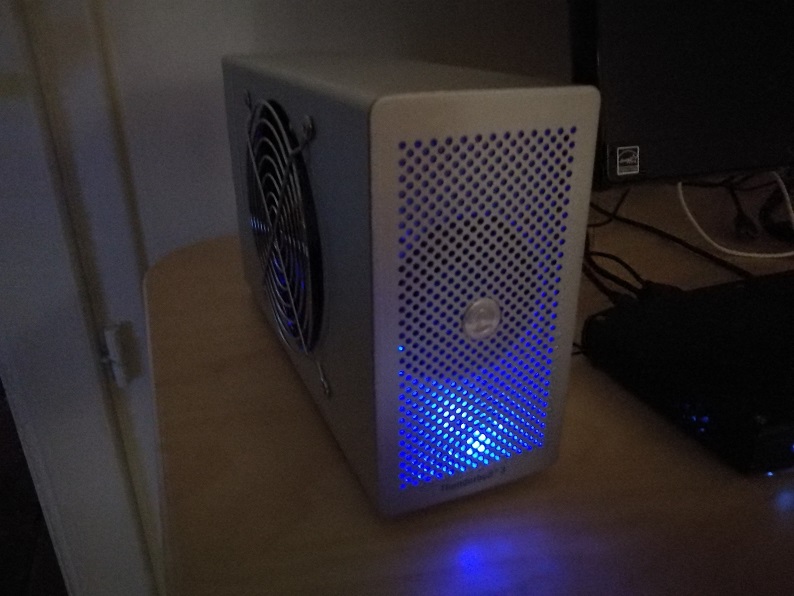
    Thunderbolt eGPU for Mac – AKiTio Thunder2 Enclosure + AMD Radeon RX 470 GPU + Dell DA-2 220W Power Supply

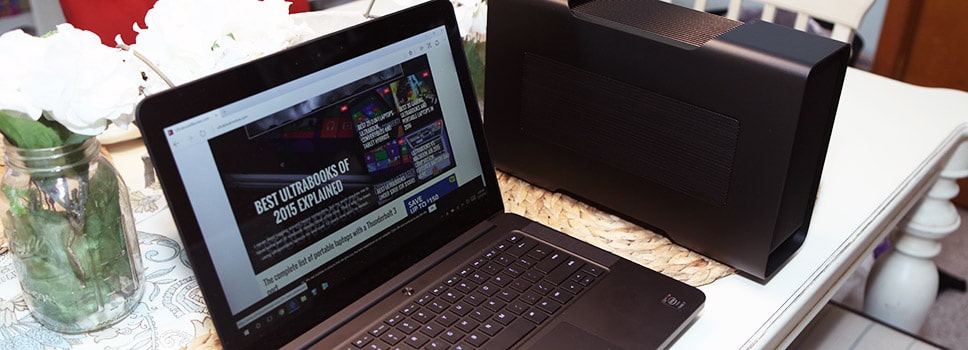
    Similar to most external peripherals, the eGPU has a few connections out the back. I modified the Dell DA-2 to have a barrel plug to power the AKiTiO Thunderbolt/PCIe board and to have a PCIe 6-pin power cable to power the RX 470. The AKiTiO enclosure communicates to a Mac through a thunderbolt cable. A DisplayPort cable connects the graphic card to an external display.

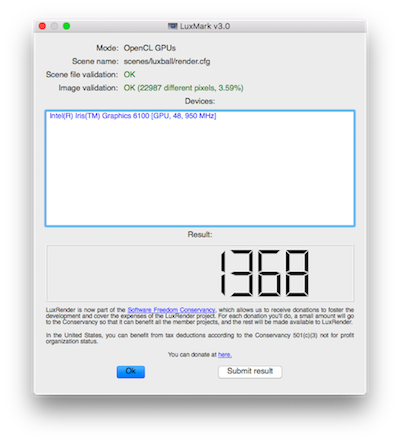
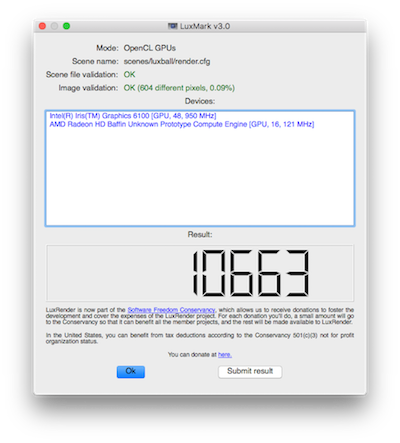
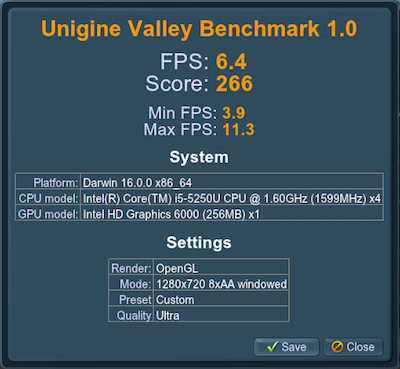
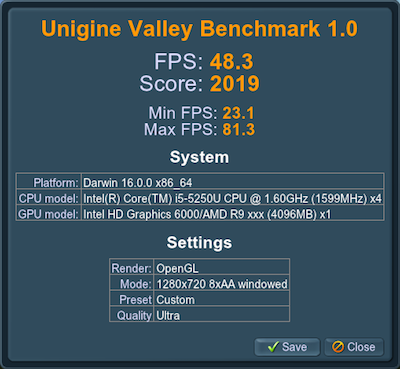
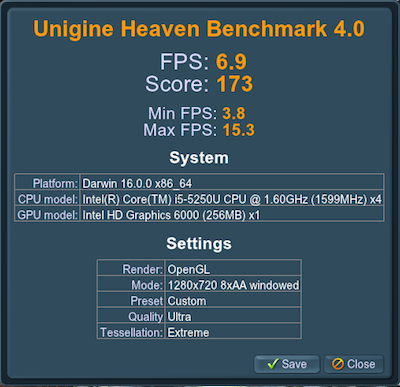
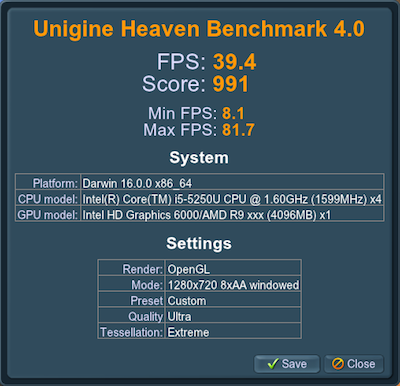
    I’m using a MacBook Air 11″ to demonstrate the performance gain this eGPU provides. All current Macs could use the performance boost from a Thunderbolt eGPU except the tower Mac Pro which has PCIe ports and can use newer graphic cards internally.

    RX 470 eGPU with MacBook Air 11" and LG 34" Ultrawide screen

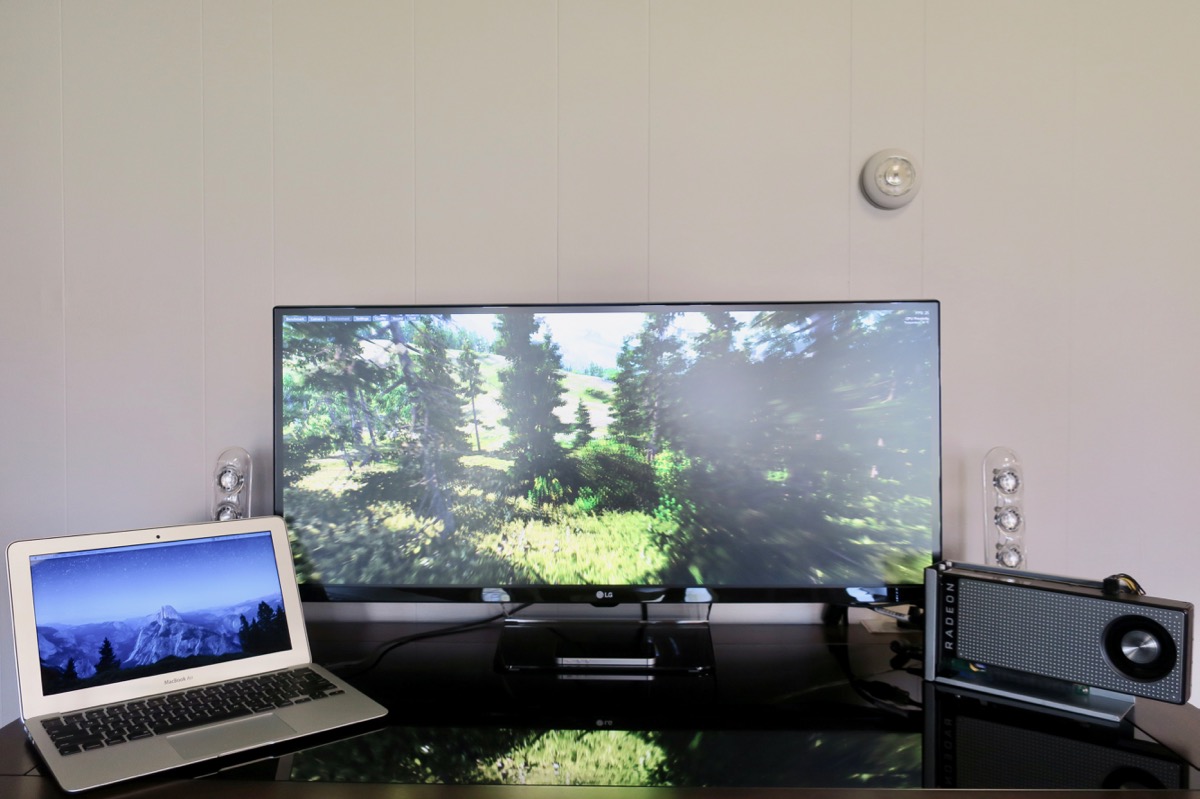
    RX 470 Thunderbolt eGPU with MacBook Air 11″ and LG 34″ Ultrawide screen

    Thunderbolt eGPU Performance Boost

    The improvement is significant. These benchmark scores show the Radeon 470 Thunderbolt eGPU performs 8x faster than the Intel HD 6000 integrated graphic card in the 2015 MacBook Air 11″.

    Intel HD 6000 Luxmark benchmark score  RX 470 Luxmark benchmark score

    Intel HD 6000 Unigine Valley benchmark score  RX 470 Unigine Valley benchmark score

    Intel HD 6000 Unigine Heaven benchmark score  RX 470 Unigine Heaven benchmark score

    As excited as I am to see these scores, building a Thunderbolt eGPU is only a stopgap. Many professionals who use Macs for their daily work are finding it harder to stay within the ecosystem as the graphical computing performance is not meeting their needs. At the end of the day, Apple needs to step up its Mac game to rekindle the enthusiasm of its most loyal users.


  7. 2 hours ago, zvasconcelos said:

    There are some "names" in portuguese. Is just to remove then? Or will need to replace the text in portuguese for something else?

    Another doubt: It will need to be done every time that I want to use the egpu?


    The devcon.txt file is attached.

    Thanks for the help.


    devcon.rar


    Pls remove the following section, then save and re-try PCI compaction:

    ACPI\PNP0A08\0
        Name: Complexo da Raiz de PCI Express
        Device is currently using the following resources:
            MEM : 000a0000-000bffff
            MEM : bfa00000-feafffff
            MEM : fed40000-fed44fff
            IO  : 0000-0cf7
            IO  : 0d00-ffff
  8. 1. Your black bootup screen is due to the BIOS seeing the eGPU. To correct this, hide the eGPU from the bios using the eGPU adapter switches as discussed at https://www.techinferno.com/index.php?/forums/topic/8947-mpcieec-egpu-troubleshooting-steps/


    2. Your PCI compaction with endpoint=56.25GB is fail probably because you have a non-English v:\config\devcon.txt file (run c:\eGPU\eGPU-setup-mount as admin to view) where the "PCI BUS" entry cannot be identified and skipped, but acts to exclude allocation. Pls remove the non-English PCI Bus section or PM me the file contents so I can identify what needs to be removed.

  9. 7 hours ago, Simone Sidoli said:

    Hello guys! :)

    i would just to know how is possible save the setting in the diyegpu setup for the next Windows boot without re-enter every time in the diyegpu setup and redoing all the setting manually. Actually I can use the egpu, setting everything when I boot the computer. If I restart the computer for example the egpu is not working.

    thank you for your help.


    Hi F3 after each required menu in Setup 1.30 to add the equivalent command to your startup.bat. Then upon reboot, select the default Setup 1.30 -> automated startup via startup.bat for replay of the same command sequence.

    • Thumbs Up 1
  10. 43 minutes ago, pixelvaganz said:

    Windows 10 was installed via Bootcamp. I prepared an USB dongle with refind 10.3.2 and apple-set-os.efi. I booted from the USB, activated the Iris Pro via apple-set-os.efi and booted Windows via EFI. Then i installed the driver for the Iris Pro from Intel Site. After that i used GPU-Switch from Github (integrated.bat) and disabled the GT750m. 


    Now when i'm booting, the boot process freezes or i if got success, the GTX1060 has a yellow triangle in device manager. If i try to install the driver from Nvidia, there is an error, that my windows is not compatible. Has someone an idea, what i can do? It would be great! Thank you


    P.S. Do you recommend Setup1.30 for my setup? I bought it, but i don't know what to do :D 


    Pls ensure you remove all existing NVidia drivers, the use "DDU" to remove NVidia registry entries as well as disable automatic driver installation and then install the latest Win10 GTX1060 driver. Check if there are any errors against the GTX1060 in Device Manager, eg: error 10, 12, 34.


  11. 19 hours ago, GNST said:

    Hey i'm using Exp Gdc v8 (mpcie)  on a Toshiba i7 with a msi 750 Ti. Everything worked out the box but I keep getting instabilities with the link swapping from pcie 2.0 x16 gen 2  to gen 1.1 on heavy load .

    Overclocking the card takes the link back to gen 2 but same thing occurs when there is gpu intensive program running. My question is will swapping from Exp Gdc to PE4H/Pe4L fix the instabilities, or can the egpu setup fix problem.


    EXP GDC has been noted to be problematic maintaining a reliable Gen2 signal. You've identified the solutions as either downgrading the signal to Gen1 or to use a PE4C V3 (with more reliable soldered cable).

  12. From http://www.ultrabookreview.com/10761-razer-core-review/
     

    Quote

    Razer Core review – how it works with the Razer Blade and Dell XPS 15

    Razer Core review – how it works with the Razer Blade and Dell XPS 15
    By Derek Sullivan , last updated on September 2, 2016
    Summary: Razer certainly beat everyone to the punch by releasing the first Thunderbolt 3 graphics card enclosure, and even though it was a little rocky getting it set up with my Razer Blade, I made it plug and play in the end. The price tag on the Core is pretty scary though, and for now the compatibility with non-Razer laptops is problematic, but these might change in the next couple of months.
    Rating: 4 / 5   Price range: $499
     

    THE GOOD

    Beautiful design; Compact design; Fits a vast range of desktop graphics cards; Pretty reliable for Razer laptops; Open source

    THE BAD

    Lack of competitor laptop support; Software setup is kind of clunky; Thunderbolt 3 pass-through would have been nice


    UPDATE LOG:

    8/25: Add MSI GS73VR to the non-Razer Laptop section (it works great so far) – check out our detailed review here.

    7/4: GTX 1080 benchmarks added, rewrote performance section, added noise levels for 1080, added new findings for XPS 15 in the non-Razer laptop section.  This might be my last update for some time pending something significant happening with XPS 15 compatibility.

    6/23: Razer Core is now available to order, but it’ll take a few weeks for them to ship it.

    6/21: Updated benchmarks with the Blade and XPS 15 with a GTX 1070.  Added explanation of results in performance section.  Added GS40 compatibility and lack thereof of the AW 17 in the non-Razer laptop section.

    6/7: Updated availability – Up for preorder and ships 6/13

    6/3: added small section about XPS 15 specs, benchmarks and noise to the non-Razer laptop section.

    6/2: Fixed issues with XPS 15, updated non-Razer laptop section, updated benchmarks in performance section, add Noise and Heat section.


    5/31: Added more gaming benchmarks and XPS 15+core comparisons.  Added section explaining the results in the non-Razer laptop section. Added noise readings to the end of the Performance section.

    5/30: Initial post

    Over the years, I’ve used my desktop less and less. In fact, the only reason I even have one still is for multi-monitor support. Sure, I could hook up external monitors to my laptop, but in my situation, it’s not really ideal. Especially since my wife has a different laptop with different connections – we’d be spending a lot of time switching out dongles and wires. In short, it’s been easier just to keep the desktop around.

    But now the Razer Core is here. You’re probably already familiar with the Core if you’re reading this post, but just in case you’re not, the Razer Core is an external graphics unit that hooks up to compatible laptops via Thunderbolt 3. It comes with its own power supply and can fit a multitude of modern Nvidia or AMD desktop-grade graphics chips. It also provides a set of extra ports (4 x USB 3.0, Gigabit Lan) besides the video outputs on the graphics cards, so can act as a dock for your peripherals.

    I don’t have the Razer Blade Stealth around anymore, but I have the new Razer Blade 14” (2016) in order to test how it works with the Core.  My wife also has a Dell XPS 15, which also has a Thunderbolt 3 port.


    So the big questions on my mind are how well does a Core+laptop bundle perform compared to my desktop, how easy it is to hook up the Core and go and whether or not the Core works with non-Razer laptops. I’ve been working diligently to answer all these questions and here’s everything I’ve learned so far.

    Note that this article is going to be a work in progress and I’ll be keeping it updated as I find things out. So keep checking in now and then, if interested.

    The Razer Core is Thunderbolt 3 external graphics units

    The Razer Core is Thunderbolt 3 external graphics units

    Specs as reviewed

      Razer Core
    GPU Support Single, double-wide, full-length PCI-Express x16
    Max GPU dimensions 12.20” x 5.98” x 1.73” (310 x 152 x 44 mm)
    Max GPU power 375 watts
    Input Thunderbolt 3
    Output USB 3.0 X 4, Gigabit Ethernet 10/100/1000
    Lighting Chrome – 2 zones
    Size 310mm or 12.2” (w) x 152mm or 5.98” (d) x 44mm or 1.73” (h)
    Weight Roughly 12.5 lbs with the GPU installed

    Design and exterior

    The overall design of the Razer Core is absolutely perfect.  The look is completely professional and could easily blend in with any desk setup.  The all aluminum construction really makes it look a high quality product that will likely last a long time.  Even with the lighting, I would certainly feel comfortable having this on my desk.

    What’s most appealing is the size.  Compared to my current desktop, this thing is so tiny, but it’s still a little larger than I was expecting.  Rest assured though, all that space is necessary for the internal cooling fans, power-source, IO output and wiring.  It seems like Razer put an excessive amount of fans in this thing, but I’d rather be safe than sorry.

    The top of the unit has a large passive vent.  On the underside is another vent, with three cooling fans to circulate the air up to the card.  The front has what looks like a vent grate, but it’s actually just for show.  At the bottom portion of the front there’s a light which can illuminate to any color of your choosing or can be switched off.

    On the right side of the unit there’s an embossed Razer logo, centered on the face.  On the left side there’s the main vent that the GPU fans will blow through.  When lit up, you can see your GPU with Razer’s chroma lighting color of your choice.  It actually looks pretty cool when lit up.  Of course yours would look differently than mine, depending on what GPU you put inside. On the back, you’ll find 4 USB 3.0 ports, a Thunderbolt 3 input, an Ethernet port and a power socket.  There’s also what appears to be the PSU vent.

    A single handle holds the internals in and if you lift it 90 degrees, everything pulls right out.  There are no screws at all, with the exception of the single screw that will hold the GPU in place.  I was a little skeptical of the locking mechanism, but it’s actually pretty solid.

    I think many will probably want to put the Core on the right side of their desk to enjoy the lighting.  Stealth owners may not have a choice though, since the Thunderbolt 3 cord provided with the Core is extremely short, a mere 18 inches long.  Apparently making the cord longer would cause problems with performance and you would need a more expensive “active” cable.  Your options with a cord this short are extremely limited.

    So with the Razer Blade Stealth’s Thunderbolt 3 port being on the left side, you’d have to have the Core on your left, which puts the lighting out of sight.  The other option is to turn the laptop to its side and put it on the right, but the screen would not be facing you.  For me it wouldn’t matter, because I don’t plan on ever using the laptop’s screen with the Core.  Plan accordingly.

    Razer Blade(14”) users will have their Thunderbolt connection on the right side, so it will be a little easier.  But keep in mind that the Core does not charge the Razer Blade, only the Razer Blade Stealth.  So you’ll have to hook up your power adapter to the Razer Blade as well, which is on the left side of the laptop.  That means wires on both sides – bummer.  For me, it’s still kind of a mess because the laptop is now where my mouse was.  My quick fix is to put my mousepad on top of the Blade.

    These are small things to complain about, considering what’s being done.  In all retrospect, the setup is a lot cleaner than the DIY external graphics enclosures I’ve seen in the past and overall, I’m really pleased with the Core’s design and ergonomics, even with the small sacrifices that had to be made to make it work.

    Setup

    Installing the graphics card was just as easy, if not easier, than installing it on a desktop.  The card goes right into the slot and all it takes is one screw to hold it in place.  Then you attach your PCI-e power connectors. Then you just slide the card into the enclosure and fold the handle bar to lock it in.  It’s as simple as that.  For my testing, I used a MSI GTX 970(and later the 1070) graphics card.

    Things get a little more complicated after that and I ran into some issues that I can’t recreate, since I now have everything up and running.  Being a Core owner, Razer emailed me some directions on what to install.  I downloaded and installed the software required, but the instructions weren’t very clear on the order I was supposed to install everything in. So all I can do is tell you what I did, what problems I ran into and how I fixed them.  Hopefully it will go better for you.

    The first thing I was supposed to install was an updated version of Razer Synapse, which is compatible with the Core.  I already own a Razer Blade though, so this was already installed.

    The next thing to install is the Razer GPU Switcher Beta Tool.  This opens a little program that switches the GPU either automatically or manually, depending on your preference.  The launcher icon is in your quick launch toolbar, but it does nothing without the Core attached.

    The last piece of software to install is Nvidia’s desktop graphics drivers.  The instructions indicate that these should be installed with the Core plugged in, but this is where I ran into problems.  When I plugged the Core in, it would lock up ALL my inputs, including the keyboard, mouse and touch.  So there was no way to install the drivers!

    I did a hard reset and installed the drivers without the Core attached.  They installed fine and I rebooted.  I tried attaching the Core and this time the Razer GPU switcher popped up with an option for me to switch to the GTX 970 I installed.  Yay!…wait.  My inputs were all locked up again.  So I couldn’t even select the option to get it to work.

    I tried it over and over again with the same results.  The ONLY thing that worked was when I booted the laptop with the Core attached – then everything mysteriously started working correctly.  Synapse then prompted me for an update and then the Core was recognized by Synapse.  Somewhere in the mess, Intel’s driver popped up and notified me that the Core was attached to Thunderbolt 3 – I can’t remember when exactly that happened.

    So after it finally worked, I was able to set it up for multi-monitor support.  Instead of 3 screens, I chose to turn off the Razer Blade’s display and operate with it closed.  The short Thunderbolt cord really makes your options limited on where to put your laptop, so again, be prepared for that.

    My GPU successfully outputted to my dual QNIX 2560 x 1440 px monitors, which are dual-link DVI only.  Prior to this, I have never been able to connect these displays to a laptop, so this was kind of exciting for me.  The default refresh rate was set to 60Hz but I’m able to set custom resolutions with higher refresh rates.  Unfortunately, it doesn’t work some of the time though and it goes back to 60Hz.  I haven’t yet pinpointed why this happens, but rest assured I plan to find out.

    One other thing I’ll mention concerns those who want to operate with the laptop’s lid closed, like me.  There are only two ways to do this so far.  The first is to disable sleep mode when you close your lid.  Then you can turn it on and flip the lid closed.  I happen to rely on sleep mode when closing my lid, so I chose not to use this option and leave this feature on.


    However, if you choose to leave sleep mode on when closing the lid, attaching the Core will not wake the laptop from sleep.  And closing the lid obviously puts the laptop to sleep.  Unfortunately, the Core is powered off while the laptop is off or in sleep, so none of your attached devices will wake the laptop.  So the only other option I have gotten to work so far is to use my USB mouse I have attached directly to the Razer Blade, to wake the laptop from sleep.  As soon as I find a way to wake the laptop from sleep by attaching the Thunderbolt cable, I’ll be sure to update this as well.

    Performance and daily experience

    For the purpose of my testing, I compared the results of my current desktop with the Razer Blade 2016 attached to the Core.  Both used the same video card, an Nvidia GTX 970.  The desktop has a Core i5-3570K (with stock clock speeds) processor and 16GB of RAM, while the Blade gets an Intel Core i7-6700HQ processor with 16 GB of RAM as well.  I also tested with the XPS 15 which has an Nvidia GTX 960m paired with the i5-6300HQ.


    Some time after I initially wrote this article, I was able to repeat the Razer Blade and XPS 15 testing using a reference GTX 1070 and then again with the Asus Strix GTX 1080.  My desktop is dismantled now so I couldn’t repeat the tests for that one.


    All benchmarks used a QNIX 2560 x 1440 px monitor, and the laptop’s display was disabled when attached to the Core.   I was able to overclock my monitor to 96Hz pretty easily, so we could see actual framerates above 60(except for Fallout below native resolution).


      Desktop w/970 Blade + Core+970 Blade + Core+1070 Blade + Core+1080 Blade XPS 15 + Core+970 XPS 15 + Core+1070 XPS 15 + Core+1080 XPS 15
    3DMark – Fire Strike 9168 8742 11554  12797 6513 7433* 8266*  11607 3561
    3DMark – Sky Diver 21371 22692 26401  27315 18741 17746* 18599*  22909 9949


    Fallout 4 – Outside the Corvega plant entrance with a battle

      Desktop w/970 Blade + Core+970 Blade + Core+1070 Blade + Core+1080 Blade XPS 15 + Core+970 XPS 15 + Core+1070 XPS 15 + Core+1080 XPS 15
    Ultra, 2560 x 1440 px 43-53 fps 38-48 fps 48-63 fps  55-65 fps N/A 32-41 fps* 44-60 fps*  49-60 fps N/A
    Ultra, 1920 x 1080 px 51-62 fps 52-60 fps 54-60+ fps  54-60+ fps 42-52 fps 43-60 fps* 48-60 fps*  54-60 fps 23-32


    Witcher 3 – Walking around the grounds on the first tutorial

      Desktop w/970 Blade + Core+970 Blade + Core+1070 Blade + Core+1080 Blade XPS 15 + Core+970 XPS 15 + Core+1070 XPS 15 + Core+1080 XPS 15
    Ultra, 2560 x 1440 px 34-38 fps 24-26 fps 34-38 fps  40-48 fps N/A 20-22 fps* 33-36 fps*  40-48 fps N/A
    High, 2560 x 1440 px 42-47 fps 34-38 fps 48-50 fps  57-60 fps N/A 29-31 fps* 48-50 fps*  57-60 fps N/A
    Ultra, 1920 x 1080 px 45-53 fps 28-31 fps 41-46 fps  48-54 fps 28-31 fps 22-25 fps* 42-46 fps*  46-56 fps 17-20
    High, 1920 x 1080 px 60 fps 45-53 fps 60 fps  60 fps 39-41 fps 38-40 fps* 60 fps*  60 fps 23-25


    Dragon Age Inquisition – Battle nearby a camp at the beginning

      Desktop w/970 Blade + Core+970 Blade + Core+1070 Blade + Core+1080 Blade XPS 15 + Core+970 XPS 15 + Core+1070 XPS 15 + Core+1080 XPS 15
    Ultra, 2560 x 1440 px 32-35 fps 22-28 fps 32-40 fps  45-48 fps N/A 23-28 fps* 22-28 fps*  43-48 fps N/A
    High, 2560 x 1440 px 53-61 fps 55-60 fps 57-64 fps  67-75 fps N/A 42-47 fps* 40-48 fps*  63-73 fps N/A
    Ultra, 1920 x 1080 px 46-54 fps 35-42 fps 48-56 fps  58-63 fps 27-31 fps 35-40 fps* 35-42 fps*  52-64 fps 17-20
    High, 1920 x 1080 px 75-89 fps 60-68 fps 73-90 fps  80-98 fps 48-52 fps 55-64 fps* 55-65 fps*  76-88 fps 26-33


    Crysis 3 – Opening mission

      Desktop w/970 Blade + Core+970 Blade + Core+1070 Blade + Core+1080 Blade XPS 15 + Core+970 XPS 15 + Core+1070 XPS 15 + Core+1080 XPS 15
    Very High, 2560 x 1440 px 31-45 fps 25-45 fps 35-65 fps  40-75 fps N/A 25-40 fps* 20-50 fps*  40-65 fps N/A
    High, 2560 x 1440 px 43-65 fps 34-65 fps 49-96 fps  57-110 fps N/A 35-60 fps* 33-75 fps*  57-95 fps N/A
    Very High, 1920 x 1080 px 46-67 fps 40-65 fps 46-85 fps  52-100 fps 29-42 fps 37-60 fps* 29-65 fps*  50-85 fps 17-27
    High, 1920 x 1080 px 65-96 fps 53-85 fps 59-96 fps  71-120 fps 44-60 fps 46-82 fps* 45-80 fps*  65-103 fps 25-40

    *readings on the XPS were taken with bios version 1.2, which was found to(sometimes) hinder performance of the GPU slightly.  I can’t go back and remeasure them since I no longer have that GPU.  The GTX 1080 readings were taken on bios 1.1.19, which is much more consistent.

    I also added a few logs showing frequencies and temperatures of the Razer Core connected to the Razer Blade and my 1440p monitor.

    As you can clearly see, the Razer Core certainly does a good job boosting the performance over the Razer Blade alone.  If you have the new Nvidia GTX 1070 or 1080, it improves  those graphics settings even more to get some really decent fps on AAA titles.  Even the 970 shows some significant signs of improvement over the 970m, if you don’t want to spend that kind of money.

    I’ve been doing a lot of research since originally writing this section and there have been a number of things I found out over the past few weeks.  The first thing to mention is the performance hit the Core takes as opposed to using a desktop.  If you compare my desktop+970 readings to the Razer Blade+Core+970, you’ll notice a significant fps drop.  The CPUs in both machines offer very similar performance scores in benchmark tests, so the only thing I can chalk off the performance hit to is losses through the thunderbolt connections/driver issues.  So if you’re planning on using a particular graphics card and are comparing it to desktop benchmarks, expect to see a 10-15% performance drop right off the bat.

    Another thing I want to mention is the performance with the newest Nvidia GTX 10xx series cards.  As you can see, my Firestrike scores are much higher than the 970, which is what you would expect.  But if you compare those results with Firestrike benchmarks taken in people’s desktops with the 1070 or 1080, you’ll see a much larger performance drop(nearly 30%).  On top of that, the Firestrike performance of the 1080 is only 10% higher than the 1070.  At first I thought maybe the 1080 is being bottlenecked by the Core somehow.  I ran another test though(which I’ll get to shortly) and determined it wasn’t the bandwidth limit being reached.  My only conclusion is that the CPU in the Razer Blade is skewing the Firestrike scores to be really low.  Here’s why.

    The score is actually calculated off of the weighted average of three scores: Graphics(GPU only), Physics(CPU) and combined.  Since the CPU is the same in all tests, the Physics score is unchanged.  And since the Graphics score has such a large increase, but the CPU score stays the same, the average is going to be lower when compared to someone testing the card in a machine with a top of the line Skylake desktop CPU.  In other words, a 20% increase in graphics performance equates to roughly a 10% increase in the Firestrike(standard) score.  This would be a good place to use the Firestrike Extreme score as a comparison since it relies more on graphics performance at high resolutions.

    The good news is this isn’t really a factor with many titles since they are more driven by the GPU than the CPU.  You can definitely see a more proportional performance jump between the 1070 and the 1080, when looking at the fps measurements I got in the games I tested.  It’s certainly better than the 970 readings and much much better than using the 970m in the Razer Blade.  To the point, I’m happy with the performance of both the 1070 and 1080 in the Core.

    So how did I determine that I wasn’t hitting the bandwidth limit of the Core?  Well since I got the Asus Strix 1080, I decided to overclock it and see if I could improve things.  My original Firestrike score was 12797(Graphics: 16764, Physics: 9603).  I overclokced the GPU boost clock to 1973 Mhz, the memory to 11.2Ghz and let the voltage alone.  My Firestrike score jumped to 13294(Graphics: 17785 Physics: 9610), a 6% gain from a ~10% overclock – not bad!  I didn’t go crazy testing games with the overclock but I did gain 3-4 fps on the Witcher on Ultra QHD settings.

    In regards to the XPS 15, you’ll notice my benchmarks are a little all over the place between GPUs.  It’s because the system is a little sensitive to a number of factors(which I describe in more detail below).  In short, if you use the wrong bios your performance will differ.  For the 970 and 1070 tests I was on bios 1.2 but for the 1080 I was on bios version 1.1.19.  The main thing it allows is for more consistently higher GPU usage, whereas before it was erratic and sometimes throttled for whatever reason.  I left the XPS 15 + 970 and 1070 benchmarks on the table but take them with a grain of salt.

    You might have noticed that even with the 1080 and the better bios, the XPS 15 still has a lower Firestrike score and some of the gaming benchmarks are a little lower than with the Razer Blade.  I looked into it and it’s definitely because my XPS 15 is the i5 version.  I’ve been collaborating with Doug who also recently got a Core.  He has the i7 version of the XPS 15 and got a Firestrike score more similar to what I got with the Razer Blade.  The physics portion of his score is 9973, which is more consistent with the Razer Blade.  The physics portion of my score was only 6165.  So if you’re looking for the bext performmance and want an XPS 15, aim for the i7 version.  It’s still a buggy connection though, which I describe more in the section below.

    Heat and Noise

    One nice feature of the Razer Core is that the external GPU takes some of the heat load off the Razer Blade.  If you read my review on the Razer Blade, you noticed that when gaming I was getting CPU and GPU temperatures as high as 87C.  That’s not the case when you attach the Core though.

    If you look closely at the HWinfo screenshots I took, you can see that the cooling system adequately cools the CPU alone and keeps temps in the 60s and 70s.  And this is with my Razer Blade lid shut.  Surely it will be a little cooler with the lid open, if that’s the way you want to set it up.

    Of course the GPU still gets hot, but that’s solely going to depend on the GPU you choose to use and whether or not you repaste it.  For my setup, everything is using the stock paste and fans.  My temps for the 970 are in the 70s, so I’m not worried at all.  For the 1080, my temps were even better for the most part.

    I also took some noise readings with the Core.  It’s actually pretty quiet compared to my desktop and even the Razer Blade by itself.  The ambient readings in the room I was in measured 25 dB.  Under normal use, the Core with 970 made noise levels increase to 35dB at ear level and 40dB six inches from the Core.  Utilizing silent mode on the Asus Strix 1080, noise levels were 31bD at ear level and 36dB six inches from the Core.

    Under heavy gaming loads, the levels for the 970 increased to 40dB at ear level and 50dB next to the Core.  The Asus Strix 1080 measured 35dB at ear level and 46dB next to the Core.  Compared to my desktop which was 50dB at normal levels, this is a welcome improvement.  Of course, your mileage may vary depending on what graphics card you choose.

    All this noise is pretty much coming from the Core.  I barely heard my Razer Blade fans at all really.  Since it’s only using the CPU and the temps are within a low range, the Razer Blade fans are not spinning as fast.  Good thing too, because the combination of both would probably be a little too noisy for me.

    Support for non-Razer Laptops

    The Razer Core is specifically designed for the Razer Blade and Razer Blade Stealth.  Even Razer’s CEO mentioned that it would not be plug and play for non-Razer laptops.  But he did say that they weren’t closing the door on the option and the software was going to be open source.

    Of course I’m going to give it a try though – it’s what I do.  The whole point of me getting this thing was to eliminate my desktop and my wife doesn’t (and won’t ever) use a Razer laptop.  So I went ahead and installed all the software on her Dell XPS 15.  Let’s just say for now that I got mixed results.

    First off, I have no idea what actually made it work right off the bat, but it did.  I installed the GPU switcher, Razer Synapse and then installed the desktop GPU drivers.  Then I connected the Razer Core and I immediately got multi-monitor support.  That wasn’t even that easy for my Razer Blade…  but it didn’t last.

    Once I unplugged it, the XPS 15 locked up with a blank screen.  Every attempt after that resulted in either a BSOD with an error with nvlddmkm.sys or a complete input hang, where the mouse and touchscreen would stop working.  I tried booting with it attached, but it would just hang at the log in screen and I couldn’t do a thing.

    Currently, the only way I’ve been able to get it to work is by going into the Device manager and manually disabling the mobile GTX 960M inside the laptop.  Once I did that and connected the Core, it works… sort of.  I’m able to get the GPU to display on my monitors, but I still don’t have interface with all the USB devices attached to the Core.  Also, Razer Synapse doesn’t recognize the Core, so there’s definitely something up.  To make it worse, unplugging the Core causes the laptop to sit at a blank screen indefinitely unless you reboot.

    Needless to say, the support for non-Razer laptops isn’t there.  But the capability certainly exists and I’ll be continuing to mess around and try to get things working.  I think there’s a possibility that laptops without a discrete GPU will fare better, but I don’t have one to test.  Doug is also getting a Core soon and will test it on his XPS 13, so hopefully he’ll chime in with his progress soon.

    UPDATE 5/31: I’ve done some extensive testing with the XPS 15 and I can’t seem to get it to work properly.  It outputs to both monitors and I can verify that the graphics card is driving them.  But what I can’t figure out is why the performance is choking so bad.  As you can clearly see in my benchmarks above, the performance with the XPS 15 and the Core is almost equal to the performance with the 960M.  There’s definitely some firmware or driver changes that have to be made to get this thing working properly.  I’ll be working on it some more, but I don’t think this thing is ready for Non-Razer laptops without some major tweaking.

    UPDATE 6/2/16:  As you can see from the lined out mess above, I had some challenges getting the XPS 15 to work properly.  Long story short, there are some Thunderbolt drivers and firmware that must be installed in order for things to work properly.  I actually figured all this out after a fresh install and I ended up getting things running rather quickly, the second time around.  Here’s what I did.

    First things first, make sure ALL your Dell drivers are installed and up to date.  This especially includes the Thunderbolt driver and the Thunderbolt updated firmware.  I think the updated firmware was the bigger part of my problem before.  Also make sure the 960M is fully updated, but before you do sso, uninstall the old driver and completely delete it.  This is important because when the GPU switcher disables the 960m, it will randomly try to reload the old driver which isn’t compatible with the Core.  It took me forever to learn about this…

    Next, install Razer Synapse.  This will not be up to date right away, but it will automatically update once it detects the Core. Once that happens, you might also be prompted to accept the Core for Thunderbolt.  Do so and Things will start to happen on their own.

    The last thing you’ll need to do is install the desktop graphics driver provided by Razer(I had Nvidia).  It will then detect your desktop GPU and everything should shift to those monitors once it does so.  If it doesn’t, manually disable the 960M in device manager and things should start to pick up.  Note that if things lock up for whatever reason try this again with the 960M disabled from the beginning.

    Update 7/4: {You’ll also want to make sure you’re on bios version 1.1.19.  The latest is bios 1.2 but has been found to be a little more buggy in regards to GPU performance.  Credit goes to Doug for finding this out.}

    You can also use the GPU switcher at this point, which works ok but is still kind of buggy.  I’ve noticed it likes to keep my 960M disabled if I shut down while plugged into the Core.  It’s not perfect yet but it’s a good start.

    So if you’re caught up with me now, you’re able to output to both monitors and all your peripherals Attached to your Core are working ok.  I am able to connect and disconnect pretty much the same as the Razer Blade now, which is great.

    I took some benchmarks and put them into the table above.  As you can see, it’s not quite as powerful as the Razer Blade and the Core but it’s really close.  This is most likely due to the i5-6300HQ processor and 8GB ram configuration I have.  Still, this might be something that will swing you in one direction or the other, if you’re having trouble deciding between the Razer Blade and the XPS 15.

    I did notice that the fan noise was a little louder than the Razer Blade.  I definitely heard it when the temps started to rise, whereas with the Razer Blade, I could not hear the fans at all.  It’s not terrible, but something I wanted to note.

    So there you have it folks, a non-Razer laptop working pretty decently on the Razer Core.  Sometimes I still have trouble getting the Core to load properly when plugging it into the XPS 15, but I think I figured out a routine to get it to work on a regular basis. The key component is making sure the 960M is disabled.  Booting with the Core plugged in works about 50% of the time and I can’t find out why it doesn’t yet.  I’ll be sure to keep you guys updated if I run into any bugs or anything.  But if this section stays as it is, assume no news is good news.

    Update 6/21: {After a couple more weeks of on and off use, I’ve come to a happy medium with the XPS 15.  It still gives me trouble occasionally but a reboot and a second try usually does the trick.  I do notice that Chrome doesn’t perform as well, which I find very strange.  It’s tolerable but seems sluggish.}

    Update 7/4{: Doug and I have been collaborating since he also now has a Razer Core.  He has been using it with an i7 version of the XPS 15 and a GTX 970.  He did a lot of trial and error with different bios versions and found that version 1.19 was the most stable.  I’ve been on 1.2, which has been somewhat stable but, as I mentioned before, I sometimes had to reboot because of sluggish performance.  Version 1.1.19 seems to be a lot more stable in terms of performance.

    We still both have different experiences, even though our firmware versions are practically the same.  I can’t boot 100% of the time with the Core attached for some reason, but Doug can.  But I can wake my computer from sleep and he can’t.  He also sometimes has disconnect problems but I haven”t experienced any yet.  Chrome for both of us is still a little sluggish but Edge works just fine.  So there’s still some bugs to work out with the XPS 15.}

    As for other laptops, I gave the Alienware 17 a try but I didn’t get it to connect.  After a little research, I think Dell needs to update the firmware on the Thunderbolt 3 hardware.  The AW 17 doesn’t even have any firmware on their support page, so I’m assuming it’s out of date for the specs the Core needs to operate properly.  The XPS 15 had multiple firmware updates for their Dell dock, which is probably why it is somewhat compatible.  I wouldn’t hold my breath with Dell doing this for Alienware though because they probably intend for you to just use the Alienware graphics amplifier instead.

    Another laptop that works with the Core is the MSI GS40.  I haven’t tested it personally, but hart breaker in the Razer Insider forums started a thread to try to get his to work.  At first, he wasn’t able to get it to work but after installing the Thunderbolt 3 driver on Razer’s website, he got it to connect fine.  He was able to run a Firestrike benchmark and get a score of 8651 with a 970 in the Core.  That’s pretty much identical to what I got with the Blade, so that is very promising for GS40 owners.

    Update 8/25/16:  I recently got my hands on an MSI GS73VR.  I’m still forming up my review on it, but I couldn’t wait to  try it out with the Core.  Long story short, it works just as if it was the Razer Blade.  It’s actually kind of nice because since the GS73VR is equipped with a desktop variant GTX 1060, the drivers are exactly the same.  Without the Core I got a Firestrike score of 9497 and a Time Spy score of 3579.  With the Core and GTX 1080 attached, my Firestrike score rose to 12980 and Time Spy hit 5733.  It’s still a very significant upgrade, granted you put the 1080 in there.

    I think it’s safe to say that MSI is leaving the eGPU capability of their laptops open.  Of course if you get one with a 1070 or 1080 in it, the Core is practically useless, especially since those versions are MXM and are upgradable anyways.  But if you go for the thin and light versions like the one I have, you can still see the benefit of having the Core attached and still enjoy carrying around a somewhat light laptop.

    Price and availability

    The Razer Core is currently only available for $499 on Razer’s website.  It’s available to order now, but looks like the stock is backed up for several weeks

    I’ll keep you posted if any other retailers get some in stock.  If you do purchase from Razer, you can get a $100 off coupon code if you also buy the Razer Blade or Razer Blade Stealth.

    Of course the cost doesn’t stop there since you also need to put a graphics card in it for the Core to operate.  I initially was using an Nvidia GTX 970 but recently switched to the newly released Asus Strix GTX 1080.  As of 7/4, they are still in very high demand, but they frequently go in and out of stock and can be picked up at many retailers such as Amazon.  The base price is $649.

    Final thoughts

    Razer certainly beat everyone to the punch by releasing the first Thunderbolt 3 graphics card enclosure.  As a tech enthusiast, the Razer Core has been quite an interesting gadget for me to play with.  Even though it was a little rocky getting it set up with my Razer Blade, I’m glad they worked out the bugs and made it plug and play.

    Sure, there’s a little performance loss when compared to the desktop experience, but to be honest, I was totally expecting that.  I can’t think of a single enclosure where no performance is lost through a wire, compared to a direct connection.  The good news is the performance is greatly increased over using the laptop by itself.  This is especially true for Razer Blade Stealth owners, because without the Core, the Stealth is not much of a gaming machine.

    The price tag on the Core is pretty scary though and will probably shy most people away from it.  But considering there is absolutely no other alternative, Razer is going to get away with the sticker price for a little while.  On top of that, the overall look and build quality probably adds $100-150 value to the device by itself, so there is some justification to be noted.


    The icing on the cake would be Razer optimizing their drivers to work with other laptops.  Maybe it’s not their responsibility, but I think it would boost sales if the Core would be compatibile with all Thunderbolt 3 laptops.  Considering it’s on heavy backorder though, I guess they probably aren’t all that worried.

    The Razer Core works well with the Razer Blade, but compatibility with non-Razer laptops is still finicky

    The Razer Core works well with the Razer Blade, but compatibility with non-Razer laptops is still finicky

    As far as I’m concerned, this is going to replace my desktop if I can get my wife’s XPS 15 to reliably work, even without plug and play capability. Now that I got this thing working with my wife’s XPS 15, I can say without a doubt that this is going to replace my desktop.  To us, the performance loss compared to a desktop is negligible and having to disable a GPU in device manager to get it to work is small potatoes compared to having to maintain a separate OS and have a giant beast of a desktop on the desk.

    The good news is the drivers are open source and I’m sure somebody out there will figure out a way to optimize the performance on non-Razer laptops, even if Razer won’t.  I’m excited to see how things pan out in the coming months.

    For now though, that wraps things up.  Again, I’ll be updating this post as I learn more, so please keep an eye out for further updates on my progress, and if you have any questions or comments, please leave a message below.


    • Thumbs Up 2
  13. 12 minutes ago, darkness1187 said:

    Hi I'm a little confused on the instructions. Does my hard drive have to be MBR or can it be GUID and just have a bootable USB drive with setup on it?


    Your Windows boot harddisk must be MBR for Setup 1.30 to chainload to it. Experimental attempts to boot UEFI have been unsuccessful.

    Pls refer to http://www.disk-partition.com/windows-10/convert-mbr-gpt-windows-10-0528.html for a conversion process.

  14. INFO: First pics of a AKiTIO Thunder3 DIY eGPU


    @benjaminlsr presents the first eGPU build with a AKiTiO Thunder3 at https://www.techinferno.com/index.php?/forums/topic/10280-intel-nuc6i7kyk-gtx106032gbps-tb3-akitio-thunder3/&do=findComment&comment=149495  quoted below.  Thank you :)


    Looks to have the same chassis as the AKiTiO Thunder2 with some slight cosmetic differences and of course a TB3 internal board. I would expect the same AKiTiO Thunder2 power and chassis mods can be applied here.


    On 13/09/2016 at 6:17 AM, benjaminlsr said:

    I received the Thunder3 model at 6PM local time. Here it is modded and working at 10PM (including meal time).


    - Created 8 pins wires coming from barrel plug (4x 12v, 4x GROUND).

    - Drilled a 110mm hole.

    - Fixed a 120mm fan protection.


    PART_1473713627177_P_20160912_193347.jpg

    PART_1473713634894_P_20160912_194453.jpg


    IMG_20160912_220417.jpg

    IMG_20160912_220421.jpg

    IMG_20160912_220426.jpg


    • Thumbs Up 4
  15. 4 minutes ago, Pr1me said:


    so with the edited devcon file it is now possible to set the endpoint to 56.25GB but the gpu won't show up in the device manager. i did remove the 4GB RAM stick leavin just the 2GB in it and everything seems to work.


    to use more RAM i need to do a DSDT override .... right?


    Yes, to use the 56.25GB endpoint requires a DSDT override to be in place as the warning message advises you when you perform such PCI compaction.

  16. 17 minutes ago, HPSUCKS said:

    This is my project for a HP ElieteBook 8460P and a MSI GTX750 using the EXP GDC Beast with the express card.

    I was able to get the OS to read that there was a NIVIDA graphic card connected to that port with out DYI eGPU but I had the Code 12 issue.

    I learned about DYI eGPU through some searches. Purchased it and installed it. I believe I followed the directions but when I reboot and select the DIY eGPU 1.3 option nothing happens.

    I do not go to a bios screen. I am stuck at this point.


    Pls run c:\eGPU\uninstall-disk-image (as admin), then re-install DIY eGPU Setup 1.30. If you still cannot bootup Setup 1.30 then pls create a USB stick install (as per supplied instructions) and test it instead.

  17. 4 hours ago, Pr1me said:

    hi guys hi @Tech Inferno Fan,


    i wanted to setup an egpu for my hp elitebook but got the error code 12. so i did get the diy setup 1.3 from nando to get rid of the error but i couldn't manage to do it.


    the tolud is under 3 gigabyte. i was able to hotplug the gpu 2 times while the system was booting up without any errors and could play games. everything worked perfectly. but i don't want to sit 20 minutes everytime hotpluging the egpu until it works. so this is where setup 1.3 comes in. unfortunately i couldn't get it working and need your help.


    here are some pics with "failures" i get while setting it up. sorry for my english and thank you.

    ..

    pic 3: warning i get if i try to set a 36 bit endpoint in pci compaction

    pic 4: error i get setting up the pci compaction (error highlighted in red)


    3.jpg

    4.jpg


    We've found Elitebooks typically require a DSDT override to be able to use AMD or GTX9xx/GTX10xx cards due to those requiring PCI apertures > 256MB.


    So first things first, do you have a 'large memory' Device Manager item in place indicative of the DSDT override working? Pls work through this thread to check: https://www.techinferno.com/index.php?/forums/topic/5874-guide-dsdt-override-to-fix-error-12/


    Second thing is your PCI compaction with endpoint=56.25GB above failed probably because you have a non-English v:\config\devcon.txt file (run c:\eGPU\eGPU-setup-mount as admin to view) where the "PCI BUS" entry cannot be identified and skipped, but acts to exclude allocation. Pls remove the non-English PCI Bus section or PM me the file contents so I can identify what needs to be removed.


  18. 9 minutes ago, Raoul Rothfeld said:

    Possible Approaches?

    • Replace the PSU with a more powerful one?
    • I've read about fuse bypassing here (though for PE4H) - could that be a possibility?

    Many thank's in advance!


    Yes, you're PSU is insufficiently powerful to drive your GTX770. It has only 228W (12V) split across two rails.  A GTX770 will use 220W combined. So even the total is just marginal but the bigger issue is your split power.


    Suggest use something like a Corsair VX450 which delivers 12V/33W (396W), plenty of power for your GTX770: https://www.amazon.com/Corsair-CMPSU-450VX-450-Watt-Certified-compatible/dp/B000UF28V4

    • Thumbs Up 1
  19. @aoe2exp, have you downgraded your eGPU port to run at Gen1 link speed using Setup 1.30? If so and the crashes continue then do note some users isolated the PSU from other devices(own power point, away from other electronics like fridges/stereos) to eliminate spikes in power delivery to the video card. Ensure you are also not using th EXP GDC USB port which can also cause power fluctuations.


    You  may even consider obtaining a PE4C V3 instead of the EXP GDC with which I was able to run a more reliable Gen2 eGPU configuration.

  20. 2 hours ago, Cornell77 said:

    I have the following setup:

    Dell E6400, 4500MHD, 8GB Ram, Windows 10, Setup 1.3, EXP Beast V8 Expresscard, Dell DA2, Nvidea 750ti.


    I am able to run the 750ti on an external monitor by using only 2GB of ram.  When booting into Setup 1.3 (as a disk image), it is not able to recognize the EGPU.  All combinations of unplugging the power supply, then plugging in the express card. and so on - do not seem to work.  When booting straight into Windows 10 with 8GB of ram, I receive Error 12.  What are my next steps as far as troubleshooting?  Will I need to perform a DSDT override as well as use Setup 1.3 to make this work with 4GB+ ram?  Or can Setup 1.3 by itself resolve the problem?


    Pls work through https://www.techinferno.com/index.php?/forums/topic/8947-mpcieec-egpu-troubleshooting-steps/ in order to get eGPU detection. 


    Once detected you can then perform PCI compaction in Setup 1.30. However, if the Dell E6400 bios is like a E4300 I used with TOLUD=3.5GB then indeed, I needed a DSDT override to get the iGPU + eGPU active. A variation you could attempt is an iGPU+eGPU 56.25GB PCI compaction where you force the eGPU to 32-bit space, if effect hijaaking the iGPU 32-bit space. What would happen there is then the iGPU would error 12 instead of the eGPU if the DSDT override wasn't in place.

×
×
  • Create New...

Important Information

By using this site, you agree to our Terms of Use. We have placed cookies on your device to help make this website better. You can adjust your cookie settings, otherwise we'll assume you're okay to continue.