Leaderboard


Popular Content
Showing content with the highest reputation since 07/02/24 in all areas
-
I don't think it's a good idea to unlock BIOS on a damaged laptop in your case.1 point
-
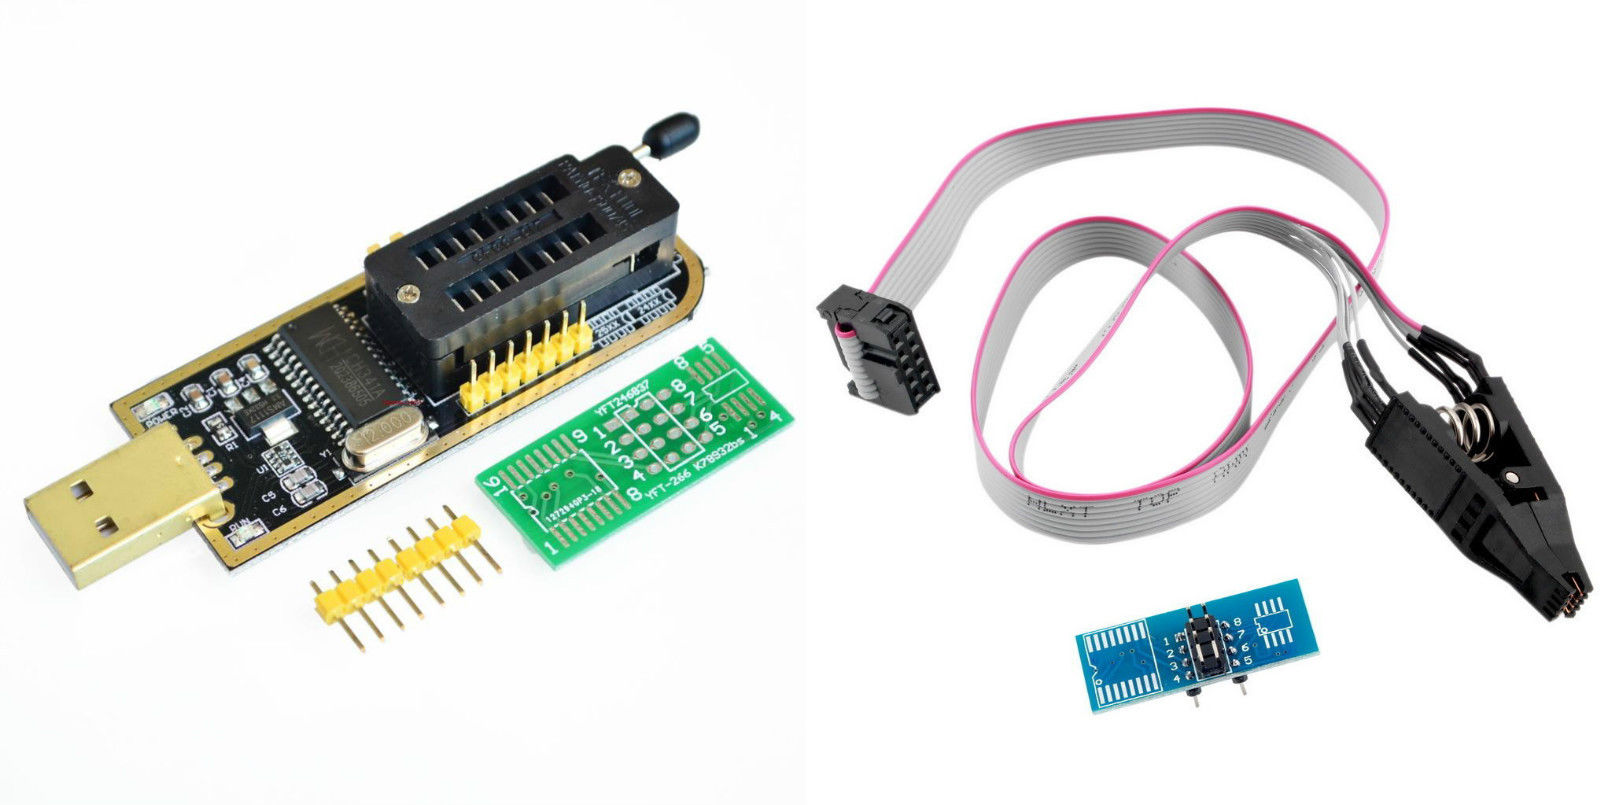
In this thread you can post your requests for Lenovo ThinkPad X250, X260. If someone wants upgrade Wi-Fi card and remove whitelist, or unlock hidden additional menus and settings in bios setup menu, then you can post your request in this thread. Important! For creating your personal bios dump and to flash your bios mod, you must use any SPI programmer (like CH341A programmer) and a SOIC8/SOP8 test clip! Just dump your Bios using any SPI programmer (like CH341A programmer) and a SOIC8/SOP8 test clip, then post it in this thread or upload it to any fileserver and send me the link. CH341A programmer: https://www.ebay.com/sch/i.html?_from=R40&_trksid=p2322090.m570.l1313&_nkw=USB+Programmer+Ch341&_sacat=0 https://www.amazon.com/s?k=ch341a&ref=nb_sb_noss_2 SOIC8/SOP8 test clip: https://www.ebay.com/itm/Soic8-Sop8-Flash-Chip-Ic-Test-Clips-Socket-Adpter-Bios-24-25-93-Programmer/201414947737?hash=item2ee5443399:g:up8AAOSw1Fda8qkt https://www.amazon.ca/programming-EEPROM-Programmer-EZP2010-RT809H/dp/B075CGH1X1/ref=sr_1_18?dchild=1&keywords=SOIC8+clip&qid=1631766855&s=electronics&sr=1-18 How to use it: Also, you can search on YouTube a lot of guide for CH341a. Note: Each bios mod prepare personally and based on your personal bios dump which contain your personal data like Serial numbers, UUID, Service TAG, MAC addresses, Windows keys, NVRAM settings, etc. For creating your personal bios dump and to flash bios mod, you need use any SPI programmer (like CH341A programmer) and a SOIC8/SOP8 test clip! Just dump your Bios (from your laptop) using any SPI programmer (like CH341A programmer) and a SOIC8/SOP8 test clip, then post it in this thread or upload it to any fileserver and send me the link.
 1 point
 -
Some guide how to use SPI Programmer CH341a:Step 1.If you already get your modified bios then go to Step 2.Step 2.Purchase the necessary equipment.To flash bios mod in to your bios chip you need a CH341A programmer and a SOIC8 SOP8 test clip. (You can found them on ebay, it cost a total of $20 USD for both items.)Step 3.The drivers and software for the hardware you can purchased were located on the seller's ad page on ebay.) This step should usually be completed BEFORE plugging the programmer to your computer. Installing them before plugging the programmer into your computer will help avoid potential driver trouble with Windows. (If you have some trouble with drivers installing, then just disable "Driver Signature Enforcement" as the drivers were not digitally signed). After installation, reboot your computer.Step 4.Connect the clip to the programmer and then plug in the programmer into your computer. Run the included software.Step 5.Now you should try to search the bios chip on your motherboard. Usually you need 8-pin chip with first two digits 25, like this: Winbond 25Q32FVSVQ, 25Q32FV, 25Q64FV, 25L3273E, MX25L6473E or the same.Step 6.This step will be based entirely on the software that came with your programmer. Enter in the exact chip information or, if the software you're using has an auto-detect option, you can use this, but I would recommend double checking.Step 7.Read the chip. Read the current programming on the chip and then read chip again. Then make some comparisons between them with any Hex editor. Make sure that it looks exactly the same. Remember, they should be the exactly identical, so they should still look exactly identical.Step 8.Load the modified bios file and write it to the chip.After loading the modified file, the tools use only required click an "Auto" button. This then took around a minute or two to write everything to the bios chip. If the program freezes, or appears to be doing nothing, don't touch anything for the next 10 minutes as you don't want to mess anything up if it is doing something.Step 9.Done. Remove the clips and see if your laptop boots. Another guide: Open your laptop and find your bios chip and search for it. Usually you need 8-pin chip with first two digits 25, like this: Winbond 25Q32FVSVQ, 25Q32FV, 25Q64FV, 25L3273E, MX25L6473E or the same Connect the ch341a and clip to your windows machine and laptop Open ch341a programmer 1.13/ CH341A.exe click “chip search” if it find your chip then next step, else rechip the chip/ Open ch341a programmer 1.26/ CH341AFree.exe choose your bios type/size. Click Read After done click Save (original_1.bin) Repeat step5 and save as original_2.bin Open HxD “Crtl+k” compare original_1.bin and original_2.bin if they are same go to next step otherwise repeat 5) Then post it in the relevant topic or upload it to any fileserver and post the link in the relevant topic. When you get your modified bios, then time to write bios to the chip Open ch341a programmer 1.26/ CH341AFree.exe choose your bios type/size Click Erase it will erase your chip . You must do it before flash After bios chip will be erased , then click Open, choice your modified bios Click Write and wait 100% Now the mod is done, remove the clip and power on the laptop, it will beep 5 x2 time , it will gone once you go to bios setting and restart. Another guide: Also, you can search on YouTube a lot of guide for CH341a. CH341A programmer: https://www.ebay.com/sch/i.html?_from=R40&_trksid=p2322090.m570.l1313&_nkw=USB+Programmer+Ch341&_sacat=0 https://www.amazon.com/s?k=ch341a&ref=nb_sb_noss_2 SOIC8/SOP8 test clip: https://www.ebay.com/itm/Soic8-Sop8-Flash-Chip-Ic-Test-Clips-Socket-Adpter-Bios-24-25-93-Programmer/201414947737?hash=item2ee5443399:g:up8AAOSw1Fda8qkt https://www.amazon.ca/programming-EEPROM-Programmer-EZP2010-RT809H/dp/B075CGH1X1/ref=sr_1_18?dchild=1&keywords=SOIC8+clip&qid=1631766855&s=electronics&sr=1-181 point
-
Hi! Ok. Check PM.1 point
-
Hi! It's impossible. Your laptop use mobile Haswell CPU therefore cannot handle RAM sticks larger than 8GB. Haswells memory controller cant address a 16gb stick, this is hardware limitation (not bios limitation).1 point
-
Hello everyone I’m going to upgrade my clevo p870tm gpu to rtx 3080 but i need a modded gpu heatsink for it . Anyone can help where i can get it ?1 point
-
Hi! Ok. Your unlocked bios done. Check PM.1 point
-
Hi! Ok. Your bios with unlocked WWAN and WLAN whitelists done. Check PM.1 point
-
I need this please.1 point
-
Ok. Your bios with unlocked Wi-Fi whitelist done. Check PM.1 point
-
Hi! Ok. Your unlocked bios done. Check PM.1 point
-
Ok. Your unlocked bios done. Check PM.1 point
-
I think yes (if as you wrote above, you already disabled your MXM card in bios).1 point
-
Note: Be careful with change any settings in bios setup menu! Before you change any settings in bios, you must absolutely exactly know what you want change and how! Don't try to disable Intel graphic card! If you set any settings to wrong value, then laptop break and can't start! In this case you will need to recover your bios with hardware SPI programmer device.1 point
-
Hi! 1. Completely disable (turn off) laptop with long press and hold the Power button. 2. Press and hold F2 button, and start laptop (to go in bios setup menu). 3. Press F9 button, then Enter button. Then press F10 button, then Enter button.1 point
-
I found it1 point
-
The Luminkey (https://www.luminkey.com) Magger 68 Pro with Gateron Jade Pro hall effect (HE) switches (hot swappable) is built like a tank! It's got a CNC aluminum chasis with a low profile design, PBT custom keycaps, plate mounted stabilizers, supports 8000 Hz polling, super low latency (0.125ms) and has all the latest features like rapid trigger (RT), SOCD etc. It starts shipping on Sept 25th for $129.00 which in my opinion is a great deal. Sadly, no web software yet but the desktop software is pretty decent. Enjoy the unboxing video below, the full review is coming soon! Unboxing Video Summary (AI generated): Luminkey Magger68 HE Pro Keyboard Unboxing: First Impressions and Detailed Overview In a recent unboxing video by SuperDirty, the Luminkey Magger68 HE Pro keyboard was put in the spotlight. Known for its premium aluminum build and robust design, this keyboard sets itself apart from standard options on the market. In this article, we’ll break down the unboxing experience, the design and performance features, and what makes the Lumen Key keyboard stand out in a crowded market of mechanical keyboards. A Heavyweight Contender: First Impressions The first thing that strikes the presenter upon opening the box is the heft of the Luminkey Magger68 HE Pro keyboard . It’s significantly heavier than many alternatives, including the plastic-cased Drunk Deer A75, a keyboard the presenter has been using. The LuminKey’s aluminum body gives it a sturdy, durable feel, immediately signaling the premium nature of the product. Unlike some competitors that offer plastic casings with optional aluminum upgrades, the Lumen Key comes fully equipped with a metal casing right out of the box. Accessories and Setup In addition to the keyboard itself, the Luminkey Magger68 HE Pro keyboard comes with a dual-purpose key and switch puller, making it easy to customize and replace keys or switches as needed. There’s also a USB-C cable included, which feels slightly firm but works perfectly fine for general use. The keyboard is fitted with Gateron linear switches, known for their smooth and quiet operation. These switches have a 30g operating force, making them comfortable for long typing or gaming sessions. The presenter praises the feel of the switches, describing them as quiet yet responsive. Customizable Layouts: A Feature-Rich Design One of the standout features of the Luminkey Magger68 HE Pro keyboard is its switch system that allows users to toggle between Windows and Mac layouts with just the press of a function key. This is a welcome addition, especially since many modern keyboards require users to download documentation or software for such functionality. SuperDirty appreciated this physical feature, emphasizing how convenient it is to have layout switching integrated into the keyboard without the need for external setup. Elegant Design and RGB Lighting The Luminkey Magger68 HE Pro keyboard comes in three distinct color options: milky white, champagne gold, and black. While all the colors are visually appealing, the presenter opted for the black version, noting its sleek, professional appearance. The champagne gold version also drew some consideration, but the black model ultimately won out due to its versatile look. The keyboard is equipped with RGB backlighting, adding a modern touch to its minimalist design. The directional arrow keys are semi-transparent, allowing light to pass through and create a subtle but stylish effect. The keycaps themselves are made from PBT plastic, which is more durable and sweat-resistant than the more commonly used ABS plastic. This choice ensures that the keycaps remain free from wear even after extended use. Built to Last: Examining the Construction Flipping the keyboard over, the presenter reveals eight torque screws that secure the back of the unit. This makes it easy to disassemble the keyboard for repairs or upgrades if needed. The metal body of the Luminkey Magger68 HE Pro keyboard provides both a premium feel and long-term durability. SuperDirty notes that the build quality is exceptional, with particular attention paid to details like the key switches and overall weight. This is a keyboard built not just for aesthetics but for long-term performance. The Typing Experience: Smooth and Quiet In a quick typing test, the presenter observes that the Luminkey Magger68 HE Pro keyboard delivers a satisfying and quiet typing experience. Importantly, the keyboard avoids the common problem of "ping," which occurs when poorly oiled springs create an irritating noise during typing. This absence of "ping" is a testament to the craftsmanship of the keyboard, offering a smooth and consistent typing experience. The presenter compares this to previous experiences with other keyboards, such as the Drunk Deer and Razer models, which often suffer from this issue. In contrast, the Luminkey Magger68 HE Pro keyboard feels polished right out of the box, requiring no additional modifications for a superior experience. Looking Ahead: Full Review and Gaming Tests Although this unboxing video focuses on first impressions, the presenter promises a full review in the near future. Over the course of the next week, the Luminkey Magger68 HE Pro keyboard will be tested in a variety of gaming environments, including Warzone, Apex Legends, and other popular shooters. The presenter will also conduct a more thorough typing test to evaluate the keyboard’s long-term usability. These tests will provide further insight into how the Luminkey Magger68 HE Pro keyboard performs under heavy gaming use, offering potential buyers a comprehensive review of its strengths and weaknesses. Conclusion: A Promising Contender in the Mechanical Keyboard Market The Luminkey Magger68 HE Pro keyboard makes a strong first impression with its premium aluminum build, customizable layout options, and smooth Gateron switches. Its sleek design, coupled with thoughtful features like the included key switcher and RGB lighting, make it a solid choice for both gamers and typists alike. Stay tuned for the upcoming full review, where SuperDirty will dive deeper into how the Luminkey Magger68 HE Pro keyboard performs during gaming and extended use. If first impressions are anything to go by, this keyboard is poised to be a favorite among enthusiasts looking for quality and performance in one package. By combining a professional build with thoughtful features, the Luminkey Magger68 HE Pro keyboard appears to be an excellent choice for anyone seeking a high-quality mechanical keyboard. Keep an eye out for the detailed review in the weeks to come!1 point
-
Hi! In your case, I recommend you to prepare bootable USB flash drive with Windows 8.1PE or with Windows 10PE, then boot your laptop from created bootable USB flash drive into Windows 8.1PE or with Windows 10PE, then use H2OUVE again.1 point
-
Hi! Ok. Your unlocked bios done. Check PM.1 point
-
Hi! Ok. Your unlocked bios done. Check PM.1 point
-
Also you can read some interested information in this place: https://patents.google.com/patent/CN107220057A/en H2OUVE for Linux: https://www.sendspace.com/file/apdnsy1 point
-
Hi! Ok. Your unlocked bios done. Check PM.1 point
-
Hi! Lenovo T470 BIOS Chip - 25Q128FVSQ1 point
-
This is normal because (WINBOND) W25M121AV, W25Q128BV, W25Q128FV and W25Q128JV are almost the same chips. You can choose any one in the software, but I recommend choosing W25Q128BV or W25Q128FV.1 point
-
Hi! Ok. Check PM.1 point
-
Here you go. I have it running on my M6600. This one isn't 84.04.49.00.19, but 84.04.49.00.13. It works in my m6600. M3000M.rom1 point
-
Hello all, Ive been a fan of the M11x for a long time. I own the 2637m model with the 2GB Vram. Just looking for others to talk to about my favorite little laptop.
 1 point
 -
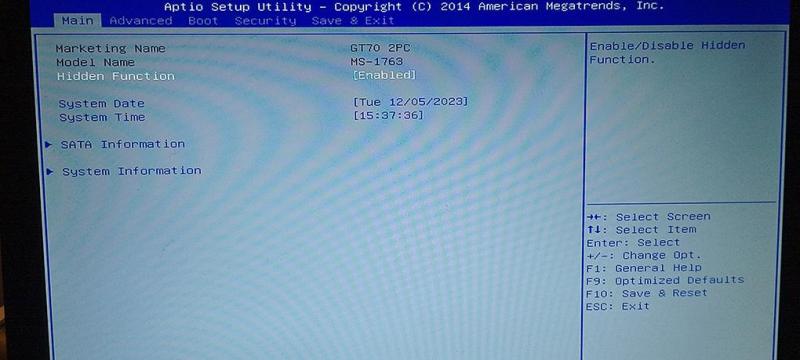
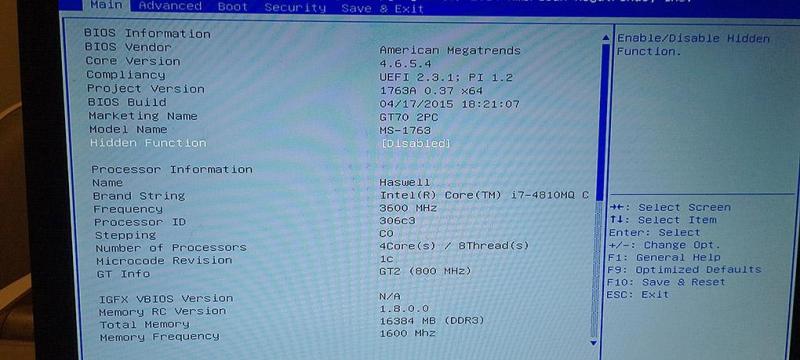
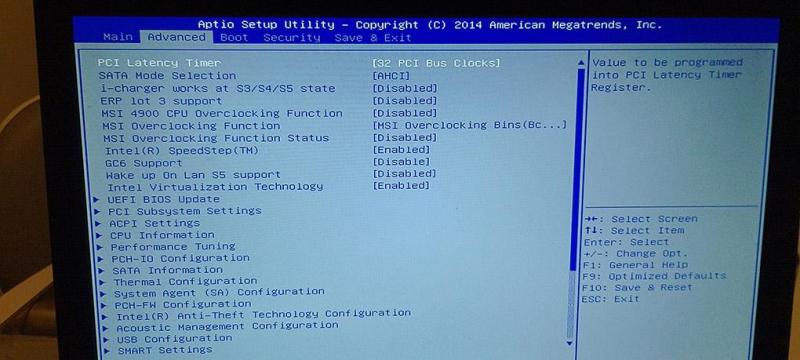
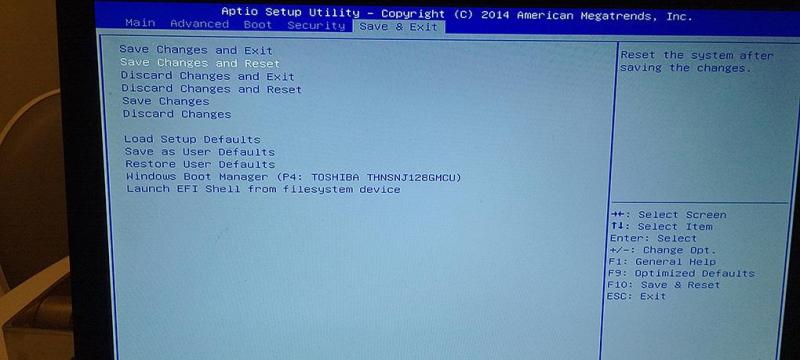
Unlocked BIOS Rom for MSI GT70 2PC Dominator (MS-1763) Original Rom File: E1763IMS.51D **ONLY APPLY TO 51D MODEL - CHECK YOUR BIOS FIRST** Modifications Made: Hidden Menu Option Enabled (Main Tab) Instructions: ============= 1) Create bootable USB using Rufus (FREE-DOS) 2) Copy AUFDOS.exe and bios.rom onto bootable USB 3) Boot to BIOS and change from UEFI to Legacy 4) Boot from USB 5) Use command: AFUDOS bios.rom /GAN 6) Restart, Boot into BIOS and in the Main tab set Hidden Menu from 'Enabled' to 'Disabled' No that's not a typo, 'Disabled' unlocks everything for some reason Features: ========= Unlocks ALL Options for Each BIOS tab (Main | Advanced | Boot | Security | Save & Exit) Included: ========= READ ME.txt rufus-4.2p.exe AFUDOS.EXE bios.rom LOCKED_MAIN.jpg UNLOCKED_MAIN.jpg UNLOCKED_ADVANCED.jpg UNLOCKED_SAVE.jpg https://drive.google.com/file/d/1RS-VaySxhxx0do5alnej1DyaJZb2RnNX/view?usp=drive_link
 1 point
 -
PROBLEM: Black screen of death on a Lenovo y580 (or probably most of the ideapad Y series since they all use similar bios software) after changing the setting for which video source gets priority (default is "SG"). SOLUTION: Rather than using the vast array of options that rarely work for anyone like heating up your video card by blocking the fan on a pillow for 20 minutes at a time until it "decides" to start working again - after much research I found the solution for setting the modified slv7 lenovo y580 bios back to its defaults in the event that you inadvertently disable your video. First, press power and immediately hold F2 until your laptop starts beeping, then release. If there is no sound hold it about 45 seconds. Second, press the following button sequence for 100 extra lives: left arrow (1x) down arrow (4x) enter (4x) At that point the system should automatically shut down and restart. If it does not, the settings may not have been changed correctly but go ahead and manually restart to find out. If you come back to a black screen again try the process over until you're certain that the cause is something other than your bios settings. This will save you hours upon hours researching CMOS bypass surgeries, blind usb jump drive bios flash procedures, and all those tedious and time consuming processes. I even started questioning whether my keyboard on my laptop worked at one point it got so screwy. I will add this, if you can use an external monitor and get a signal, do that. Use Fn+F4 to switch to an external signal and that will make your life much easier. Barring that, the above is the easiest solution I was able to track down. Best.. wissper [original issue] This has come up fairly often, and I've read every post I can find trying to fix it but with no positive results so far. I've got a lenovo y580, running a modified svl7 bios. I accidentally changed the video setting that was set to "SG" to some other setting, unsure what. Now I can't get a response from the laptop other than from the power button which simply lights up, but no other indications of life show any more. Early on there was a point at which I pressed some button combo and heard loud beeps, but that has not recurred. I've tried the typical blind default reset method (left, 4x down, 4x enter) which didn't help. I cannot access the computer remotely when it's been powered on which makes me believe that it is not moving past the bios to windows. (no ping response or net view access) I have been unsuccessful in getting an external display to work on the HDMI or VGA ports (though I am going to try VGA again to be sure). Most of the advice I've found says to unplug everything from the system (wifi adapter, HDD, SSD, Optical,etc.), insert a usb stick with various ROM/BIN files conforming to a particular name variant depending on your model, and to hold Fn+B continuously just after inserting power cord w/o battery installed and hit the power button. The 1 time I've tried this, I had copies of the bios w/ extentions .bi .bin .rom .fd with prefixes QIWY3207 or just QIWY3 (which was the suggestion from Andy's phoenix tool that was part of the instructions). If anyone sees a mistake I've made along the way, another method to try, or just knows the key pattern to reset the modified svl7 y580 bios to default I would really appreciate the help. I'm looking forward to buying another laptop about as much as choking down a bag of cement. Thanks! Wissper1 point
-
Hi, yes, still alive here, running an Alienware M17xR3 machine on Windows 10 OS. :) Years ago I somehow managed it to install GTX 880M on my machine for the price of not working audio output. Now I am using bluetooth earphones for everything with audio. That works fine for gaming and video, but unfortunately it doesn't work well with Microsoft Teams - after 20-30 minutes of video call the bluetooth connection is interrupted. It perhaps has something to do with the earphones, who knows... Very interesting that you figured out how to install Windows 11, my machine is reportedly doesn't meet the requirements for such an update. I guess it would not work out for me neither, because the modified video card driver won't work with Windows 11 so I am not even taking chances. Besides of that I value the card reader function. ;-) For the processor - I upgraded it to i7-2960XM and installed more powerful fans. It does a good job with my only 256 GB SATA 600 Kingston SSD and 8GB RAM. So for me, the upgrade journey ends here, but I wish you success for the cpu upgrade - I think it is worth it!1 point
-
hello i recently upgraded from 765m to 980m but the gpu fan is not working at all with that. (works with 765m) tried flashing various vbios that i saw fit but nothing worked... any ideas? i have alienware 17 2014 model that came with 4700mq cpu and 765m gpu1 point
-
Hi buddyes! I post this at nootebookreview but i think here they ara a lot of people interested with this! gt 1060 Upgrde succes! And its so amazing cooler and powerfull. With i7 3630qm i have 9250 points on fire strike (last update) with stock clocks!This is not posible without help of Svet!If anyone wants to upgrade here is my steps. First of all whe need 1c60 card. Eactly with this ID NVIDIA_DEV.1C60.11FF.14621- Flash unlocked bios and t.24 EC ( thanks to Svet)2-Install your OS with Legacy boot, here with windows 10 pro LEgecy, maybe needs to convert storage to MBR3-Update intel chipset and VGA drivers to last release4-Mod last Nvidia drivers, nvmii and dispi needed, thanks to Svet!!5-Boot with driver enforcment disabling ( hold Mayus key when push Restart button, i think option 7)6-Install modded drivers7-Enjoy !!!!!After a lot of test, everithing works includes keyboard colors, only cant regulate brightness but its for EC. In battlefield 1 its runs with Auto Fans and really quiet, stays at 75Cº. With turbo fan on, stays at 63cº!!!! Amazing!! PD: @Bugii Your problems its fied with legacy install of windows 101 point
-
Seems the same here too. Except now I cannot unlock my BIOS.. EDIT: Actually. If the BIOS is basically the same, would I be able to trick slv7's biosfixer tool into modifying my 3.08 into a 3.05 file? Or is this a quick way to brick my laptop?1 point
-
Svl7! I love u!! When I was so frustrated for unable to stop the 7970m from the annoying throttling when playing crysis 2 or running 3d mark 11(combined test), I find ur thread of the modified vbios of 7970m!! I must say i feel like seeing the god the moment I see ur posts!! After I re-flash the vbios to reduce the voltage to 0.975V(first I tried 1V, but throttle won't stop just gets better ), I find no more throttle any more!! With the new vbios, I'm able to run 3d mark 11 with 920 @ 24/24/24/24, no more throttle in combined test. Also, however long I run crysis 2, not even once throttle I detected. It's like a miracle and finally I can run 7970m perfectly in M15x, all with ur help! I wanna to say Thank you man!!1 point