Leaderboard


Popular Content
Showing content with the highest reputation on 02/04/22 in all areas
-
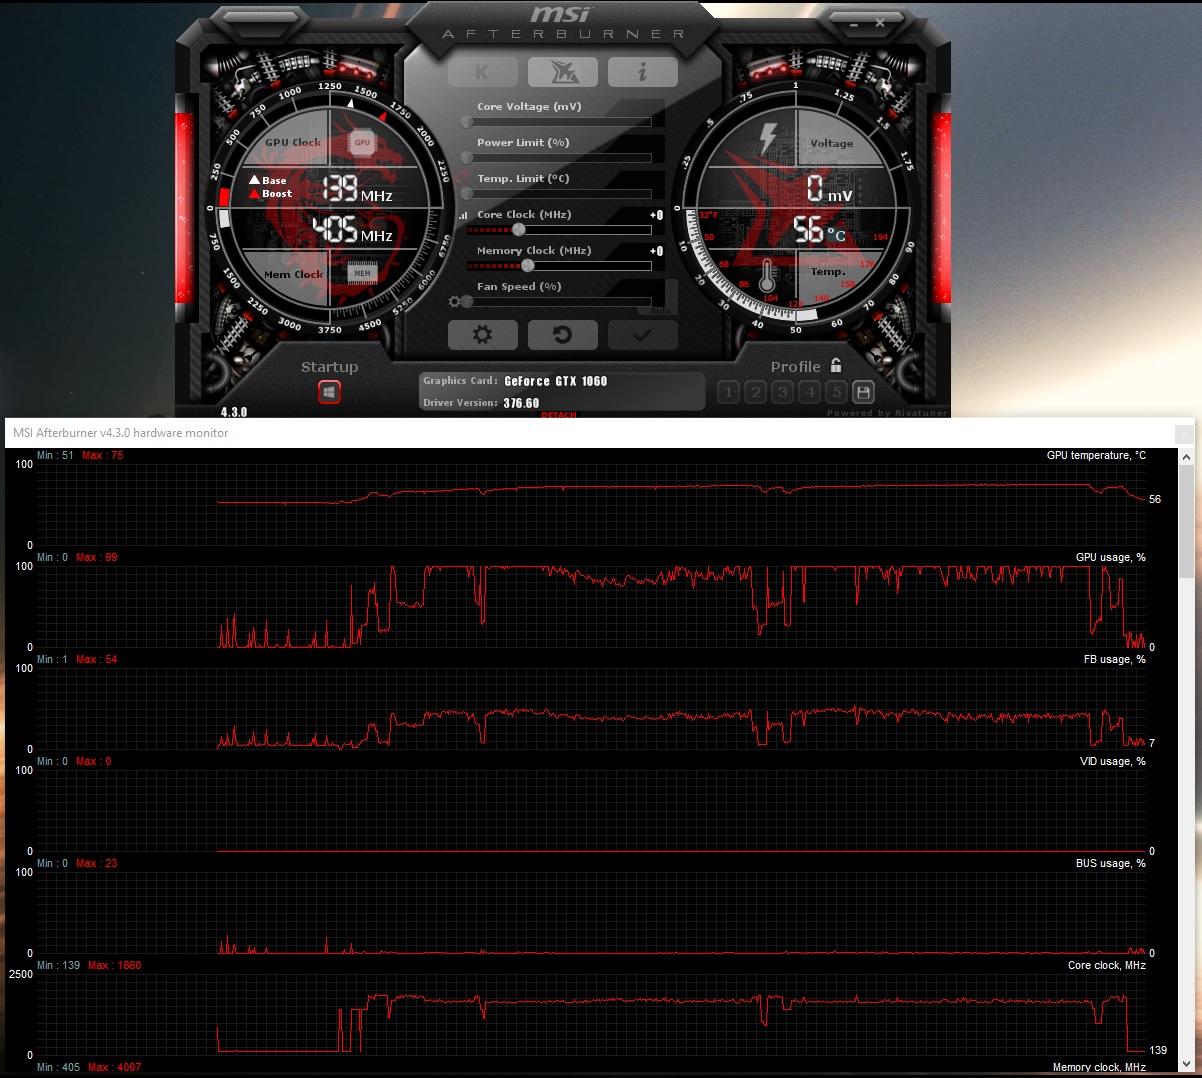
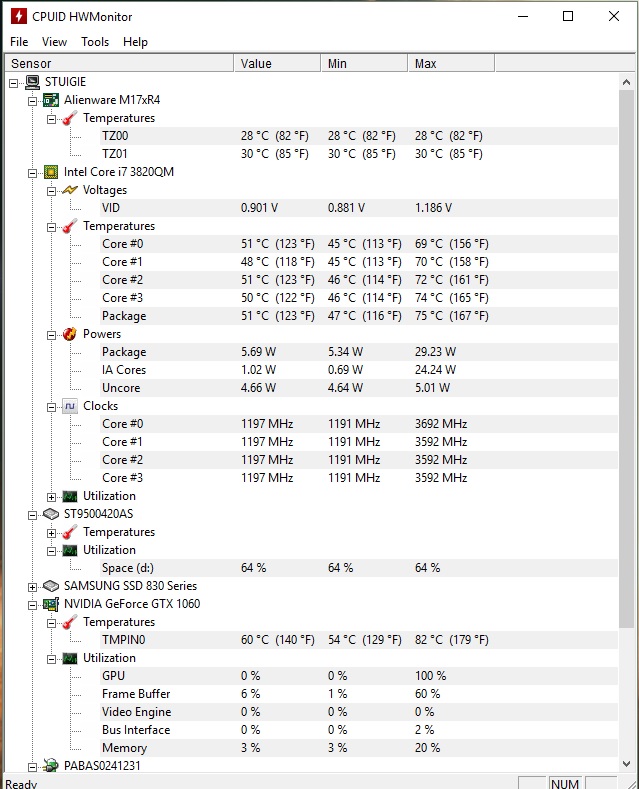
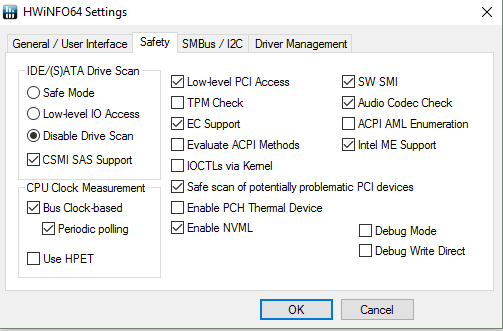
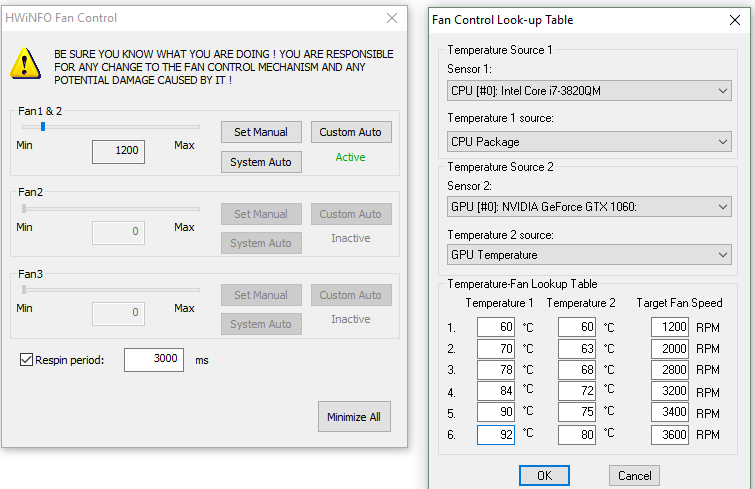
Hi all, This is just to report the success of installing a gtx 1060 on my M17X R4. Mine is the 3D version and as far as I'm aware, you need a screen in eDP mode (120Hz 3D model) for it to work (confirmed) on top of UEFI support to boot up. See here for the gtx 980m install which is the same for this card, but the 980m works on 2D models too: https://www.techinferno.com/index.php?/forums/topic/8103-installed-980m-in-m17x-r4120hz-3d/ HDMI in and out works but it does raise the question if the gtx 1060 will work on the 2D model via HDMI out. It should do as it's the eDP connector for the laptop screen is the issue here. Also 3D mode will no longer work (like anyone cares about 3D anymore ). The cards above the 8xxm series have no 3D support. Prerequisites A 120Hz screen is needed to pascal GPUS as only the 120hz connector in the laptop supports eDP mode. Keep your current card, in case you try modding your Bios or something like that, if settings become reset, UEFI is usually off by default. That means in this situation the GTX 1060 won't work without changing the Bios settings. Install your old card as it supports non-UEFI and UEFI modes. UEFI mode: This is must for the reason above. Windows needs to be installed on a GPT partition to use this feature. As this laptop origianlly came with windows 7, GPT and UEFI originally was not used. However Bios updates and windows 8+ could use it so UEFI was enabled. Install a fresh copy of windows on a GPT partition. The windows installation menu can help you with that. https://technet.microsoft.com/en-gb/library/dn336946.aspx Bios settings: In the boot options, set to UEFI mode, disable fastboot and legacy options. This ensures that your old card and the Pascal card both work when you swap them out. Installation It seems the laptop just about supports it. One Major thing to be aware of is the installation. For at least the MSI model of the GTX 1060, you need to use very thin heat pads as the core only just makes contact with the heat sink otherwise. I have found that on the core side are some new resistor blocks (Labelled R.22) that weren't in my old GTX 680m and thankfully they are the exact height of the core, so it isn't impossible to mount the heat sink. It's a very fine mark but provided you use thin pads (stock GTX 6xxm cards have nice thin ones) and a tightly screwed X bracket, you can get good cooling performance. The top R.22 blocks also do not need thermal pads (may benefit from thermal paste though) as you need as little height as possible. I'm aware of two types of heatsink used in the m17x r4. Both will work but there is a protrusion (in red) that can prevent proper contact with the core. If on a copper cornered heatsink (second image), you may not have to file this bit down. If you seriously have no tools to do this, you can very carefully bend this section VERY slightly to provide a little more clearance. To ensure good contact with other components in this case, use thicker pads or more paste on this section. (Top) Taken by Zoldago (Bottom) Taken by Decool Drivers Drivers are fine, just go to laptopvideo2go and get the latest drivers with the modded .inf files. Remember to use DDU before installing . Simple guide for drivers:) - uninstall any graphics drivers, including ones automatically downloaded by windows (disable windows update if need be). Using DDU ensure every trace is wiped clean to avoid any problems - Disable driver signature enforcement (Shift + restart button in the start menu -> troubleshoot -> Advanced options -> Startup settings) OR f8 at boot screen (windows 7) - Run official installer, quit once the driver files are extracted. - Place the modded .inf file into "display.driver" of the extracted files - run "setup.exe" from extracted folder. Done! Bios + screen Generally, a modded bios is not needed as all necessary options are already available. Some scenarios may need a display type change or the iGPU cannot be disabled the usual way. To convert from a 60hz to a 120hz screen, you need to ensure that when booting up on the 60hz screen to disable the iGPU (FN+ F7) (Check BIOS settings to ensure it stays off). Once in dGpu only mode, you can go ahead and install the 120hz screen. 120hz screens do not support optimus as the iGPU is incompatible. Performance wise it's pretty close to a desktop 1060, hitting a score of ~3600 in time spy and ~12,000 graphics score in Firestrike (desktop scored ~14,000). Temps settle at 75C as the card is limited to ~80W (so very limited OC for now ). First Screenshot below used the stock paste that came with the card. Highly recommend a different paste such as mx-4 paste which I used (second screenshot). I doubt it will work on a M17X r3 due to the lack of UEFI support. Fan control and monitoring I use MSI afterburner for monitoring temps. You can also use HWinfo to control the fans, seeing as the 1060 is an 80W GPU compared to the 100W that the laptop is capable of cooling. If you're interested in lowering the fan speed for the sake of noise, use HWinfo. I'm aware that a system lock up can occur when using the fan control feature. However, so far I may have a solution. - Remove the main battery. A fix for many users and easy to implement - Alternatively use the settings provided in my screenshot. I know that the ACPI features are likely to be the main cause of lockups, but to be sure copy my settings and only monitor the sensors needed for fan control (e.g. CPU package temp and GPU temp). the author of this program is aware that the battery monitoring is the cause for lock ups (which uses the ACPI in windows) Remember that you can only control both fans at the same time! Be sure to stress your CPU with a program prime95 to ensure your CPU does not overheat with your new fan settings. Also use both fan tables, one for the CPU and the other for the GPU so the fans spin up under loads from either. A final note. I would set a re-spin period on the fan control menu to reduce fan pulse. I found 2-3 seconds ideal. In my machine at least, the BIOS sets the fan speeds higher than needed before settling down to their target speed. E.g. at 4000 rpm, the fans spin up to 4600 rpm and in around 10 seconds slow down to 4000. Below is my preferences, although you may not want to run components quite as hot. Under max load, the CPU hits 90c and GPU 78c. Good luck and enjoy!

 1 point
 -
In the unlocked bios set video options to "SG", check if windows detecs the graphics card. You might find a clue here,1 point
-
Hi, I purchased an MSI 1070 for attempted use in my m17x r4 and it is not detected when I boot with it in my system. Unlocked a11 bios reports "not detected" for discrete graphics when trying to use this card. Can anyone advise? Am I missing a step? I have a 1920x1080 60hz display, but thought that was fine as long as I was running in optimus mode. @naightmehr, you've been such a help in the past. Do you have any input on this?1 point
-
So YES 60Hz is possible with optimus thanks to the update from November actually working for the HD Intel (for a few months after it wouldn't install but otherwise was supporting pascal) YES with a 120Hz panel 1060's will work flawlessly if you are in PEG mode for the graphics. If you have a 120Hz panel and an old 660/675/680M GPU that your running in legacy mode, then you need to get an unlocked bios, or find a way to switch to PEG. Does anyone have the unlocked A12 bios ? (or link, please). Also we have new EURO 1070 which works for Optimus, we had to change the vbios to limit the card to 90W in the Alienware systems, it' getting about 15,250 in the graphics score of the Firestrike. So about less then 10% the typical full powered desktop would get you but like 50% more then a 1060N. We also have a EURO 1060 as well to match the MSI 1060N but have not yet tested it 100%.1 point
-
GTX 1060 works with LDVS without Problems in MSI GT70,this is not a Problem from the Card.1 point