Leaderboard


Popular Content
Showing content with the highest reputation on 01/13/17 in all areas
-
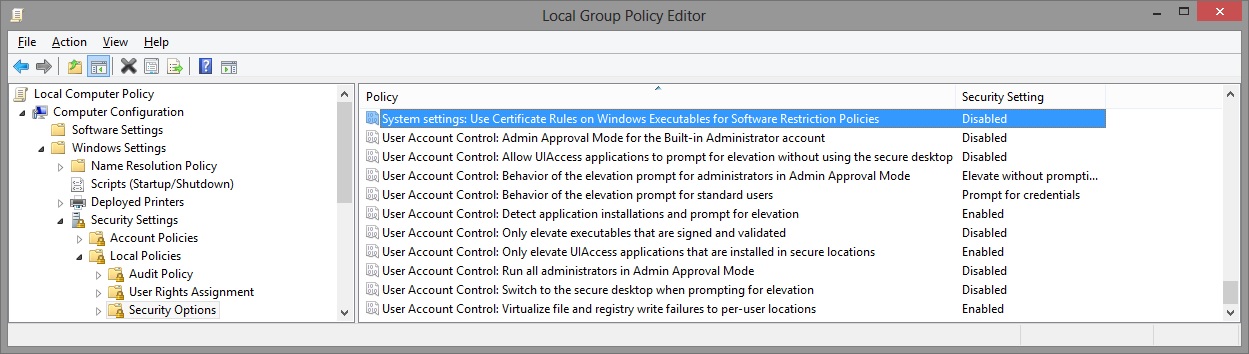
I've recreated the OSD Icons for the R1/R2/R3/R4 and R5 aka 17 as the standard ones are a bit dated. It should also work with the M15x though as my old M15x had the same setup for the OSD app. Regarding the R3 OSD, it seems its the same install for the M18x as well so it should work for you M18x owners too. I've also added the AW 17 OSD to the list. This exe is also compatible with the 14 and 18 as Dell uses the same OSD for all the new machines. There's also a set for you Area-51 m17 R1 owners. I've tried to give it a simular feel to the Invader Icon pack by Alienware. Hope you guys like it Install Instructions for R1 1. You need to end the OSD process in Task Manager since it may be using some of these icon files. Ctrl+Shift+Esc then find the OSD process and end it. 2. Backup your current icons if you want to revert to the originals (You can also uninstall and re-install the OSD application if you want to go back to the original icons) 3. Extract the attached "M17X R1-R2 & M15X.zip" contents to C:\Program Files (x86)\OSD\picture\. Overwrite if prompted. 4. Restart the OSD application. It is located in C:\Program Files (x86)\OSD\Launch.exe 5. Done! Install Instructions for R2 /M15x 1. You need to end the OSD.exe process in Task Manager since it may be using some of these icon files. Ctrl+Shift+Esc then find "OSD.exe" and end the process. 2. Backup your current icons if you want to revert to the originals (You can also uninstall and re-install the OSD application if you want to go back to the original icons) 3. Extract the attached "M17X R1-R2 & M15X.zip" contents to C:\Program Files (x86)\OSD\ICONs\. Overwrite if prompted. 4. Restart the OSD application. It is located in C:\Program Files (x86)\OSD\Launch_OSD.exe 5. Done! Install instructions for R3 / R4 / M18x 1. You need to end the OSD process in Task Manager since it may be using some of these icon files. Ctrl+Shift+Esc then find the AlienwareOn-ScreenDisplay.exe process and end it. 2. Backup the existing AlienwareOn-ScreenDisplay.exe by renaming it to "AlienwareOn-ScreenDisplay.exe.BAK" for example. Its in C:\Program Files (x86)\Alienware On-Screen Display\ 3. Extract the AlienwareOn-ScreenDisplay.exe from the appropriately named file depending on your OS and model to the C:\Program Files (x86)\Alienware On-Screen Display\ folder. 4. Restart the OSD application by double-clicking the file. 5. Done! Install instructions for 14 / 17 / 18 ** 1. You need to end the OSD process in Task Manager since it may be using some of these icon files. Ctrl+Shift+Esc then find the AlienwareOn-ScreenDisplay.exe process and end it. 2. Backup the existing AlienwareOn-ScreenDisplay.exe by renaming it to "AlienwareOn-ScreenDisplay.exe.BAK" for example. Its in C:\Program Files (x86)\Alienware On-Screen Display\ 3. Extract the AlienwareOn-ScreenDisplay.exe from the "AW 14-17-18 (Windows 8).zip" file to the C:\Program Files (x86)\Alienware On-Screen Display\ folder. 4. Restart the OSD application by double-clicking the file. 5. Done! The Area-51 m17-R1 install should be similar to the steps for the other laptop revisions above. They all basically follow the same process anyway, apart from filenames/paths. @robby_hd was kind enough to make a red version of these icons for the M17x R3 / M18x R1 which can be downloaded from his post here. **There seems to be a security issue with Windows 8/8.1 at this point in time since it doesn't allow modified exe's. I will update this post with a solution once it has been found. Also a few Alienware owners are having an issue with the unmodified OSD and Windows 8. Only the default Windows 8 OSD displays and not the Alienware version. Try the solution posted by Dell here and then attempt installing the mod. The below screenprint is a workaround by editing the security policies to allow the unsigned exe to run in Windows 8. If you are not aware of what these settings do and the repercussions of changing them, please do not attempt it. - Open the Group Policy Editor by typing "gpedit.msc" in the search or run text box. - Duplicate the settings below. Area-51 m17-R1.zip M17X R1-R2 & M15X.zip M17X R3-R4 & M18X R1-R2 (Windows 7).zip M17x R4 & M18X R2 (Windows 8).zip AW 14-17-18 (Windows 8).zip M17X R4 & M18X R2 (Windows 8.1).zip

 1 point
 -
The goal here was to keep my workhorse laptop functional for school, and in the off chance I get free time, require only 5 minutes of setup for high end gaming and virtual reality. Though there were many hurdles to overcome due to issues caused by the manufacturer, I finally have a VR-Ready working solution. Thanks to Nando for DIY eGPU Setup 1.30 and his timely response to my ichip error. Hardware & Software Tools Lenovo Thinkpad Edge E550 (i7) Processor: Intel i7 5500U iGPU: Intel HD Graphics 5500 dGPU: AMD Radeon R7 M265 eGPU: ZOTAC GeForce GTX 1060 AMP! Edition Adapter: EXP GDC Beast V8.0 (NGFF M.2) PSU: EVGA 400w DIY eGPU Setup 1.30 Initial Setup: Begin by downloading the drivers for the GTX 1060, as you'll have to remove the WiFi card later and won't have access to internet. Then attach the GTX 1060 to the PCI port of the GDC Beast. Then attach the power supply connectors (6 pin connector to the top of the 1060, 20 pin and 4 pin connectors to the included connectors from the GDC Beast). Once this is completed, plug in the power supply and shut down the PC. Remove the WiFi card and attach the NGFF M.2 connector in its place. Plug the HDMI end of the connector into the GDC Beast and power on the PC. The graphics card should be recognized in the device manager as a basic display adapter and you should be able to install the drivers. After the drivers install you may have a working setup (as I did), however after rebooting you'll be confronted with a black screen and a code 12 error in device manager. This means that there are not enough resources to accommodate the device. A DSDT Override is needed to compensate. DSDT Override: Nando has a great guide for this process here, but it is important to note that you'll want the Windows 10 Drivers Kit instead of the link provided on that page. Using the Windows 8 Drivers Kit will result in compilation errors when compiling the asl file. Aside from that, follow the instructions and set TESTSIGNING on. Once you reboot, you should notice a large memory address in your device manager in resources-by-type. You now have a 36 bit PCI space that will accommodate the GTX 1060. After rebooting, you'll notice that you still get code 12 error. This is because of improper PCI allocation. Therefore, you'll need to hard allocate the eGPU into the 36 bit PCI space which can be done with Nando's DIY eGPU Setup 1.30. Issues Before PCI Compaction: However, before compaction there are several issues that need to be addressed. One well known issue is that Lenovo BIOS whitelists their WiFi cards, causing the BIOS to not acknowledge other devices attached in their place. This is usually overcome by hotswapping the WiFi card and the eGPU after booting into Setup 1.30, but there are issue to tackle before this. After mounting Setup 1.30, you may have this error when attempting to boot into menu-based setup. [ichip] Unknown intel chipset found. Update R:\core\intel.txt including version with your chipset info, run ichip clear to clear variables then run ichip to confirm your chipset is found. If this is the case you'll need to contact Nando for an updated intel.txt. You'll then replace your intel.txt found in R:\core\ with the new intel.txt. You then will be able to properly boot into the menu-based setup. Theoretically from here you should be able to hotswap the WiFi card and the eGPU and have Setup 1.30 recognize it, but after performing that process the eGPU is remains unrecognized. This means that the adapter is not correctly interfacing with the PC. Specifically the GDC Beast is set to only receive power from the PSU when signal is detected, which makes it unready when the CLKRUN signal should be received. We can overcome this issue by removing the top plate from the GDC Beast. You'll notice 2 small switches on the bottom left. One of them is used to set the PSU to be permanently on, while the other delays the receive of the CLKRUN and PERST# signals in order to avoid ACPI_BIOS_ERROR. Set the PSU switch to on and the CTD/PTD switch to 15. You should now be ready for hotswapping. Reboot into Setup 1.30 (menu-based setup) with the WiFi card attached. Hotswap the WiFi card and the eGPU and your eGPU should now be recognized. PCI Compaction: Since we now have the eGPU recognized by Setup 1.30, we can begin PCI compaction which will eliminate the code 12 error. First, disable the PCI port of the dGPU and any other PCI ports you don't need using iport>disable ports. We also want to set our eGPU's PCI port to Gen2 with iport>Gen2>(whatever port your eGPU is on). Then select PCI compaction and set the endpoint to 36 bit. Run PCI compaction with the scope being iGPU + eGPU and force the iGPU to 32 bit PCI space. Finally, chainload to Windows 10 and you should no longer have any errors. We now have a VR-Ready working solution. Results: Setup and benchmark images coming soon []1 point
-
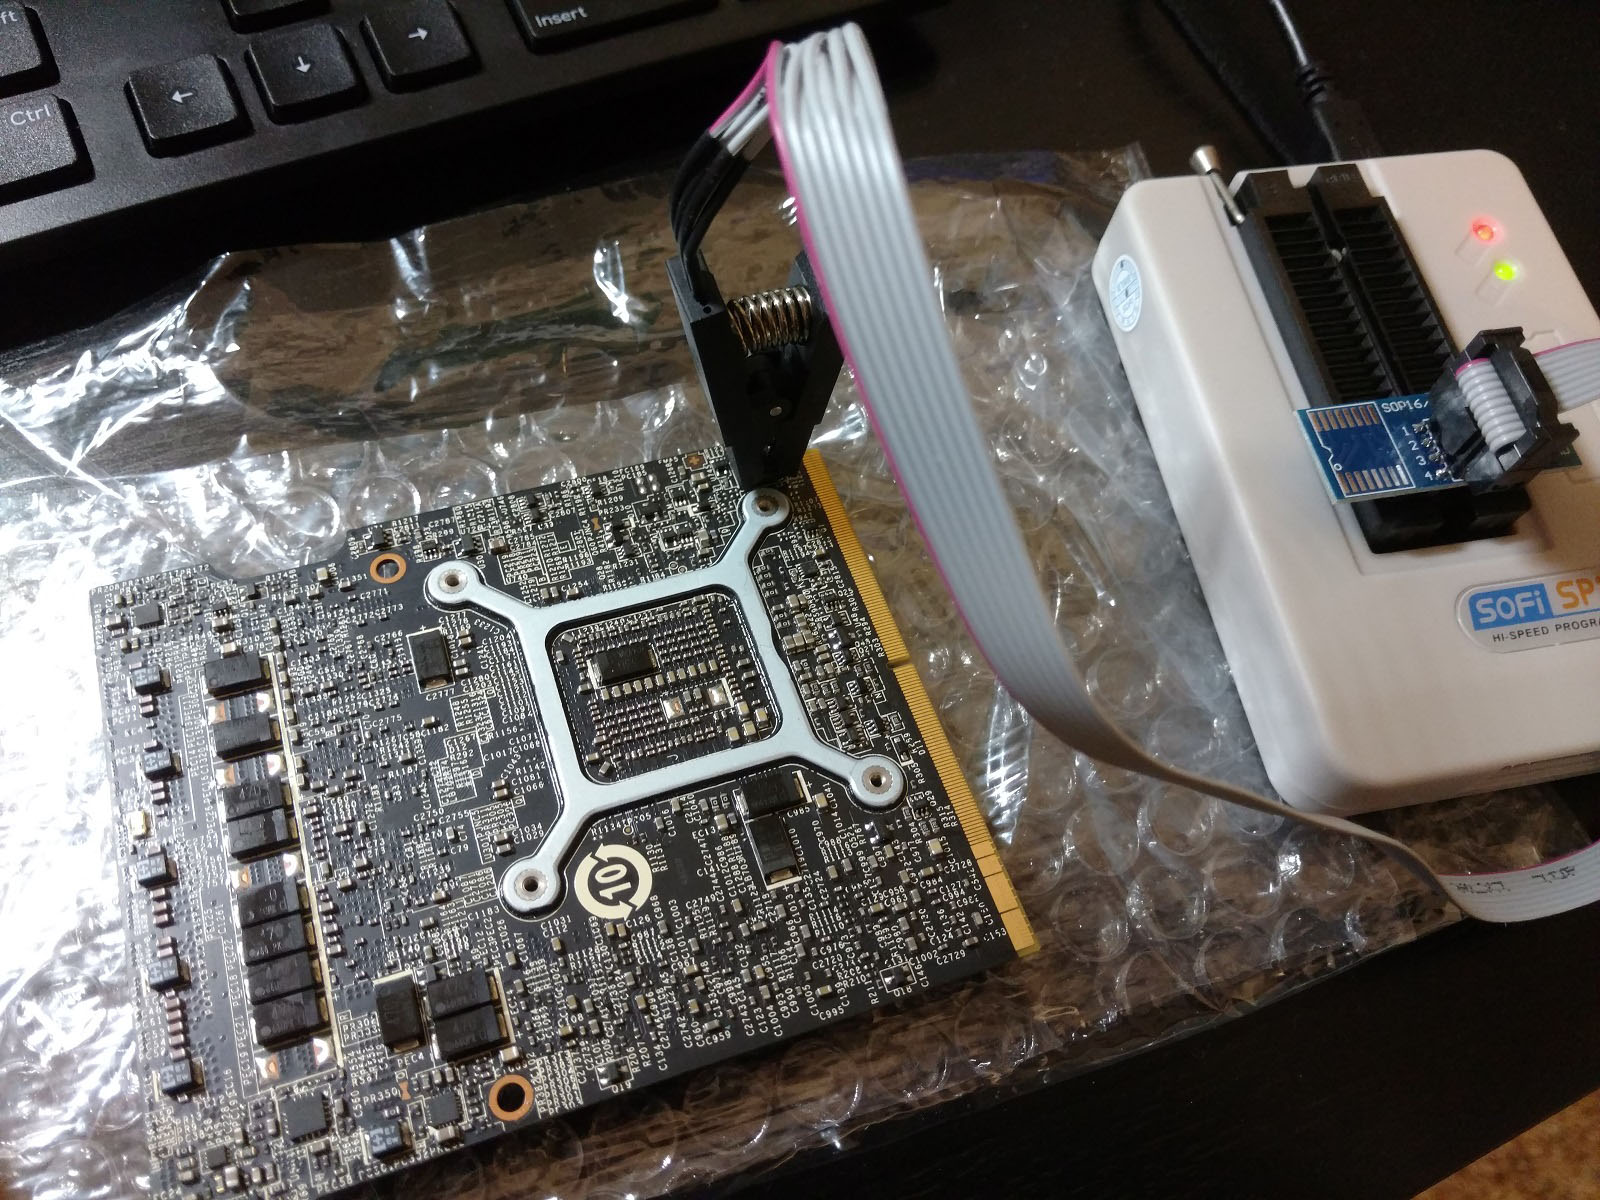
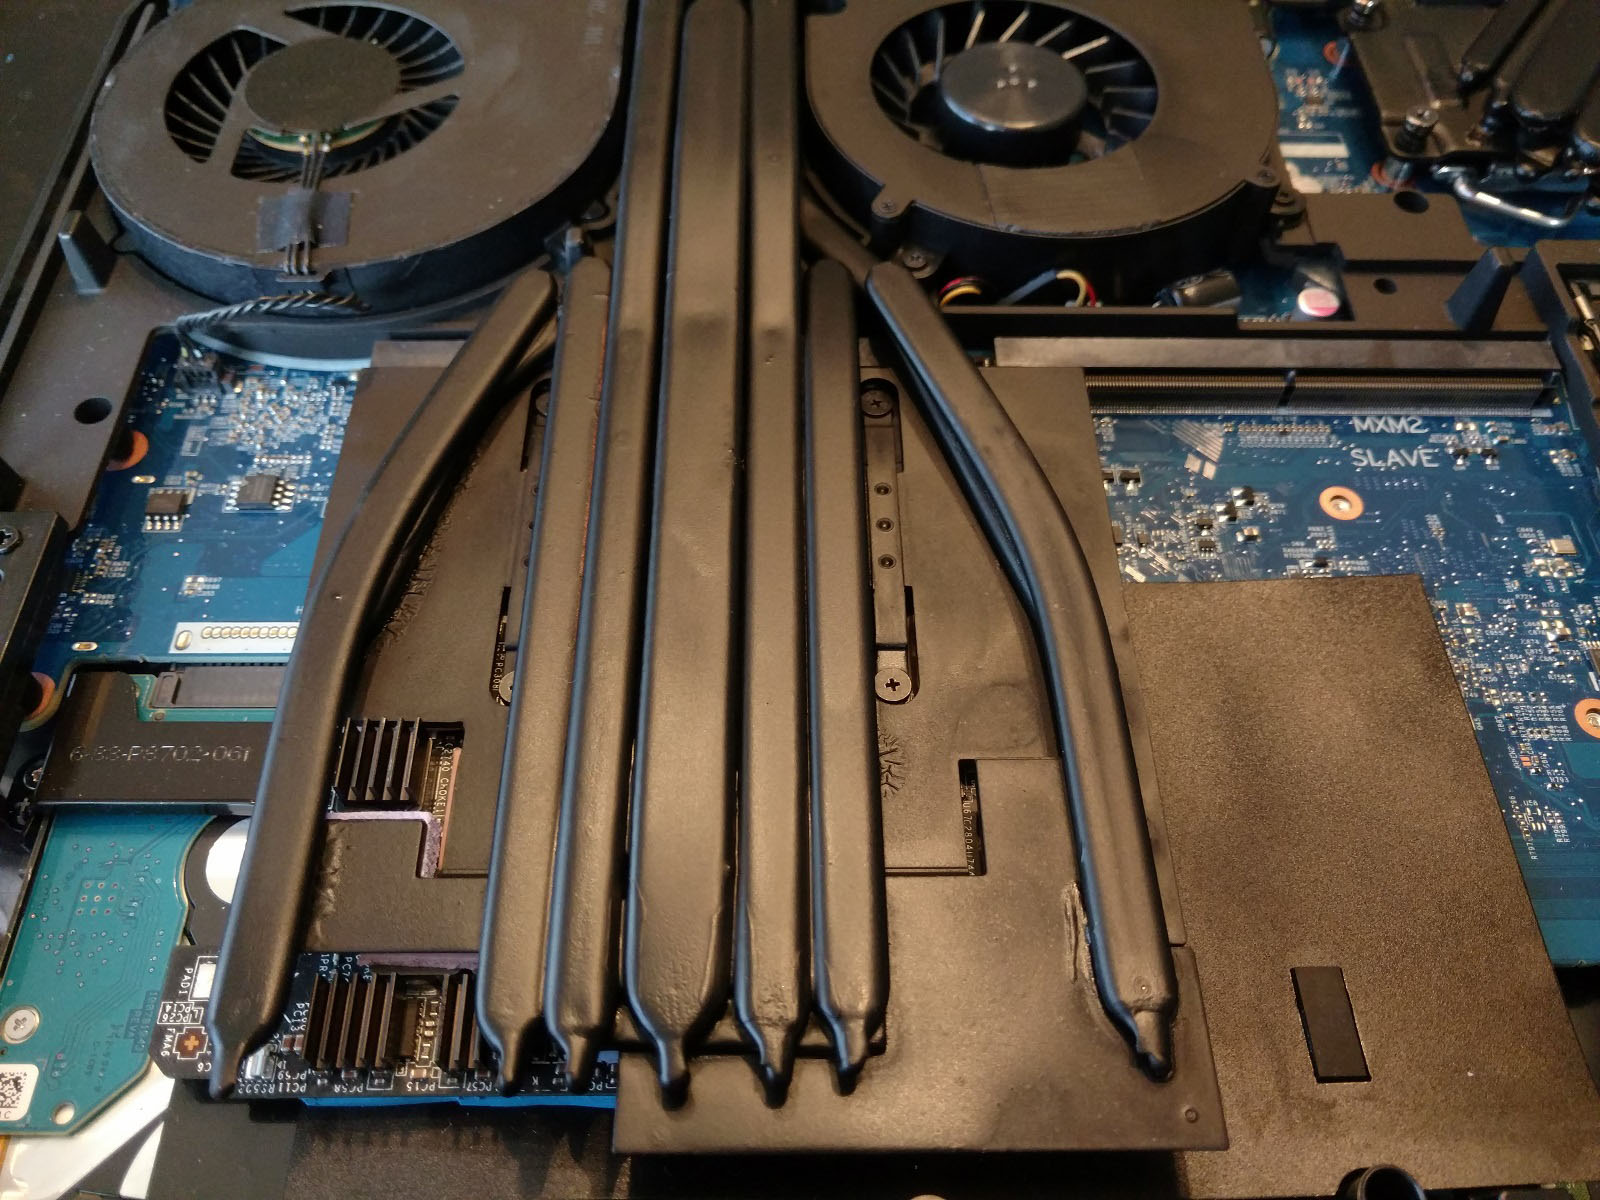
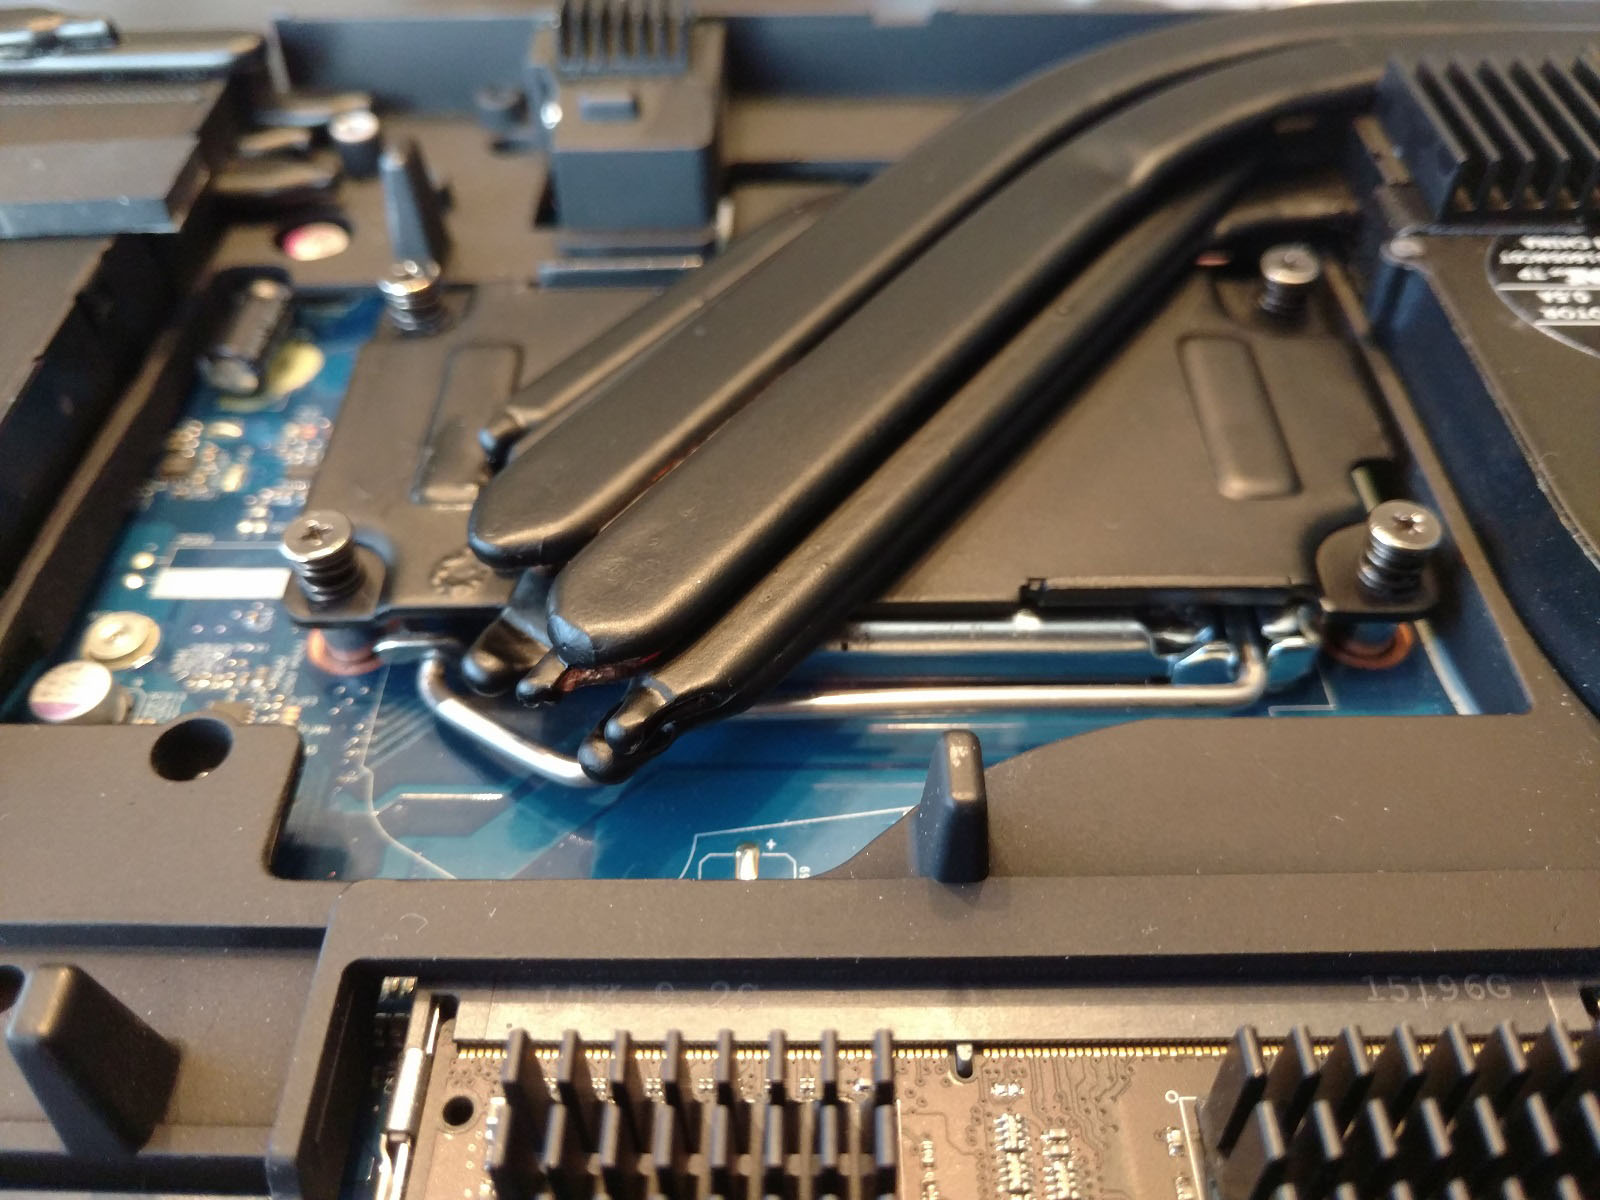
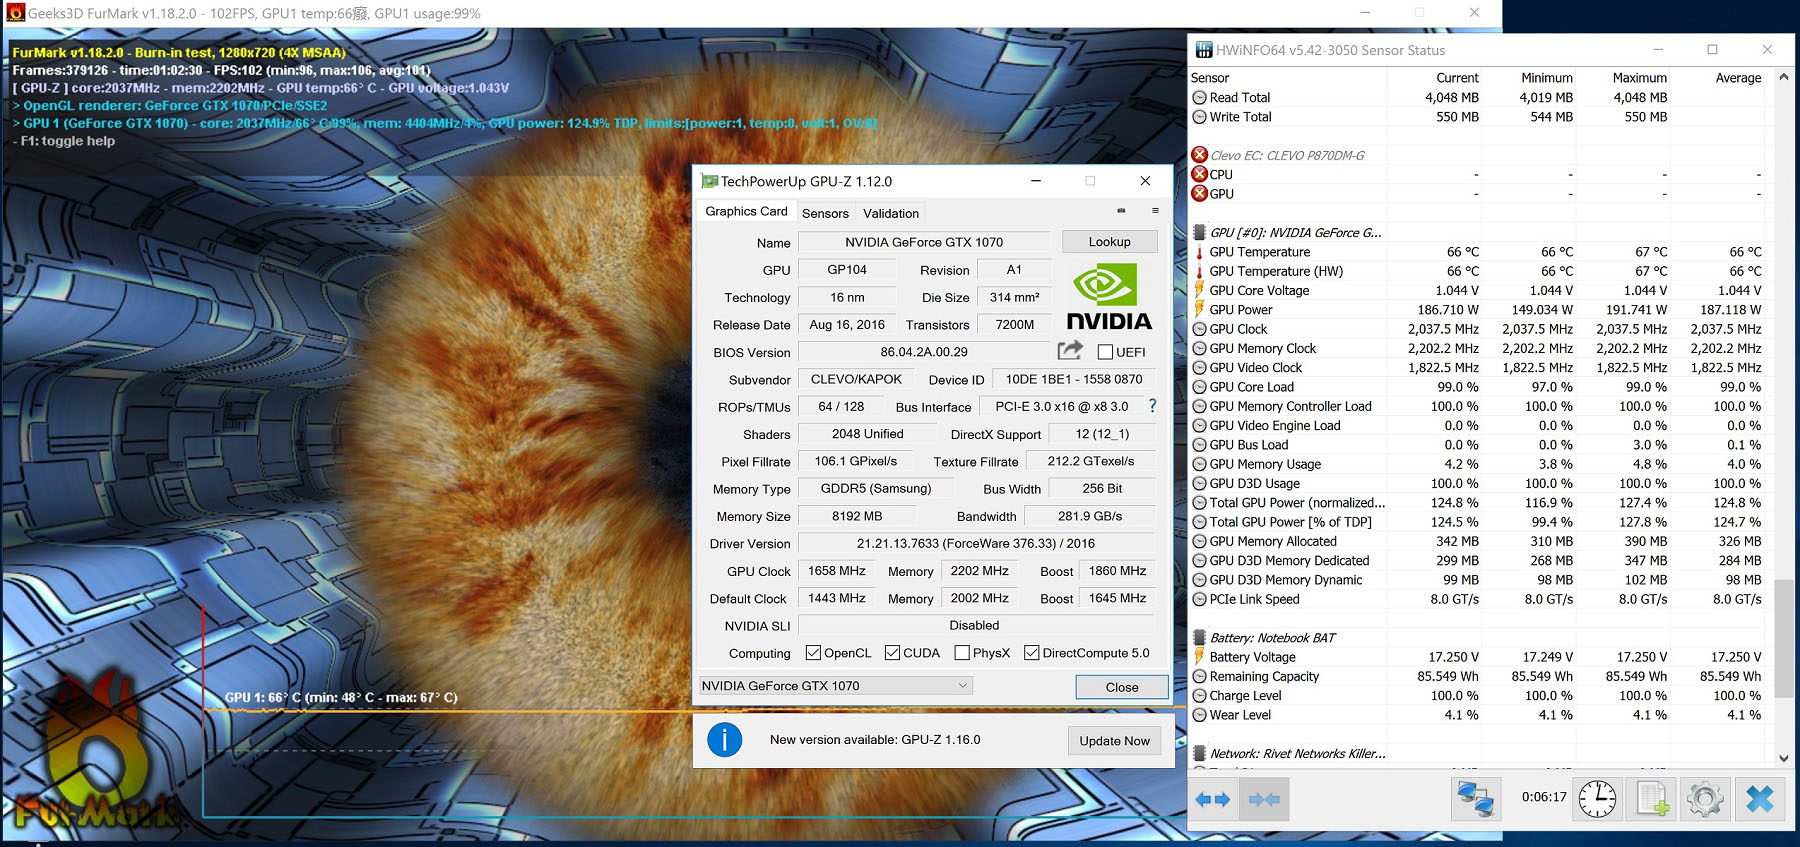
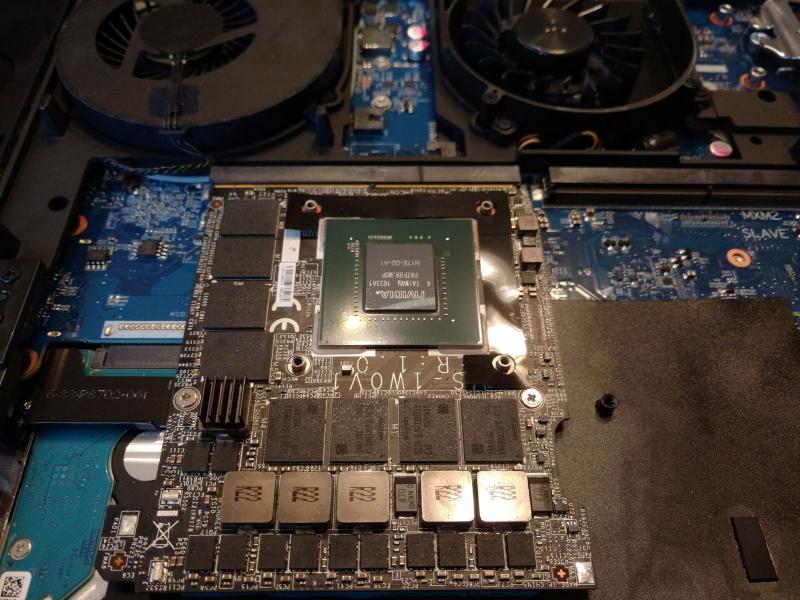
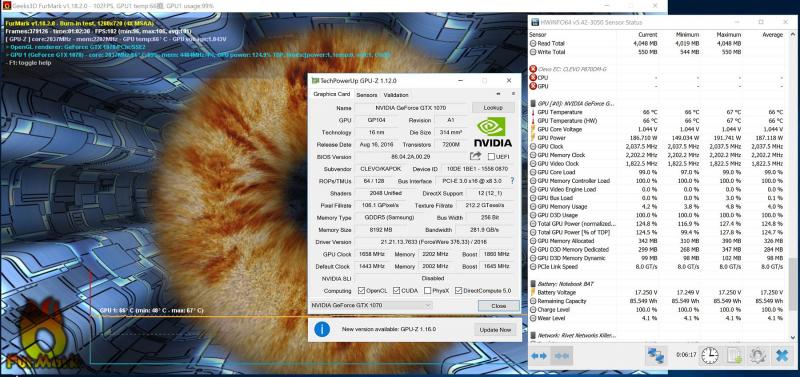
Though my pair of 970Ms is still doing fine in FHD or QHD gaming, but some of the games that I like do not support SLI, such as Gears of War 4, Horizon 3, Quantum Break, etc. This annoyed me sometimes, and happened that I had a chance to be in China for 2 weeks. So well, just did some treasure hunt, and found a MSI 1070 in good price. Here begins with some benchmarks: Immediately unlocked the card to 200W TDP, core +215 MHz, mem +655 MHz: Fire Strike, over 21K GPU score: http://www.3dmark.com/fs/11324399 Fire Strike Extreme, over 10K GPU score: http://www.3dmark.com/fs/11324446 Time Spy: 6.8K GPU score: http://www.3dmark.com/spy/1009997 3DMark 11 Extreme, over 9K GPU score: http://www.3dmark.com/3dm11/11882793 Behind the scene: Programmed the vBIOS chip to 200W TDP using the SP16-B programmer, the chipset model is MXIC 25U8033E: Modded the 980DT heat sink for standard card, required patiently sawing a corner and sanding work. Added 7 heat pipes for extra cooling: Re-modded the CPU heat sink for better looking (got some phobia of small dense heat sinks), added 7 heat pipes also: Loading temperature of 200W TDP in Furmark with 1280x720 (4xMSAA) after one hour: Personally I think setting of 720p + 4xMSAA can very well represent general gaming load, 0xMSAA or 2xMSAA consumes too much heat and non realistic, not recommended. Cost (got everything from taobao.com): new MSI 1070: $660; new 980DT heat sink: $65; Heat pipe: $2 ~ 3 each depends on length; SP16-B programmer: $70; Also got a new B173ZAN01.0 for only $65 (including added $5 for picking a perfect screen); 40 pins EDP cable $35.


 1 point
 -
I already told you that SLI + optimus is impossible. Even if you could connect it somehow you'd need a MUX switch to go from iGPU-only to dGPU-only and it would require a reboot.1 point
-
side by side comparison, literally.1 point