Leaderboard


Popular Content
Showing content with the highest reputation on 07/26/16 in all areas
-
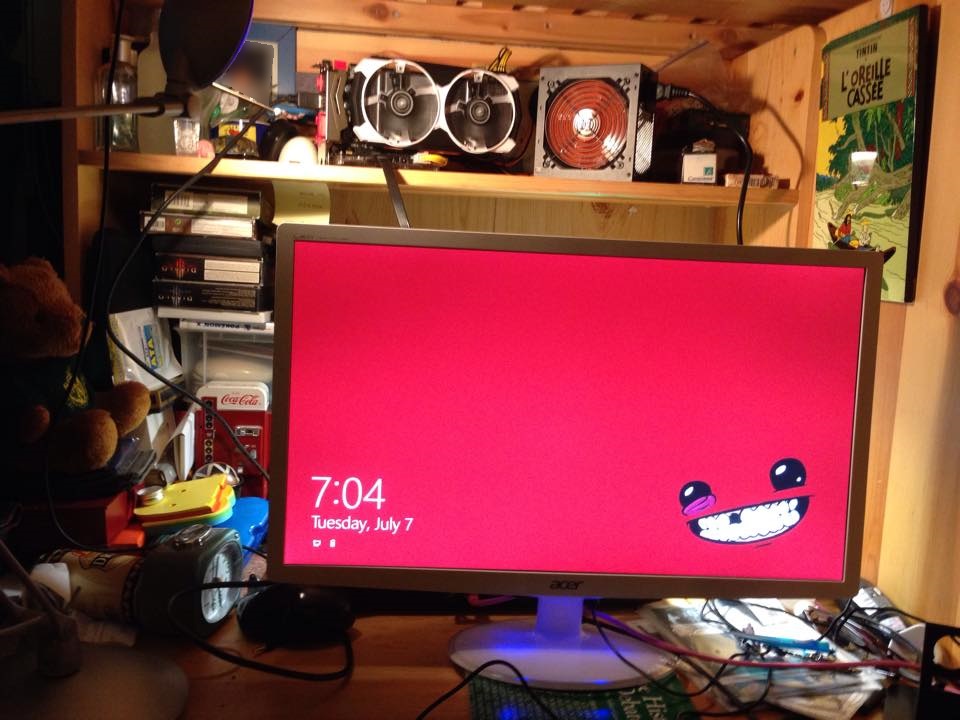
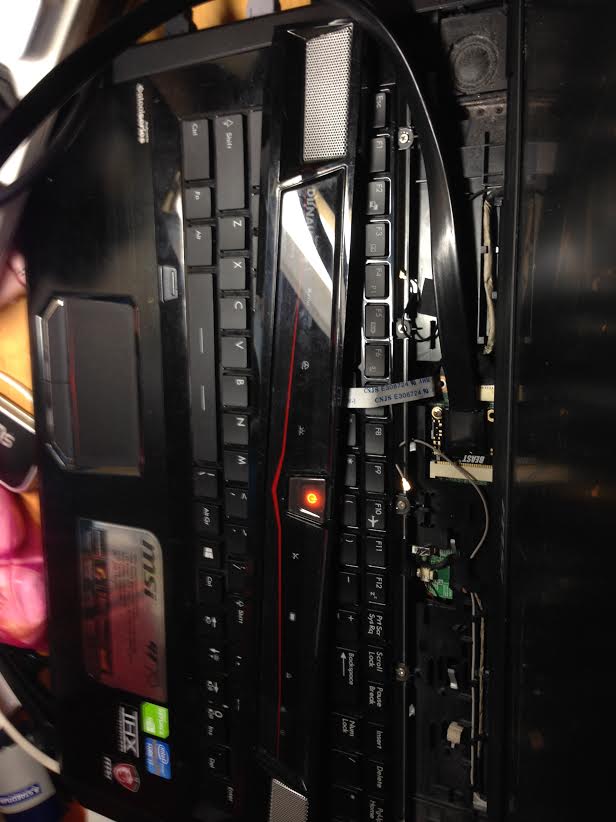
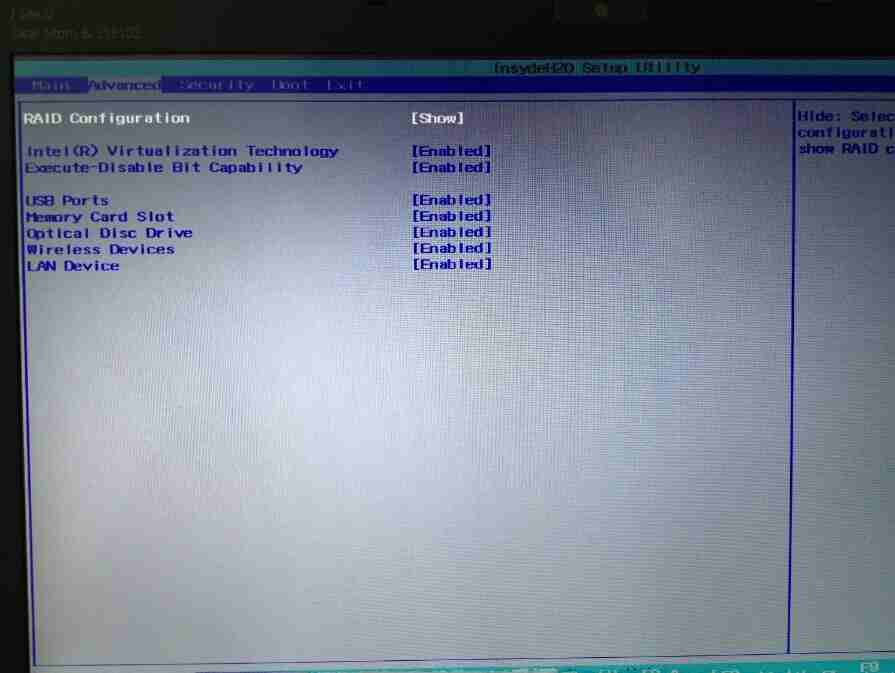
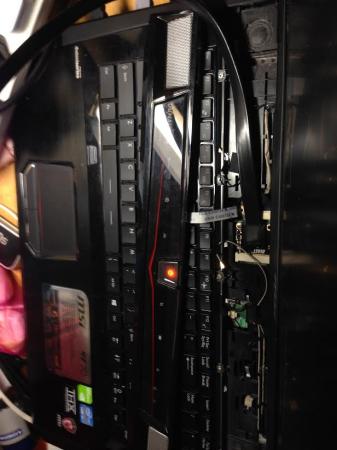
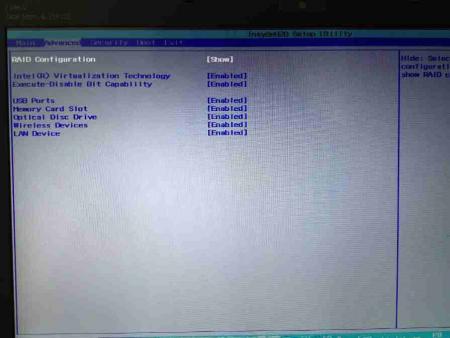
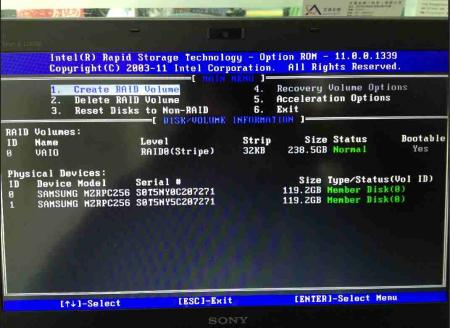
This is a provisional guide to getting the MSI GT70 to work with an EXP GDC Beast eGPU set up. (I will be adding pictures at a later date) Warning: Some of the things described in this guide may void your warranty. I am in no way responsible for anything that goes wrong. This worked for me it might not work for you. Firstly a bit of background: Last summer my internal dedicated GPU (a GTX 675M) died in my MSI GT70, long story short, MSI screwed me over on the warranty and I couldn't RMA it. This summer I decided I would try and breathe some life back into the laptop with an eGPU set up. My Laptop: Model: GT70-0ND 444US (2012) dGPU: (Dead) GTX 675M iGPU: Intel HD 4000 CPU: Intel Core i7-3630QM Memory: 12GB Why should you consider an eGPU set up on a GT70? What I used: -EXP GDC Beast (mPCIe version) -MSI GTX 960 2GD5T OC (Tiger) -XIGMATEK Calibre 500w ATX PSU -ACER 24" S242HL external monitor (this is optional but will yield better results) What you need: -EXP GDC Beast (mPCIe version) -A small form factor GTX 960 -An ATX PSU or the DA-2 -An external monitor (This is optional) Tools needed: -Tweezers -Small screwdriver [H][/HR] Installing the mPCIe connector. Step 1: Accessing the mPCIe slot. The Wi-Fi card in the GT70 and the GT60 is located under the power button bar. This makes for a relatively easy access point which doesn’t require opening bottom of the laptop up. There are 6 points you will need to pop to free the bar from its slot, use tweezers for this. Once freed be very careful not to pull away the bar, it is connected to the motherboard via a ribbon cable, do not pull this apart. Step 2: Remove the Intel Centrino Wi-Fi card. Remove the Wi-Fi card by disconnecting the two antenna located on the rear of the card. Next unscrew the card from its slot and remove it. Make sure to keep the screw as it will help to secure the EXP GDC Beast’s mPCIe connector and prevent it from falling out. Step 3: Inserting the connector. Insert the EXP GDC Beast’s mPCIe connector into the mPCIe slot and screw it in, done. [H][/HR] Disabling the dGPU: Note: I never had to disable the dGPU as my GTX 675M is dead. I would recommend those who have a fully functioning dGPU to just live with it as the results from the EXP GDC beast will be only marginally better. Warning: (The following should not be attempted unless you know what you’re are doing, do not take apart your computer unless you understand the risks associated.) If you are determined to get this working and are unable to disable the dGPU through the bios then you can simply remove the dGPU, this will invoke the same situation as myself. This can be accomplished by removing the back panel, removing the fan, pulling out the dGPU heatsink, unscrewing the dGPU and un-slotting it. Now the dGPU will not be detected and Nvidia Optimus will work. Note: (Follow a GT70 disassembly guide to help you) Fan issue: To get this working in any capacity you will have to accept that when the dGPU isn’t detected by the motherboard it will max the fans out, this is because it isn’t getting a temperature reading. If you can’t stand the sound of maxed fans then don’t try this guide. If you do find a way around this please let me know. BIOS fan fix: The fan issue can be remedied by Flashing an unlocked BIOS for your GT70. This will give you the option to swap the primary graphics device to the Intel HD4000 when not using the eGPU, this is very useful if you intend to use your laptop for anything besides gaming and provides a best of both worlds solution. However this does mean that you have to boot into the BIOS each time you wish to swap graphics solutions. To find an unlocked BIOS I suggest asking Svet, he is big in the GT70 scene. [H][/HR] Setting up the EXP GDC Beast: Wiring: Please ensure you use the correct wiring. If you do not it could result in a cable fire and could kill your EXP GDC. I have included a basic diagram for ATX power set ups. (Warning: If your PSU fans do not spin or spin for briefly and stop your wiring is incorrect, turn off the PSU immediately and ensure you correct it) Placement of eGPU: My advice is to put your eGPU out of harm’s way. Without any enclosure many of the components are exposed. As you can see in my picture I have chosen to place it on a shelf above my desk however I intend to create an enclosure at some point. Performance: Graphics set up 3dmark 11 3dmark 13 Fire Strike. GTX 960 eGPU 7785 5800 GTX 675M dGPU 3248.8 2182 Gaming performance: I have tried the following games out on my eGPU set up through the external monitor. You may notice that these are not ‘modern’ games, these are games that I like playing, I think they are a realistic group of games to test eGPUs on lower bandwidths. Note: For each of the following titles I turned anti-aliasing off. I find that it has the biggest negative impact on performance. All the following games were run at 1080p. V-Sync was enabled for each of these games. Skyrim: High settings (60 FPS consistently, dropping to 55 at the lowest briefly) Fallout 3: High settings (60 FPS consistently) Fallout: New Vegas: High settings (60 FPS consistently) Civ V: High Settings DX11 (60 FPS consistently)

 1 point
 -
http://www.3dmark.com/fs/9496804 and http://www.3dmark.com/spy/146998 managed to get few more points, by oc'ing memory some more. But this is it. Going more crashes the benchmark. +222 core +575 memory +62,5mV. Wondering if i can go up on voltage, but i dont know... temps are stable 78-79 on cpu and 68 on gpu max. Repasting didnt help much.1 point
-
So I name my card 980(m?). I got 1.2V to run. Here's 1466/6960 3dm11: http://www.3dmark.com/3dm11/11427346 And firestrike same clocks: http://www.3dmark.com/3dm/134425001 point
-
Did you try nvflash -6 XXX.rom Are you flashing in DOS? If not, here is a guide for that:1 point
-
i wish to test the bios,could you sent me one?my email:[email protected] and the image you wanted
 1 point
 -
Here's new test version which hopefully finally brings access to some more bios menus. If you want to try it let me know so I can give you the password. The reason for this is that I need to get feedback on the mod since I don't have a system to test it myself. If you ask for the password I'll expect you to test the bios and let me know how it works. SVS13-15_series_-_BIOS_R0142C5_[unlocked][TEST].zip1 point