Leaderboard


Popular Content
Showing content with the highest reputation on 05/27/14 in all areas
-
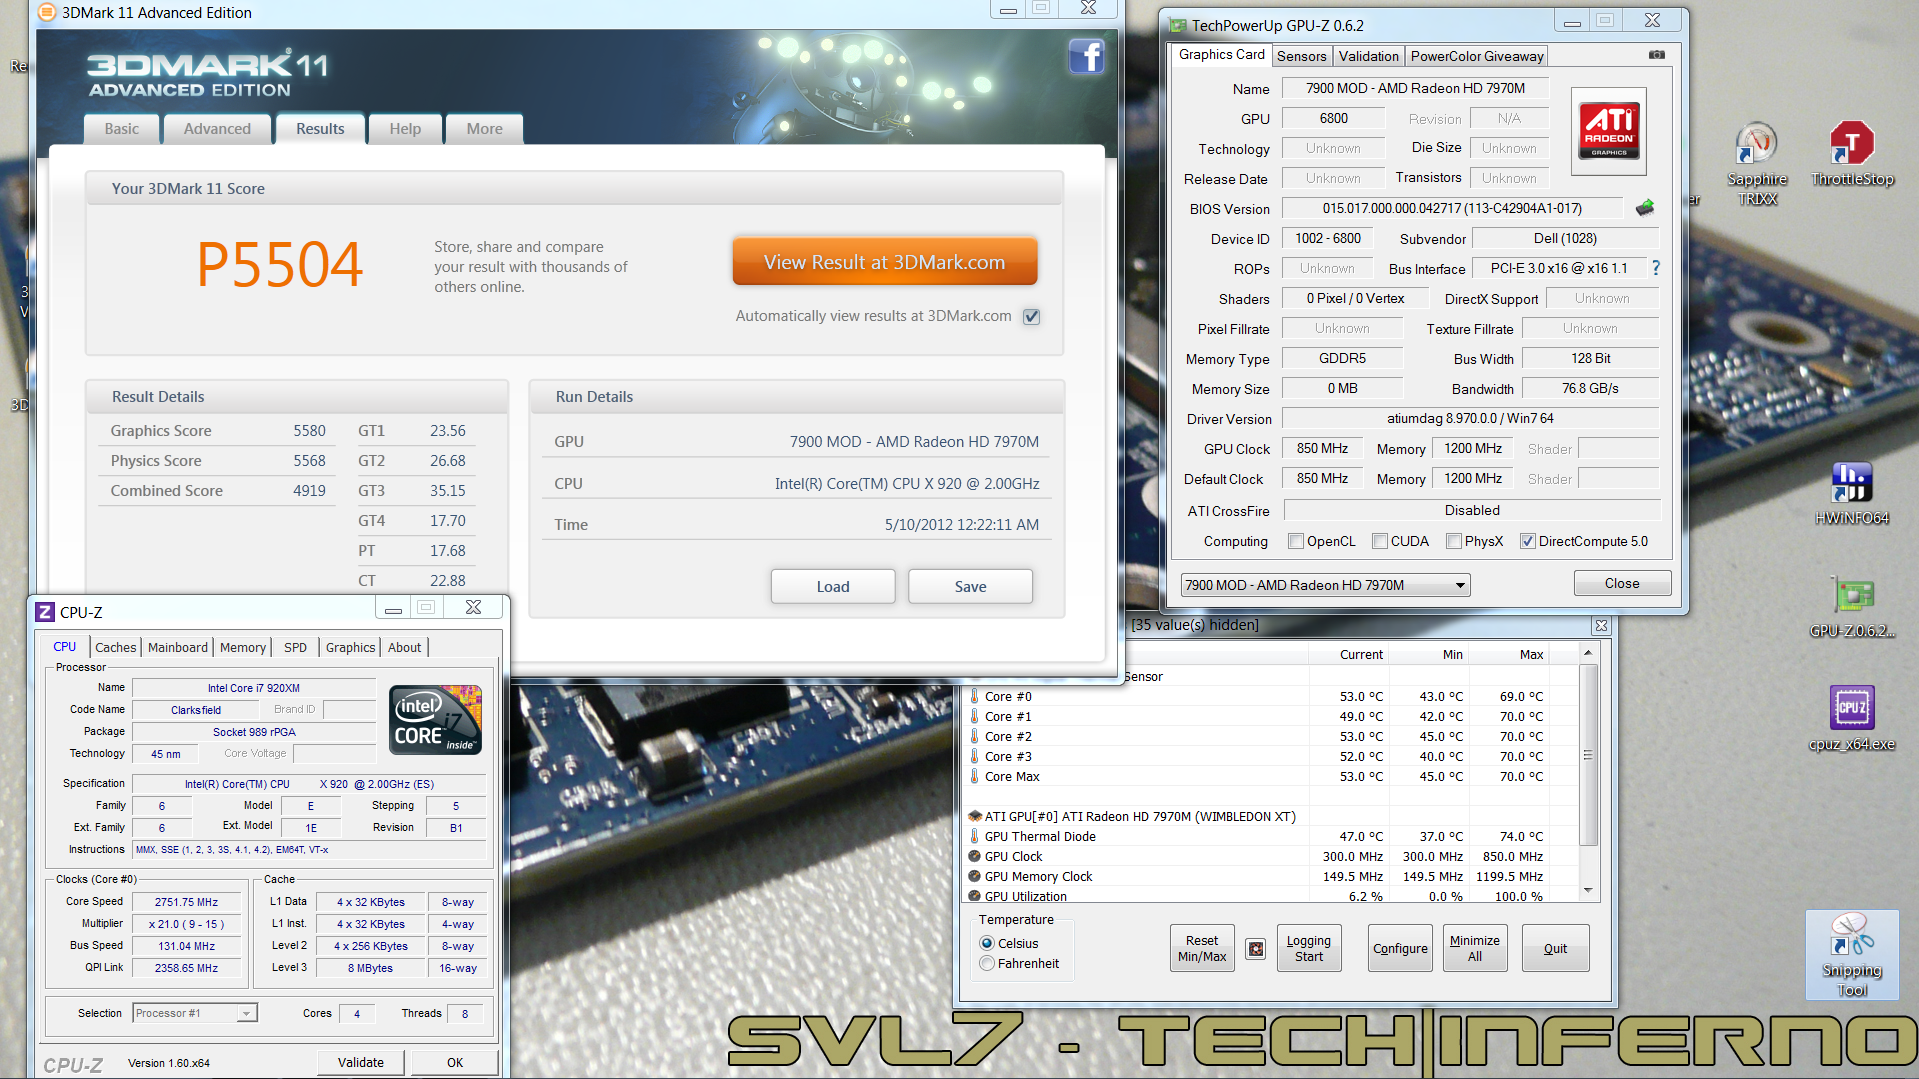
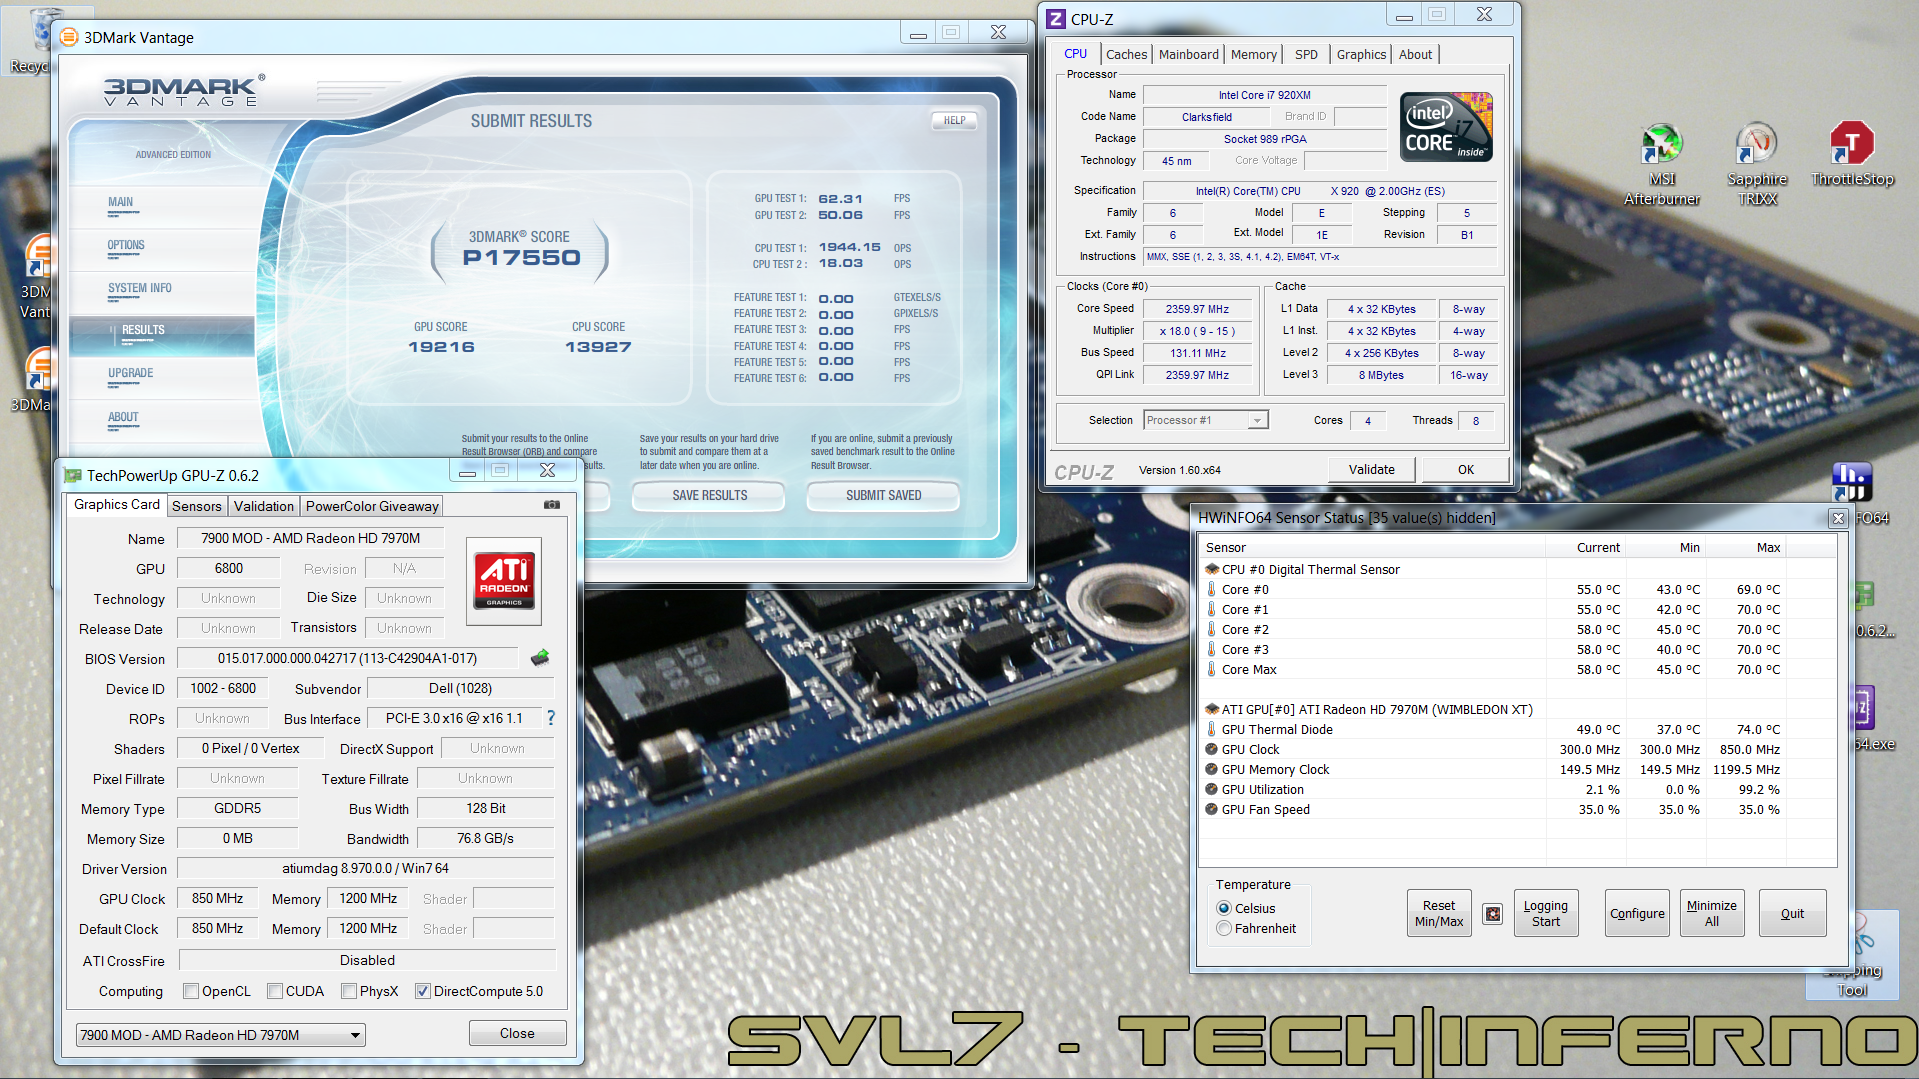
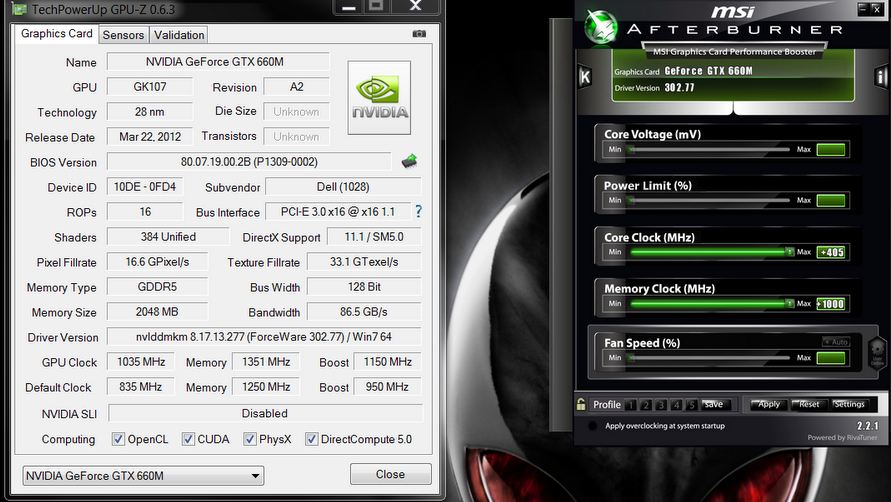
Got my Dell 7970m (ES) today... and so far it rocks! Native fan control, runs cooler than the 6900m series, and it simply kicks ass. It's pretty much plug-and-play, no issues so far, though I will need to continue the testing (and benching ). Only did a Vantage and 3dM11 run so far, with GPU and CPU at stock, Tess on, check it out, hehe: Confirmed for the Dell 7970m (part nr. 747M2) in the M15x: Fan control is working properly Sound per DisplayPort / HDMI is working GPU clocks and performs as expected Possible issues: The card runs slightly warmer than the officially supported cards, due to it's higher power draw. This also leads to less overclock headroom. The card works fine even if you have an i7 920XM in your system, but if you overclock the CPU too hard, the GPU voltage drops, resulting in a drastic performance drop. (This is actually not directly caused by a power limit due to the PSU... the CPU can draw as much power as it can get, but it seems that when the CPU draws more power than usual, the GPU voltage supply somehow doesn't get provided anymore with enough power, even though there's headroom power-wise, it's probably caused by the circuit design of the mobo). Things to do before changing the GPU: Download working drivers. At the moment you can either get the drivers of the M17x R4 from Dell, or the modified, but actually more recent (12.5) from "benchmark3d". Get some thermal paste, e.g. Arctic MX-4, or Prolimatech PK-1, or whatever you prefer, you'll also need something to clean the GPU die and heatsink, isopropyl alcohol or similar will do. I highly recommend using an ESD mat and wristband whenever working Get familiar with the upgrading procedure, respectively disassembling the system. Refer to the M15x service manual if you need help, or to this pictured guide which explains how to replace the GPU in the M15x. The upgrading procedure: Uninstall your GPU drivers. Make a power drain (Turn off your M15x, remove the power cord and the battery. Then press and hold down the power button (Alienhead) for about 10-20 sec. Remove your GPU - Here's a little guide with pics in case you need some help. Clean your heatsink, if necessary replace the thermal pads with new ones. Make sure the 7970m has the correct backplate on it. Insert your GPU, make sure that it sits properly. Apply the thermal paste, and attach the heatsink. More to come.
 1 point
 -
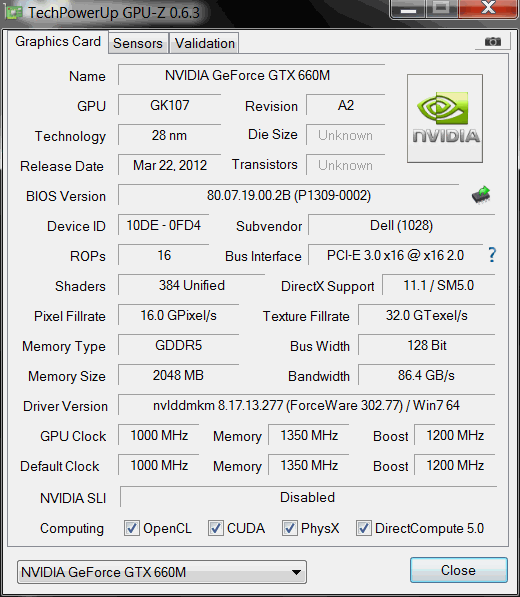
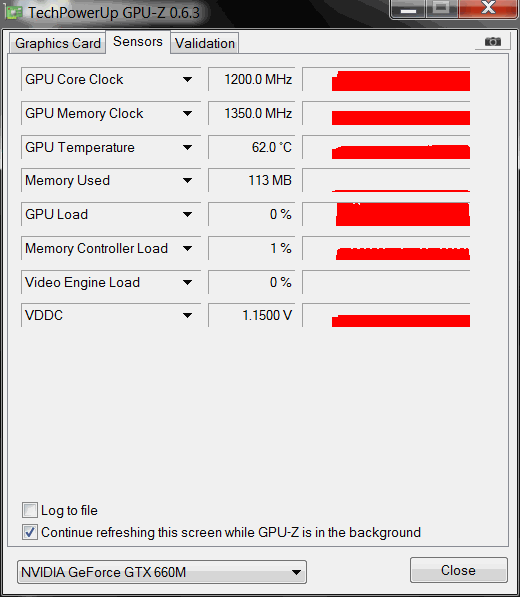
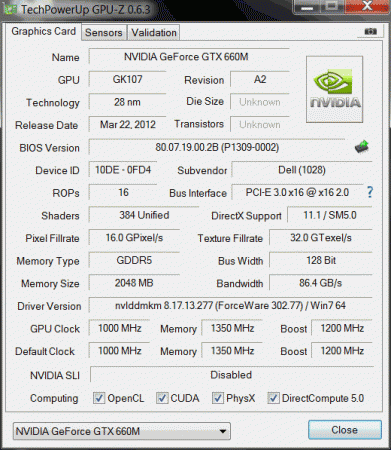
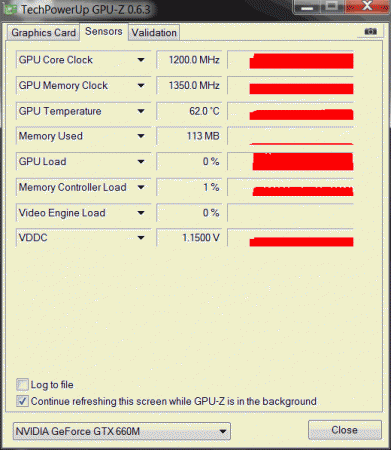
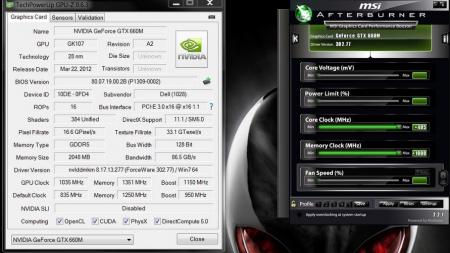
UPDATE: ALL DOWNLOADS LISTED IN THIS POST FOUND HERE. Nvidia 'Kepler' GPUs - modified VBIOS files >>> NOTE: More versions (including voltage mods) exclusive for T|I users can be found in the second post. <<< The 'Kepler' GPUs from Nvidia perform really well, even at increased clocks speeds they stay quite cool - a perfect behavior when it comes to overclocking and improving the performance. Unfortunately the mobile GPUs suffer from an artificial +135MHz core overclocking limit, so you can't go higher by using tools like Nvidia Inspector and similar. The modified VBIOS files listed here have this limit unlocked, some have increased stock clocks or tweaked voltages. Just refer to the description. All files have been modified by myself, if you like them feel free to buy me a drink, donation link can be found below GTX 660m: 660m_OC_edition__VBIOS_[DELL].zip- comes with unlocked software overclocking limits 660m_GHz-Edition_overvolted_VBIOS_[DELL].zip - default 3d clock 1000MHz, base boost 1200MHz,, memory (3d) 1350MHz, increased 3d voltage undervolted editions possible, depends on interest, tba Some screenshots: GTX 680m: Clevo_680m_-_80.04.33.00.10_'OCedition'_revised_01.zip Dell_680m_-_80.04.33.00.32_'OCedition'_revised_00.zip Increased software overclocking limits & optimized for no throttling. Read the included 'Read me' file before flashing. Instructions: I recommend flashing under DOS using nvflash . Donation link in case you want to buy me a beer Thanks and cheers! More to come. Testers: Thanks @eliteone (Dell 660m), @littleone562 (Dell 680m) For all mods: Use at your own risk.
 1 point
 -
Cooling: Previous stages. To put things in perspective this laptop would hit 90s with T5750 (35W, 2GHz, 2MB cache, 667MHz FSB) and HD3470 (12W). Now - low 80s while both CPU (X9100 - 44W, 3GHz, 6MB cache, 1066MHz FSB) and GPU (HD4670, 35W) are overclocked (3.6GHz and 775/885). CPU: I've successfully upgraded to next-gen platform (PM45) CPU (X9100 E0) thanks to this mod. There's a wire inside which makes PLL unlock and enables FSB overclocking. I have a theory that a Quad is possible but it involves A LOT of work - A LOT of soldering and A LOT of pin isolation, as well as a small PCB board for some components RAM: Intel says 4GB max, but I had to try it and it turns out that 8GB are running just fine GPU: Well I've tried to get GT 550m and HD8850m working but sadly it's a no-go. The first (GT 550m) lacks proper designation on the board in order to swap some resistors. It's not that impossible mod given that I ever come across the ASUS GT 240m (M90GN) boardview (since there are almost no markings on the GPU itself, the only way to know which is which, is through a boardview file). The second one (HD8850m) is a definite no-go since the receiving board is M96 based and it's lacking couple of crucial connections. One of them is PWR GOOD, which is essential to get it running, since it tells the core that all is good, and it can run. So in the end I'll stick with my old, but trusty HD4670. HDD: I'm running an mSATA SSD through adapter board, because of the less heat it generates (I'm all in for shaving couple of ºC from this poorly designed machine) Speeds limited to SATA II of course. I have a theory that I can mod my vacant mPCIe slot to mSATA, since I have an useless second SATA connector on the MoBo. I've compared couple of schematics and everything that is different is the 4 data lines - in the mPCIe they are obviously PCIe lines, and in the mSATA - SATA. So all I have to do is cut the PCIe lines and solder the SATA lines from the connector which is conveniently placed right behind the mPCIe connector. I'm yet to try this mod, so so far it's just a theory. I'm also running an optical-bay caddy with Hitachi's 7K1000, probably the last 7200rpm 2.5" HDD. Yes, my ODD connector is PATA (limited to 33MB/s), but I'm using this drive's response time, than the transfer speed. Disply: I'm currently running Dual CCFL WXGA (1280x800) display on single lamp only, since there is no space to add second inverter. Also the Dual CCFLs inverters are requiring different voltages than what 5920G supplies. There is a link in my signature to mod your cable for Dual LVDS - which grants support for higher resolution displays. I've tried it and it works Oh, and the current display is absolutely stunning compared to the stock POS. Tried to get the best 15.4" display running M4400's WUXGA RGB LED - but sadly it doesn't work at all. Most displays would output picture even without back-light (you have to use flashlight in order to see it), but this one is totally dead Misc: I'm using 120W Cooler Master adapter and it's definitely needed! The Intel Ultimate-N 6300 WiFi card works fine and has a slight improvement from 4965AGN and it also gives me some space for the cooling mod I've swapped the keyboard (white) for a black one and in my opinion it looks WAY better.1 point
-
A 7K1000 can do 133MB/s on a SATA-II interface as shown by CDM benchmarks here. PATA UDMA-5 is a 100MB/s interface. Using the PATA interface with a SATA-to-PATA caddy should see just over 90MB/s (68% of SATA-II) in real life as shown by results here for bulk transfers. Means it would be perfectly OK for backup. The PATA interface would however limit you in other ways. It can't do AHCI's multi-threaded reads (eg: Q=4 in CrystalDiskmark) affecting boot/app opening performance if used as a main drive. In addition you won't get AHCI's ALPM slumber mode for reduced power consumption during battery operation.1 point
-
yes...did everything you said1 point
-
Hi J95 i did some googling and finale find out how to check my Card ID ( PCI\VEN_10DE&DEV_11E0&SUBSYS_05801028&REV_A1 ) the last number its different yours is ( 057B1028&REV_A1) my is ( 05801028&REV_A1 ) can you help please and thank for Edit: Never mind i Figure out just change now the 057b to 0580 lol.. but thank you so much with out you i was stock on this 4ever1 point
-
Hi Prema! I got my P150SM-A from mysn.se yesterday, and flashed it with your bios. It's working great. Also I found on hardwareluxx.de a new video bios from Svogt for the 880m, I installed that as well. It will work fine until svl7 releases his unlocked vbios. Keep up the good work.1 point
-
Confirm card Id PCI\VEN_10DE&DEV_11E0&SUBSYS_057B1028&REV_A1, instructions here #8 http://forum.techinferno.com/nvidia/5249-%5Bguide%5D-modding-nvidia-oem-inf-files.html#post934951 point
-
So I have a VERY special scenario y410p, and I'm looking for some input. My laptop is a nearly August 2013 y410p on 1.07 BIOS with single 750m. I just recently bought one of the GT755M5s from Lenovo when they were only $99, and modified the hardware straps and BIOS so that it could be recognized in my y410p as a 750m. SLI is working great. It's a 750m SLI'ed with 755m->750m downgraded Ultrabay card. Does this 1.07 BIOS mod allow for SLI? If so I noticed that there is a notice for SLI users to reflash their Ultrabay... however I'm a 750m user using a hax0r'd 755m. I just want undervolting really. Not too worried about the whitelisting. My laptop is throttling excessively while playing games and it is unacceptable.1 point