Leaderboard


Popular Content
Showing content with the highest reputation on 11/29/12 in all areas
-
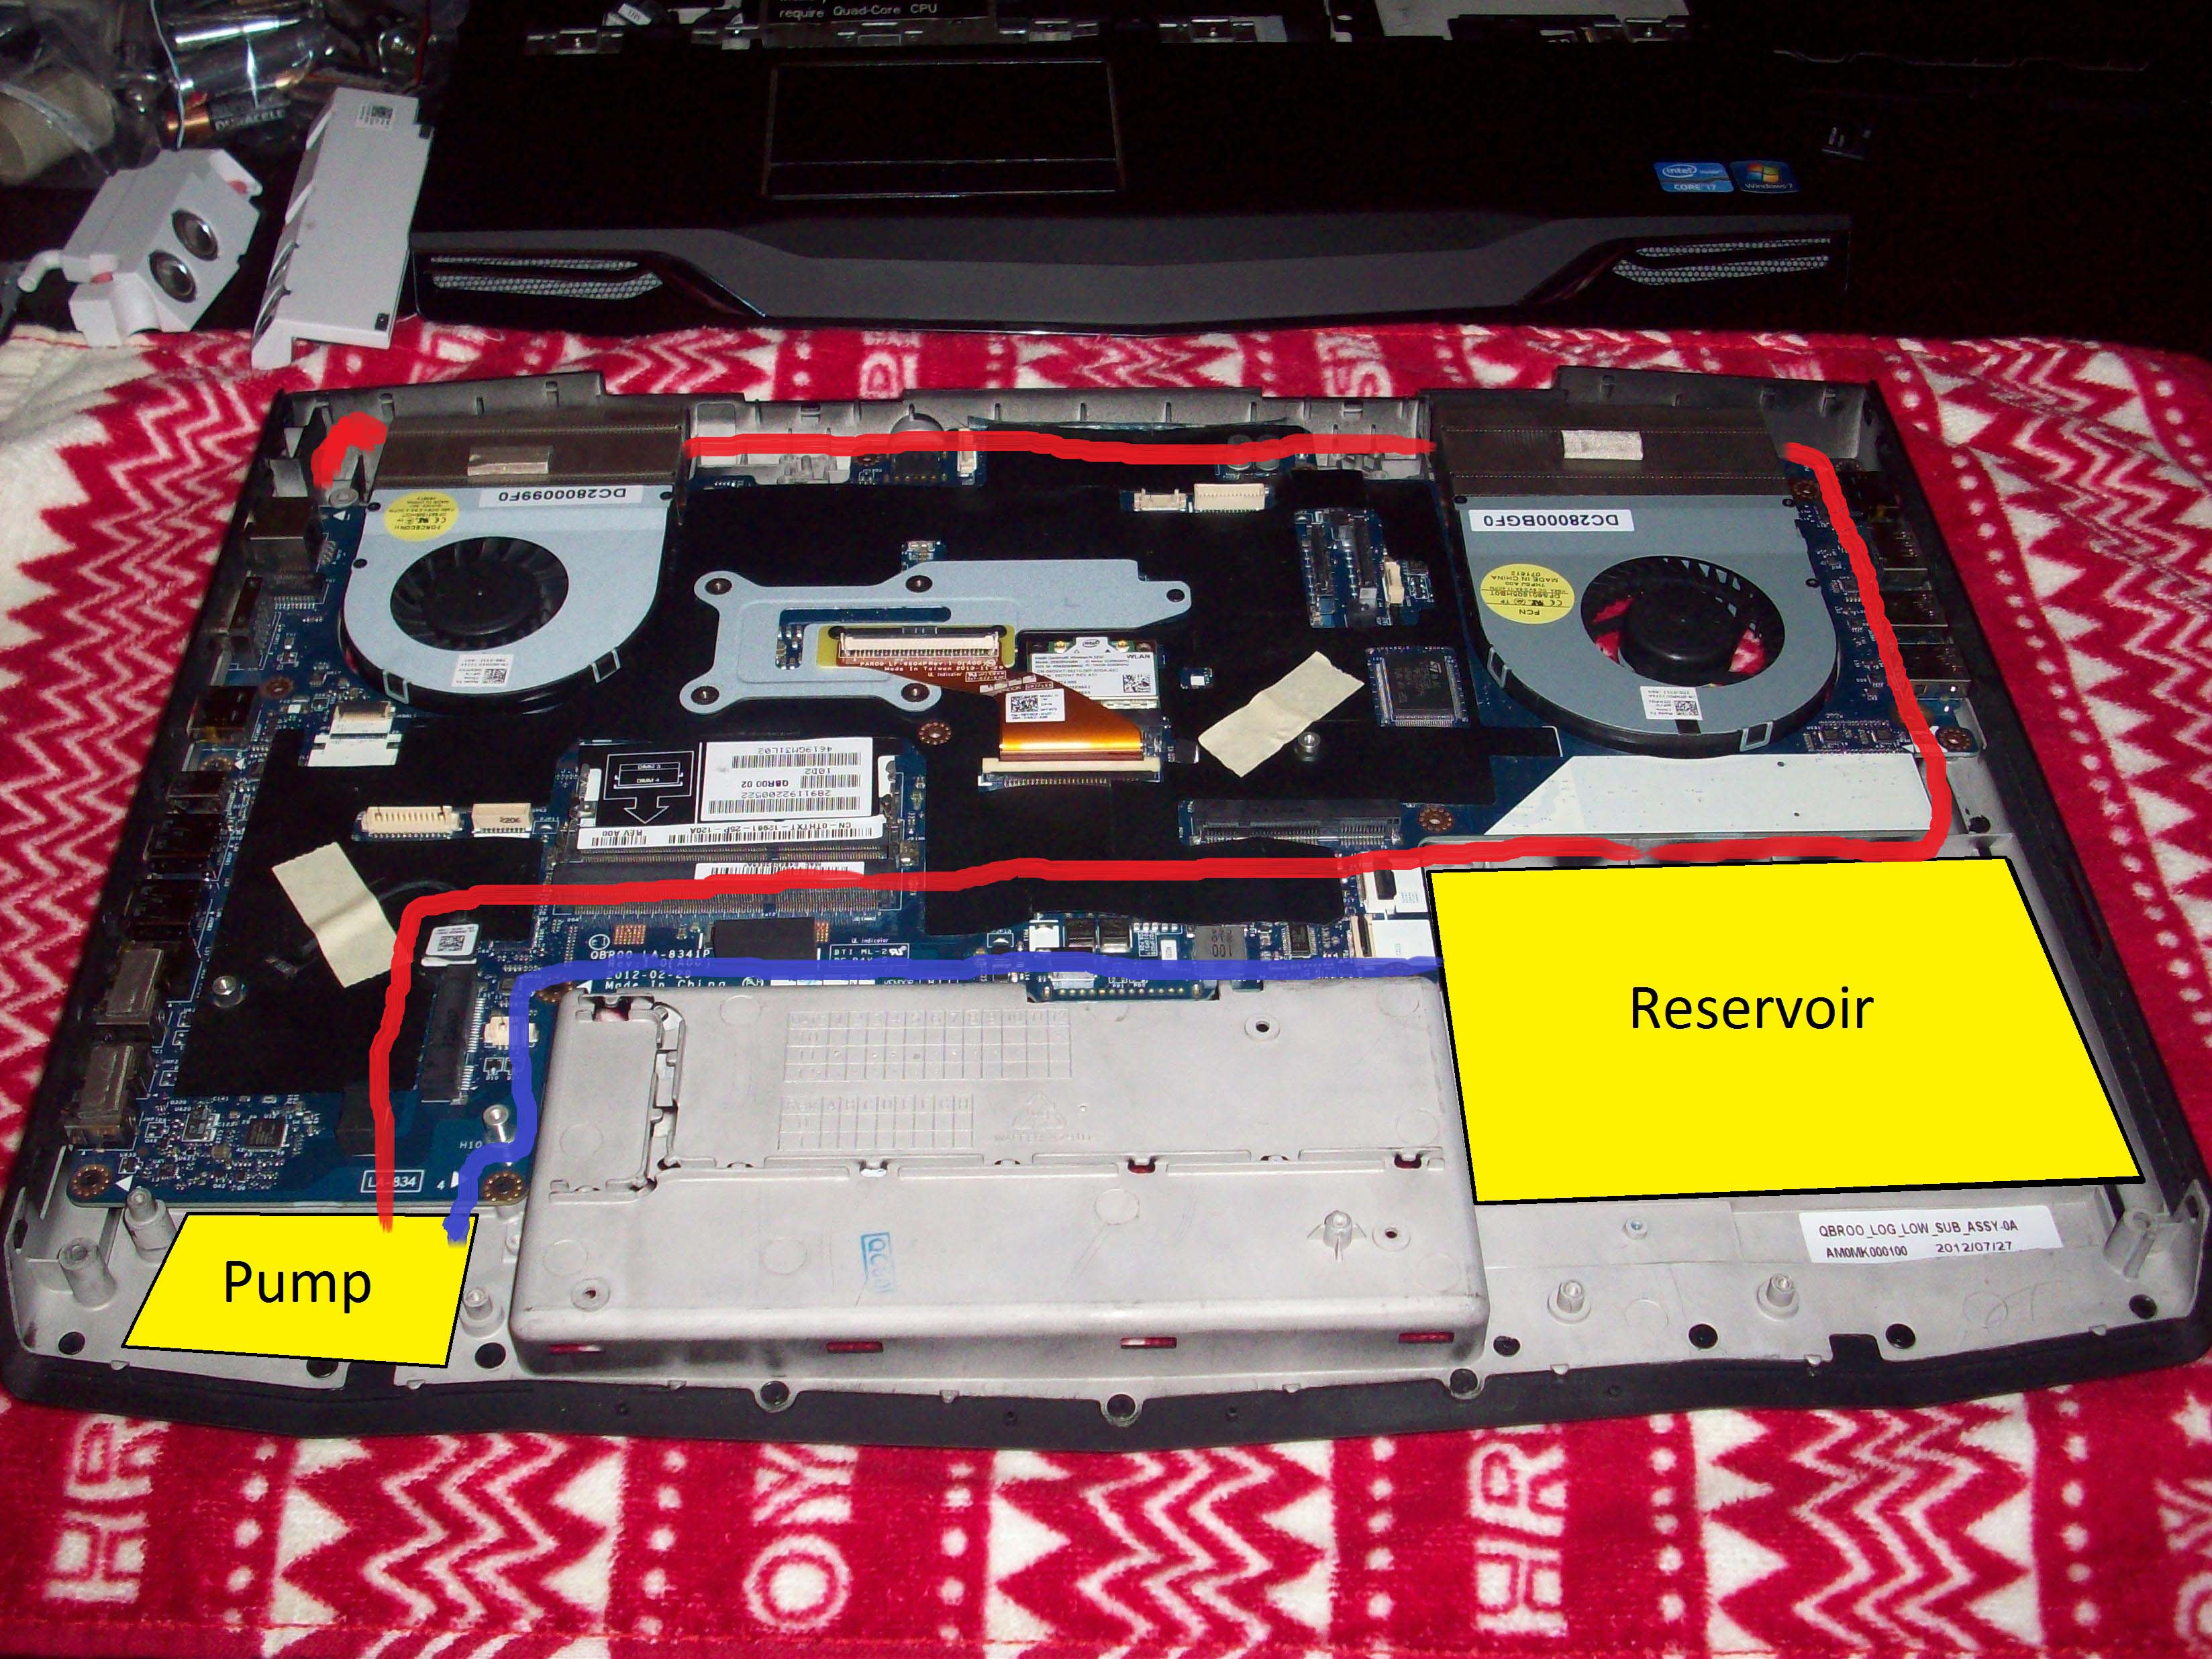
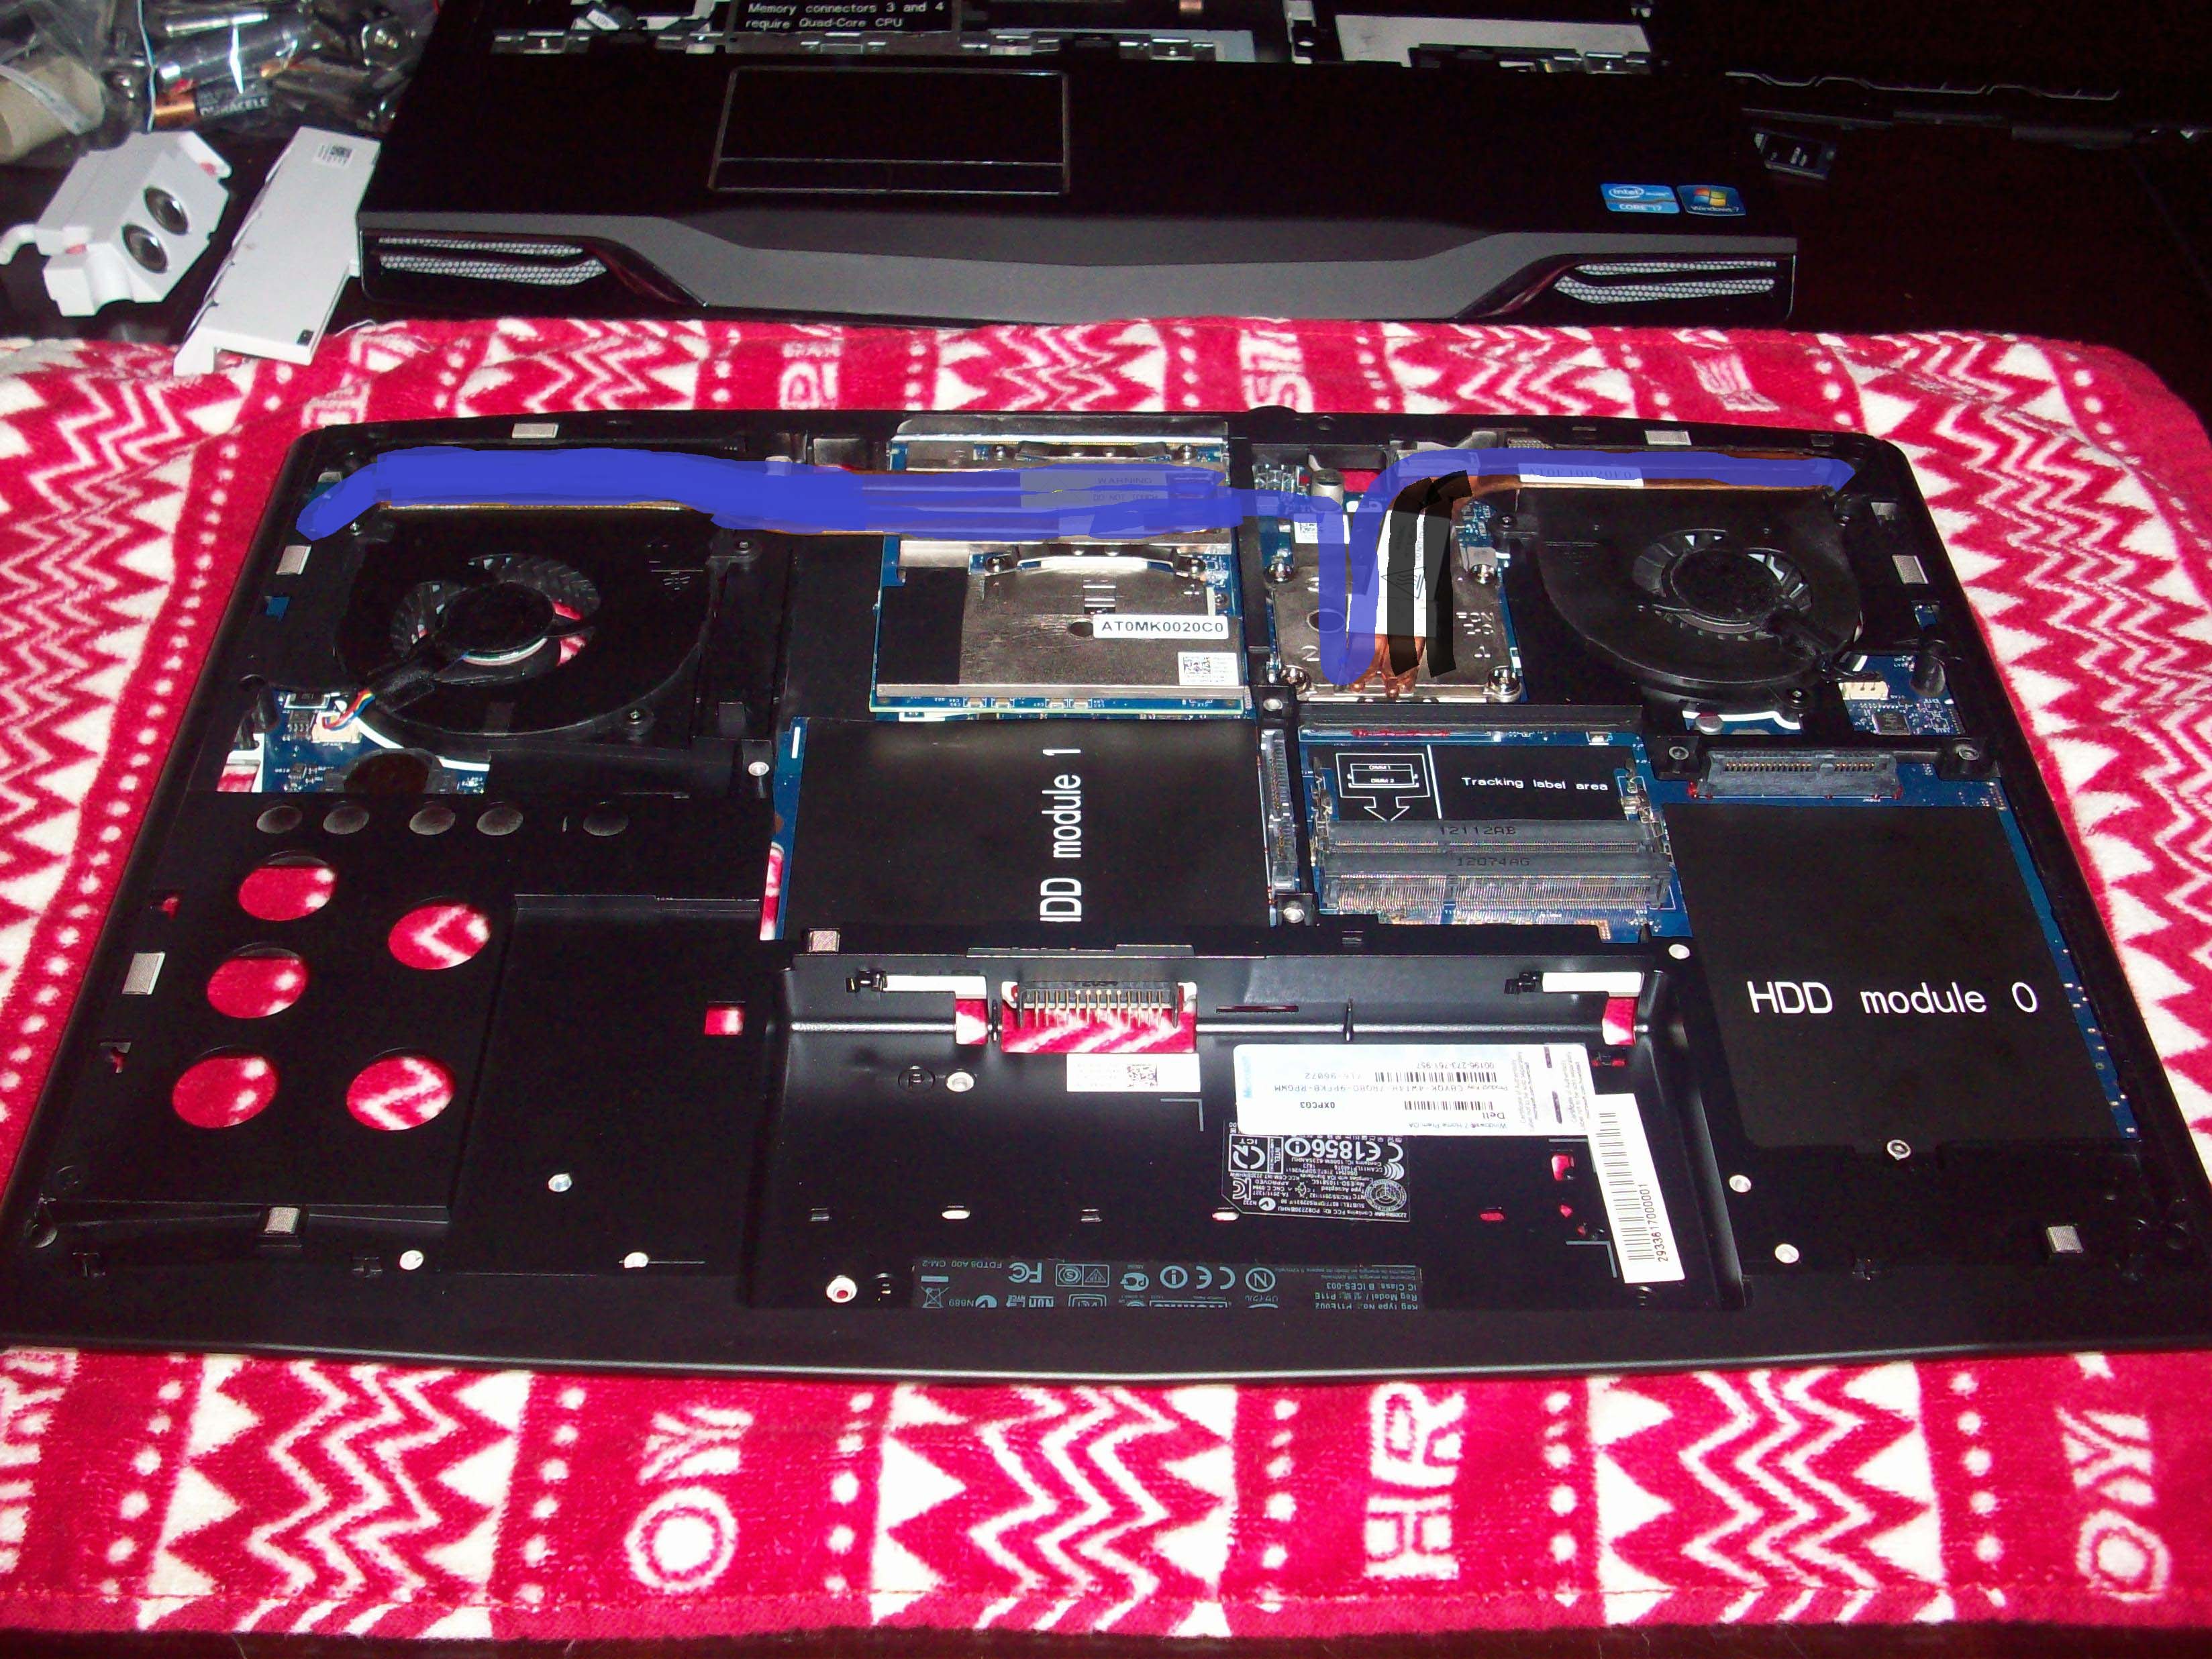
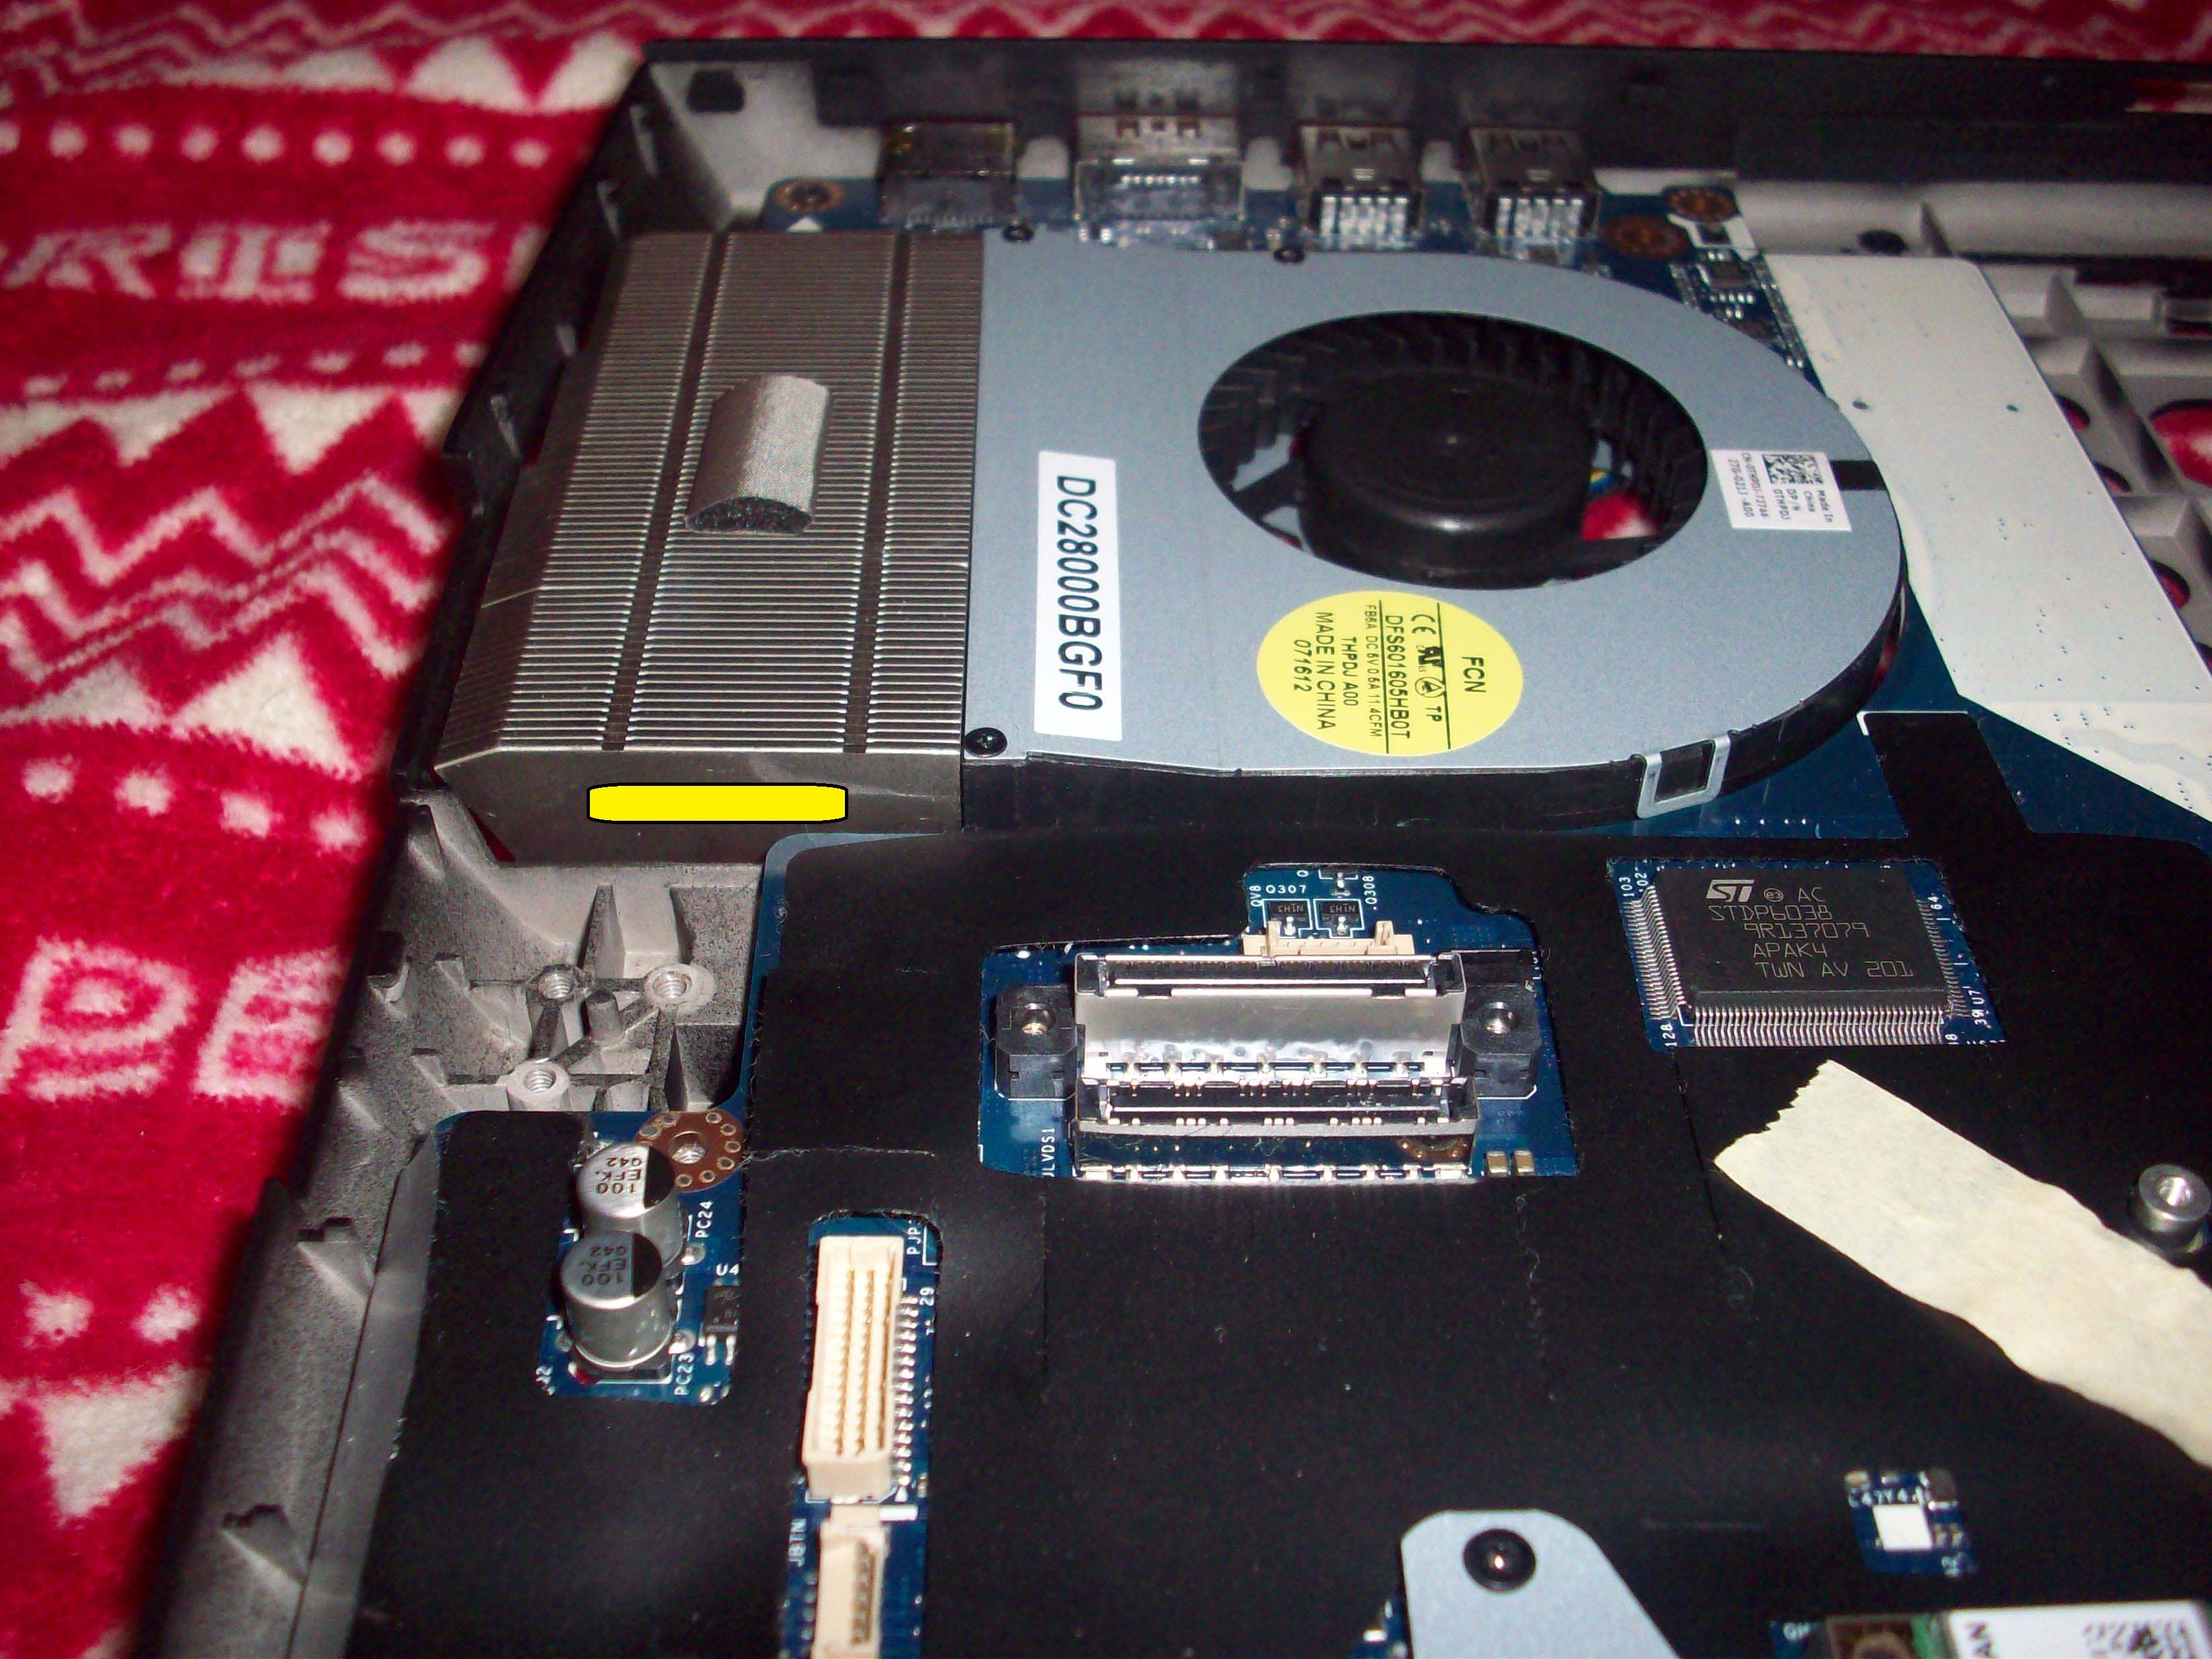
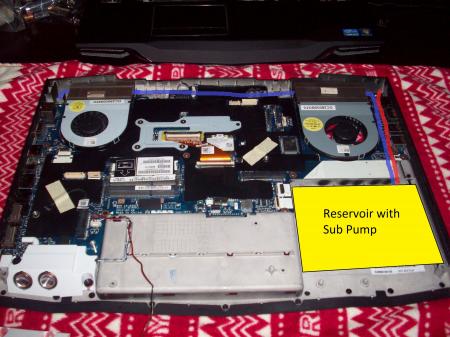
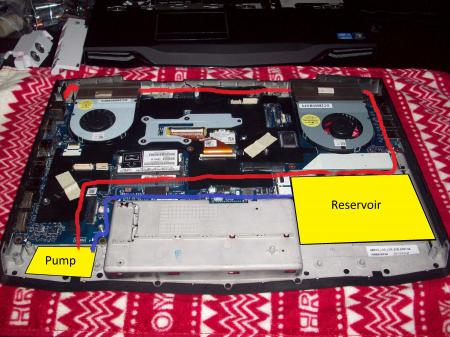
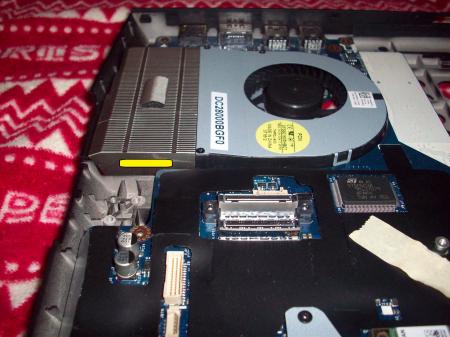
Well here is my schematic finally finished up. The first picture is only the tear down. After that you will see picture 2 and 3. When I receive the pump I purchased I will see what fitting is more appropriate. So far I am pushing for the one with the submersible pump. If it won't fit I will settle for the one I ordered, which is not submersible. Side note pump will be powered by CD drive. Both 2 and 3 show the layout for the copper piping on the front of the motherboard. Picture 4 shows the layout on the back of the motherboard. The layout is a little unique so I will explain it as good as I can. I will solder a 1/2 inch pipe to the 1/4 inch copper pipe which is what will be used overall. If you see the picture you will notice that all the piping will be layered over with extra flat piping. As for the CPU heat sink, I will take it to a machine shop to cut a score instead of slant that it currently has. That way I can move over the current heat sink and add the water copper next to them. Then I will do the same procedure to the GPU heat sink. Allowing all the heat sinks to be merge to spread heat equally. Finally to explain how the piping will cross through the heat sinks. I will drill through and solder a flatten 1/2 inch piece of copper piping through. This will give me 2 built in radiators. If you have any question or want to follow along with me let me know. I will give you a list of what I have gotten so far. Current I am just waiting for the extra GPU and CPU heat sink so that I put everything together. Will update soon and wish me luck.

 4 points
 -
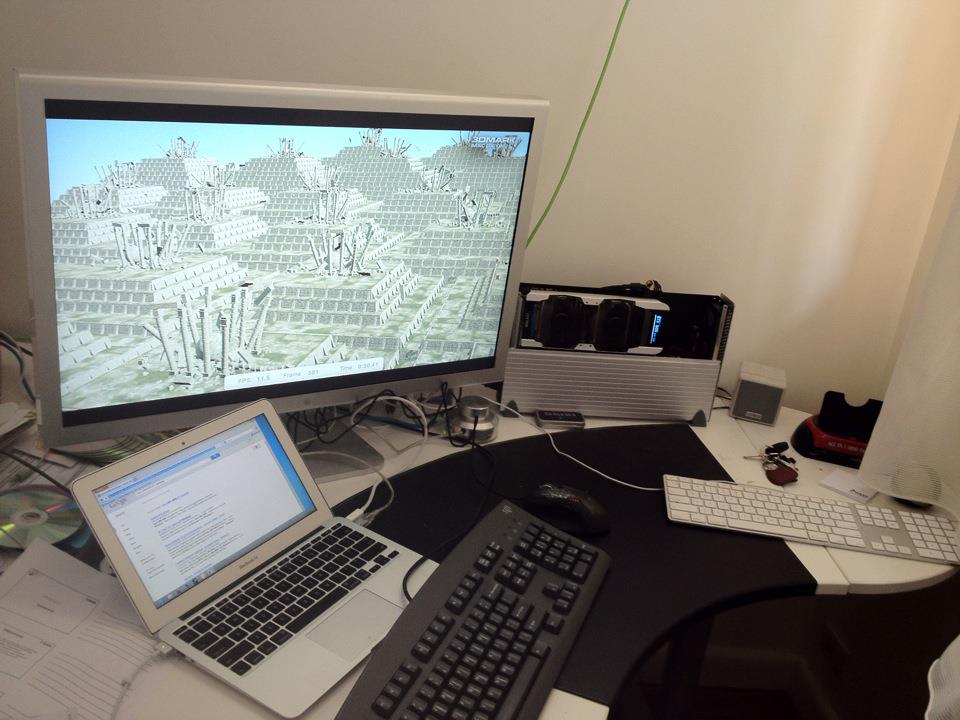
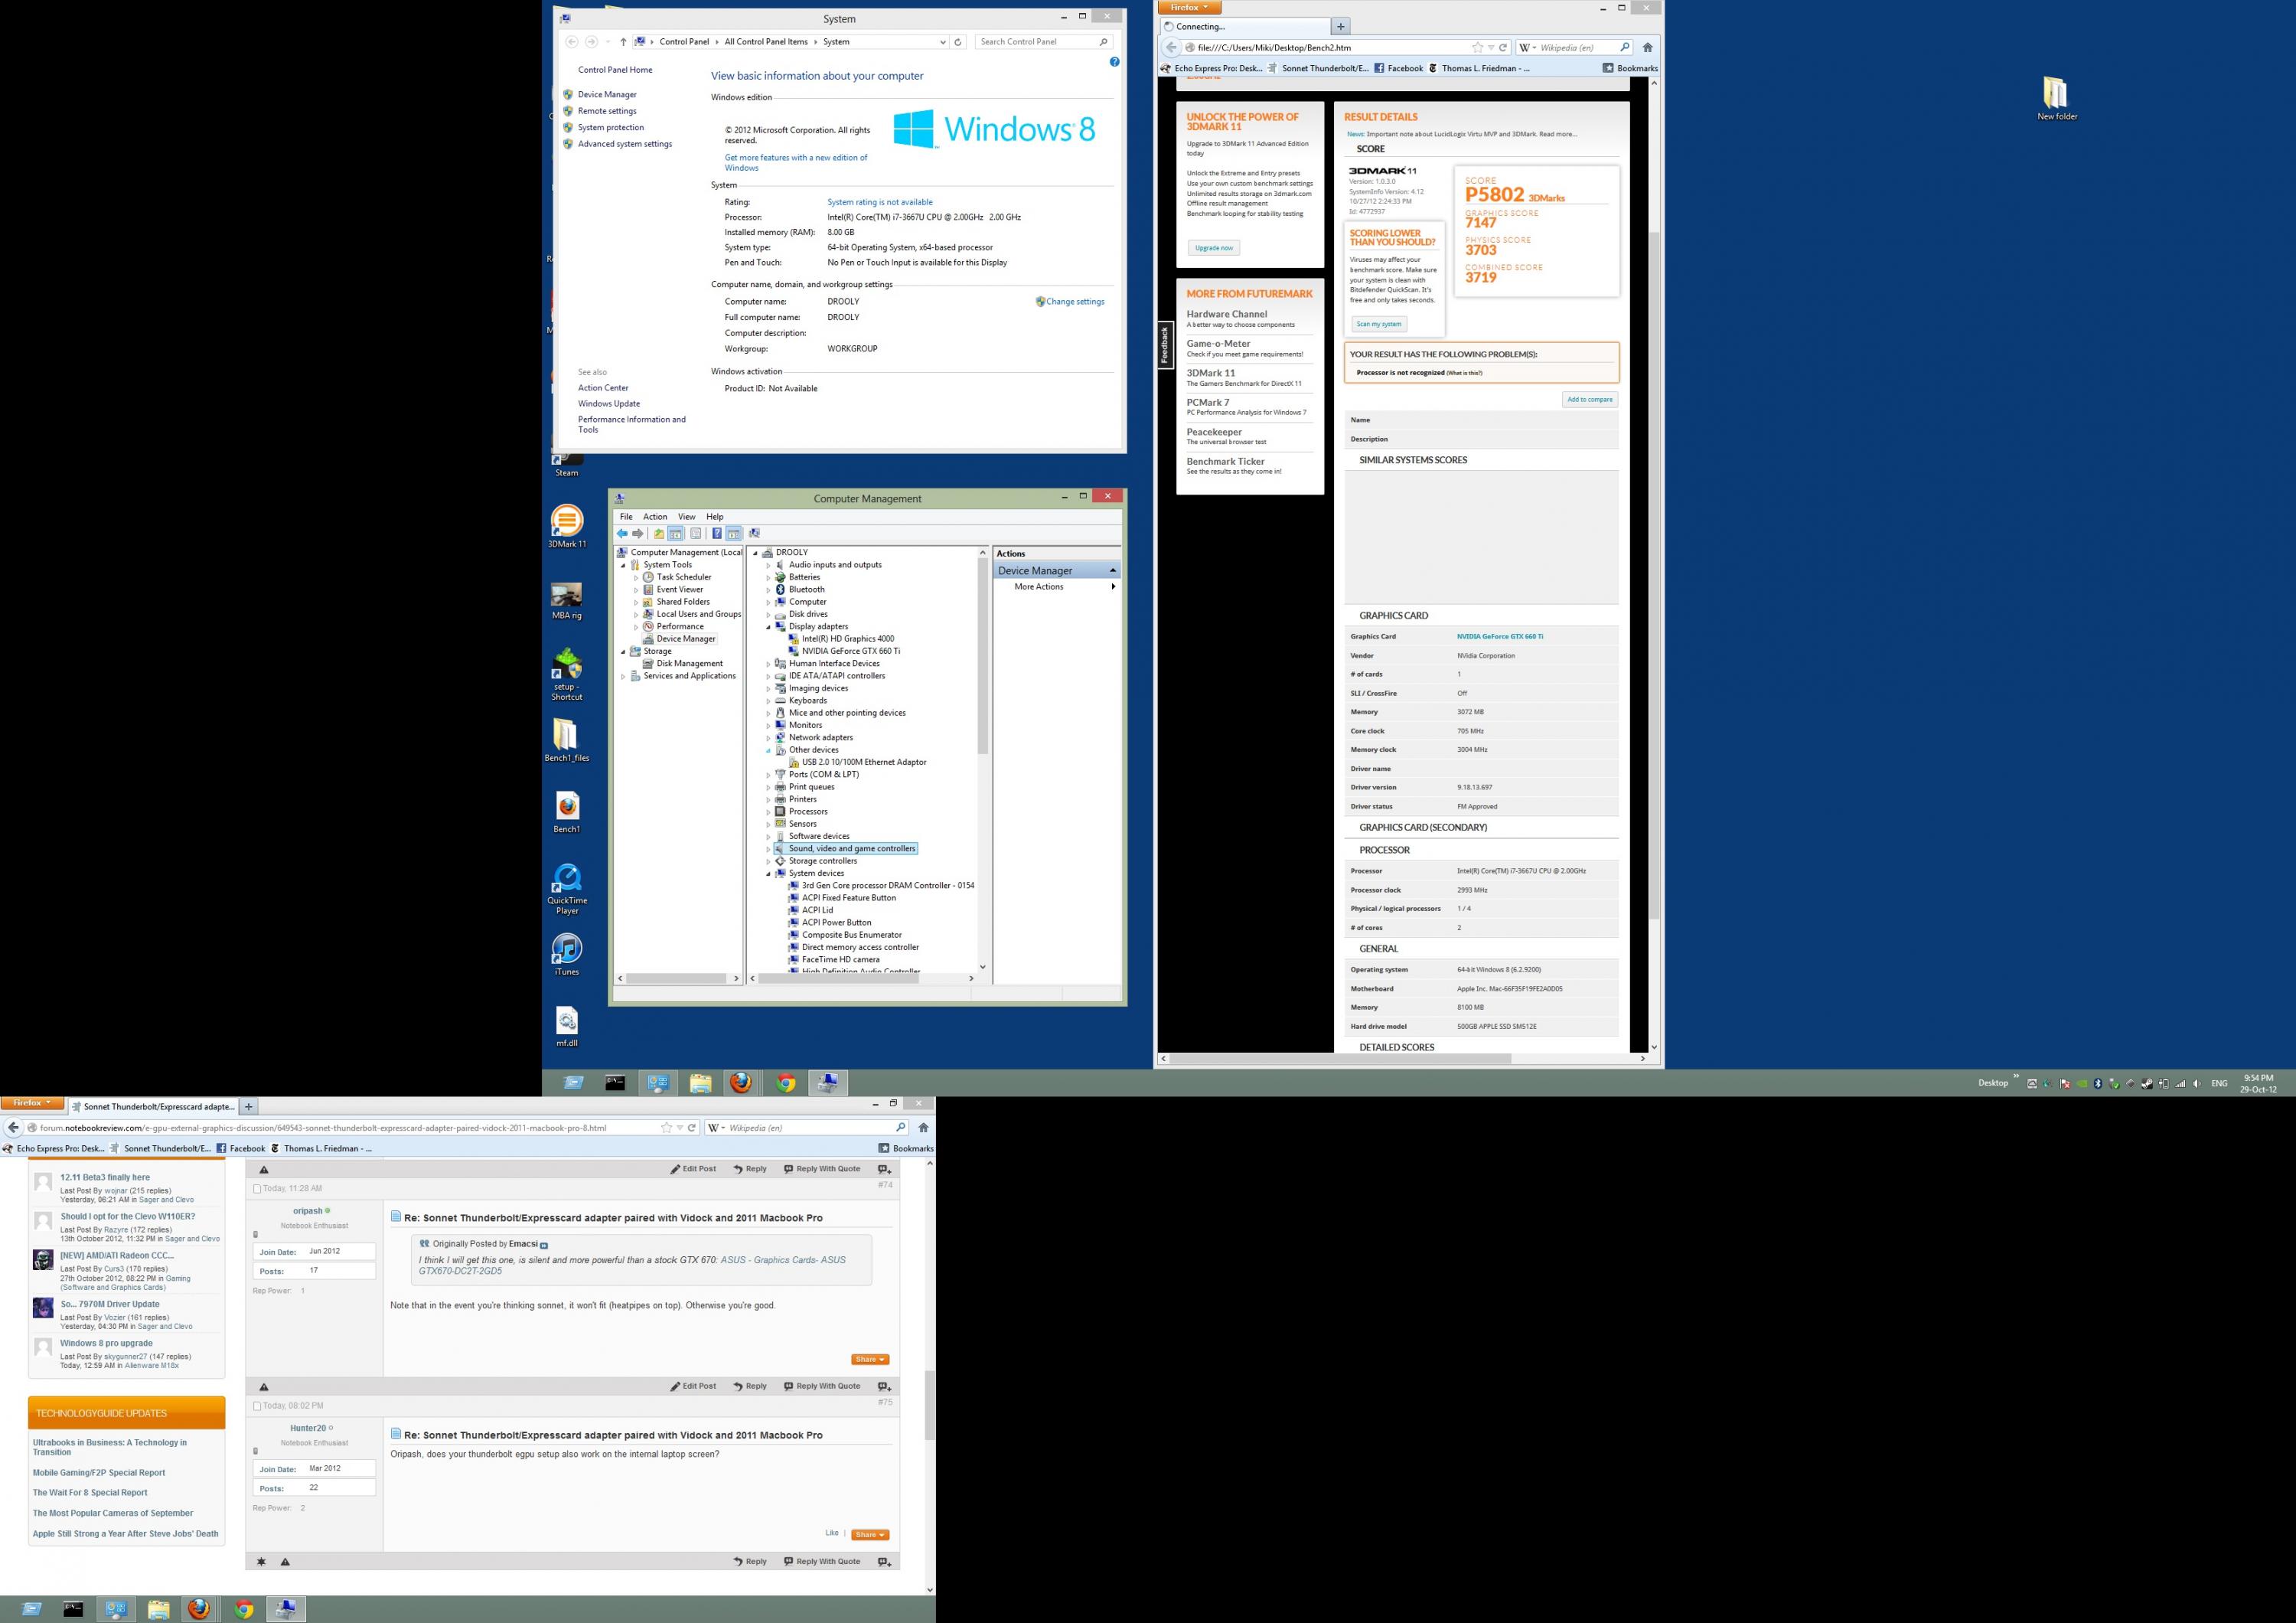
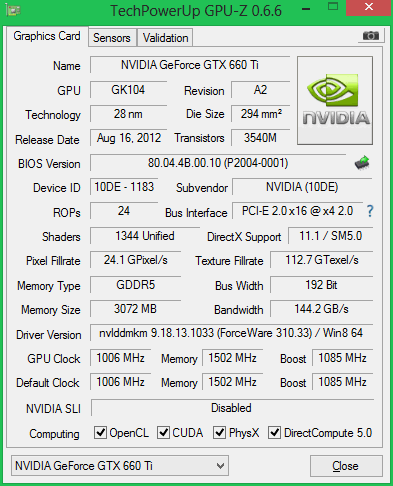
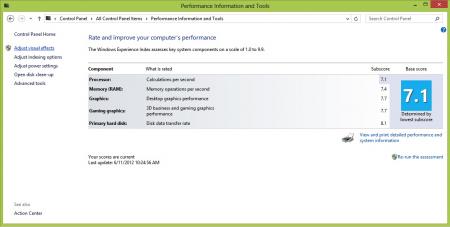
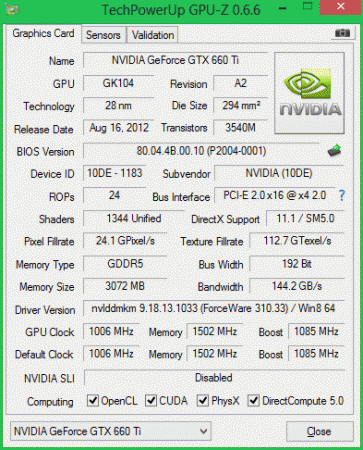
This is a loose guide for installing Windows 8 64-bit in EFI mode (e.g. not via bootcamp), dual-booting with MacOSX on a 2012 Macbook Air. It's a work in progress, so I update it from time to time. The purpose of this exercise is to set up a windows-based game rig on the mac using a thunderbolt-based eGPU, that will co-exist nicely with OSX. FYI: 1. This is a re-post from other forums which I've moved here. This is the one I keep updated. 2. Some of the specifications of this rig are very deceptive (It has two thunderbolt channels and four PCIe 2.0 lanes. Except it doesn't fully use either.). Please make sure you've read my short PCIe/thunderbolt Plumbing Primer to make sense of how stuff actually works. On to the fun: My experiences so far: There are two roads to install Windows on a mac. The road of BIOS and the road of EFI. Older PC's only have BIOS. Windows on those PCs talks to hardware directly through the BIOS. Macs come with EFI as the primary interface to the hardware. OSX talks to hardware directly through EFI. Macs also come with a BIOS emulation, because through BIOS, Windows works flawlessly (with the exception of thunderbolt...). This is how bootcamp makes your windows work. The newest Windows (Win7/64 and Win8/64 ONLY) can interface with hardware directly through EFI as well. Not all windows drivers are tested to work this way. What happens when we connect an eGPU - the new eGPU thunderbolt device tells EFI/BIOS it exists. On a BIOS-based PC, the BIOS would enumerate it and tell the OS the device is ready. Tomshardware review of the Sonnet suggests this works flawlessly on a thunderbolt-equipped desktop motherboard. On an EFI-based mac, things are a bit different. The thunderbolt device tells the EFI it exists. The EFI enumerates it as a PCI device and tells the OS the device is ready. That's what happens in OSX (which runs in straight EFI mode), and what happens in Win7/x64 or Win8/x64 if you installed them in straight EFI mode. If, however, you run windows in regular BIOS mode (if you installed Windows via bootcamp, this is the case), Apple's BIOS emulation does not pass the thunderbolt enumeration event back to windows, and your thunderbolt eGPU doesn't work. There's a way to make it work using a rain dance, where you connect the eGPU to the mac but not the AUX power plug to the GPU, turn mac on, get past the boot loader, immediately turn the GPU power on before windows completes booting, jump on one foot holding your left ear, bend over backwards twice, scream in agony, and on occasion your thunderbolt device gets recognized and appears in device manager. Even then, twice it disappeared on me while installing nVidia drivers. I gave up on trying to get thunderbolt eGPUs work it through Apple's BIOS emulation. I decided to install windows in EFI mode. I tried windows7/64bit/EFI, ran into a pile of weirdness installing and gave up. I'm using Win8/64/EFI instead. Setting up a dual-boot EFI on a macbook is easy: a. NO BOOTCAMP. b. when in OSX, fire up terminal, sudo to root and shrink your EFI OSX partition: # diskutil resizevolume /dev/disk0s2 250G (in this case, I have a 512GB SSD, I shrunk the partition to 250G). c. DO NOT create windows partitions under OSX. DEFINITELY do not let boot camp do this for you - it creates MBR partitions, EFI windows won't install on that. d. On some windows PC (or if you're like me, in your Windows7 parallels VM), Create a USB bootdrive of windows 8: insert 4GB or larger USB disk. Note: below steps will wipe it. Proceed at own risk. run command prompt as administrator > diskpart > list disk (check which disk number your USB disk appears as, use it in the next commands) > select your-usb-disk-number-from-previous-step > clean > convert gpt > create partition primary > select partition 1 > format quick fs=fat32 > assign > exit Now copy the guts of the windows 8 DVD or ISO onto this new drive. Congrats, you now have an install drive. e. Back on our macbook, I recommend installing rEFIt - install it, then open a shell, cd to /efi/refit and run: sudo ./enable.sh f. Reboot with the USB disk in. in the rEFIt menu, you should see two ways to boot from the USB disk - EFI and BIOS. Choose EFI. g. Installing windows: 1. First boot: windows installation. When you get to the partitioning stage, you should have a block of empty space on your macbook SSD. Let windows create its EFI partitions on them and tell windows to format the last big one of these. Then proceed with the install. It will copy files and reboot. 2. Seocnd boot: you don't need to do anything. It will go into a black screen (this is because the GMA4000 driver breaks in EFI mode), reboot on its own after a few minutes. 3. Third boot: Again, it'll go into a black screen again. LEAVE FOR 15 MINUTES for the installer to do its thing, then, after it presumably finished doing all the things it isn't showing you, HARD POWER-OFF. 4. Fourth boot: In the refit menu, choose to boot off the USB drive again. This time go into the recovery menu and fire up a command prompt. Delete the broken intel GMA4000 driver file (causing the default VGA driver to take over). Once in the shell, run: C:\> del c:\windows\system32\drivers\igdkmd64.sys Exit the shell and let the machine reboot. Finish the windows installation and go through the formalities. 5. Timekeeping: Windows likes to think that the machine's SAVED time (what time your machine thinks it is if you boot it completely offline) reflects the local time in your timezone. OSX likes to think SAVED time reflects time in Greenwich. They'll keep fighting between them over what time it is. Solution: In Windows, using regedit, navigate-to and add the following DWORD, and set it to 1: HKEY_LOCAL_MACHINE\SYSTEM\ControlSet001\Control\RealTimeIsUniversal Then reboot. Now let either OS set the time, and it will remain good across both. 6. Windows works!. h. DO NOT TRY TO UPDATE THE DRIVER FOR THE GMA4000 onboard graphics. It will just reinstall a new (still broken, as of the time I'm writing this post) igdkmxd64.sys file, and force you to go through step 4 above again. i. I installed Forceware 306.97 nVidia driver for Win8/64. It installed fine. j. Go back to OSX. Fire up boot camp assistant and select "Download the latest Windows support software from Apple". Untick everything else. Save it on your USB or somewhere where windows can see it. It will create a WindowsSupport directory with drivers for all the Apple bits and an installer that installs all of them. Boot into windows, go to the WindowsSupport folder on this USB stick and run setup.exe. This will properly install drivers for a few more things, including bluetooth. GMA4000, screen brightness controls & onboard audio will still not work. The boot camp control panel in windows won't work - its start screen shows bootable partitions and it expects a hybrid MBR which we've very deliberately avoided setting up in our non-1980's shiny GPT partition structure (you can manually install a hybrid MBR and experiment using gdisk and the 'h' option in the recovery submenu, but that confuses the hell out of windows). k. Things that don't work for me: 1. Screen brightness controls in Windows. 2. Sound driver. I just plugged in an external USB sound card I had lying around. 3. The GMA driver. There are four drivers you can use: a. The GMA driver bundled with windows (or an updated WHQL one from windowsupdate). b. The driver supplied in Apple's bootcamp driver pack. c. The latest GMA driver downloadable from intel's website. d. The default VGA driver in Windows. 4. Virtu (The installer fails to set up) As of 26/11/2012, (a-c) do NOT work in EFI. This has nothing to do with the eGPU and whether it is connected or not. It has everything to do with the driver not yet being written to be compatible with windows working in straight EFI. I'm sure Intel will fix this at some point, I'm just not sure when this will happen. (a) and ( will give you a yellow triangle in device manager, © will not (but still not work). (d) works FINE (it's snappy and not laggy or anything, it doesn't feel like the good'ol "video card without a driver" in windows). It'll be 100% good for everything except gaming. 4. Boot camp control panel (to tweak behavior of apple hardware, trackpad options, what the button on your apple display does, etc). It opens up on the "partitions" tab, which it can't figure out because we have no hybrid MBR, so it bombs out. The system tray icon still runs, and you can tweak some of the behavior via registry if you're thus inclined. At the end of the day: Steam works. So do all games I tried to date (Metro 2033, Borderlands, Portal 2...) 3DMark 2011 P5802 : Graphics Score: 7147, Physics Score: 3703 Combined Score: 3719 By contrast: A retina Macbook Pro 15 with a Kepler dGPU does P2275, and an alienware M18x does P5602. Mu-ha-ha. I would REALLY love to compare this rig in a benchmark that is HIGHLY influenced by PCIe constraints (such as the Dirt3min test Anand ran here: AnandTech.com - The Radeon HD 7970 Reprise: PCIe Bandwidth, Overclocking, & The State Of Anti-Aliasing) using [a] a 660Ti with 2GB, a 660Ti with 3GB, [c] a 680/690 (at, say, 1080p and 2560x1600 res) and [d] Same 680/690 with 4GB. This would show: 1. Whether having more GPU RAM results in meaningfully more on-card caching (both at the 660-level cards and 680 or 690 level cards), less need to shuttle textures over limited thunerbolt bandwidth and ultimately a meaningful performance increase. 2. Whether there's any point in putting a high-end GPU on this rig. I don't have the required GPU's, but if anyone is in the Melbourne, Australia area and has one he can lend for the sake of this experiment, shoot me a private message and we'll try. My kit: Macbook Air 2012: Dual-channel thunderbolt (Intel DSL3510L Cactus Ridge controller, details here), supposedly 2x10Gbit/direction (no more than 10Gbit/direction/GPU), 8GB RAM, 512GB SSD, CPU: Intel Core i7-3667U @ 2.00GHz/3.2GHz turbo'd (...always wanted to run a gamebox on a ULV 14Watt part ) Thunderbolt to PCIe: Sonnet Echo Express Pro (dual-channel thunderbolt, 2x10Gbit/direction, 1 thunderbolt channel->four PCIe 2.0 lanes) GPU: Galaxy GTX660ti 3GB Power supply: FSP X5, external to the Sonnet enclosure. (It's a 5.25'' 450Watt booster PSU). I'm too lazy to pull enough 12V rails from the Sonnet's built-in 150W PSU to drive the card (and I don't want to accidentally fry it, it is an $800 part), so I'm feeding the GPU's power from an external $80 source. Summary: to quote a vending machine, and referring directly to the number of PCIe lanes used... "FOUR HUNDRED PERCENT MORE AWESOME". Next stuff on the agenda to test: 1. I will re-install something similar on a macbook air 2011, which only has one thunderbolt channel (an a 1.8GHz i7). I want to see the GPU performance difference between the two... and confirm if indeed the Sonnet is putting its four PCIe 2.0 lanes on one 10Gbit thunderbolt channel or teaming both thunderbolt channels to achieve this. 2. Lucid Virtu doesn't from Lucid's website doesn't install on Windows 8. However, there is a newer version on ASRock's website, and you can grab it from here: LucidLogix VIRTU 2.1.220 64-bit.rar I want to try and install that, and see if I can get some mileage out of the GMA as well. 3. Optimus. The reason Optimus is interesting is the use of the internal monitor (meh.. it's 11''), and the compression it puts on PCIe (now THAT can be interesting). People say that it turns on when the nVidia driver shows you both GPUs in the drop-down. Mine does that. People also say it only enables when you have one PCIe 1.0 lane, and disables when you have more. I have a sneaky suspicion that compressing GIGABYTES of data in realtime - that's eight times what a single PCIe 1.0 lane carries - requires more oomph than the nVidia card has at its disposal, and the absence of said oomph is the reason it's disabled. Just a suspicion. That said, if this can be forced on somehow, I'd love to try. I haven't found any way of doing this, so this is just a background thought, not an active course of investigation I'm running with.

 2 points
 -
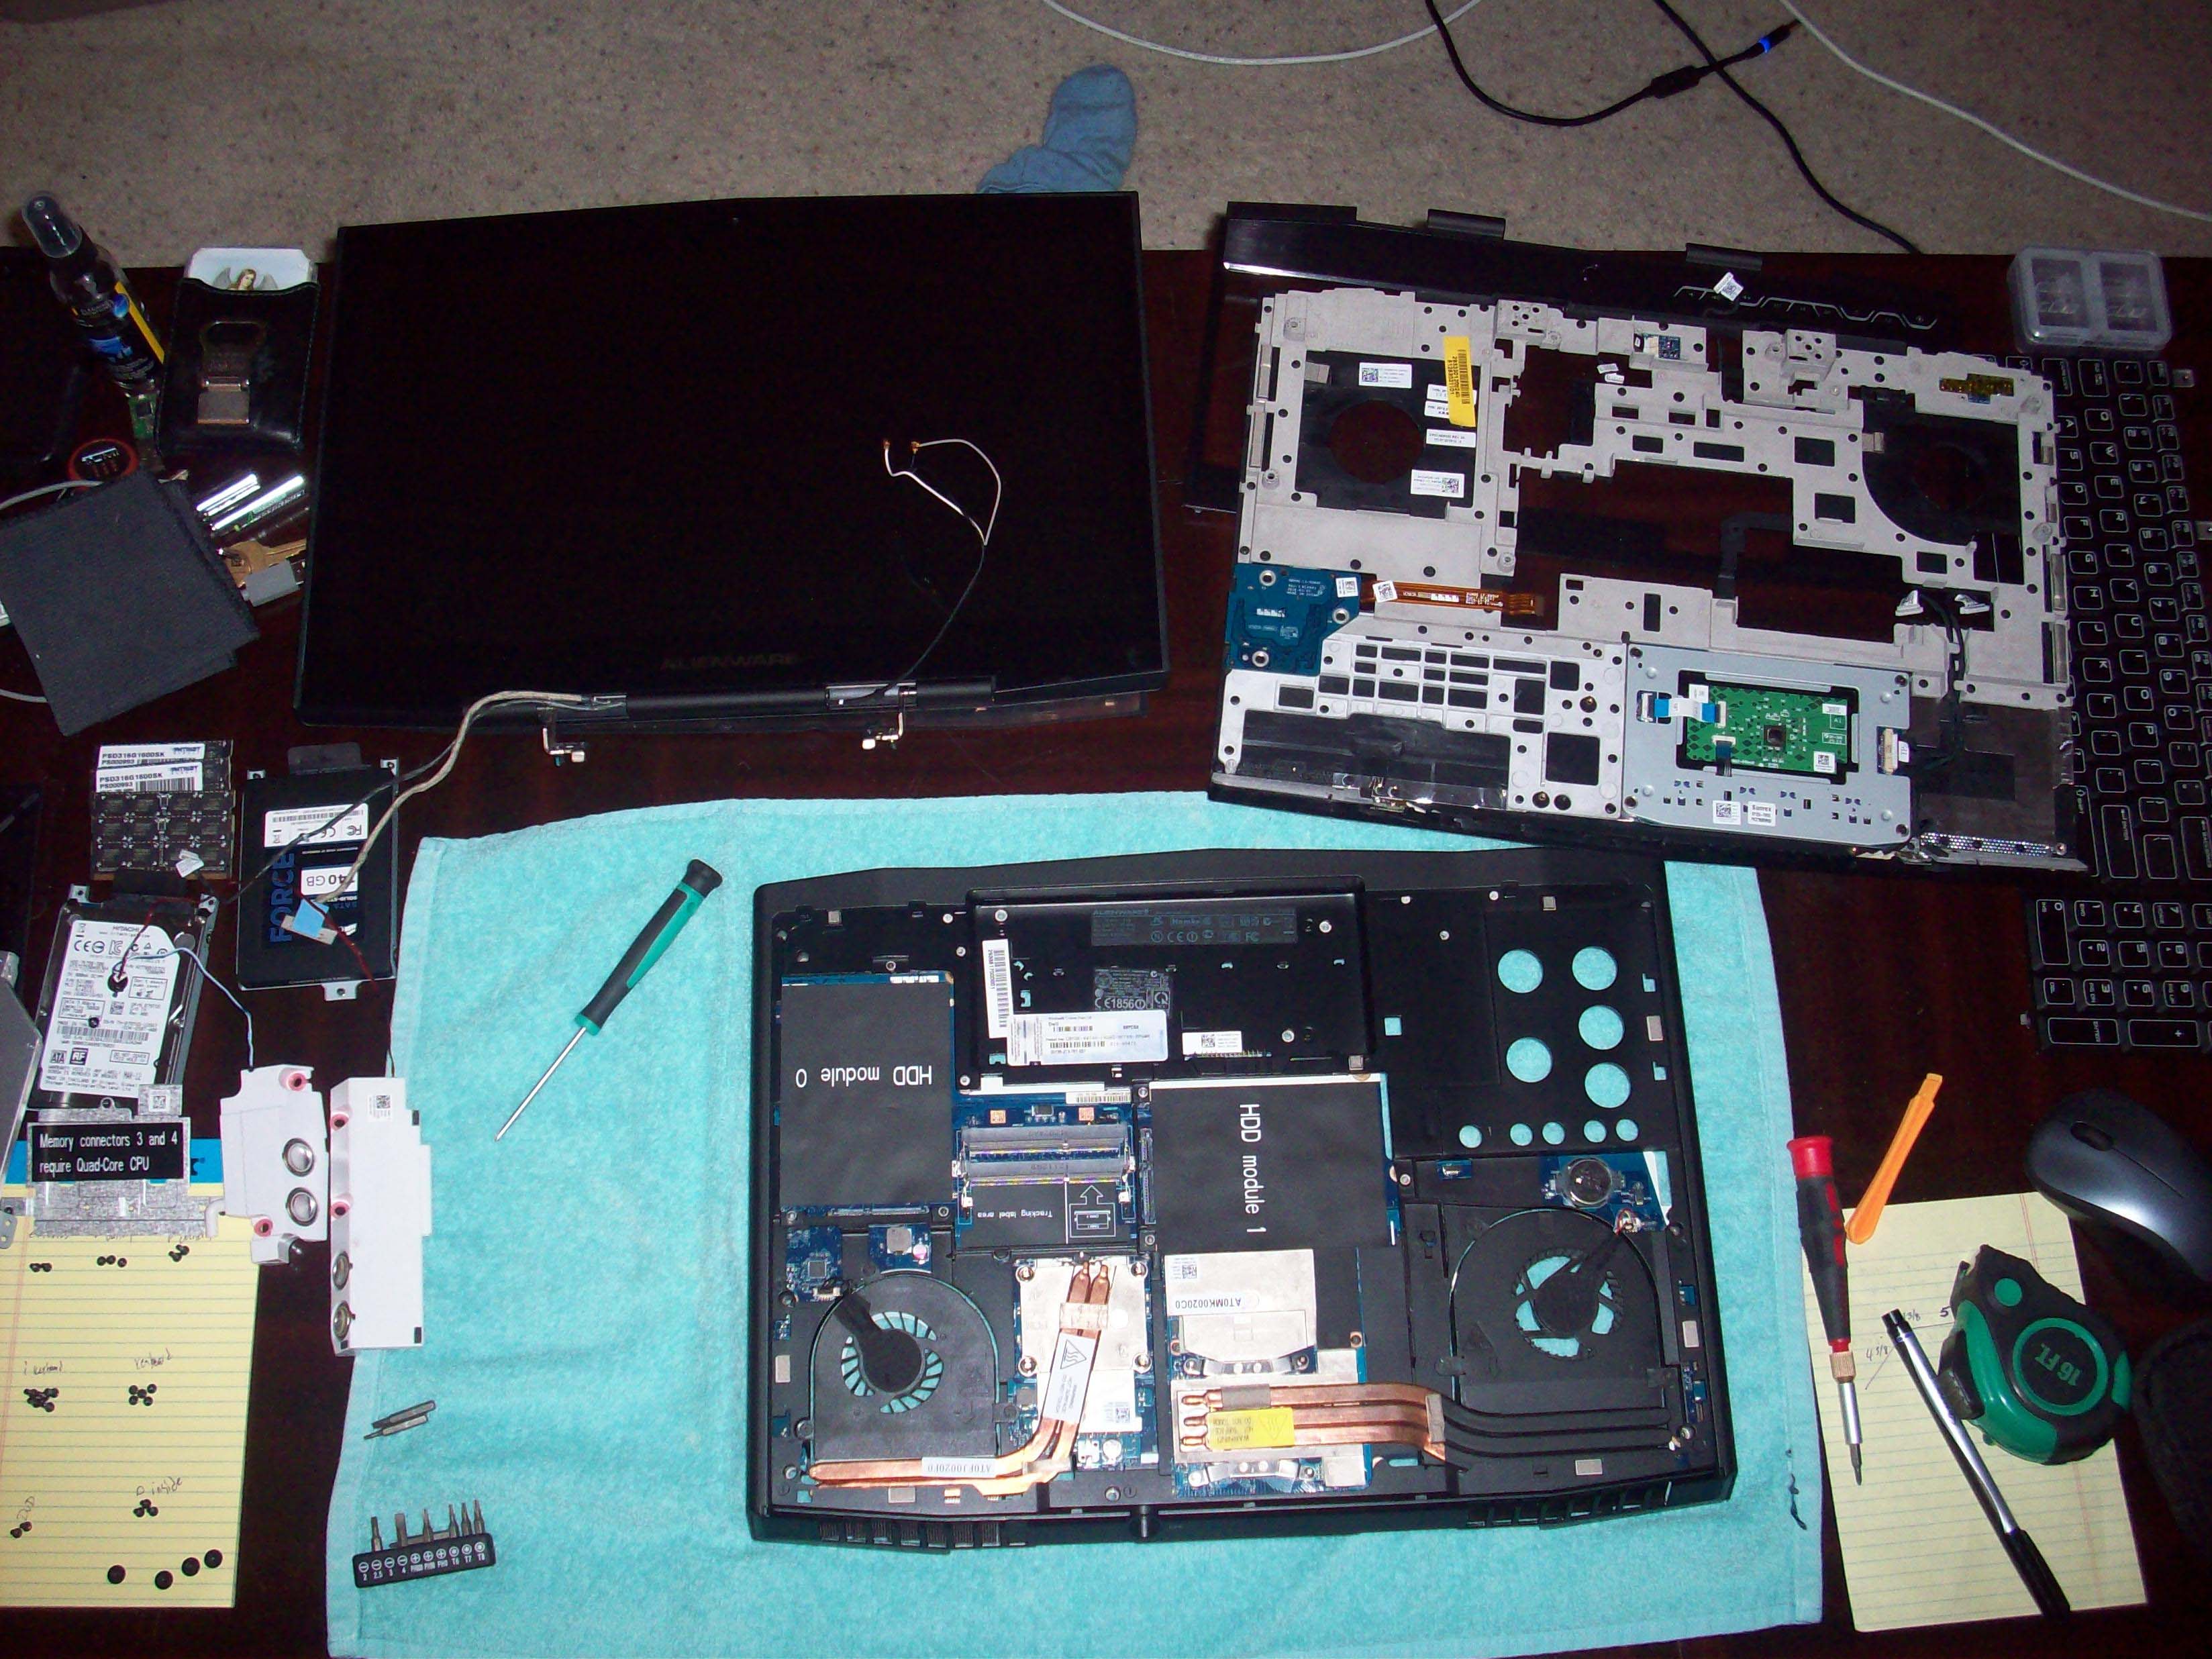
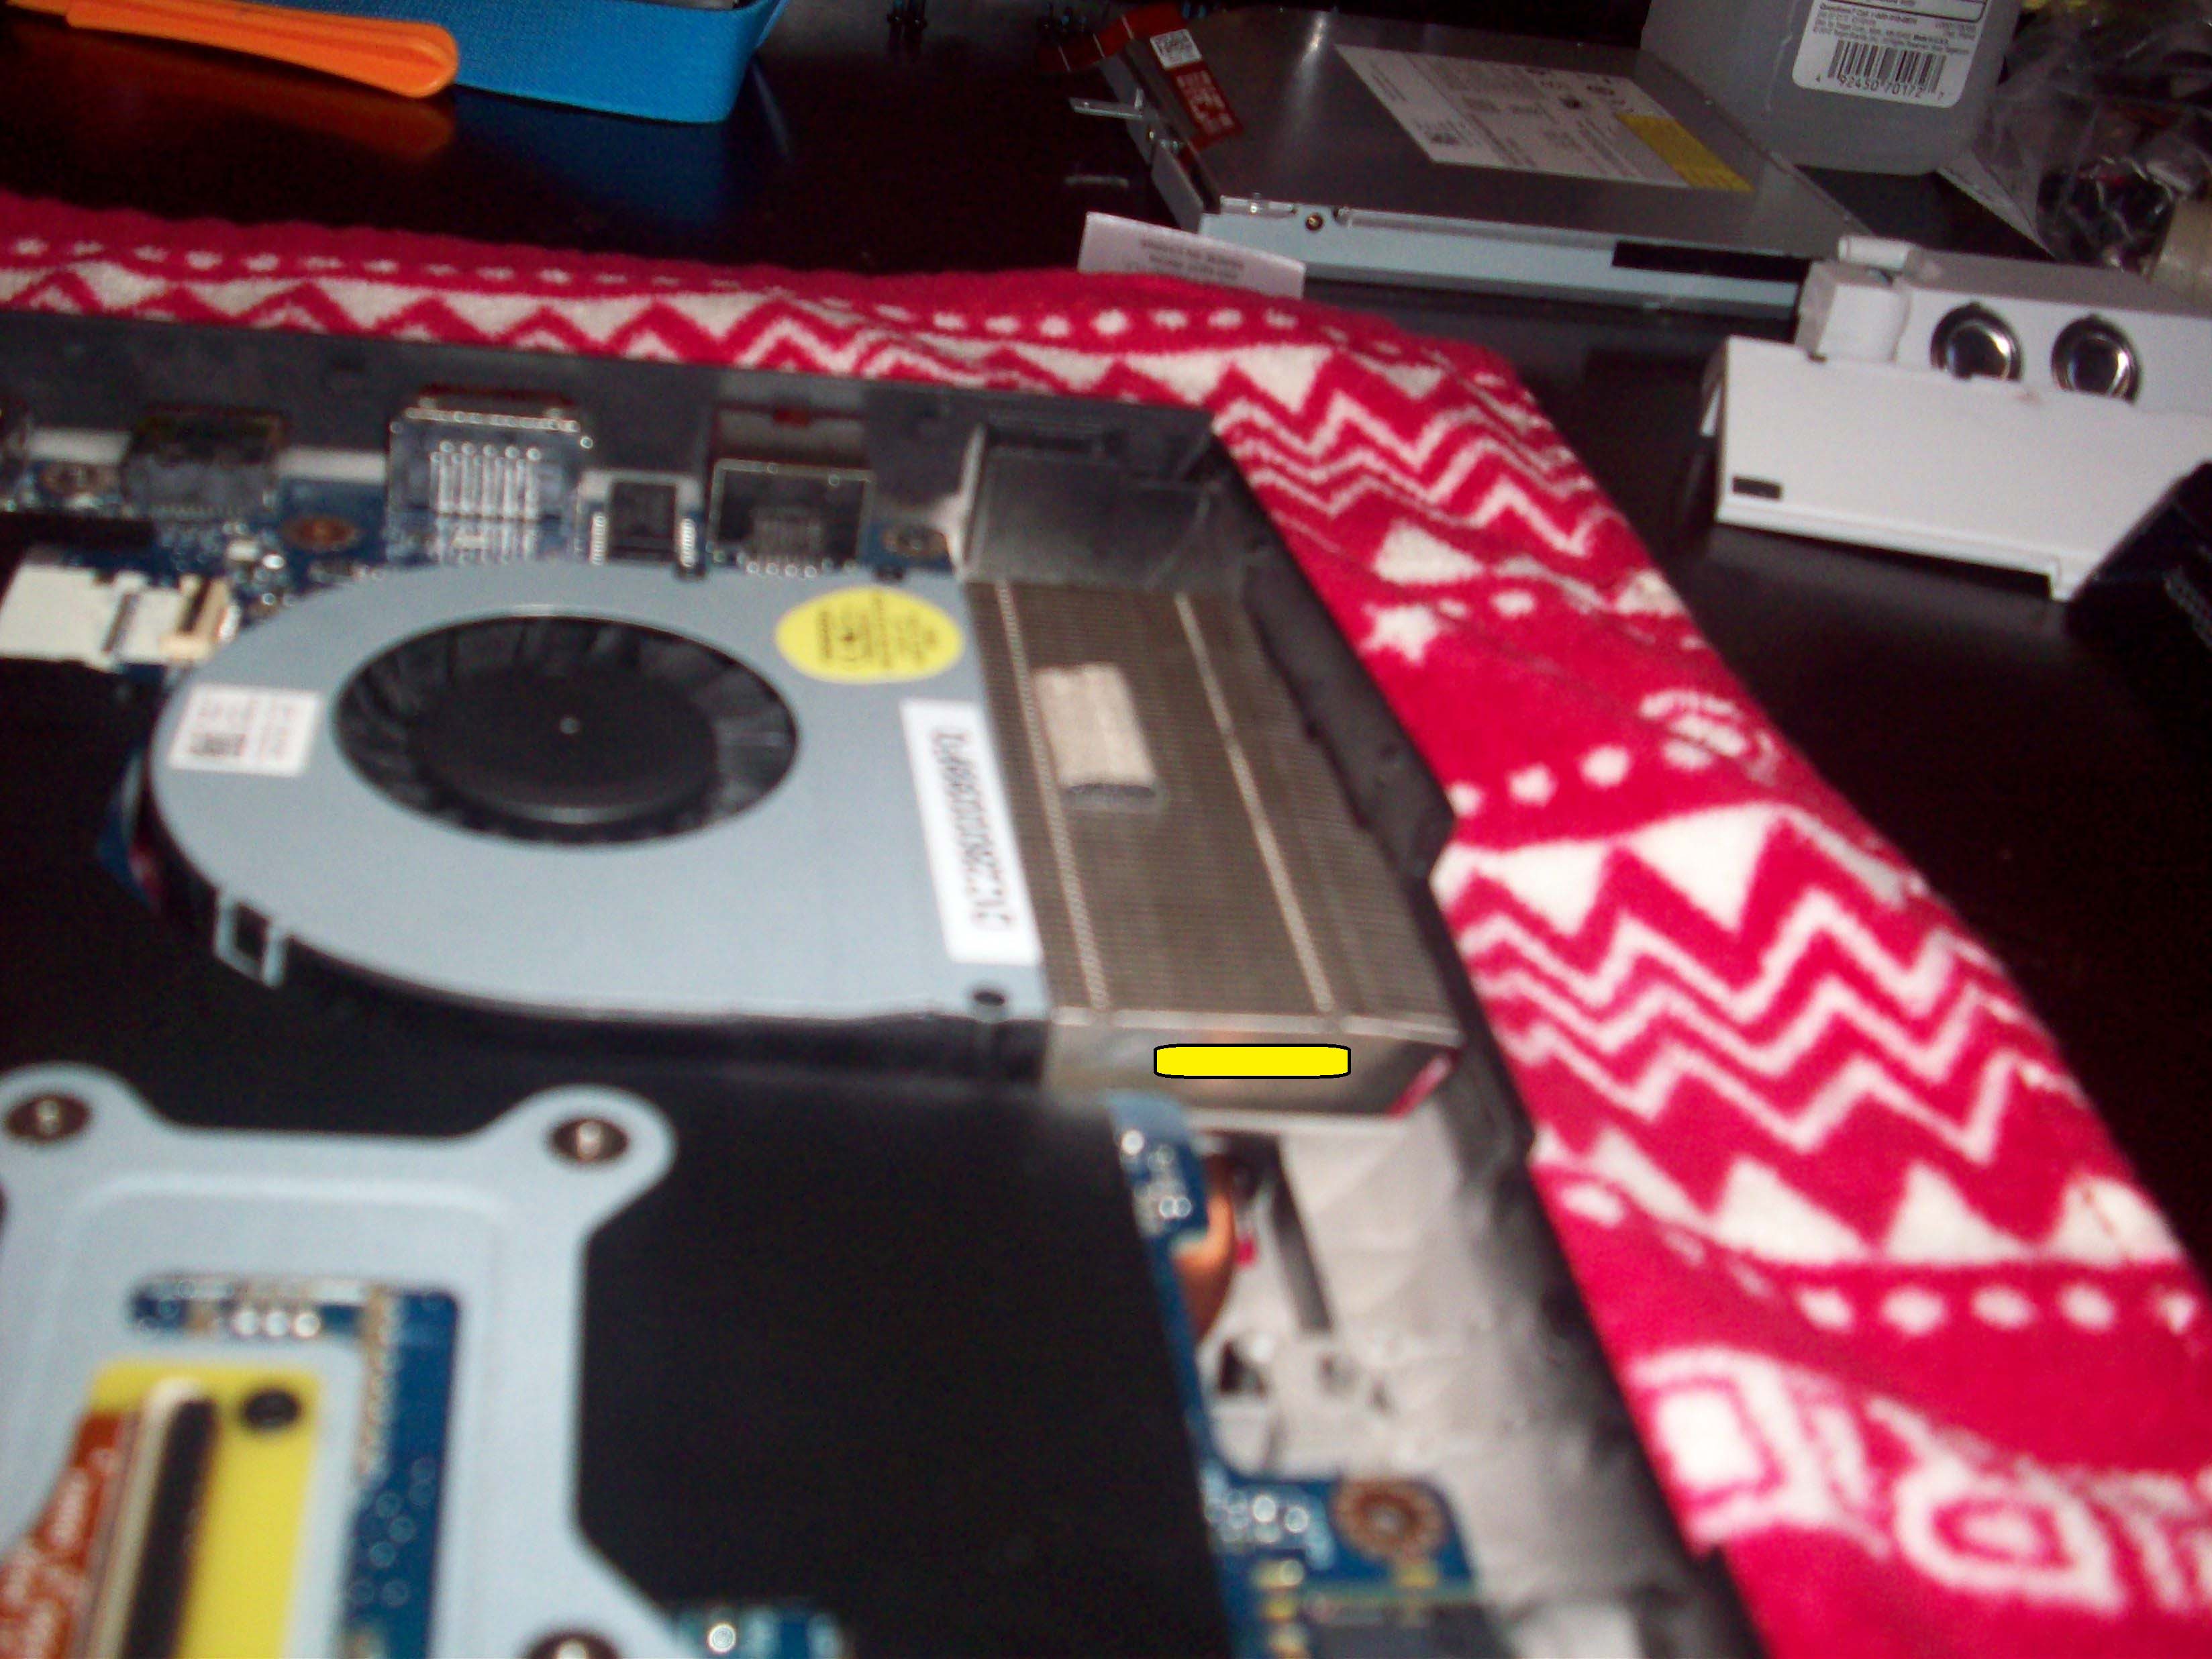
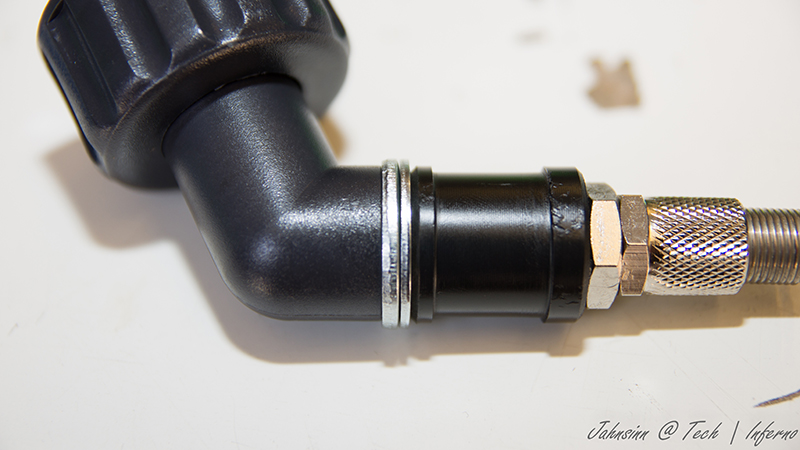
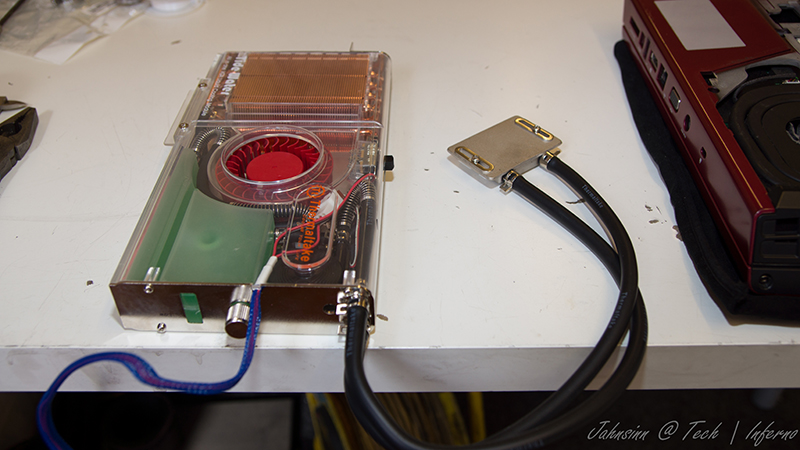
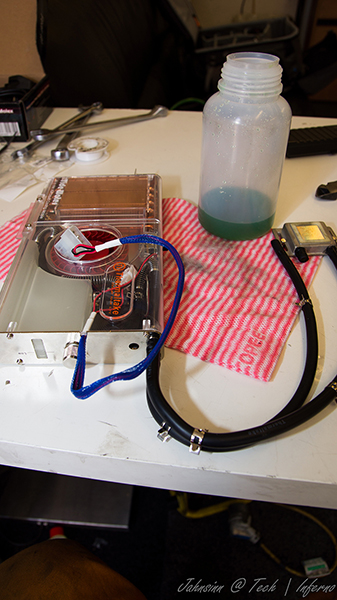
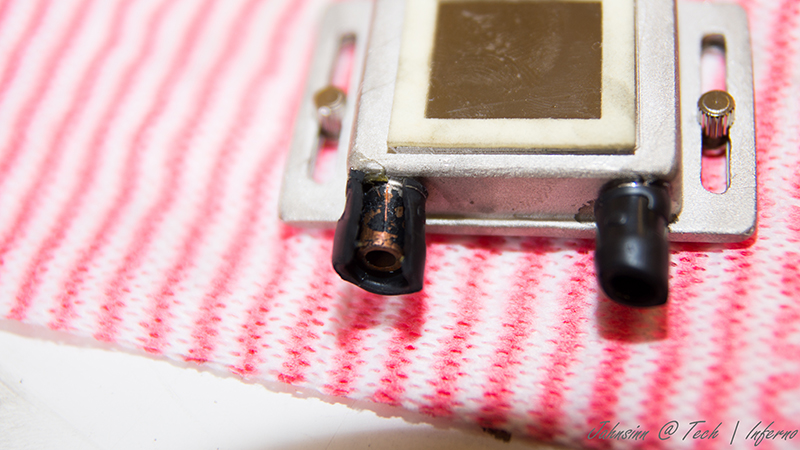
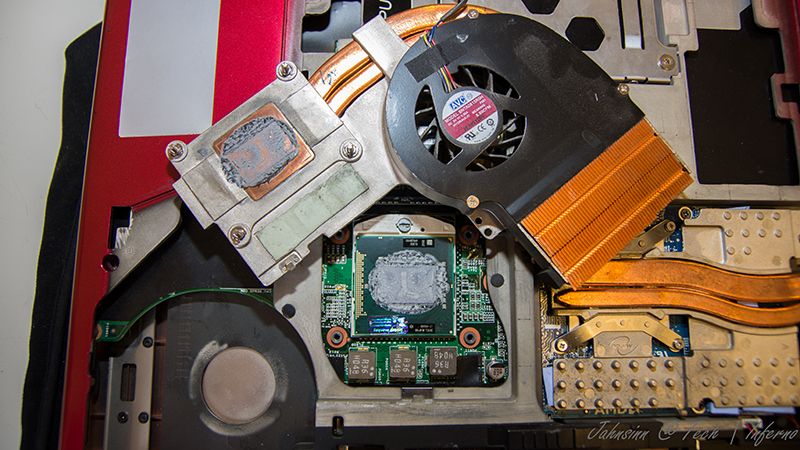
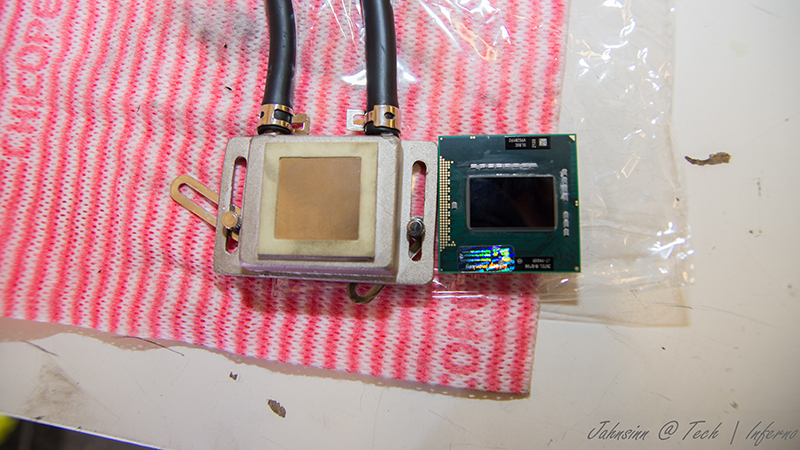
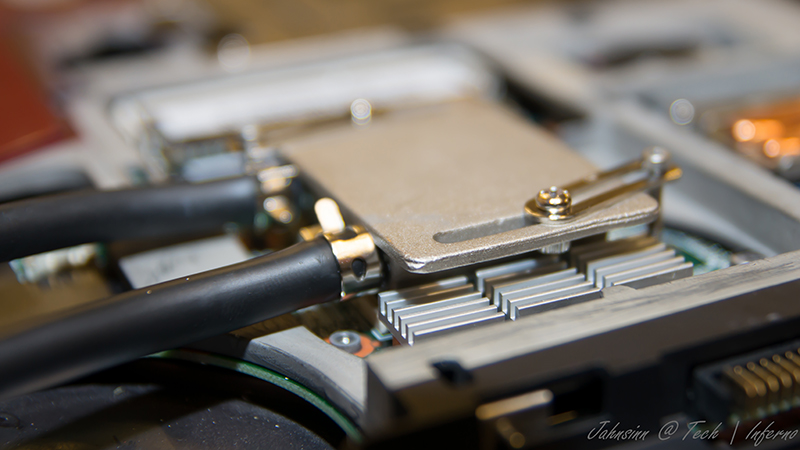
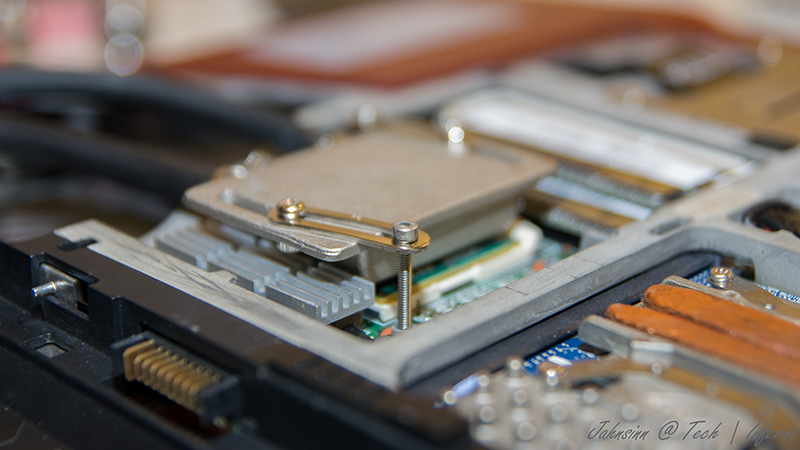
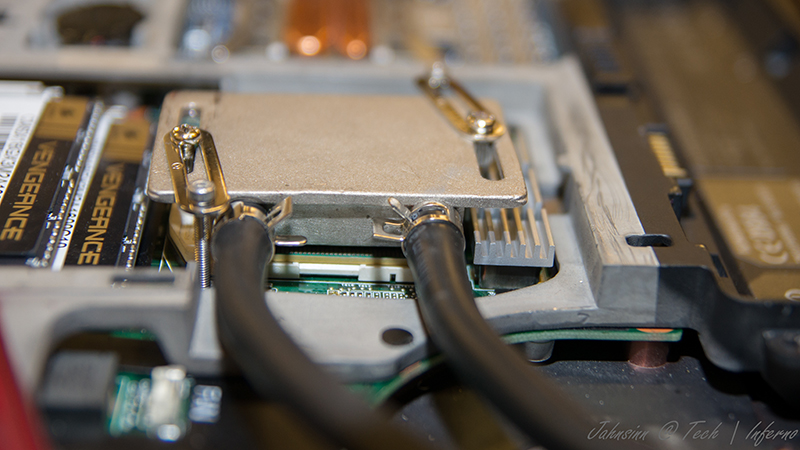
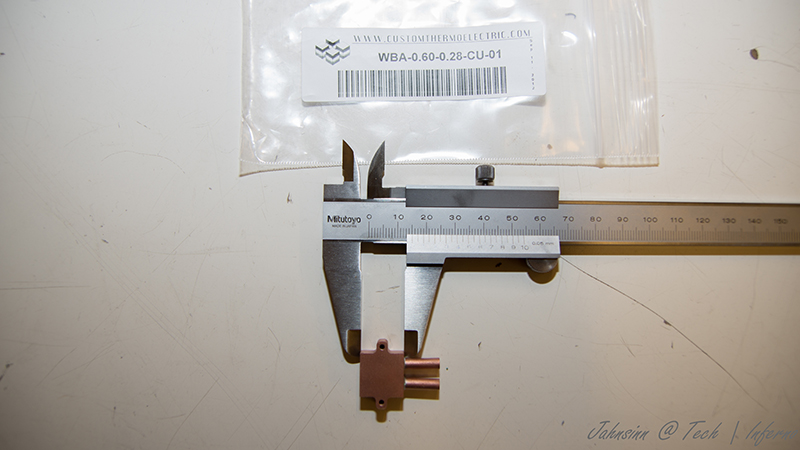
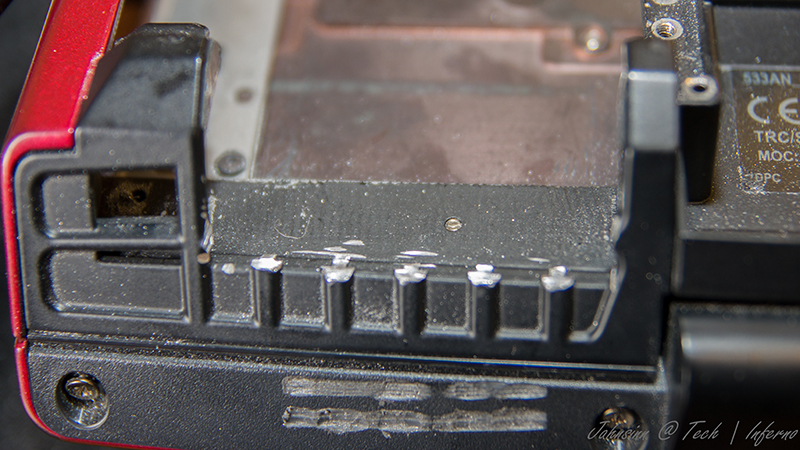
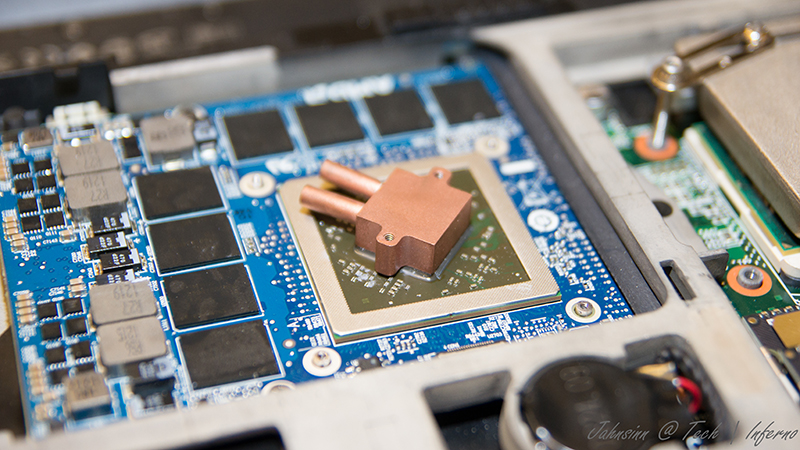
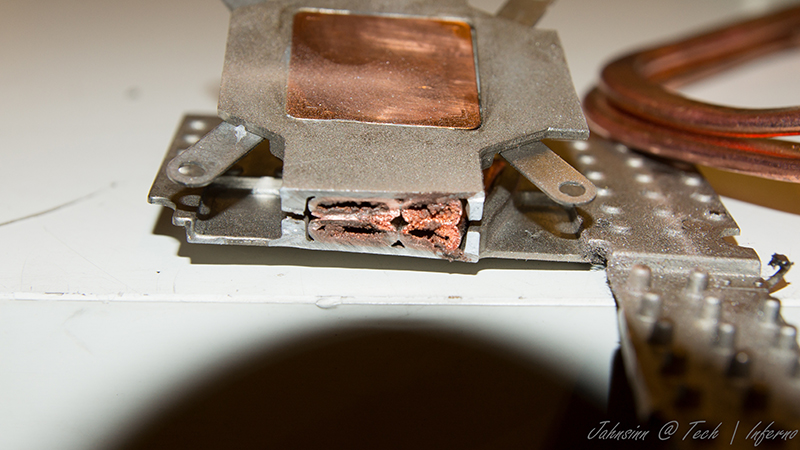
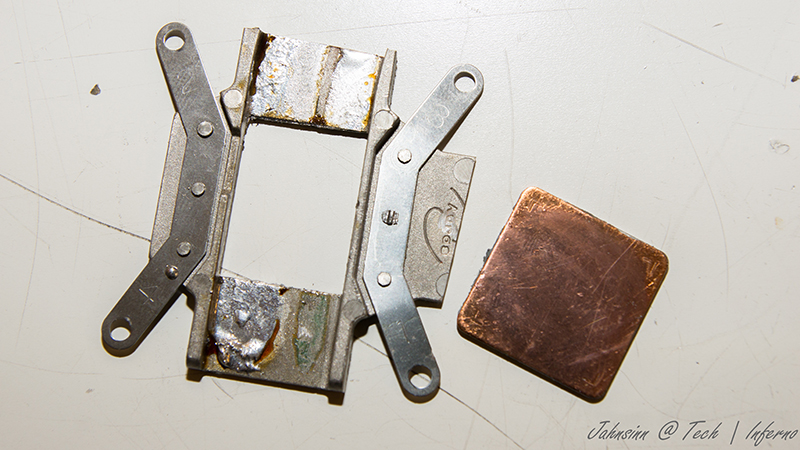
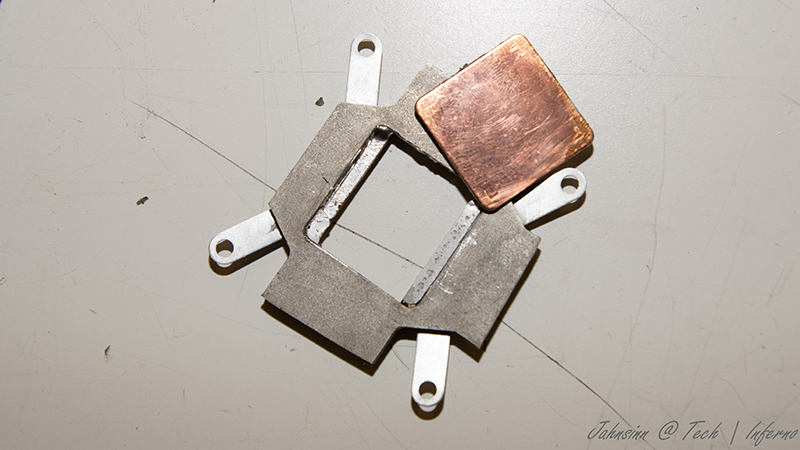
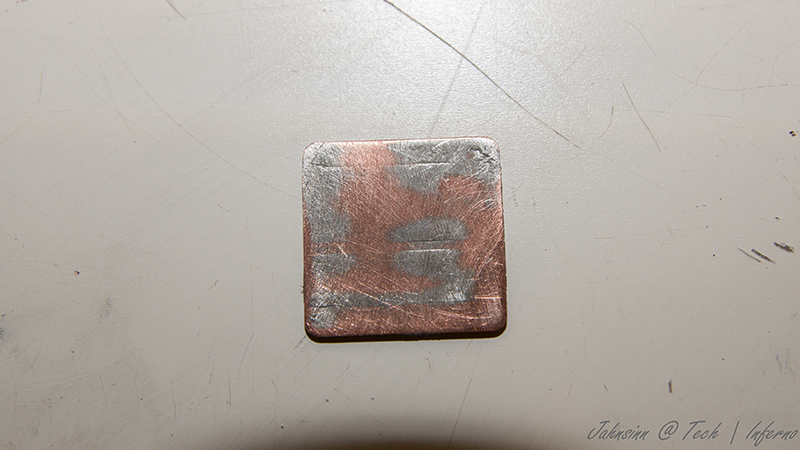
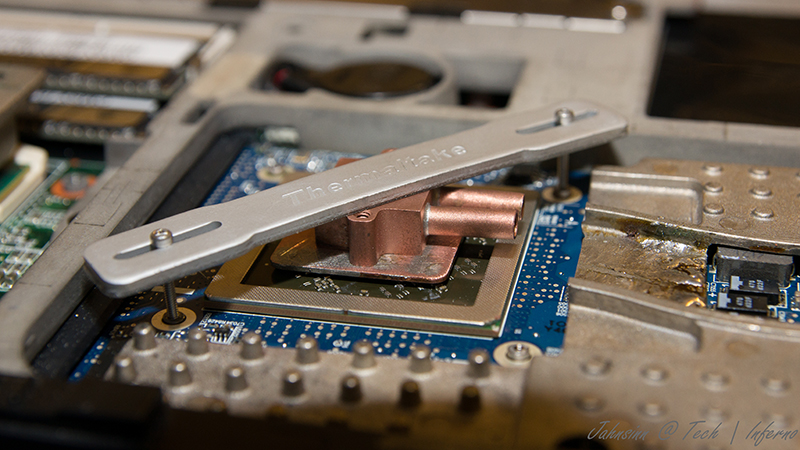
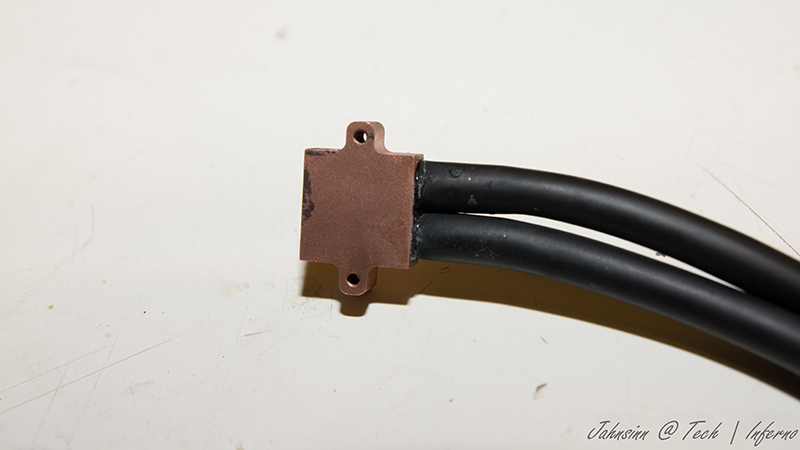
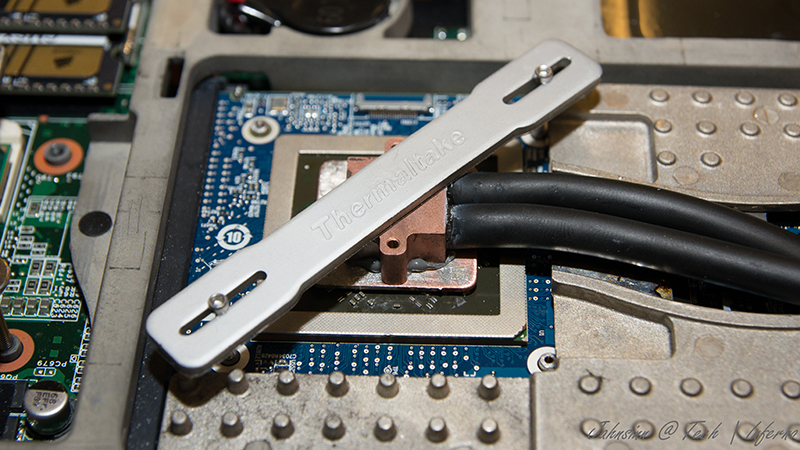
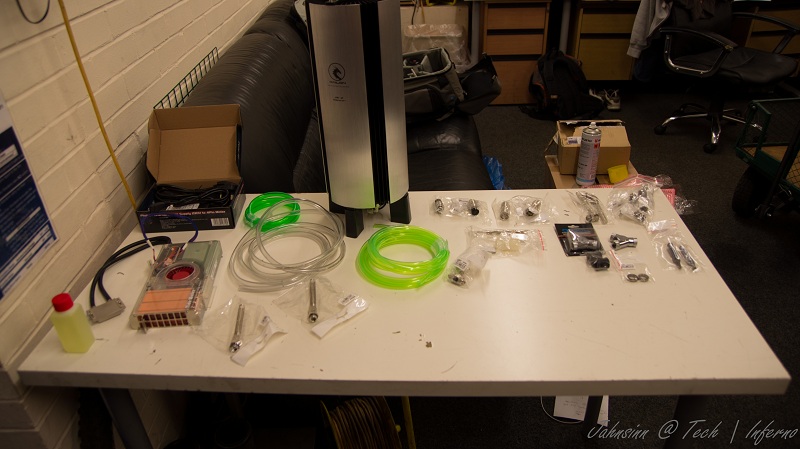
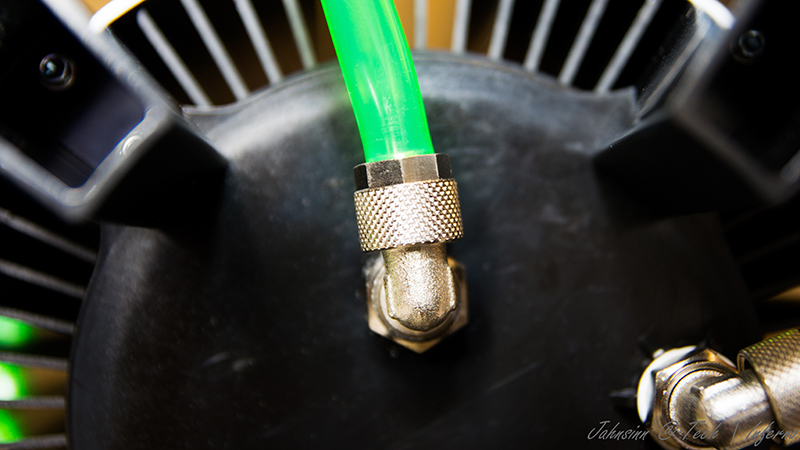
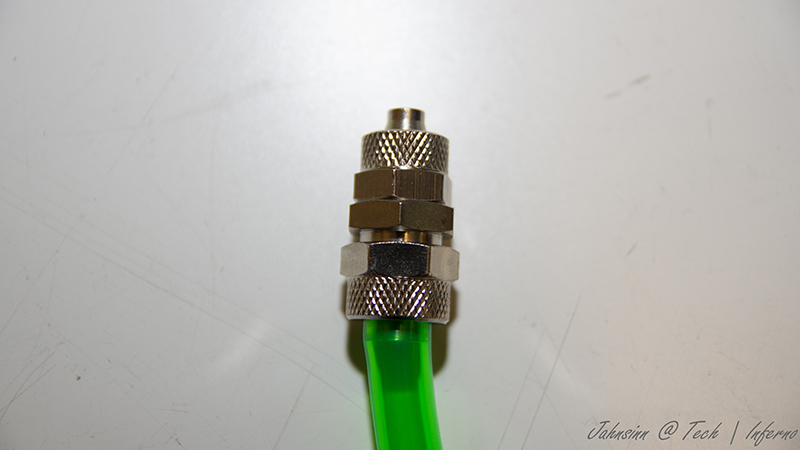
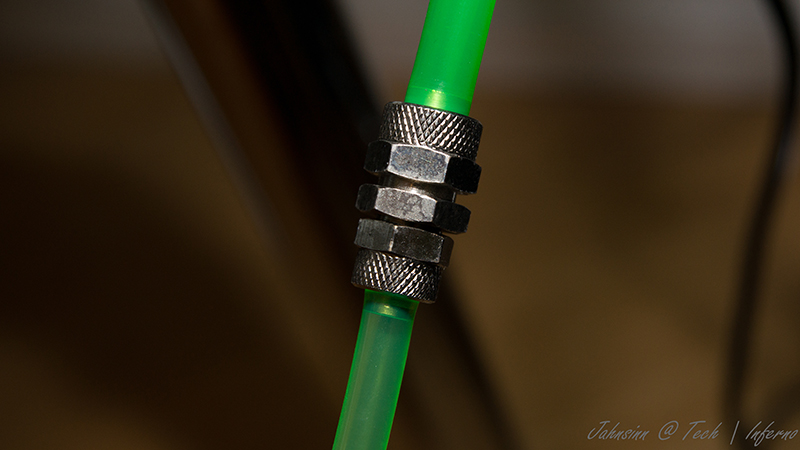
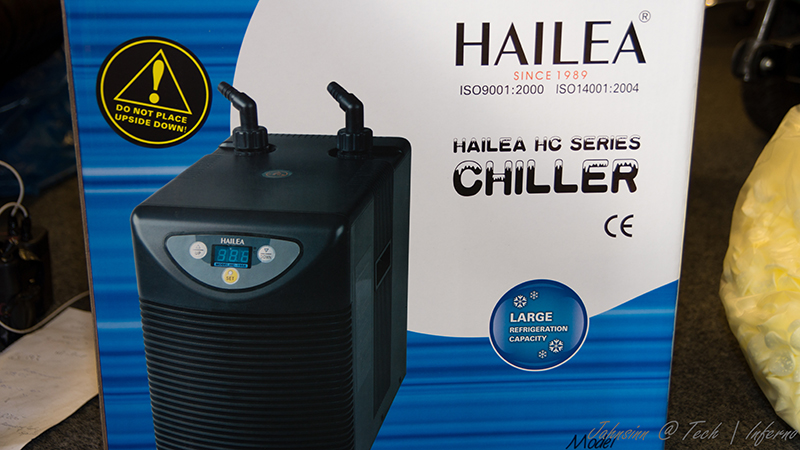
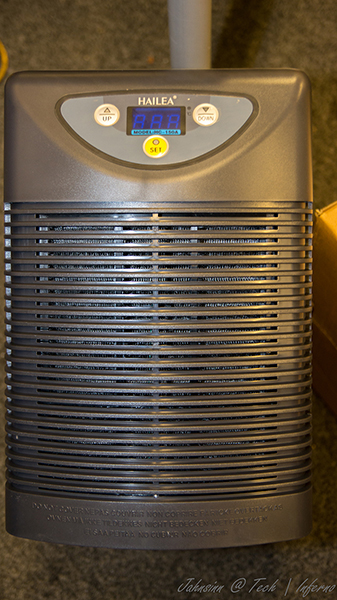
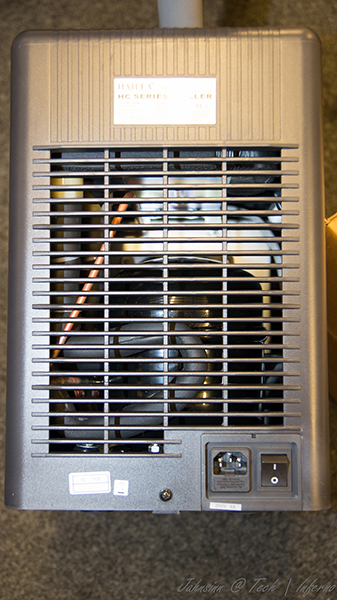
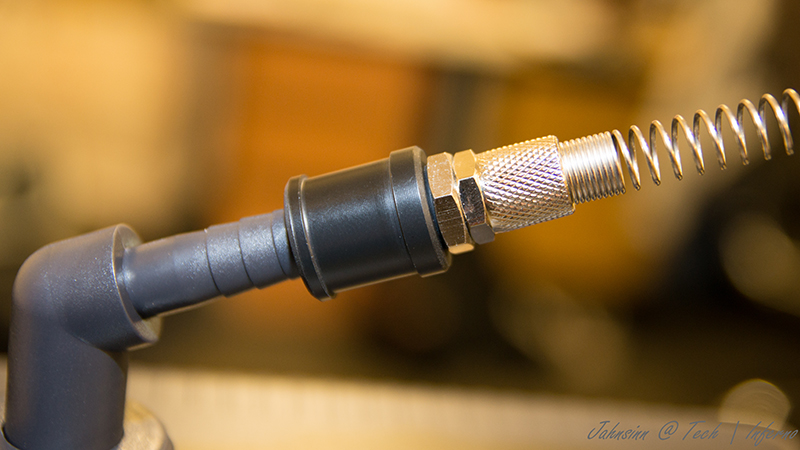
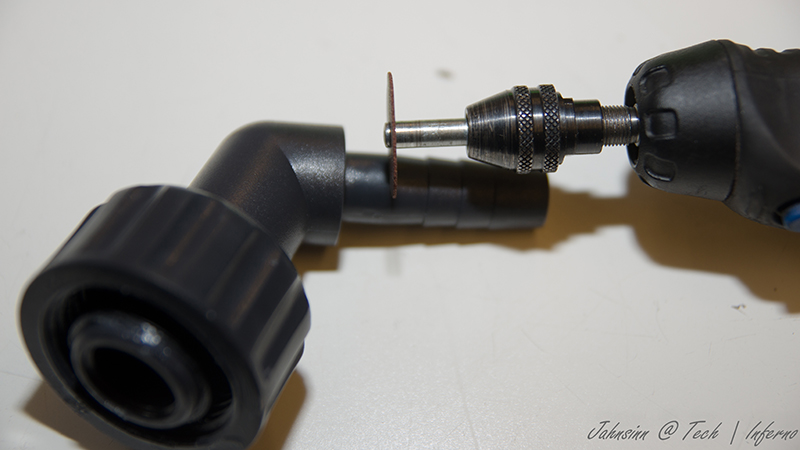
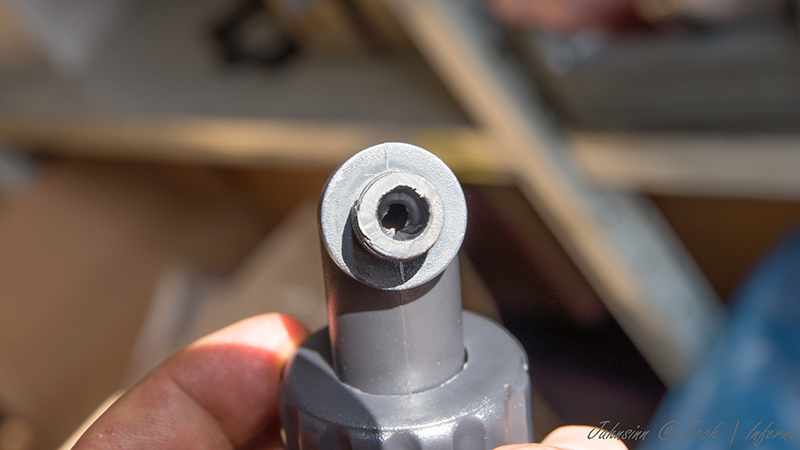
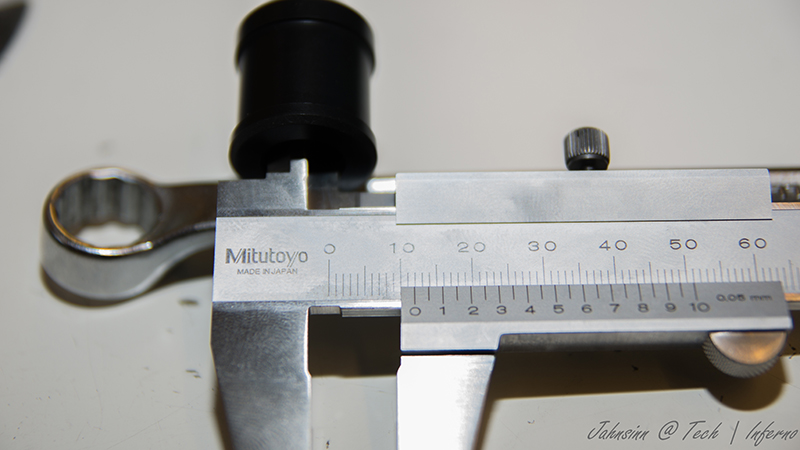
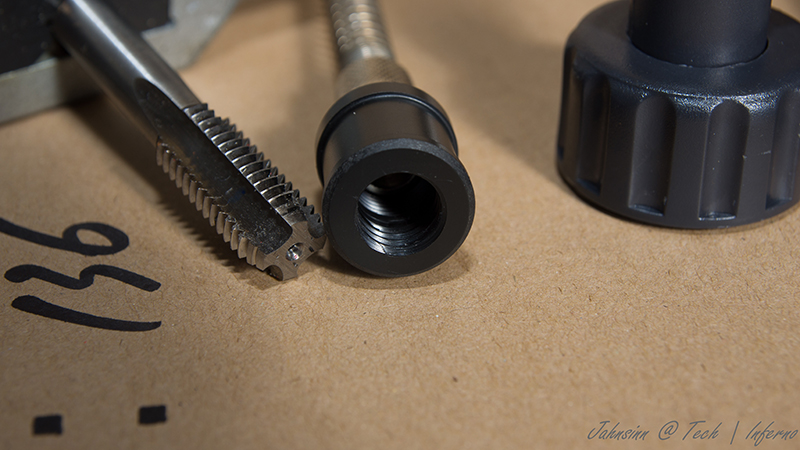
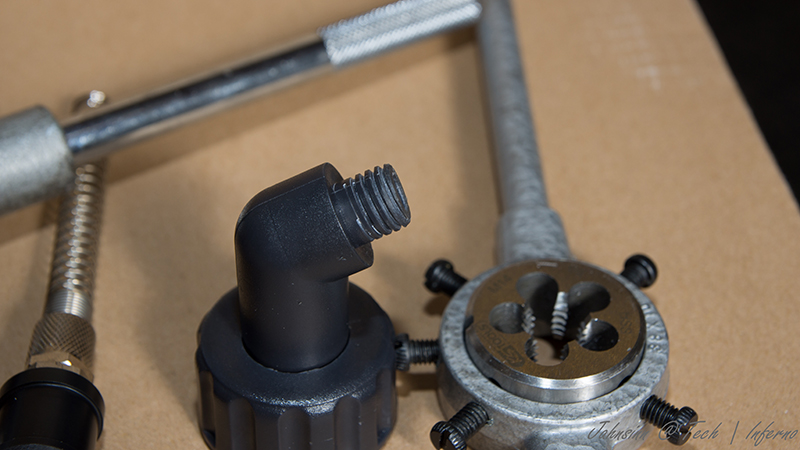
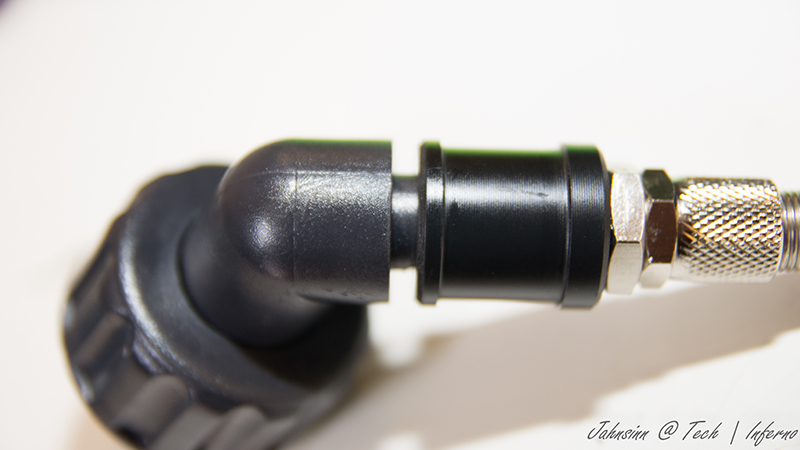
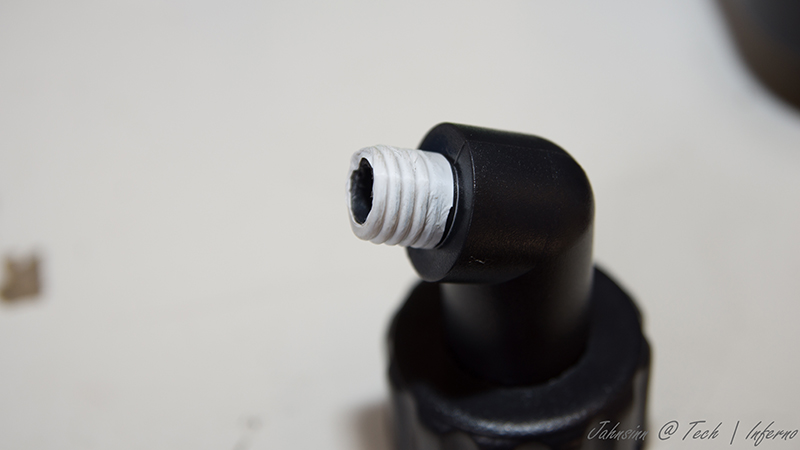
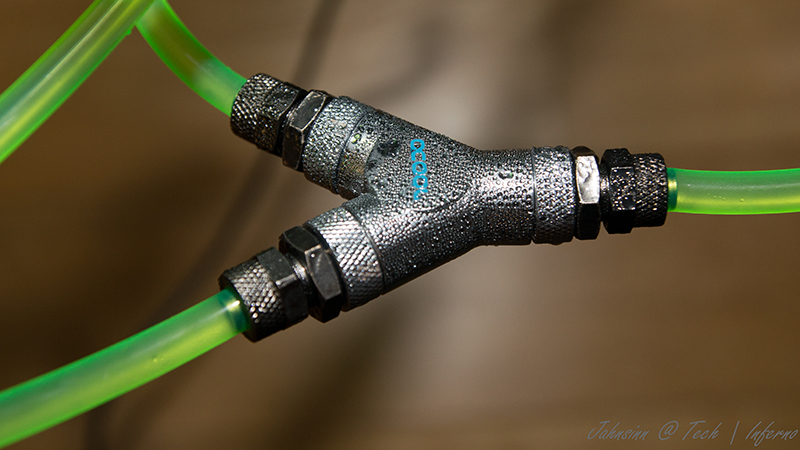
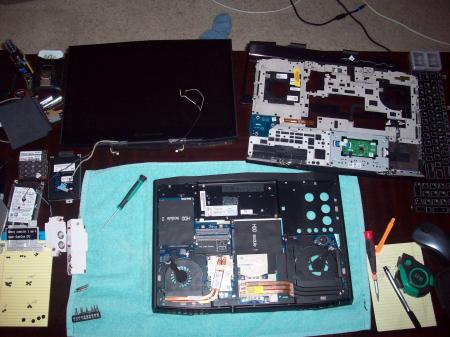
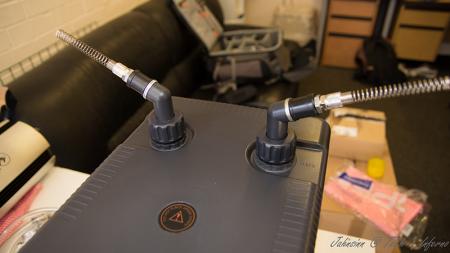
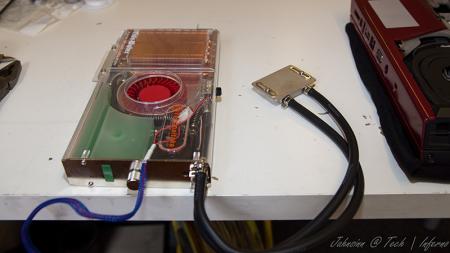
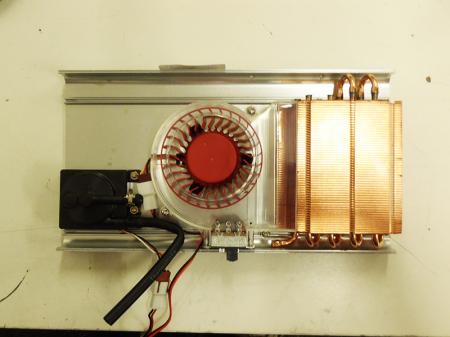
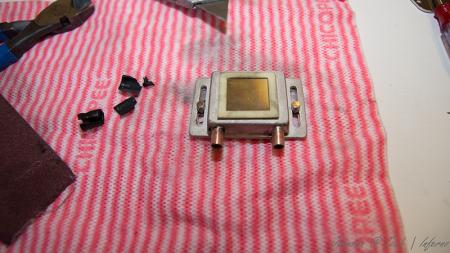
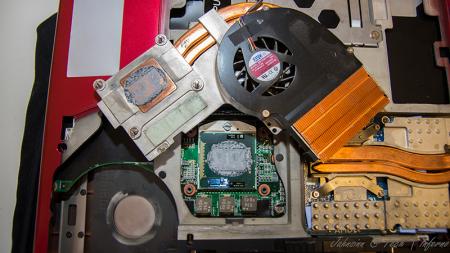
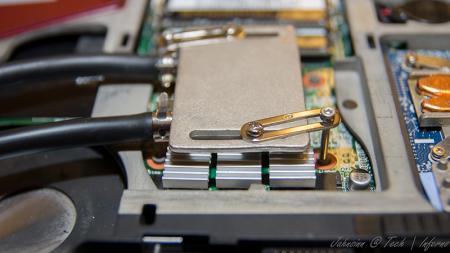
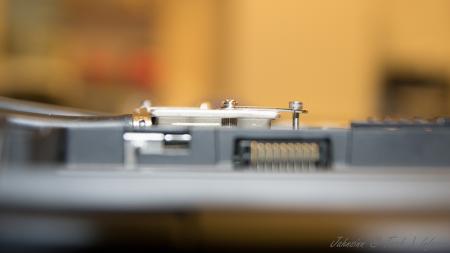
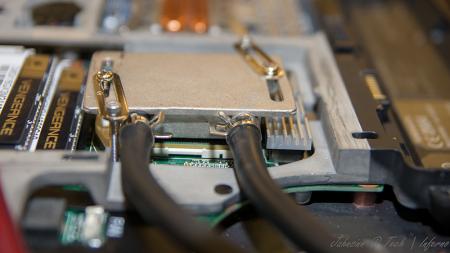
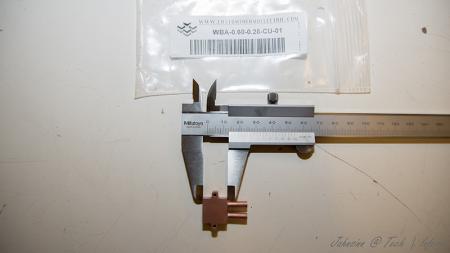
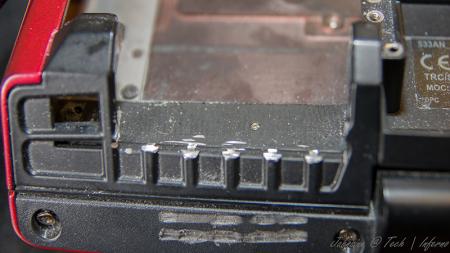
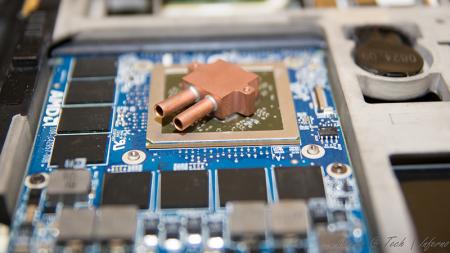
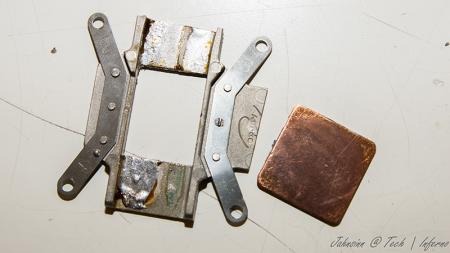
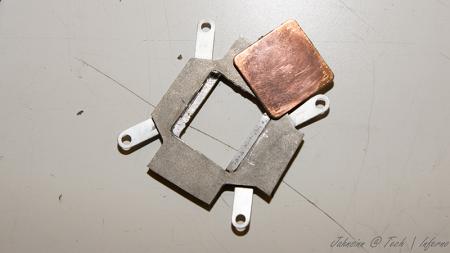
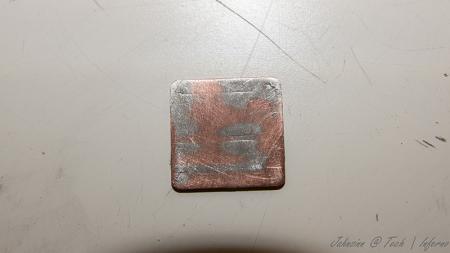
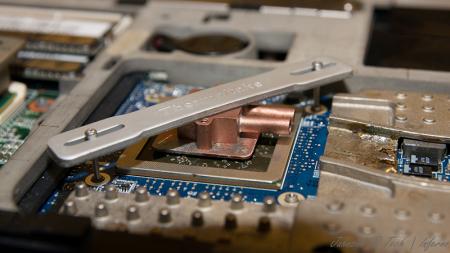
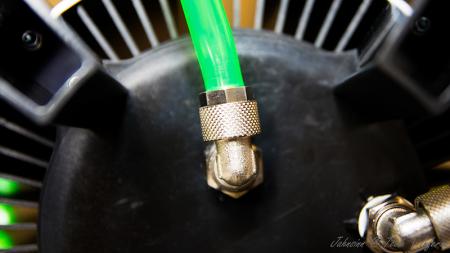
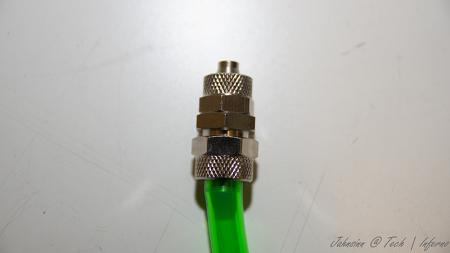
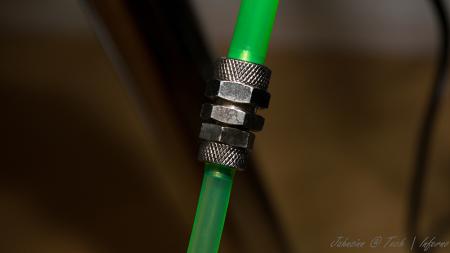
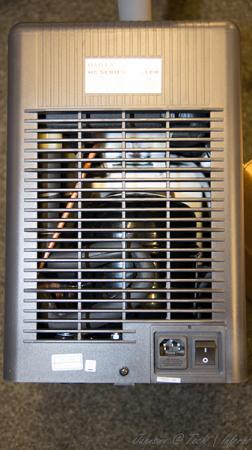
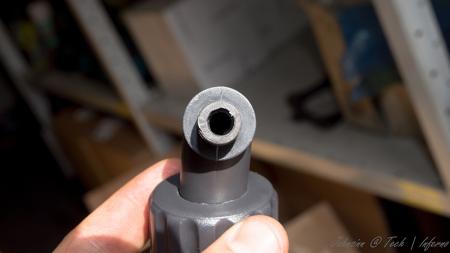
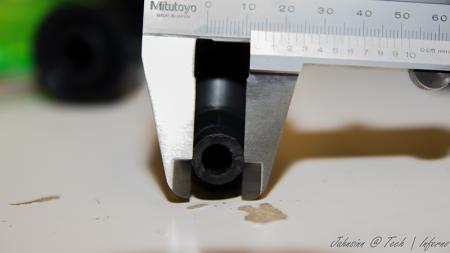
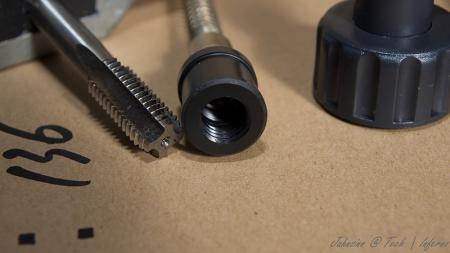
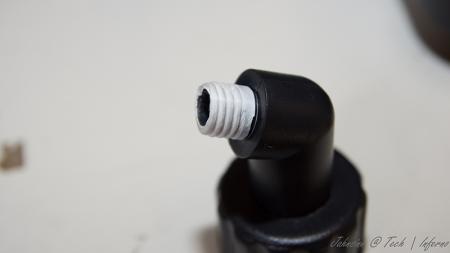
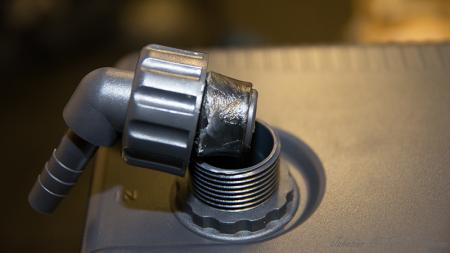
First of all, let me say I haven't finished yet. I'm still working on it and will update this thread from time to time due to much work at the moment. When I fitted my 940xm and the 7970m I got really mad of the heat and the fan noises even in idle mode. So I decided to get it all cooled with a silent, most important quiet, external water cooling system. I checked the internet and found evth I need to get it done. The most difficult thing was to find slim water blocks to cover the dies. I will list all the parts I used with article number and website if you're interested at the end of this post. First the overview. These parts are going to be used: Actually not much, so let's start. I start tubing at the inner hose socket of the reserator. This is the place where the pump is placed behind. You have to use a 10/8mm hose. By this, 10mm means the outside diameter of the hose, 8mm means the inside diameter. This is very important to know by everything you do on water cooling systems due to different fittings, barbs or reducers. Fit the hose and tighten it well with a spanner. Now you need a reducer to get on a 8/6mm hose. This is necessary to get in fitted to the chiller. At the other end you need to fit the 8/6mm hose. After this is done the 8/6mm hose leads into the chiller. A chiller pushs down your temps to a predefined value set by you, the minimum you can get theoretically is +3°C. Basically you can say it works like a refrigerator. This is very helpfully when you start gaming or other intense work on the laptop to keep the temps low. Here are some pics of it. To get the hose fitted the first custom made had to be done. Maybe I didn't know how it actually works, but I had no clue how else to do it without a modification... As you can see on the picture, the 1/4" adapter didn't fit to the chiller's nozzle. I really don't know what's the original idea by the developers. So the first adjustment had to be made. Cut the end of the nozzle as you can see on the pic. When this was done I noticed really pour casting quality inside the nozzle. This would massively reduce your flow speed. So I used a drill to get it out. Finally I got an outside diameter of 13mm at the nozzle. The adapter has 12mm inside diameter So just perfect to cut a M14 thread to both parts. Unfortunately I couldn't get closer due to the layout of the die. two washers solve this problem to get it proper tightened. To get it proper sealed I used teflon tape. Just the best way to get something sealed. Don't do it without any sealing! Use some Vaseline before you stick in the nozzles. Do the same with second side of course. At the end it'll look like that. Let's get to the CPU water block. I purchased the Thermaltake CL-W0052 Tide Water, originally made for desktop PCs to cool down the graphics card, on ebay to get all the stuff I'll need to do it. I chose that one because the water block has just a height of 8mm. Also all the hoses and clamps will be helpful. First drain the coolant. Then I opened the chassis and robbed all hoses and clamps. You'll need them in a couple of minutes. They're all bonded quite well, so just cut them at the ends. I also cut and removed the hoses of the water block itself, just to make sure everything is okay. I didn't want to get upset when I filled the system with water. So I cut them and removed the old adhesive. I then removed the original cpu heatsink and compared the die with the water block The water block as it was out from the box was just a touch too small to fit correctly onto the die. So I just removed the tape around the block. Now it was ready to get fitted. All I needed to do was loosing the existing bolts on the water block and tightened it with M2.5x20 hex nut bolts into the existing holes. At the end it looks like that. By the way, the mosfet heatsinks came with the tide water vga cooler. I also fitted the black hoses as they were, just without the glew and it still seals perfectly. To get the hoses guided out of the laptop you need to remove your fan control at the back of your laptop. When you're doing this, be careful not to touch the chassis as I did with whatever you use. I used the dremel and didn't see it for a while. What a shame! Nevermind, so let's get over to the gpu side. I bought a very tiny water block with just 15x15x7mm dimensions to not to exceed the height. So may be later I will be able to fit the backplate cover again. The water blocks would actually fit on the die, perfectly. But due to the layout of the gpu die the block just fits in diagonal postion. So useless for me. To get the water block in the right direction I unsoldered the copper plate of the original heatsink. That one has got the right dimensions to get this solved. Clean the copper plate from the old tin on top by using the Dremel or sandpaper. At the end that's the way it should work. Just to mention, also the holder came with Thermaltake tide water cooler. The bolts I bought seperatly on ebay. They are M1.6x20 but too long, so I cut them down to 15mm. Now they fit into the existing holes and push down the block properly Use now the -->small<-- black hoses robbed from Thermaltake chassis. These are the inside hoses, they're smaller. You need to use some adhesive because the clamps coming with the hoses are just a way too big and don't keep it tight to nozzle. Now just add some thermal paste between copper plate and die, and copper plate and water block. Tighten it all down. Finally it looks like that. [ATTACH=CONFIG]5105[/ATTACH] hoses leaded through the fan grill, gpu side. I mention again, just temporarily cause I'm still waiting for parts. in progress... [ATTACH=CONFIG]5107[/ATTACH] [ATTACH=CONFIG]5106[/ATTACH] cpu side [ATTACH=CONFIG]5108[/ATTACH][ATTACH=CONFIG]5109[/ATTACH] The hose laying is actually just in common sense. Nothing particular I should mention. Reserator -> 10/8mm hose -> 10/8mm to 8/6mm reducer -> 1/4" compression fitting -> 1/4" adapter for chiller -> chiller nozzle -> chiller -> nozzle, adapter, fitting -> 8/6mm hose -> Y-splitter first end hose -> 8/6mm hose -> quick coupling -> black hose (termaltake tide water) -> cpu block inlet-> cpu outlet -> black hose -> quick coupling -> 8/6mm -> Y-splitter second end hose -> 8/6mm hose -> 6mm barb -> small black hose (thermaltake tide water) -> gpu block inlet -> gpu outlet -> small black hose -> 6mm barb -> 8/6mm hose -> Y-splitter | Y-splitter -> 8/6mm hose -> 10/8 to 8/6mm reducer -> reserator update in progress...


 1 point
 -
Modded Inf for GTX680 in PXXHM https://hotfile.com/dl/181592996/0039f98/nvcv.inf.html GeForce 310.64 Driver Highlights • Improves performance in Far Cry 3 by up to 38 percent1. • Plus, previously-released R310 optimizations: o Up to 26 percent faster performance in Call of Duty: Black Ops 2; o Up to 18 percent faster performance in Assassin’s Creed III; o Smooth, shimmer-free graphics with TXAA anti-aliasing in Call of Duty: Black Ops and Assassin’s Creed III; o Up to 16 percent in other top games likes Battlefield 3, The Elder Scrolls V: Skyrim and StarCraft II.1 point
-
hmm...When I look at this picture here and the pages 21 and 22 of the service manual, I would say the space is identical to the G73Jw. The graphics card also appears to be the same cripple, if you look at the form and layout. Probably you'll have to modify your heatsink or replace it, it's hard to say if the holes are in the right place. My personal conclusion: I guess it works, if a suitable heatsink is available.1 point
-
That sums up how I felt about PS2 when I played it during beta. The game just isn't that fun or interesting, BF3 is much better.1 point
-
Lol, even i get 40-60 fps maxed out when nothings happening and i have a bare bones M14x R1. The problems when the bullets start flying, tanks my FPS to like 20-30 and its not a smooth 20-30 either T_T IDK, im just not that motivated to play, it takes about 80 hours of actual gameplay to unlock 1 gun, assuming you dont buy upgrades in the meantime and it really doesnt feel like hundreds of people are playing per team. If you ask me it feels less populated than battlefield, and the weapons arent particularly cool, or challenging to use. IDK, I get about 5 times the fun for my time from something like Blacklight retribution. Not to mention that game looks and runs better X31 point
-
Well the fake colors look better in any case. But yeah, the game feels like beta. I don't think they should have released it now. First impressions matter a lot.1 point
-
More stuff exclusive for T|I users, voltage mods: All the vbios listed here are attached at the end of the post. ******************************** Nvidia 800m series: Nvidia GTX 880m (8GB version only): 'OC edition' -> unlocked overclocking limits, voltage adjustable, power target adjustable, optimized performance at higher clocks Can be used for all current 880m (Clevo, MSI and Dell). Nvidia GTX 870m: 'OC edition' -> see above Nvidia GTX 860m (GK104 variant): 'OC edition' -> see above. Refer to the file name to know which version is suited for your system. NOTE: Only for the Kepler version of the 860m. Silly Nvidia started giving different GPUs the same name. ******************************** Nvidia 700m series: Nvidia GTX 780m: 'OC edition' -> unlocked overclocking limits, voltage adjustable, power target adjustable, optimized performance at higher clocks Can be used for all current 780m (Clevo, MSI and Dell). Nvidia GTX 770m: 'OC edition' -> see above Nvidia GTX 765m: 'OC edition' -> see above. Refer to the file name to know which version is suited for your system. ********************************* Nvidia 600m series: MSI GTX 680m (4GB version): 'OC edition' revised -> higher limits for software overclocking, stock default clocks ----------------------- Dell GTX 680m (2GB version) vbios: 'OCedition' revised -> higher limits for software overclocking, stock default clocks same with increased 3d voltage ('OV') -> refer to the file name ----------------------- Clevo GTX 680m (4GB version) vbios: 'OCedition' revised -> higher limits for software overclocking, stock default clocks. For P1xxHM based systems I recommend only using version 80.04.29.00.01 !! Some users reported issue with other vbios versions (stock or modified, doesn't matter). EM users make sure you're on the latest BIOS / EC same with increased 3d voltage ('OV') -> refer to the file name (Same warning as above applies to P1xxHM users). ----------------------- K3000m: (Nvidia) K3000m - 80.04.3A.00.07 'OCedition' -> higher software overclocking limit Should work on all K3000m, unless you got a board ID mismatch. (HP) K3000m - 80.04.33.00.2E - 'OC edition' - > same as above, but probably the better choice if you use a HP machine ----------------------- K5000m: (Dell) K5000m - 80.04.33.00.35 - 'OCedition' -> higher software overclocking limit, stock 3d clocks 758MHz It's Dell but should work on all K5000m, unless you get a board ID mismatch. ----------------------- GTX 670mx: MSI 670mx (1.5GB) - 80.04.5B.00.A5_'OCedition'_rev00 -> higher software overclocking limits, tweaked performance at high clocks. Same board as the Clevo card. Clevo 670mx (3GB) - 80.04.58.00.03_'OC edition'_rev02 -> same as above, plus voltage is adjustable per software. ---------------------- MSI GTX 675mx: MSI 675mx (2GB) - 80.04.58.00.14_'OCedition'_rev00 -> higher software overclocking limits, tweaked performance at high clocks. MSI 675mx (4GB) - 80.04.58.00.0E_'OCedition'_rev00 -> same as above, vbios for 4GB card (!) ----------------------- Clevo GTX 675mx: Clevo 675mx (4GB) - 80.04.58.00.05_'OCedition'_rev00 -> higher software overclocking limits, tweaked performance at high clocks. ----------------------- ASUS G75VW BIOS: - 660m at 1000MHz core / 1400MHz memory - additional BIOS menus http://forum.techinferno.com/asus-gaming-notebook-forum/2538-%5Bg75vw%5D-modified-bios-vbios-higher-overclocking.html ------- Donation link in case you want to buy me a beer Thanks and cheers! *** FILE DOWNLOAD LOCATION:1 point