Leaderboard


Popular Content
Showing content with the highest reputation on 11/15/12 in all areas
-
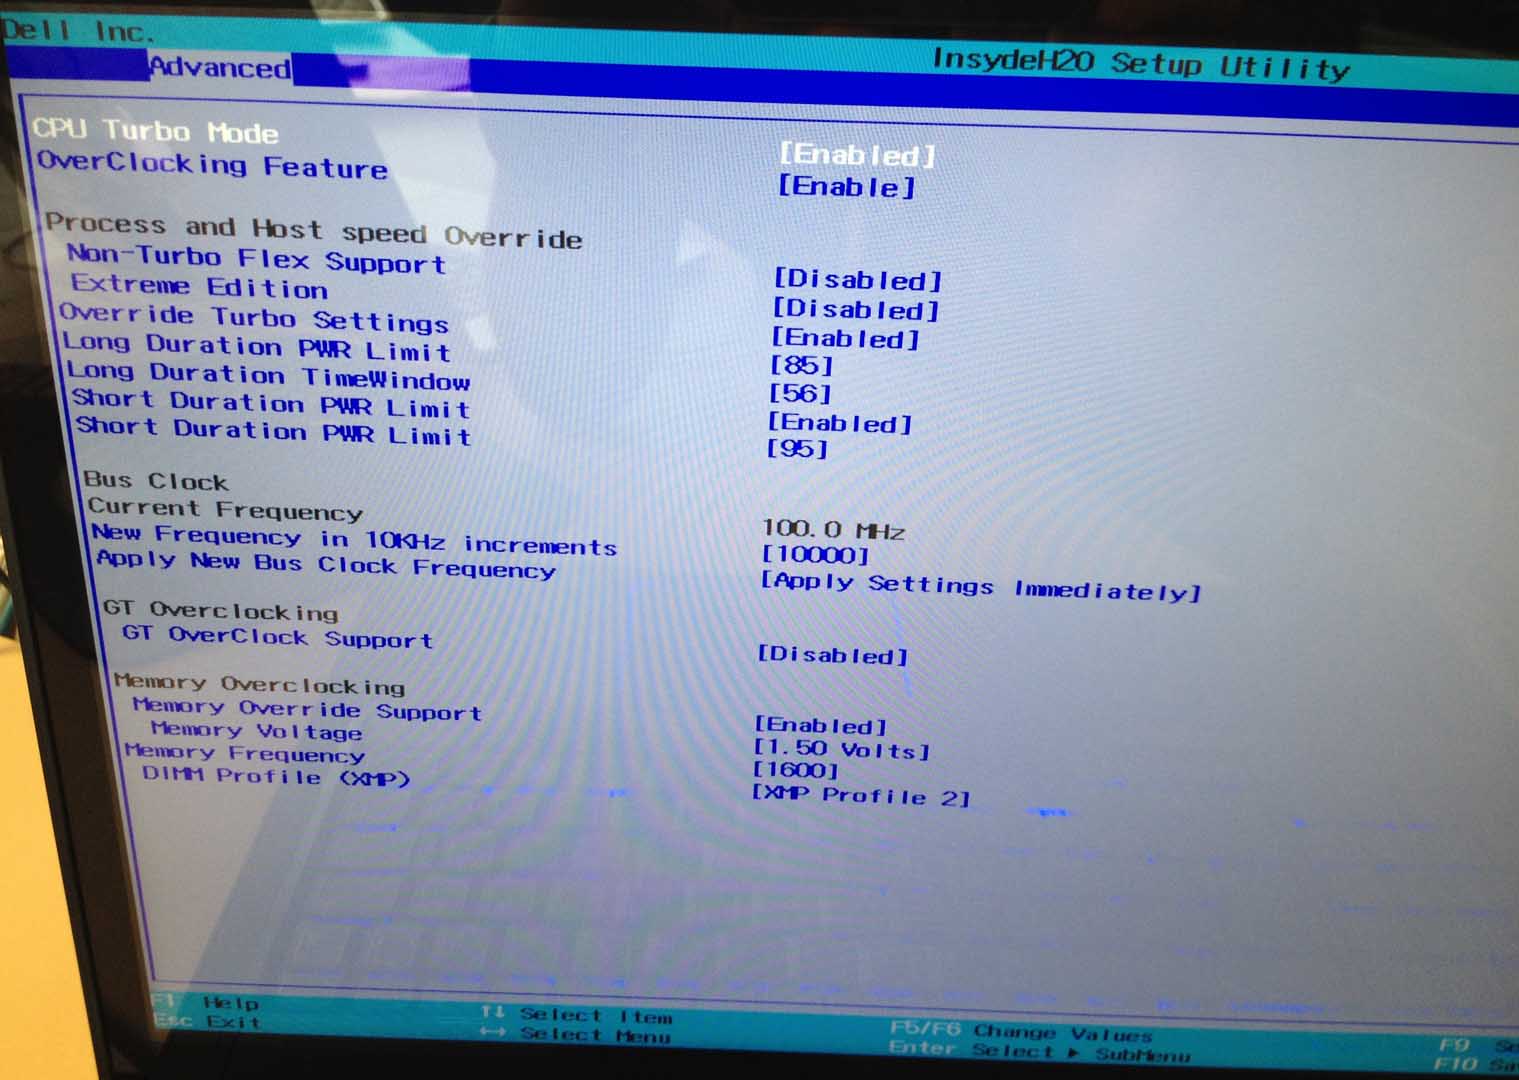
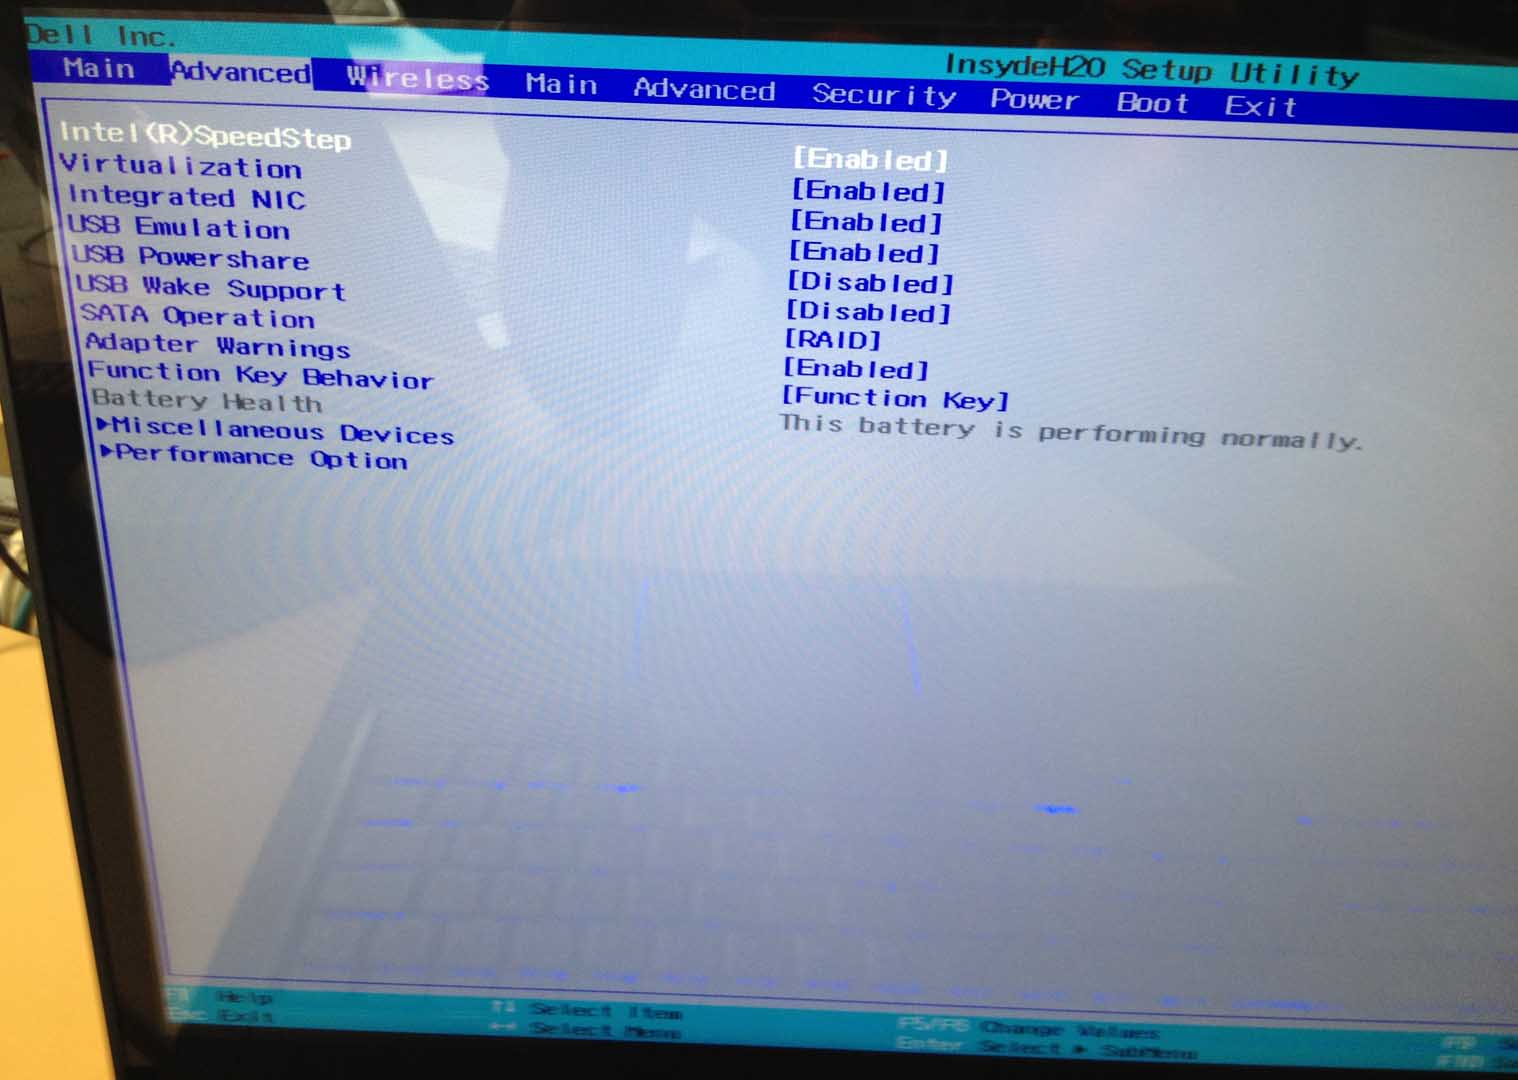
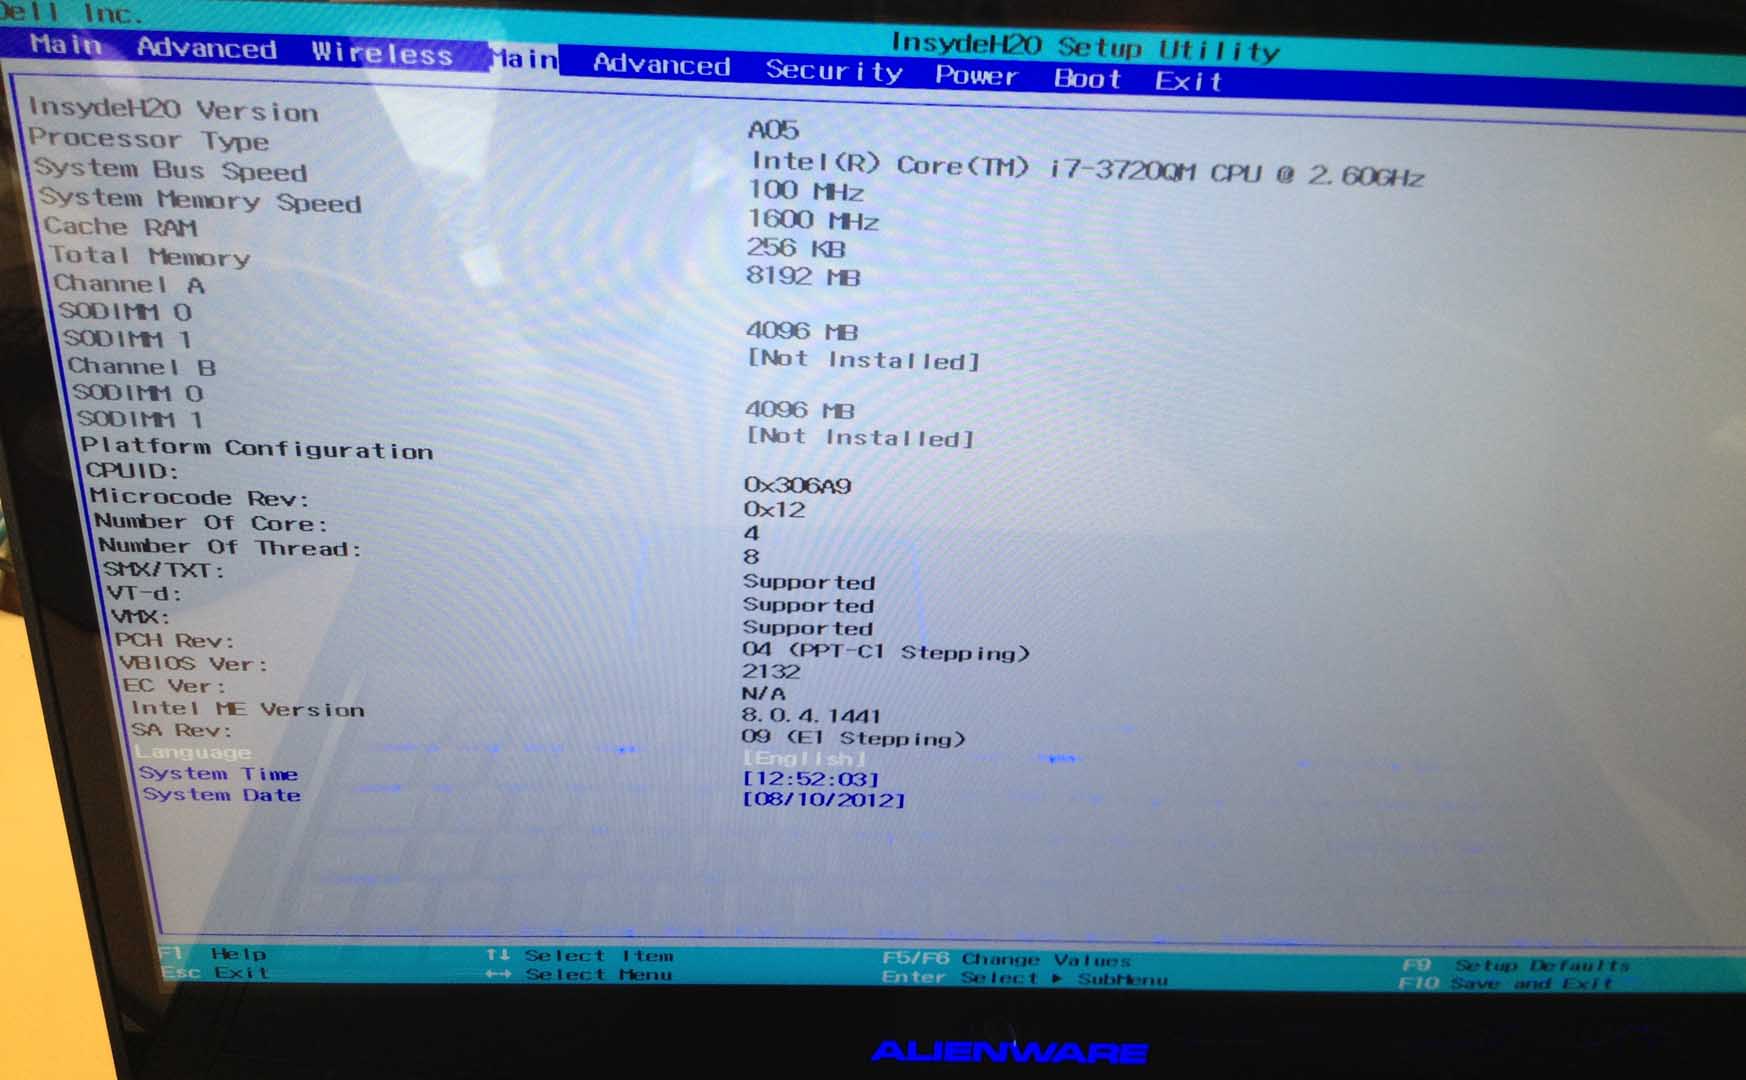
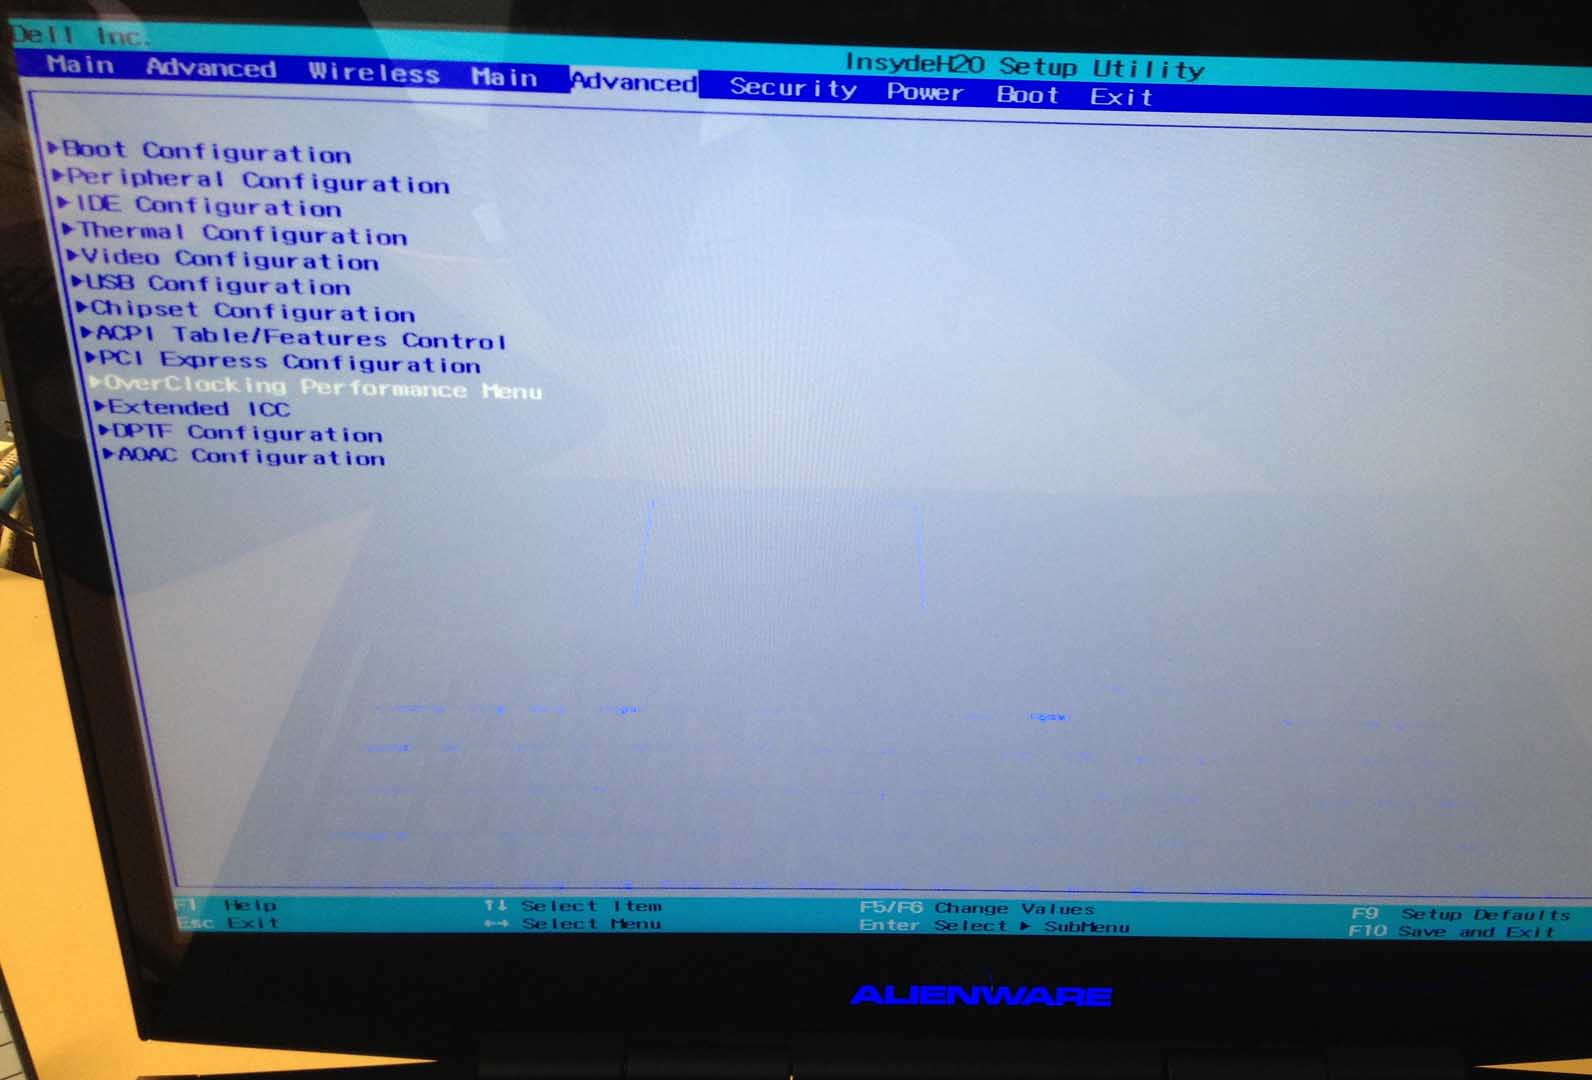
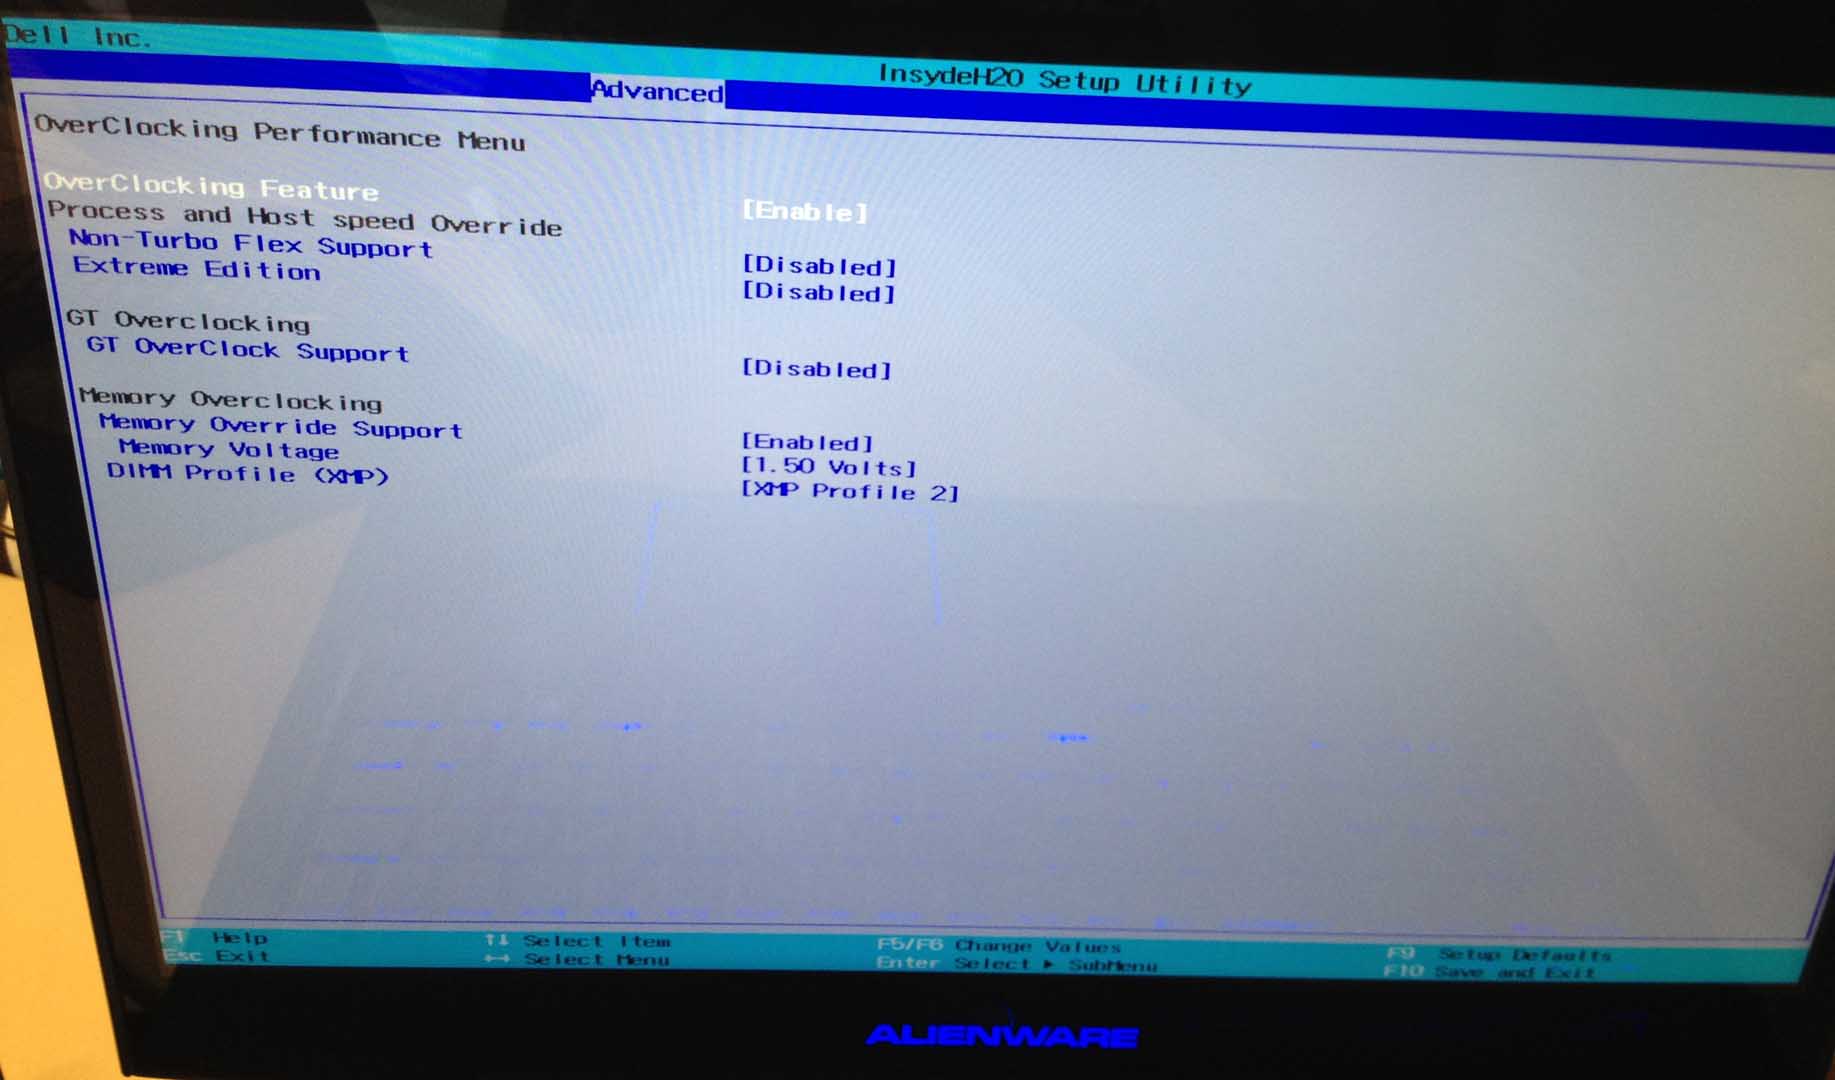
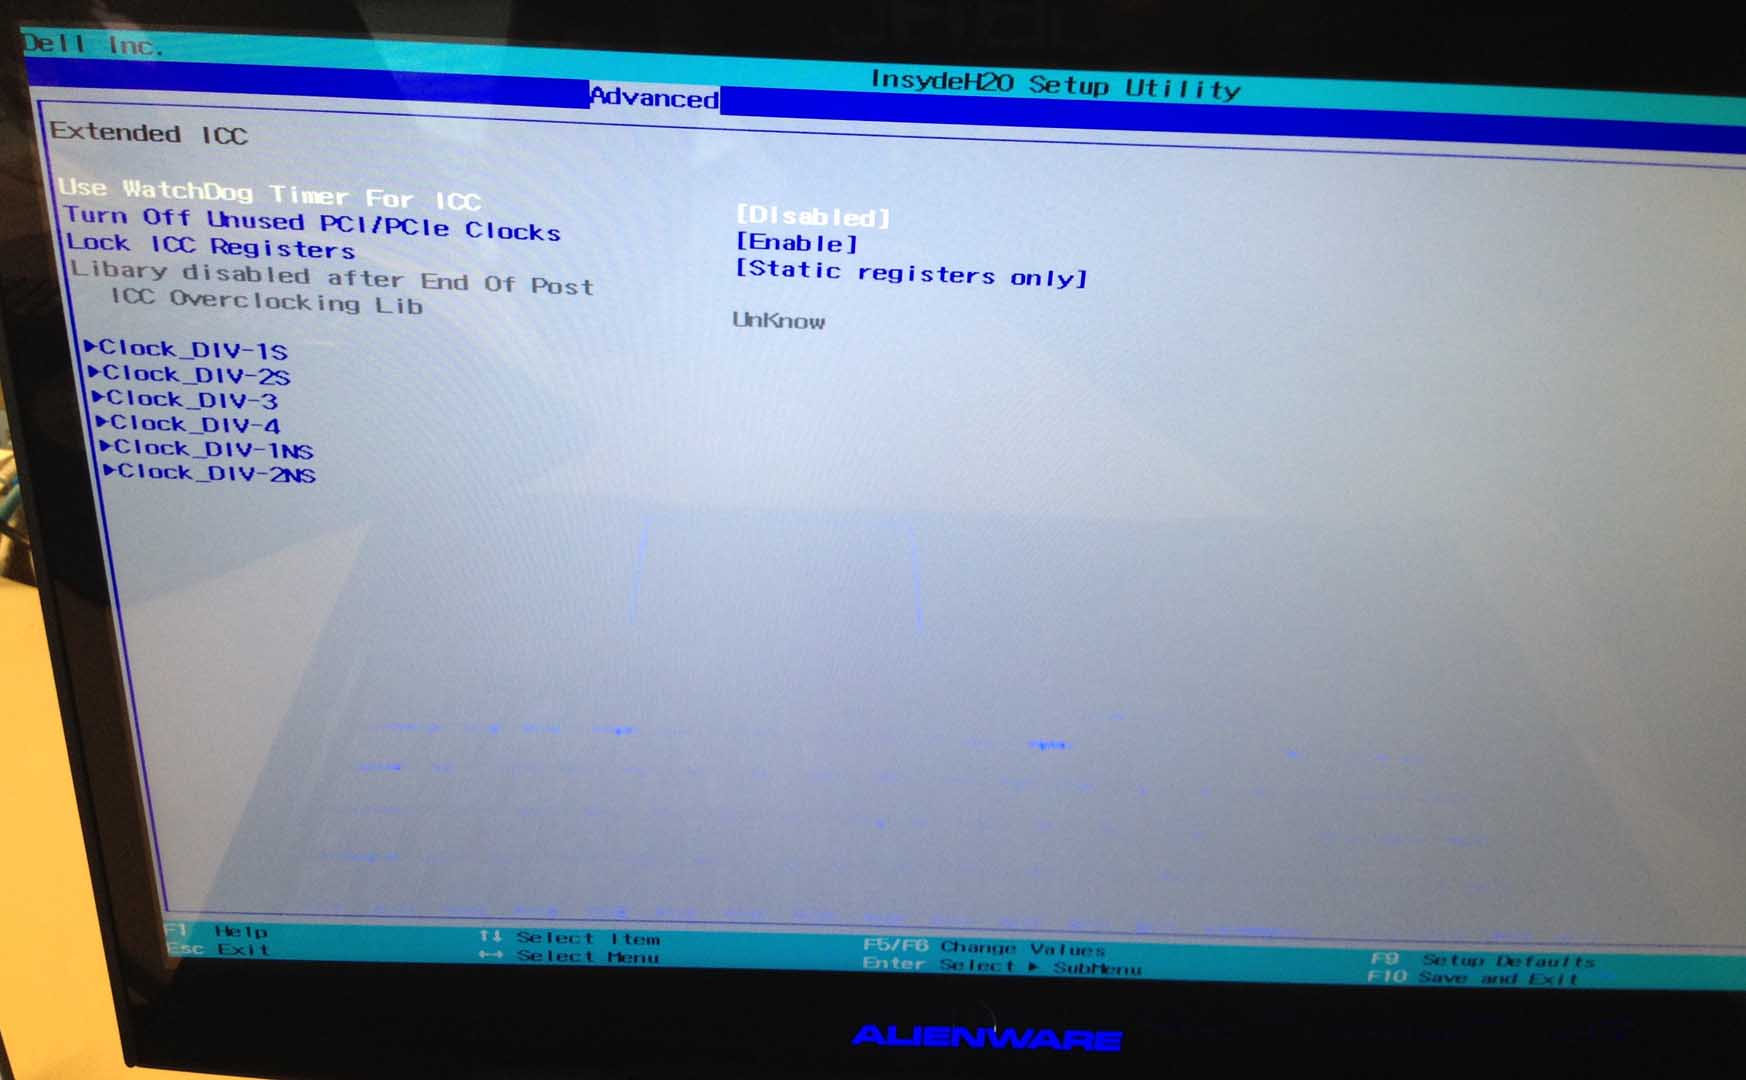
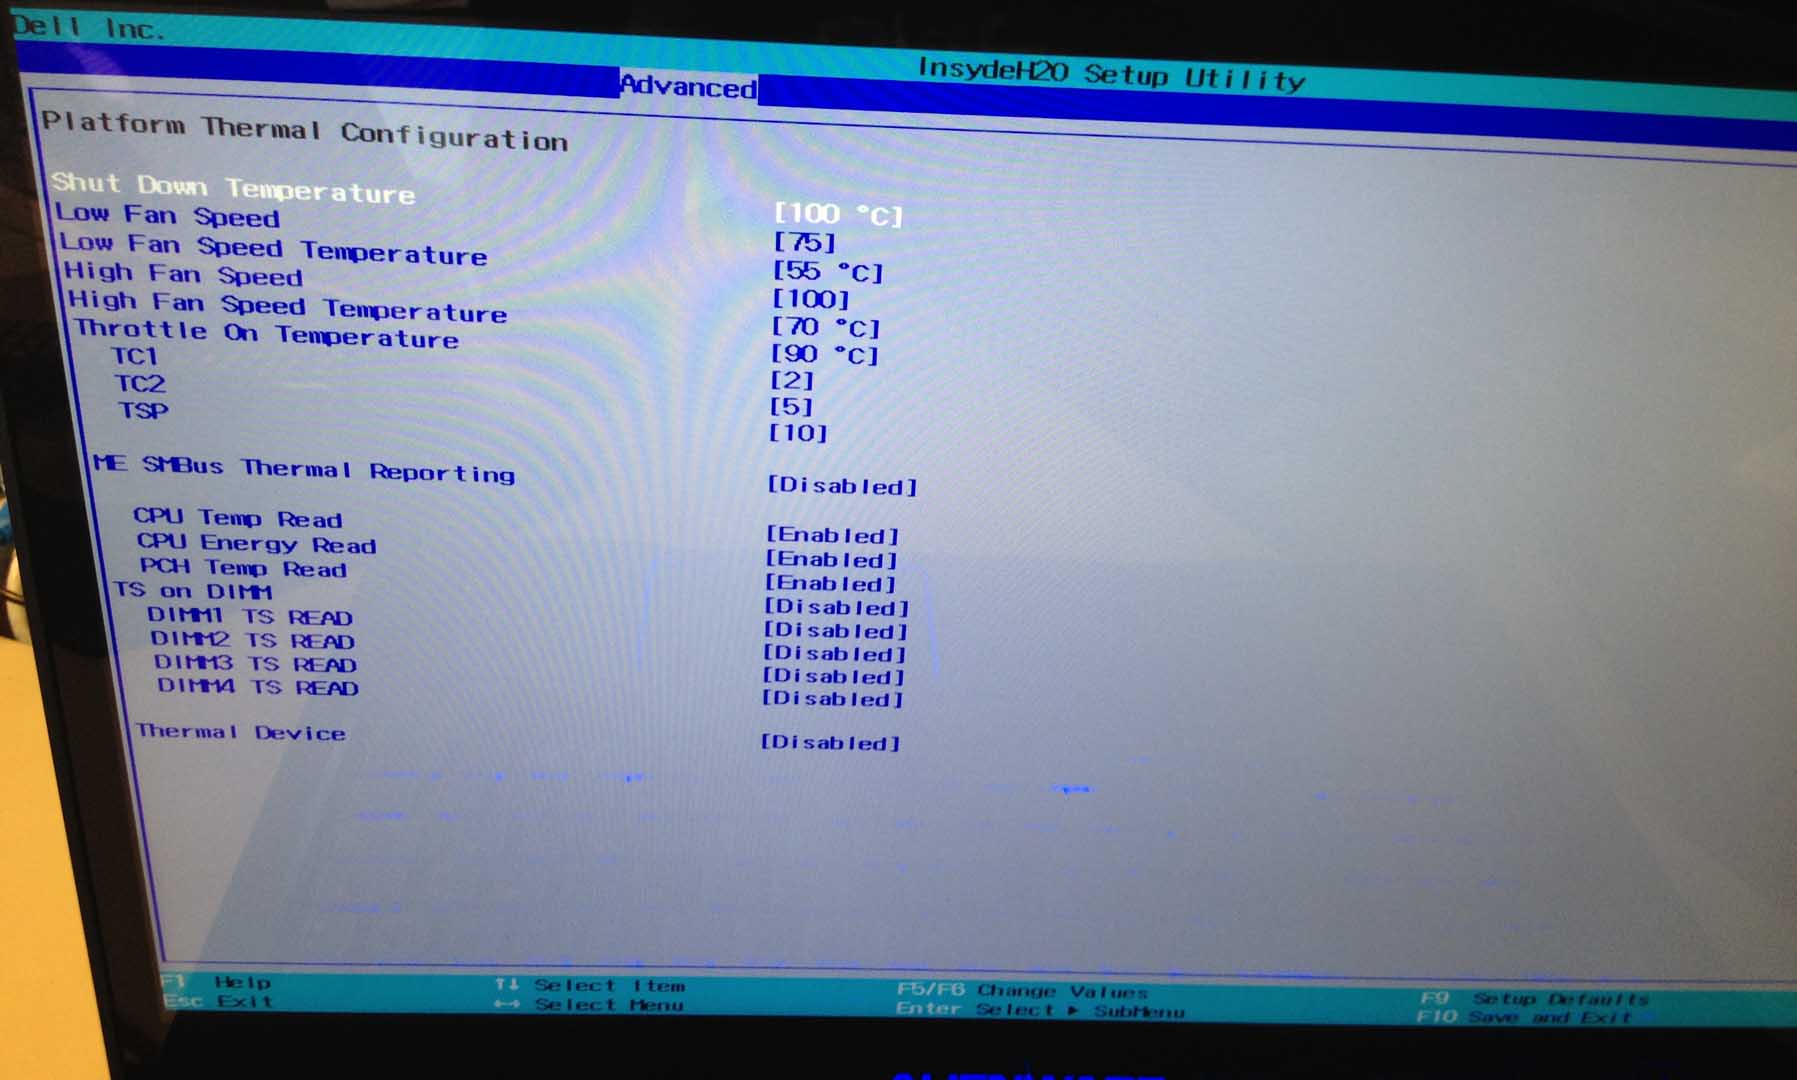
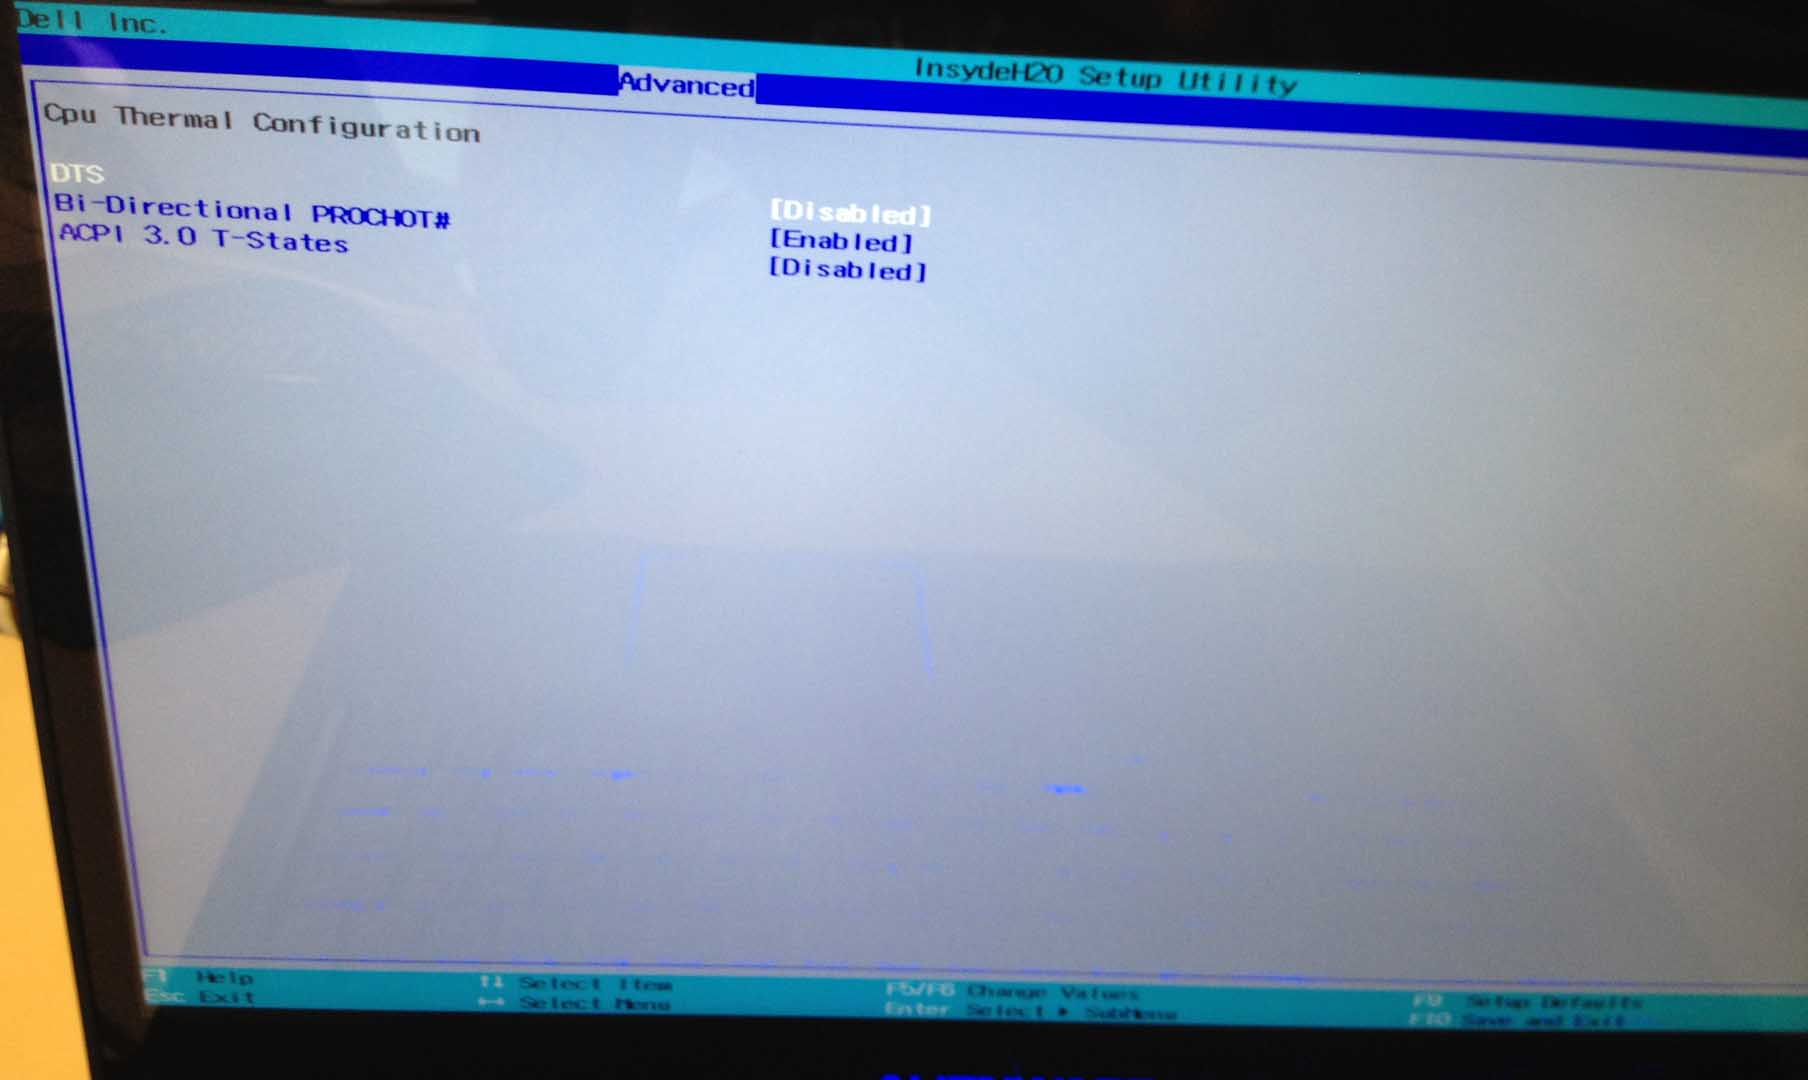
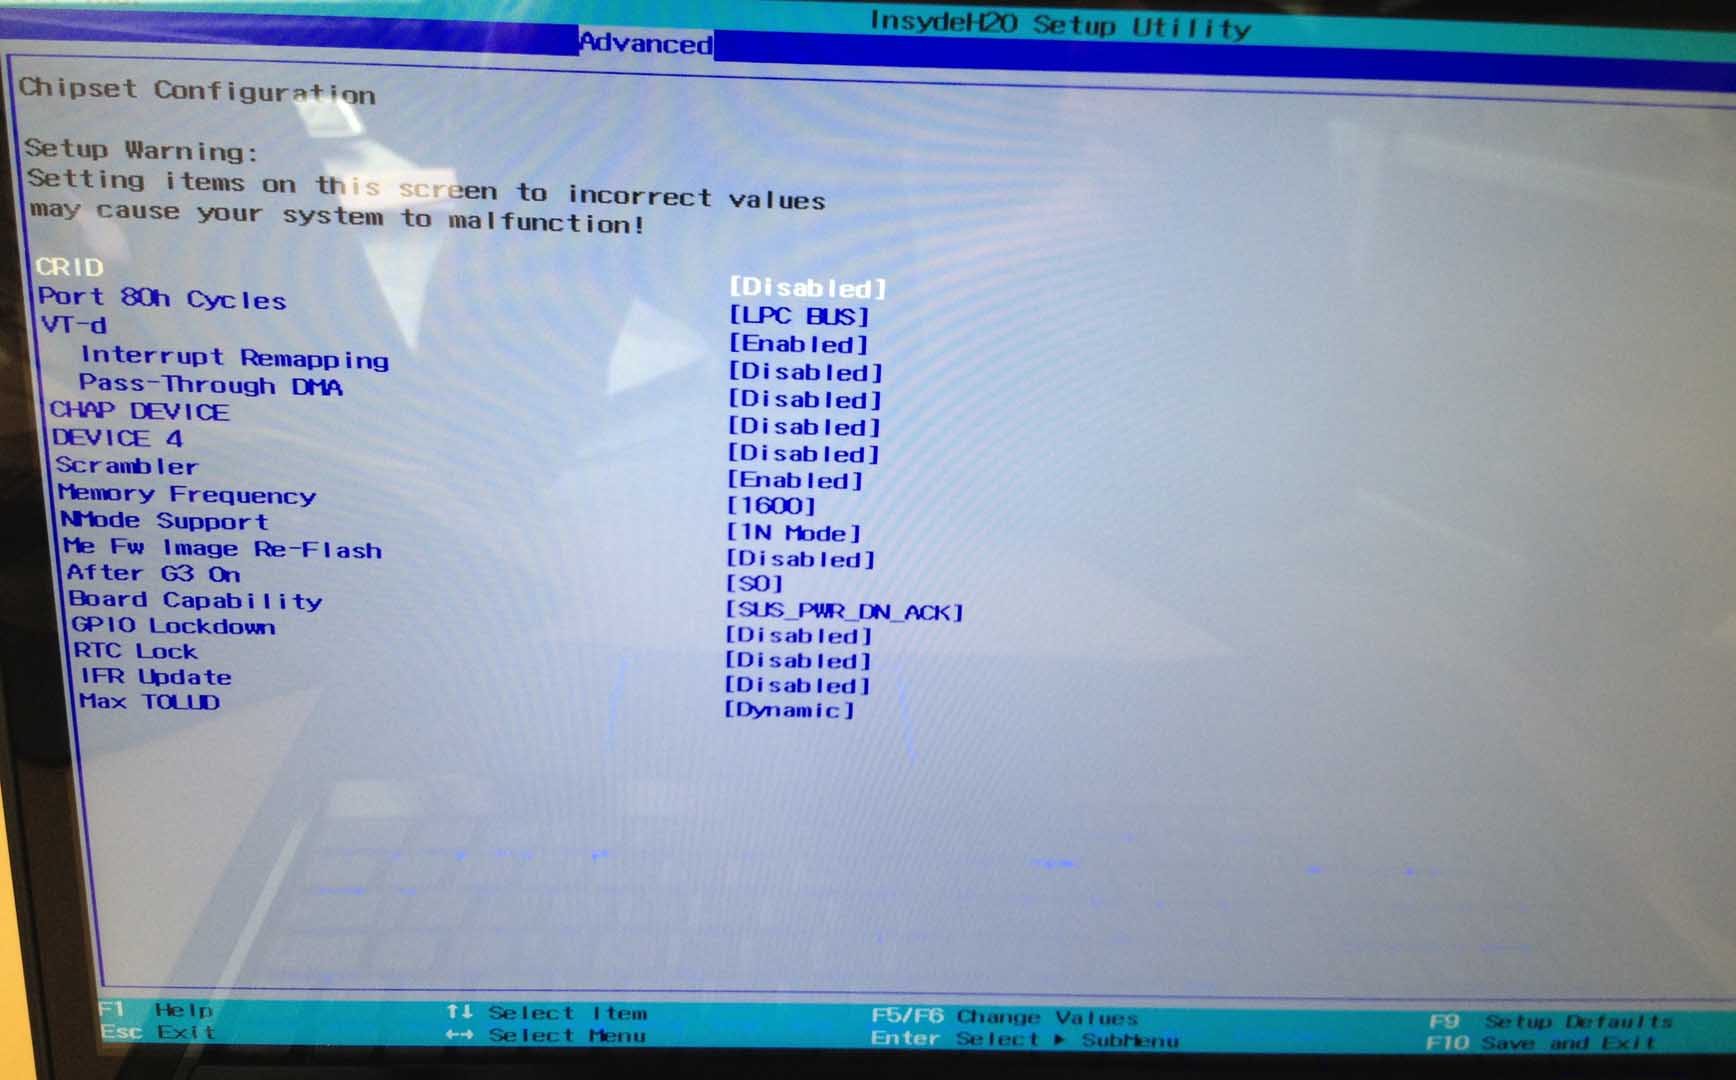
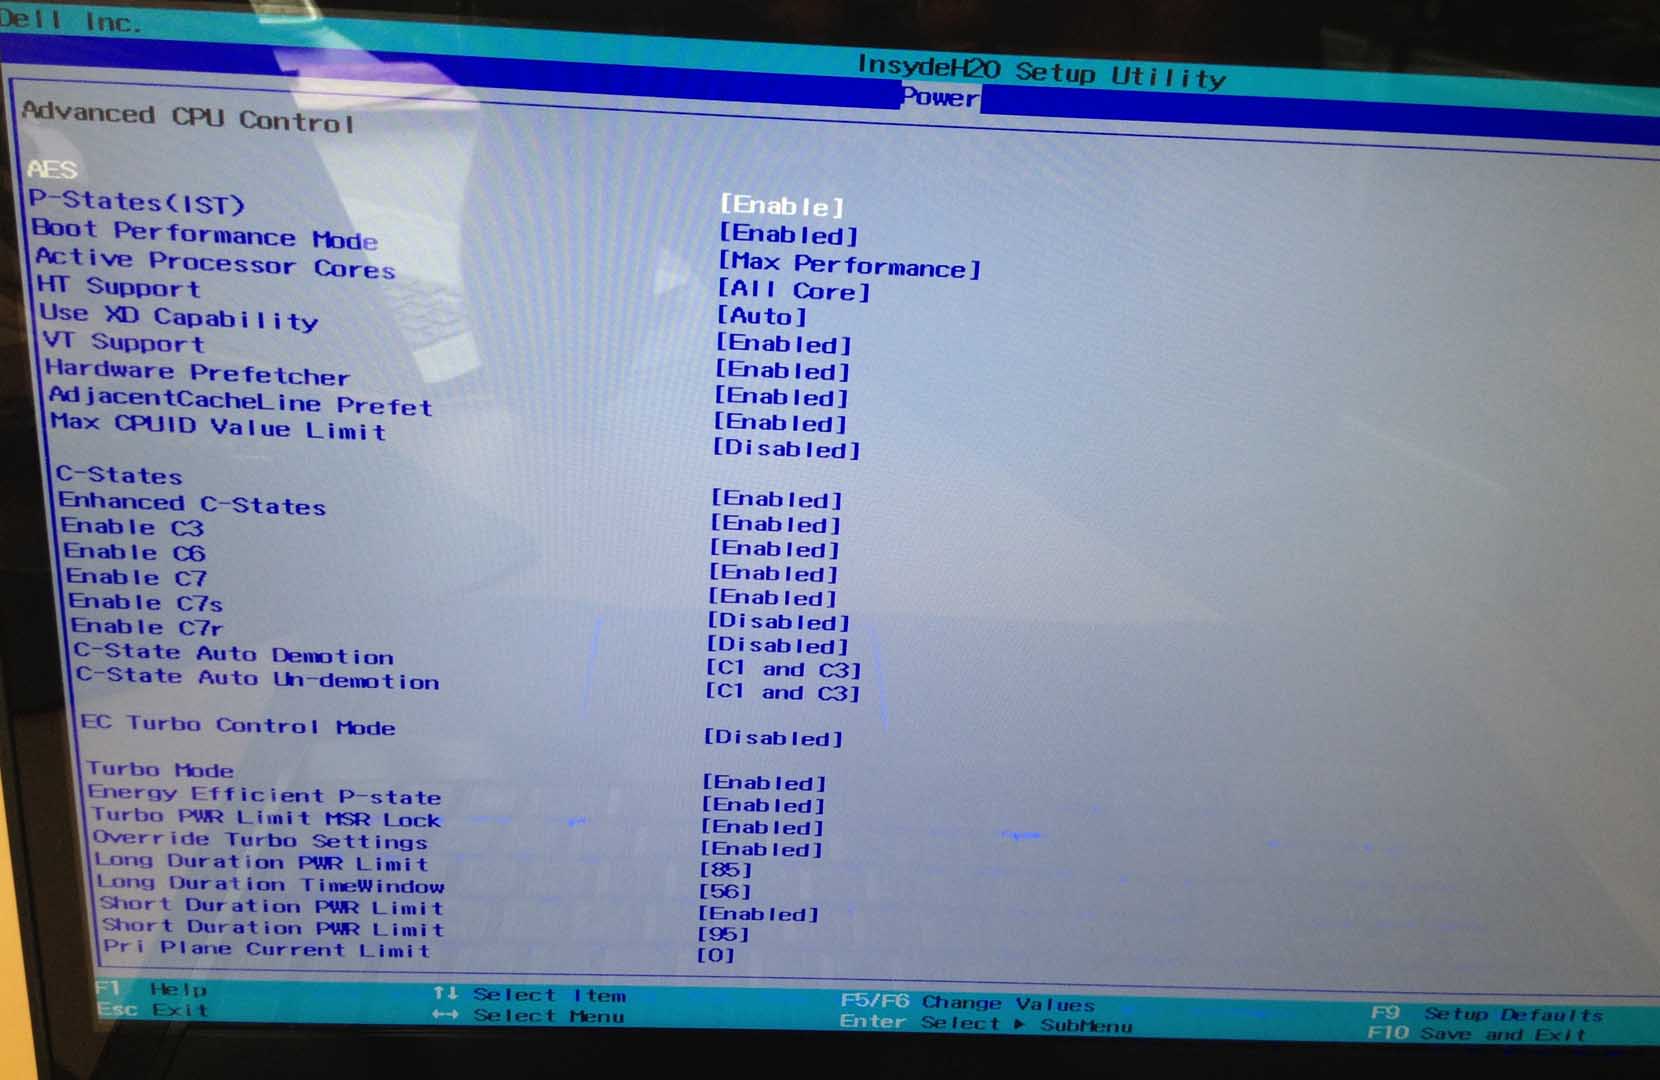
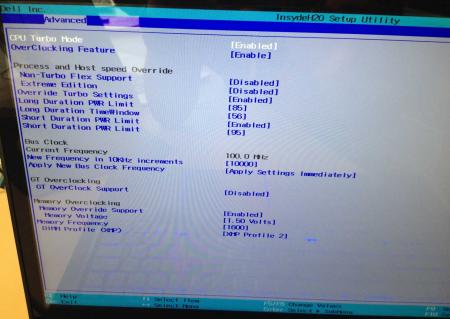
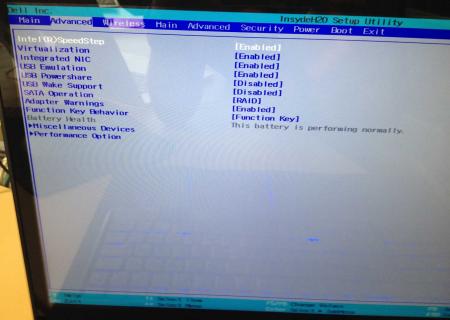
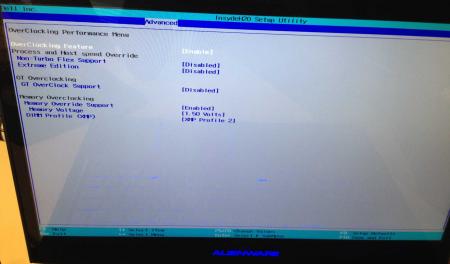
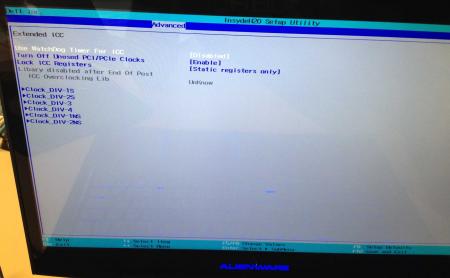
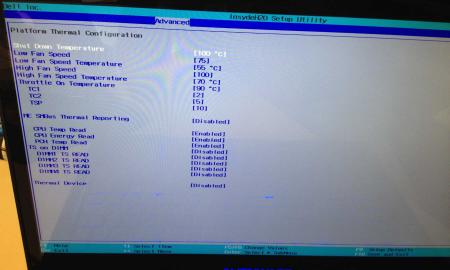
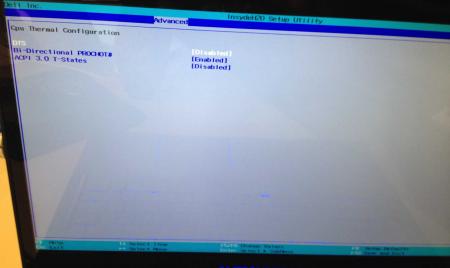
Dell has hidden a lot of options in the BIOS of the Alienware M17x R4, the modified BIOS versions here will show you all the hidden menus and allow you to further tweak your system and optimize its performance. Don't change anything you're not familiar with. There might be functions available which don't work on your system, so use this BIOS with care. It should only be used by advanced users. In case you mess up and your system refuses to boot after applying the changes you make, remove the AC adapter, battery and coin cell battery in order to clear the non-volatile ram of the BIOS. This should fix most issues. *********************** Instructions: If you're on A05 or an earlier version, you can flash the modified bios by simply using the InsydeFlash utility provided with the official bios update on the Dell support site. However, once you're on a version newer than A05, things get a bit more complicated. There are two options then: - Method 1: Revert to stock A05 or earlier by using the Insyde USB bios recovery method, and then flash the modified bios by using the official tools (InsydeFlash). - Method 2 (recommended): Flash the modified Bios from DOS by using the FPT tool: . Grab the DOS version of fpt for flashing, and my 'prr tool' to circumvent write protection.. Download a '[FPT]' labeled version of the unlocked BIOS. Put the DOS version of the flash tool on the root of the prepared USB stick (fpt.exe and fparts.txt), along with the prr.exe and the file you want to flash (plus the included flash.bat). . Restart the system and boot from your USB stick. Run prr.exe, then flash the bios by executing the flash.bat file. Wait until the tool completes the flash. If the verification is okay, reboot, else flash again.. Go to the bios, load the default settings and reboot. Done NOTE: The flashing from DOS as described above will only update the BIOS, not the rest of the firmware. Therefore I strongly advise you to first flash the stock version of the bios you want by using the official update provided by Dell, and once that's done you can go ahead and flash the modified version of your bios by following the instructions above. Download links to the unlocked M17x R4 BIOS versions: M17x R4 - BIOS A05 [unlocked] M17x R4 - BIOS A08 [unlocked] - see attachment M17x R4 - BIOS A09 [unlocked] - see attachment M17x R4 - BIOS A10 [unlocked] - see attachment [FPT] M17x R4 - BIOS A10 [unlocked] - see attachment [FPT] M17x R4 - BIOS A11 [unlocked] - see attachment Donation link, in case you want to buy me a beer Here some pictures of the menus (thanks a lot for the pics @deadbydawn!) I want to thank @widezu69 for testing !! It's hard to find users who are willing to risk their system in order to test a mod, I greatly appreciate this! Thank you!! ********* Flash and use at your own risk. I don't take any responsibility for any possible damages on your system. The software which I provide here ('prr tool') comes with absolutely no warranty to the extent permitted by applicable law. ___ M17x_R4_-_BIOS_A08_[unlocked].zip M17x_R4_-_BIOS_A09_[unlocked].zip M17x_R4_BIOS_A10_-_[unlocked].zip [FPT]-M17x_R4_BIOS_A11_-_[unlocked]V2.zip [FPT] M17x R4 - BIOS A10 [unlocked].zip M17x_R4_-_BIOS_A05_[unlocked].zip


 1 point
 -
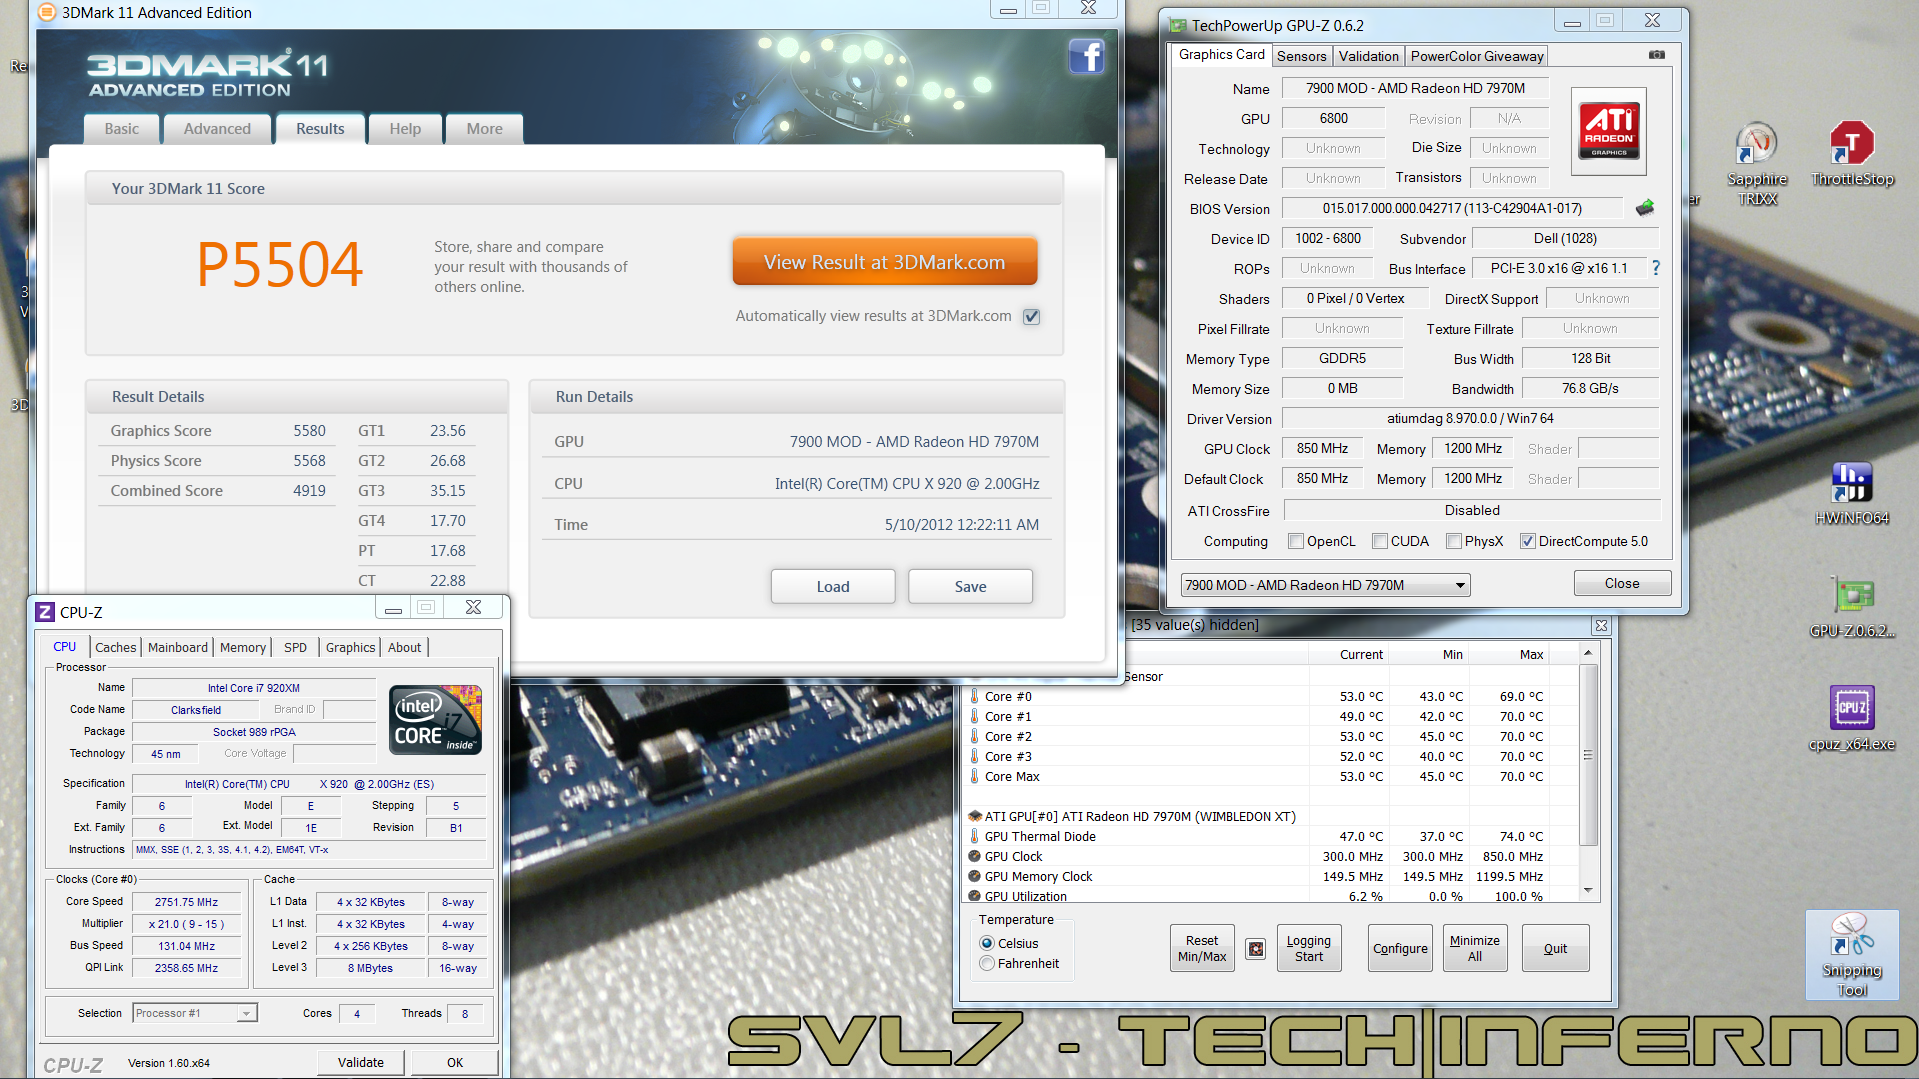
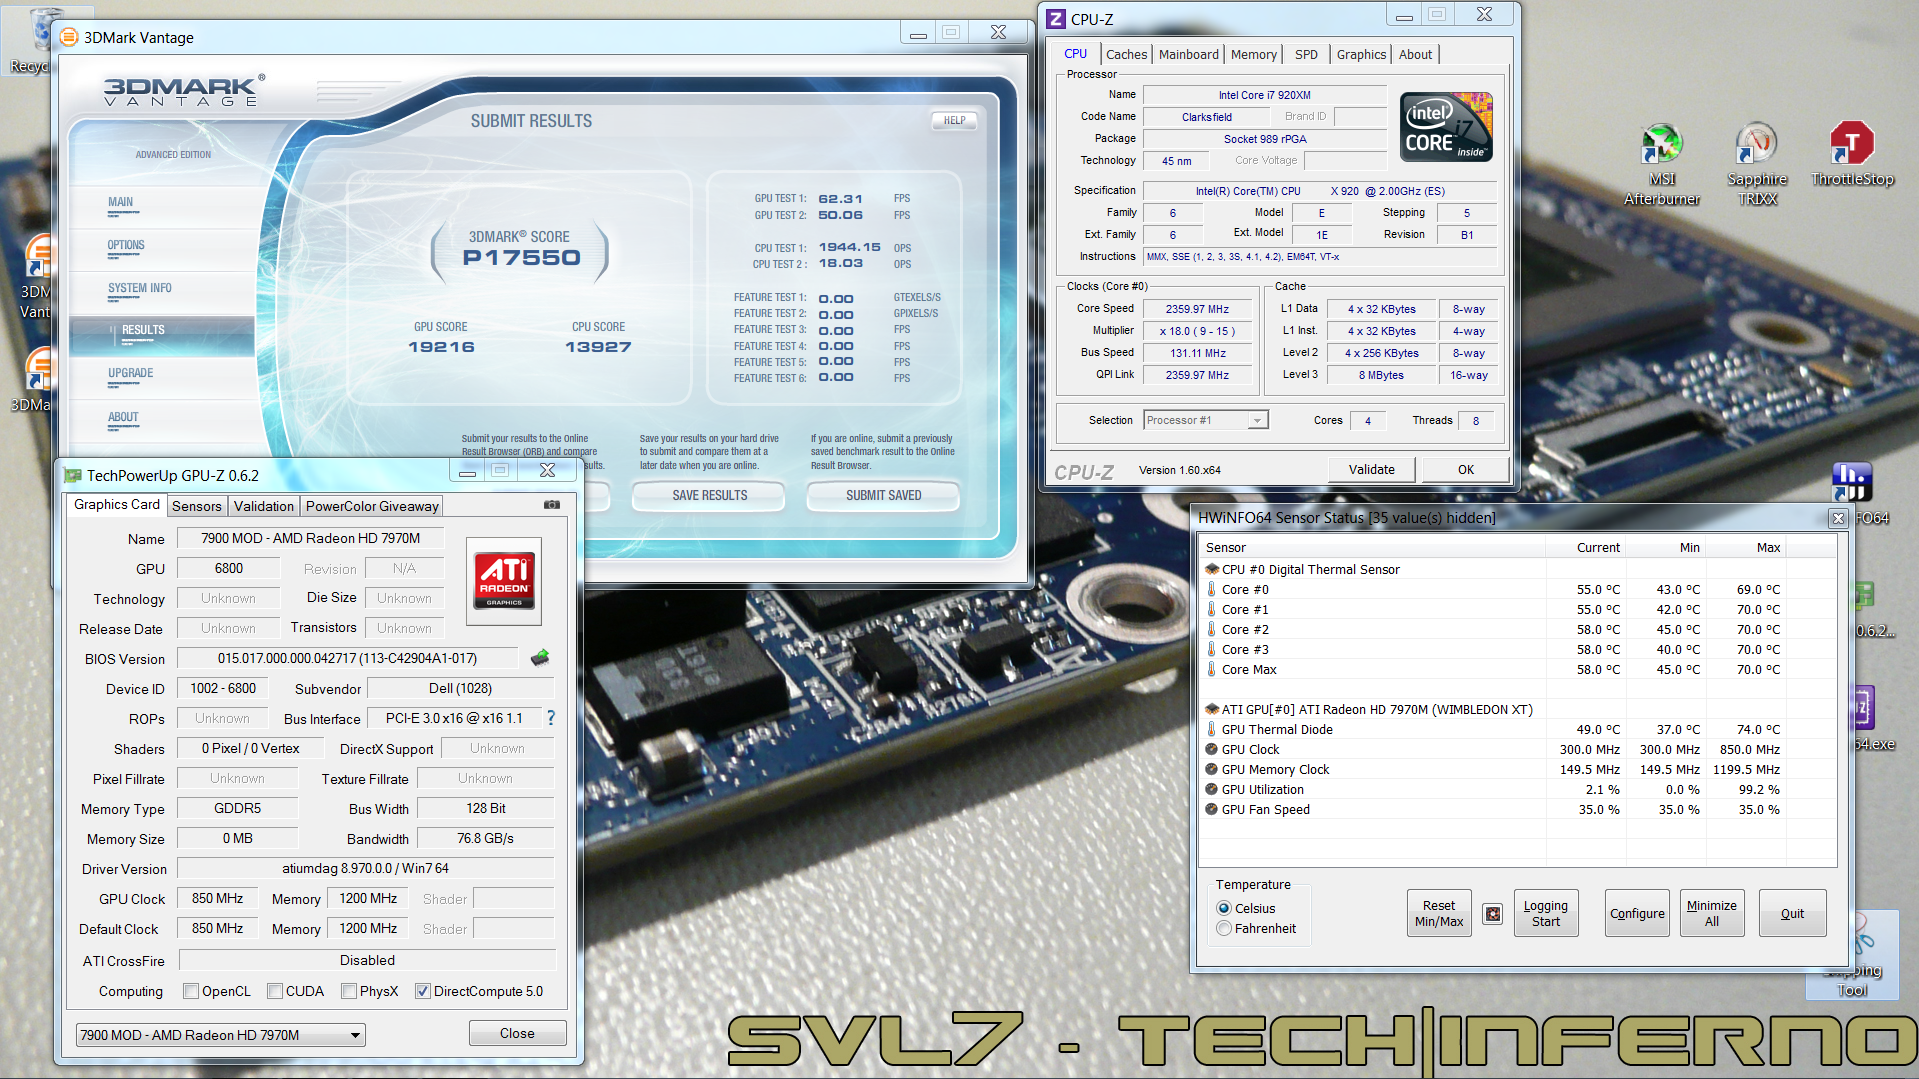
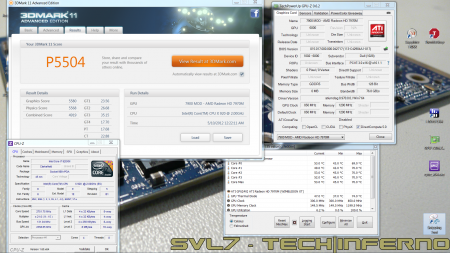
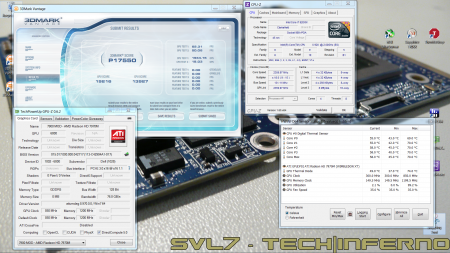
Got my Dell 7970m (ES) today... and so far it rocks! Native fan control, runs cooler than the 6900m series, and it simply kicks ass. It's pretty much plug-and-play, no issues so far, though I will need to continue the testing (and benching ). Only did a Vantage and 3dM11 run so far, with GPU and CPU at stock, Tess on, check it out, hehe: Confirmed for the Dell 7970m (part nr. 747M2) in the M15x: Fan control is working properly Sound per DisplayPort / HDMI is working GPU clocks and performs as expected Possible issues: The card runs slightly warmer than the officially supported cards, due to it's higher power draw. This also leads to less overclock headroom. The card works fine even if you have an i7 920XM in your system, but if you overclock the CPU too hard, the GPU voltage drops, resulting in a drastic performance drop. (This is actually not directly caused by a power limit due to the PSU... the CPU can draw as much power as it can get, but it seems that when the CPU draws more power than usual, the GPU voltage supply somehow doesn't get provided anymore with enough power, even though there's headroom power-wise, it's probably caused by the circuit design of the mobo). Things to do before changing the GPU: Download working drivers. At the moment you can either get the drivers of the M17x R4 from Dell, or the modified, but actually more recent (12.5) from "benchmark3d". Get some thermal paste, e.g. Arctic MX-4, or Prolimatech PK-1, or whatever you prefer, you'll also need something to clean the GPU die and heatsink, isopropyl alcohol or similar will do. I highly recommend using an ESD mat and wristband whenever working Get familiar with the upgrading procedure, respectively disassembling the system. Refer to the M15x service manual if you need help, or to this pictured guide which explains how to replace the GPU in the M15x. The upgrading procedure: Uninstall your GPU drivers. Make a power drain (Turn off your M15x, remove the power cord and the battery. Then press and hold down the power button (Alienhead) for about 10-20 sec. Remove your GPU - Here's a little guide with pics in case you need some help. Clean your heatsink, if necessary replace the thermal pads with new ones. Make sure the 7970m has the correct backplate on it. Insert your GPU, make sure that it sits properly. Apply the thermal paste, and attach the heatsink. More to come.
 1 point
 -
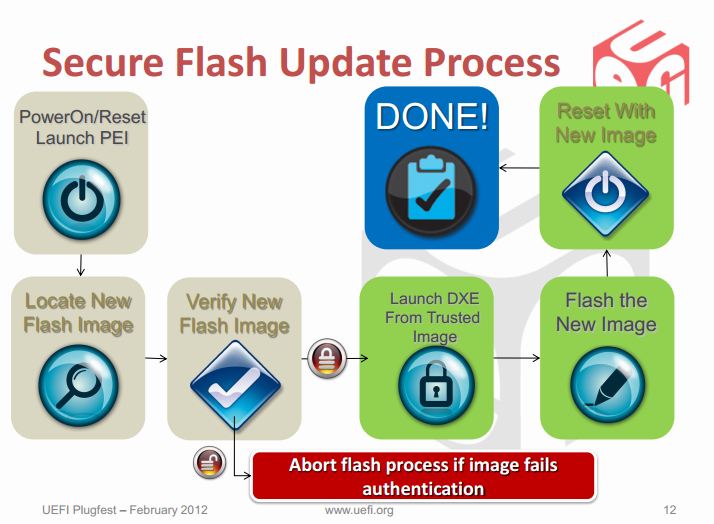
********** * This is only for systems with Intel chipsets. * * It still won't work for all of them, but for some it does. * This article is meant as an explanation for interested / advanced users. Since some of the more recent bios mods require the tool described below in order to allow flashing, I decided to share some information about it. Also I really don't like how users get locked out of their own hardware, this is a way to circumvent a couple of the more recent restrictions of certain systems. I hope this will be useful to some of you. If you know other ways to get around the current firmware updating restrictions (per software), please let me know. The problem: With the appearance of Windows 8 and Microsoft's requirement for OEMs to support 'secure boot' in order to get the Win8 certificate for their machines, a lot of the most recent systems (notebooks and desktops) use now firmware which is digitally signed. Since secure boot looses its purpose if firmware updates aren't verified and protected as well, the latest UEFI implementations come with a secure firmware upgrading procedure which makes sure that only properly signed and unmodified images can be flashed. This updating protections is active even if you don't enable secure boot. These two pictures explain the idea behind secure firmware updating very clearly: On the second picture you can see that the system verifies the firmware image even before it loads the drivers required for the flash. For bios modders or people who want to use modified firmware, the consequences of this are severe. It simply isn't possible anymore to flash digitally signed bios which have been modified, there's no way around the signature, at least not with the usual tools. The solution (at least for some systems): The only way to get around those new restrictions is to directly program the firmware flash memory and therefore leave out the verifying of the image. In Intel systems the flash chip is directly wired to the PCH, and it can be accessed by an Intel utility called Flash Programming Tool. It's a very powerful application which supports the most common flash memory chips. The requirement for it to work on a system are the following: - BIOS region of the flash memory must have write permissions - The OEM or BIOS vendor omitted to set an additional flash lock. - You can't flash an encapsulated firmware image, only the pure bios region. You will have access to the BIOS region for obvious reasons, but the second point can only be figured out by trying to flash a BIOS. If the tool comes up with an 'Error 28', download the attached 'prr' utility, as well as the DOS version of the flash tool. Put both on an USB drive which can boot DOS, boot from it and execute the prr.exe, if it manages to remove the protection on your system it will tell you 'ready to flash', in this case go ahead and directly flash with fpt, without rebooting before doing so. If prr can't remove the protection you're most likely out of luck, even though might be ways for certain systems, but the chances are pretty small. In order to flash a BIOS you will need to remove the capsule from the firmware image provided by your system manufacturer. You only want to update the bios. Then flash it by using this command: fptw64 -f FILE -bios (FILE stands for the image you want to flash) ***WARNING*** This tool is only for very advanced users. If you mess up it will override your BIOS without a warning or waiting for you to confirm. This means you can easily brick your system beyond any chance of recovery. You most likely don't need this tool. My BIOS mods which require this application for flashing will always come with a .bat file which will do the flashing for you. Again, for 99.9% of the users there's no need to mess with this. This version of the tool works only for 7 series chipsets. *InBeforeOmgMyYystemWontBootAnymore* The tool provided here by svl7 (prr2.exe and former prr.exe) may not be hosted anywhere outside of Tech|Inferno without the previous approval of the author. FPT_DOS.zip Fptw64.zip prr2.zip

 1 point
 -
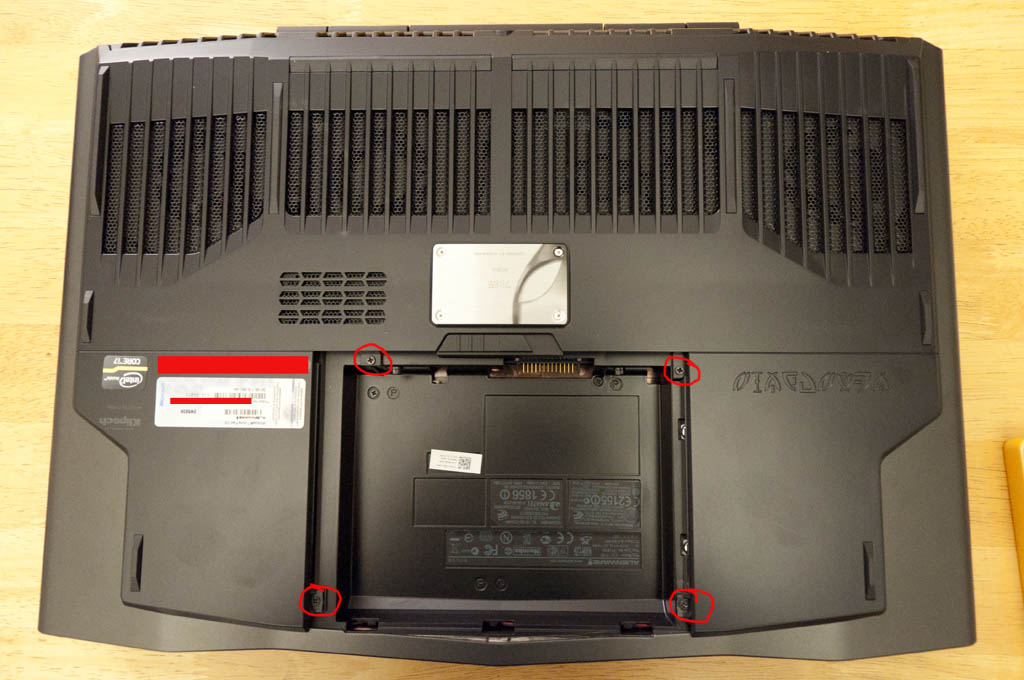
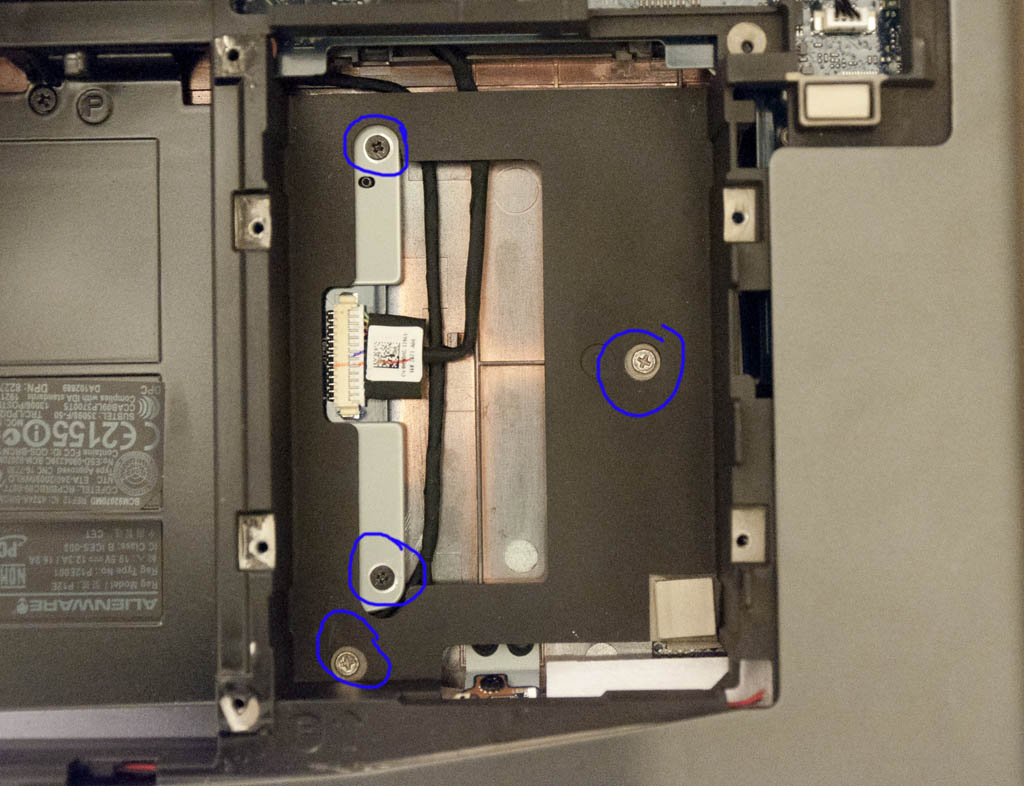
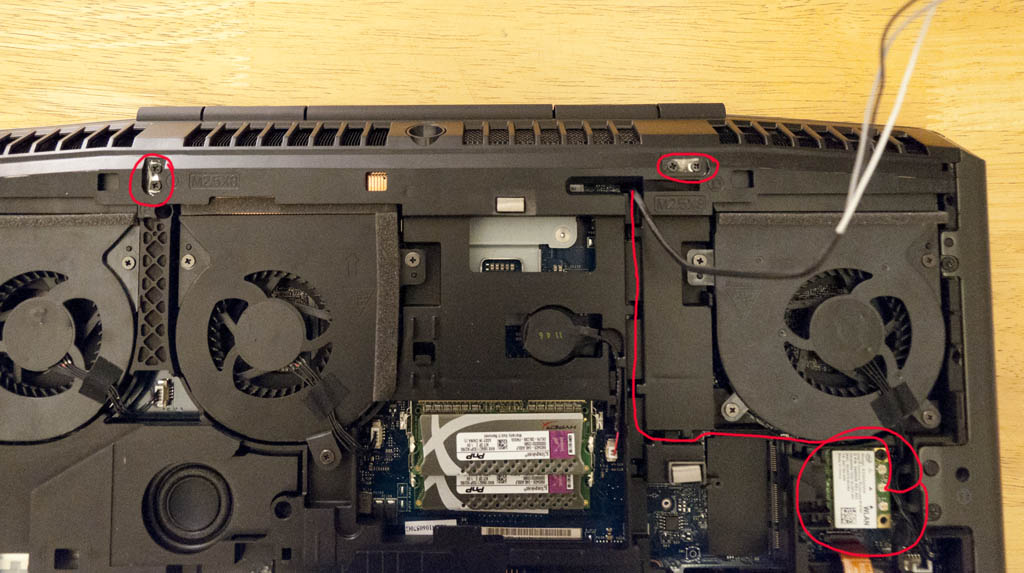
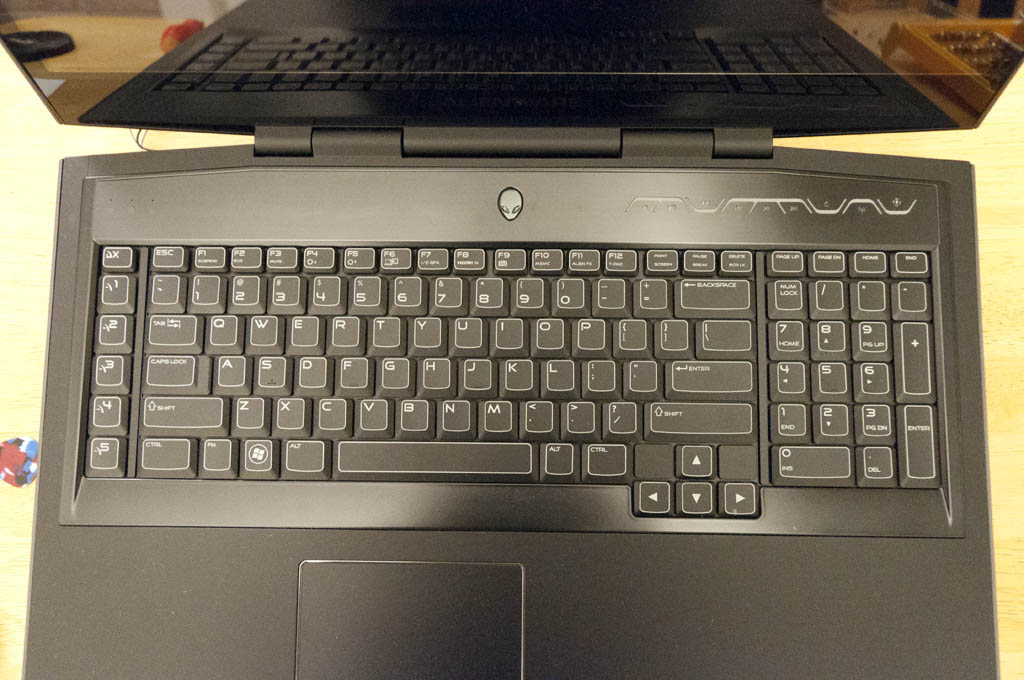
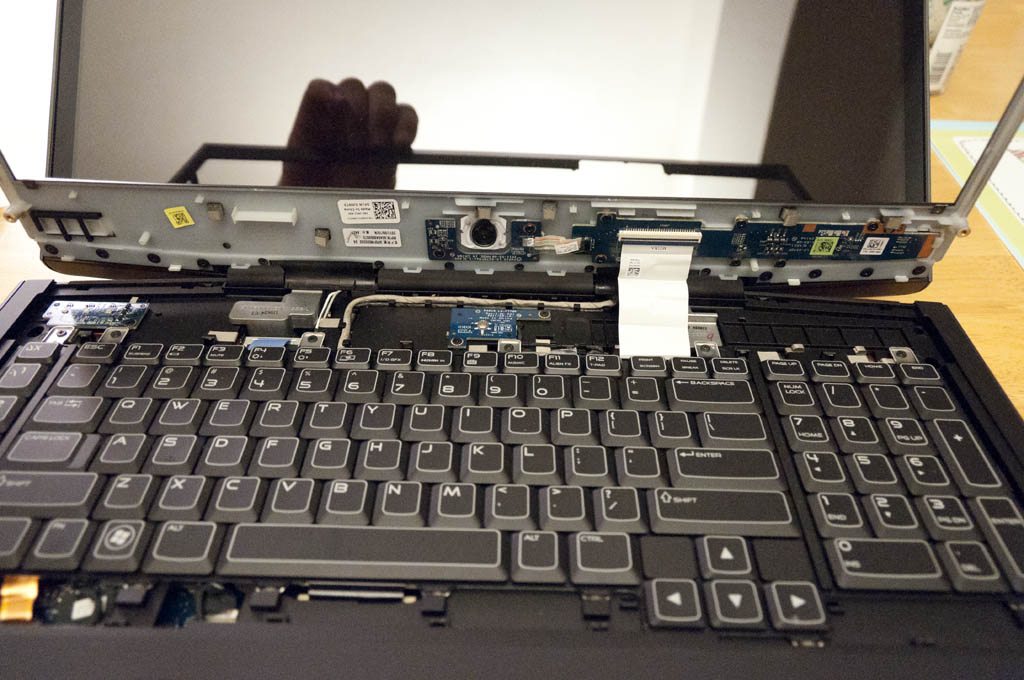
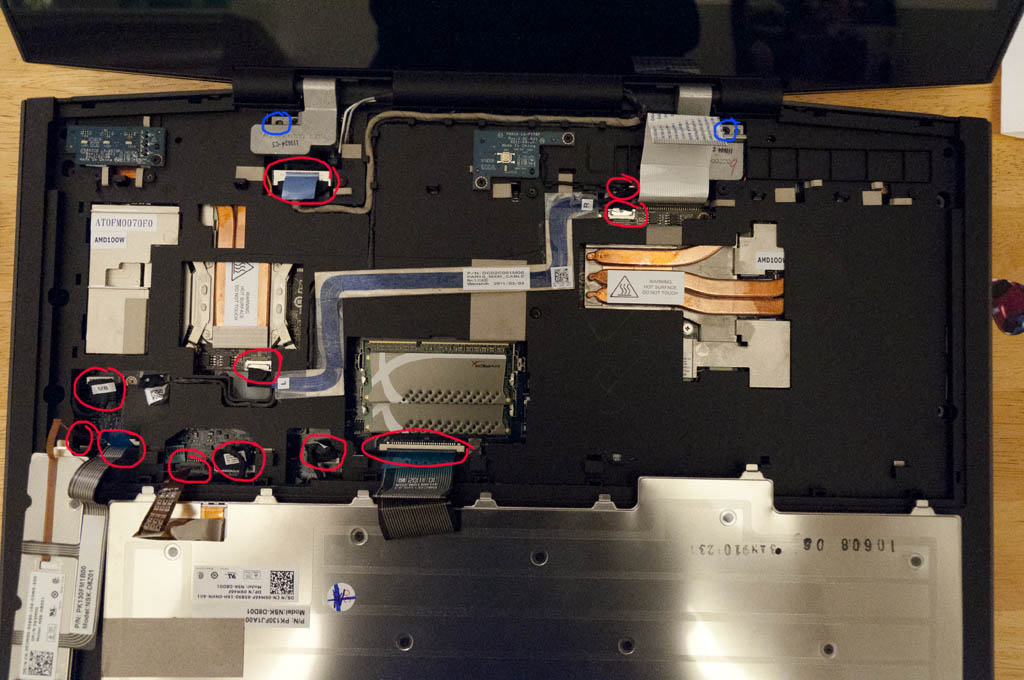
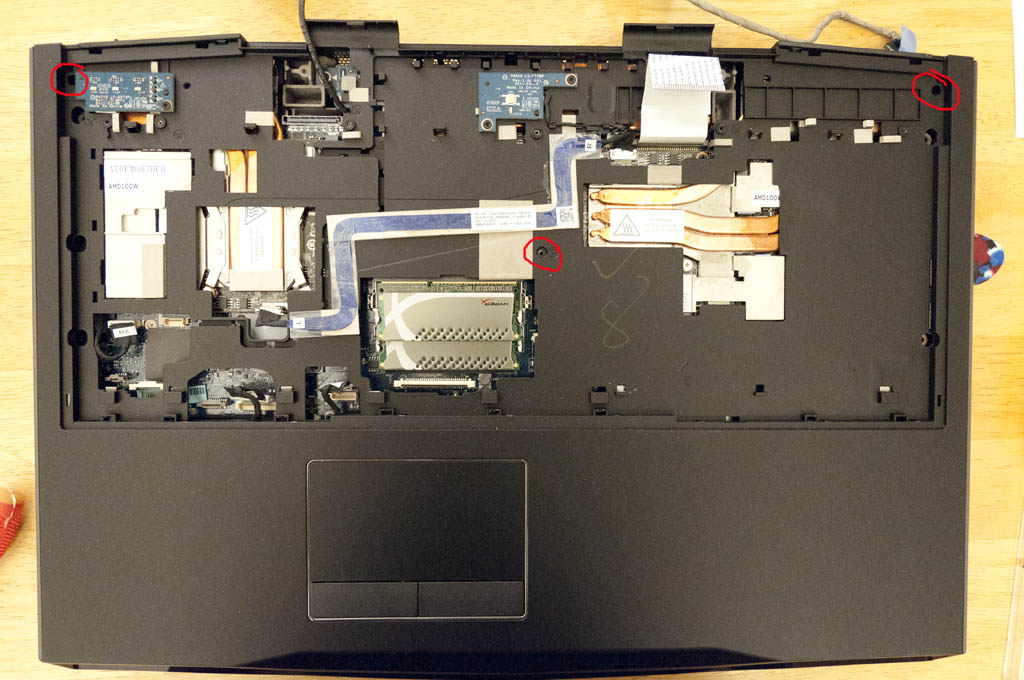
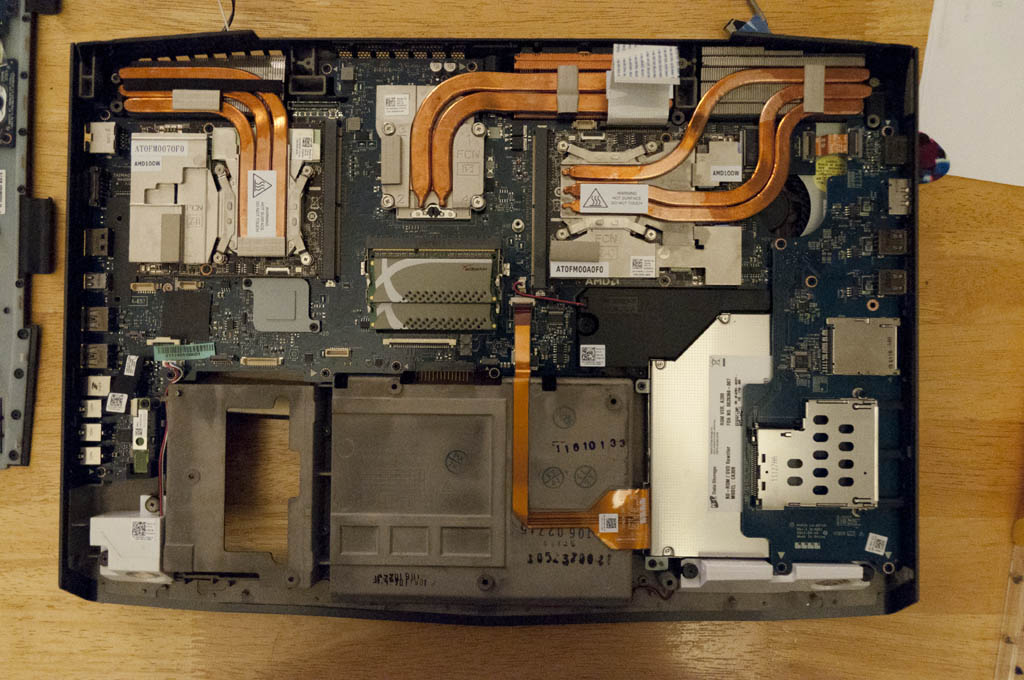
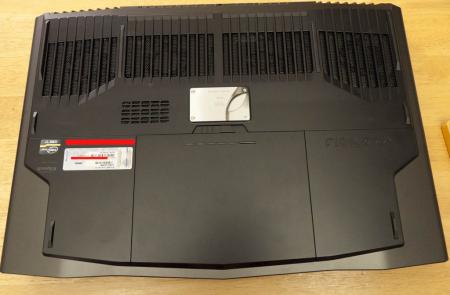
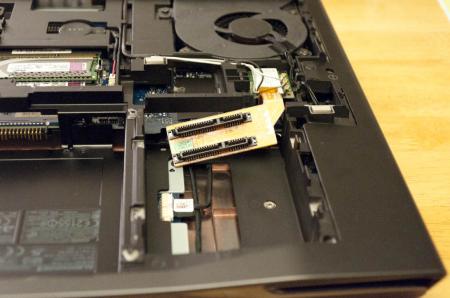
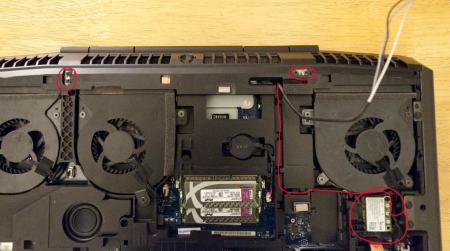
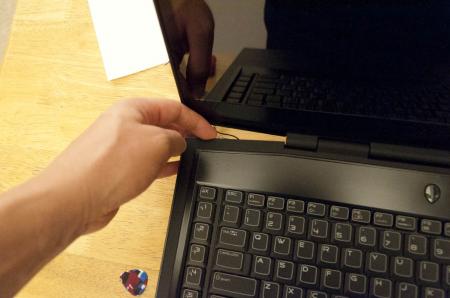
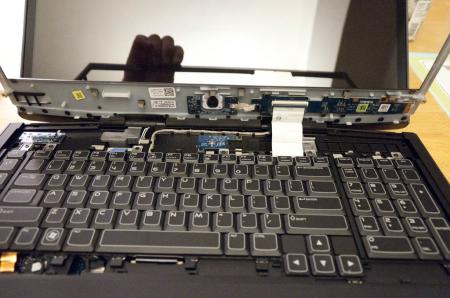
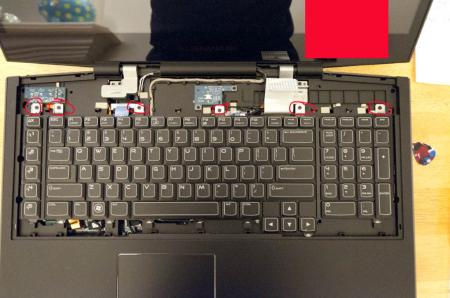
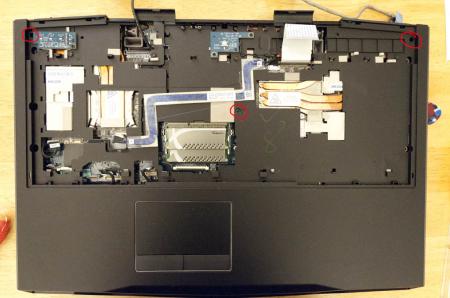
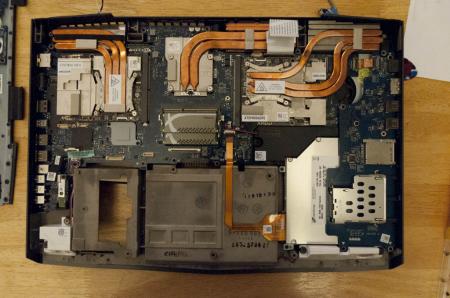
OK, people have been asking for this for a while so I thought since I can tear this down in about 10min, I should do a quick write-up. Like the title said, I did this quick so pictures wont be the best but you will get a better understanding on how to teardown the system enough to at least repaste etc.. Here we go 1 - Shot of the underside 2 - Remove battery and the 4 screws in red to remove bottom cover 3 - Bottom Cover Off: Remove Screws Labeled I (5 of them in Red), P ( 5 in Blue), and HD Bay screws (4 in Green) 4 - Remove Hard Drives 5 - Remove Screws In Empty Hard Drive Bay (4 in blue) 6 - Remove the LCD Hinge Screws ( 4 in Red) and disconnect the wireless antennae (circled and traced in Red) 7 - Flip System over and open screen 8 - Pop off the media control panel by lifting the back right and left corners until it "pops" off. I find using my guitar pick helps with this 9 - Once the back corners have popped loose, run the guitar pick around the edges to loosen the rest (around the keyboard) 10 - Picture of the media panel loose but still connected with the ribbon cable (disconnect this now) 11 - Remove the Keyboard and macro keyboard screws ( 6 in Red) 12 - Disconnect all cables from the motherboard and graphic cards ( 11 in total) and 2 more lcd screws ( 2 in blue) This includes: 2 ribbon cables for the macro keyboard 2 ribbon cables for the keyboard 3 for the handrest/trackpad (2 on bottom, 1 near the right crossfire cable connector) 2 for the screen (one toward the bottom left, one at the top left) 2 for the crossfire cable (labeled L and R on the cable) 13 - Remove 3 more screws securing the cover ( 3 in Red). You will need to pop off this cover starting at the back... just lift until it pops off. If it is being difficult, make sure all screws labeled "P" on both the top and bottom are removed. 14 - Once the cover is off, remove the screws (going from #1-4) on your heatsinks.... clean and repaste. If anyone wants pics of the heatsinks removed just let me know (I took a couple but not really necessary for this guide). Once again, I did this all very fast so I know it is not as polished as it could have been.... but I wanted this out sooner than later for everyone to use. Let me know if anything is unclear etc... D.


 1 point
 -
Why does svl7 have to continue bending his back for you? Is modifying the BIOS for free not enough? We aren't a download portal and have no plans of becoming one. This is a forum for discussion, just like any other. Anyone who want files off of this forum has to adhere to the forum rules and contribute 5 quality posts to the discussion to gain download rights or can become T|I Elite Members. Here's a suggestion: read the forum rules before you start posting so you don't get banned.1 point
-
everyone here knows the the purdy lights makes the computer run faster hahah i had both a wonderful and nightmarish experiences with tech support.1 point
-
Alright, let's try to somehow prevent the card from throttling... Here's a version which should give result in 835MHz core clock, and increased software overclocking limits. Flashing instructions: Grab the attached Flash Tool, extract it to a folder, put the BIOS file in there and run the FLASH.bat file. Please report back with your results. And as always, flash at your own risk. Inspirion 7720 - A11 [650m mod 00].zip Flash_Tool.zip1 point
-
@Xonar well one thing for sure my 2 x 256GB vertex4 SSDs would support trim but its not being enabled because of old IRST OROM version (I assume) Yea Im running RAID0 with these SSDs and I#m looking to get the best out of them. I was wondering what IRTS version come with latest GT60 and GT70 versions...if these could be extracted and merged with GT683R... - - - Updated - - - my first thing Ive done was installed 32GB ram with all original BIOS and it worked just fine, I have only flashed to unlocked bios to tinker a little bit with my CPU settings Also can you guys see and tell if I have managed to raise the bar on the power limits to be able successfully OC XM CPU's?1 point
-
Every feature works including the fans. You will need a modded nvdm.inf file but I can supply that. Edit: Ignore the above statement, it applies to 680m. For the 7970m it's plug and play. Sent from my GT-N70001 point
-
Then you haven't pushed your system1 point
-
It's only necessary if you want to enable XMP profiles (i.e. RAM frequencies > 1600mhz). The rest is up to the IMC (Integrated memory controller) on the CPU. I honestly don't know, I haven't even thought about it. TRIM is enabled though... unless you mean for RAID Intel SSD's. Will have it tomorrow!! Along with the GT70, 1762, etc. Also, I will have the RAID version and you can manually DISABLE RAID in the BIOS. There's no sense in unlocking the same BIOS twice when you can just disable RAID and potentially enable it down the road if you buy a second HDD... [ATTACH=CONFIG]5334[/ATTACH] Then you use Throttlestop to force the CPU to Turbo and you can sustain maximum turbo indefinitely, unless you have thermal throttling.1 point
-
I am currently successfully running 4 x 8GB DDR3 1600MHz from Crucial 1,35v modules, and it does run at dual channel rate of ~800MHz per channel, and by thespec sheet of intel it should not run 1600MHz memory and it should not run 32GB DDR3 memory because Im runing i7-2670QM cpu, but it runs just fine.1 point
-
Thread updated with: GT60 / GT70 -- based on .30M 0NE BIOS w/ 680M GTX support GX740 -- based on 1.0F by request Feedback is appreciated guys. I don't have these notebooks to test with so I can't guarantee they will work or have everything unlocked. So please let me know if there are any concerns!1 point