Leaderboard


Popular Content
Showing content with the highest reputation on 10/30/11 in all areas
-
2 points
-
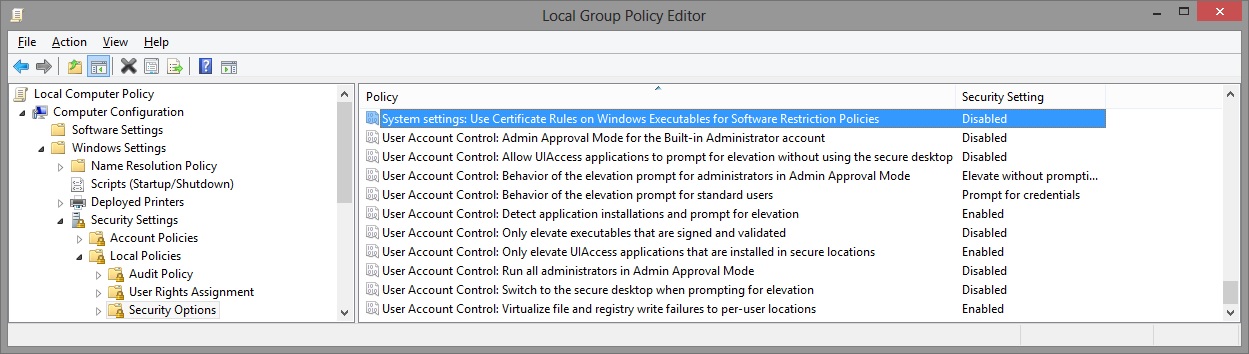
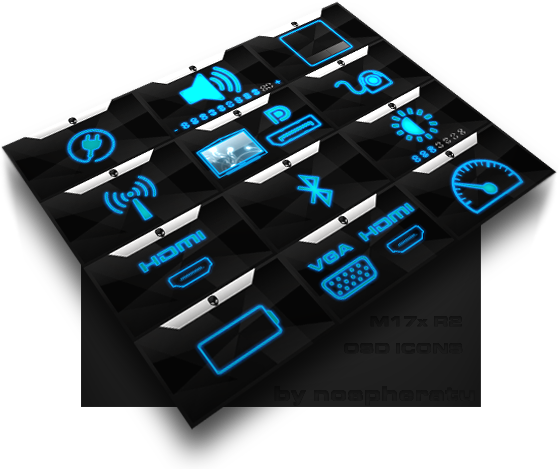
I've recreated the OSD Icons for the R1/R2/R3/R4 and R5 aka 17 as the standard ones are a bit dated. It should also work with the M15x though as my old M15x had the same setup for the OSD app. Regarding the R3 OSD, it seems its the same install for the M18x as well so it should work for you M18x owners too. I've also added the AW 17 OSD to the list. This exe is also compatible with the 14 and 18 as Dell uses the same OSD for all the new machines. There's also a set for you Area-51 m17 R1 owners. I've tried to give it a simular feel to the Invader Icon pack by Alienware. Hope you guys like it Install Instructions for R1 1. You need to end the OSD process in Task Manager since it may be using some of these icon files. Ctrl+Shift+Esc then find the OSD process and end it. 2. Backup your current icons if you want to revert to the originals (You can also uninstall and re-install the OSD application if you want to go back to the original icons) 3. Extract the attached "M17X R1-R2 & M15X.zip" contents to C:\Program Files (x86)\OSD\picture\. Overwrite if prompted. 4. Restart the OSD application. It is located in C:\Program Files (x86)\OSD\Launch.exe 5. Done! Install Instructions for R2 /M15x 1. You need to end the OSD.exe process in Task Manager since it may be using some of these icon files. Ctrl+Shift+Esc then find "OSD.exe" and end the process. 2. Backup your current icons if you want to revert to the originals (You can also uninstall and re-install the OSD application if you want to go back to the original icons) 3. Extract the attached "M17X R1-R2 & M15X.zip" contents to C:\Program Files (x86)\OSD\ICONs\. Overwrite if prompted. 4. Restart the OSD application. It is located in C:\Program Files (x86)\OSD\Launch_OSD.exe 5. Done! Install instructions for R3 / R4 / M18x 1. You need to end the OSD process in Task Manager since it may be using some of these icon files. Ctrl+Shift+Esc then find the AlienwareOn-ScreenDisplay.exe process and end it. 2. Backup the existing AlienwareOn-ScreenDisplay.exe by renaming it to "AlienwareOn-ScreenDisplay.exe.BAK" for example. Its in C:\Program Files (x86)\Alienware On-Screen Display\ 3. Extract the AlienwareOn-ScreenDisplay.exe from the appropriately named file depending on your OS and model to the C:\Program Files (x86)\Alienware On-Screen Display\ folder. 4. Restart the OSD application by double-clicking the file. 5. Done! Install instructions for 14 / 17 / 18 ** 1. You need to end the OSD process in Task Manager since it may be using some of these icon files. Ctrl+Shift+Esc then find the AlienwareOn-ScreenDisplay.exe process and end it. 2. Backup the existing AlienwareOn-ScreenDisplay.exe by renaming it to "AlienwareOn-ScreenDisplay.exe.BAK" for example. Its in C:\Program Files (x86)\Alienware On-Screen Display\ 3. Extract the AlienwareOn-ScreenDisplay.exe from the "AW 14-17-18 (Windows 8).zip" file to the C:\Program Files (x86)\Alienware On-Screen Display\ folder. 4. Restart the OSD application by double-clicking the file. 5. Done! The Area-51 m17-R1 install should be similar to the steps for the other laptop revisions above. They all basically follow the same process anyway, apart from filenames/paths. @robby_hd was kind enough to make a red version of these icons for the M17x R3 / M18x R1 which can be downloaded from his post here. **There seems to be a security issue with Windows 8/8.1 at this point in time since it doesn't allow modified exe's. I will update this post with a solution once it has been found. Also a few Alienware owners are having an issue with the unmodified OSD and Windows 8. Only the default Windows 8 OSD displays and not the Alienware version. Try the solution posted by Dell here and then attempt installing the mod. The below screenprint is a workaround by editing the security policies to allow the unsigned exe to run in Windows 8. If you are not aware of what these settings do and the repercussions of changing them, please do not attempt it. - Open the Group Policy Editor by typing "gpedit.msc" in the search or run text box. - Duplicate the settings below. Area-51 m17-R1.zip M17X R1-R2 & M15X.zip M17X R3-R4 & M18X R1-R2 (Windows 7).zip M17x R4 & M18X R2 (Windows 8).zip AW 14-17-18 (Windows 8).zip M17X R4 & M18X R2 (Windows 8.1).zip

 1 point
 -
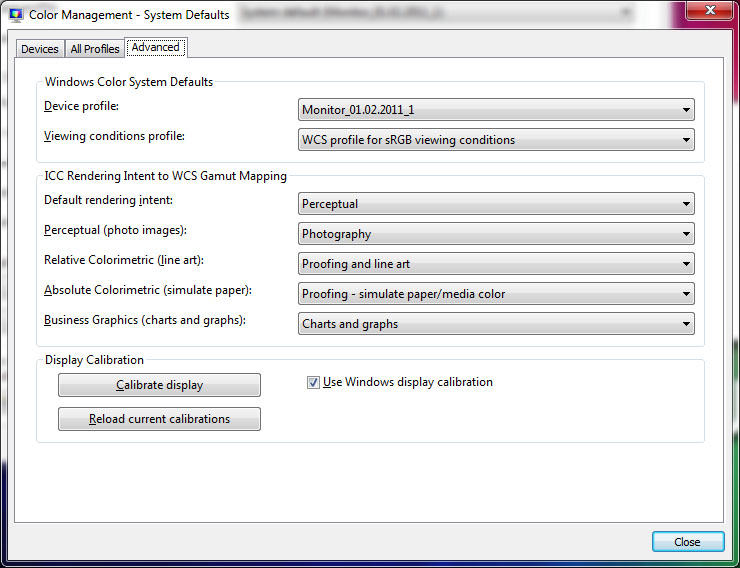
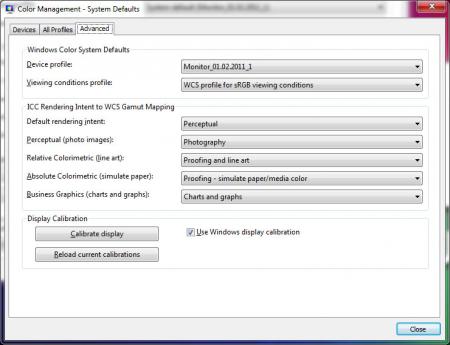
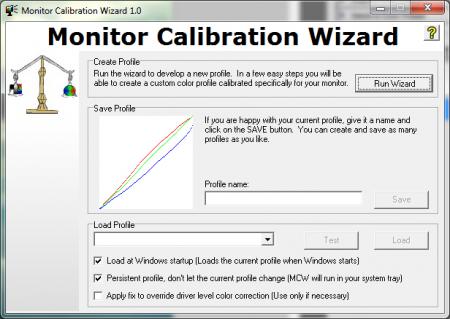
update : new profile for AUO panel, see post #7 my Personal m17x R3 - Perfect Screen Calibration : LG Philips LP173WF1 (72% color gamut) .. i love the vivid rich color of the m17x R2 (sometime giving too much eye strain), and 8bits high accuracy color of the m17x R1 (but the screen is too dark compare to R2 and R3) it's too complicated to swap to the V4 AUO or B+RG, i have no idea how to remove the glossy glass and put it back in. After 4 month trying to make my screen look better, i finally satisfied with my m17x r3 screen the way it is now (can't help with the view angle anyway, worst feature from this panel) Normally we just trying to adjust the color / gamma / color temperature .. so the image will look more vivid .. but actually still missing alot of warm compare to R2 and losing too many detail. When calibrating you may notice how the color changed and how much detail you killed, sometime after a recalibrate you may thinking Oh wow i didn't saw this detail before... something like that. Take a look at these images and try remember the pointed area.. so you can compare before and after the calibration. Can you see the detail i pointed in this pic ? See the smoke trail ? the detail inside, if the saturation is too high you cant see anything here. Look careful at the tip of the meteror! The cherry flower If the contrast is too high, it's very hard to spot out the different in the white area. This picture had more red than you was thinking, the dark area near her hand .. the detail on her face. how far can you see the smoke in this pic ? notice the dog's fur and the flower field ! see the different ? cute dog eh ? now download the ICC profile in the attachment, right click and install it go to Color management > advanced > change system default > advanced > device profile > choose : monitor_01.02.2011_1 important step : before leaving tick the box "use windows display calibration" and click reload current calibrations. (to access color management : right click on ur desktop > screen resolution > advanced setting > color management) Your screen may look a bit yellowish now, it's okay just go to catalyst control panel > my built-in-display change the Hue from -2 or lower ! depend on your color taste change the saturation into 112 or higher/lower until you meet your best. you can change the contrast to your liking but i recommend leave it at 100 Video settings : set video gamma to 1.05, Brighter whites, Full Dynamic range 0-255, disable Dynamic contrast ! leave everything else at default. Did you see the improvement in your screen ? open your picture library and have a look .. Fixing color profiles override each other : important step After boot up/reset your OS the color profile switch back to default catalyst profile, or When you use switch graphic with HD3000, or when you launched a game, the color profile automatic changes again your will. to fix this, it's really simple. Download this software called : Monitor Calibration Wizard 1.0 (It's free ) install it and make sure you have the best color calibrated at this moment. (don't click "run this wizard") (some1 mistaken about what i'm trying to do here, see the screenshot, don't use the calibration of this software or it will override your iCC settings so everything u did till now is pointless) open it ! and tick : *load at windows startup , *Persistent profile That's it youre done. don't try to save into profile. minimize it into tray bar. it won't take much resource CPU or memory, don't worry. no matter what happen your color profile will stay the same. any suggestions with even better color profile all welcome and appreciated. (the ICC profile was taken from notebookcheck) Enjoy, and sry for my bad english. ^^ ICC profiles.zip
 1 point
 -
UNOFFICIAL 11.9 CAP4: Rage3D Released note: Battlefield 3 - Provides great CrossFire scaling and resolves stuttering issues when running in CrossFire mode. Deus Ex Missing Link: Improves CrossFire performance F1 2011: Improves CrossFire performance Dead Island: Improves CrossFire performance Batman Arkham City (DX9 version): Improves CrossFire performance NBA 2012: Disables CrossFire1 point
-
Well my R2 has been giving me some problems with gaming blue screens etc.. I have to wipe the hard drives clean. Anyway, i completed the single player on the G73JH, CPU and GPU is overclocked, someone posted oh you shouldn't be overclocking the 5870 man i was laughing at that! I just need to get the 180W Targus universal charger for further overclocking and stability. I uploaded a video1 point
-
Strain : OG Diesel (one of my current favs) Smell:Smell like citrus, very strong and pungent Taste:Strong sweet, almost like orange zest, I love it Highs: Very nice high both heady and body. after a session I was high for like 2hrs.1 point
-
Strain : Jolly Rancher Smell:Friggin amazing!!! Crazy strong and very skunky. Fruity/Purp smell Taste:Awesome!!!! Just like it smells, very fruity purp Highs: After Vaping 2 bowls, I was ass out, stoned and stuck. not recommended if your planning on doing anything. makes you lazy as shit, hehehe1 point
-
Strain: Juicy Fruit Smell: Light sweet fruity almost like fruit punch/ very strong and skunky 4/5 Taste: Didn't taste as fruity as I thought it would be, more of a vanilla flavor(weird right) hahah 3.5/5 Highs: Good, more heady then body. Good for wake and bake 4/51 point
-
Go into device manager and delete the IDT sound. Then click on refresh in device manager and let it pick up on your integrated sound again and it should work. If it doesn't, I'd check the windows sound properties and make sure you don't have it muted by mistake. Other than that, if the sound still doesn't output, it could be a sign of hardware failure.0 points